DIYables Web Apps Web Joystick

WebJoystick Example - Setup Instructions

Overview

The WebJoystick example creates a virtual joystick interface accessible from any web browser. Designed for Arduino Uno R4 WiFi and DIYables STEM V4 IoT educational platform with enhanced robotics capabilities, built-in motor control features, and seamless integration with robotics educational modules. Perfect for controlling robots, vehicles, or any system requiring 2D position input.

Arduino WebJoystick Example - Virtual Joystick Control Tutorial

Features

  • Virtual Joystick: Interactive joystick control via web interface
  • Real-time Coordinates: X/Y values from -100 to +100 for precise control
  • Touch & Mouse Support: Works on desktop, tablet, and mobile devices
  • Configurable Auto-Return: Option for joystick to return to center when released
  • Sensitivity Control: Adjustable sensitivity to prevent excessive updates
  • Visual Feedback: Real-time position display and coordinate values
  • WebSocket Communication: Instant response without page refresh
  • Center Position: Clear center position indicator for neutral control
  • Platform Extensible: Currently implemented for Arduino Uno R4 WiFi, but can be extended for other hardware platforms. See DIYables_WebApps_ESP32

Hardware Preparation

1×Arduino UNO R4 WiFi
1×Alternatively, DIYables STEM V4 IoT
1×USB Cable Type-A to Type-C (for USB-A PC)
1×USB Cable Type-C to Type-C (for USB-C PC)
1×Recommended: Screw Terminal Block Shield for Arduino UNO R4
1×Recommended: Breadboard Shield for Arduino UNO R4
1×Recommended: Enclosure for Arduino UNO R4
1×Recommended: Power Splitter for Arduino UNO R4
1×Recommended: Prototyping Base Plate & Breadboard Kit for Arduino UNO

Or you can buy the following kits:

1×DIYables STEM V4 IoT Starter Kit (Arduino included)
1×DIYables Sensor Kit (30 sensors/displays)
1×DIYables Sensor Kit (18 sensors/displays)
Disclosure: Some of the links provided in this section are Amazon affiliate links. We may receive a commission for any purchases made through these links at no additional cost to you.
Additionally, some of these links are for products from our own brand, DIYables .

Setup Instructions

Detailed Instructions

Follow these instructions step by step:

  • If this is your first time using the Arduino Uno R4 WiFi/DIYables STEM V4 IoT, refer to the tutorial on setting up the environment for Arduino Uno R4 WiFi/DIYables STEM V4 IoT in the Arduino IDE.
  • Connect the Arduino Uno R4/DIYables STEM V4 IoT board to your computer using a USB cable.
  • Launch the Arduino IDE on your computer.
  • Select the appropriate Arduino Uno R4 board (e.g., Arduino Uno R4 WiFi) and COM port.
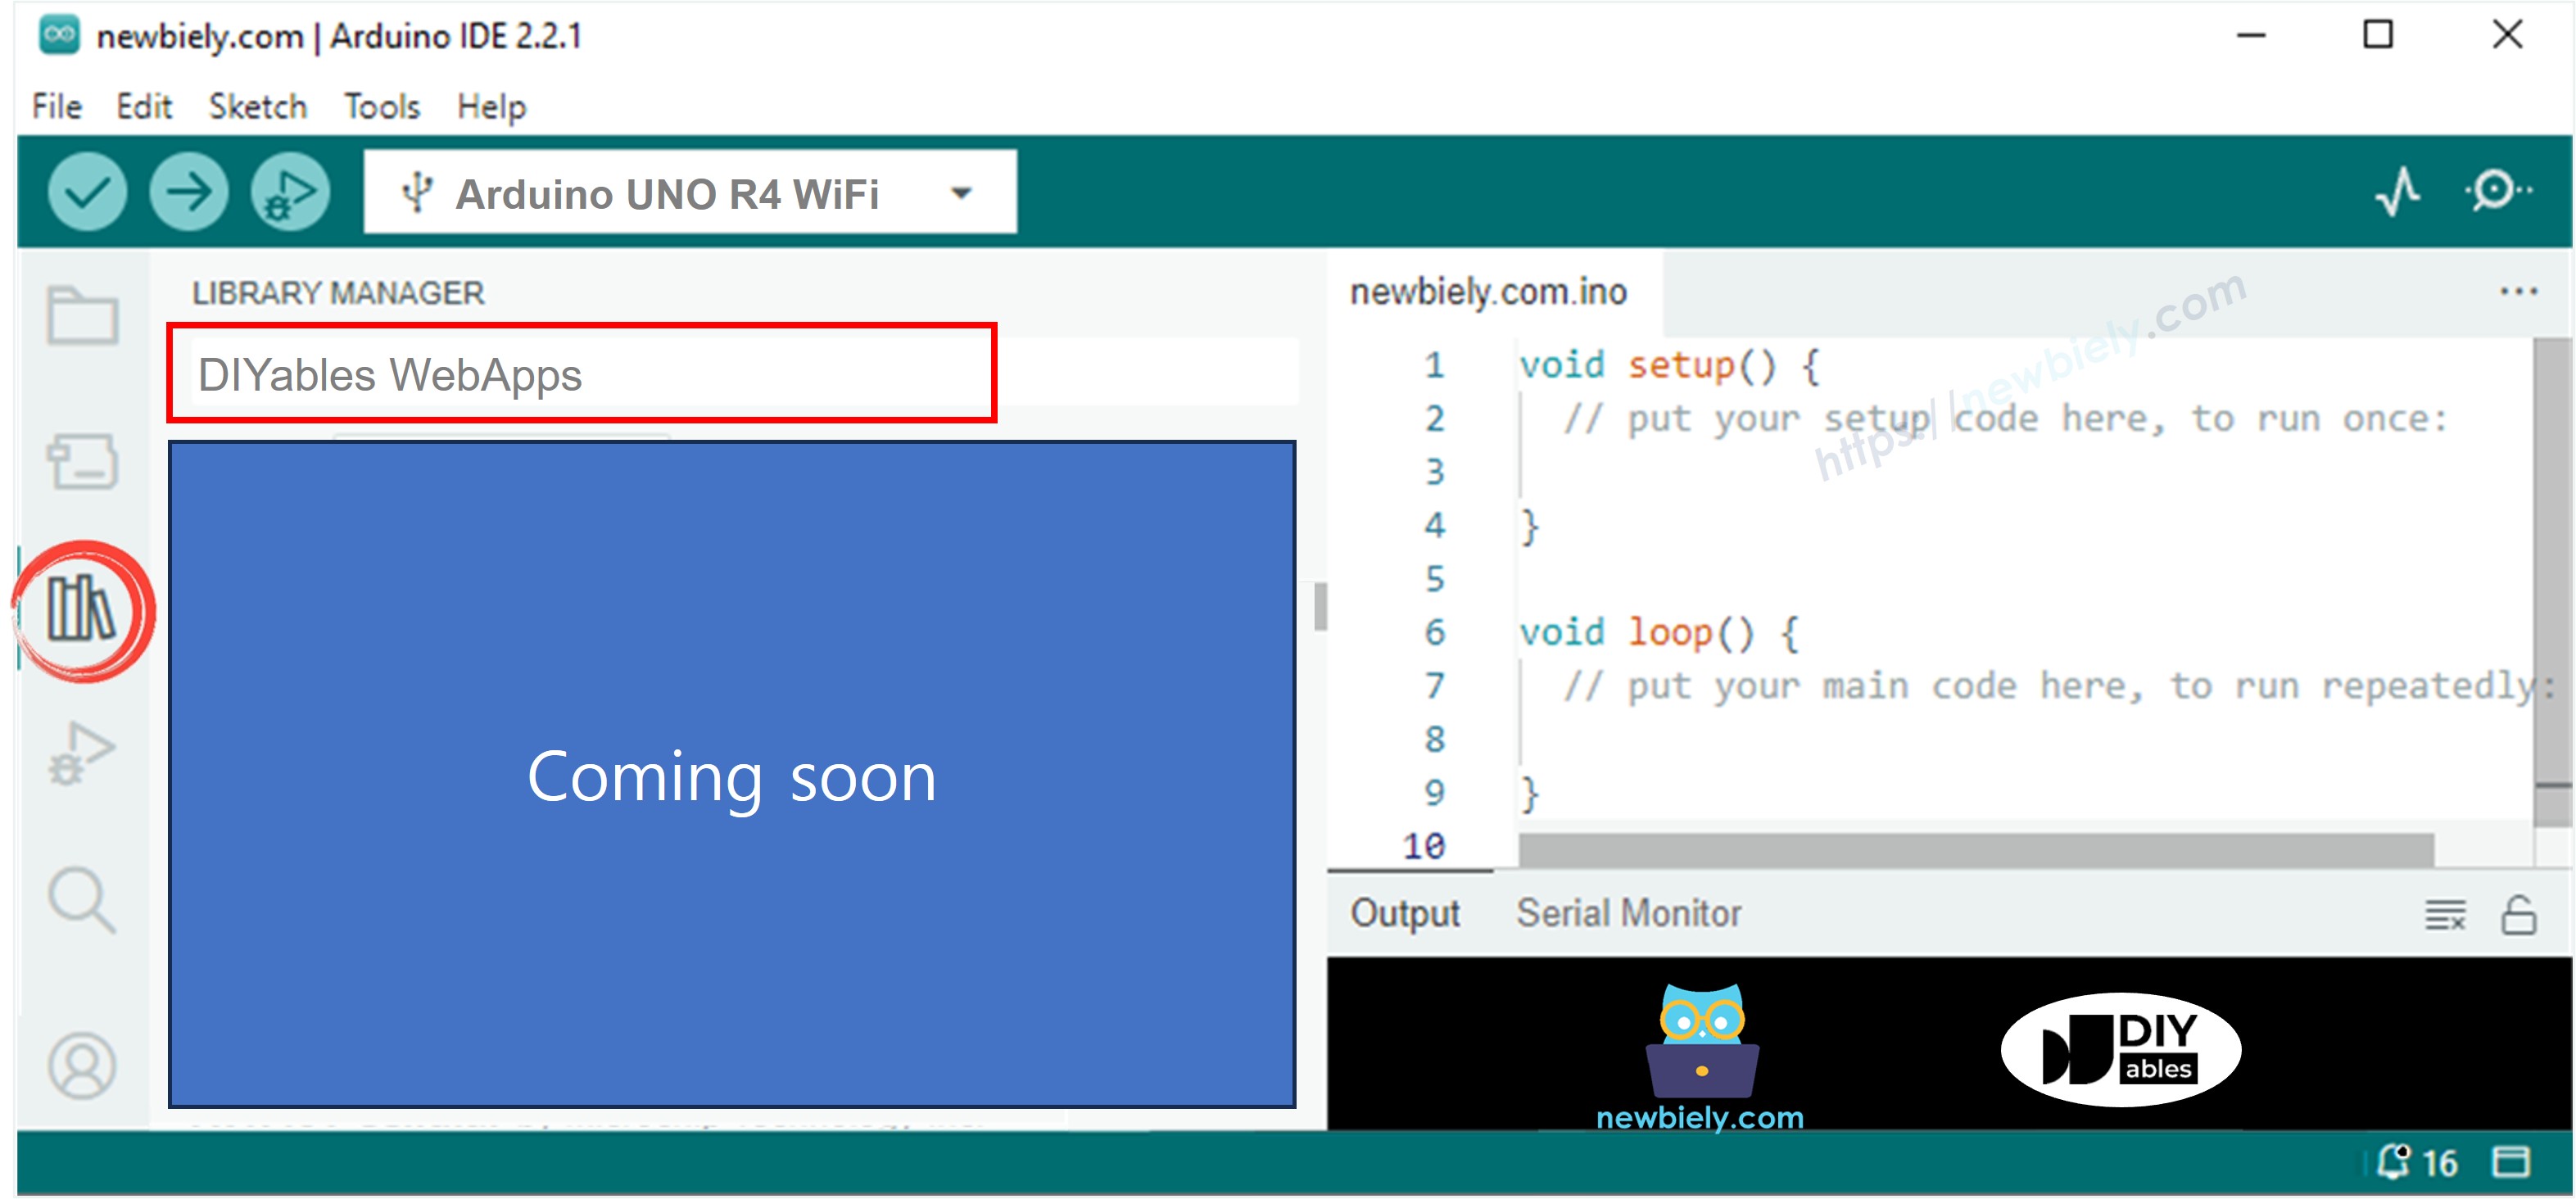
  • Navigate to the Libraries icon on the left bar of the Arduino IDE.
  • Search "DIYables WebApps", then find the DIYables WebApps library by DIYables
  • Click Install button to install the library.
Arduino UNO R4 DIYables WebApps library
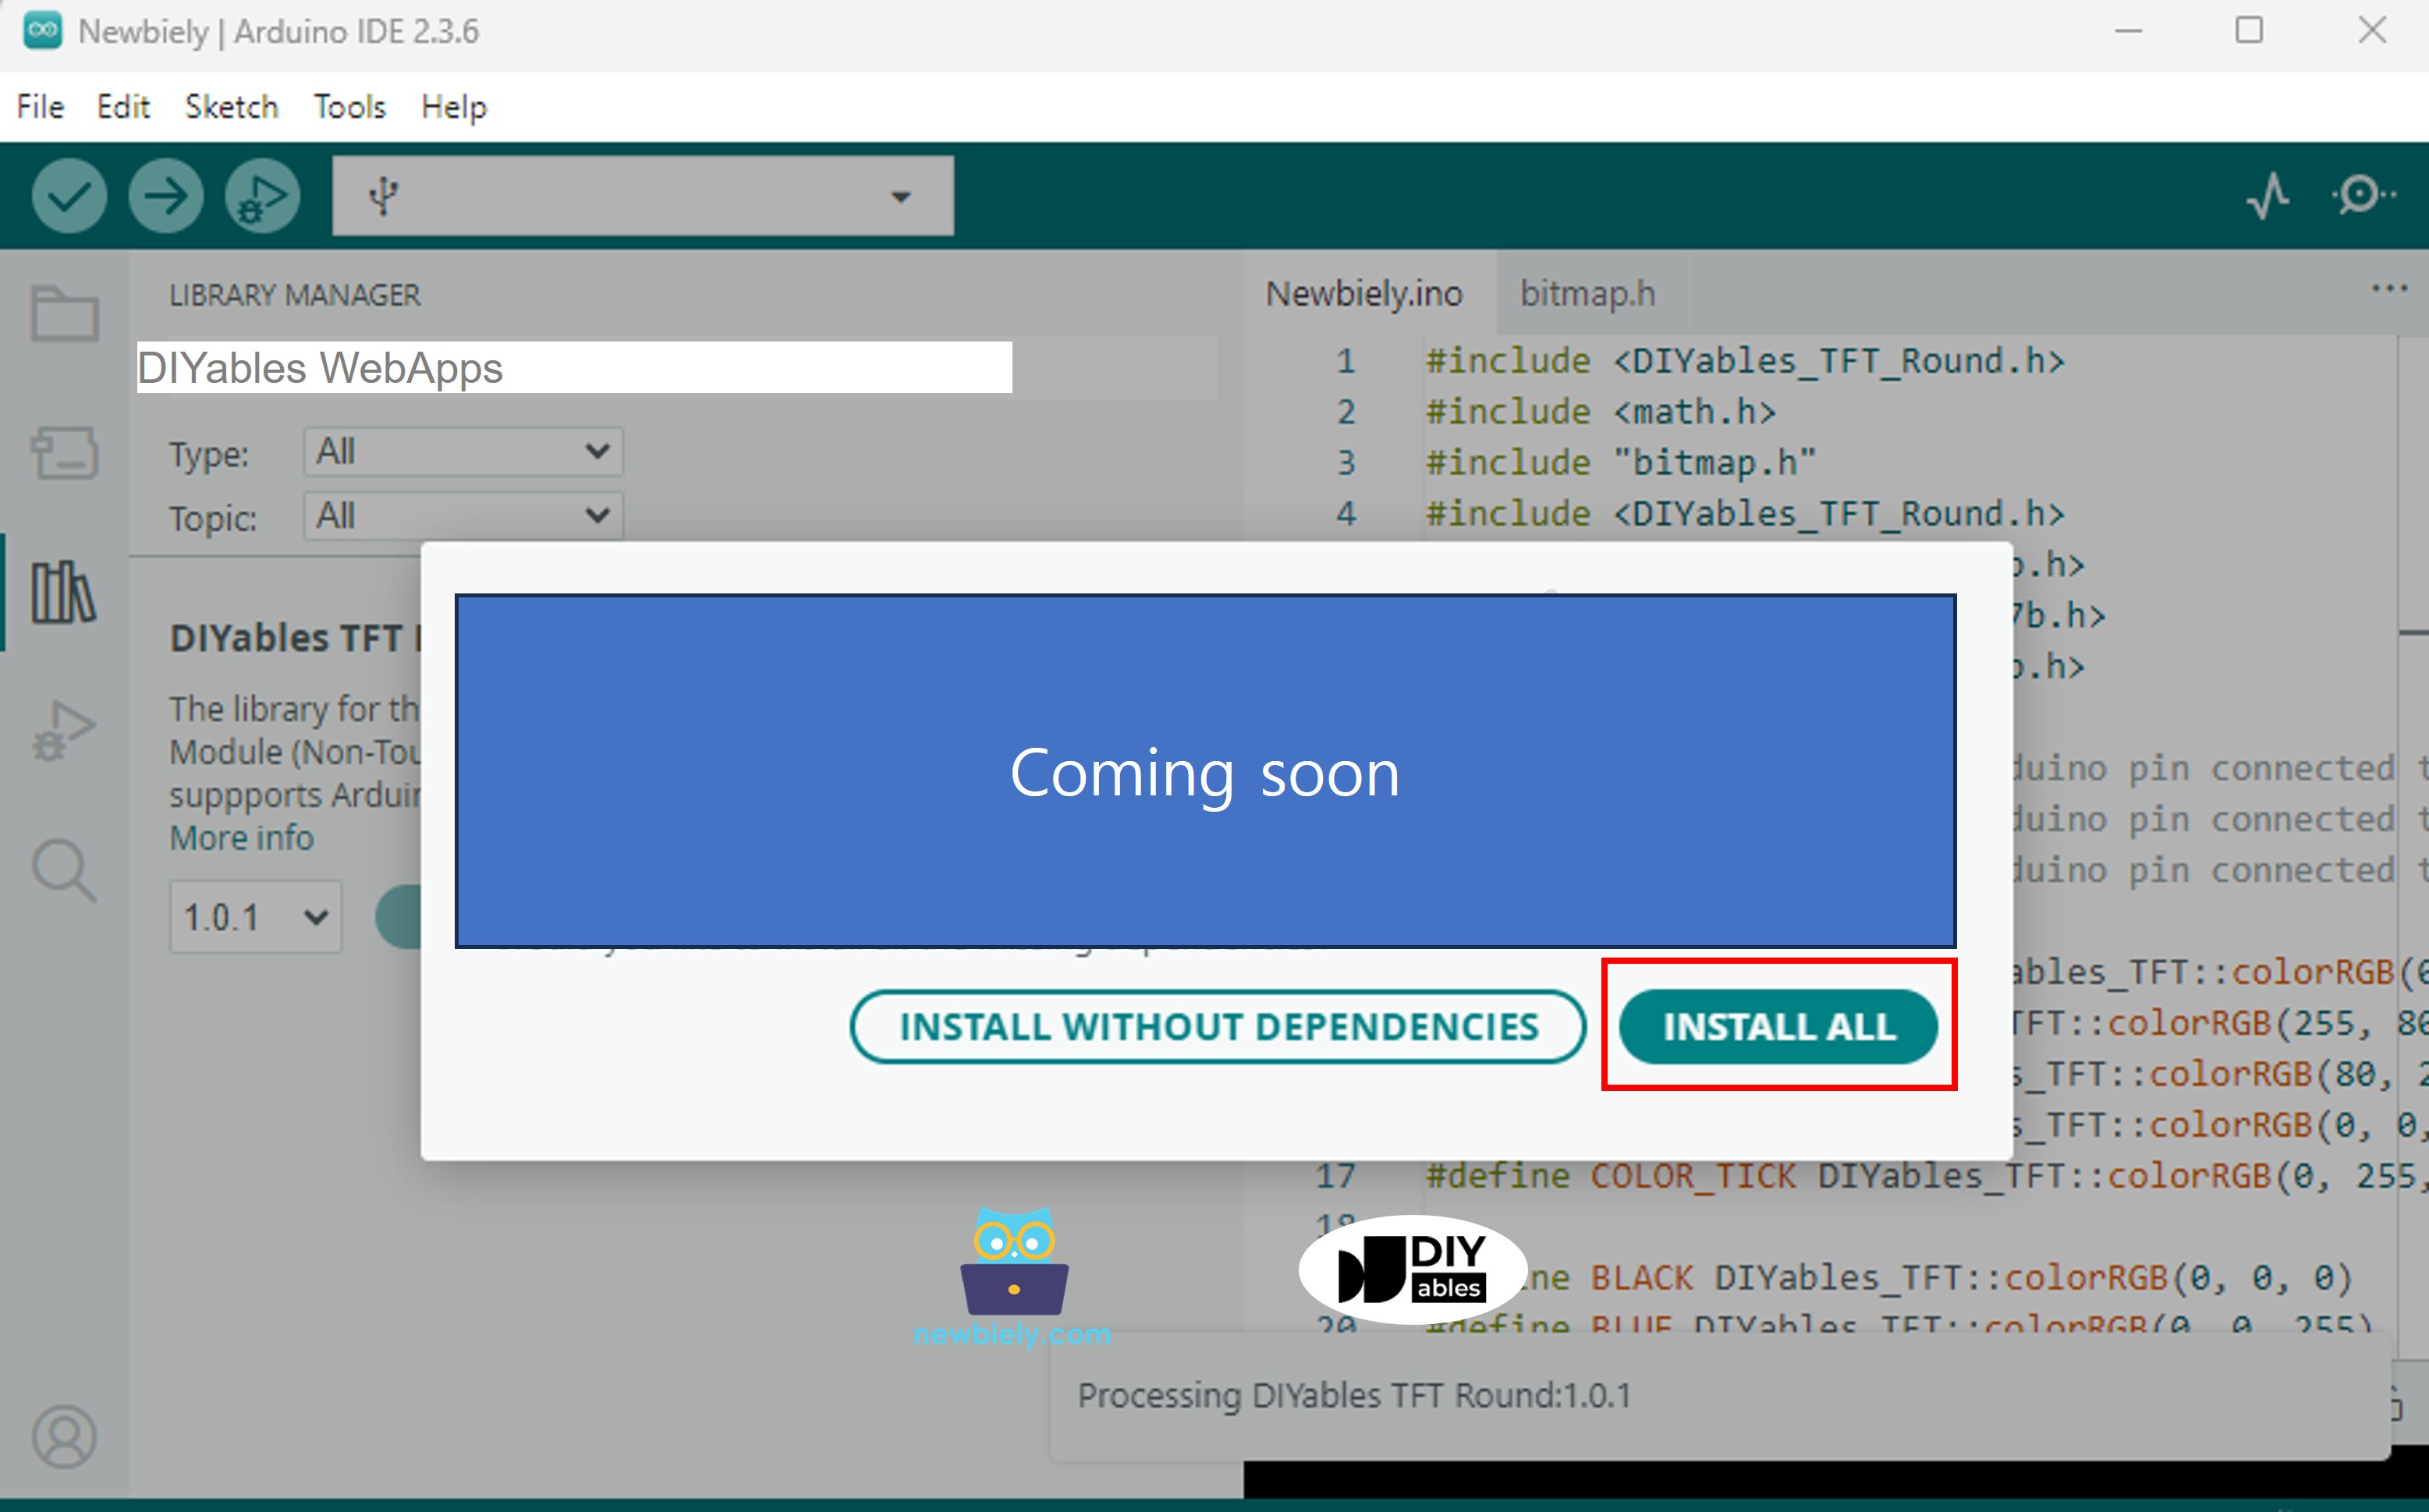
  • You will be asked for installing some other library dependencies
  • Click Install All button to install all library dependencies.
Arduino UNO R4 DIYables WebApps dependency
  • On Arduino IDE, Go to File Examples DIYables WebApps WebJoystick example, or copy the above code and paste it to the editor of Arduino IDE
/* * DIYables WebApp Library - Web Joystick Example * * This example demonstrates the Web Joystick feature: * - Interactive joystick control via web interface * - Real-time X/Y coordinate values (-100 to +100) * - Control pins based on joystick position * * Hardware: Arduino Uno R4 WiFi or DIYables STEM V4 IoT * * Setup: * 1. Update WiFi credentials below * 2. Upload the sketch to your Arduino * 3. Open Serial Monitor to see the IP address * 4. Navigate to http://[IP_ADDRESS]/webjoystick */ #include <DIYablesWebApps.h> // WiFi credentials - UPDATE THESE WITH YOUR NETWORK const char WIFI_SSID[] = "YOUR_WIFI_SSID"; const char WIFI_PASSWORD[] = "YOUR_WIFI_PASSWORD"; // Create WebApp server and page instances // MEMORY SAFETY FIX: Use static factory to avoid stack object lifetime issues static UnoR4ServerFactory serverFactory; // Static ensures lifetime matches program DIYablesWebAppServer webAppsServer(serverFactory, 80, 81); DIYablesHomePage homePage; // Configure joystick with autoReturn=false and sensitivity=5 (minimum 5% change to trigger updates) DIYablesWebJoystickPage webJoystickPage(false, 5); // Variables to store current joystick values int currentJoystickX = 0; int currentJoystickY = 0; void setup() { Serial.begin(9600); delay(1000); // TODO: initialize your hardware pins here Serial.println("DIYables WebApp - Web Joystick Example"); // Add home and web joystick pages webAppsServer.addApp(&homePage); webAppsServer.addApp(&webJoystickPage); // Optional: Add 404 page for better user experience webAppsServer.setNotFoundPage(DIYablesNotFoundPage()); // Start the WebApp server if (!webAppsServer.begin(WIFI_SSID, WIFI_PASSWORD)) { while (1) { Serial.println("Failed to start WebApp server!"); delay(1000); } } // Set up joystick callback for position changes webJoystickPage.onJoystickValueFromWeb([](int x, int y) { // Store the received values currentJoystickX = x; currentJoystickY = y; // Print joystick position values (-100 to +100) Serial.println("Joystick - X: " + String(x) + ", Y: " + String(y)); // TODO: Add your control logic here based on joystick position // Examples: // - Control motors: if (x > 50) { /* move right */ } // - Control servos: servo.write(map(y, -100, 100, 0, 180)); // - Control LEDs: analogWrite(LED_PIN, map(abs(x), 0, 100, 0, 255)); // - Send commands to other devices via Serial, I2C, SPI, etc. }); // Optional: Handle requests for current joystick values (when web page loads) webJoystickPage.onJoystickValueToWeb([]() { // Send the stored joystick values back to the web client webJoystickPage.sendToWebJoystick(currentJoystickX, currentJoystickY); Serial.println("Web client requested values - Sent to Web: X=" + String(currentJoystickX) + ", Y=" + String(currentJoystickY)); }); // You can change configuration at runtime: // webJoystickPage.setAutoReturn(false); // Disable auto-return // webJoystickPage.setSensitivity(10.0); // Only send updates when joystick moves >10% (less sensitive) } void loop() { // Handle WebApp server communications webAppsServer.loop(); // TODO: Add your main application code here delay(10); }
  • Configure WiFi credentials in the code by updating these lines:
const char WIFI_SSID[] = "YOUR_WIFI_NETWORK"; const char WIFI_PASSWORD[] = "YOUR_WIFI_PASSWORD";
  • Click Upload button on Arduino IDE to upload code to Arduino UNO R4/DIYables STEM V4 IoT
  • Open the Serial Monitor
  • Check out the result on Serial Monitor. It looks like the below
COM6
Send
DIYables WebApp - Web Joystick Example INFO: Added app / INFO: Added app /web-joystick DIYables WebApp Library Platform: Arduino Uno R4 WiFi Network connected! IP address: 192.168.0.2 HTTP server started on port 80 Configuring WebSocket server callbacks... WebSocket server started on port 81 WebSocket URL: ws://192.168.0.2:81 WebSocket server started on port 81 ========================================== DIYables WebApp Ready! ========================================== 📱 Web Interface: http://192.168.0.2 🔗 WebSocket: ws://192.168.0.2:81 📋 Available Applications: 🏠 Home Page: http://192.168.0.2/ 🕹️ Web Joystick: http://192.168.0.2/web-joystick ==========================================
Autoscroll Show timestamp
Clear output
9600 baud  
Newline  
  • If you do not see anything, reboot Arduino board.
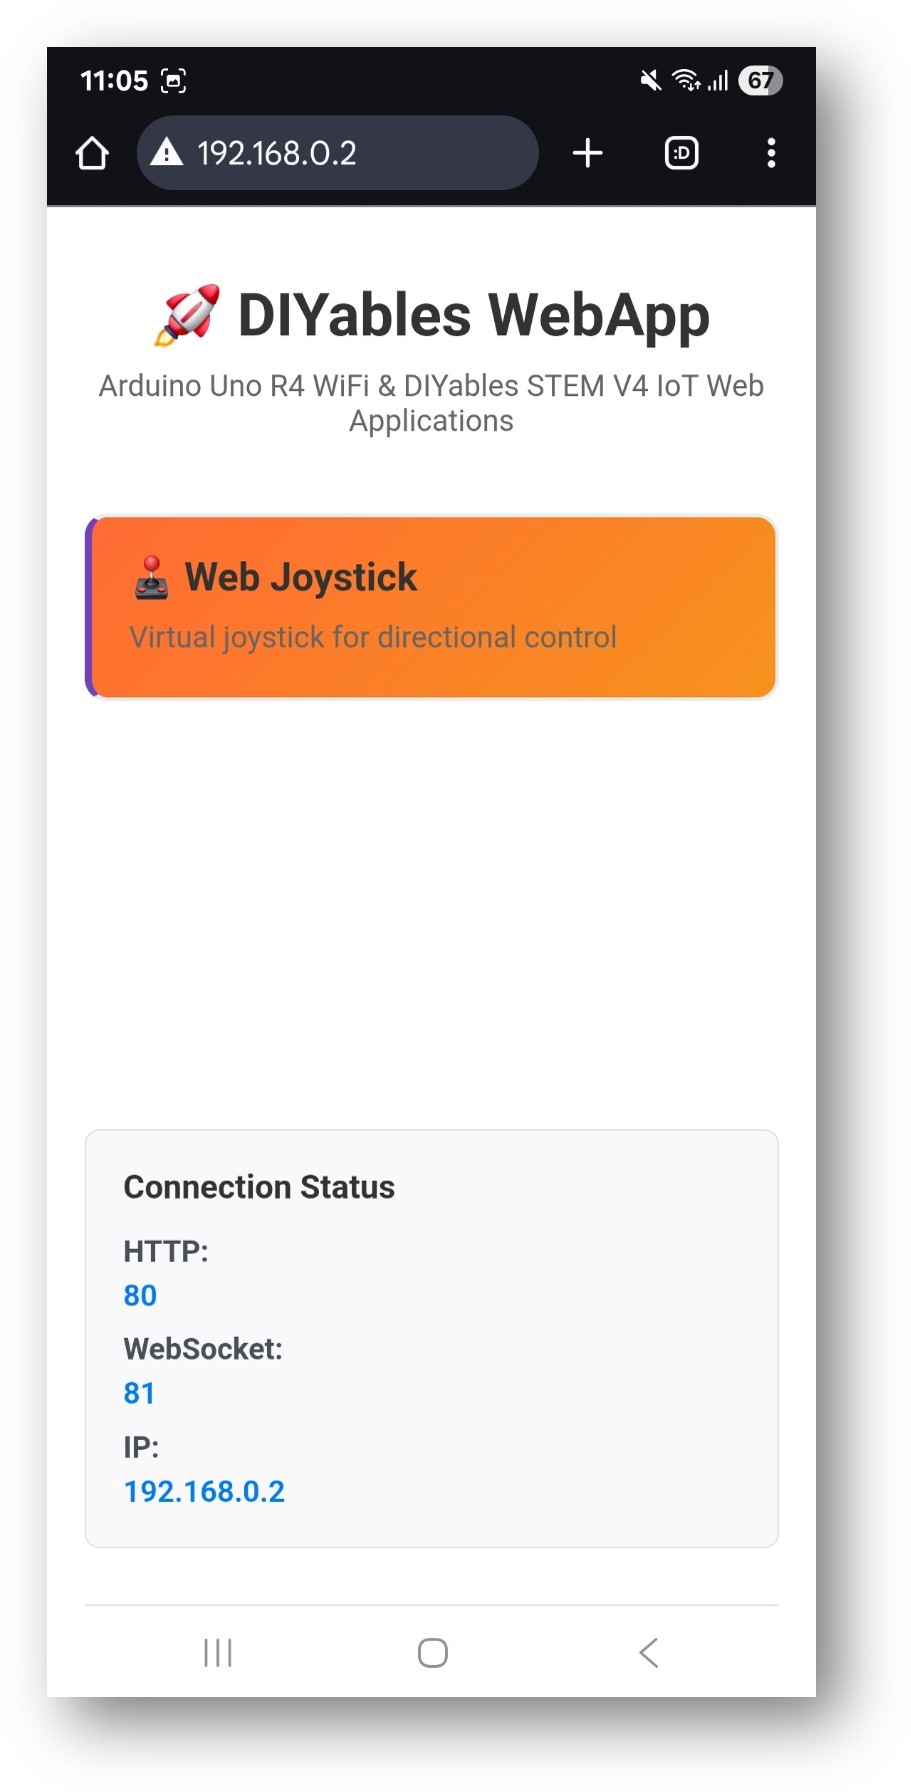
  • Take note of the IP address displayed, and enter this address into the address bar of a web browser on your smartphone or PC.
  • Example: http://192.168.0.2
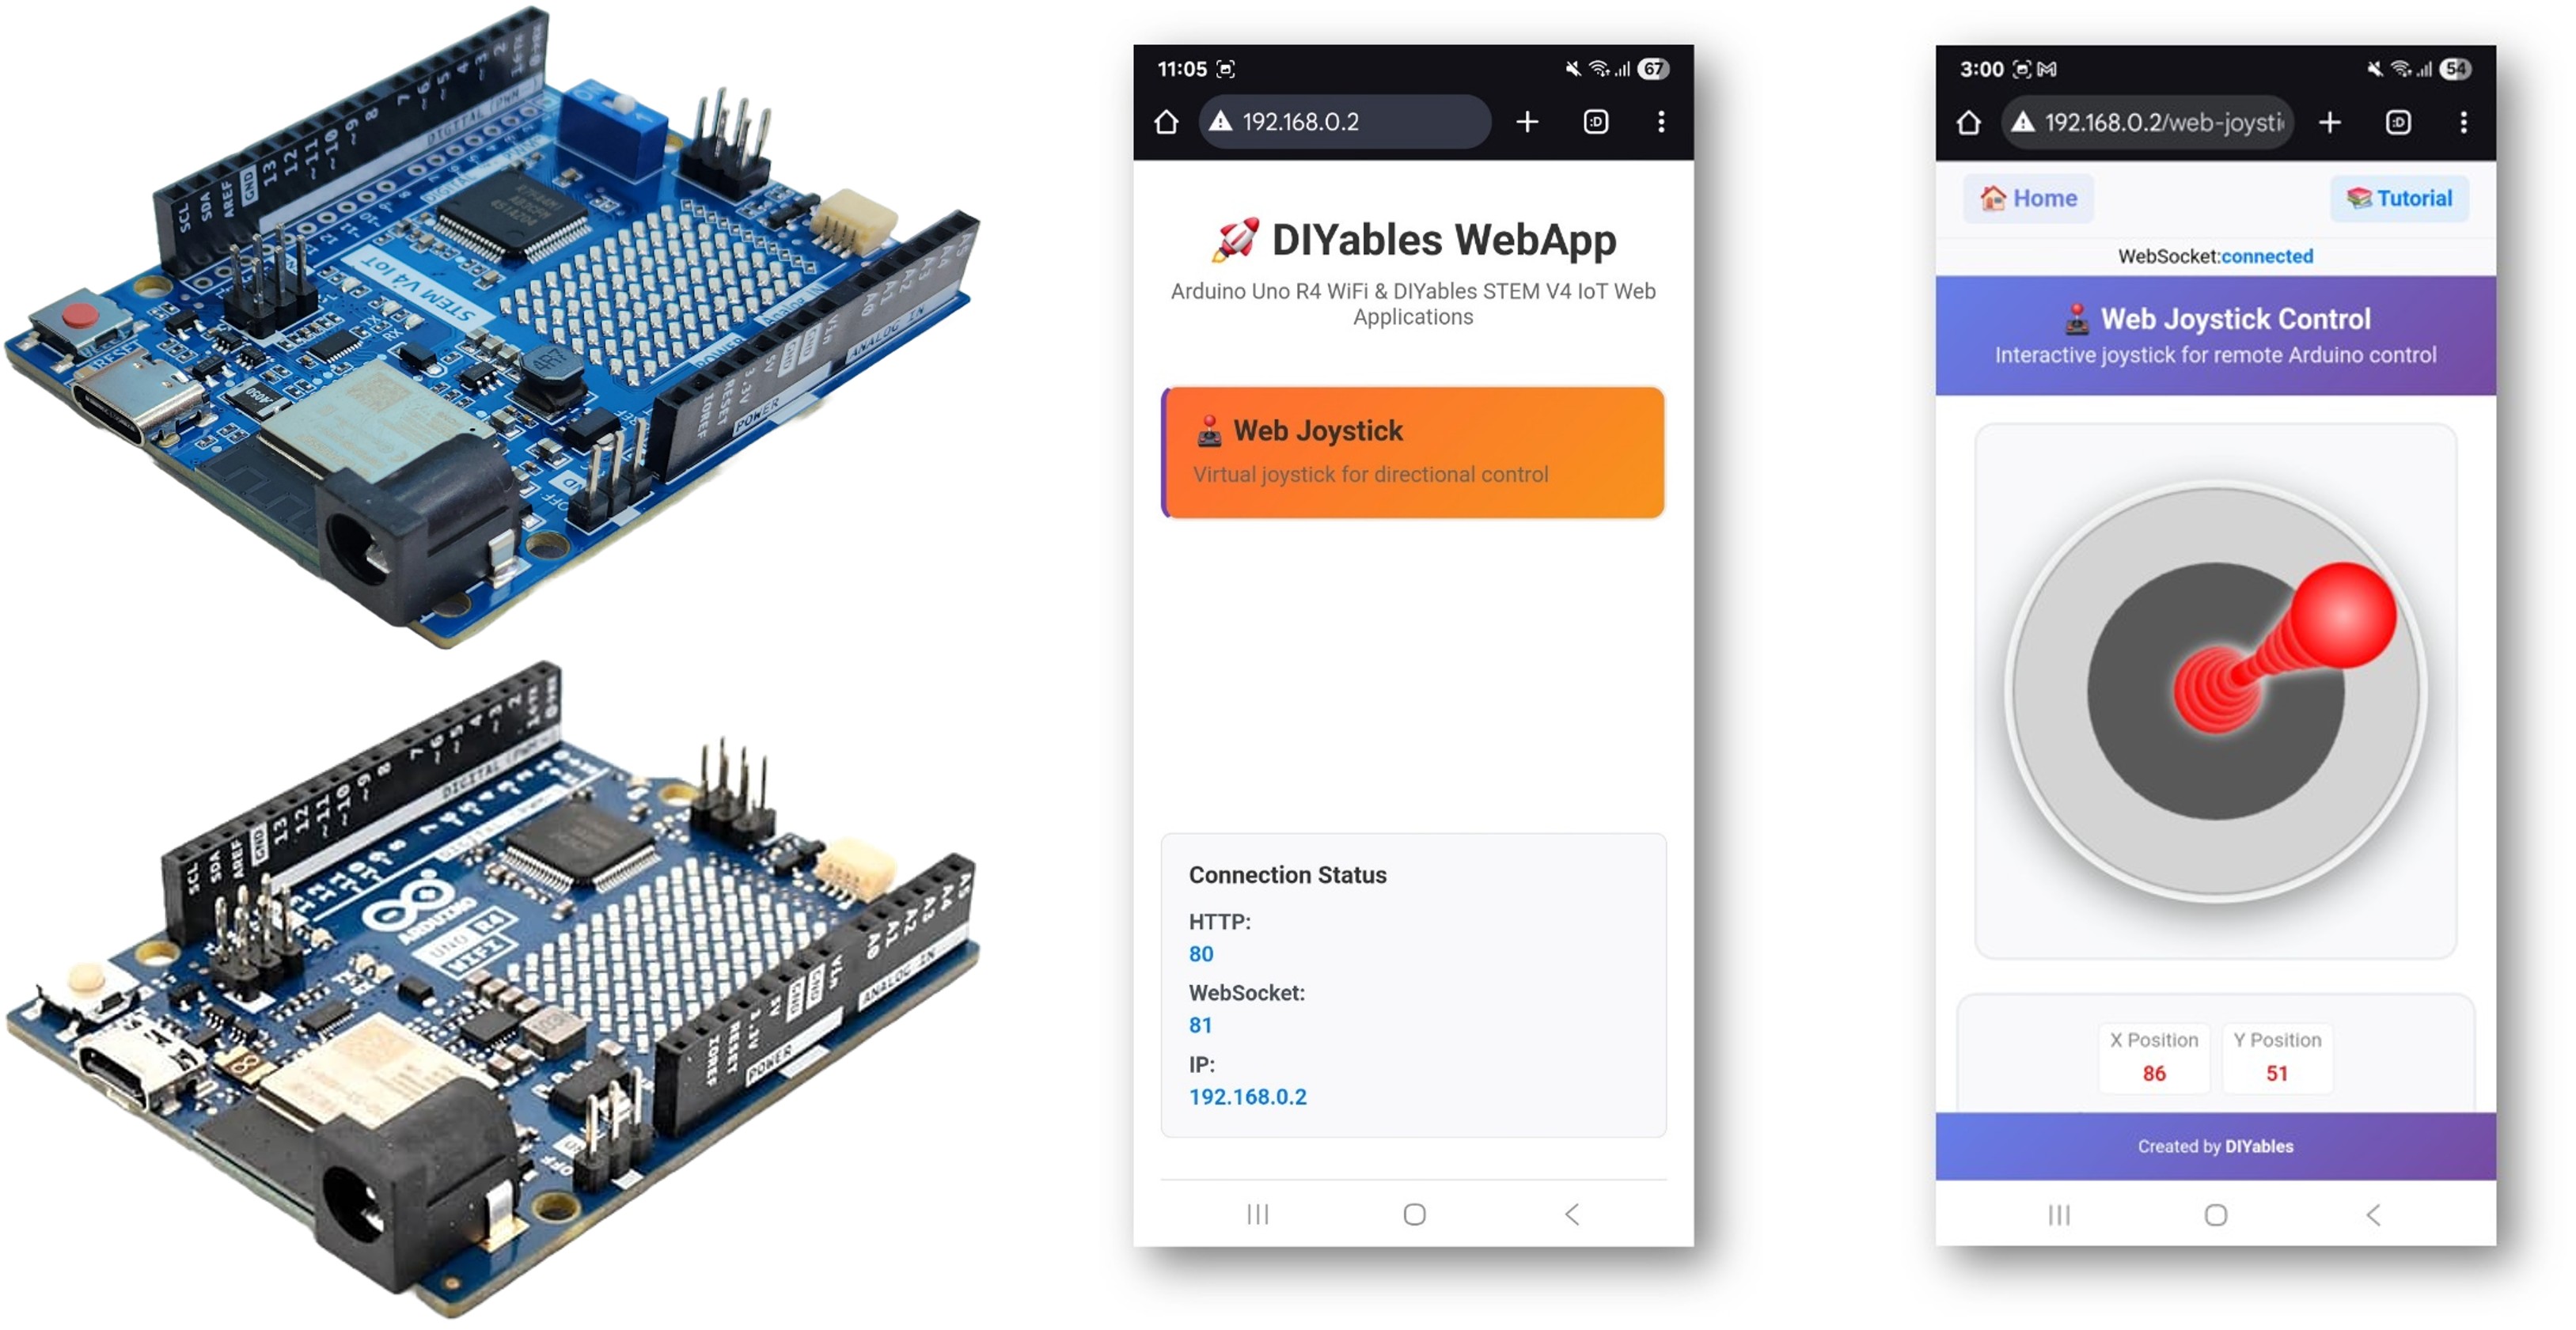
  • You will see the home page like below image:
Arduino UNO R4 DIYables WebApp Home page with Web Joystick app
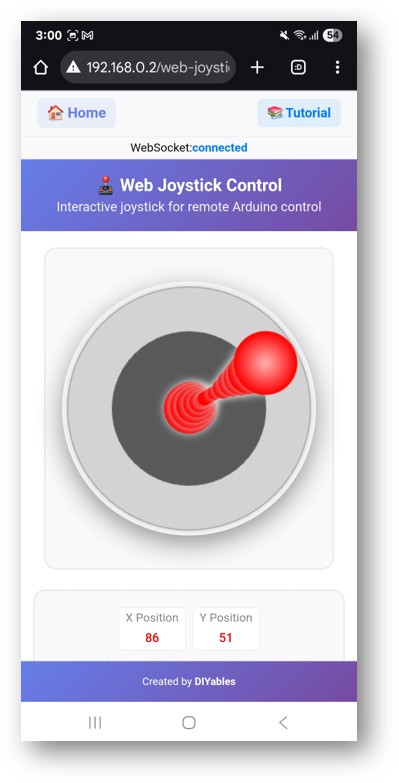
  • Click to the Web Joystick link, you will see the Web Joystick app's UI like the below:
Arduino UNO R4 DIYables WebApp Web Joystick app
  • Or you can also access the page directly by IP address followed by /web-joystick. For example: http://192.168.0.2/web-joystick
  • Try controlling the virtual joystick by clicking and dragging on the joystick area and observe the X/Y coordinate values (-100 to +100) in the Serial Monitor.

Creative Customization - Adapt the Code to Your Project

2. Configure Joystick Settings

The joystick can be configured with different parameters:

Basic Configuration
// Create joystick with default settings (autoReturn=true, sensitivity=1) DIYablesWebJoystickPage webJoystickPage;
Advanced Configuration
// Create joystick with custom settings // autoReturn=false: Joystick stays at last position when released // sensitivity=5: Only send updates when movement > 5% DIYablesWebJoystickPage webJoystickPage(false, 5);

How to Use the Joystick

Web Interface Controls

The joystick interface provides:

  • Joystick Pad: Circular control area for touch/mouse input
  • Position Indicator: Shows current joystick position
  • Coordinate Display: Real-time X/Y values (-100 to +100)
  • Center Point: Visual reference for neutral position

Operating the Joystick

Desktop (Mouse Control)
  1. Click and Drag: Click on joystick and drag to move
  2. Release: Joystick returns to center (if autoReturn=true)
  3. Click Position: Direct click to set joystick position
Mobile/Tablet (Touch Control)
  1. Touch and Drag: Touch joystick and drag finger to move
  2. Multi-touch: Single finger for precise control
  3. Release: Automatic return to center (if enabled)

Coordinate System

The joystick provides coordinates in a standard Cartesian system:

  • X-axis: -100 (full left) to +100 (full right)
  • Y-axis: -100 (full down) to +100 (full up)
  • Center: X=0, Y=0 (neutral position)
  • Corners: Diagonal positions provide combined X/Y values

Programming Examples

Basic Joystick Handler

void setup() { // Set up joystick callback for position changes webJoystickPage.onJoystickValueFromWeb([](int x, int y) { // Store the received values currentJoystickX = x; currentJoystickY = y; // Print joystick position values Serial.println("Joystick - X: " + String(x) + ", Y: " + String(y)); // Add your control logic here }); }

Motor Control Example

// Pin definitions for motor driver const int MOTOR_LEFT_PIN1 = 2; const int MOTOR_LEFT_PIN2 = 3; const int MOTOR_RIGHT_PIN1 = 4; const int MOTOR_RIGHT_PIN2 = 5; const int MOTOR_LEFT_PWM = 9; const int MOTOR_RIGHT_PWM = 10; void setup() { // Configure motor pins pinMode(MOTOR_LEFT_PIN1, OUTPUT); pinMode(MOTOR_LEFT_PIN2, OUTPUT); pinMode(MOTOR_RIGHT_PIN1, OUTPUT); pinMode(MOTOR_RIGHT_PIN2, OUTPUT); pinMode(MOTOR_LEFT_PWM, OUTPUT); pinMode(MOTOR_RIGHT_PWM, OUTPUT); webJoystickPage.onJoystickValueFromWeb([](int x, int y) { controlRobot(x, y); }); } void controlRobot(int x, int y) { // Convert joystick coordinates to motor speeds int leftSpeed = y + x; // Forward/backward + turn left/right int rightSpeed = y - x; // Forward/backward - turn left/right // Constrain speeds to valid range leftSpeed = constrain(leftSpeed, -100, 100); rightSpeed = constrain(rightSpeed, -100, 100); // Control left motor if (leftSpeed > 0) { digitalWrite(MOTOR_LEFT_PIN1, HIGH); digitalWrite(MOTOR_LEFT_PIN2, LOW); analogWrite(MOTOR_LEFT_PWM, map(leftSpeed, 0, 100, 0, 255)); } else if (leftSpeed < 0) { digitalWrite(MOTOR_LEFT_PIN1, LOW); digitalWrite(MOTOR_LEFT_PIN2, HIGH); analogWrite(MOTOR_LEFT_PWM, map(-leftSpeed, 0, 100, 0, 255)); } else { digitalWrite(MOTOR_LEFT_PIN1, LOW); digitalWrite(MOTOR_LEFT_PIN2, LOW); analogWrite(MOTOR_LEFT_PWM, 0); } // Control right motor if (rightSpeed > 0) { digitalWrite(MOTOR_RIGHT_PIN1, HIGH); digitalWrite(MOTOR_RIGHT_PIN2, LOW); analogWrite(MOTOR_RIGHT_PWM, map(rightSpeed, 0, 100, 0, 255)); } else if (rightSpeed < 0) { digitalWrite(MOTOR_RIGHT_PIN1, LOW); digitalWrite(MOTOR_RIGHT_PIN2, HIGH); analogWrite(MOTOR_RIGHT_PWM, map(-rightSpeed, 0, 100, 0, 255)); } else { digitalWrite(MOTOR_RIGHT_PIN1, LOW); digitalWrite(MOTOR_RIGHT_PIN2, LOW); analogWrite(MOTOR_RIGHT_PWM, 0); } }

Servo Control Example

#include <Servo.h> Servo panServo; // X-axis control (left/right) Servo tiltServo; // Y-axis control (up/down) void setup() { // Attach servos to pins panServo.attach(9); tiltServo.attach(10); // Center servos initially panServo.write(90); tiltServo.write(90); webJoystickPage.onJoystickValueFromWeb([](int x, int y) { controlServos(x, y); }); } void controlServos(int x, int y) { // Map joystick coordinates to servo angles int panAngle = map(x, -100, 100, 0, 180); // X controls pan (0-180°) int tiltAngle = map(y, -100, 100, 180, 0); // Y controls tilt (inverted) // Move servos to calculated positions panServo.write(panAngle); tiltServo.write(tiltAngle); Serial.println("Pan: " + String(panAngle) + "°, Tilt: " + String(tiltAngle) + "°"); }

LED Position Indicator

// LED pins for position indication const int LED_UP = 2; const int LED_DOWN = 3; const int LED_LEFT = 4; const int LED_RIGHT = 5; const int LED_CENTER = 13; void setup() { // Configure LED pins pinMode(LED_UP, OUTPUT); pinMode(LED_DOWN, OUTPUT); pinMode(LED_LEFT, OUTPUT); pinMode(LED_RIGHT, OUTPUT); pinMode(LED_CENTER, OUTPUT); webJoystickPage.onJoystickValueFromWeb([](int x, int y) { updateLEDIndicators(x, y); }); } void updateLEDIndicators(int x, int y) { // Turn off all LEDs first digitalWrite(LED_UP, LOW); digitalWrite(LED_DOWN, LOW); digitalWrite(LED_LEFT, LOW); digitalWrite(LED_RIGHT, LOW); digitalWrite(LED_CENTER, LOW); // Check if joystick is near center if (abs(x) < 10 && abs(y) < 10) { digitalWrite(LED_CENTER, HIGH); return; } // Activate LEDs based on direction if (y > 20) digitalWrite(LED_UP, HIGH); if (y < -20) digitalWrite(LED_DOWN, HIGH); if (x > 20) digitalWrite(LED_RIGHT, HIGH); if (x < -20) digitalWrite(LED_LEFT, HIGH); }

Advanced Configuration

Runtime Configuration Changes

void setup() { // Initial setup with default values webJoystickPage.onJoystickValueFromWeb([](int x, int y) { handleJoystickInput(x, y); }); // Change settings at runtime webJoystickPage.setAutoReturn(false); // Disable auto-return webJoystickPage.setSensitivity(10.0); // Reduce sensitivity } void handleJoystickInput(int x, int y) { // Handle different modes based on current settings static bool precisionMode = false; // Toggle precision mode with extreme positions if (abs(x) > 95 && abs(y) > 95) { precisionMode = !precisionMode; if (precisionMode) { webJoystickPage.setSensitivity(1.0); // High sensitivity Serial.println("Precision mode ON"); } else { webJoystickPage.setSensitivity(10.0); // Low sensitivity Serial.println("Precision mode OFF"); } } }

Dead Zone Implementation

void processJoystickWithDeadZone(int x, int y) { const int DEAD_ZONE = 15; // 15% dead zone around center // Apply dead zone filtering int filteredX = (abs(x) < DEAD_ZONE) ? 0 : x; int filteredY = (abs(y) < DEAD_ZONE) ? 0 : y; // Scale values outside dead zone if (filteredX != 0) { filteredX = map(abs(filteredX), DEAD_ZONE, 100, 0, 100); filteredX = (x < 0) ? -filteredX : filteredX; } if (filteredY != 0) { filteredY = map(abs(filteredY), DEAD_ZONE, 100, 0, 100); filteredY = (y < 0) ? -filteredY : filteredY; } // Use filtered values for control controlDevice(filteredX, filteredY); }

Speed Ramping

class SpeedController { private: int targetX = 0, targetY = 0; int currentX = 0, currentY = 0; unsigned long lastUpdate = 0; const int RAMP_RATE = 5; // Change per update cycle public: void setTarget(int x, int y) { targetX = x; targetY = y; } void update() { if (millis() - lastUpdate > 20) { // Update every 20ms // Ramp X value if (currentX < targetX) { currentX = min(currentX + RAMP_RATE, targetX); } else if (currentX > targetX) { currentX = max(currentX - RAMP_RATE, targetX); } // Ramp Y value if (currentY < targetY) { currentY = min(currentY + RAMP_RATE, targetY); } else if (currentY > targetY) { currentY = max(currentY - RAMP_RATE, targetY); } // Apply ramped values applyControlValues(currentX, currentY); lastUpdate = millis(); } } void applyControlValues(int x, int y) { // Your control logic here with smooth ramped values Serial.println("Ramped - X: " + String(x) + ", Y: " + String(y)); } }; SpeedController speedController; void setup() { webJoystickPage.onJoystickValueFromWeb([](int x, int y) { speedController.setTarget(x, y); }); } void loop() { server.loop(); speedController.update(); // Apply speed ramping }

Hardware Integration Examples

Robot Car Control

void setupRobotCar() { // Motor driver pins pinMode(2, OUTPUT); // Left motor direction 1 pinMode(3, OUTPUT); // Left motor direction 2 pinMode(4, OUTPUT); // Right motor direction 1 pinMode(5, OUTPUT); // Right motor direction 2 pinMode(9, OUTPUT); // Left motor PWM pinMode(10, OUTPUT); // Right motor PWM webJoystickPage.onJoystickValueFromWeb([](int x, int y) { // Tank drive calculation int leftMotor = y + (x / 2); // Forward/back + steering int rightMotor = y - (x / 2); // Forward/back - steering // Constrain to valid range leftMotor = constrain(leftMotor, -100, 100); rightMotor = constrain(rightMotor, -100, 100); // Control motors setMotorSpeed(9, 2, 3, leftMotor); // Left motor setMotorSpeed(10, 4, 5, rightMotor); // Right motor }); } void setMotorSpeed(int pwmPin, int dir1Pin, int dir2Pin, int speed) { if (speed > 0) { digitalWrite(dir1Pin, HIGH); digitalWrite(dir2Pin, LOW); analogWrite(pwmPin, map(speed, 0, 100, 0, 255)); } else if (speed < 0) { digitalWrite(dir1Pin, LOW); digitalWrite(dir2Pin, HIGH); analogWrite(pwmPin, map(-speed, 0, 100, 0, 255)); } else { digitalWrite(dir1Pin, LOW); digitalWrite(dir2Pin, LOW); analogWrite(pwmPin, 0); } }

Camera Gimbal Control

#include <Servo.h> Servo panServo, tiltServo; int panOffset = 90, tiltOffset = 90; // Center positions void setupCameraGimbal() { panServo.attach(9); tiltServo.attach(10); // Set initial center positions panServo.write(panOffset); tiltServo.write(tiltOffset); webJoystickPage.onJoystickValueFromWeb([](int x, int y) { // Calculate servo positions with offset int panPos = panOffset + map(x, -100, 100, -45, 45); // ±45° range int tiltPos = tiltOffset + map(y, -100, 100, -30, 30); // ±30° range // Constrain to servo limits panPos = constrain(panPos, 0, 180); tiltPos = constrain(tiltPos, 0, 180); // Move servos smoothly panServo.write(panPos); tiltServo.write(tiltPos); }); }

RGB LED Color Control

const int RED_PIN = 9; const int GREEN_PIN = 10; const int BLUE_PIN = 11; void setupRGBControl() { pinMode(RED_PIN, OUTPUT); pinMode(GREEN_PIN, OUTPUT); pinMode(BLUE_PIN, OUTPUT); webJoystickPage.onJoystickValueFromWeb([](int x, int y) { // Convert joystick position to RGB values int red = map(abs(x), 0, 100, 0, 255); int green = map(abs(y), 0, 100, 0, 255); int blue = map(abs(x + y), 0, 141, 0, 255); // Diagonal distance // Apply quadrant-specific color mixing if (x > 0 && y > 0) { // Upper right: Red + Green = Yellow blue = 0; } else if (x < 0 && y > 0) { // Upper left: Green + Blue = Cyan red = 0; } else if (x < 0 && y < 0) { // Lower left: Blue + Red = Magenta green = 0; } else if (x > 0 && y < 0) { // Lower right: Red only green = blue = 0; } // Set RGB values analogWrite(RED_PIN, red); analogWrite(GREEN_PIN, green); analogWrite(BLUE_PIN, blue); }); }

Troubleshooting

Common Issues

1. Joystick not responding

  • Check WebSocket connection status in browser console
  • Verify network connectivity
  • Refresh browser page
  • Check Serial Monitor for errors

2. Jerky or inconsistent movement

  • Increase sensitivity value to reduce update frequency
  • Implement dead zone filtering
  • Add speed ramping for smooth transitions
  • Check for network latency issues

3. Auto-return not working

  • Verify autoReturn setting: webJoystickPage.setAutoReturn(true)
  • Check browser compatibility (some touch devices vary)
  • Test with different input methods (mouse vs touch)

4. Values not reaching full range

  • Check joystick calibration in web interface
  • Verify coordinate calculations in callback
  • Test with different browser/device combinations

Debug Tips

Add comprehensive debugging:

void debugJoystickState(int x, int y) { Serial.println("=== Joystick Debug ==="); Serial.println("X: " + String(x) + " (" + String(map(x, -100, 100, 0, 100)) + "%)"); Serial.println("Y: " + String(y) + " (" + String(map(y, -100, 100, 0, 100)) + "%)"); Serial.println("Distance from center: " + String(sqrt(x*x + y*y))); Serial.println("Angle: " + String(atan2(y, x) * 180 / PI) + "°"); Serial.println("====================="); }

Project Ideas

Robotics Projects

  • Remote-controlled robot car
  • Robotic arm control
  • Drone flight control (basic movements)
  • Pet robot navigation

Home Automation

  • Smart curtain control (open/close/position)
  • Camera pan/tilt control
  • Light brightness and color control
  • Fan speed and direction control

Educational Projects

  • Coordinate system teaching tool
  • Motor control demonstrations
  • Servo positioning experiments
  • Gaming controller interfaces

Art and Creative Projects

  • LED matrix pattern control
  • Music visualization control
  • Drawing robot control
  • Interactive art installations

Integration with Other Examples

Combine with WebSlider

Use joystick for direction and sliders for speed/intensity:

// Use joystick for direction, sliders for speed limits webJoystickPage.onJoystickValueFromWeb([](int x, int y) { int maxSpeed = getSliderValue(); // From WebSlider int scaledX = map(x, -100, 100, -maxSpeed, maxSpeed); int scaledY = map(y, -100, 100, -maxSpeed, maxSpeed); controlRobot(scaledX, scaledY); });

Combine with WebDigitalPins

Use joystick positions to trigger digital pin states:

webJoystickPage.onJoystickValueFromWeb([](int x, int y) { // Activate pins based on joystick quadrants webDigitalPinsPage.setPinState(2, x > 50); // Right quadrant webDigitalPinsPage.setPinState(3, x < -50); // Left quadrant webDigitalPinsPage.setPinState(4, y > 50); // Upper quadrant webDigitalPinsPage.setPinState(5, y < -50); // Lower quadrant });

Next Steps

After mastering the WebJoystick example, try:

  1. WebSlider - For additional analog control
  2. WebDigitalPins - For discrete on/off control
  3. WebMonitor - For debugging joystick values
  4. MultipleWebApps - Combining joystick with other controls

Support

For additional help:

  • Check the API Reference documentation
  • Visit DIYables tutorials: https://newbiely.com/tutorials/arduino-uno-r4/arduino-uno-r4-diyables-webapps
  • Arduino community forums

※ OUR MESSAGES

  • As freelancers, We are AVAILABLE for HIRE. See how to outsource your project to us
  • Please feel free to share the link of this tutorial. However, Please do not use our content on any other websites. We invested a lot of effort and time to create the content, please respect our work!