DIYables Web Apps Web Temperature

WebTemperature Example - Setup Instructions

Overview

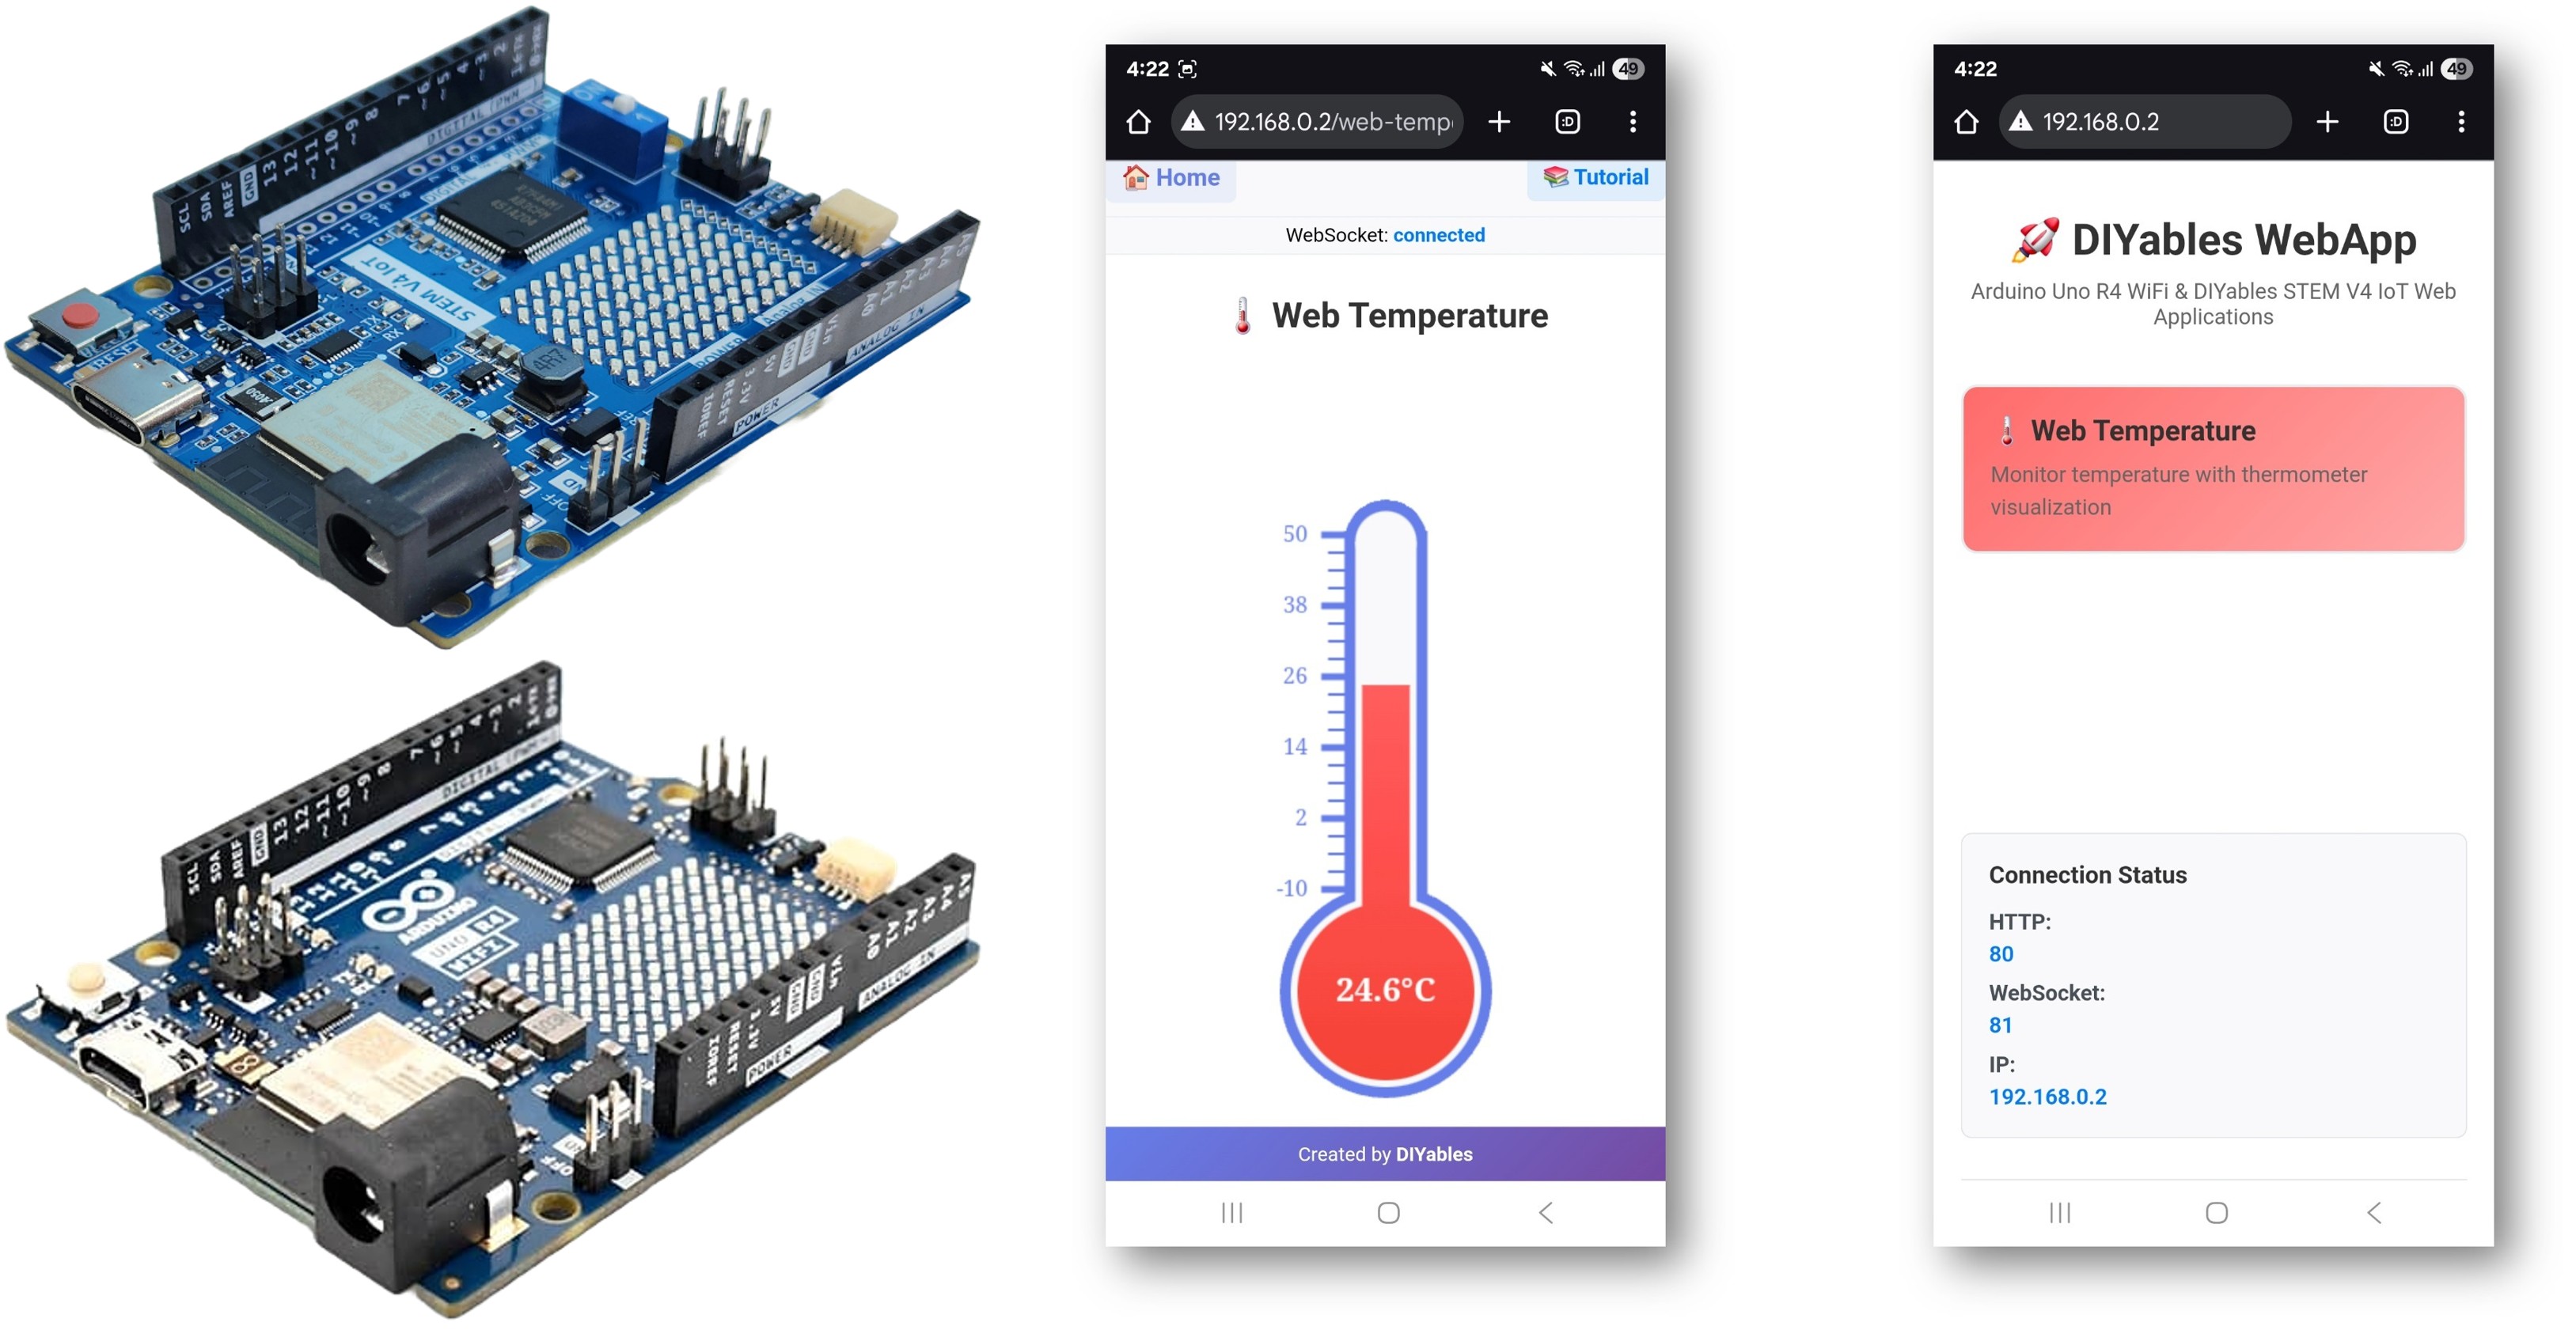
The WebTemperature example creates a visual thermometer interface accessible from any web browser. Designed for Arduino Uno R4 WiFi and DIYables STEM V4 IoT educational platform with enhanced sensor monitoring capabilities, built-in temperature sensing features, and seamless integration with environmental monitoring educational modules. Perfect for monitoring temperature sensors, environmental conditions, or any temperature-based measurements requiring visual feedback.

Arduino WebTemperature Example - Thermometer Display Interface Tutorial

Features

  • Visual Thermometer Display: Interactive thermometer via web interface
  • Configurable Temperature Range: Custom minimum and maximum temperatures with units
  • Real-time Updates: Live temperature display with mercury-style animation
  • Multiple Units Support: Celsius (°C), Fahrenheit (°F), Kelvin (K)
  • Automatic Config Handling: Set range and unit once in constructor
  • WebSocket Communication: Instant updates without page refresh
  • Mobile Responsive: Works perfectly on desktop, tablet, and mobile devices
  • Professional Design: Clean thermometer visualization with smooth animations
  • Platform Extensible: Currently implemented for Arduino Uno R4 WiFi, but can be extended for other hardware platforms. See DIYables_WebApps_ESP32

Hardware Preparation

1×Arduino UNO R4 WiFi
1×Alternatively, DIYables STEM V4 IoT
1×USB Cable Type-A to Type-C (for USB-A PC)
1×USB Cable Type-C to Type-C (for USB-C PC)
1×DS18B20 Temperature Sensor (optional)
1×DHT22 Temperature/Humidity Sensor (optional)
1×Breadboard
1×Jumper Wires
1×Recommended: Screw Terminal Block Shield for Arduino UNO R4
1×Recommended: Breadboard Shield for Arduino UNO R4
1×Recommended: Enclosure for Arduino UNO R4
1×Recommended: Power Splitter for Arduino UNO R4
1×Recommended: Prototyping Base Plate & Breadboard Kit for Arduino UNO

Or you can buy the following kits:

1×DIYables STEM V4 IoT Starter Kit (Arduino included)
1×DIYables Sensor Kit (30 sensors/displays)
1×DIYables Sensor Kit (18 sensors/displays)
Disclosure: Some of the links provided in this section are Amazon affiliate links. We may receive a commission for any purchases made through these links at no additional cost to you.
Additionally, some of these links are for products from our own brand, DIYables .

Buy Note: Many DS18B20 sensors available in the market are unreliable. We strongly recommend buying the sensor from the DIYables brand using the link provided above. We tested it, and it worked reliably.

Setup Instructions

Detailed Instructions

Follow these instructions step by step:

  • If this is your first time using the Arduino Uno R4 WiFi/DIYables STEM V4 IoT, refer to the tutorial on setting up the environment for Arduino Uno R4 WiFi/DIYables STEM V4 IoT in the Arduino IDE.
  • Connect the Arduino Uno R4/DIYables STEM V4 IoT board to your computer using a USB cable.
  • Launch the Arduino IDE on your computer.
  • Select the appropriate Arduino Uno R4 board (e.g., Arduino Uno R4 WiFi) and COM port.
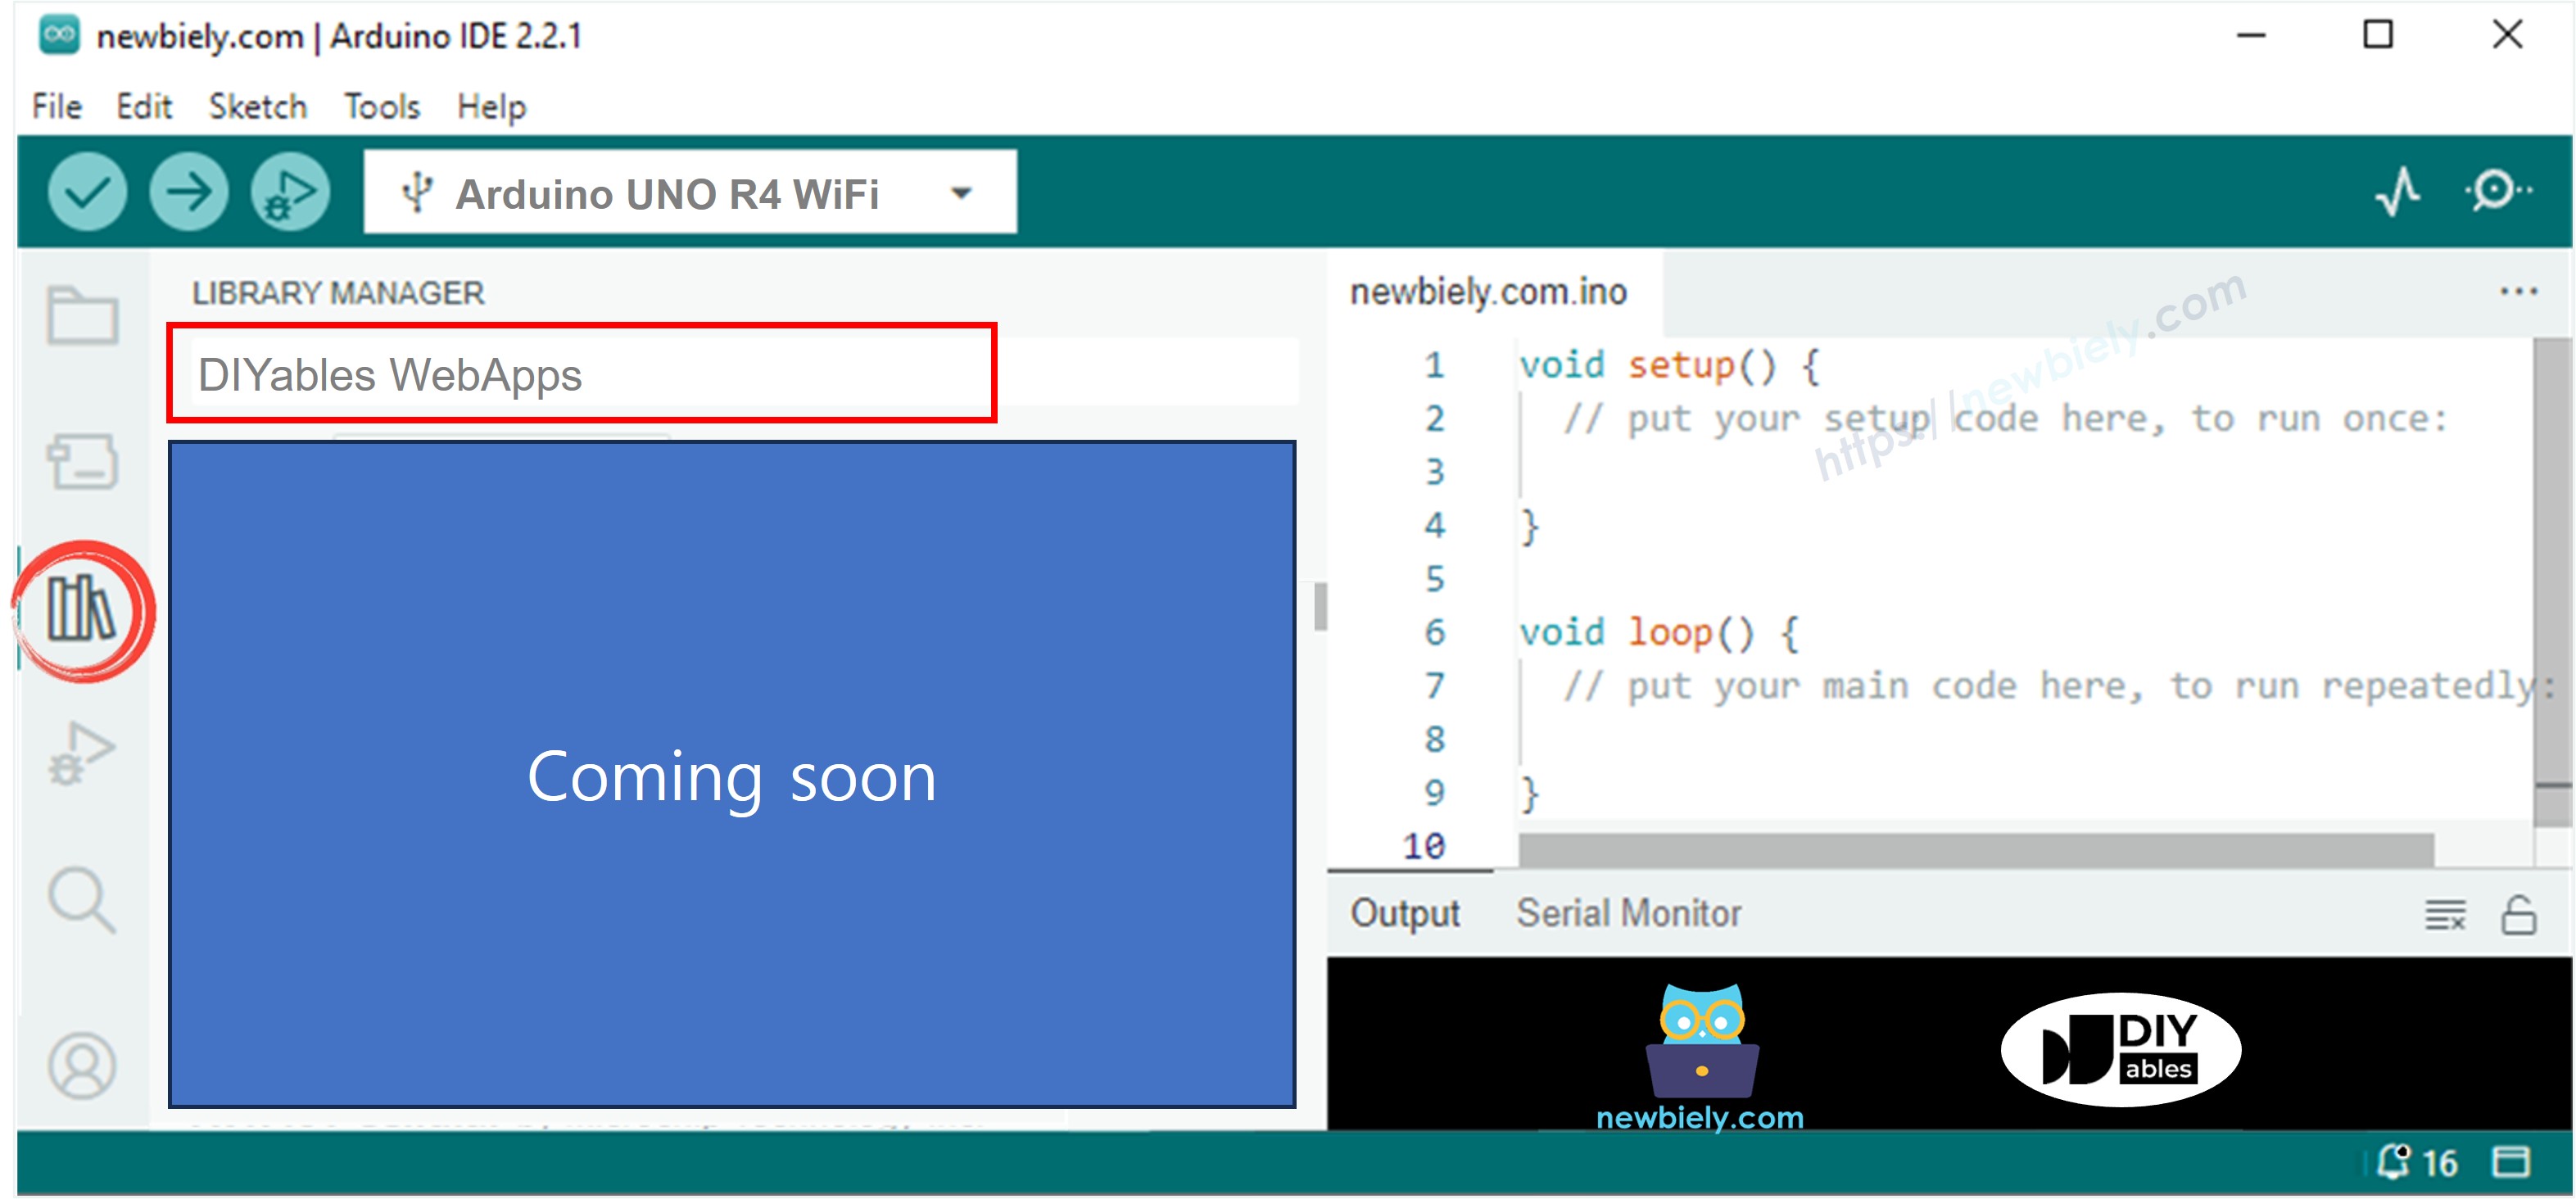
  • Navigate to the Libraries icon on the left bar of the Arduino IDE.
  • Search "DIYables WebApps", then find the DIYables WebApps library by DIYables
  • Click Install button to install the library.
Arduino UNO R4 DIYables WebApps library
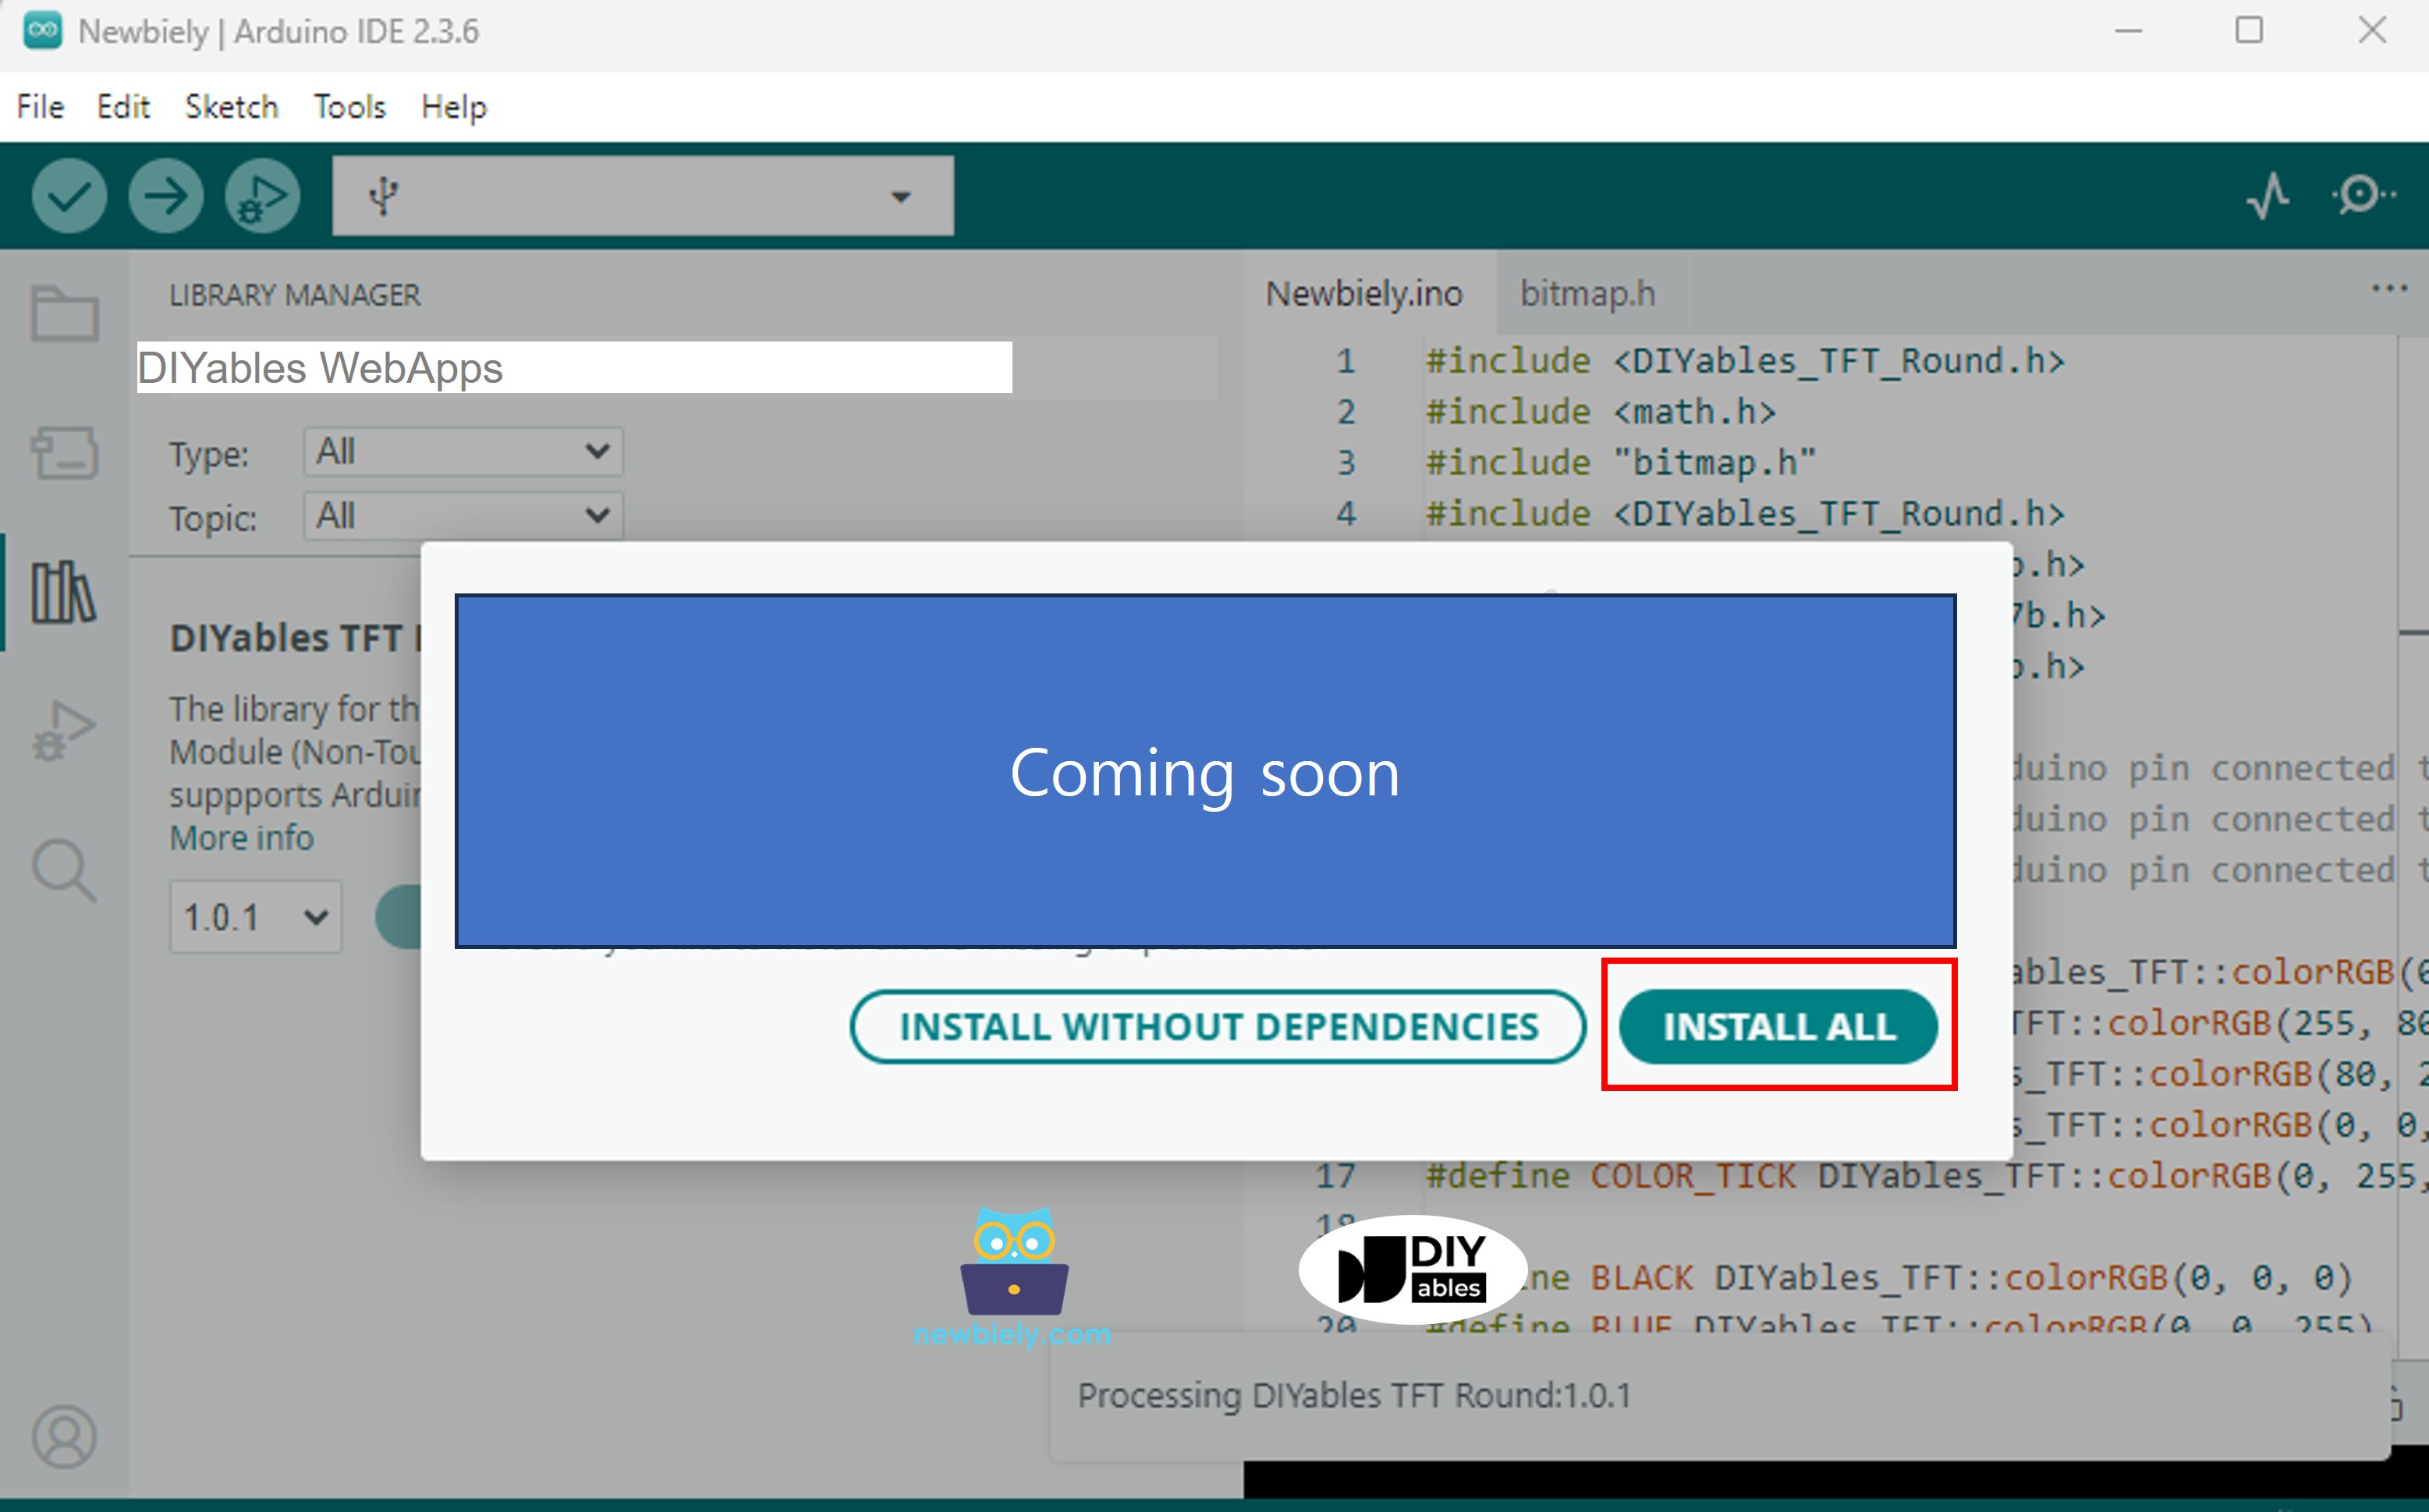
  • You will be asked for installing some other library dependencies
  • Click Install All button to install all library dependencies.
Arduino UNO R4 DIYables WebApps dependency
  • On Arduino IDE, Go to File Examples DIYables WebApps WebTemperature example, or copy the above code and paste it to the editor of Arduino IDE
/* * This example demonstrates how to create a web-base Serial.println("Starting Web Temperature Server..."); // Add web apps to server server.addApp(&homePage); server.addApp(&temperaturePage); // Set 404 Not Found page (optional - for better user experience) server.setNotFoundPage(DIYablesNotFoundPage());re display * using the DIYables WebApps library with Arduino Uno R4 WiFi. * * The library automatically detects the Arduino Uno R4 WiFi platform and * includes the appropriate abstraction layer for seamless operation. * * The web page displays a thermometer visualization that shows temperature * readings in real-time through WebSocket communication. * * Features: * - Real-time temperature display with thermometer visualization * - Configurable temperature range and units * - Auto-connecting WebSocket for seamless communication * - Mobile-responsive design with professional UI * - Automatic platform detection and abstraction * - Compatible with both WiFi and Ethernet connections * Hardware: Arduino Uno R4 WiFi or DIYables STEM V4 IoT */ #include <DIYablesWebApps.h> // WiFi credentials - UPDATE THESE WITH YOUR NETWORK const char WIFI_SSID[] = "YOUR_WIFI_SSID"; const char WIFI_PASSWORD[] = "YOUR_WIFI_PASSWORD"; // Create web app instances UnoR4ServerFactory serverFactory; DIYablesWebAppServer server(serverFactory, 80, 81); // HTTP port 80, WebSocket port 81 DIYablesHomePage homePage; DIYablesWebTemperaturePage temperaturePage(-10.0, 50.0, "°C"); // Min: -10°C, Max: 50°C // Temperature simulation variables float currentTemp = 25.0; // Starting temperature unsigned long lastUpdate = 0; void setup() { Serial.begin(9600); Serial.println("Starting Web Temperature Server..."); // Add web apps to server server.addApp(&homePage); server.addApp(&temperaturePage); // Set 404 Not Found page (optional - for better user experience) server.setNotFoundPage(DIYablesNotFoundPage()); // Set up temperature callback for value requests temperaturePage.onTemperatureValueRequested(onTemperatureValueRequested); // Start the server server.begin(WIFI_SSID, WIFI_PASSWORD); } void loop() { // Handle web server and WebSocket communications server.loop(); // Simulate temperature readings simulateTemperature(); // Send temperature update every 2 seconds if (millis() - lastUpdate >= 2000) { temperaturePage.sendTemperature(currentTemp); // Print temperature to Serial Monitor Serial.println("Temperature: " + String(currentTemp, 1) + "°C"); lastUpdate = millis(); } delay(10); // Small delay for stability } void simulateTemperature() { // Simple temperature simulation - slowly increases and decreases static bool increasing = true; if (increasing) { currentTemp += 0.1; // Increase temperature slowly if (currentTemp >= 35.0) { increasing = false; // Start decreasing when it reaches 35°C } } else { currentTemp -= 0.1; // Decrease temperature slowly if (currentTemp <= 15.0) { increasing = true; // Start increasing when it reaches 15°C } } } /** * Callback function called when web interface requests temperature value * Send current temperature value to web interface */ void onTemperatureValueRequested() { Serial.println("Temperature value requested from web interface"); // Send current temperature value (config is automatically sent by the library) temperaturePage.sendTemperature(currentTemp); } /* * Alternative setup for real temperature sensor (DS18B20 example): * * #include <OneWire.h> * #include <DallasTemperature.h> * * #define ONE_WIRE_BUS 2 * OneWire oneWire(ONE_WIRE_BUS); * DallasTemperature sensors(&oneWire); * * void setup() { * // ... existing setup code ... * sensors.begin(); * } * * float readTemperature() { * sensors.requestTemperatures(); * return sensors.getTempCByIndex(0); * } * * // In loop(), replace simulateTemperature() with: * // currentTemp = readTemperature(); */
  • Configure WiFi credentials in the code by updating these lines:
const char WIFI_SSID[] = "YOUR_WIFI_NETWORK"; const char WIFI_PASSWORD[] = "YOUR_WIFI_PASSWORD";
  • Click Upload button on Arduino IDE to upload code to Arduino UNO R4/DIYables STEM V4 IoT
  • Open the Serial Monitor
  • Check out the result on Serial Monitor. It looks like the below
COM6
Send
Starting Web Temperature Server... INFO: Added app / INFO: Added app /web-temperature DIYables WebApp Library Platform: Arduino Uno R4 WiFi Network connected! IP address: 192.168.0.2 HTTP server started on port 80 Configuring WebSocket server callbacks... WebSocket server started on port 81 WebSocket URL: ws://192.168.0.2:81 WebSocket server started on port 81 ========================================== DIYables WebApp Ready! ========================================== 📱 Web Interface: http://192.168.0.2 🔗 WebSocket: ws://192.168.0.2:81 📋 Available Applications: 🏠 Home Page: http://192.168.0.2/ 🌡️ Web Temperature: http://192.168.0.2/web-temperature ==========================================
Autoscroll Show timestamp
Clear output
9600 baud  
Newline  
  • If you do not see anything, reboot Arduino board.
  • Open a web browser on your PC or mobile phone.
  • Type the IP address shown in the Serial Monitor to the web browser
  • Example: http://192.168.1.100
  • You will see the home page like below image:
Arduino UNO R4 DIYables WebApp Home page with Web Temperature app
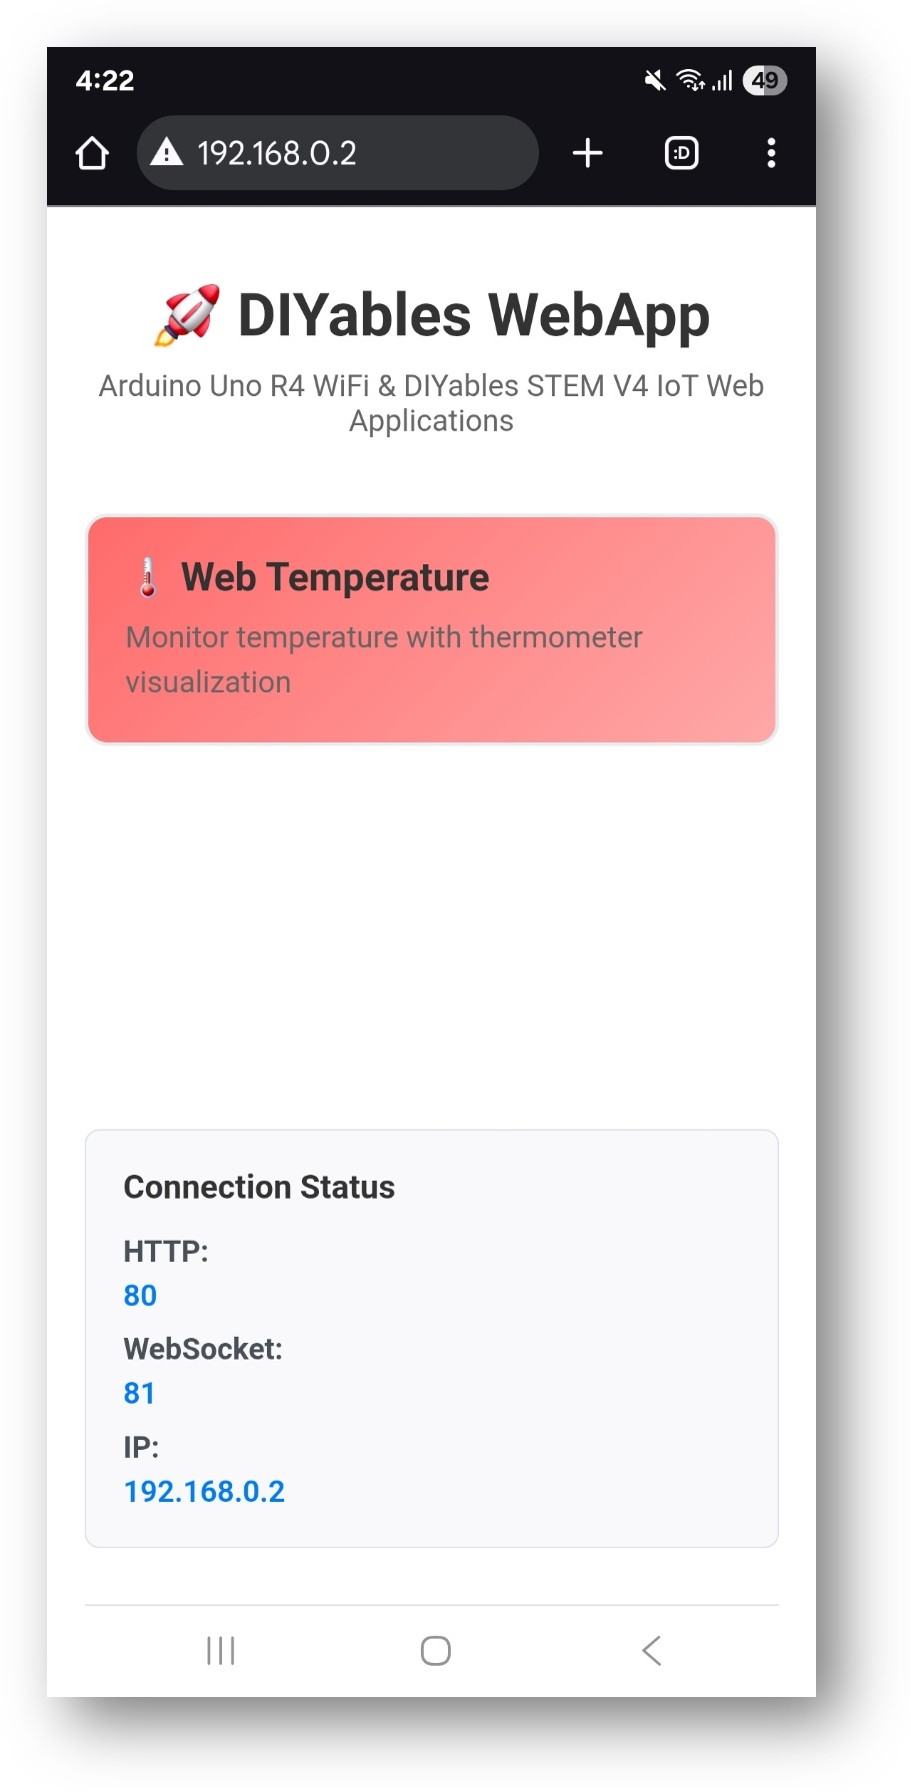
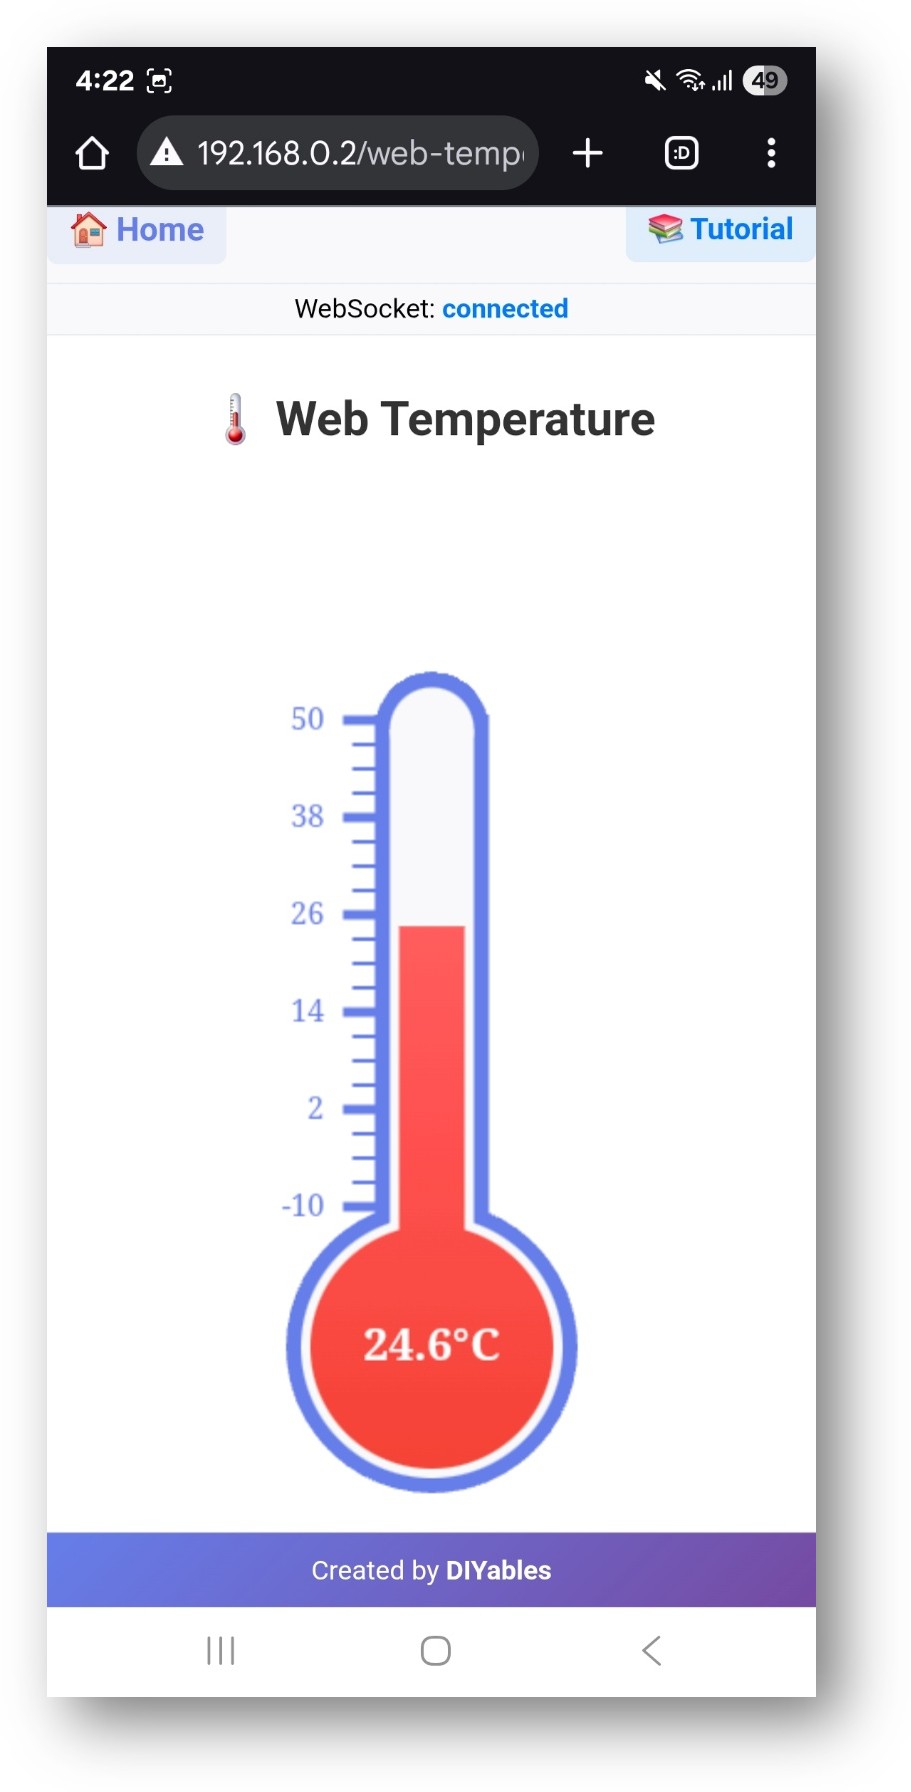
  • Click to the Web Temperature link, you will see the Web Temperature app's UI like the below:
Arduino UNO R4 DIYables WebApp Web Temperature app
  • Or you can also access the page directly by IP address followed by /web-temperature. For example: http://192.168.1.100/web-temperature
  • You will see a visual thermometer display showing real-time temperature readings

Web Interface Features

Thermometer Display

  • Visual Thermometer: Classic thermometer design with mercury-style animation
  • Temperature Scale: Clear scale markings with configurable range
  • Real-time Updates: Live temperature display with smooth transitions
  • Unit Display: Shows configured temperature units (°C, °F, K)
  • Professional Design: Clean, educational-style thermometer visualization

Real-time Monitoring

  • Live Data: Temperature updates automatically via WebSocket connection
  • Smooth Animation: Mercury level moves smoothly between readings
  • Status Feedback: Connection status indicator
  • Mobile Optimized: Touch-friendly interface for all devices

Code Configuration

Temperature Setup

// Configure temperature range and units DIYablesWebTemperaturePage temperaturePage(-10.0, 50.0, "°C"); // -10 to 50°C // Set up temperature value request callback temperaturePage.onTemperatureValueRequested(onTemperatureValueRequested);

Sending Temperature Values

void onTemperatureValueRequested() { // Read temperature from sensor (example with simulation) float currentTemp = readTemperatureSensor(); // Send to thermometer display temperaturePage.sendTemperature(currentTemp); }

Temperature Sensor Integration

DS18B20 Digital Temperature Sensor

#include <OneWire.h> #include <DallasTemperature.h> #define ONE_WIRE_BUS 2 OneWire oneWire(ONE_WIRE_BUS); DallasTemperature sensors(&oneWire); void setup() { sensors.begin(); // Configure temperature page for sensor range DIYablesWebTemperaturePage tempPage(-55.0, 125.0, "°C"); } float readTemperatureSensor() { sensors.requestTemperatures(); return sensors.getTempCByIndex(0); }

DHT22 Temperature/Humidity Sensor

#include <DHT.h> #define DHT_PIN 2 #define DHT_TYPE DHT22 DHT dht(DHT_PIN, DHT_TYPE); void setup() { dht.begin(); // Configure for DHT22 range DIYablesWebTemperaturePage tempPage(-40.0, 80.0, "°C"); } float readTemperatureSensor() { return dht.readTemperature(); // Returns °C }

Analog Temperature Sensor (TMP36)

#define TEMP_PIN A0 float readTemperatureSensor() { int reading = analogRead(TEMP_PIN); float voltage = reading * 5.0 / 1024.0; float temperatureC = (voltage - 0.5) * 100.0; // TMP36 formula return temperatureC; }

Unit Conversion

Supporting Multiple Units

// Temperature in different units DIYablesWebTemperaturePage celsiusPage(-10.0, 50.0, "°C"); DIYablesWebTemperaturePage fahrenheitPage(14.0, 122.0, "°F"); DIYablesWebTemperaturePage kelvinPage(263.15, 323.15, "K"); // Conversion functions float celsiusToFahrenheit(float celsius) { return (celsius * 9.0/5.0) + 32.0; } float celsiusToKelvin(float celsius) { return celsius + 273.15; }

Customization Options

Temperature Range

  • Minimum Temperature: Set lowest expected reading
  • Maximum Temperature: Set highest expected reading
  • Units: Display unit string (°C, °F, K, or custom)
  • Scale: Thermometer scale automatically adjusts to range

Update Frequency

// Control update rate to avoid overwhelming the interface unsigned long lastUpdate = 0; const unsigned long UPDATE_INTERVAL = 1000; // 1 second void loop() { server.loop(); if (millis() - lastUpdate >= UPDATE_INTERVAL) { // Update temperature display lastUpdate = millis(); } }

Common Use Cases

Educational Projects

  • Weather Monitoring: Indoor/outdoor temperature tracking
  • Physics Experiments: Heat transfer, thermal dynamics
  • Environmental Science: Climate monitoring, greenhouse control
  • Electronics Learning: Sensor interfacing, data visualization

Practical Applications

  • Home Automation: HVAC control, energy monitoring
  • Greenhouse Control: Plant growth optimization
  • Food Safety: Temperature monitoring for storage
  • Industrial: Process monitoring, quality control

Troubleshooting

Temperature Not Updating

  • Check WiFi connection and WebSocket status
  • Verify sensor wiring and power supply
  • Ensure callback function is properly set
  • Check Serial Monitor for sensor readings

Incorrect Temperature Values

  • Verify sensor calibration and accuracy
  • Check voltage reference for analog sensors
  • Ensure proper sensor initialization
  • Test sensor independently with basic code

Sensor Connection Issues

  • Check wiring connections (power, ground, data)
  • Verify pull-up resistors for digital sensors
  • Test sensor with multimeter for proper operation
  • Check sensor library installation and compatibility

Advanced Features

Multiple Temperature Sensors

Monitor multiple locations with separate thermometers:

DIYablesWebTemperaturePage indoorTemp(-10.0, 40.0, "°C"); DIYablesWebTemperaturePage outdoorTemp(-30.0, 50.0, "°C"); DIYablesWebTemperaturePage waterTemp(0.0, 100.0, "°C"); server.addApp(&indoorTemp); server.addApp(&outdoorTemp); server.addApp(&waterTemp);

Temperature Logging

Combine with Web Plotter for historical temperature data:

// Send same value to both thermometer and plotter temperaturePage.sendTemperature(currentTemp); plotterPage.sendData("Temperature", currentTemp);

Alert System

Implement temperature alerts:

void checkTemperatureAlerts(float temp) { if (temp > 35.0) { Serial.println("⚠️ High temperature alert!"); // Send alert via web interface } else if (temp < 5.0) { Serial.println("🧊 Low temperature alert!"); // Send alert via web interface } }

Educational Integration

STEM Learning Objectives

  • Temperature Physics: Understanding thermal concepts
  • Sensor Technology: Learning digital and analog sensors
  • Data Visualization: Real-time data display techniques
  • Programming: Callback functions, sensor integration

Classroom Activities

  • Sensor Comparison: Compare different temperature sensor types
  • Calibration Exercise: Learn measurement accuracy principles
  • Environmental Monitoring: Track temperature changes over time
  • System Integration: Combine with other environmental sensors

Science Experiments

  • Heat Transfer: Monitor temperature changes during experiments
  • Phase Changes: Observe temperature during melting/boiling
  • Insulation Testing: Compare insulation effectiveness
  • Climate Study: Long-term temperature monitoring

This example provides a comprehensive foundation for temperature monitoring and visualization, perfect for both educational and practical environmental monitoring applications.

※ OUR MESSAGES

  • As freelancers, We are AVAILABLE for HIRE. See how to outsource your project to us
  • Please feel free to share the link of this tutorial. However, Please do not use our content on any other websites. We invested a lot of effort and time to create the content, please respect our work!