DIYables Web Apps Web Monitor

WebMonitor Example - Setup Instructions

Overview

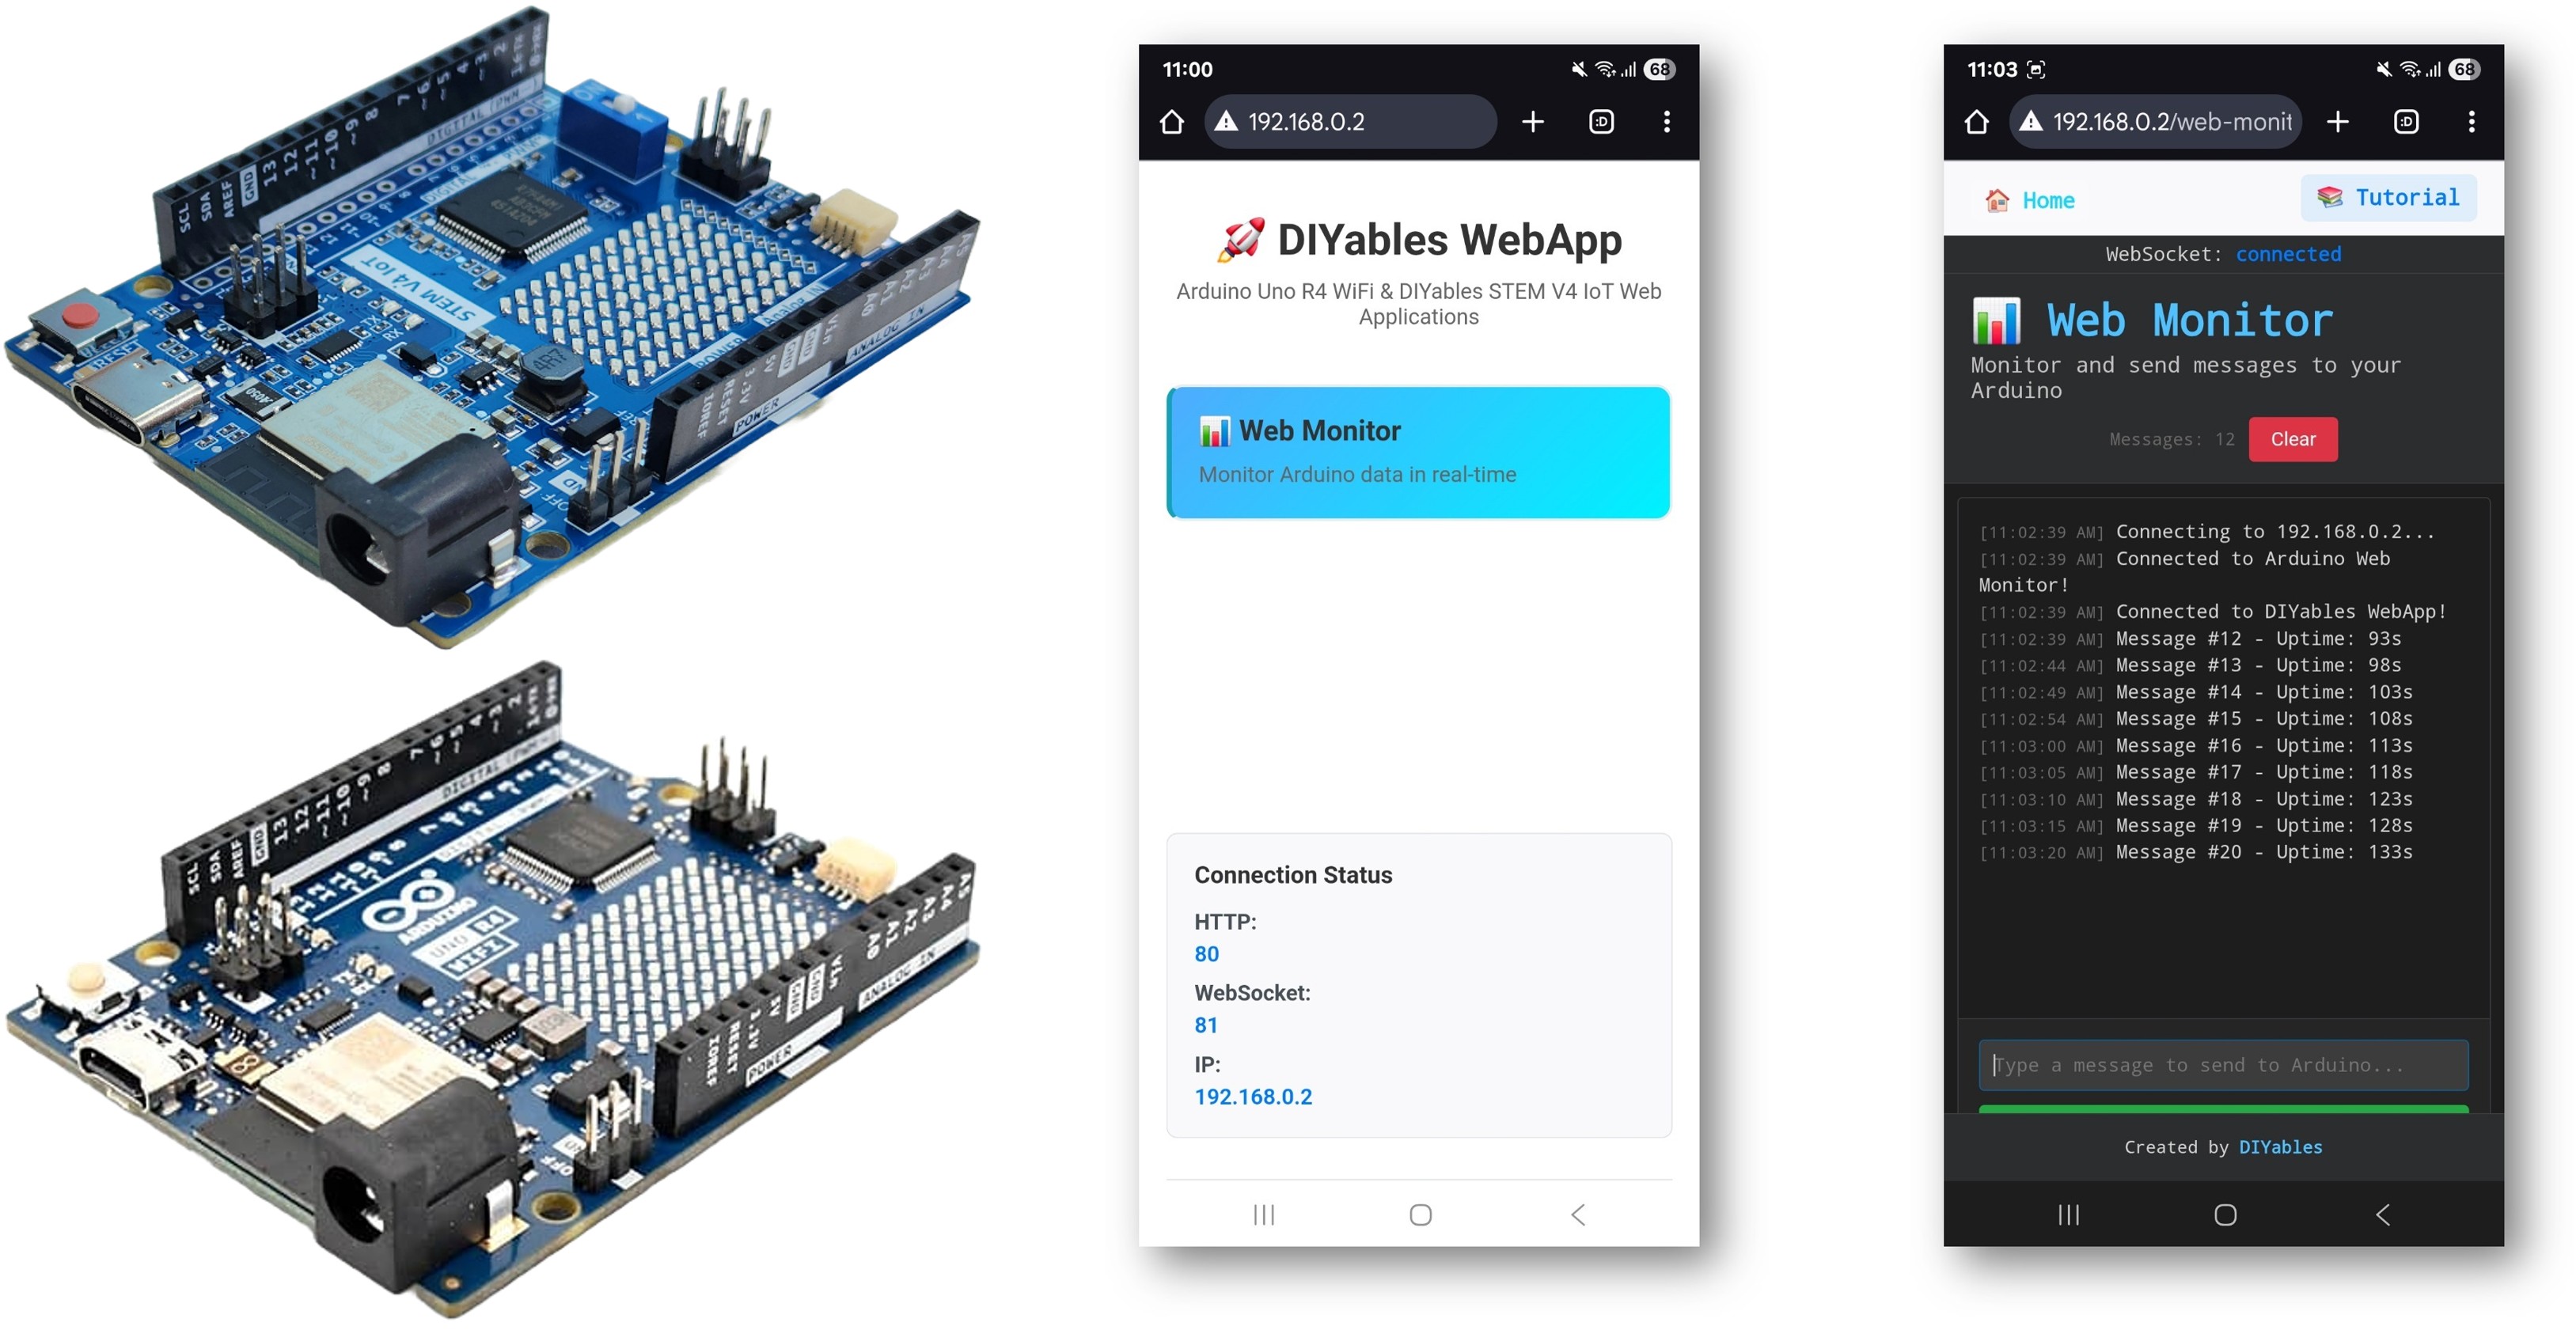
The WebMonitor example replaces the traditional Serial Monitor with a web-based interface that's accessible from any device on your network. Designed for Arduino Uno R4 WiFi and DIYables STEM V4 IoT educational platform with enhanced IoT capabilities, built-in sensor monitoring, and seamless integration with the educational ecosystem.

Arduino WebMonitor Example - Web-based Serial Monitor Tutorial

Features

  • Real-time Serial Output: View Arduino messages instantly in browser
  • Command Input: Send commands from web interface to Arduino
  • Dark Theme: Easy-on-eyes terminal-style interface
  • Auto-scroll: Automatically scrolls to latest messages
  • Timestamp: All messages include timestamps
  • Command History: Navigate previous commands with arrow keys
  • Clear Function: Clear the monitor display
  • Copy/Paste: Full text selection and copying support
  • Platform Extensible: Currently implemented for Arduino Uno R4 WiFi, but can be extended for other hardware platforms. See DIYables_WebApps_ESP32

Hardware Preparation

1×Arduino UNO R4 WiFi
1×Alternatively, DIYables STEM V4 IoT
1×USB Cable Type-A to Type-C (for USB-A PC)
1×USB Cable Type-C to Type-C (for USB-C PC)
1×Recommended: Screw Terminal Block Shield for Arduino UNO R4
1×Recommended: Breadboard Shield for Arduino UNO R4
1×Recommended: Enclosure for Arduino UNO R4
1×Recommended: Power Splitter for Arduino UNO R4
1×Recommended: Prototyping Base Plate & Breadboard Kit for Arduino UNO

Or you can buy the following kits:

1×DIYables STEM V4 IoT Starter Kit (Arduino included)
1×DIYables Sensor Kit (30 sensors/displays)
1×DIYables Sensor Kit (18 sensors/displays)
Disclosure: Some of the links provided in this section are Amazon affiliate links. We may receive a commission for any purchases made through these links at no additional cost to you.
Additionally, some of these links are for products from our own brand, DIYables .

Setup Instructions

Detailed Instructions

Follow these instructions step by step:

  • If this is your first time using the Arduino Uno R4 WiFi/DIYables STEM V4 IoT, refer to the tutorial on setting up the environment for Arduino Uno R4 WiFi/DIYables STEM V4 IoT in the Arduino IDE.
  • Connect the Arduino Uno R4/DIYables STEM V4 IoT board to your computer using a USB cable.
  • Launch the Arduino IDE on your computer.
  • Select the appropriate Arduino Uno R4 board (e.g., Arduino Uno R4 WiFi) and COM port.
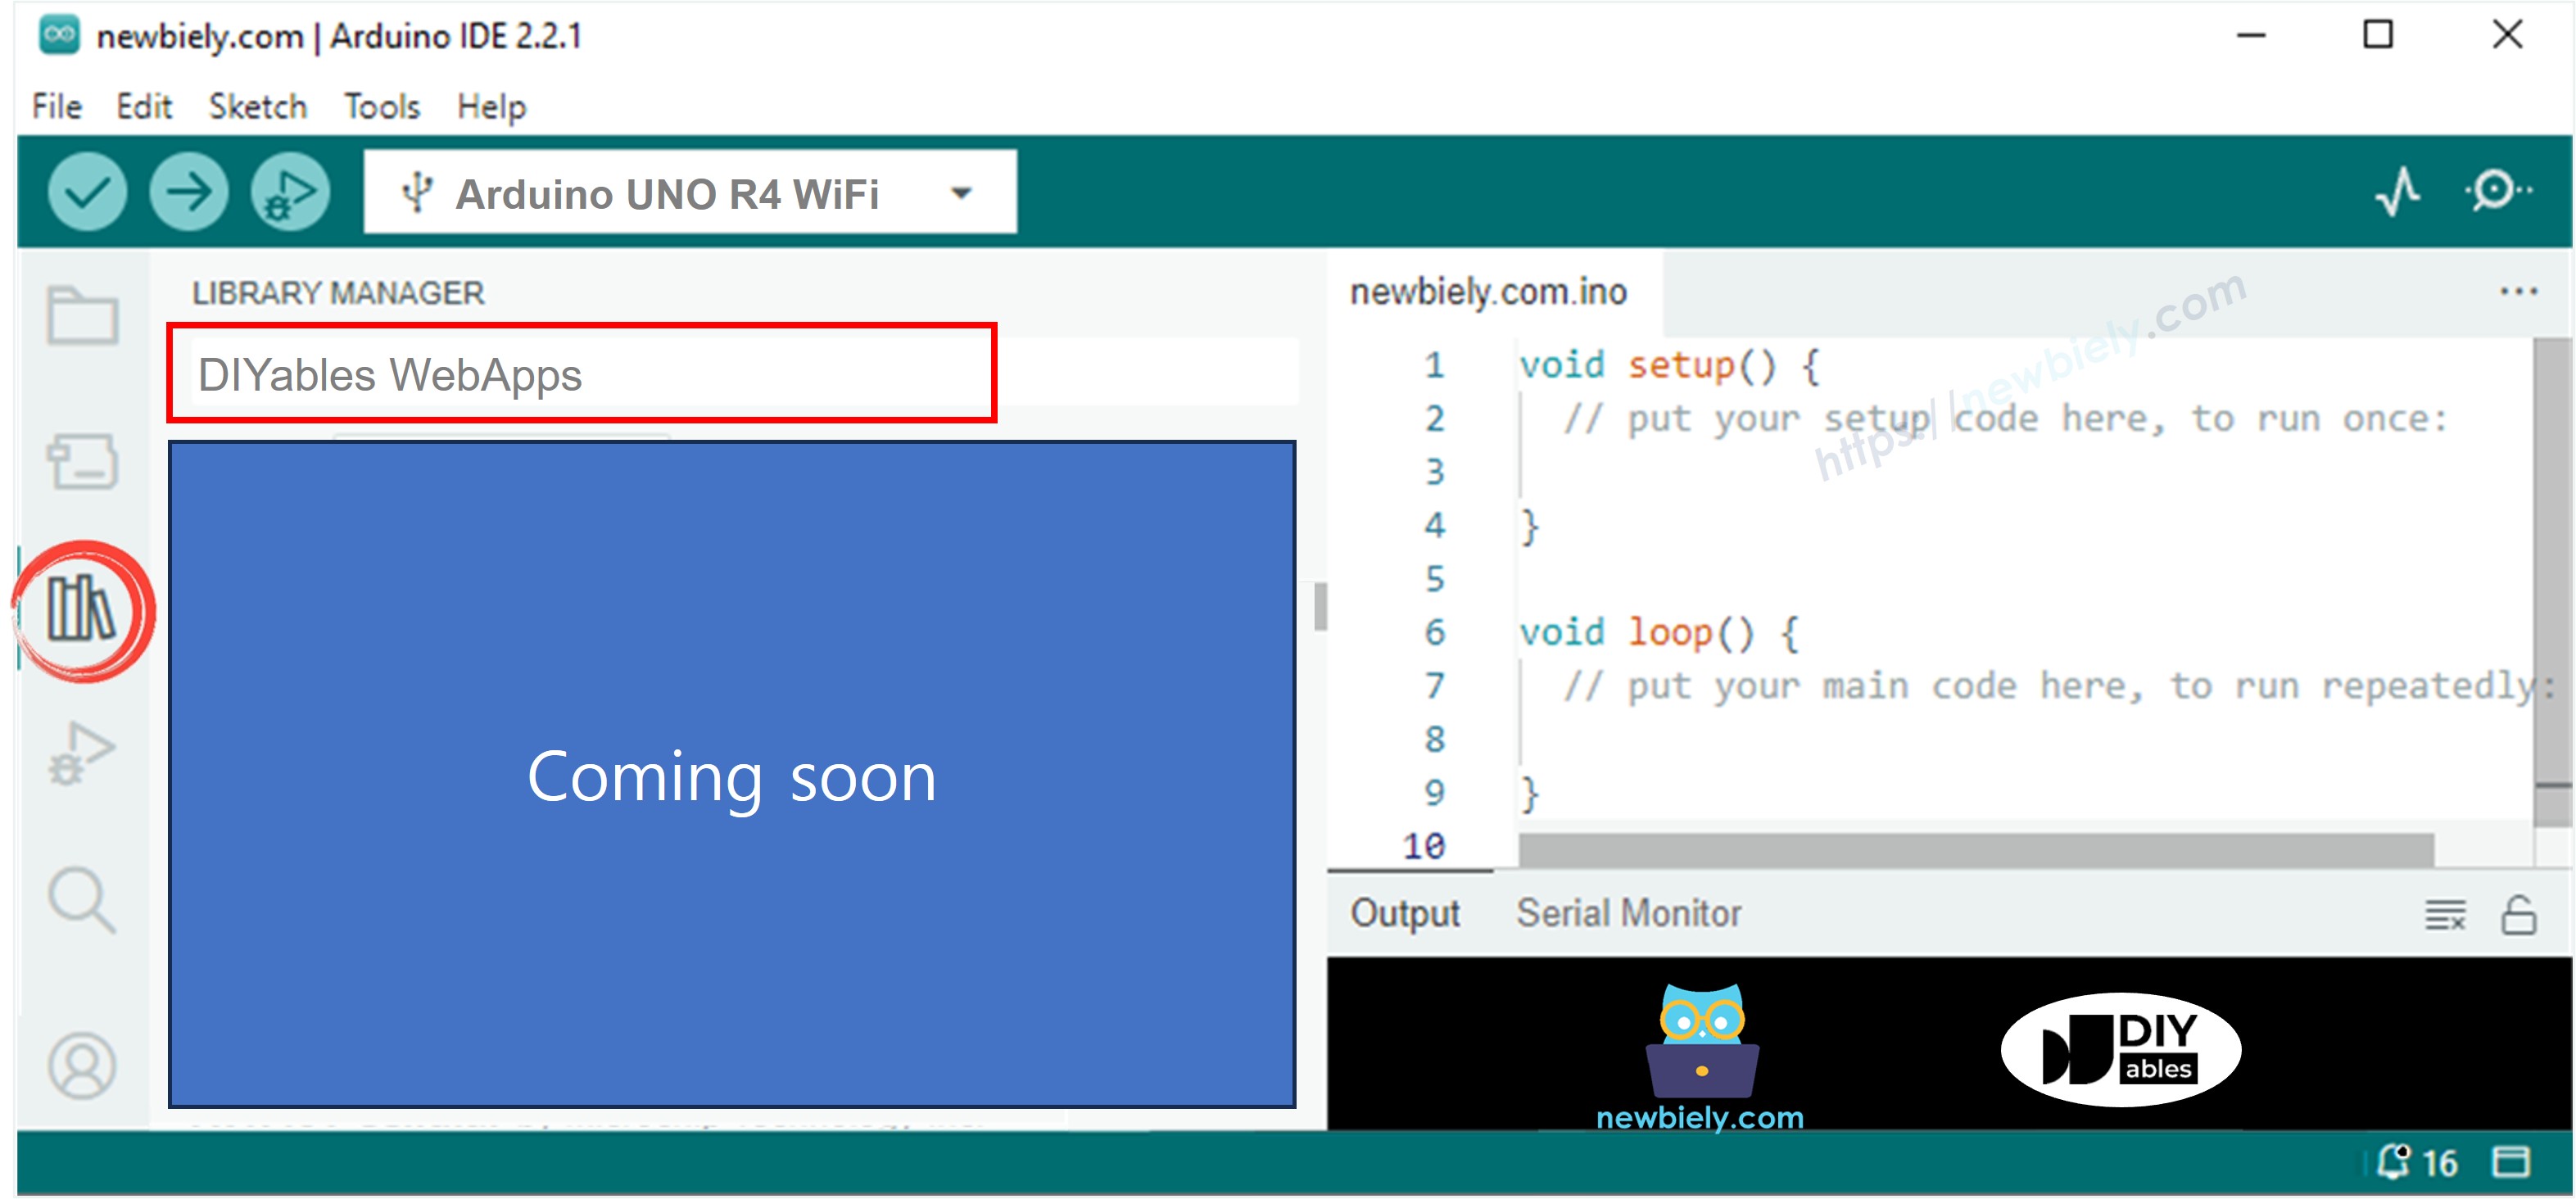
  • Navigate to the Libraries icon on the left bar of the Arduino IDE.
  • Search "DIYables WebApps", then find the DIYables WebApps library by DIYables
  • Click Install button to install the library.
Arduino UNO R4 DIYables WebApps library
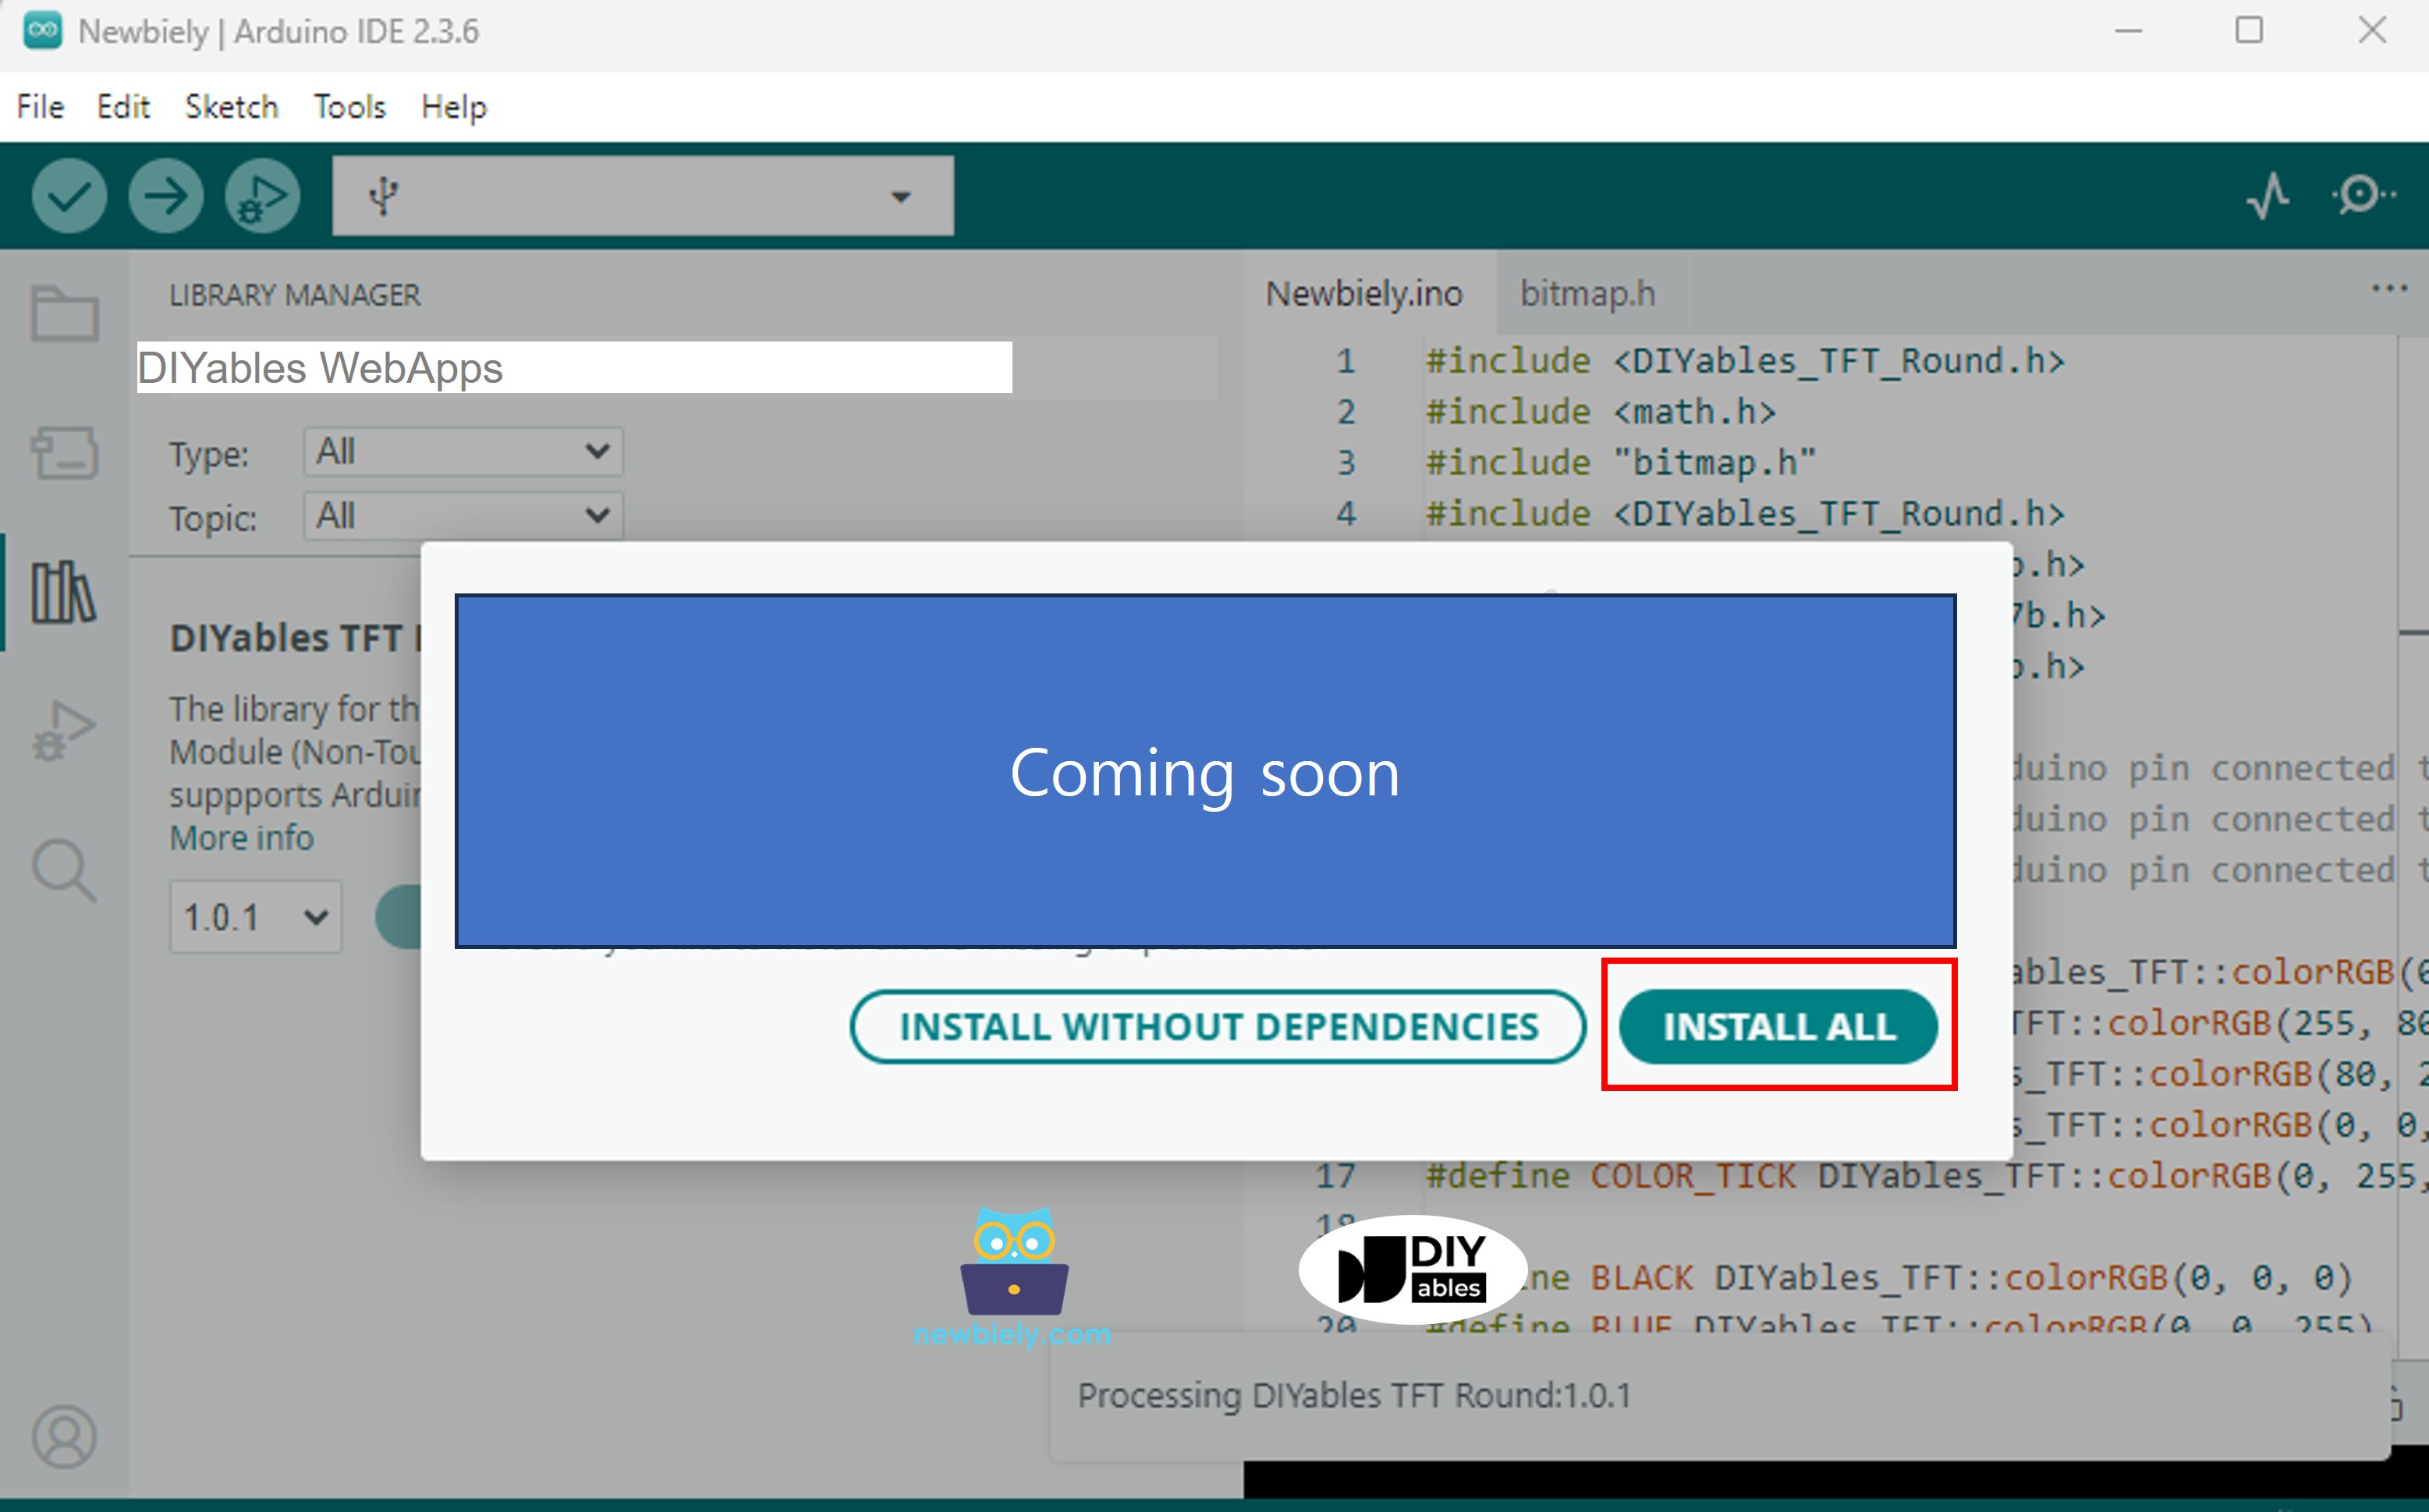
  • You will be asked for installing some other library dependencies
  • Click Install All button to install all library dependencies.
Arduino UNO R4 DIYables WebApps dependency
  • On Arduino IDE, Go to File Examples DIYables WebApps WebMonitor example, or copy the above code and paste it to the editor of Arduino IDE
/* * DIYables WebApp Library - Web Monitor Example * * This example demonstrates the Web Monitor feature: * - Real-time serial monitor in web browser * - Send commands from browser to Arduino * - Automatic message timestamping * * Hardware: Arduino Uno R4 WiFi or DIYables STEM V4 IoT * * Setup: * 1. Update WiFi credentials below * 2. Upload the sketch to your Arduino * 3. Open Serial Monitor to see the IP address * 4. Navigate to http://[IP_ADDRESS]/webmonitor */ #include <DIYablesWebApps.h> // WiFi credentials - UPDATE THESE WITH YOUR NETWORK const char WIFI_SSID[] = "YOUR_WIFI_SSID"; const char WIFI_PASSWORD[] = "YOUR_WIFI_PASSWORD"; // Create WebApp server and page instances UnoR4ServerFactory serverFactory; DIYablesWebAppServer webAppsServer(serverFactory, 80, 81); DIYablesHomePage homePage; DIYablesWebMonitorPage webMonitorPage; // Demo variables unsigned long lastMessage = 0; int messageCount = 0; void setup() { Serial.begin(9600); delay(1000); Serial.println("DIYables WebApp - Web Monitor Example"); // Add home and web monitor pages webAppsServer.addApp(&homePage); webAppsServer.addApp(&webMonitorPage); // Optional: Add 404 page for better user experience webAppsServer.setNotFoundPage(DIYablesNotFoundPage()); // Initialize LED for status indication pinMode(LED_BUILTIN, OUTPUT); // Start the WebApp server if (!webAppsServer.begin(WIFI_SSID, WIFI_PASSWORD)) { while (1) { Serial.println("Failed to start WebApp server!"); delay(1000); } } // Set up monitor callback for incoming commands webMonitorPage.onWebMonitorMessage([](const String& message) { Serial.println("Command from web: " + message); // Process simple commands if (message == "LED_ON") { digitalWrite(LED_BUILTIN, HIGH); webMonitorPage.sendToWebMonitor("LED turned ON"); return; } if (message == "LED_OFF") { digitalWrite(LED_BUILTIN, LOW); webMonitorPage.sendToWebMonitor("LED turned OFF"); return; } if (message == "STATUS") { String status = "Arduino Status: LED=" + String(digitalRead(LED_BUILTIN) ? "ON" : "OFF"); webMonitorPage.sendToWebMonitor(status); return; } if (message == "HELP") { webMonitorPage.sendToWebMonitor("Available commands: LED_ON, LED_OFF, STATUS, HELP"); return; } webMonitorPage.sendToWebMonitor("Unknown command: " + message); }); // Send welcome message webMonitorPage.sendToWebMonitor("Arduino Web Monitor ready!"); webMonitorPage.sendToWebMonitor("Type HELP for available commands"); } void loop() { // Handle WebApp server communications webAppsServer.loop(); // Send periodic updates to web monitor if (millis() - lastMessage > 5000) { // Every 5 seconds messageCount++; // Send sensor readings or status updates String message = "Message #" + String(messageCount) + " - Uptime: " + String(millis() / 1000) + "s"; webMonitorPage.sendToWebMonitor(message); lastMessage = millis(); } // Add your main application code here delay(10); }
  • Configure WiFi credentials in the code by updating these lines:
const char WIFI_SSID[] = "YOUR_WIFI_NETWORK"; const char WIFI_PASSWORD[] = "YOUR_WIFI_PASSWORD";
  • Click Upload button on Arduino IDE to upload code to Arduino UNO R4/DIYables STEM V4 IoT
  • Open the Serial Monitor
  • Check out the result on Serial Monitor. It looks like the below
COM6
Send
DIYables WebApp - Web Monitor Example INFO: Added app / INFO: Added app /web-monitor DIYables WebApp Library Platform: Arduino Uno R4 WiFi Network connected! IP address: 192.168.0.2 HTTP server started on port 80 Configuring WebSocket server callbacks... WebSocket server started on port 81 WebSocket URL: ws://192.168.0.2:81 WebSocket server started on port 81 ========================================== DIYables WebApp Ready! ========================================== 📱 Web Interface: http://192.168.0.2 🔗 WebSocket: ws://192.168.0.2:81 📋 Available Applications: 🏠 Home Page: http://192.168.0.2/ 📊 Web Monitor: http://192.168.0.2/web-monitor ==========================================
Autoscroll Show timestamp
Clear output
9600 baud  
Newline  
  • If you do not see anything, reboot Arduino board.
  • Take note of the IP address displayed, and enter this address into the address bar of a web browser on your smartphone or PC.
  • Example: http://192.168.0.2
  • You will see the home page like below image:
Arduino UNO R4 DIYables WebApp Home page with Web Monitor app
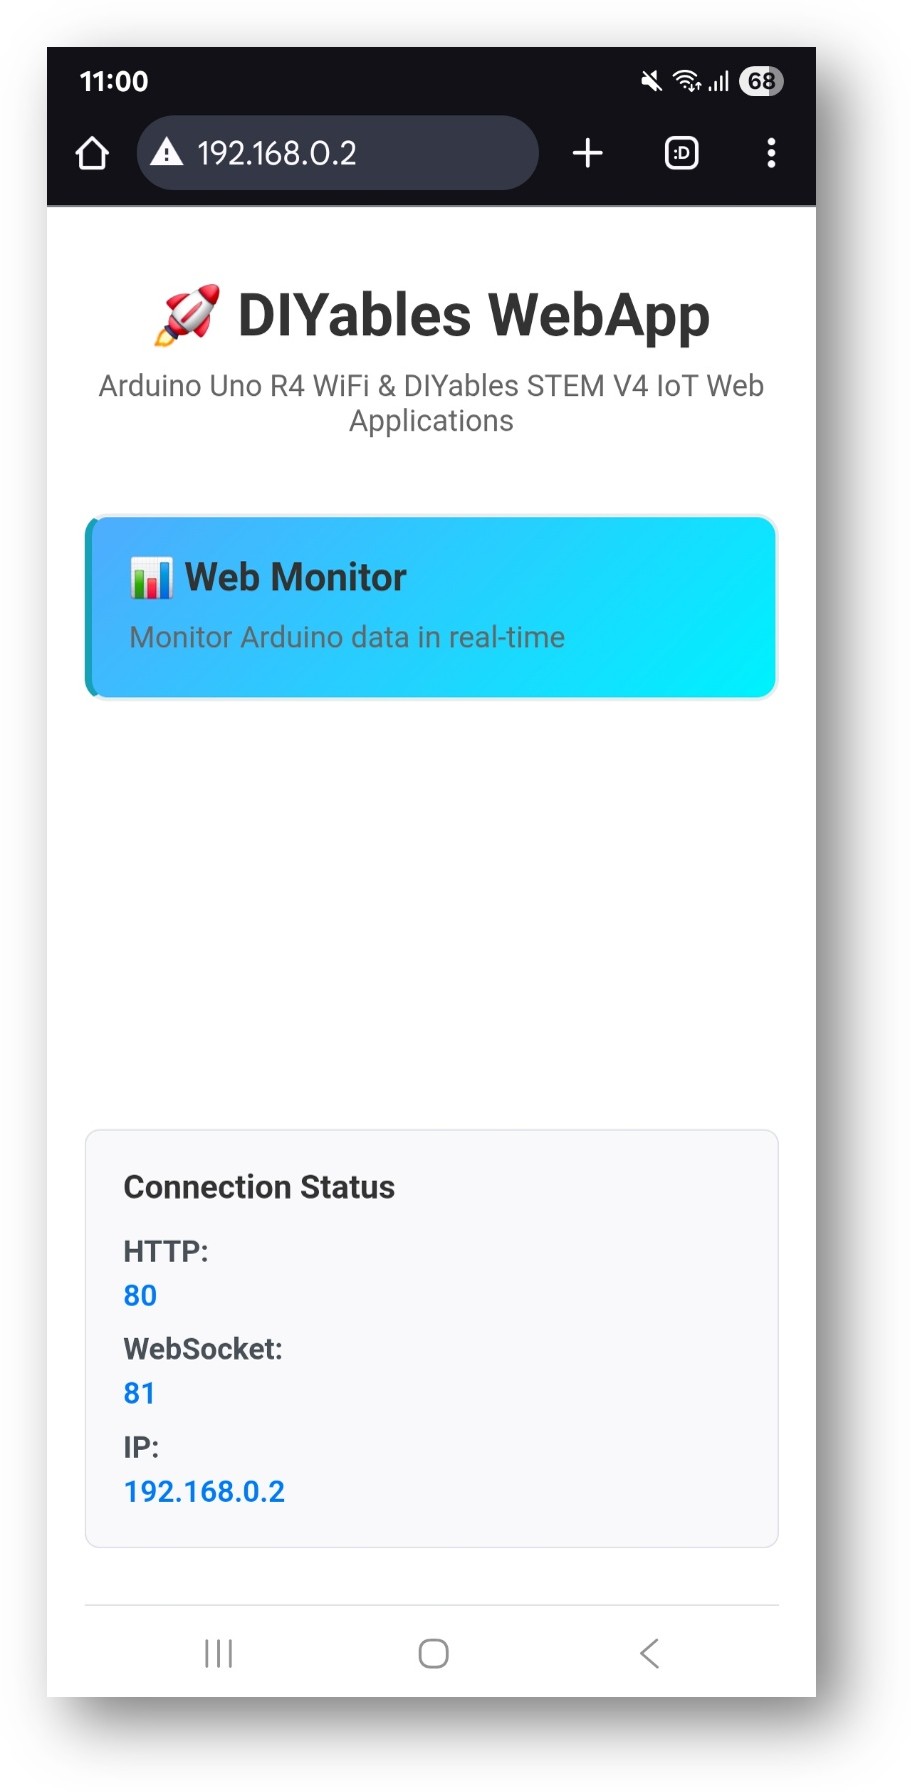
  • Click to the Web Monitor link, you will see the Web Monitor app's UI like the below:
Arduino UNO R4 DIYables WebApp Web Monitor app
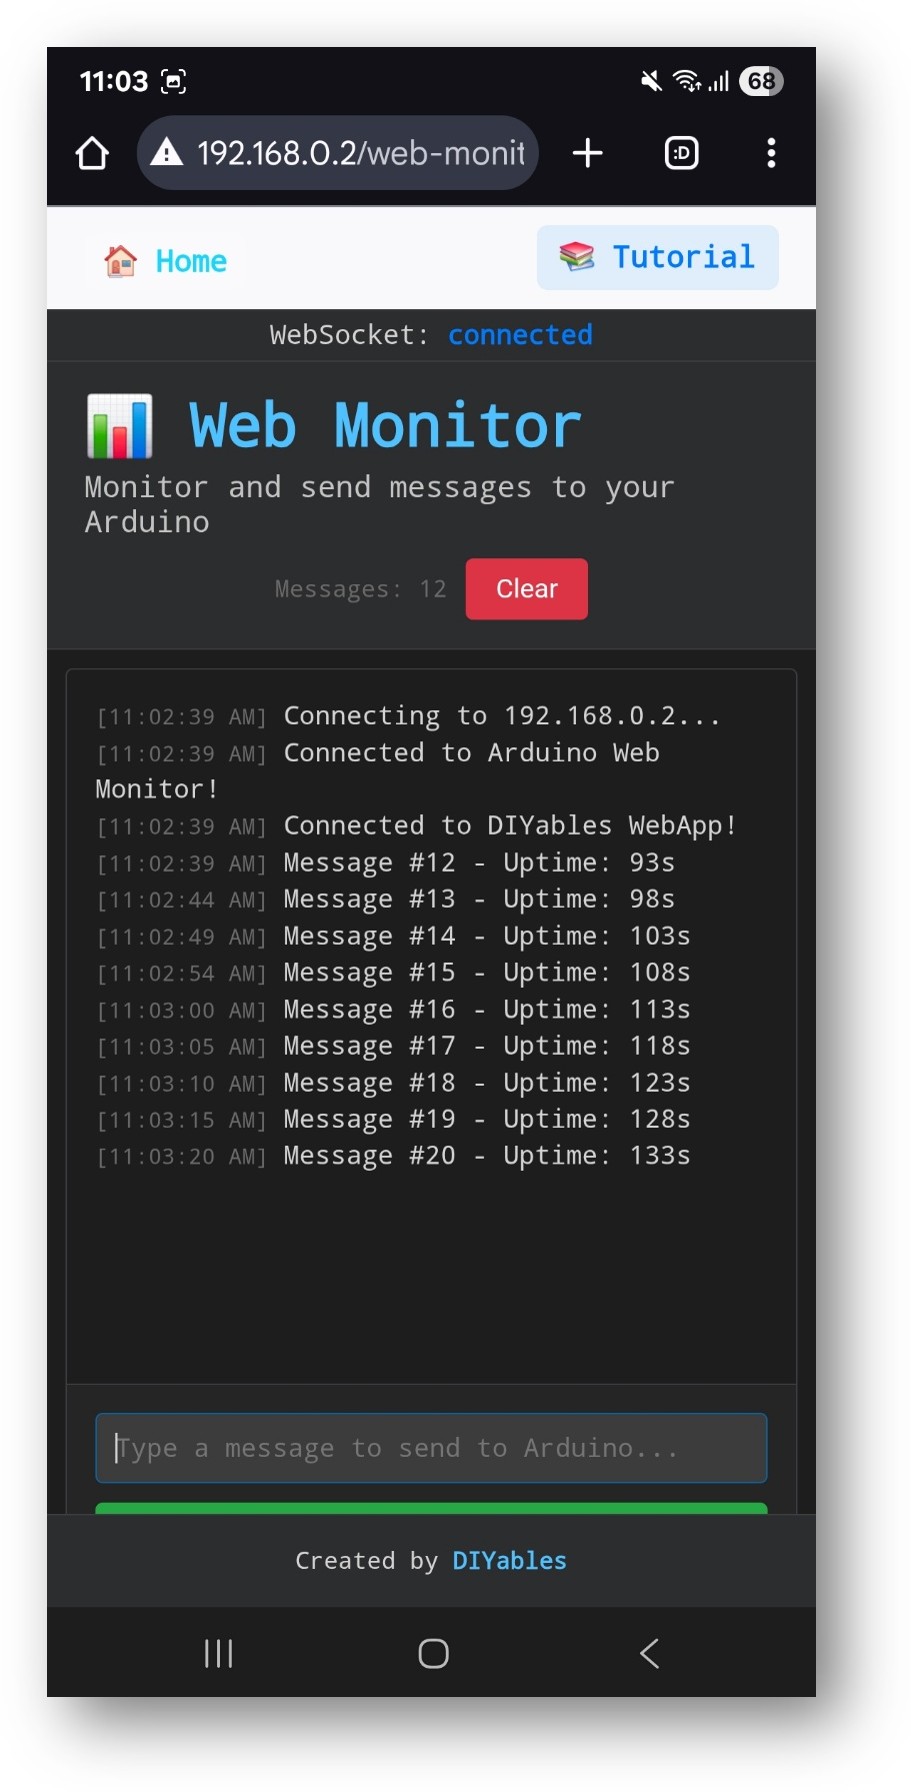
  • Or you can also access the page directly by IP address followed by /web-monitor. For example: http://192.168.0.2/web-monitor
  • Try sending commands to your Arduino through the web monitor interface and view real-time serial output from your Arduino.

How to Use

Viewing Serial Output

  1. Open the web monitor interface
  2. Arduino automatically sends status messages every 5 seconds
  3. All Serial.println() output appears in the monitor
  4. Messages are timestamped automatically

Sending Commands

  1. Type commands in the input field at the bottom
  2. Press Enter or click Send button
  3. Arduino processes the command and responds

Built-in Commands

The example includes these demonstration commands:

LED Control
  • "led on" → Turns on built-in LED
  • "led off" → Turns off built-in LED
  • "led toggle" → Toggles LED state
  • "blink" → Blinks LED 3 times
System Commands
  • "status" → Shows Arduino status and uptime
  • "help" → Lists available commands
  • "reset counter" → Resets message counter
  • "memory" → Shows free memory information
Debug Commands
  • "test" → Sends test message
  • "echo [message]" → Echoes back your message
  • "repeat [n] [message]" → Repeats message n times

Interface Features

Keyboard Shortcuts
  • Enter → Send command
  • ↑/↓ Arrow Keys → Navigate command history
  • Ctrl+L → Clear monitor (if implemented)
  • Ctrl+A → Select all text
Monitor Controls
  • Auto-scroll → Automatically scrolls to new messages
  • Clear → Clears the monitor display
  • Copy → Copy selected text to clipboard

Creative Customization - Build Your Advanced Debugging Tool

Expand this web monitor example to create a powerful debugging and control interface for your projects! Add custom commands, sensor monitoring, and real-time data visualization to suit your creative needs.

Code Structure

Main Components

  1. WebApp Server: Handles HTTP and WebSocket connections
  2. Monitor Page: Provides terminal-style web interface
  3. Message Handler: Processes incoming commands
  4. Serial Bridge: Forwards Serial output to web interface

Key Functions

// Handle commands from web interface void handleWebCommand(String command, String clientId) { // Process command and execute actions } // Send message to web monitor void sendToWebMonitor(String message) { // Forward message via WebSocket }

Adding Custom Commands

To add new commands, modify the handleWebCommand function:

if (command.startsWith("your_command")) { // Extract parameters String param = command.substring(12); // After "your_command" // Execute your action digitalWrite(LED_BUILTIN, HIGH); // Send response sendToWebMonitor("Command executed: " + param); }

Practical Applications

Development and Debugging

void loop() { // Debug sensor readings int sensorValue = analogRead(A0); sendToWebMonitor("Sensor A0: " + String(sensorValue)); // Debug variables sendToWebMonitor("Loop count: " + String(loopCount++)); delay(1000); }

Remote System Monitoring

void checkSystemHealth() { // Monitor memory int freeMemory = getFreeMemory(); sendToWebMonitor("Free memory: " + String(freeMemory) + " bytes"); // Monitor sensors float temperature = getTemperature(); sendToWebMonitor("Temperature: " + String(temperature) + "°C"); // Monitor connectivity if (WiFi.status() == WL_CONNECTED) { sendToWebMonitor("WiFi: Connected (RSSI: " + String(WiFi.RSSI()) + ")"); } else { sendToWebMonitor("WiFi: Disconnected"); } }

Configuration Management

// Handle configuration commands if (command.startsWith("config ")) { String setting = command.substring(7); if (setting.startsWith("interval ")) { int interval = setting.substring(9).toInt(); updateInterval = interval * 1000; // Convert to milliseconds sendToWebMonitor("Update interval set to " + String(interval) + " seconds"); } if (setting == "save") { saveConfigToEEPROM(); sendToWebMonitor("Configuration saved to EEPROM"); } }

Advanced Features

Message Filtering

Add message types and filtering:

enum MessageType { INFO, WARNING, ERROR, DEBUG }; void sendToWebMonitor(String message, MessageType type = INFO) { String prefix; switch(type) { case WARNING: prefix = "[WARN] "; break; case ERROR: prefix = "[ERROR] "; break; case DEBUG: prefix = "[DEBUG] "; break; default: prefix = "[INFO] "; } webMonitorPage.sendMessage(prefix + message); }

Command Parsing

Implement sophisticated command parsing:

struct Command { String name; String parameters[5]; int paramCount; }; Command parseCommand(String input) { Command cmd; int spaceIndex = input.indexOf(' '); if (spaceIndex > 0) { cmd.name = input.substring(0, spaceIndex); // Parse parameters... } else { cmd.name = input; cmd.paramCount = 0; } return cmd; }

Data Logging

Log monitor data to SD card or EEPROM:

#include <SD.h> void logMessage(String message) { File logFile = SD.open("monitor.log", FILE_WRITE); if (logFile) { logFile.print(millis()); logFile.print(": "); logFile.println(message); logFile.close(); } }

Troubleshooting

Common Issues

1. No output in web monitor

  • Check Serial.begin() is called in setup()
  • Verify WebSocket connection (green status indicator)
  • Check browser console for errors

2. Commands not working

  • Ensure commands are exactly as specified
  • Check command case sensitivity
  • Look for response messages in monitor

3. Interface loading slowly

  • Check WiFi signal strength
  • Reduce message frequency
  • Clear browser cache

4. WebSocket disconnections

  • Check network stability
  • Reduce message size
  • Implement reconnection logic

Debug Tips

Enable detailed debugging:

#define DEBUG_WEBMONITOR 1 #if DEBUG_WEBMONITOR #define DEBUG_PRINT(x) Serial.print(x) #define DEBUG_PRINTLN(x) Serial.println(x) #else #define DEBUG_PRINT(x) #define DEBUG_PRINTLN(x) #endif

Monitor WebSocket status:

void checkWebSocketStatus() { if (server.getClientCount() > 0) { sendToWebMonitor("WebSocket clients connected: " + String(server.getClientCount())); } }

Security Considerations

Command Validation

Always validate incoming commands:

bool isValidCommand(String command) { // Check command length if (command.length() > 100) return false; // Check for dangerous characters if (command.indexOf("\\") >= 0 || command.indexOf("/") >= 0) return false; // Check against whitelist String allowedCommands[] = {"led", "status", "help", "test"}; String cmdName = command.substring(0, command.indexOf(' ')); for (String allowed : allowedCommands) { if (cmdName.equals(allowed)) return true; } return false; }

Access Control

Implement basic authentication:

bool isAuthorized(String clientId) { // Check client authorization return authorizedClients.indexOf(clientId) >= 0; }

Integration Examples

Sensor Monitoring System

void monitorSensors() { static unsigned long lastSensorRead = 0; if (millis() - lastSensorRead > 5000) { // Read multiple sensors int light = analogRead(A0); int temp = analogRead(A1); int humidity = analogRead(A2); // Send formatted data String data = "Sensors - Light: " + String(light) + ", Temp: " + String(temp) + ", Humidity: " + String(humidity); sendToWebMonitor(data); lastSensorRead = millis(); } }

Home Automation Monitor

void monitorHome() { // Door sensors if (digitalRead(DOOR_SENSOR) == HIGH) { sendToWebMonitor("ALERT: Front door opened"); } // Motion detection if (digitalRead(PIR_SENSOR) == HIGH) { sendToWebMonitor("Motion detected in living room"); } // Environmental monitoring float temp = dht.readTemperature(); if (temp > 25.0) { sendToWebMonitor("WARNING: Temperature high (" + String(temp) + "°C)"); } }

Next Steps

After mastering the WebMonitor example, try:

  1. Chat - For interactive communication
  2. DigitalPins - For controlling outputs
  3. Slider - For analog value control
  4. MultipleWebApps - Combining monitoring with control

Support

For additional help:

  • Check the API Reference documentation
  • Visit DIYables tutorials: https://newbiely.com/tutorials/arduino-uno-r4/arduino-uno-r4-diyables-webapps
  • Arduino community forums

※ OUR MESSAGES

  • As freelancers, We are AVAILABLE for HIRE. See how to outsource your project to us
  • Please feel free to share the link of this tutorial. However, Please do not use our content on any other websites. We invested a lot of effort and time to create the content, please respect our work!