DIYables Web Apps Web Table

DIYables WebApps Library - WebTable Example

Overview

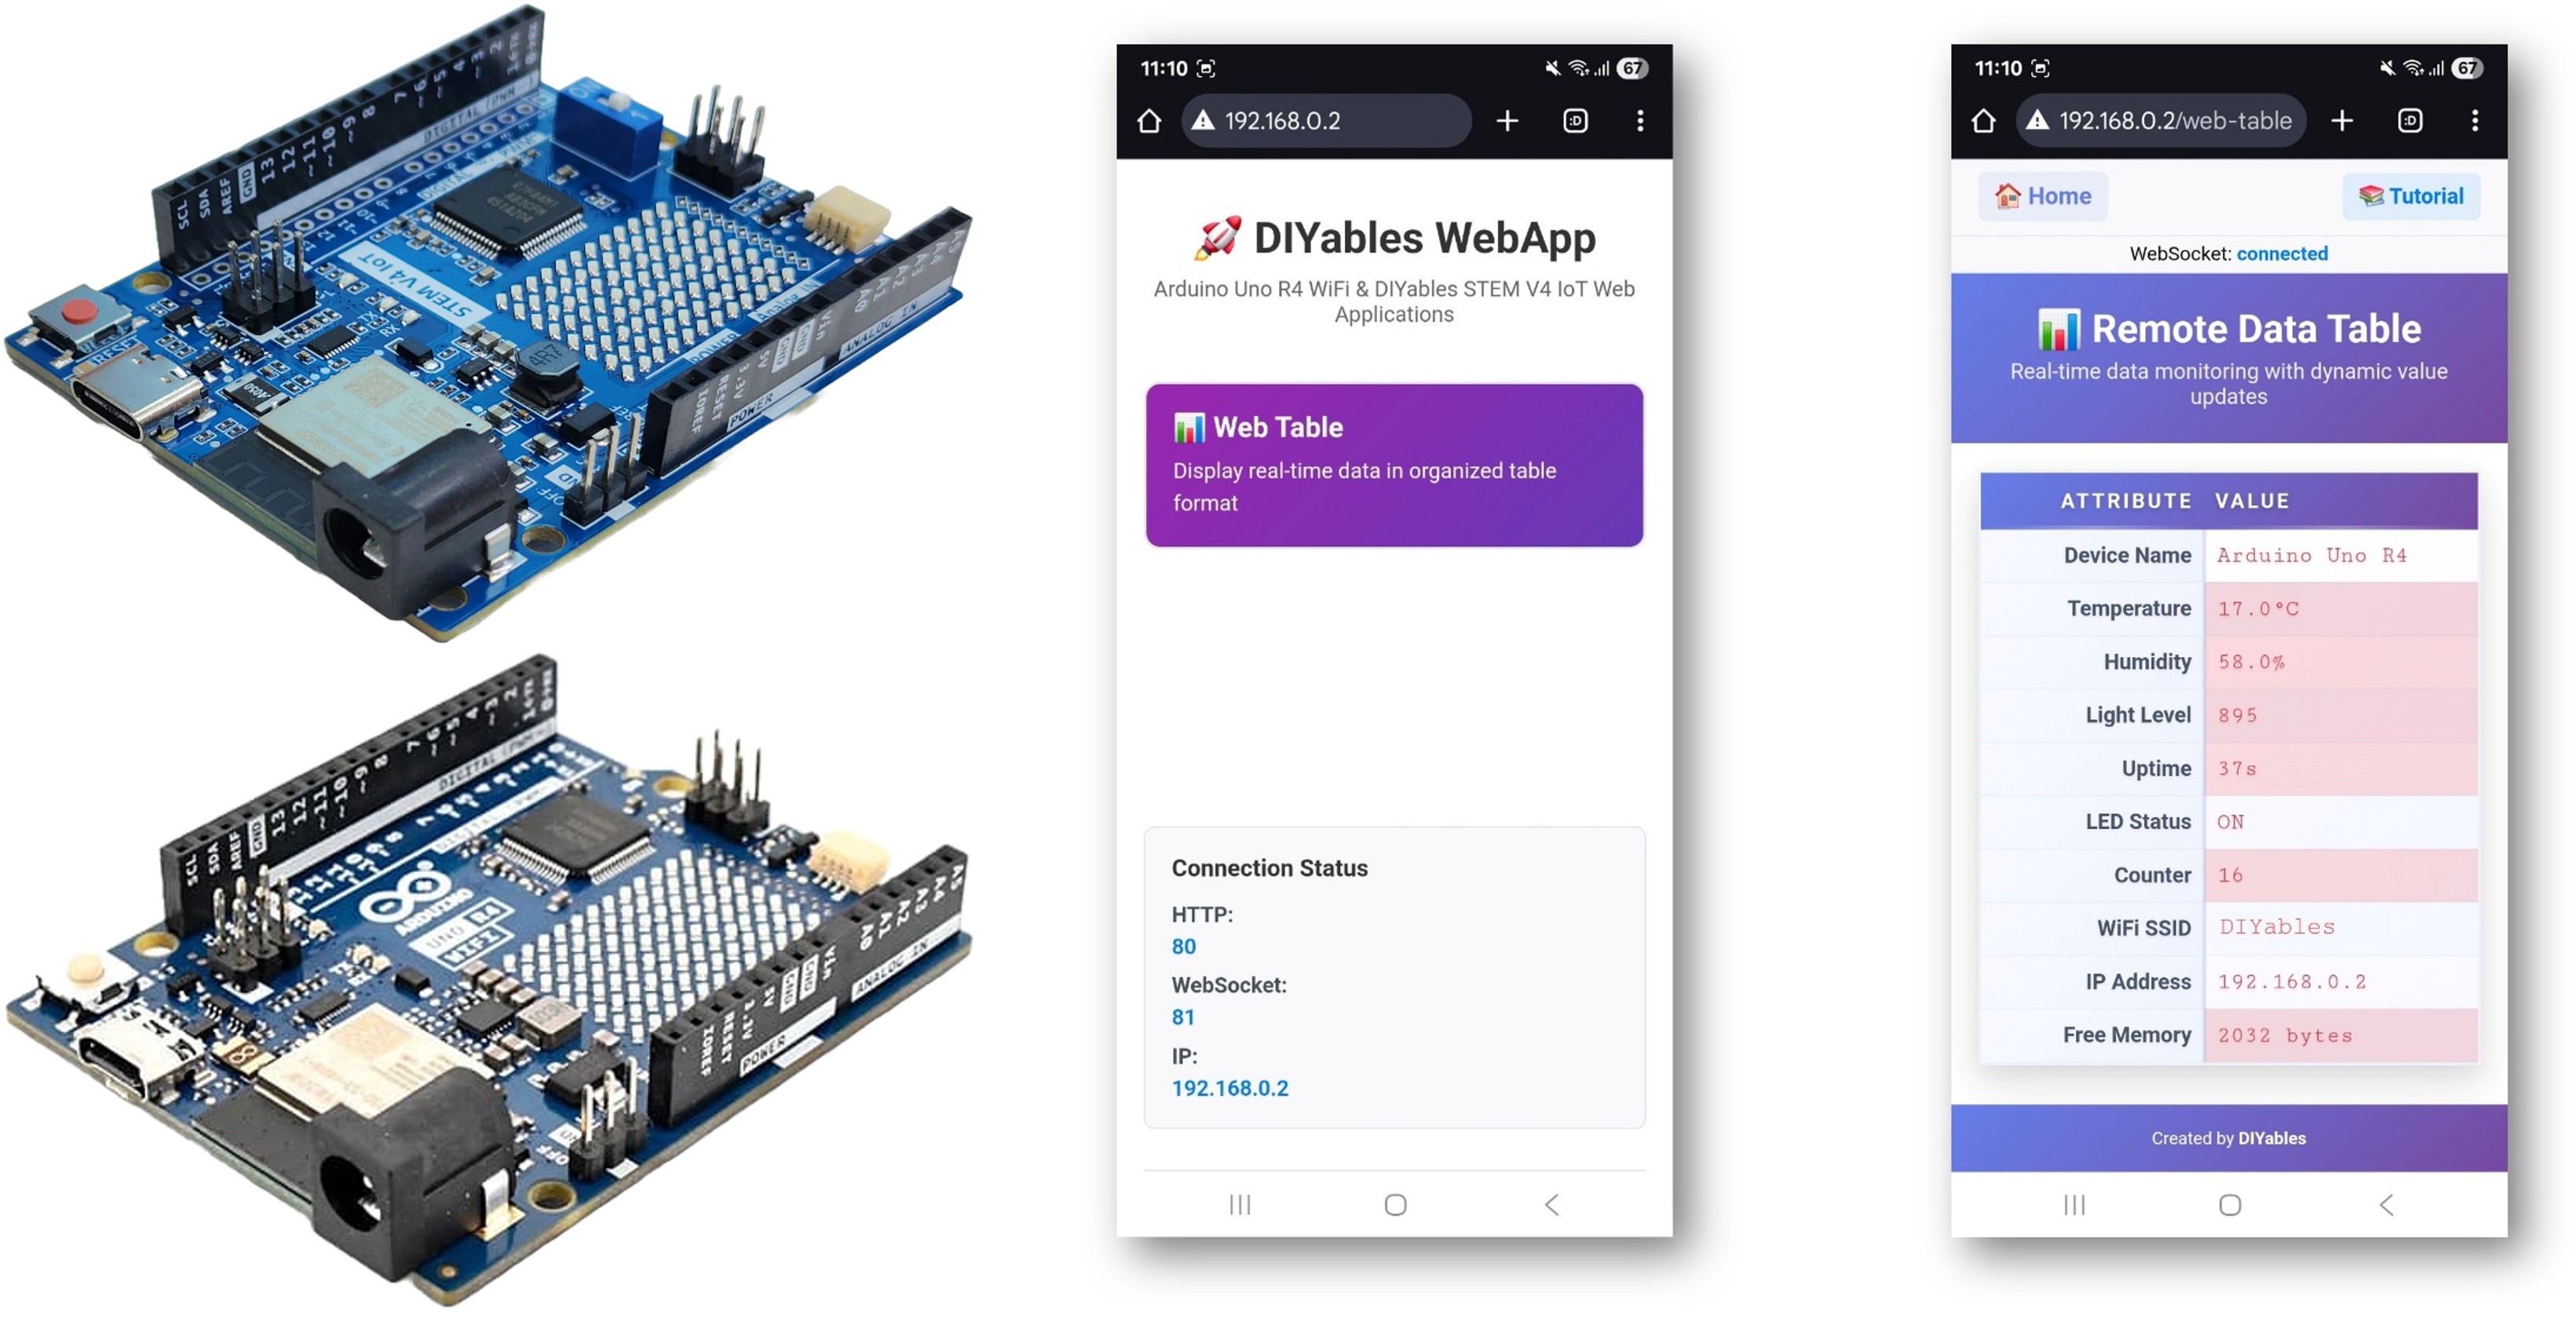
The WebTable example provides a web-based two-column data table interface for displaying real-time information from your Arduino projects. Designed for Arduino Uno R4 WiFi and DIYables STEM V4 IoT educational platform with advanced data visualization capabilities, intelligent value change highlighting, and seamless integration with the educational ecosystem.

Arduino WebTable Example - Real-time Data Display Tutorial

Key Features

Core Functionality

  • Two-Column Data Table: Clean attribute-value pairs for organized data display
  • Real-time Value Updates: WebSocket-based instant data refresh without page reload
  • Memory Efficient Design: No value storage in Arduino memory - all tracking in web interface
  • Dynamic Configuration: Set up table structure once in Arduino setup() function
  • Interactive Controls: Refresh button for manual data requests and auto-reconnect capability

Intelligent Highlighting System

  • Smart Change Detection: Automatically detects which values actually change over time
  • Automatic Value Tracking: Compares current vs previous values automatically
  • Dual-Level Highlighting:
    • Red highlighting: For values that are actively changing
    • Blue highlighting: For values that remain stable over time
  • No Setup Required: System automatically learns which values change without any configuration
  • Visual Feedback: Smooth animations provide clear visual feedback for value updates

Modern Web Interface

  • Responsive Design: Works seamlessly on desktop, tablet, and mobile devices
  • Professional Styling: Card-style layout with hover effects and modern aesthetics
  • Connection Status: Visual indicators for WebSocket connection state
  • Footer Integration: Consistent styling matching other DIYables web apps
  • Empty State Handling: User-friendly messages when no data is available
  • Platform Extensible: Currently implemented for Arduino Uno R4 WiFi, but can be extended for other hardware platforms. See DIYables_WebApps_ESP32

Hardware Preparation

1×Arduino UNO R4 WiFi
1×Alternatively, DIYables STEM V4 IoT
1×USB Cable Type-A to Type-C (for USB-A PC)
1×USB Cable Type-C to Type-C (for USB-C PC)
1×Recommended: Screw Terminal Block Shield for Arduino UNO R4
1×Recommended: Breadboard Shield for Arduino UNO R4
1×Recommended: Enclosure for Arduino UNO R4
1×Recommended: Power Splitter for Arduino UNO R4
1×Recommended: Prototyping Base Plate & Breadboard Kit for Arduino UNO

Or you can buy the following kits:

1×DIYables STEM V4 IoT Starter Kit (Arduino included)
1×DIYables Sensor Kit (30 sensors/displays)
1×DIYables Sensor Kit (18 sensors/displays)
Disclosure: Some of the links provided in this section are Amazon affiliate links. We may receive a commission for any purchases made through these links at no additional cost to you.
Additionally, some of these links are for products from our own brand, DIYables .

Setup Instructions

Detailed Instructions

Follow these instructions step by step:

  • If this is your first time using the Arduino Uno R4 WiFi/DIYables STEM V4 IoT, refer to the tutorial on setting up the environment for Arduino Uno R4 WiFi/DIYables STEM V4 IoT in the Arduino IDE.
  • Connect the Arduino Uno R4/DIYables STEM V4 IoT board to your computer using a USB cable.
  • Launch the Arduino IDE on your computer.
  • Select the appropriate Arduino Uno R4 board (e.g., Arduino Uno R4 WiFi) and COM port.
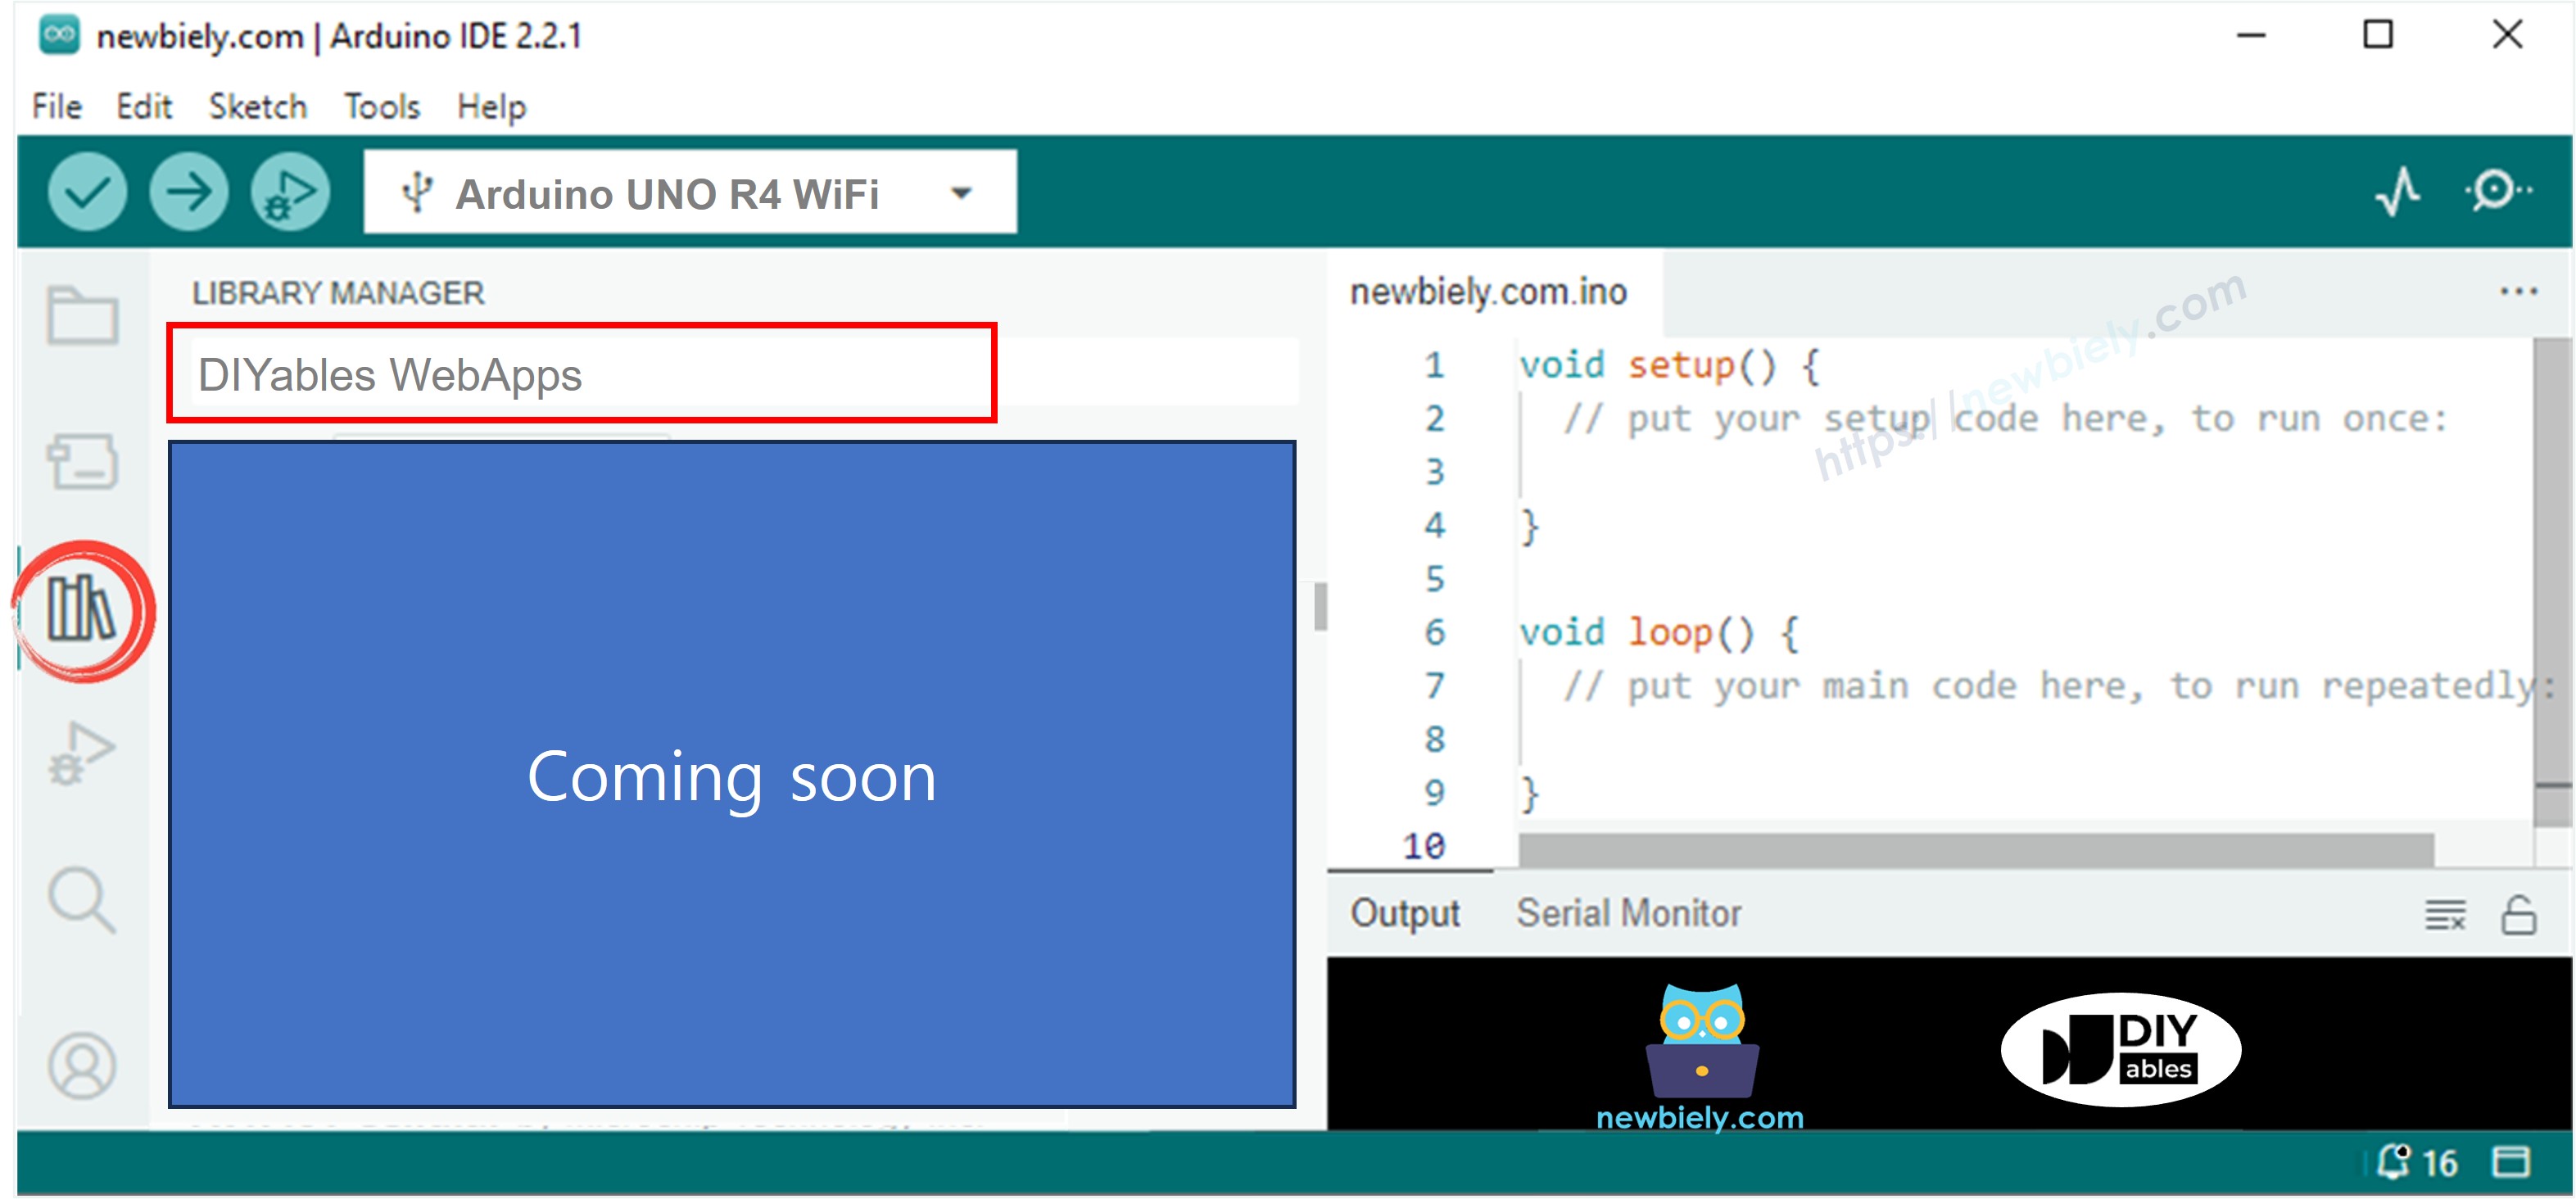
  • Navigate to the Libraries icon on the left bar of the Arduino IDE.
  • Search "DIYables WebApps", then find the DIYables WebApps library by DIYables
  • Click Install button to install the library.
Arduino UNO R4 DIYables WebApps library
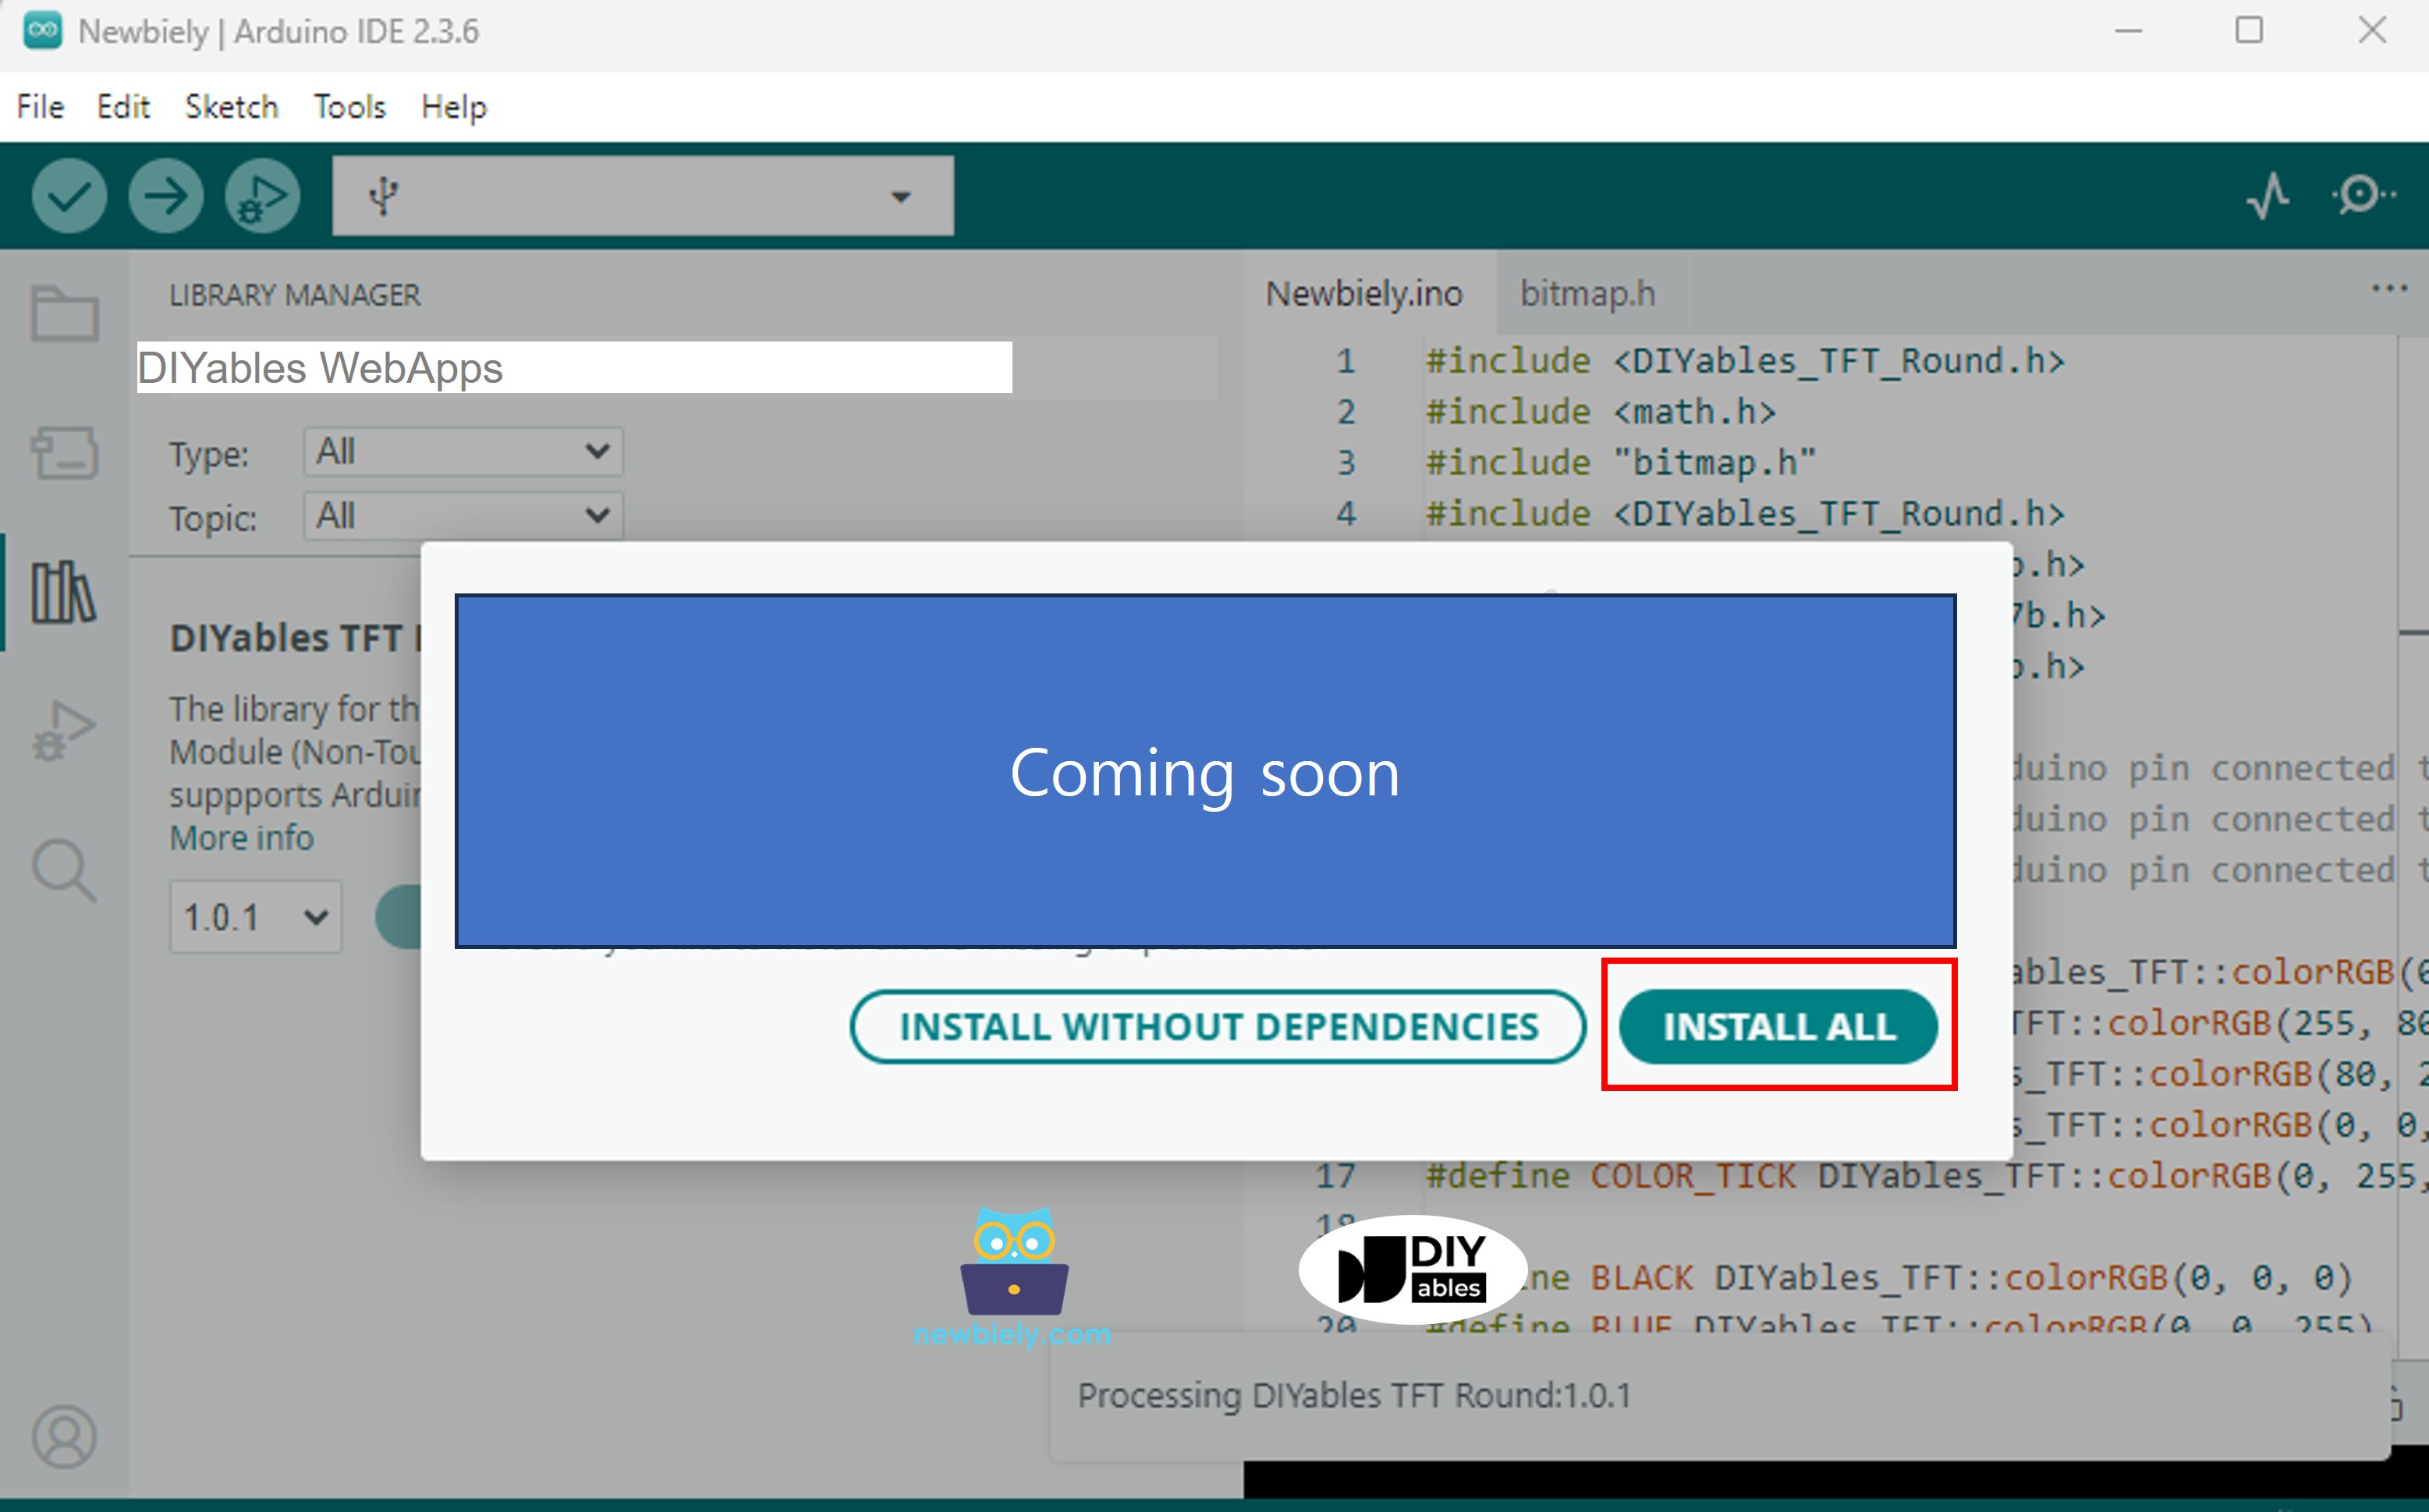
  • You will be asked for installing some other library dependencies
  • Click Install All button to install all library dependencies.
Arduino UNO R4 DIYables WebApps dependency
  • On Arduino IDE, Go to File Examples DIYables WebApps WebTable example, or copy the code and paste it to the editor of Arduino IDE
/* * DIYables WebApps Library - WebTable Example * * This example demonstrates how to create a web-based table interface * that displays real-time data in a two-column format (attribute-value pairs). * * Features: * - Two-column table with attributes and real-time values * - WebSocket-based real-time updates * - Configurable table rows in setup() * - Dynamic value updates during runtime * - Modern responsive web interface * * Hardware: Arduino Uno R4 WiFi or DIYables STEM V4 IoT * * Instructions: * 1. Update WiFi credentials below * 2. Upload the code to your Arduino * 3. Open Serial Monitor to get the IP address * 4. Open web browser and go to: * - Home page: http://[ARDUINO_IP]/ * - WebTable: http://[ARDUINO_IP]/web-table * 5. Watch real-time data updates in the table * * Created by DIYables * Visit: https://diyables.com for more tutorials and projects */ #include <DIYablesWebApps.h> // WiFi credentials - Update these with your network details const char WIFI_SSID[] = "YOUR_WIFI_SSID"; const char WIFI_PASSWORD[] = "YOUR_WIFI_PASSWORD"; // Initialize web server and pages UnoR4ServerFactory serverFactory; DIYablesWebAppServer server(serverFactory, 80, 81); DIYablesHomePage homePage; DIYablesWebTablePage tablePage; // Variables to simulate sensor data float temperature = 20.5; float humidity = 65.0; int lightLevel = 512; unsigned long uptime = 0; bool ledState = false; int counter = 0; void setup() { Serial.begin(9600); Serial.println("DIYables WebApp - Web Table Example"); // Initialize built-in LED pinMode(LED_BUILTIN, OUTPUT); // Add web apps server.addApp(&homePage); server.addApp(&tablePage); // Optional: Add 404 page for better user experience server.setNotFoundPage(DIYablesNotFoundPage()); // Start the WebApp server server.begin(WIFI_SSID, WIFI_PASSWORD); // Set up callback for data requests tablePage.onTableValueRequest(onDataRequested); // Configure table structure in setup - attributes are set once setupTableStructure(); Serial.println("WebTable Server started!"); } void loop() { server.loop(); // Update sensor values every 2 seconds static unsigned long lastUpdate = 0; if (millis() - lastUpdate > 2000) { updateSensorValues(); sendRealTimeUpdates(); lastUpdate = millis(); } // Toggle LED every 5 seconds static unsigned long lastLedToggle = 0; if (millis() - lastLedToggle > 5000) { ledState = !ledState; digitalWrite(LED_BUILTIN, ledState); // Send LED status update to web interface tablePage.sendValueUpdate("LED Status", ledState ? "ON" : "OFF"); lastLedToggle = millis(); } delay(10); } // Setup table structure - called once in setup() void setupTableStructure() { Serial.println("Setting up table structure..."); // Add table rows with attributes only (no values stored) tablePage.addRow("Device Name"); tablePage.addRow("Temperature"); tablePage.addRow("Humidity"); tablePage.addRow("Light Level"); tablePage.addRow("Uptime"); tablePage.addRow("LED Status"); tablePage.addRow("Counter"); tablePage.addRow("WiFi SSID"); tablePage.addRow("IP Address"); tablePage.addRow("Free Memory"); Serial.println("Table structure configured with " + String(tablePage.getRowCount()) + " rows"); } // Simulate sensor readings and send values to web interface void updateSensorValues() { // Simulate temperature sensor (20-30°C range) temperature = 20.0 + (sin(millis() / 10000.0) * 5.0) + random(-10, 10) / 10.0; // Simulate humidity sensor (40-80% range) humidity = 60.0 + (cos(millis() / 8000.0) * 15.0) + random(-20, 20) / 10.0; // Simulate light sensor (0-1023 range) lightLevel = 512 + (sin(millis() / 5000.0) * 400) + random(-50, 50); if (lightLevel < 0) lightLevel = 0; if (lightLevel > 1023) lightLevel = 1023; // Update uptime uptime = millis() / 1000; // Increment counter counter++; } // Send real-time updates to web interface void sendRealTimeUpdates() { // Send individual value updates to web clients tablePage.sendValueUpdate("Temperature", String(temperature, 1) + "°C"); tablePage.sendValueUpdate("Humidity", String(humidity, 1) + "%"); tablePage.sendValueUpdate("Light Level", String(lightLevel)); tablePage.sendValueUpdate("Uptime", formatUptime(uptime)); tablePage.sendValueUpdate("Counter", String(counter)); tablePage.sendValueUpdate("Free Memory", String(getFreeMemory()) + " bytes"); } // Callback function called when web client requests table data void onDataRequested() { Serial.println("Web client requested table data"); // Send all current values to web interface tablePage.sendValueUpdate("Device Name", "Arduino Uno R4"); tablePage.sendValueUpdate("Temperature", String(temperature, 1) + "°C"); tablePage.sendValueUpdate("Humidity", String(humidity, 1) + "%"); tablePage.sendValueUpdate("Light Level", String(lightLevel)); tablePage.sendValueUpdate("Uptime", formatUptime(uptime)); tablePage.sendValueUpdate("LED Status", ledState ? "ON" : "OFF"); tablePage.sendValueUpdate("Counter", String(counter)); tablePage.sendValueUpdate("WiFi SSID", WIFI_SSID); tablePage.sendValueUpdate("IP Address", WiFi.localIP().toString()); tablePage.sendValueUpdate("Free Memory", String(getFreeMemory()) + " bytes"); } // Format uptime in human-readable format String formatUptime(unsigned long seconds) { unsigned long days = seconds / 86400; unsigned long hours = (seconds % 86400) / 3600; unsigned long minutes = (seconds % 3600) / 60; unsigned long secs = seconds % 60; String result = ""; if (days > 0) result += String(days) + "d "; if (hours > 0) result += String(hours) + "h "; if (minutes > 0) result += String(minutes) + "m "; result += String(secs) + "s"; return result; } // Get approximate free memory int getFreeMemory() { // Simple approximation for demonstration // In a real application, you might use a more accurate method return 2048 - (counter % 1024); }

WiFi Configuration

Configure WiFi credentials in the code by updating these lines:

const char WIFI_SSID[] = "YOUR_WIFI_NETWORK"; const char WIFI_PASSWORD[] = "YOUR_WIFI_PASSWORD";
  • Click Upload button on Arduino IDE to upload code to Arduino UNO R4/DIYables STEM V4 IoT
  • Open the Serial Monitor
  • Check out the result on Serial Monitor. It looks like the below
COM6
Send
WebSocket server started on port 81 WebSocket URL: ws://192.168.0.2:81 WebSocket server started on port 81 ========================================== DIYables WebApp Ready! ========================================== 📱 Web Interface: http://192.168.0.2 🔗 WebSocket: ws://192.168.0.2:81 📋 Available Applications: 🏠 Home Page: http://192.168.0.2/ 📊 Web Table: http://192.168.0.2/web-table ==========================================
Autoscroll Show timestamp
Clear output
9600 baud  
Newline  
  • If you do not see anything, reboot Arduino board.

Using the Web Interface

  • Open a web browser on your computer or mobile device connected to the same WiFi network
  • Type the IP address shown in the Serial Monitor to the web browser
  • Example: http://192.168.1.100
  • You will see the home page like below image:
Arduino UNO R4 DIYables WebApp Home page with Web Table app
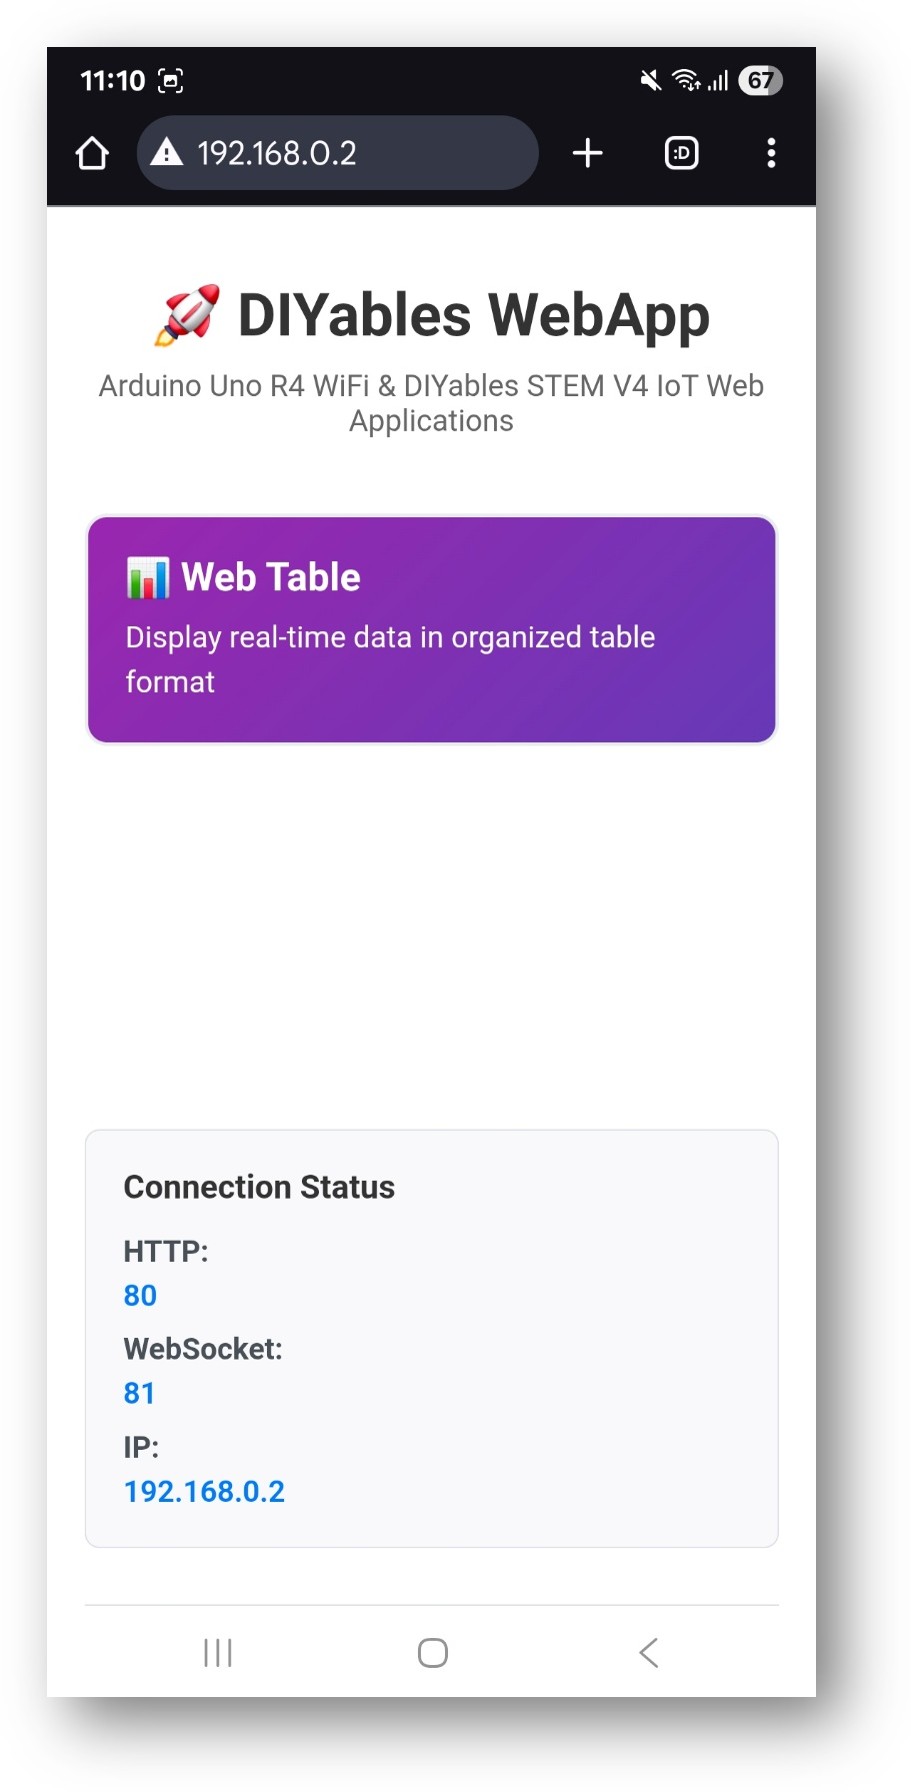
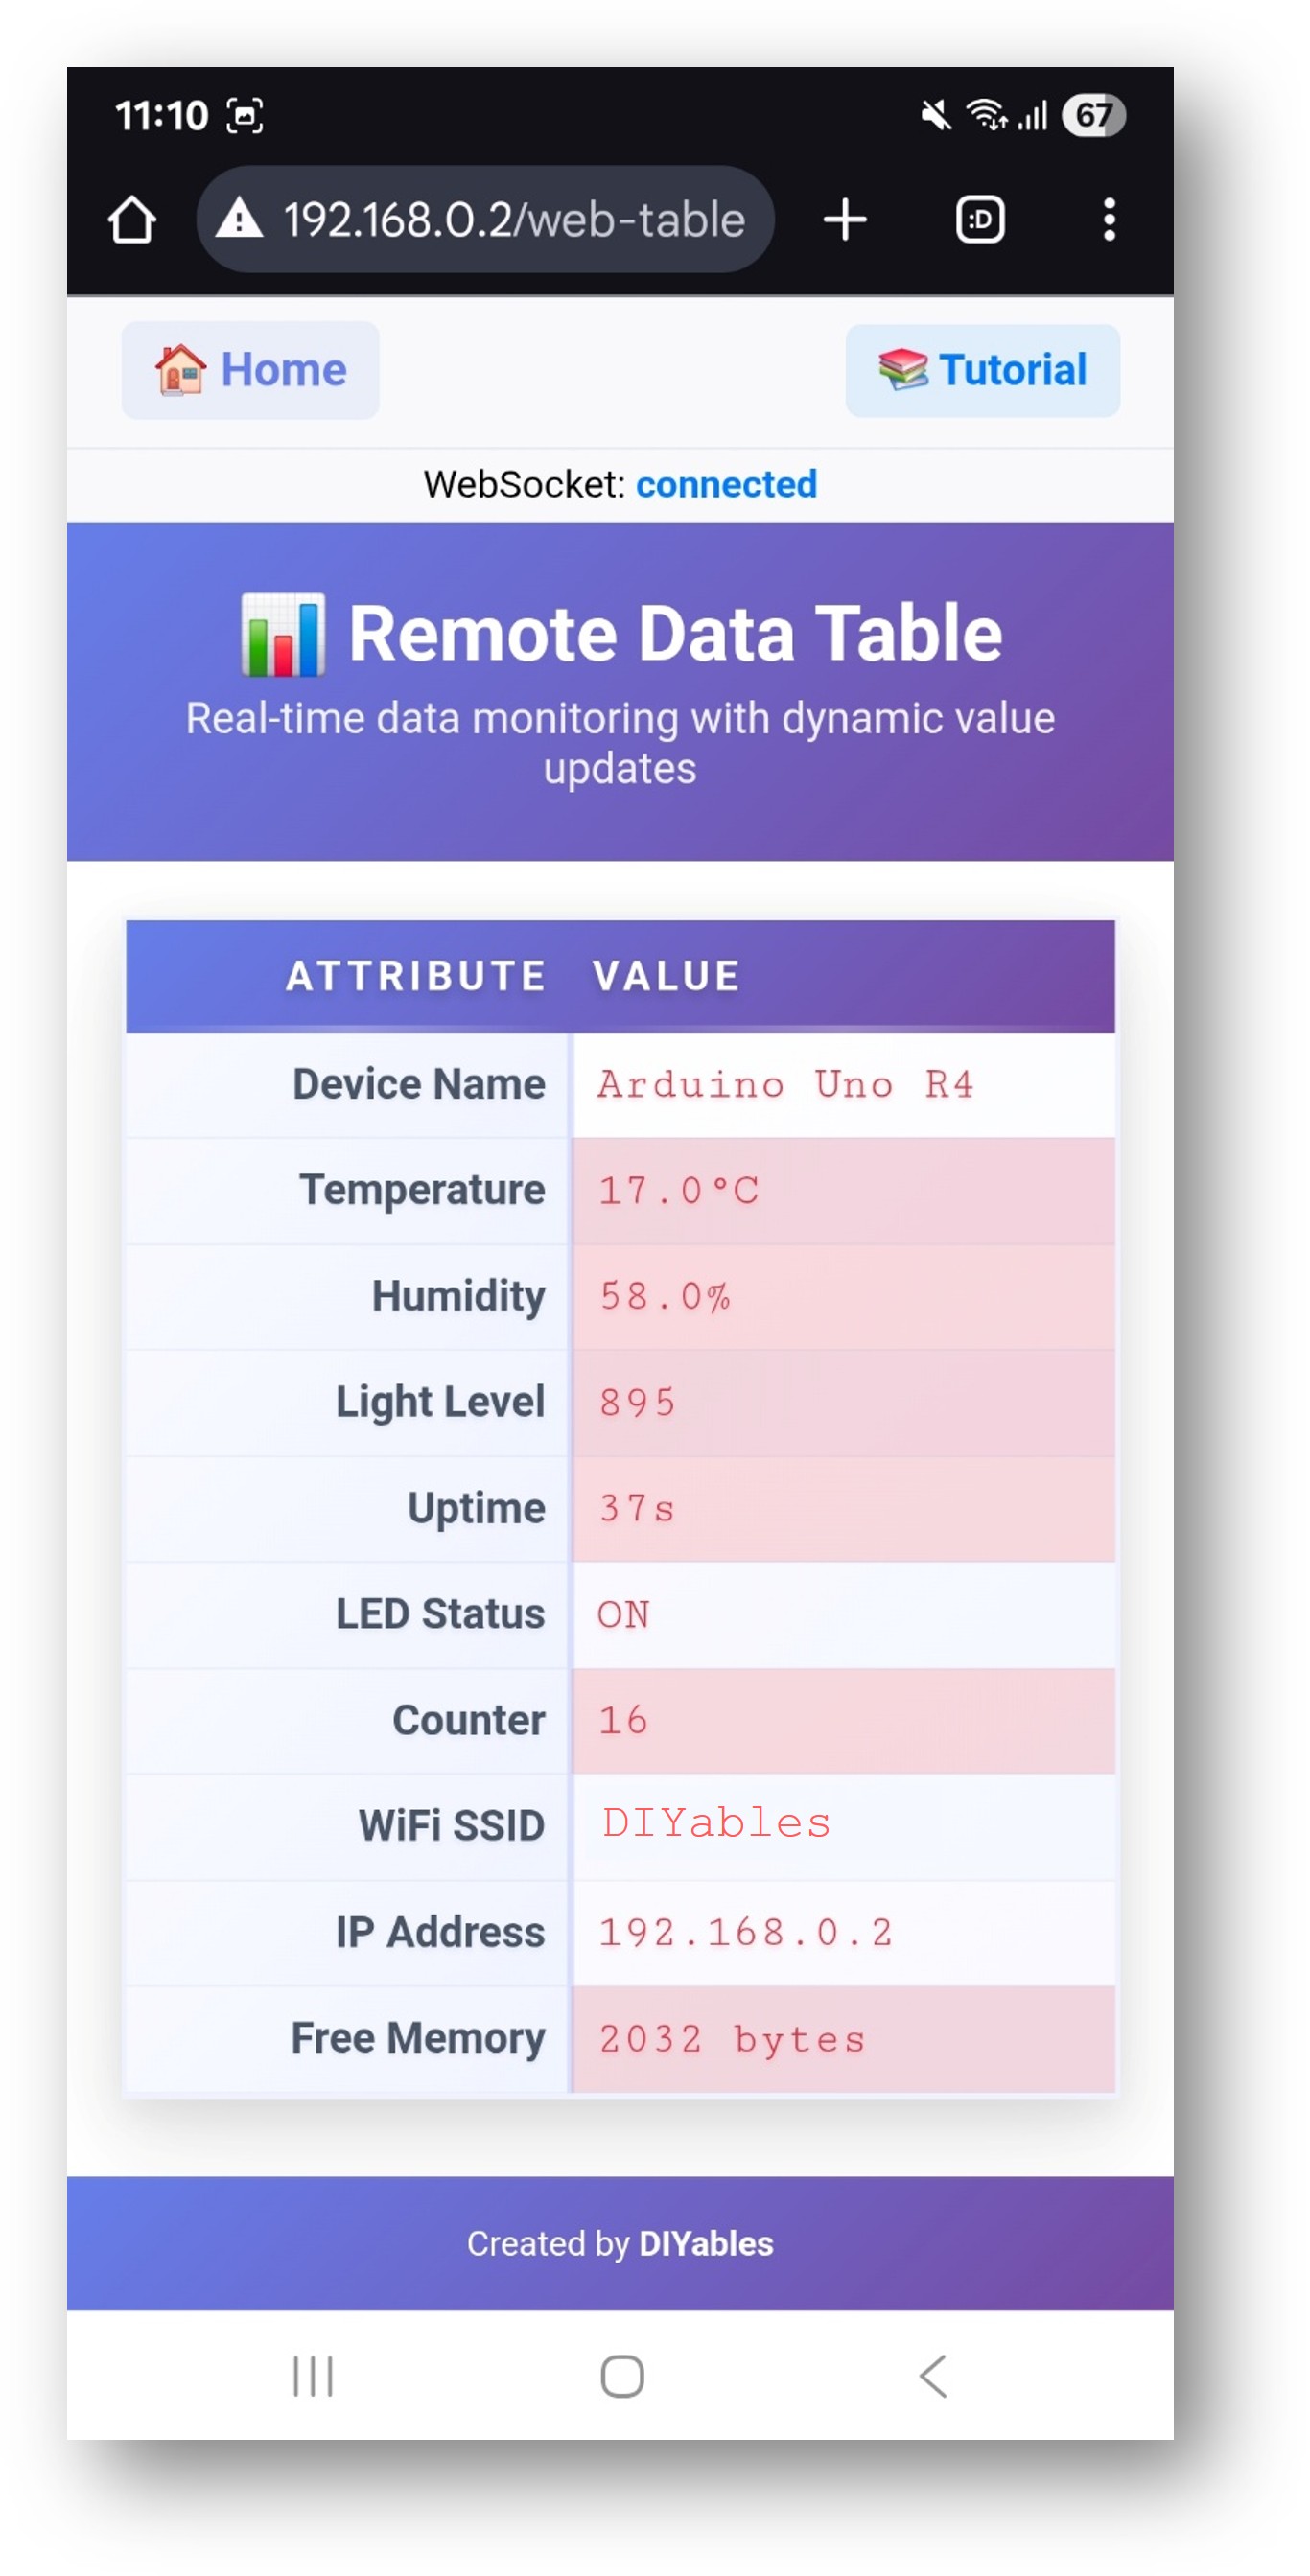
  • Click to the Web Table link, you will see the Web Table app's UI like the below:
Arduino UNO R4 DIYables WebApp Web Table app
  • Or you can also access the page directly by IP address followed by /web-table. For example: http://192.168.1.100/web-table
  • You will see the Web Table interface showing:
    • Real-time Data Table: Two-column table with attributes and their current values
    • Intelligent Highlighting: Automatic color-coding of changing vs stable values
    • Connection Status: Visual indicator showing WebSocket connection state
    • Refresh Button: Manual refresh capability for latest data
    • Automatic Updates: Values update in real-time via WebSocket

    Intelligent Highlighting System

    How It Works

    The WebTable features an advanced highlighting system that automatically detects which values change over time without requiring any configuration in your Arduino code.

    Automatic Change Detection

    The web interface automatically tracks your data and provides visual feedback:

    • Red highlighting: Applied to values that change frequently (like sensor readings, counters, timers)
    • Blue highlighting: Applied to values that remain stable (like device names, IP addresses, configuration settings)
    • No setup required: The system learns automatically as your Arduino sends updates
    What You See
    • Values that change over time (temperature, uptime, sensor readings) will be highlighted in red
    • Static information (device name, WiFi SSID, IP address) will be highlighted in blue
    • This helps you quickly identify which data is actively changing vs stable information
    Key Benefits
    • No Configuration Required: Just use sendValueUpdate() and highlighting works automatically
    • Visual Learning: Easily see which parts of your system are active
    • Beginner Friendly: Works without any web programming knowledge
    • Memory Efficient: All highlighting happens in the web browser, not on your Arduino
    • Real-time Updates: Highlighting changes immediately as values update

    Table Structure Configuration

    The table structure is configured once in the setup() function using the addRow() method:

    void setupTableStructure() { // Add table rows with attributes and initial values tablePage.addRow("Device Name", "Arduino Uno R4"); tablePage.addRow("Temperature", "0.0°C"); tablePage.addRow("LED Status", "OFF"); tablePage.addRow("Uptime", "0 seconds"); tablePage.addRow("WiFi Signal", "0 dBm"); tablePage.addRow("Free Memory", "0 bytes"); }

    Real-time Value Updates

    Values are updated during runtime using sendValueUpdate() method:

    Direct Update Method (Recommended)

    void updateSensorValues() { // Read sensor data float temperature = readTemperature(); bool ledStatus = digitalRead(LED_BUILTIN); // Send updates directly to web interface tablePage.sendValueUpdate("Temperature", String(temperature, 1) + "°C"); tablePage.sendValueUpdate("LED Status", ledStatus ? "ON" : "OFF"); tablePage.sendValueUpdate("Uptime", formatUptime(millis() / 1000)); }

    Benefits of Direct Updates

    • Memory Efficient: No value storage in Arduino memory
    • Real-time: Instant updates to web interface
    • Automatic Highlighting: Web interface automatically detects changes
    • Simplified Code: No need to manage local value storage

    Code Explanation

    Key Components

    #include <DIYablesWebApps.h> // Initialize web server and table page DIYablesWebAppServer server; DIYablesWebTablePage tablePage;

    Setup Function

    void setup() { Serial.begin(9600); // Setup WiFi connection server.setupWiFi(WIFI_SSID, WIFI_PASSWORD); // Add table page to server server.addWebApp(tablePage); // Set up callback for data requests tablePage.onTableValueRequest(onDataRequested); // Configure table structure setupTableStructure(); // Start the server server.begin(); }

    Real-time Updates in Loop

    void loop() { server.handleClient(); // Update sensor values every 2 seconds static unsigned long lastUpdate = 0; if (millis() - lastUpdate > 2000) { updateSensorValues(); sendRealTimeUpdates(); lastUpdate = millis(); } delay(10); }

    Callback Function

    // Called when web interface requests table data void onDataRequested() { Serial.println("Web client requested table data"); // Update all current values before sending updateSensorValues(); // The table data is automatically sent by the library }

    Value Update Functions

    void updateSensorValues() { // Update sensor readings temperature = readTemperatureSensor(); humidity = readHumiditySensor(); // Update values in table tablePage.updateValue("Temperature", String(temperature, 1) + "°C"); tablePage.updateValue("Humidity", String(humidity, 1) + "%"); } void sendRealTimeUpdates() { // Send updates to web clients tablePage.sendValueUpdate("Temperature", String(temperature, 1) + "°C"); tablePage.sendValueUpdate("Humidity", String(humidity, 1) + "%"); }

    API Methods

    DIYablesWebTablePage Class Methods

    addRow(attribute, initialValue)

    • Adds a new row to the table structure
    • Parameters:
      • attribute: String - The attribute name (left column)
      • initialValue: String - Initial value (right column, optional)
    • Usage: Called in setup() to configure table structure

    updateValue(attribute, value)

    • Updates a value by attribute name (local storage only)
    • Parameters:
      • attribute: String - The attribute name to update
      • value: String - New value to set
    • Usage: Updates local table data

    updateValue(index, value)

    • Updates a value by row index (local storage only)
    • Parameters:
      • index: int - Row index (0-based)
      • value: String - New value to set
    • Usage: Updates local table data by position

    sendValueUpdate(attribute, value)

    • Sends value update to web clients by attribute name
    • Parameters:
      • attribute: String - The attribute name to update
      • value: String - New value to send
    • Usage: Real-time update to web interface

    sendValueUpdate(index, value)

    • Sends value update to web clients by row index
    • Parameters:
      • index: int - Row index (0-based)
      • value: String - New value to send
    • Usage: Real-time update to web interface by position

    sendTableData()

    • Sends complete table data to web clients
    • Usage: Refresh entire table on web interface

    clearTable()

    • Clears all table data and resets row count
    • Usage: Reset table structure (rarely needed)

    getRowCount()

    • Returns the number of rows in the table
    • Returns: int - Current row count
    • Usage: Get table size information

    getAttribute(index)

    • Gets attribute name by row index
    • Parameters: index: int - Row index (0-based)
    • Returns: String - Attribute name
    • Usage: Access table structure information

    getValue(index)

    • Gets value by row index
    • Parameters: index: int - Row index (0-based)
    • Returns: String - Current value
    • Usage: Access current table values

    onTableValueRequest(callback)

    • Sets callback function for data requests from web clients
    • Parameter: void (*callback)() - Function to call when data is requested
    • Usage: Handle web client data requests

    WebSocket Communication

    Messages from Web to Arduino

    • TABLE:GET_DATA - Request complete table data
    • TABLE:UPDATE:attribute:value - Update value for specific attribute

    Messages from Arduino to Web

    • TABLE_DATA:attr1:val1|attr2:val2|... - Send complete table data
    • VALUE_UPDATE:attribute:value - Send single value update

    Troubleshooting

    Common Issues

    1. Table Not Displaying Data

    • Issue: Empty table or "No Data Available" message
    • Cause: Table structure not configured or WiFi connection issues
    • Solution:
      • Verify setupTableStructure() is called in setup()
      • Check WiFi connection status
      • Click refresh button to manually request data
      • Check Serial Monitor for error messages

      2. Values Not Updating in Real-time

      • Issue: Table shows old values despite Arduino updates
      • Cause: WebSocket connection lost or update functions not called
      • Solution:
        • Check connection status indicator on web page
        • Refresh the web page
        • Verify sendValueUpdate() is called properly
        • Check network stability

        3. Highlighting Not Working

        • Issue: Values don't show red or blue highlighting
        • Cause: JavaScript not detecting value changes properly
        • Solution:
          • Refresh the web page to reset change detection
          • Ensure values are actually changing (check Serial Monitor)
          • Clear browser cache if highlighting seems stuck
          • Values need multiple updates to trigger highlighting system

          4. "Not connected to Arduino" Error

          • Issue: Error when clicking refresh button
          • Cause: WebSocket connection failed
          • Solution:
            • Verify Arduino IP address is correct
            • Check if Arduino is on same WiFi network
            • Restart Arduino and refresh web page
            • Check firewall settings

            3. "Not connected to Arduino" Error

            • Issue: Error when clicking refresh button
            • Cause: WebSocket connection failed
            • Solution:
              • Verify Arduino IP address is correct
              • Check if Arduino is on same WiFi network
              • Restart Arduino and refresh web page
              • Check firewall settings

              4. Table Structure Changes Not Reflected

              • Issue: Added/removed rows don't appear on web interface
              • Cause: Table structure is configured in setup() only
              • Solution:
                • Restart Arduino to apply structure changes
                • Use clearTable() and addRow() if dynamic changes needed
                • Refresh web page after Arduino restart

                Debug Tips

                Enable Serial Debugging:

                void onDataRequested() { Serial.println("Web client requested table data"); Serial.println("Sending table configuration..."); // Send table configuration to web client tablePage.sendTableConfig(); }

                Monitor Value Updates:

                void updateSensorValues() { float temperature = readTemperature(); Serial.print("Updating temperature: "); Serial.println(String(temperature, 1) + "°C"); // Send update to web interface (highlighting will be handled automatically) tablePage.sendValueUpdate("Temperature", String(temperature, 1) + "°C"); }

                Check Connection Status:

                void setup() { // ... other setup code setupTableStructure(); Serial.println("Table configured with real-time highlighting"); Serial.println("Values will be highlighted automatically based on changes"); }

                Advanced Usage Examples

                Sensor Monitoring with Smart Highlighting

                void updateEnvironmentalSensors() { // Read various sensors float temperature = readTemperatureSensor(); float humidity = readHumiditySensor(); int lightLevel = analogRead(A0); bool motionDetected = digitalRead(2); // Send updates - highlighting happens automatically tablePage.sendValueUpdate("Temperature", String(temperature, 1) + "°C"); tablePage.sendValueUpdate("Humidity", String(humidity, 1) + "%"); tablePage.sendValueUpdate("Light Level", String(lightLevel)); tablePage.sendValueUpdate("Motion", motionDetected ? "DETECTED" : "CLEAR"); }

                System Status Dashboard

                void updateSystemStatus() { // System information that changes over time gets red highlighting tablePage.sendValueUpdate("Uptime", formatUptime(millis() / 1000)); tablePage.sendValueUpdate("Free Memory", String(ESP.getFreeHeap()) + " bytes"); tablePage.sendValueUpdate("WiFi Signal", String(WiFi.RSSI()) + " dBm"); // Static information that doesn't change gets blue highlighting tablePage.sendValueUpdate("Device ID", "Arduino-" + String(ESP.getChipId())); tablePage.sendValueUpdate("Firmware", "v1.0.0"); }

                Conditional Status Updates

                void updateStatusWithConditions() { float temperature = readTemperature(); // Format status messages based on conditions String tempStatus; if (temperature > 30.0) { tempStatus = String(temperature, 1) + "°C (HIGH)"; } else if (temperature < 10.0) { tempStatus = String(temperature, 1) + "°C (LOW)"; } else { tempStatus = String(temperature, 1) + "°C (NORMAL)"; } // The highlighting system will automatically detect if status changes tablePage.sendValueUpdate("Temperature Status", tempStatus); }

                Multiple Web Apps Integration

                // Combine WebTable with other web apps void setup() { // Add multiple web apps server.addWebApp(tablePage); // Data table with smart highlighting server.addWebApp(monitorPage); // Serial monitor server.addWebApp(sliderPage); // Control interface // Configure table for system monitoring tablePage.addRow("System Status", "Running"); tablePage.addRow("Active Connections", "0"); tablePage.addRow("Data Points Logged", "0"); }

                Applications and Use Cases

                Educational Projects

                • Sensor Monitoring: Display real-time sensor readings with automatic change highlighting
                • System Status Dashboard: Show Arduino system information with visual feedback
                • IoT Data Visualization: Present live data with intelligent highlighting for active vs static values
                • Learning Tool: Demonstrate data visualization and real-time communication concepts

                Real-World Applications

                • Environmental Monitoring: Temperature, humidity, air quality with change detection
                • Home Automation: System status, device states, and operational parameters
                • Industrial Monitoring: Equipment status, alerts, and performance metrics
                • Agricultural Systems: Soil conditions, weather data, and irrigation status

                Key Benefits for STEM Education

                • Visual Learning: See which data changes over time through automatic highlighting
                • Real-time Systems: Experience WebSocket communication and live data updates
                • No Configuration Needed: Intelligent highlighting works automatically
                • Modern Web Interface: Learn contemporary web development techniques

                Technical Specifications

                Memory Usage (Optimized Design)

                • Flash Memory: ~8KB for WebTable functionality (including intelligent highlighting)
                • SRAM Usage: ~1KB during operation (no value storage in Arduino)
                • WebSocket Buffer: ~1KB for message handling
                • Maximum Rows: 20 (configurable via MAX_TABLE_ROWS)
                • Memory Efficiency: Values tracked in web browser, not Arduino memory

                Performance Characteristics

                • Update Frequency: Real-time via WebSocket (no polling)
                • Response Time: <50ms for value updates
                • Highlighting Speed: Instant visual feedback on value changes
                • Network Overhead: ~30-50 bytes per value update
                • Change Detection: Automatic comparison of values over time

                Compatibility

                • Arduino Boards: Arduino Uno R4 WiFi, DIYables STEM V4 IoT
                • Browsers: All modern browsers with WebSocket support
                • Devices: Desktop, tablet, and mobile devices
                • Networks: WiFi networks with local access

                Intelligent Highlighting Features

                • Automatic Detection: Identifies which values change over time without any setup
                • Two-Level System: Red for changing values, blue for stable values
                • No Configuration: Works without any manual setup or Arduino coding
                • Memory Efficient: All tracking done in web browser, not on Arduino
                • Professional Appearance: Smooth animations provide clear visual feedback

                Summary

                The WebTable example demonstrates how to:

                • Create structured data displays with attribute-value pairs
                • Implement real-time value updates via WebSocket communication
                • Utilize intelligent highlighting that automatically detects value changes
                • Build memory-efficient systems without storing values in Arduino
                • Configure table structure once in setup() for consistent organization
                • Handle web client requests with automatic data refresh capabilities
                • Provide visual feedback through smart change detection algorithms
                • Create responsive web interfaces for modern data monitoring applications

                Key Innovation: Intelligent Highlighting

                The standout feature of this WebTable implementation is its intelligent highlighting system that:

                • Learns automatically which values change without any hard-coding
                • Adapts dynamically as data patterns change over time
                • Provides visual feedback through two-level color coding
                • Operates efficiently without consuming Arduino memory
                • Works universally for any type of data without configuration

                This example is perfect for projects requiring organized data display, real-time monitoring dashboards with visual feedback, system status interfaces with automatic change detection, and educational demonstrations of advanced data visualization techniques in IoT applications.

※ OUR MESSAGES

  • As freelancers, We are AVAILABLE for HIRE. See how to outsource your project to us
  • Please feel free to share the link of this tutorial. However, Please do not use our content on any other websites. We invested a lot of effort and time to create the content, please respect our work!