
ESP32 C3 Super Mini - Ultrasonic Sensor - Piezo Buzzer
Build a simple distance alarm with the ESP32 C3 Super Mini, an ultrasonic sensor and a piezo buzzer. The buzzer sounds when an object comes close, and it stops when the object moves away.
In this tutorial, you'll learn:
- How the ESP32 C3 Super Mini turns the piezo buzzer on when an object is close to the ultrasonic sensor
- How the ESP32 C3 Super Mini turns the piezo buzzer off when the object is far from the ultrasonic sensor
- How to wire the HC-SR04 ultrasonic sensor and the piezo buzzer to the board
- How to play a simple sound when an object is closer than 50 cm
- How to play a melody instead of a simple sound
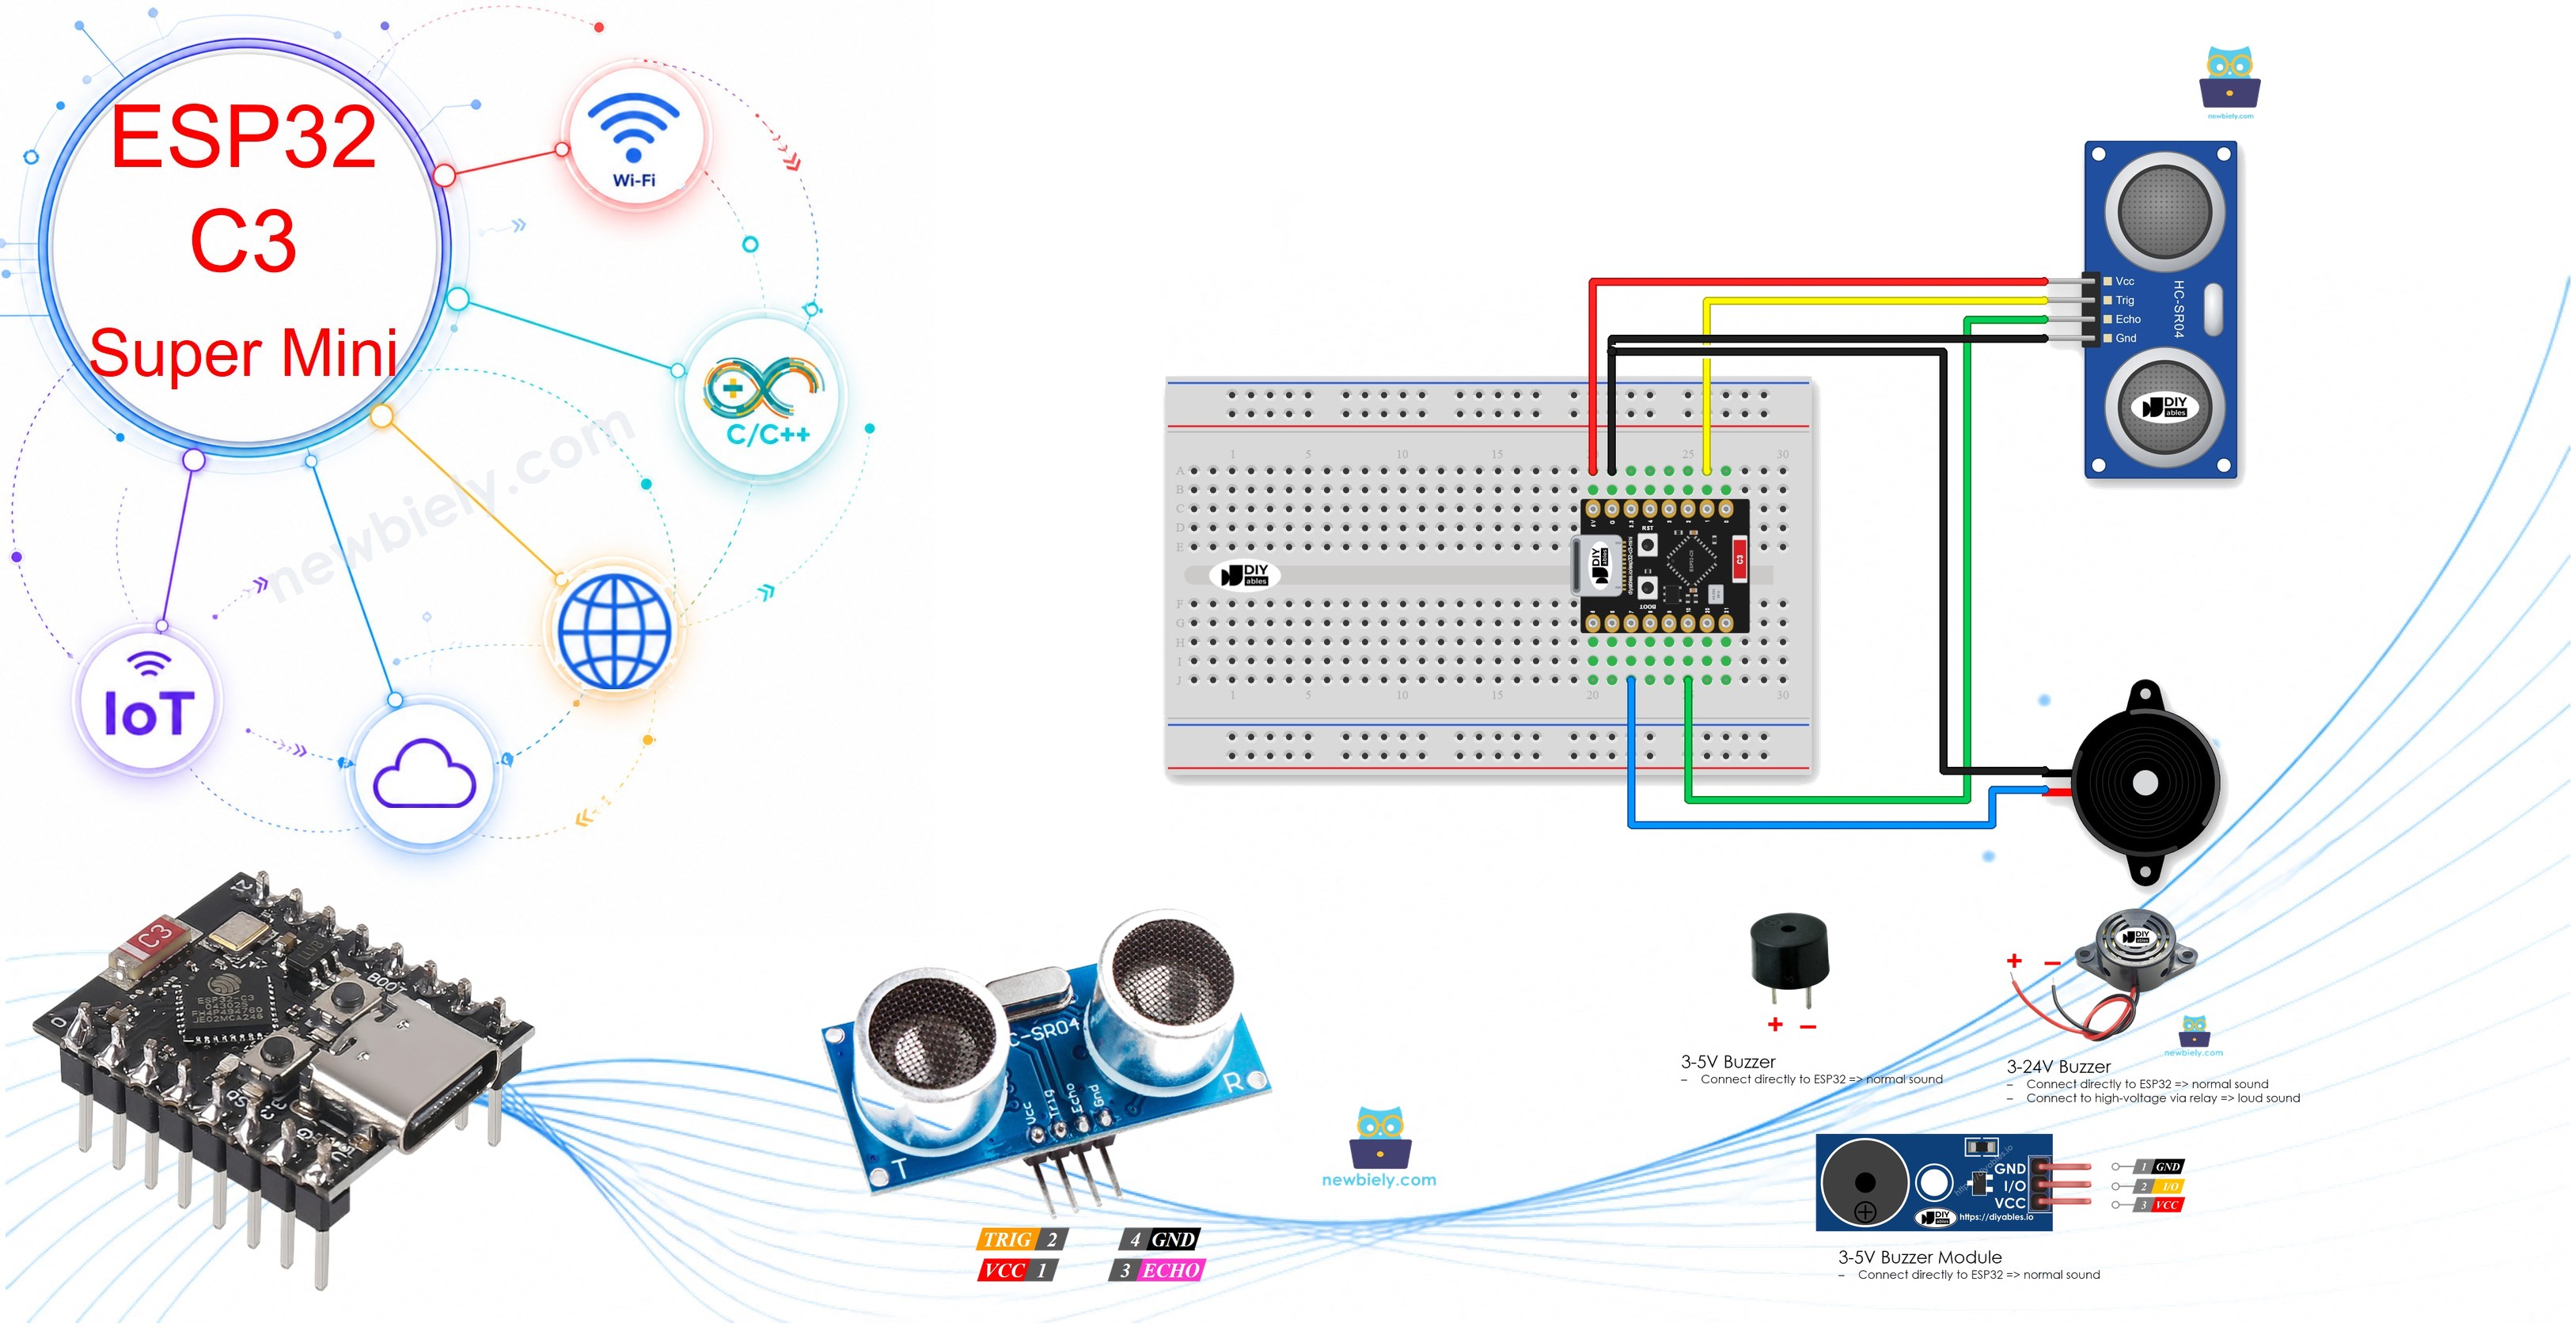
Hardware Preparation
Or you can buy the following kits:
| 1 | × | DIYables Sensor Kit (18 sensors/displays) |
Additionally, some of these links are for products from our own brand, DIYables .
Overview of Piezo Buzzer and Ultrasonic Sensor
The ultrasonic sensor is a distance sensor that measures how far away an object is, and the piezo buzzer is a small part that makes sound.
Key Features:
- No touch needed: The ultrasonic sensor detects an object without touching it
- Simple sound output: The piezo buzzer needs only one GPIO pin
- Easy code: A few lines of code turn a distance reading into sound
Technical Specifications:
- Ultrasonic sensor voltage: 5V DC
- Measuring range: 2 cm to 400 cm
- Measuring angle: 15 degrees
- Buzzer voltage: This tutorial uses a 3-5V buzzer, and you can adapt it for a 12V buzzer
Learn more in our detailed tutorials (pinout, how it works, wiring and code):
- Piezo buzzer: ESP32 C3 Super Mini - Piezo Buzzer tutorial
- Ultrasonic sensor: ESP32 C3 Super Mini - Ultrasonic Sensor tutorial
- 12V buzzer: ESP32 C3 Super Mini - Buzzer tutorial
Pinout
Each part connects to the board with only a few pins.
- VCC (ultrasonic sensor): Connect to 5V power
- GND (ultrasonic sensor): Connect to ground (0V)
- TRIG (ultrasonic sensor): Receives the trigger pulse from the ESP32 C3 Super Mini
- ECHO (ultrasonic sensor): Sends a pulse back, and its length depends on the distance
- Positive (+) (piezo buzzer): Receives the control signal from the ESP32 C3 Super Mini
- Negative (-) (piezo buzzer): Connect to ground (0V)
Wiring Diagram
Connect the ultrasonic sensor and the piezo buzzer as shown below.
- Note: The ultrasonic sensor needs 5V power, so connect its VCC to the 5V pin.
- Note: Check the polarity of the bare buzzer. The (+) pin has a longer leg or a + mark.
The wiring diagram with power supply from USB cable:
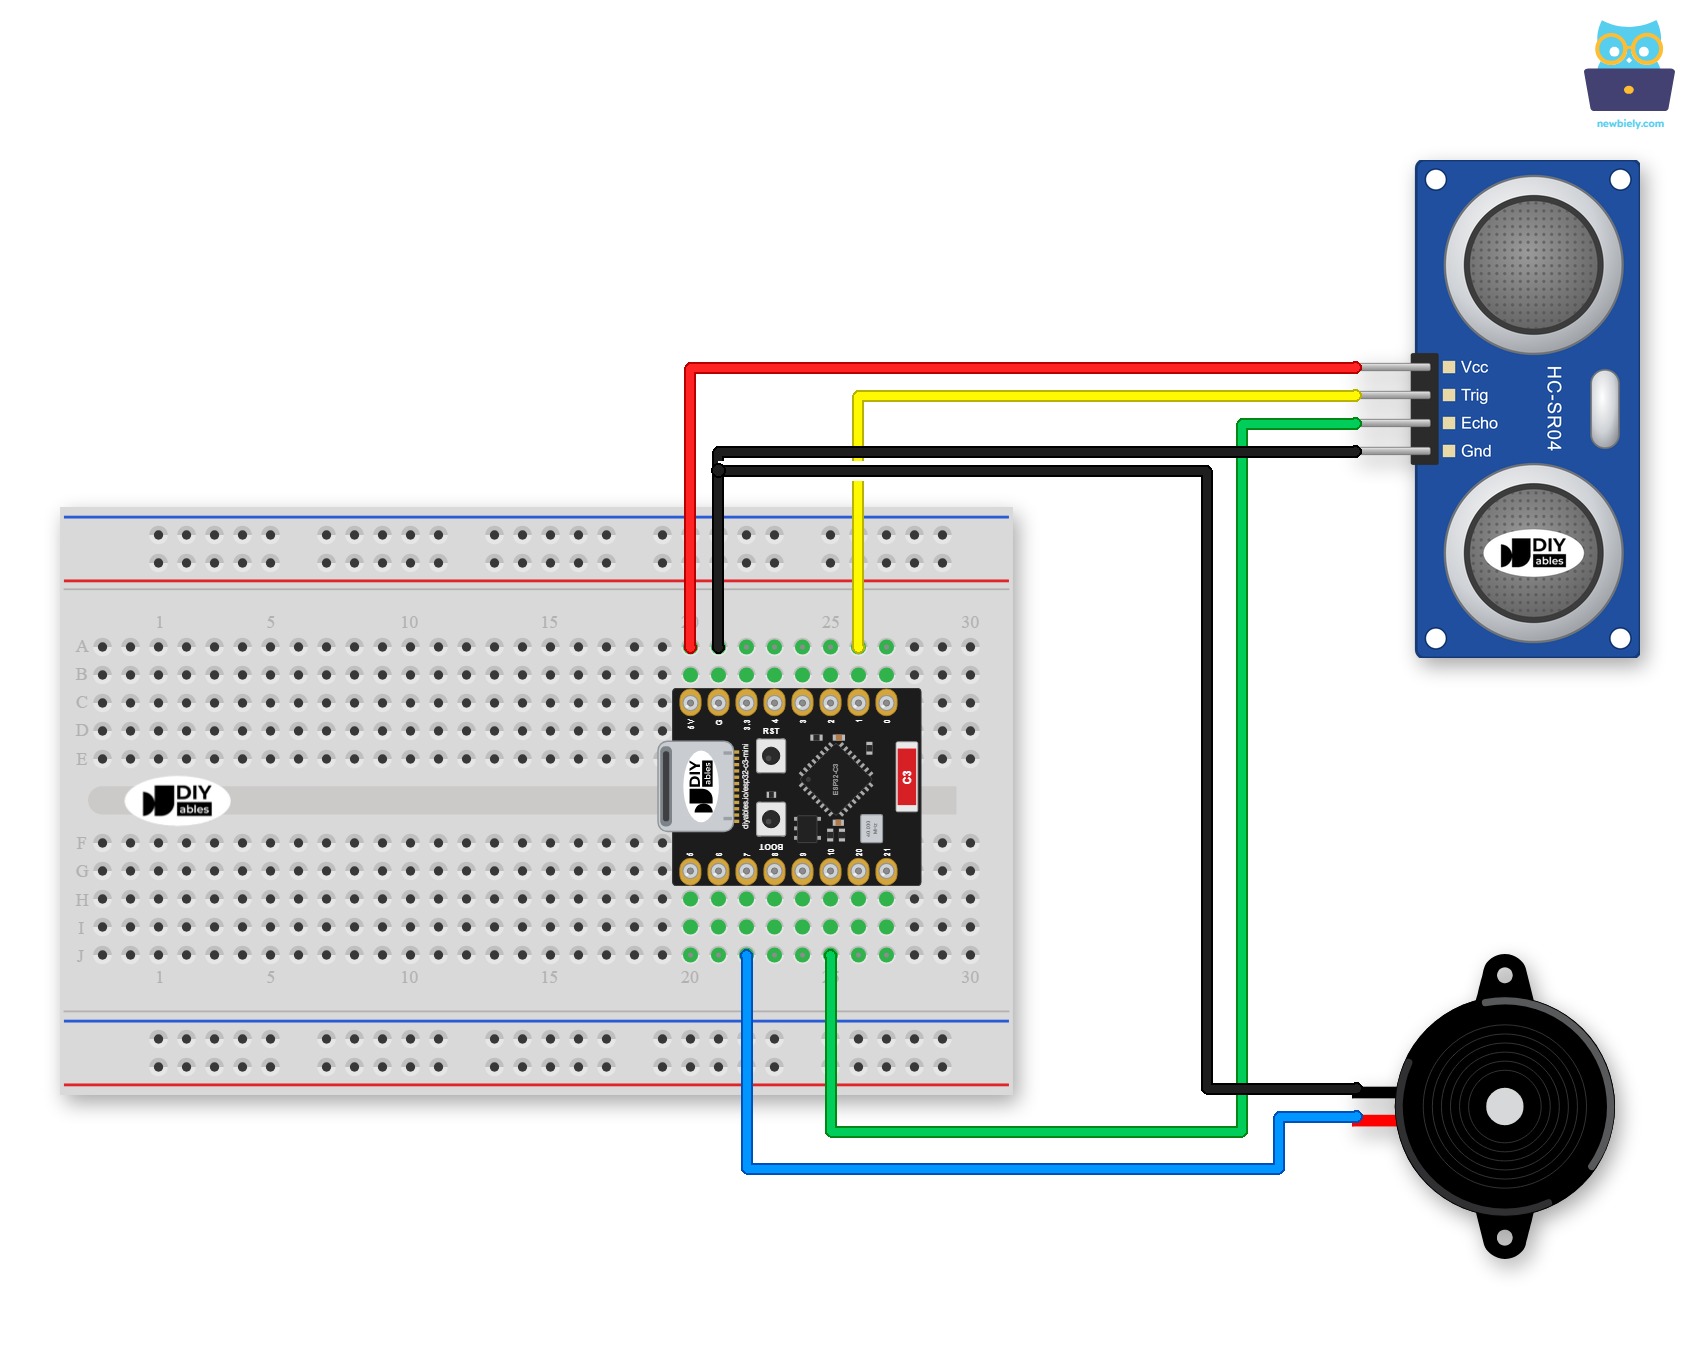
This image is created using Fritzing. Click to enlarge image
The wiring diagram with power supply from 5V adapter:
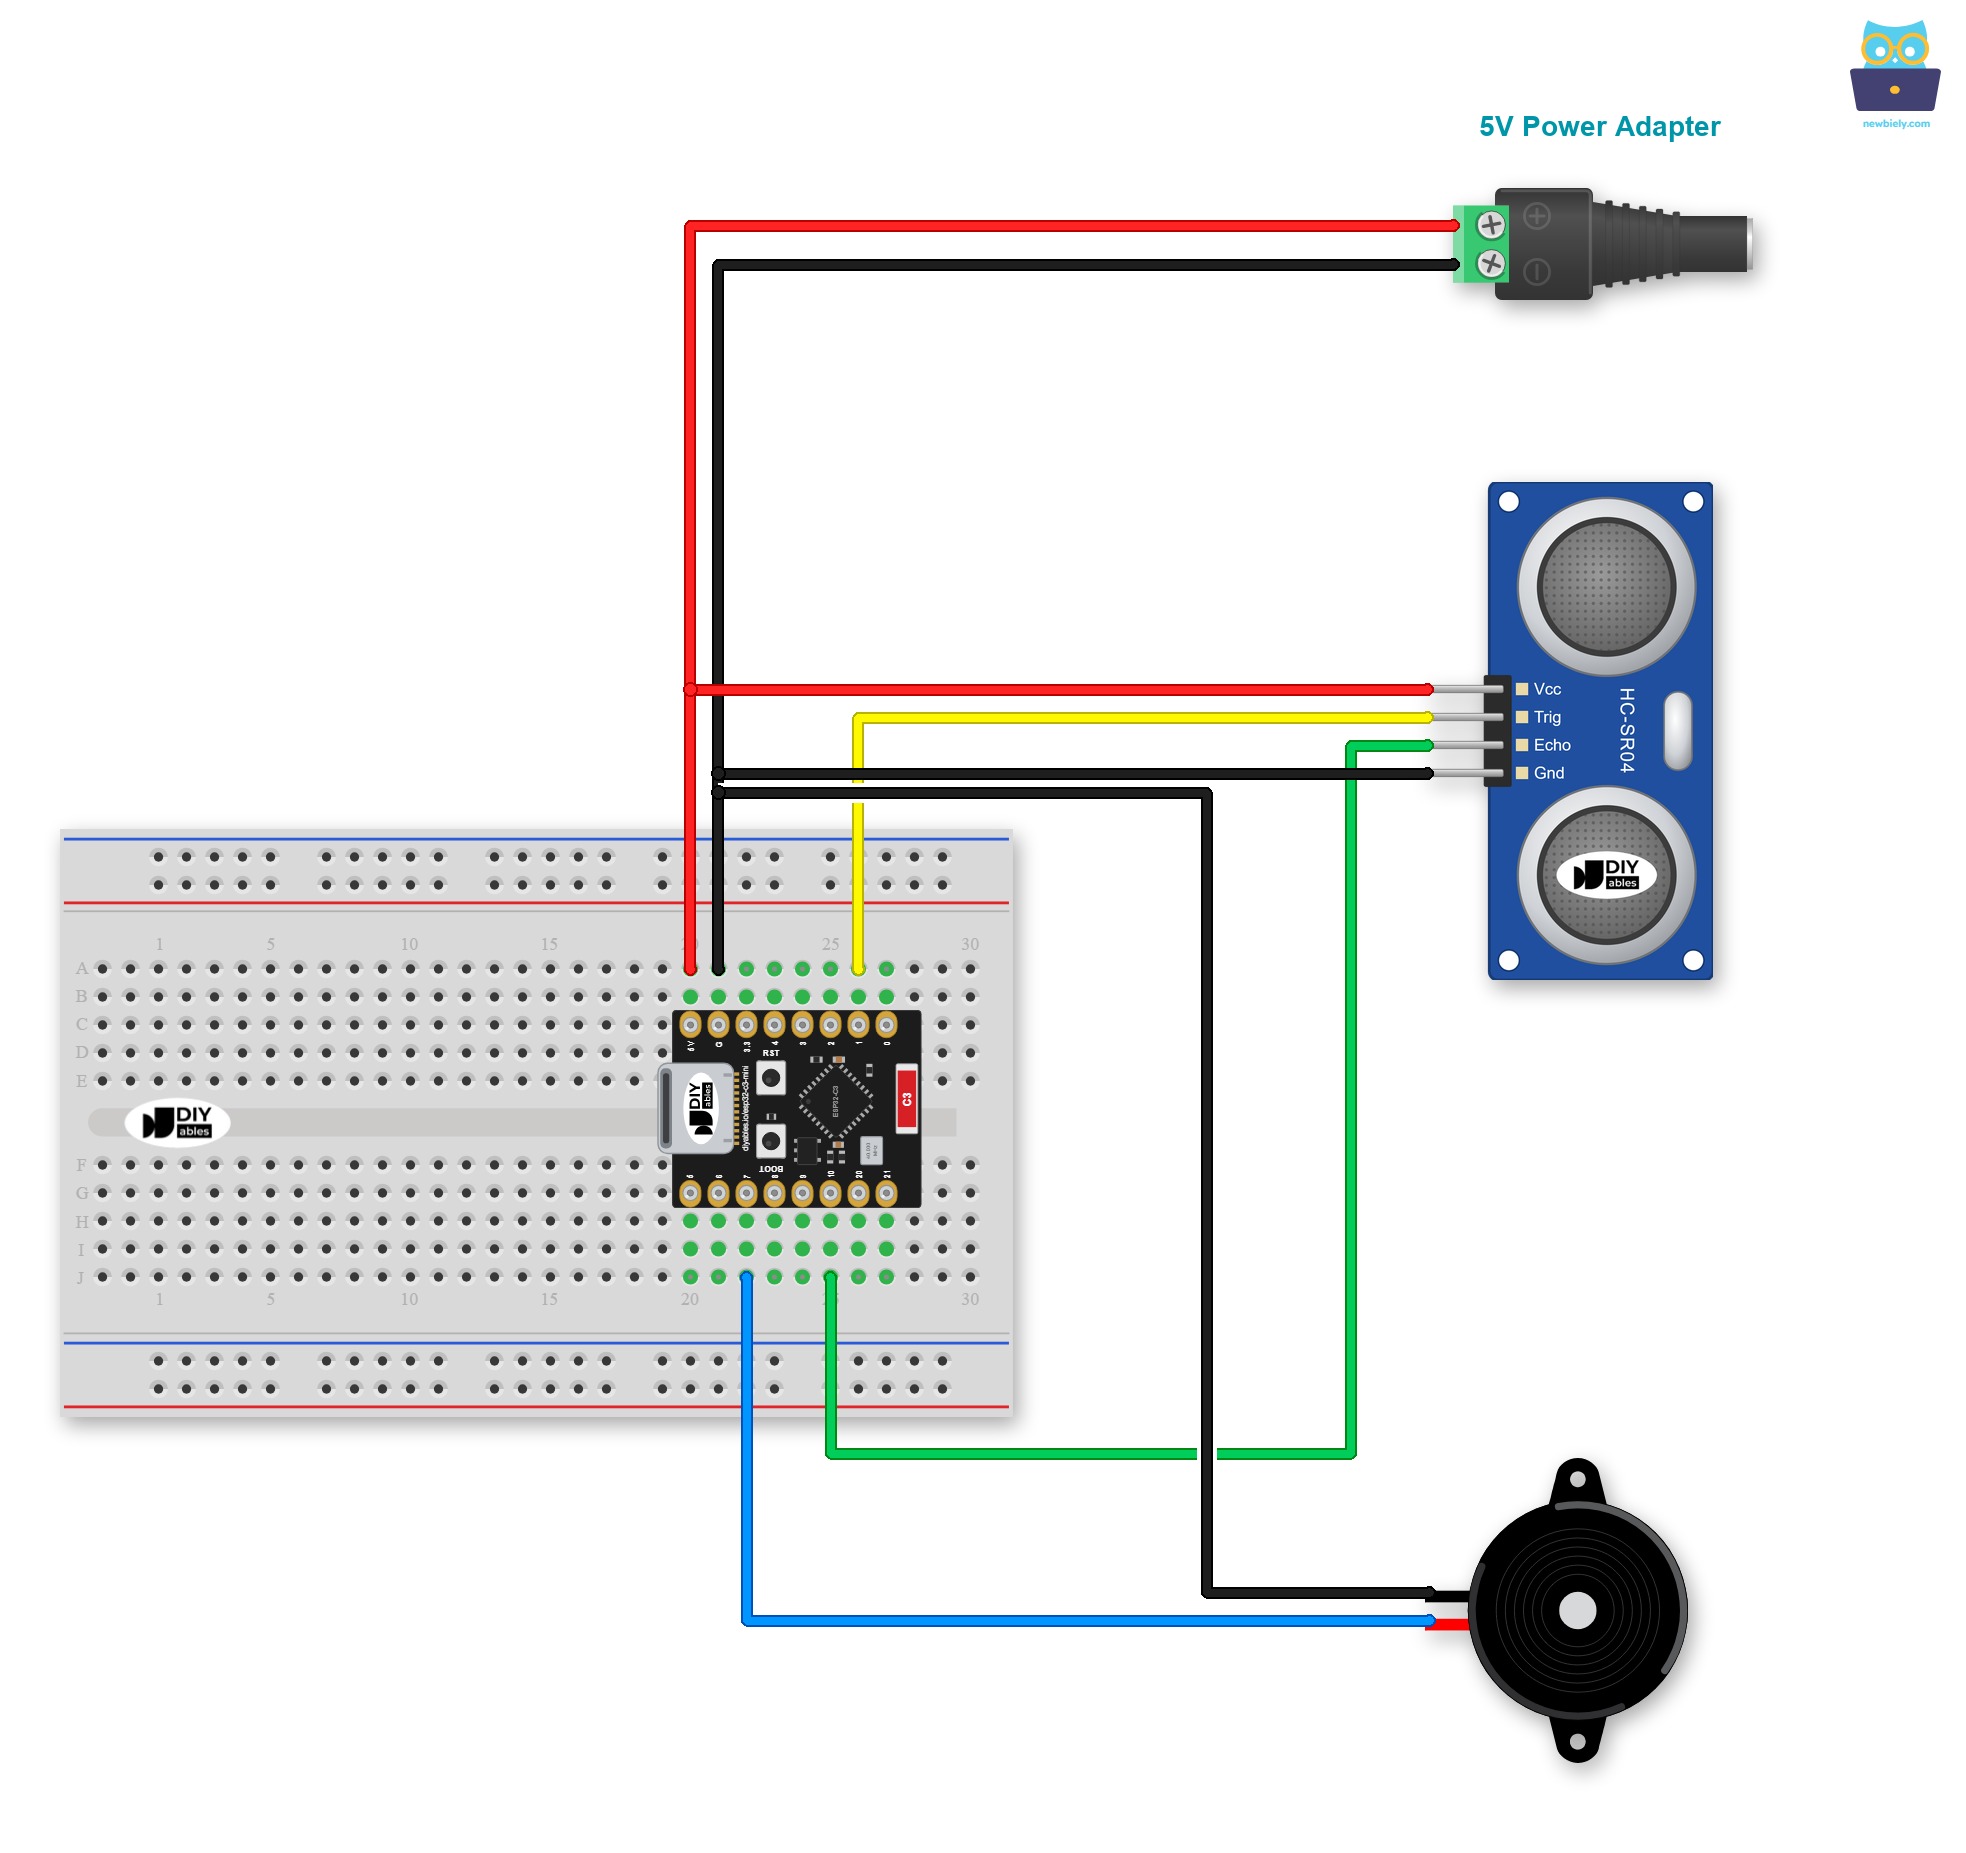
This image is created using Fritzing. Click to enlarge image
| Ultrasonic Sensor Pin | ESP32 C3 Super Mini Pin |
|---|---|
| VCC | 5V |
| GND | GND |
| TRIG | GPIO1 |
| ECHO | GPIO10 |
| Piezo Buzzer Pin | ESP32 C3 Super Mini Pin |
|---|---|
| Positive (+) | GPIO7 |
| Negative (-) | GND |
ESP32 C3 Super Mini Code - Simple Sound
This ESP32 C3 Super Mini code turns the piezo buzzer on while an object is close to the ultrasonic sensor.
What This Code Does:
- Sends a 10-microsecond pulse to the TRIG pin on GPIO1
- Measures the echo pulse on the ECHO pin on GPIO10
- Calculates the distance in centimeters
- Turns the buzzer on GPIO7 on when the distance is below 50 cm, and off when it is not
- Prints the distance to the Serial Monitor every 500 milliseconds
Detailed Instructions
Follow these steps to run the simple sound example.
- New to ESP32 C3 Super Mini? Complete our Getting Started with ESP32 C3 Super Mini tutorial first to set up your development environment.
- Wire the parts: Follow the wiring diagram above.
- Connect the board: Plug the ESP32 C3 Super Mini into your computer with a USB Cable Type-C.
- Open the IDE: Launch the Arduino IDE on your computer.
- Select the board: Make sure ESP32 C3 Super Mini is selected in Tools > Board.
- Select the port: Pick the COM port of your board.
- Copy the code: Copy the above code and paste it into the Arduino IDE.
- Upload the code: Click the Upload button in the Arduino IDE.
- Open the Serial Monitor: Set the baud rate to 115200 to see the distance.
- Test it: Move your hand in front of the sensor.
- Listen: The piezo buzzer sounds when your hand is closer than 50 cm.
- Pro Tip: Hear nothing? Swap the two buzzer legs. A bare buzzer only works one way round.
Serial Monitor Output
The distance changes as you move your hand toward the sensor and away from it.
Line-by-line Code Explanation
The above ESP32 C3 Super Mini code contains line-by-line explanation. Please read the comments in the code!
ESP32 C3 Super Mini Code - Melody
This ESP32 C3 Super Mini code plays a melody when an object is close to the ultrasonic sensor.
What This Code Does:
- Measures the distance in the same way as the first example
- Reads note names such as NOTE_E5 from a pitches.h file
- Plays the whole melody on GPIO7 when the distance is below 50 cm
- Stays quiet when the object is far away
Detailed Instructions
Follow these steps to run the melody example.
- New to ESP32 C3 Super Mini? Complete our Getting Started with ESP32 C3 Super Mini tutorial first to set up your development environment.
- Select the board: Make sure ESP32 C3 Super Mini is selected in Tools > Board.
- Copy the code: Copy the above code and paste it into the Arduino IDE.
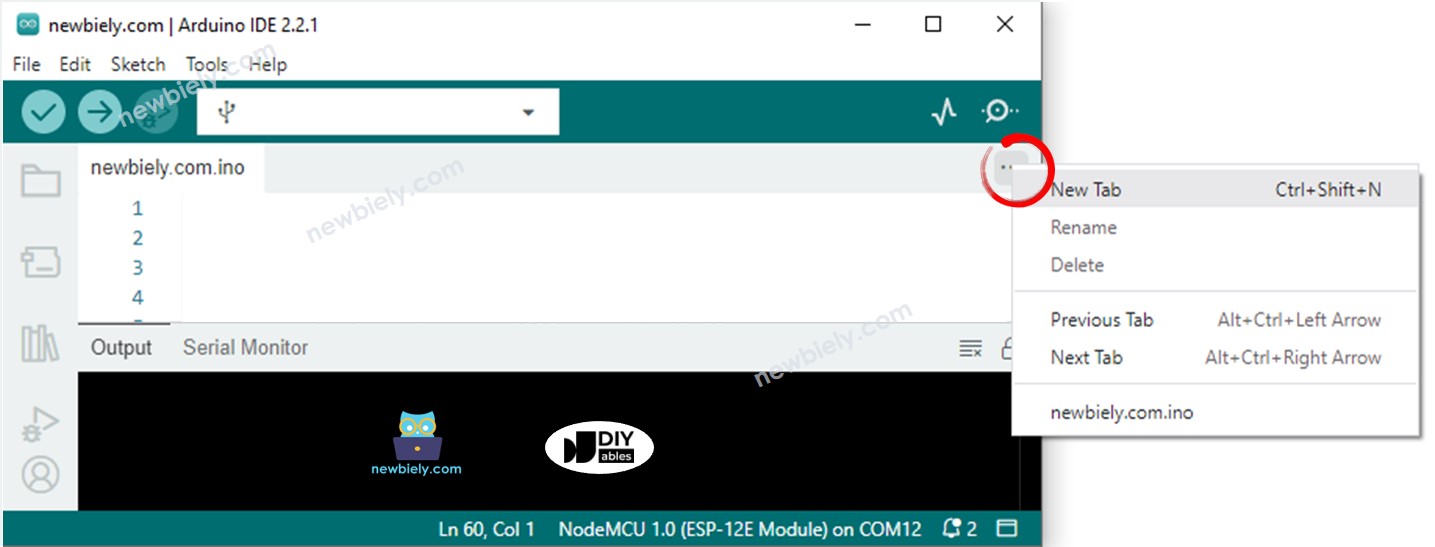
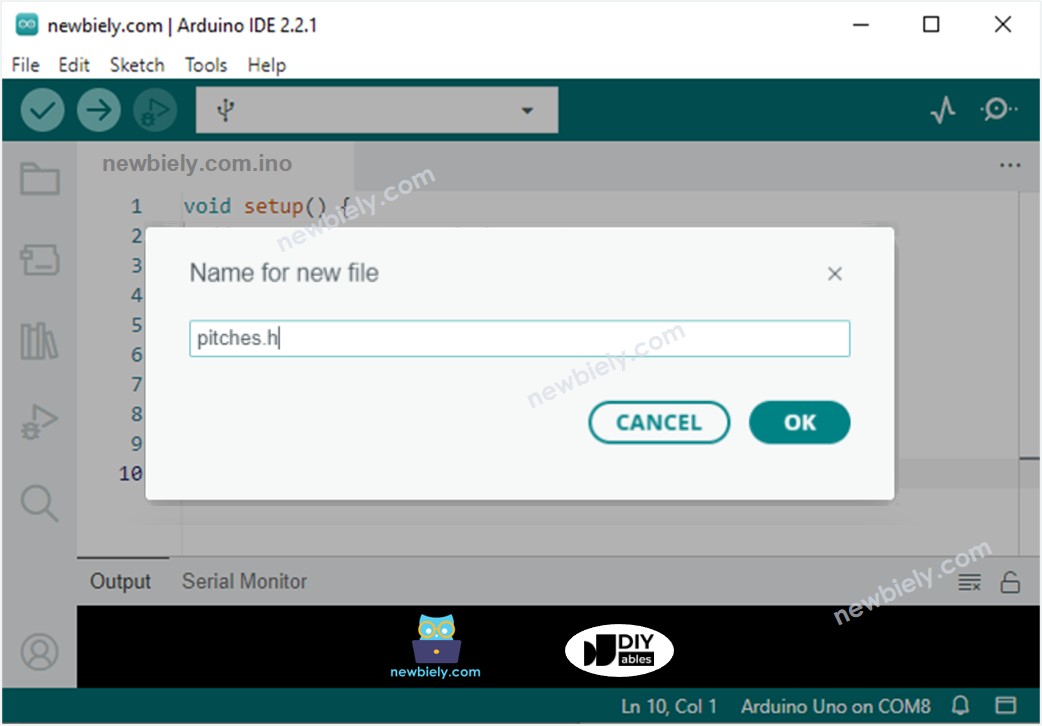
- Create the pitches.h file in the Arduino IDE by:
- Either click on the button just below the serial monitor icon and choose New Tab, or use Ctrl+Shift+N keys.
- Give the file the name pitches.h and click the OK button.
- Copy the code below and paste it into the new pitches.h file.
- Upload the code: Click the Upload button in the Arduino IDE.
- Test it: Move your hand in front of the sensor.
- Listen: The piezo buzzer plays the melody.
- Serial Monitor: This sketch prints nothing. If you add your own Serial.print() lines, use Serial.begin(115200) and set the baud rate to 115200.
- Pro Tip: A passive buzzer module plays the melody best, because it follows each note.
Line-by-line Code Explanation
The above ESP32 C3 Super Mini code contains line-by-line explanation. Please read the comments in the code!
Application and Project Ideas
Here are simple ways to use the ESP32 C3 Super Mini with an ultrasonic sensor and a piezo buzzer.
- Parking helper: Beep when a car gets close to the garage wall
- Doorway alert: Sound when someone walks through a door
- Desk distance reminder: Beep when you sit too close to the screen
- Robot warning: Sound when a small robot gets close to an obstacle
- Welcome melody: Play a song when a person walks up to a shop counter
Challenge Yourself
Ready for more? Try these challenges with your ESP32 C3 Super Mini.
- Easy: Change DISTANCE_THRESHOLD from 50 cm to 20 cm
- Easy: Replace the melody with another song from your own notes
- Medium: Beep faster as the object gets closer
- Medium: Add an LED that lights up together with the buzzer
- Advanced: Use the ezBuzzer library so the code keeps measuring the distance during the melody