Arduino UNO R4 - MQ3 Alcohol Sensor
This guide will show you how to use Arduino UNO R4 and MQ3 alcohol sensor to detect alcohol vapor and ethanol in the air. This sensor is commonly used in breathalyzer projects and alcohol detection systems.
- How to connect the MQ3 alcohol sensor to Arduino UNO R4
- How to write a code for Arduino UNO R4 to read alcohol concentration from the sensor
Hardware Preparation
Or you can buy the following kits:
| 1 | × | DIYables STEM V4 IoT Starter Kit (Arduino included) | |
| 1 | × | DIYables Sensor Kit (18 sensors/displays) |
Additionally, some of these links are for products from our own brand, DIYables .

Overview of MQ3 Alcohol Sensor
The MQ3 alcohol sensor is a MOS (Metal Oxide Semiconductor) sensor, also known as a Chemiresistor, because it detects alcohol based on the change in resistance of the sensing material when exposed to alcohol vapor. It is specifically designed to detect alcohol vapor (ethanol) in the air and is highly sensitive to alcohol concentrations.
The sensor uses a Tin Dioxide (SnO2) coating on an Aluminum Oxide ceramic substrate as its sensing element. When heated, the SnO2 becomes sensitive to alcohol. The sensor is covered with a stainless steel mesh (anti-explosion network) that protects the internal heating element and filters out suspended particles while allowing gaseous elements to reach the sensing chamber.
Common applications include breath analyzers, drunk driving detection systems, alcohol presence alarms, and projects that require monitoring alcohol concentration in the environment.
Technical Specifications
- Operating Voltage: 5V DC
- Load Resistance: 200 KΩ
- Heater Resistance: 33Ω ± 5%
- Heating Consumption: < 800mW
- Sensing Resistance: 1 MΩ – 8 MΩ
- Detection Range: 25 – 500 ppm (parts per million)
- Preheat Time: 24-48 hours for first use
What does ppm mean? Parts-per-million (ppm) is the unit for measuring gas concentration. For example, 500 ppm of alcohol means that out of one million gas molecules, 500 are alcohol and 999,500 are other gases.
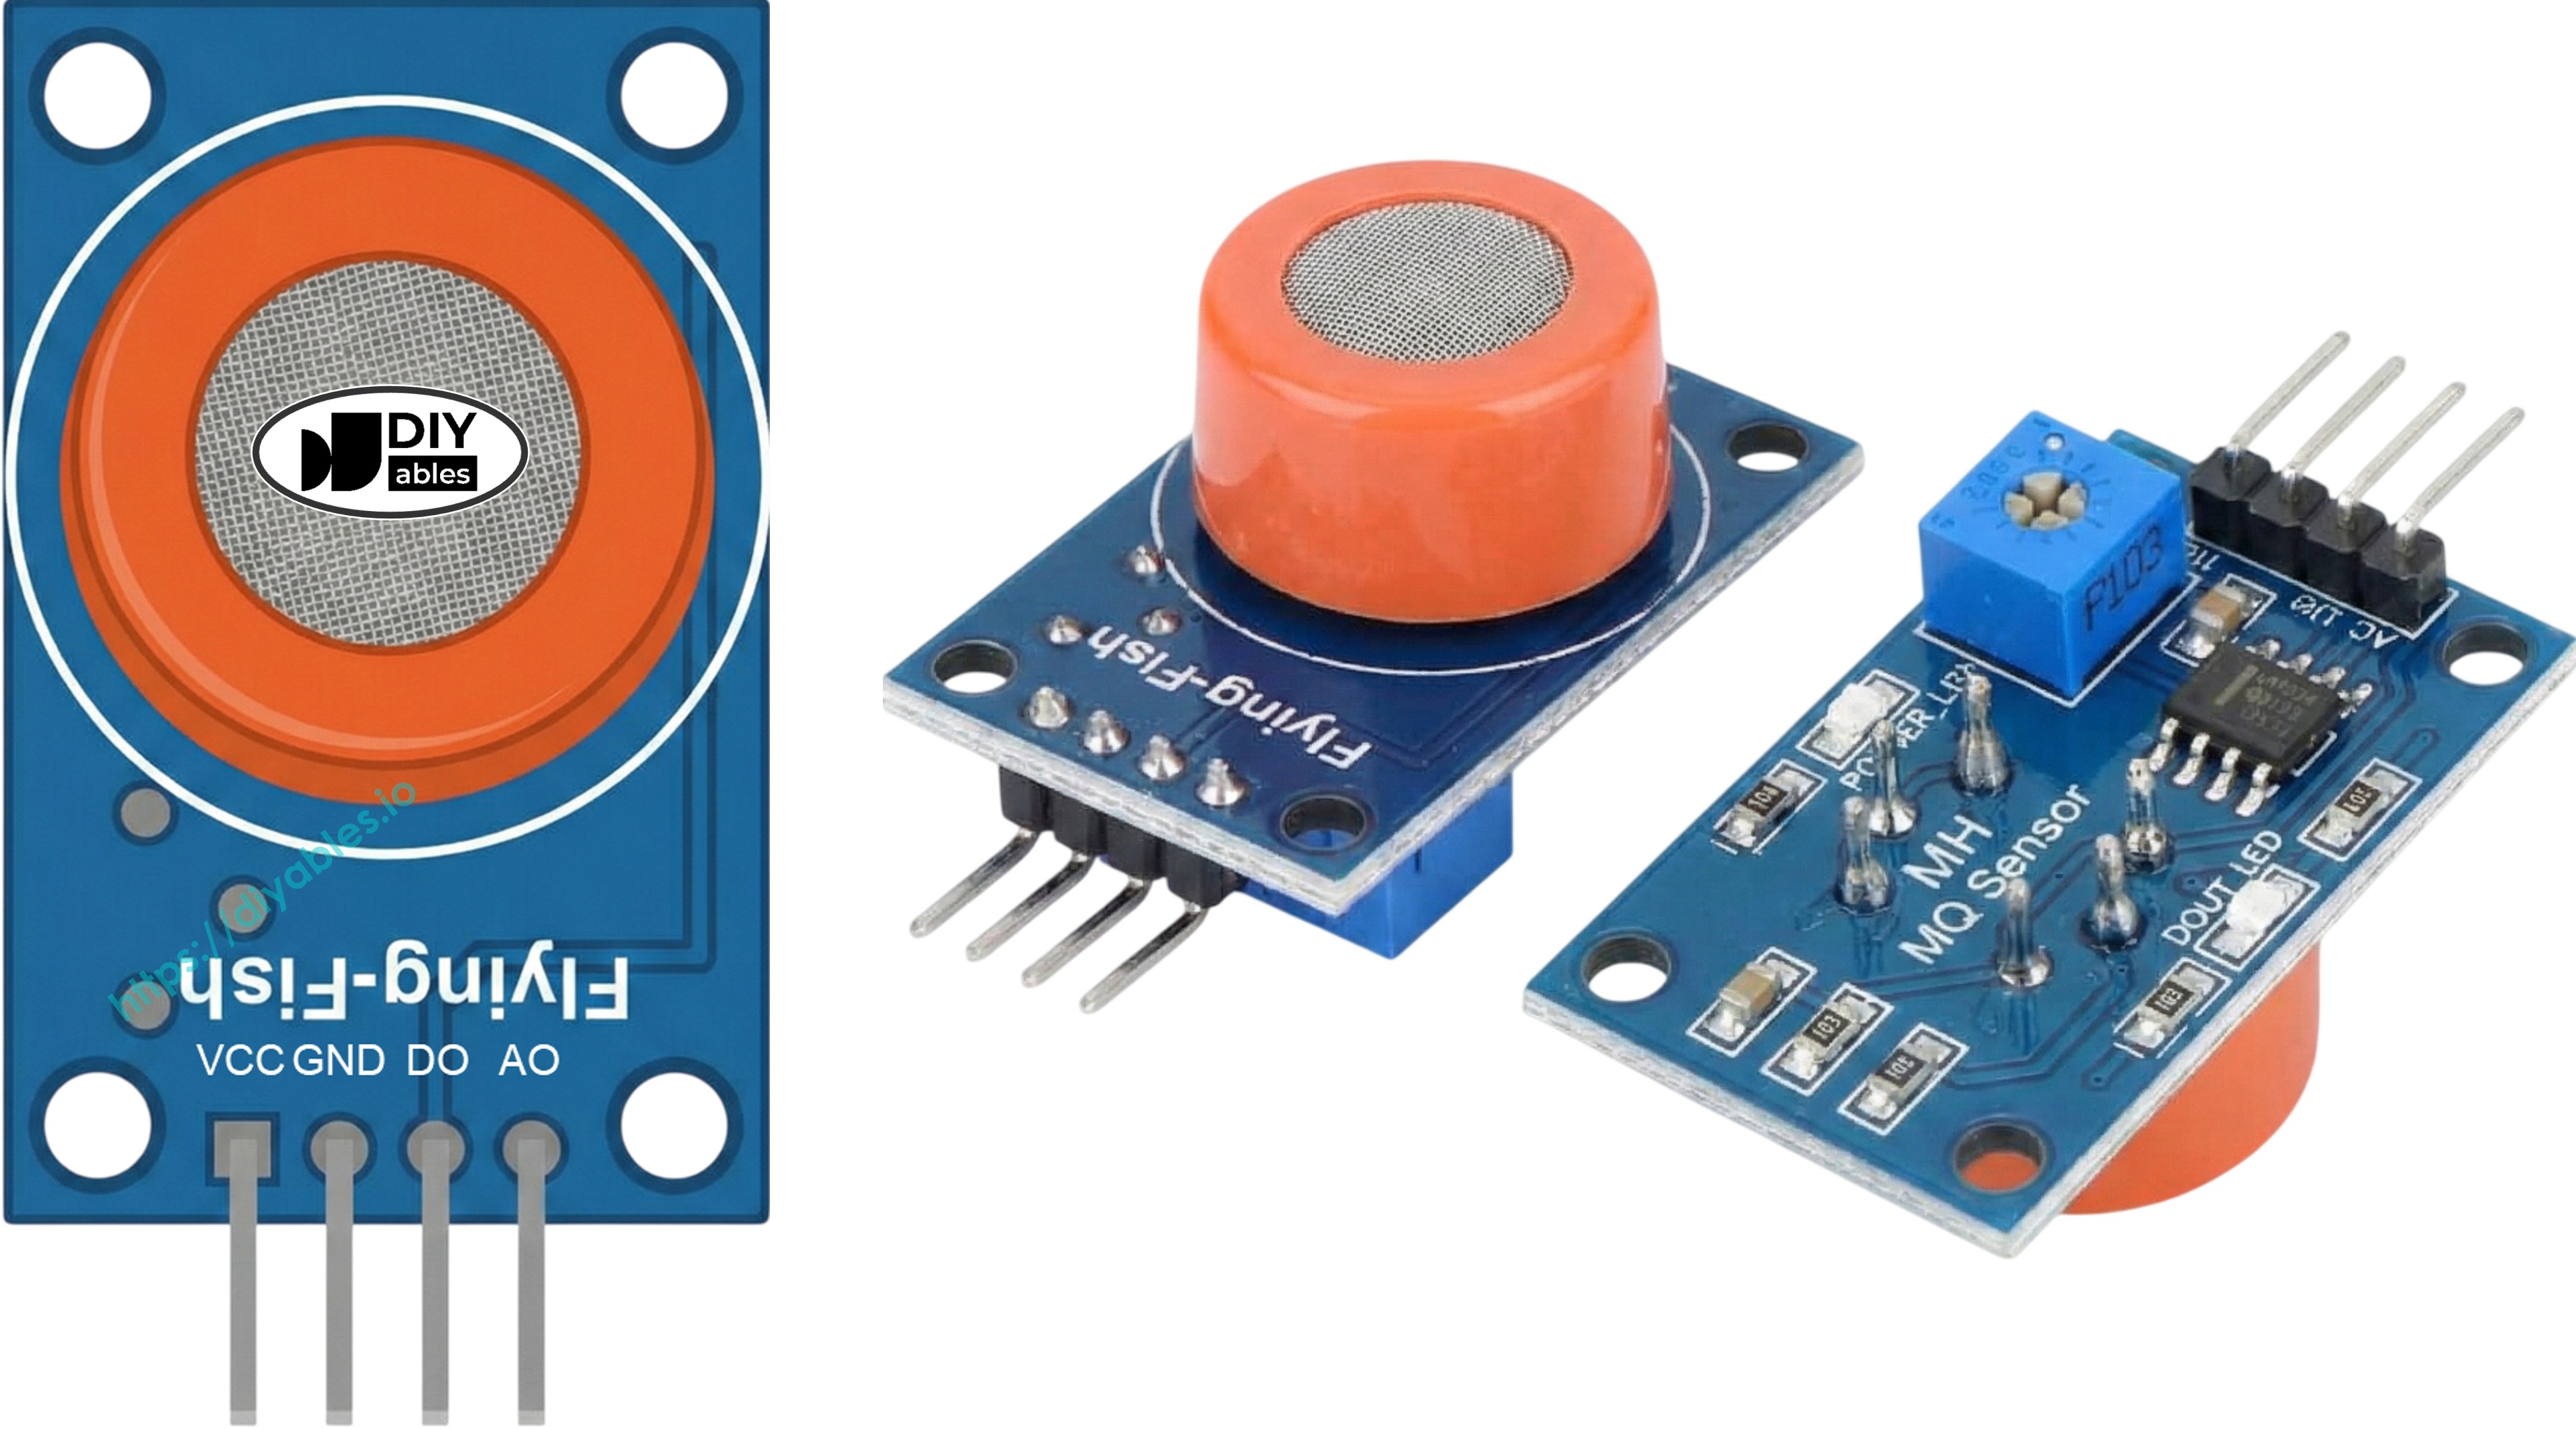
Pinout
The MQ3 alcohol sensor has four pins:
- VCC pin: Connect this pin to VCC (5V).
- GND pin: Connect this pin to GND (0V).
- DO pin: This is a digital output pin. It shows LOW when alcohol is detected and HIGH if not. You can adjust the alcohol detection threshold using the onboard potentiometer.
- AO pin: This is an analog output pin. It produces a voltage that changes depending on the alcohol concentration. Higher alcohol concentration makes the voltage go up.
It also has two LED lights:
- One PWR-LED light shows power is on.
- One DO-LED light shows alcohol detection status based on DO pin value: it lights up when alcohol is detected and turns off when there is none.
How It Works
The MQ3 sensor works based on changes in electrical resistance of the Tin Dioxide (SnO2) sensing element:
In clean air: When the SnO2 semiconductor is heated, oxygen molecules are adsorbed on the surface, creating an electron depletion layer. This forms a potential barrier that makes the material highly resistive, preventing current flow.
In the presence of alcohol: The alcohol vapor reacts with the adsorbed oxygen, reducing the surface oxygen density and lowering the potential barrier. This releases electrons into the tin dioxide, allowing current to flow freely. The more alcohol present, the lower the resistance.
The sensor provides two types of outputs:
For the DO pin (Digital Output):
- The module includes a potentiometer to adjust the sensitivity threshold for alcohol detection.
- If the alcohol concentration exceeds the set threshold, the sensor's output pin turns LOW and the DO-LED light turns on.
- If the alcohol concentration is below the threshold, the sensor's output pin turns HIGH and the DO-LED light turns off.
For the AO pin (Analog Output):
- The output voltage is proportional to the alcohol concentration.
- Higher alcohol vapor concentration produces higher voltage.
- Lower alcohol vapor concentration produces lower voltage.
- The potentiometer does not affect the AO pin value.
The MQ3 Sensor Warm-up and Calibration
Warm-up Time
The MQ3 alcohol sensor must be heated before use to get accurate readings:
- First-time use or after long storage (over a month): Warm it up for 24-48 hours to get stable and accurate results.
- Recent use: It requires only 5-10 minutes to warm up. At first, the readings might be high, but they will stabilize after a short while.
To heat up the MQ3 sensor, connect its VCC and GND pins to a power source or to the VCC and GND on an Arduino UNO R4, and leave it connected for the warm-up period.
Calibration for Threshold Values
Because the MQ3 is a heater-driven sensor, calibration may drift if left in storage for an extended period. To calibrate the sensor and find threshold values for your breathalyzer project:
- Record baseline values: Run the sensor in clean air and record the analog readings (typically around 100-150).
- Test with alcohol: Use isopropyl alcohol or hand sanitizer (do not get liquid on the sensor - only vapors). Squeeze the bottle near the sensor to release vapors and record the readings (typically 400-900 depending on concentration).
- Set thresholds: Based on your readings, you can define threshold levels:
- Sober: Below baseline + 20 (e.g., < 120)
- Within legal limits: Between baseline and moderate level (e.g., 120-400)
- Above legal limits: Above moderate level (e.g., > 400)
Note: These values vary depending on your specific sensor and environment. Always calibrate with your own sensor before use.
Adjusting Digital Output Threshold
To set the threshold for the DO pin using the onboard potentiometer:
- Expose the sensor to alcohol vapors.
- Turn the potentiometer clockwise until the Status LED turns on.
- Turn the potentiometer counterclockwise just until the LED turns off.
- Your threshold is now set.
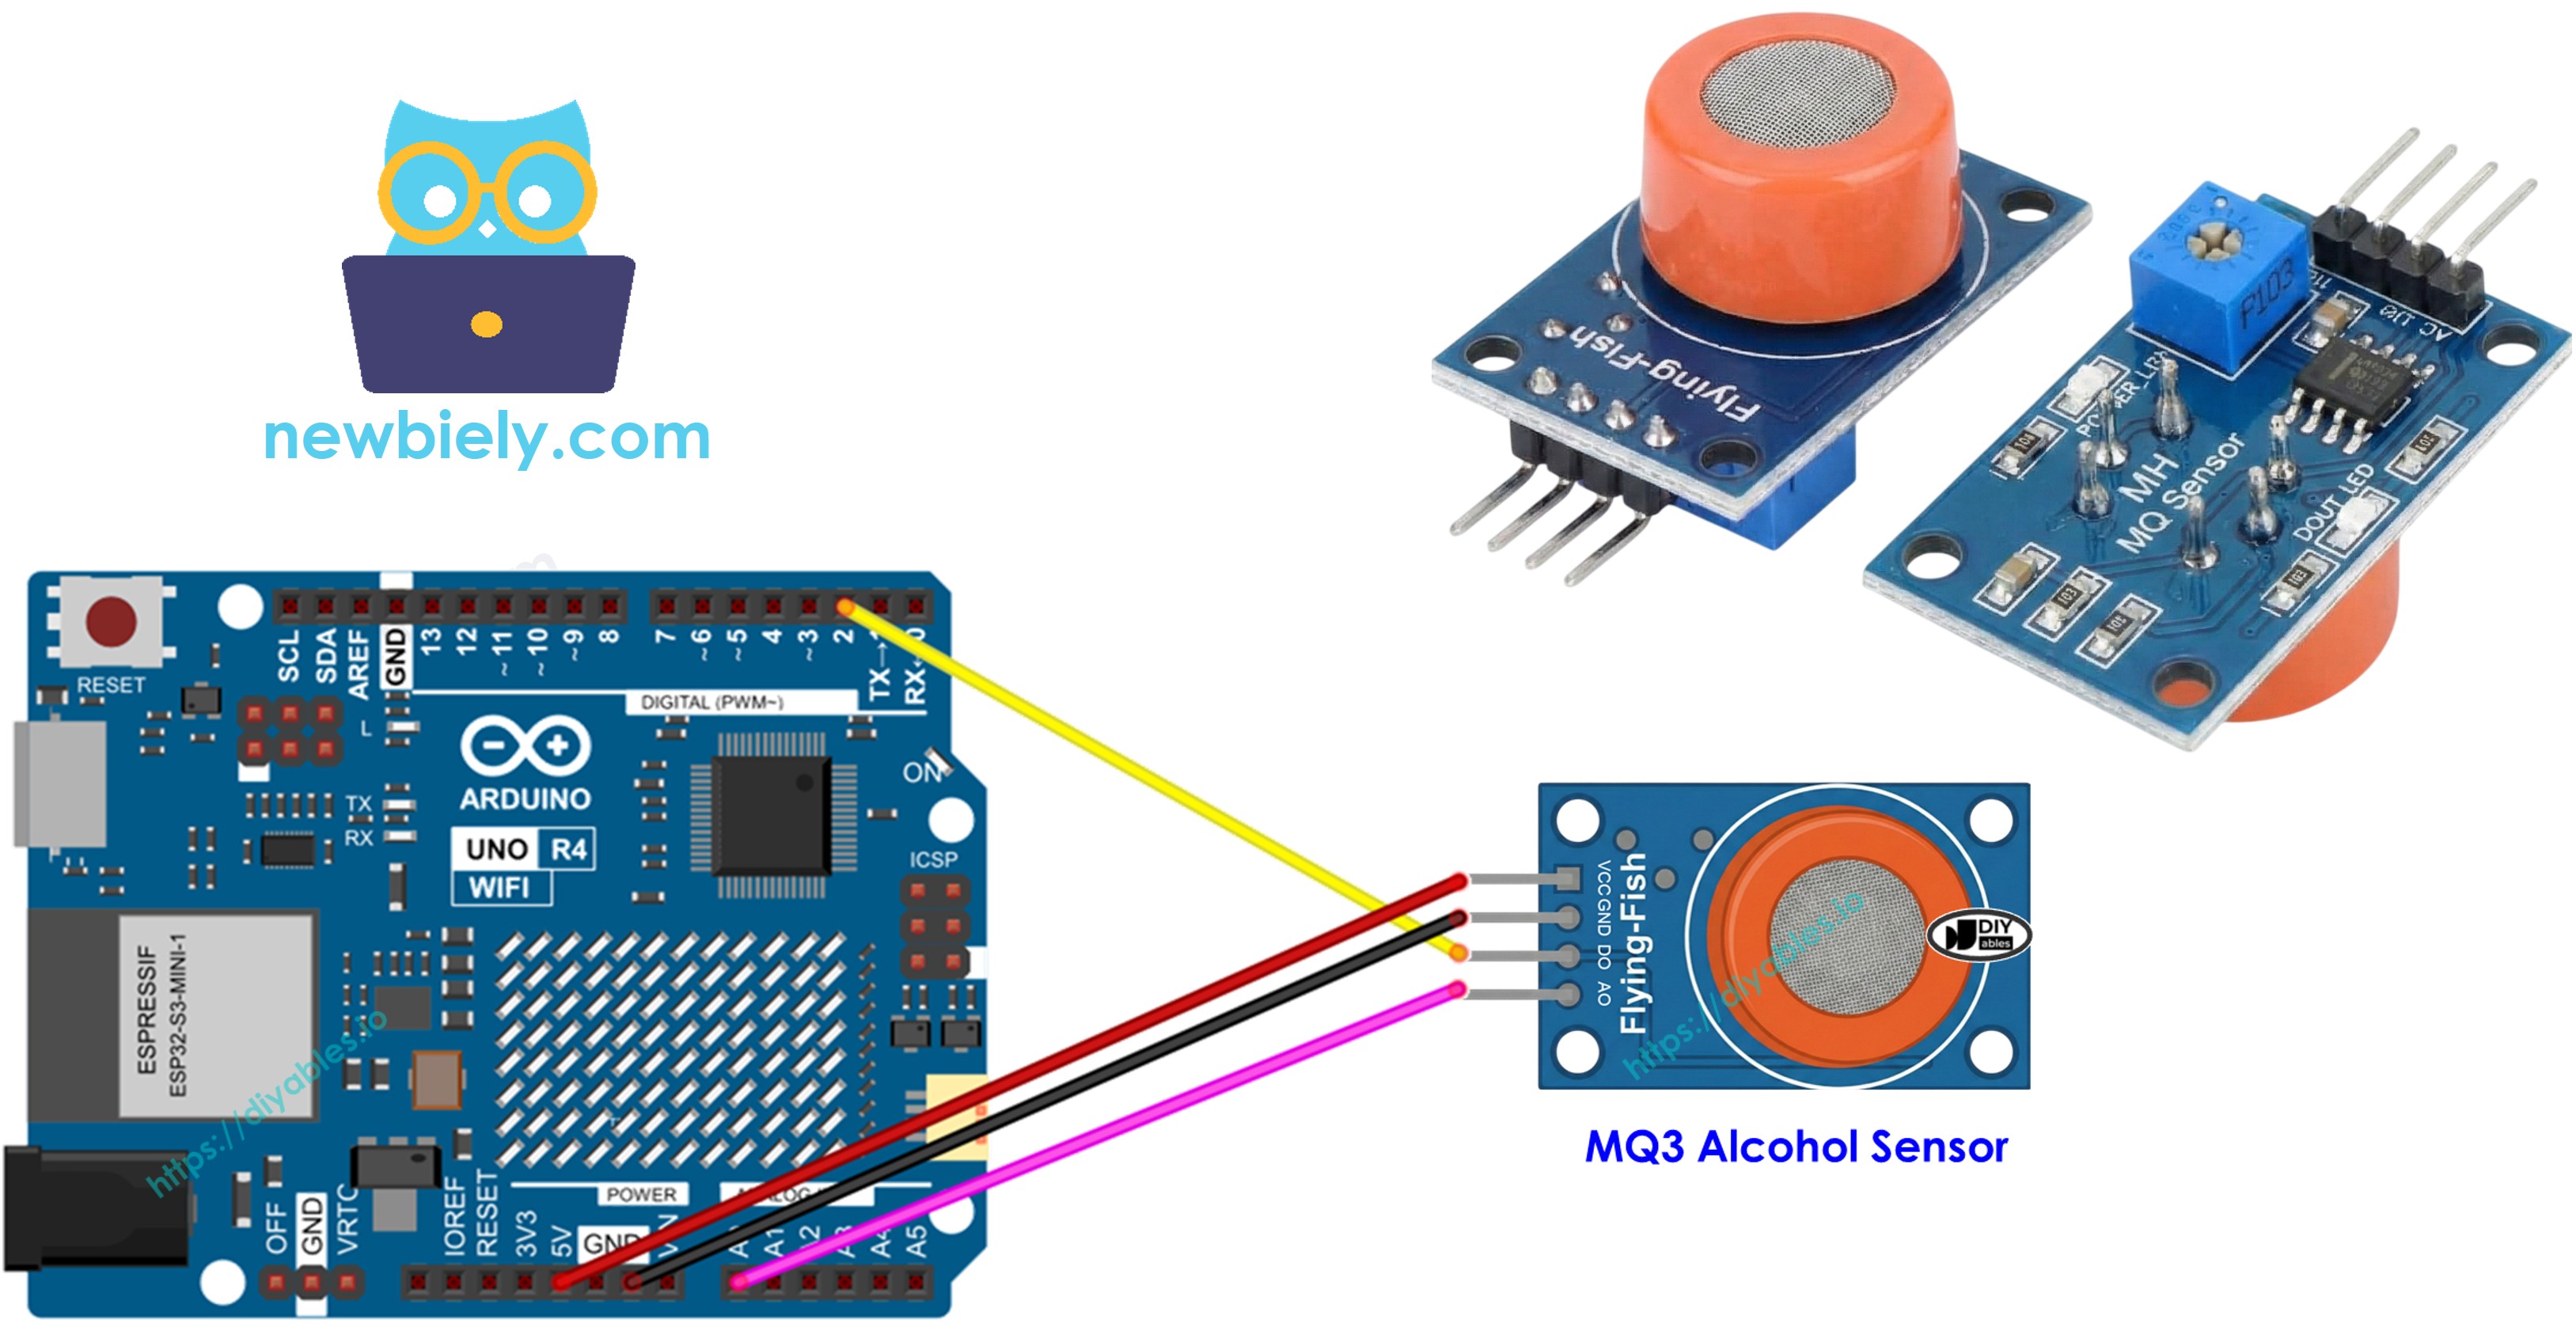
Wiring Diagram
The MQ3 alcohol sensor module has two outputs. You can use one or both, depending on your needs.
| MQ3 Alcohol Sensor | Arduino UNO R4 |
|---|---|
| VCC | 5V |
| GND | GND |
| DO | Pin 2 |
| AO | A0 |
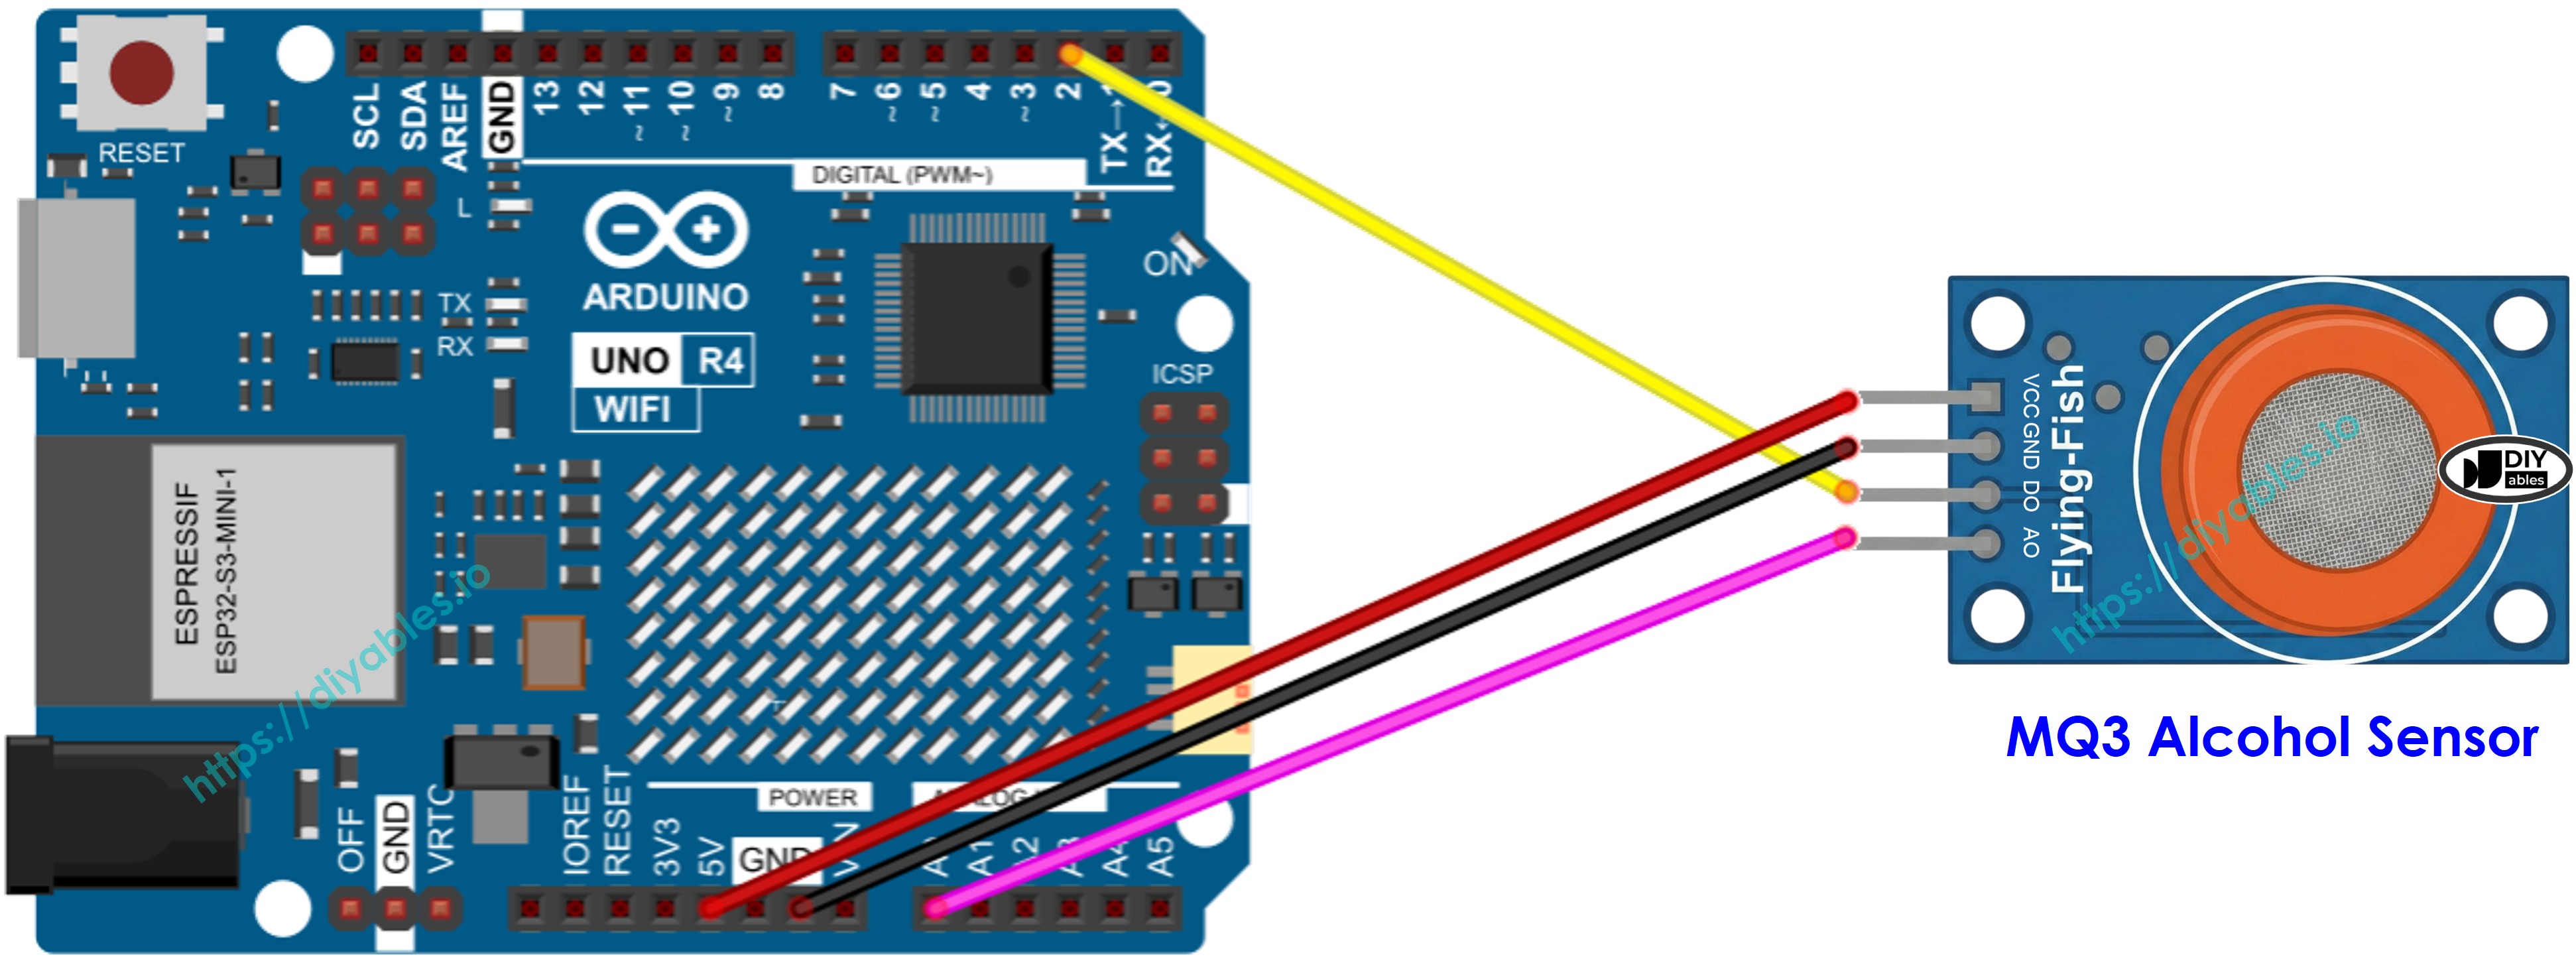
This image is created using Fritzing. Click to enlarge image
See The best way to supply power to the Arduino Uno R4 and other components.
Arduino UNO R4 Code - Read value from DO pin
Detailed Instructions
Follow these instructions step by step:
- If this is your first time using the Arduino Uno R4 WiFi/Minima, refer to the tutorial on setting up the environment for Arduino Uno R4 WiFi/Minima in the Arduino IDE.
- Connect the Arduino Uno R4 board to the MQ3 alcohol sensor according to the provided diagram.
- Connect the Arduino Uno R4 board to your computer using a USB cable.
- Launch the Arduino IDE on your computer.
- Select the appropriate Arduino Uno R4 board (e.g., Arduino Uno R4 WiFi) and COM port.
- Copy the code above and open it in Arduino IDE.
- Click the Upload button in Arduino IDE to upload the code to Arduino UNO R4.
- Expose the MQ3 sensor to alcohol vapor (you can use hand sanitizer or rubbing alcohol on a cotton ball near the sensor).
- Check the result on the Serial Monitor.
Note: If the sensor output does not reflect the actual alcohol presence (e.g., it detects alcohol when there is none, or doesn't detect when alcohol is present), you need to adjust the trigger threshold by turning the potentiometer on the sensor module. Turn it clockwise to increase sensitivity or counterclockwise to decrease sensitivity until the detection matches reality.
Arduino UNO R4 Code - Read value from AO pin
Detailed Instructions
- Copy the code above and open it in Arduino IDE
- Click the Upload button in Arduino IDE to upload the code to Arduino UNO R4
- Expose the MQ3 sensor to alcohol vapor (you can use hand sanitizer or rubbing alcohol)
- Check the result on the Serial Monitor.
Based on the values from DO or AO, you can set threshold levels for alcohol detection and trigger an alarm, activate a warning LED, or log the data for breathalyzer applications.
Arduino UNO R4 Code - Simple Breathalyzer with Thresholds
This advanced example uses the analog output to estimate the level of alcohol intoxication based on calibrated threshold values.
Detailed Instructions
- Important: Before using this code, run the calibration sketch above to find your sensor's threshold values in clean air and with alcohol present.
- Replace the threshold values in the code (SOBER_THRESHOLD and DRUNK_THRESHOLD) with your calibrated values.
- Upload the code to Arduino UNO R4.
- Test by exposing the sensor to alcohol vapor (hand sanitizer or isopropyl alcohol).
- Check the result on the Serial Monitor.
Note: This is for educational purposes only. Do not use this as a legal breathalyzer or for determining fitness to drive.