This fun project combines the TCS3200D/TCS230 color sensor with a web-based Minion character. The Arduino UNO R4 WiFi reads colors from the sensor and sends the detected color to a web browser via WebSocket. The Minion on the web page changes its skin color in real-time to match whatever color you put in front of the sensor! To make it easy to build the web interface and handle real-time communication, we will use the DIYables WebApps library.
The Arduino UNO R4 reads RGB values from the TCS3200D/TCS230 color sensor
The Arduino converts the RGB values to a HEX color code
The color code is sent to a web browser via WebSocket in real-time
The web page displays a fun animated Minion whose body, arms, and eyelids change color
We also provide a step-by-step video instruction at the bottom of this tutorial.
Disclosure: Some of the links provided in this section are Amazon affiliate links. We may receive a commission for any purchases made through these links at no additional cost to you. Additionally, some of these links are for products from our own brand, DIYables .
Overview of TCS3200D/TCS230 Color Sensor and DIYables WebApps
Learn about the TCS3200D/TCS230 color sensor, DIYables WebApps library, and how to create custom web apps in the tutorials below:
The Arduino reads the color sensor every 1 second.
For each reading, it selects the red, green, and blue filters one at a time using the S2/S3 pins, then measures the pulse width on the OUT pin.
The raw pulse width values are mapped to 0-255 RGB values using calibration values (from the calibration step).
The RGB values are converted to a HEX color string (e.g., #FF8000).
The HEX color string is sent to the web browser via WebSocket using the DIYables WebApps library.
The web page receives the color and updates the Minion's body, arms, and eyelids to that color in real-time.
Arduino UNO R4 Code - Color Sensor Minion Web App
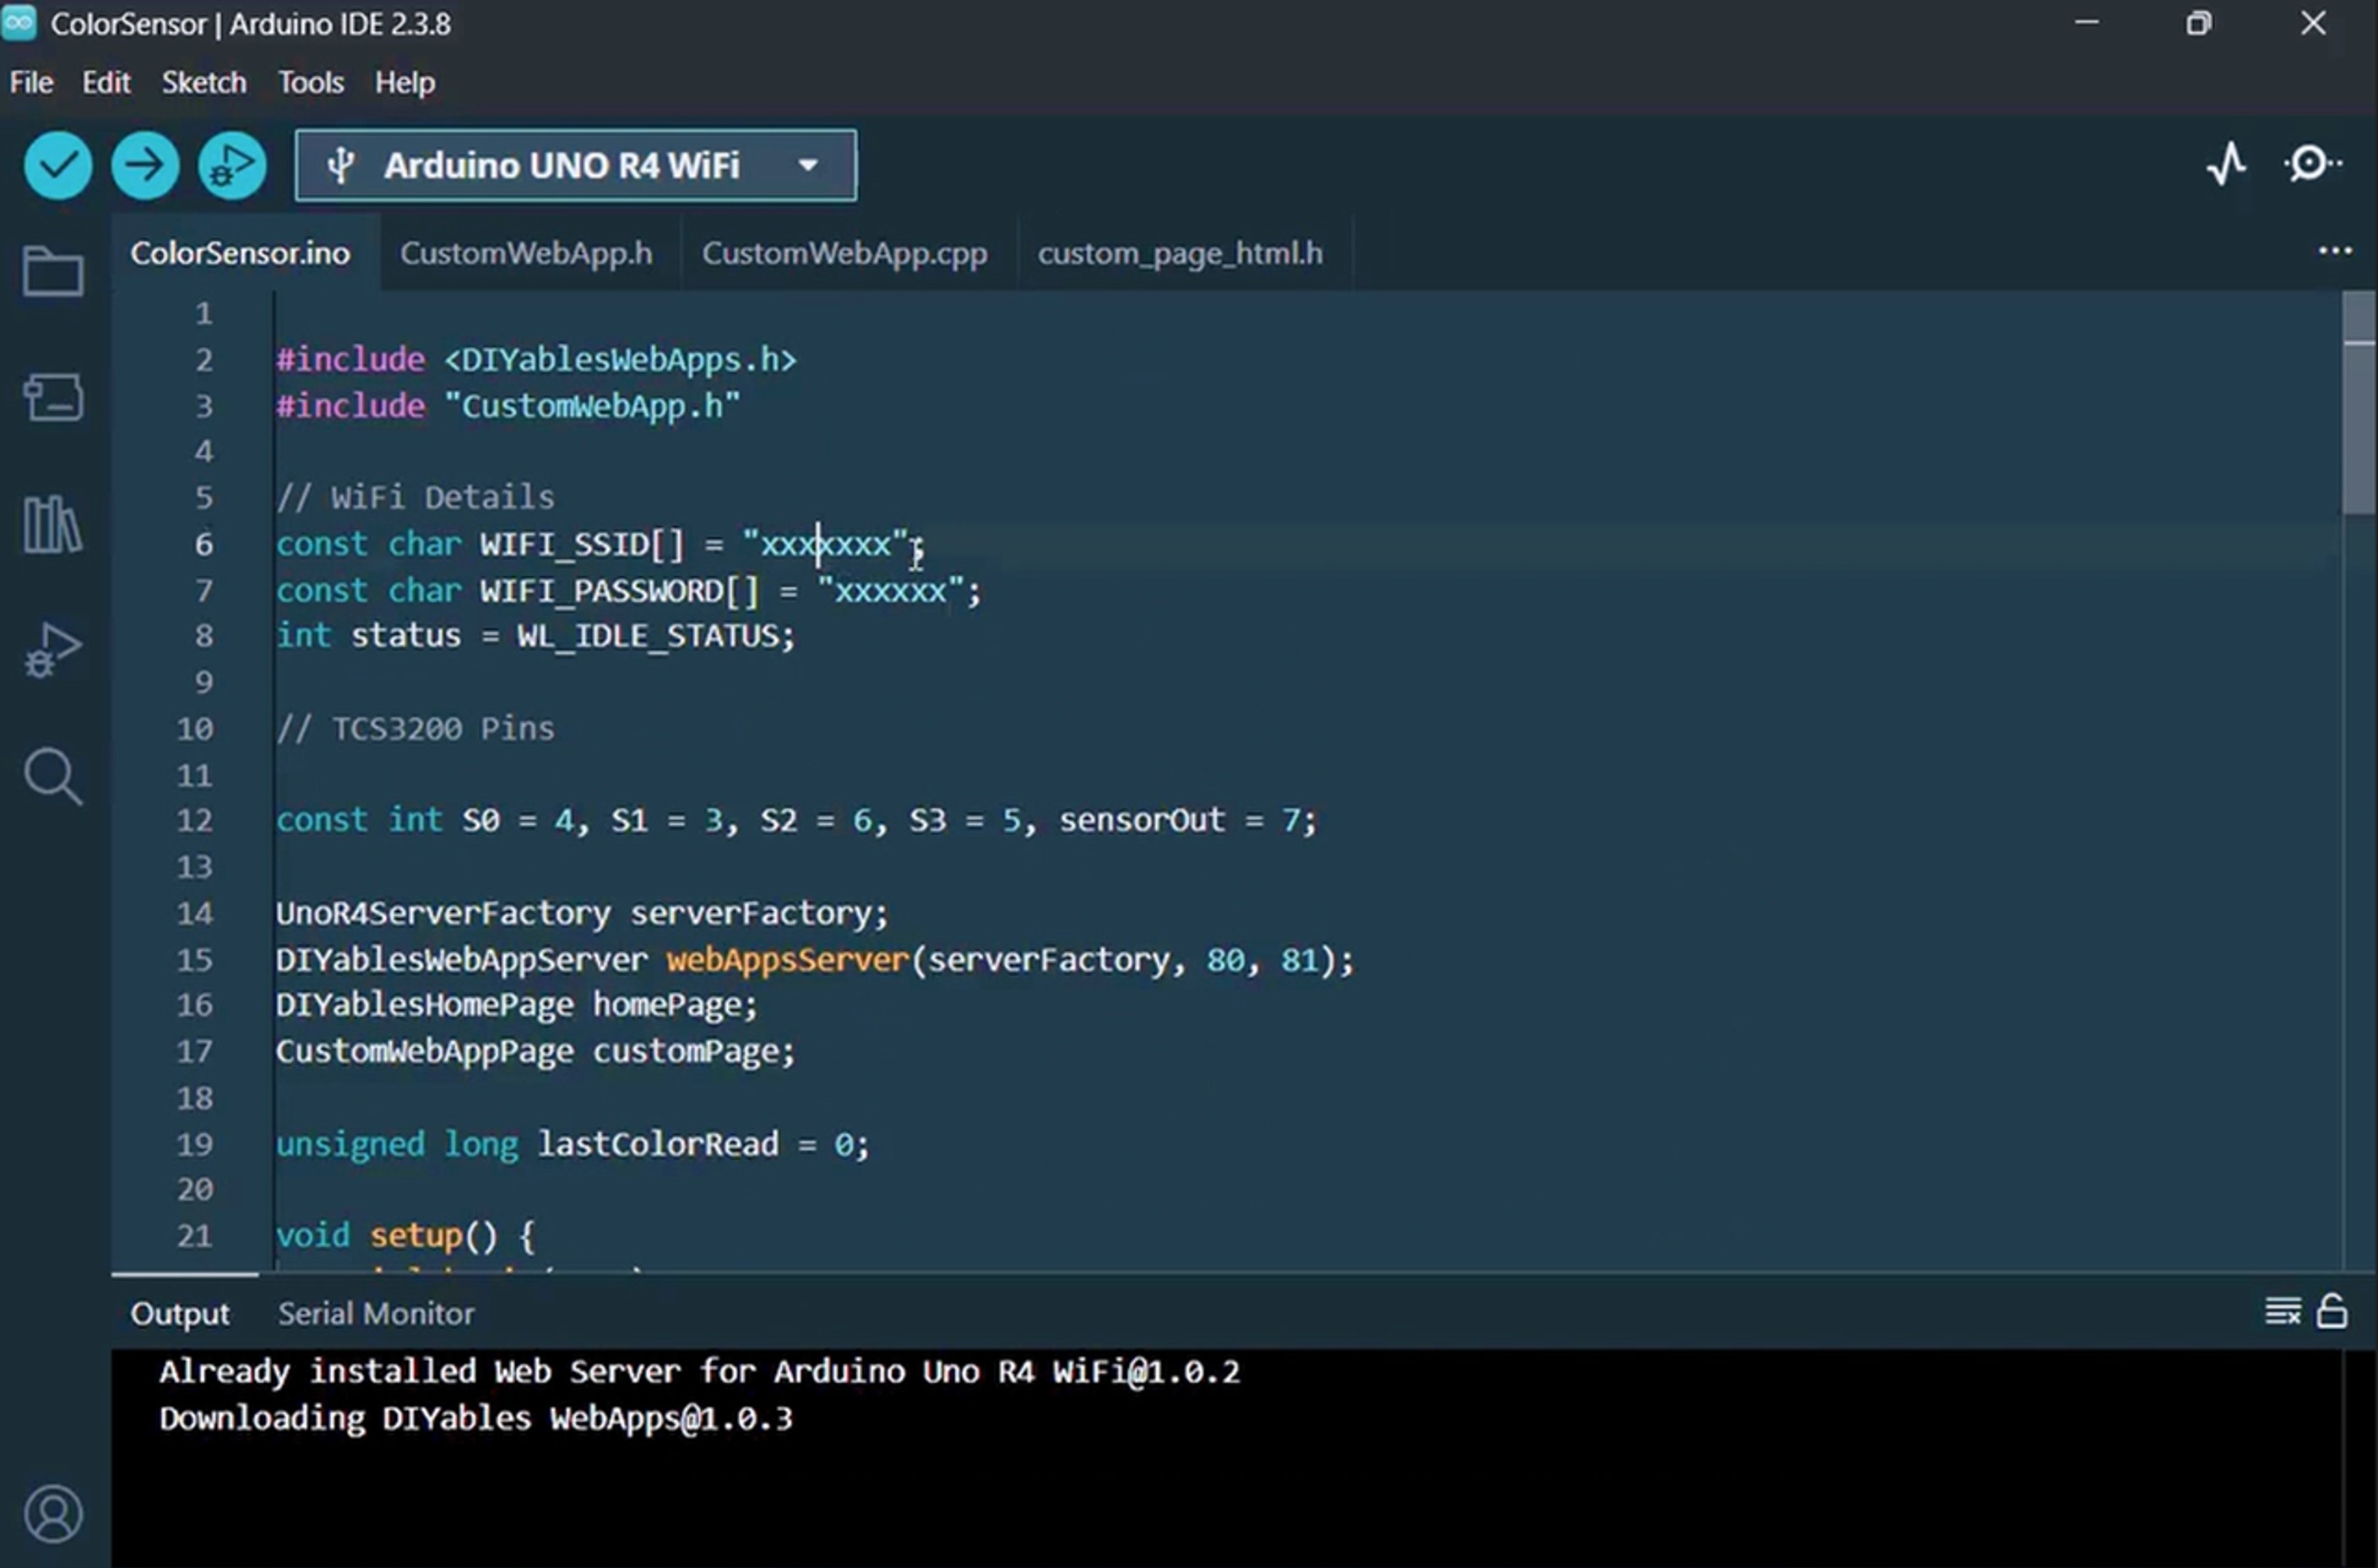
The code consists of 4 files:
ColorSensor.ino - Main Arduino sketch: reads the color sensor and sends the color to the web page
CustomWebApp.h - Header file: defines the custom web app page class
CustomWebApp.cpp - Implementation file: handles WebSocket communication with the "Color Sensor:" identifier
custom_page_html.h - Web page: contains the animated Minion HTML/CSS/JavaScript that receives colors and updates the Minion's skin
ColorSensor.ino
/* * This Arduino UNO R4 code was developed by newbiely.com * * This Arduino UNO R4 code is made available for public use without any restriction * * For comprehensive instructions and wiring diagrams, please visit: * https://newbiely.com/tutorials/arduino-uno-r4/arduino-uno-r4-color-sensor-via-web */#include <DIYablesWebApps.h>#include"CustomWebApp.h"// CHANGE THESE TO YOUR WIFI DETAILSconstchar WIFI_SSID[] = "YOUR_WIFI_SSID";constchar WIFI_PASSWORD[] = "YOUR_WIFI_PASSWORD";intstatus = WL_IDLE_STATUS;// TCS3200 Pinsconstint S0 = 4, S1 = 3, S2 = 6, S3 = 5, sensorOut = 7;UnoR4ServerFactory serverFactory;DIYablesWebAppServerwebAppsServer(serverFactory, 80, 81);DIYablesHomePage homePage;CustomWebAppPage customPage;unsignedlong lastColorRead = 0;voidsetup() {Serial.begin(9600);// Initialize TCS3200 pinspinMode(S0, OUTPUT);pinMode(S1, OUTPUT);pinMode(S2, OUTPUT);pinMode(S3, OUTPUT);pinMode(sensorOut, INPUT);digitalWrite(S0, HIGH);digitalWrite(S1, LOW); // 20% frequency scalingwebAppsServer.addApp(&homePage);webAppsServer.addApp(&customPage);// Check for the WiFi moduleif (WiFi.status() == WL_NO_MODULE) {Serial.println("Communication with WiFi module failed!");// Stop program executionwhile (true); }String fv = WiFi.firmwareVersion();if (fv < WIFI_FIRMWARE_LATEST_VERSION) {Serial.println("Please upgrade the firmware"); }// Attempt to connect to WiFi networkwhile (status != WL_CONNECTED) {// Connect to WPA/WPA2 network (change if using open or WEP)status = WiFi.begin(WIFI_SSID, WIFI_PASSWORD);// Wait 10 seconds for connectiondelay(10000); }webAppsServer.begin();Serial.println("Color Web Server Ready!");}voidloop() {webAppsServer.loop();// Read color every 1 secondif (millis() - lastColorRead > 1000) {// Read Red colordigitalWrite(S2, LOW);digitalWrite(S3, LOW);int r = map(pulseIn(sensorOut, LOW), 31, 150, 255, 0);// Read Green colordigitalWrite(S2, HIGH);digitalWrite(S3, HIGH);int g = map(pulseIn(sensorOut, LOW), 35, 180, 255, 0);// Read Blue colordigitalWrite(S2, LOW);digitalWrite(S3, HIGH);int b = map(pulseIn(sensorOut, LOW), 30, 150, 255, 0);// Convert to HEX and send to Webchar hexColor[8]; sprintf(hexColor, "#%02X%02X%02X", constrain(r, 0, 255), constrain(g, 0, 255), constrain(b, 0, 255)); customPage.sendToWeb(String(hexColor));Serial.println("Sent to Minion: " + String(hexColor)); lastColorRead = millis(); }}
CustomWebApp.h
/* * This Arduino UNO R4 code was developed by newbiely.com * * This Arduino UNO R4 code is made available for public use without any restriction * * For comprehensive instructions and wiring diagrams, please visit: * https://newbiely.com/tutorials/arduino-uno-r4/arduino-uno-r4-color-sensor-via-web */#ifndef CUSTOM_WEBAPP_H#define CUSTOM_WEBAPP_H#include <DIYablesWebApps.h>/** * Simple Custom WebApp Page * * This is a template for creating your own custom web applications. * It provides basic controls like buttons and sliders that communicate * with your Arduino in real-time. */class CustomWebAppPage : public DIYablesWebAppPageBase {private:// WebSocket message identifier for this custom appstaticconstString APP_IDENTIFIER;public: CustomWebAppPage();// ========================================// REQUIRED METHODS - USED BY LIBRARY - DON'T CHANGE THESE!// ========================================void handleHTTPRequest(IWebClient& client) override;void handleWebSocketMessage(IWebSocket& ws, const char* message, uint16_tlength) override;const char* getPageInfo() constoverride;String getNavigationInfo() constoverride;// ========================================// YOUR METHODS - USE THESE IN YOUR CODE!// ========================================void onCustomMessageReceived(void (*callback)(const String& payload));void sendToWeb(const String& message);};#endif
CustomWebApp.cpp
/* * This Arduino UNO R4 code was developed by newbiely.com * * This Arduino UNO R4 code is made available for public use without any restriction * * For comprehensive instructions and wiring diagrams, please visit: * https://newbiely.com/tutorials/arduino-uno-r4/arduino-uno-r4-color-sensor-via-web */#include"CustomWebApp.h"#include"custom_page_html.h"// Define the static member - WebSocket message identifier for this custom appconstString CustomWebAppPage::APP_IDENTIFIER = "Color Sensor:";// Callback function for handling messages from web browservoid (*customMessageCallback)(const String& payload) = nullptr;CustomWebAppPage::CustomWebAppPage() : DIYablesWebAppPageBase("/custom") {}void CustomWebAppPage::handleHTTPRequest(IWebClient& client) {// Send the HTML page to web browser sendHTTPHeader(client); client.print(CUSTOM_PAGE_HTML);}void CustomWebAppPage::handleWebSocketMessage(IWebSocket& ws, const char* message, uint16_tlength) {String messageStr = String(message, length);Serial.print("Color Sensor WebApp received: ");Serial.println(messageStr);// Only handle messages that start with our app identifierif (messageStr.startsWith(APP_IDENTIFIER)) {String payload = messageStr.substring(APP_IDENTIFIER.length()); // Remove identifier// Call your callback function with the payloadif (customMessageCallback) { customMessageCallback(payload); } }}void CustomWebAppPage::onCustomMessageReceived(void (*callback)(const String& payload)) { customMessageCallback = callback;}void CustomWebAppPage::sendToWeb(const String& message) {// Send message to web browser with app identifierString fullMessage = APP_IDENTIFIER + message; broadcastToAllClients(fullMessage.c_str());}const char* CustomWebAppPage::getPageInfo() const {return"🔧 Color Sensor WebApp";}String CustomWebAppPage::getNavigationInfo() const {String result = "<a href=\""; result += getPagePath(); result += "\" class=\"app-card custom\" style=\"background: linear-gradient(135deg, #007bff 0%, #0056b3 100%);\">"; result += "<h3>🔧 Color Sensor WebApp</h3>"; result += "<p>Simple template for your own apps</p>"; result += "</a>";return result;}
Calibrate your color sensor first by following the TCS3200D/TCS230 calibration guide. Note down your calibration values (redMin, redMax, greenMin, greenMax, blueMin, blueMax).
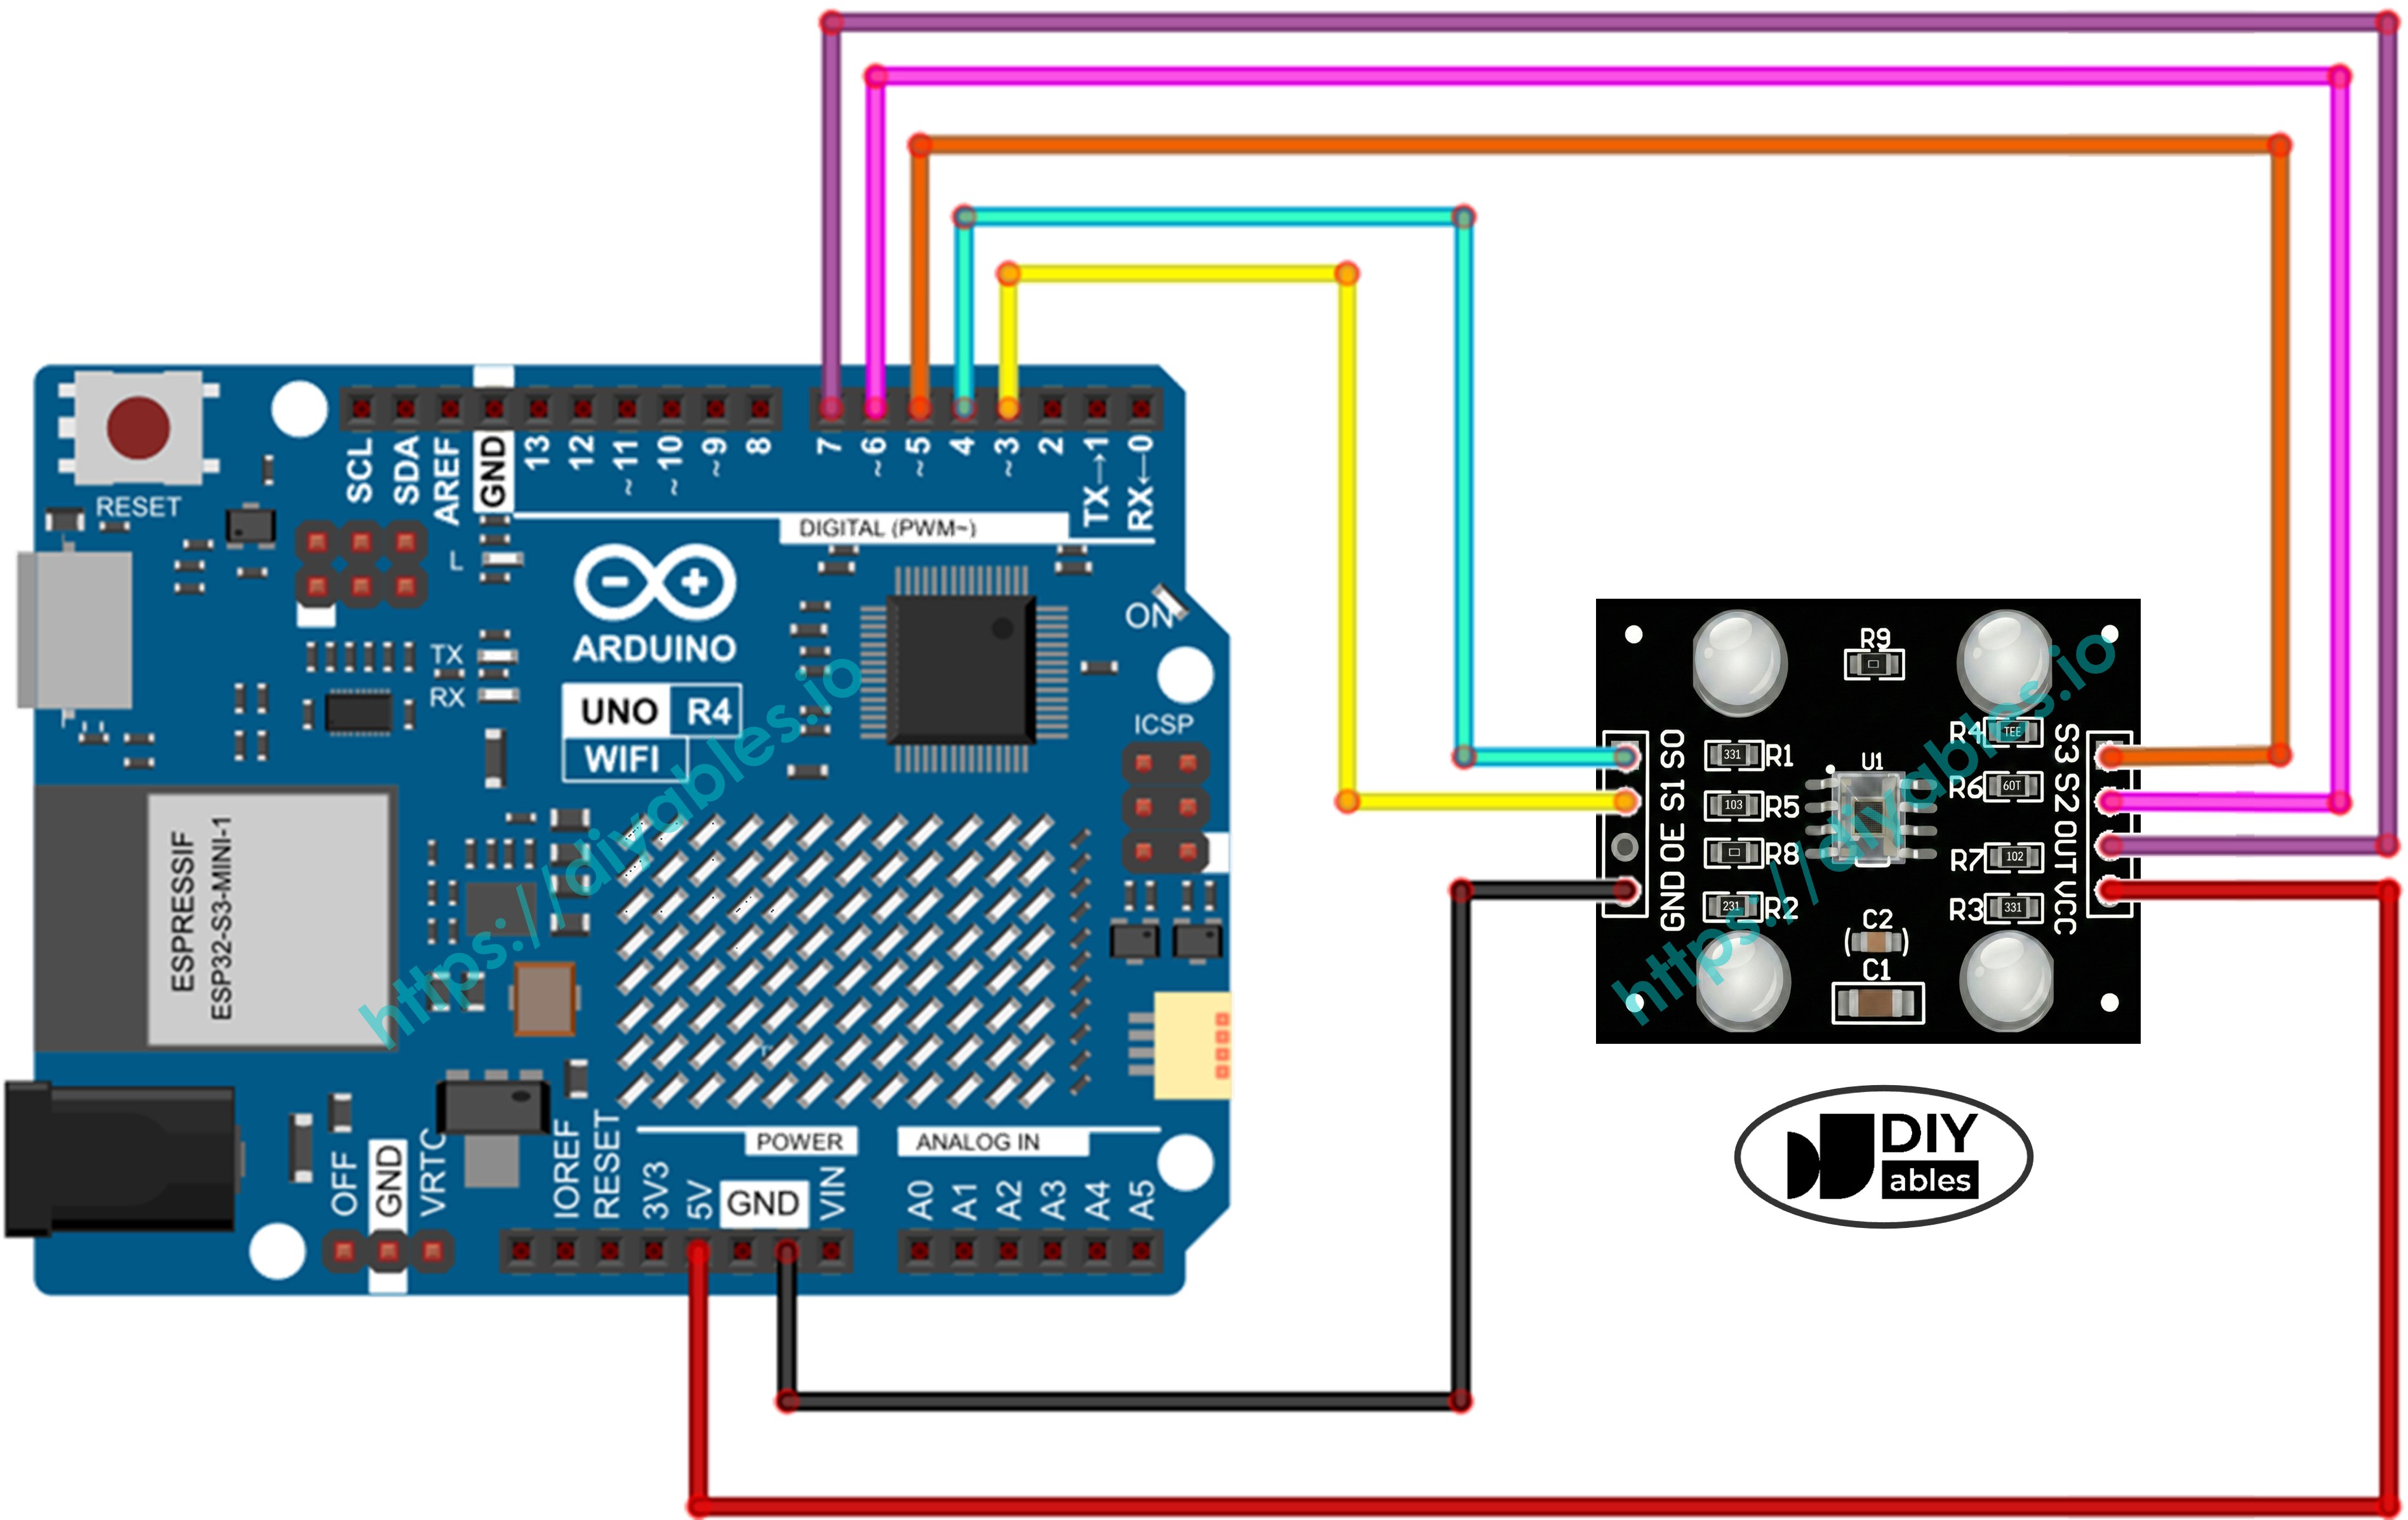
Wire the components according to the wiring diagram above.
Connect the Arduino Uno R4 WiFi board to your computer using a USB cable.
Launch the Arduino IDE on your computer.
Select the appropriate Arduino Uno R4 board (e.g., Arduino Uno R4 WiFi) and COM port.
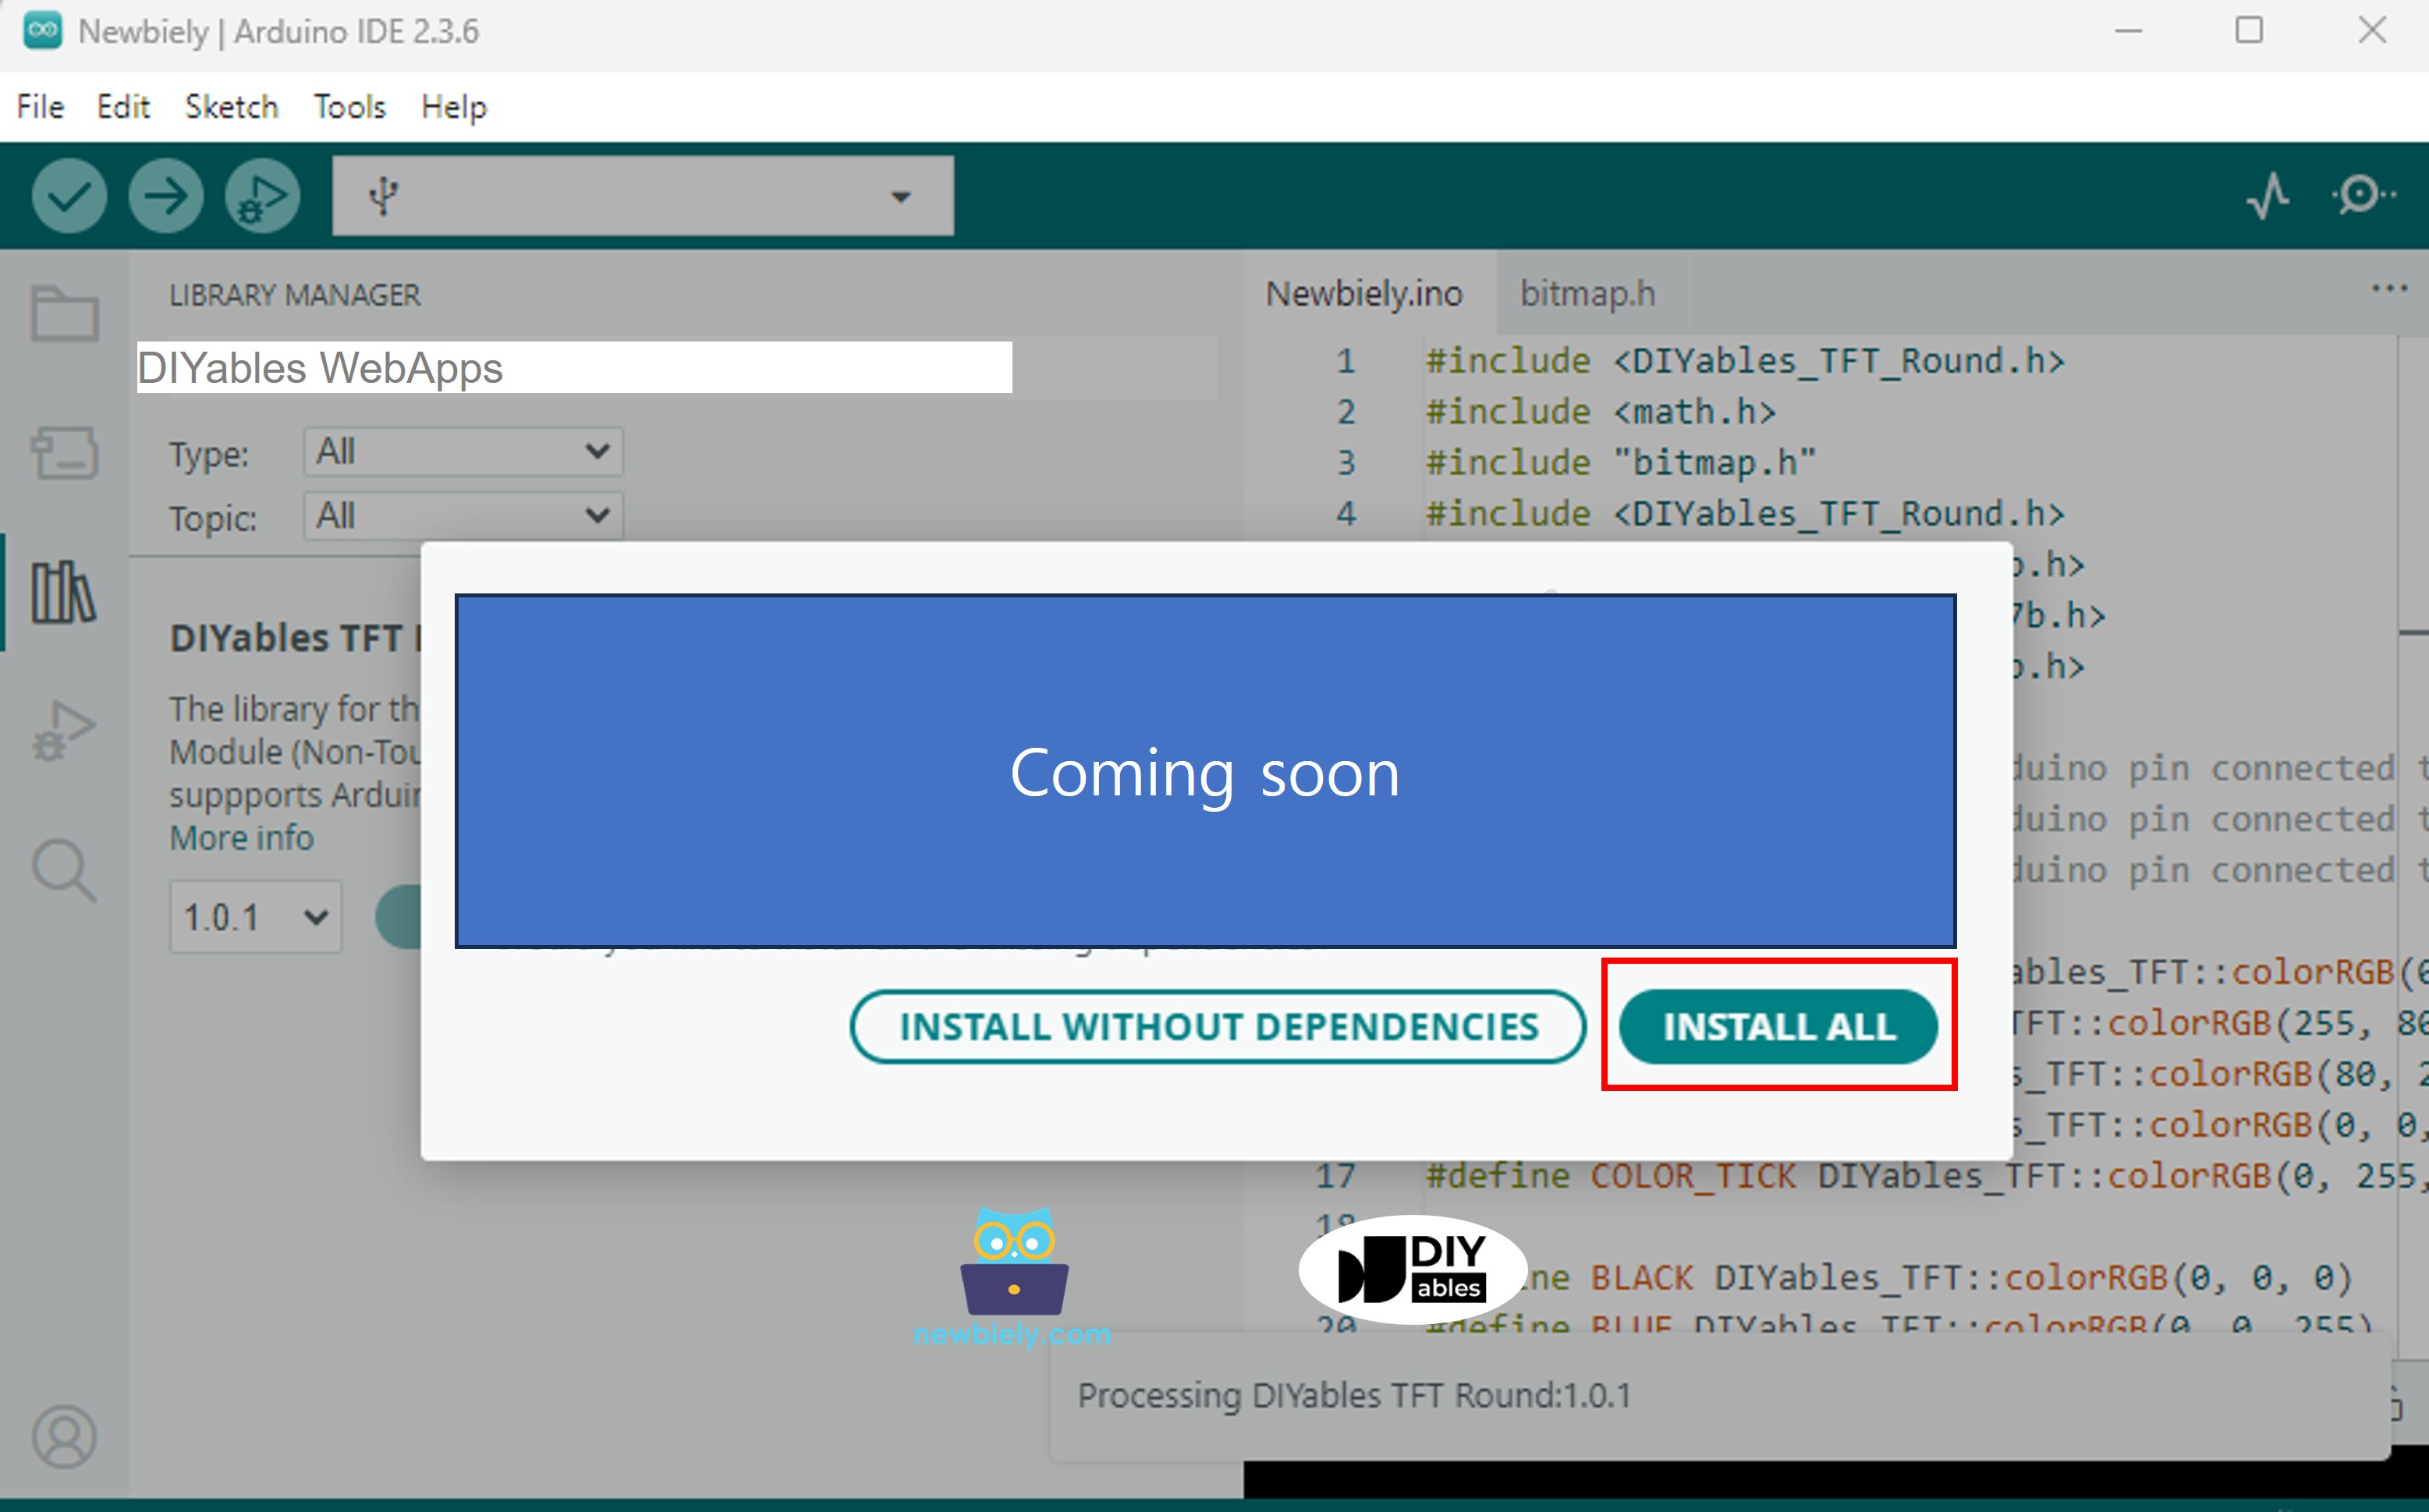
Navigate to the Libraries icon on the left bar of the Arduino IDE.
Search "DIYables WebApps", then find the DIYables WebApps library by DIYables.
Click Install button to install the library.
You will be asked for installing some other library dependencies.
Click Install All button to install all library dependencies.
Create a new sketch in Arduino IDE and name it ColorSensor.
Copy and paste all 4 files above into the Arduino IDE project. The Arduino IDE project should have 4 files as shown below:
In the ColorSensor.ino file, update the Wi-Fi details (SSID and password) with your own:
Update the calibration values in the map() calls inside loop() with your own calibration values from the calibration step. For example, if your calibration gave you redMin = 42, redMax = 210, greenMin = 55, greenMax = 185, blueMin = 60, blueMax = 172, change the lines to:
int r = map(pulseIn(sensorOut, LOW), 42, 210, 255, 0);int g = map(pulseIn(sensorOut, LOW), 55, 185, 255, 0);int b = map(pulseIn(sensorOut, LOW), 60, 172, 255, 0);
Click the Upload button in Arduino IDE to upload the code to Arduino UNO R4.
Open the Serial Monitor. You will see output like this:
Newbiely | Arduino IDE 2.3.8
──
☐
✕
File
Edit
Sketch
Tools
Help
Arduino Uno R4 WiFi
Newbiely.ino
···
8Serial.println("Hello World!");
Output
Serial Monitor
Message (Enter to send message to 'Arduino Uno R4 WiFi' on 'COM15')
New Line
9600 baud
Color Web Server Ready!
INFO: Added app /
INFO: Added app /custom
DIYables WebApp Library
Platform: Arduino Uno R4 WiFi
Network connected!
IP address: 192.168.0.2
HTTP server started on port 80
WebSocket server started on port 81
==========================================
DIYables WebApp Ready!
==========================================
📱 Web Interface: http://192.168.0.2
🔗 WebSocket: ws://192.168.0.2:81
📋 Available Applications:
🏠 Home Page: http://192.168.0.2/
🔧 Color Sensor WebApp: http://192.168.0.2/custom
==========================================
Sent to Minion: #FFD200
Sent to Minion: #00C832
Sent to Minion: #0028FF
Ln 11, Col 1
Arduino Uno R4 WiFi on COM15
2
If you do not see anything, reboot the Arduino board.
Take note of the IP address displayed, and enter this address into the address bar of a web browser on your smartphone or PC.
Example: http://192.168.0.2
You will see the home page. Click the Color Sensor WebApp link.
Or you can access the Minion page directly by IP address followed by /custom. For example: http://192.168.0.2/custom
You will see the animated Minion character on the web page.
Place a colored object in front of the TCS3200 sensor — the Minion's skin color will change in real-time to match the detected color!
You can see the step-by-step instructions in the video below.
How the Code Works
Arduino Side (ColorSensor.ino)
The main sketch does the following:
Initializes the TCS3200 sensor pins: S0, S1 are set for 20% frequency scaling. S2, S3 are used to select color filters.
Reads color every 1 second: In the loop(), the Arduino selects the red, green, and blue filters one by one, reads the pulse width using pulseIn(), and maps the raw values to 0-255 RGB values using your calibration numbers.
Converts to HEX: The RGB values are formatted into a HEX color string like #FF8000 using sprintf().
Sends to web browser: The HEX string is sent to all connected web clients via customPage.sendToWeb().
Web Page Side (custom_page_html.h)
The HTML page contains:
An animated Minion character built entirely with CSS — including blinking eyes, a laughing mouth, and randomly moving pupils.
WebSocket connection: The JavaScript connects to the Arduino's WebSocket server (port 81) and listens for incoming color messages.
Color update: When a message like #FF8000 is received, the Minion's body, arms, and eyelids smoothly transition to the new color using CSS transition.
Auto-reconnect: If the WebSocket connection drops, the page automatically tries to reconnect every 2 seconds.
Responsive design: The Minion scales automatically to fit different screen sizes (phones, tablets, desktops).
Communication Protocol
This project uses the DIYables WebApps custom web app framework with the identifier "Color Sensor:":
Arduino sends: Color Sensor:#FF8000 (identifier + HEX color)
Web page receives: Strips the identifier and applies the remaining HEX color #FF8000 to the Minion
Please feel free to share the link of this tutorial. However, Please do not use our content on any other websites. We invested a lot of effort and time to create the content, please respect our work!