Arduino UNO R4 - DIYables Bluetooth App Multiple Apps

Overview

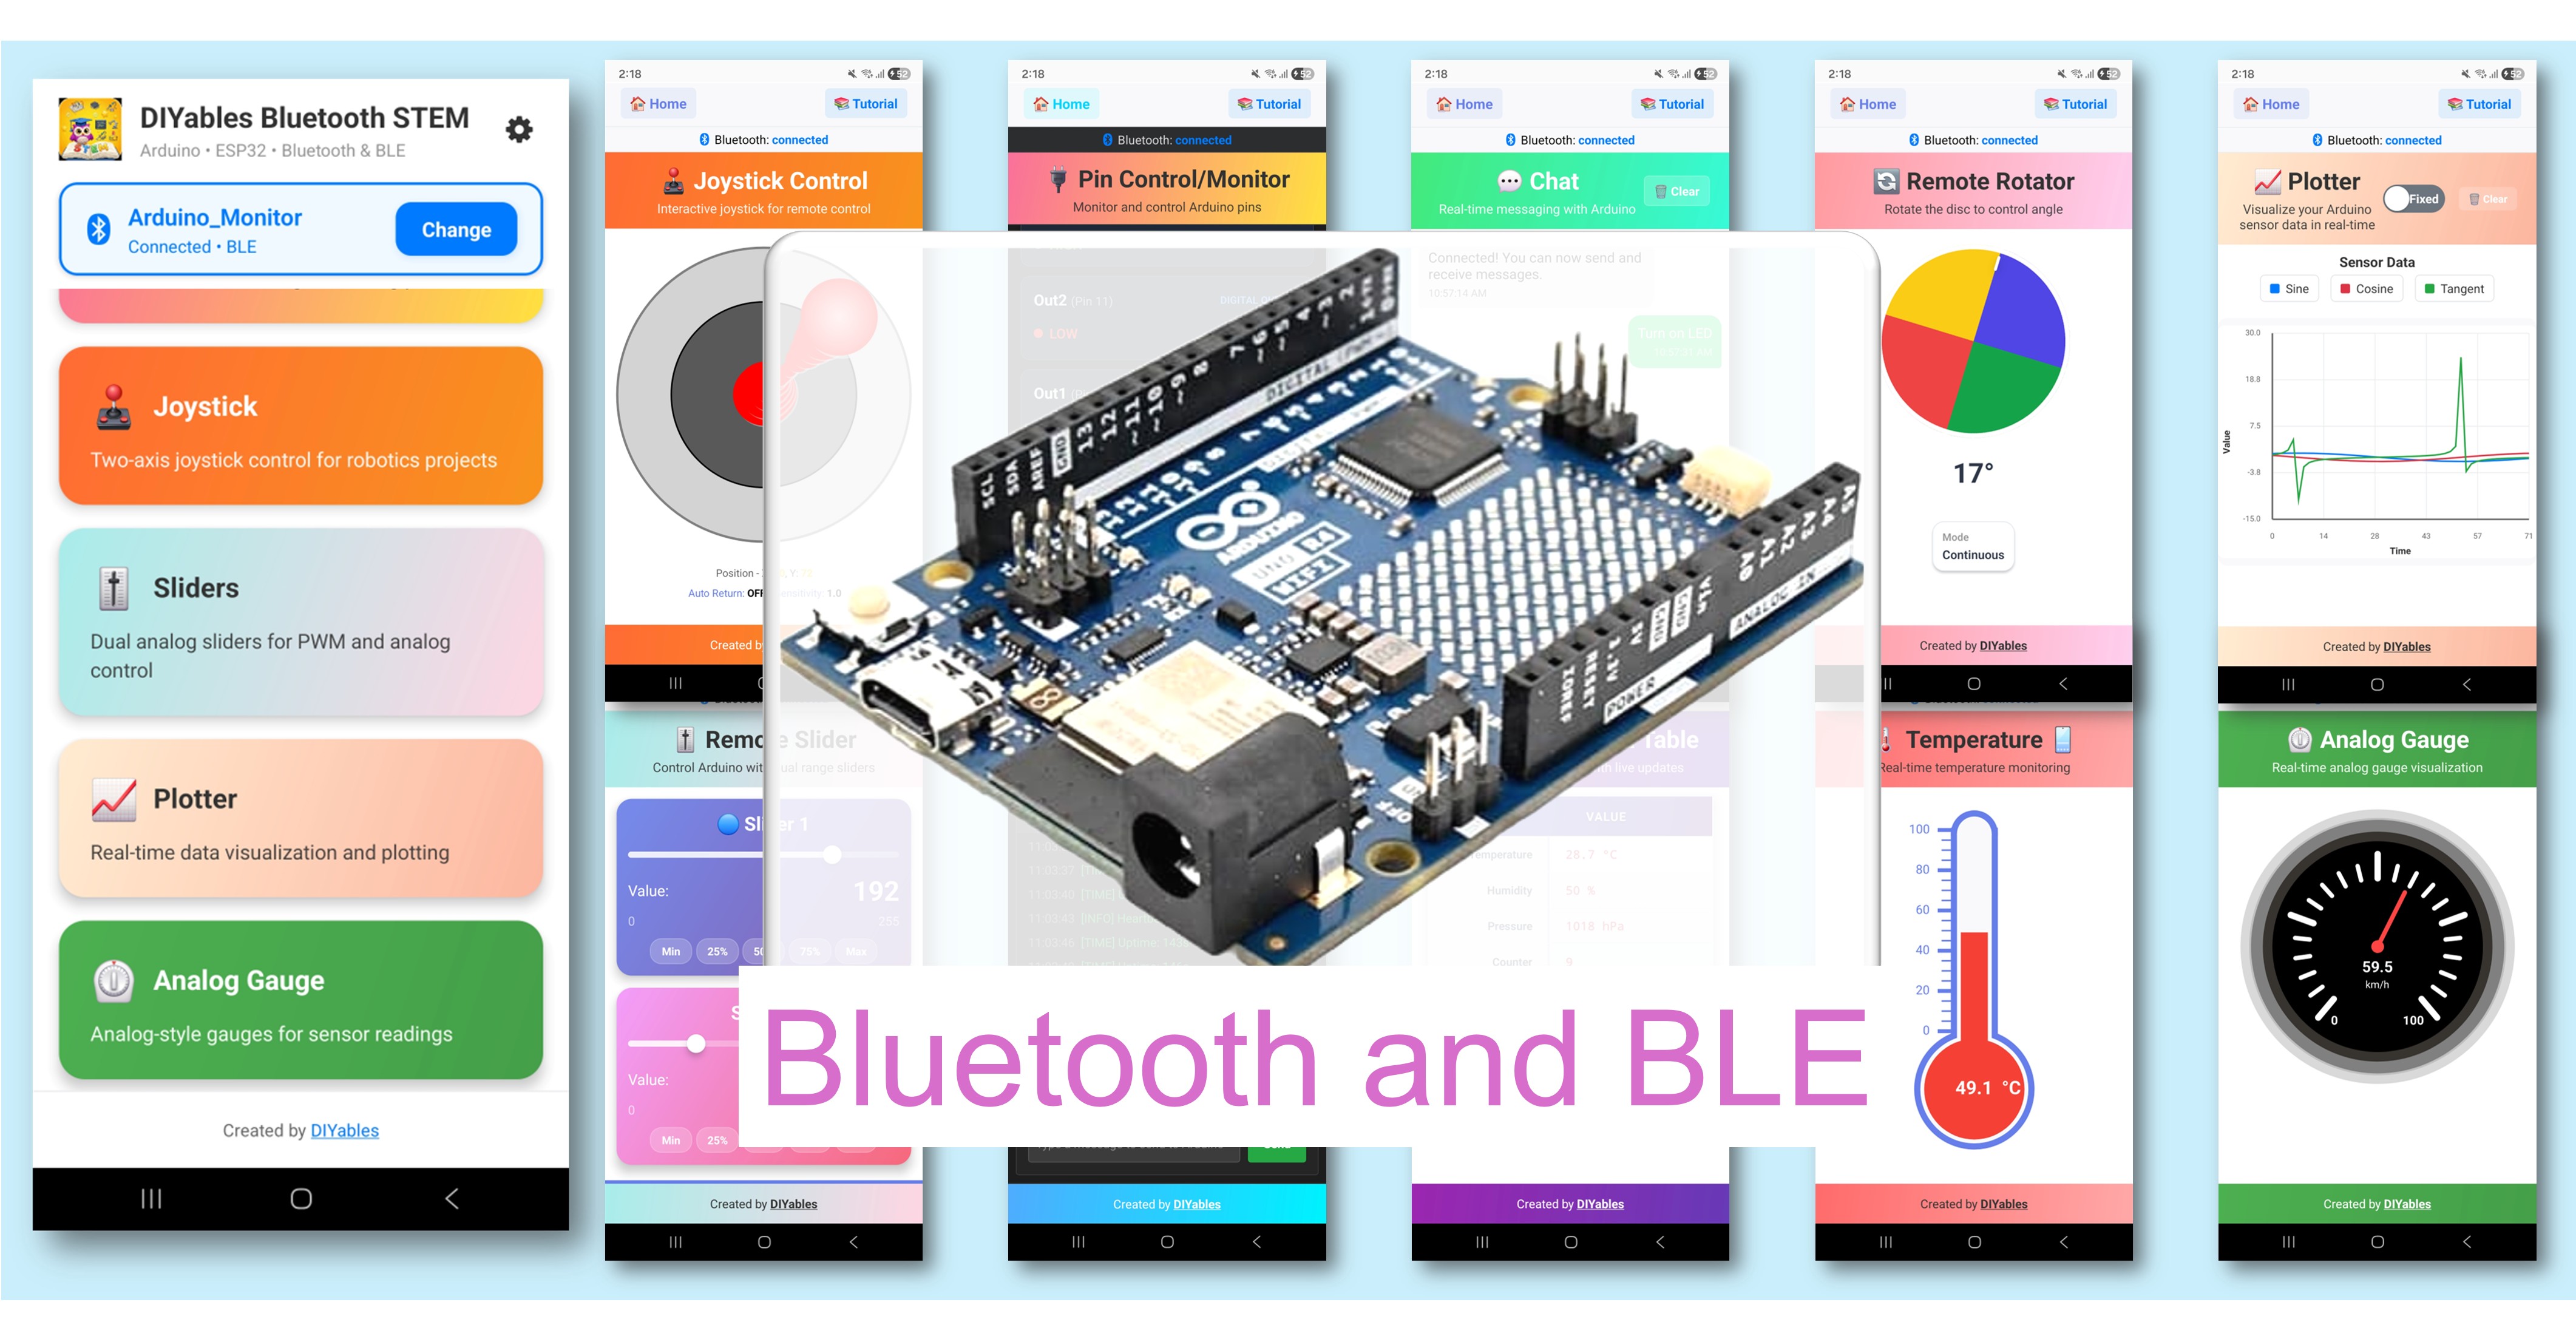
The Bluetooth Multiple Apps example demonstrates running 9 Bluetooth apps simultaneously on a single Arduino UNO R4 WiFi using BLE. Designed for Arduino UNO R4 WiFi using BLE (Bluetooth Low Energy) to combine Monitor, Chat, Slider, Joystick, Temperature, Plotter, Table, Analog Gauge, and Rotator into one powerful sketch. All apps share a single BLE connection and can interact with each other. Perfect for comprehensive dashboards, complex IoT projects, and learning multiple app types at once.

Note: The Arduino UNO R4 WiFi only supports BLE (Bluetooth Low Energy). It does not support Classic Bluetooth. The DIYables Bluetooth App supports both BLE and Classic Bluetooth on Android, and BLE on iOS. Since this board uses BLE, the app works on both Android and iOS.

Arduino UNO R4 WiFi Bluetooth Multiple Apps Example - All-in-One BLE Tutorial

Features

  • 9 Apps in One: Monitor, Chat, Slider, Joystick, Temperature, Plotter, Table, Analog Gauge, Rotator
  • Cross-App Interaction: Slider value updates gauge and table, joystick updates table, etc.
  • Single BLE Connection: All apps share one connection efficiently
  • Real-Time Updates: Each app updates at its own interval
  • Comprehensive Dashboard: View all data from one device
  • Works on Android & iOS: BLE is supported on both platforms
  • No Pairing Required: BLE auto-connects without manual pairing

Included Apps

AppDescriptionUpdate Interval
MonitorText-based status display5 seconds
ChatTwo-way text messagingOn demand
SliderValue control (0-255)On change
Joystick2D position controlOn change
TemperatureTemperature gauge (-10 to 50°C)2 seconds
PlotterReal-time data graph100ms
TableStructured data (10 rows)5 seconds
Analog GaugeDial-style gauge (0-100%)3 seconds
RotatorAngle control (continuous)On change

Hardware Preparation

1×Arduino UNO R4 WiFi
1×Alternatively, DIYables STEM V4 IoT
1×USB Cable Type-A to Type-C (for USB-A PC)
1×USB Cable Type-C to Type-C (for USB-C PC)
1×Recommended: Screw Terminal Block Shield for Arduino UNO R4
1×Recommended: Breadboard Shield for Arduino UNO R4
1×Recommended: Enclosure for Arduino UNO R4
1×Recommended: Power Splitter for Arduino UNO R4
1×Recommended: Prototyping Base Plate & Breadboard Kit for Arduino UNO

Or you can buy the following kits:

1×DIYables STEM V4 IoT Starter Kit (Arduino included)
1×DIYables Sensor Kit (30 sensors/displays)
1×DIYables Sensor Kit (18 sensors/displays)
Disclosure: Some of the links provided in this section are Amazon affiliate links. We may receive a commission for any purchases made through these links at no additional cost to you.
Additionally, some of these links are for products from our own brand, DIYables .

Arduino UNO R4 WiFi Code

Detailed Instructions

Follow these instructions step by step:

  • If this is your first time using the Arduino UNO R4 WiFi, refer to the Arduino UNO R4 WiFi getting started guide.
  • Connect the Arduino UNO R4 WiFi board to your computer using a USB cable.
  • Launch the Arduino IDE on your computer.
  • Select Arduino UNO R4 WiFi board and the appropriate COM port.
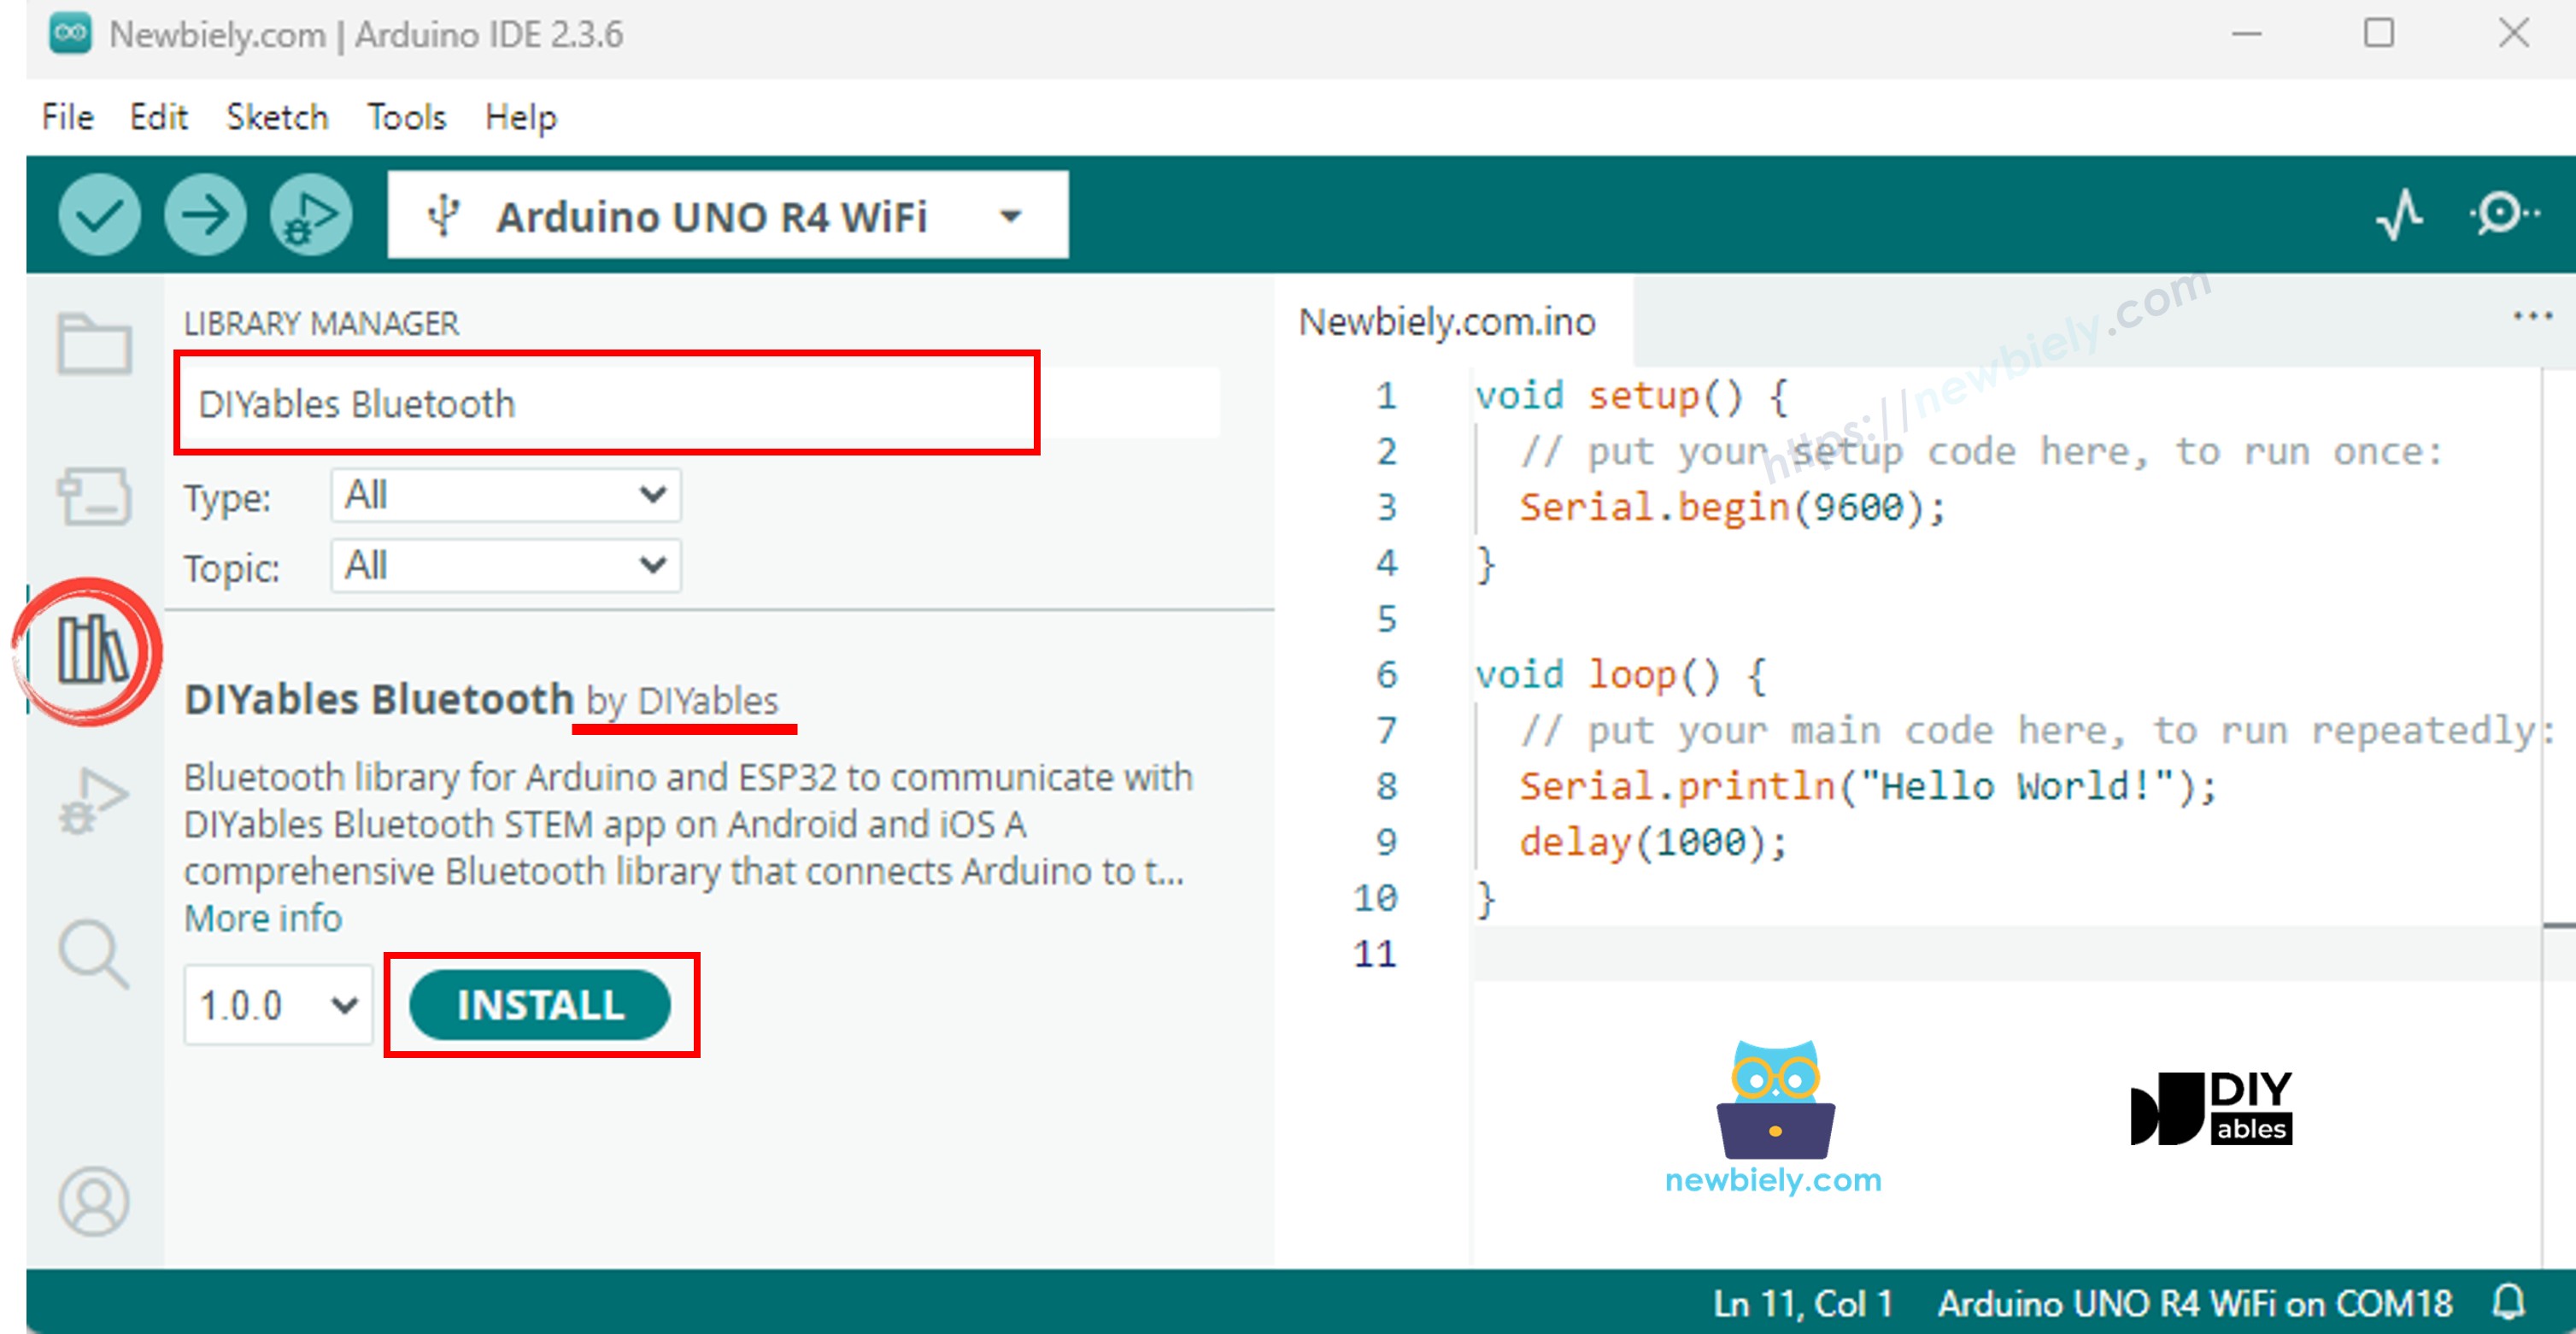
  • Navigate to the Libraries icon on the left bar of the Arduino IDE.
  • Search "DIYables Bluetooth", then find the DIYables Bluetooth library by DIYables
  • Click Install button to install the library.
Arduino UNO R4 DIYables Bluetooth library
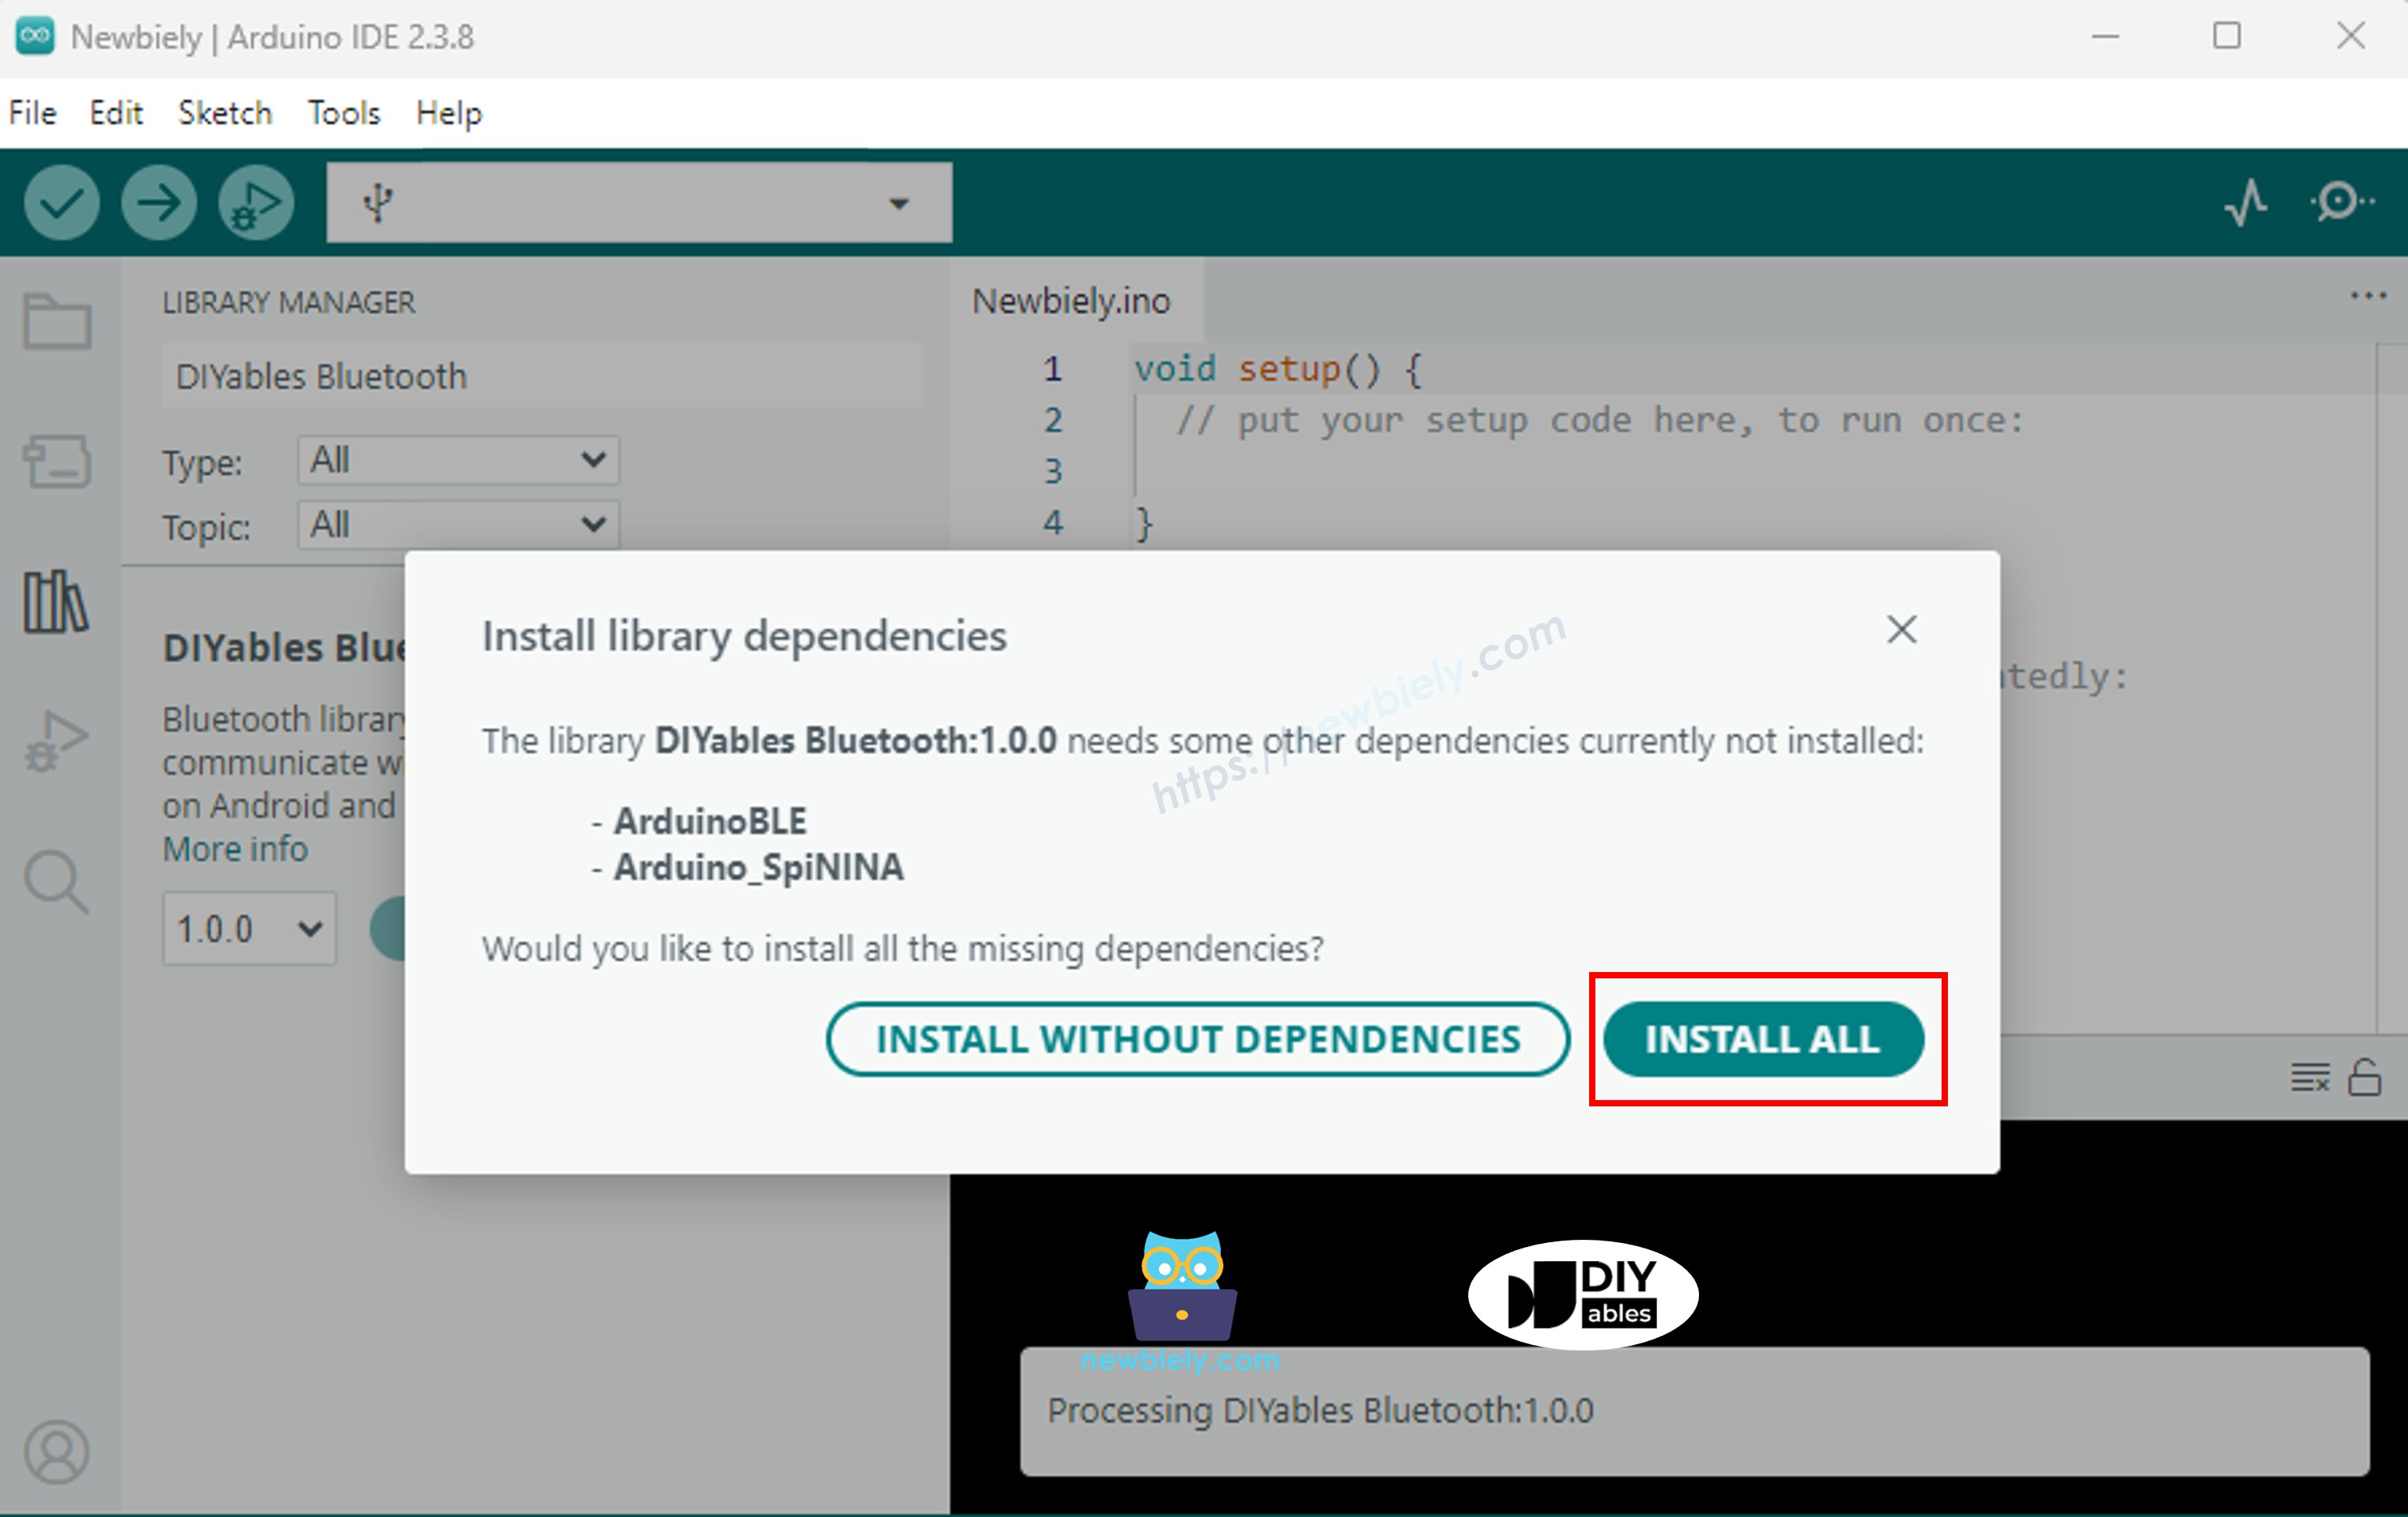
  • You will be asked for installing some other library dependencies
  • Click Install All button to install all library dependencies.
Arduino UNO R4 DIYables Bluetooth dependency

BLE Code

  • On Arduino IDE, Go to File Examples DIYables Bluetooth ArduinoBLE_MultipleApps example, or copy the above code and paste it to the editor of Arduino IDE
/* * DIYables Bluetooth Library - Multiple Apps Example (ArduinoBLE) * Works with DIYables Bluetooth STEM app on Android and iOS * * This example demonstrates how to use multiple Bluetooth apps simultaneously: * - Monitor: Real-time serial monitoring and logging * - Chat: Bi-directional text messaging * - Slider: Dual slider control (0-255 range) * - Joystick: Interactive joystick control (X, Y coordinates) * - Temperature: Temperature monitoring and display * - Plotter: Real-time data plotting (3 channels) * - Table: Two-column data table with real-time updates * - Analog Gauge: Circular gauge for sensor monitoring * - Rotator: Rotatable disc/knob control * - Pin Control: Digital pin control and monitoring * * Features: * - All apps run simultaneously on a single BLE connection * - Automatic message routing to appropriate app handlers * - Simplified callback system - no manual parsing needed * - All BLE protocol details handled by the library * - Compatible with DIYables Bluetooth Mobile App * * Compatible Boards: * - Arduino UNO R4 WiFi * - Arduino Nano 33 BLE / BLE Sense * - Arduino Nano 33 IoT * - Arduino MKR WiFi 1010 * - Arduino Nano RP2040 Connect * - Any board supporting the ArduinoBLE library * * Setup: * 1. Upload the sketch to your Arduino * 2. Open Serial Monitor (9600 baud) * 3. Open DIYables Bluetooth App on your phone * 4. Connect to "DIYables Multi-App" * 5. Navigate to different screens to test each app * * Tutorial: https://diyables.io/bluetooth-app * Author: DIYables */ #include <DIYables_BluetoothServer.h> #include <DIYables_BluetoothMonitor.h> #include <DIYables_BluetoothChat.h> #include <DIYables_BluetoothSlider.h> #include <DIYables_BluetoothJoystick.h> #include <DIYables_BluetoothTemperature.h> #include <DIYables_BluetoothPlotter.h> #include <DIYables_BluetoothTable.h> #include <DIYables_BluetoothAnalogGauge.h> #include <DIYables_BluetoothRotator.h> #include <platforms/DIYables_ArduinoBLE.h> // BLE Configuration const char* DEVICE_NAME = "DIYables Multi-App"; const char* SERVICE_UUID = "19B10000-E8F2-537E-4F6C-D104768A1214"; const char* TX_UUID = "19B10001-E8F2-537E-4F6C-D104768A1214"; const char* RX_UUID = "19B10002-E8F2-537E-4F6C-D104768A1214"; // Create Bluetooth instances DIYables_ArduinoBLE bluetooth(DEVICE_NAME, SERVICE_UUID, TX_UUID, RX_UUID); DIYables_BluetoothServer bluetoothServer(bluetooth); // Create app instances DIYables_BluetoothMonitor bluetoothMonitor; DIYables_BluetoothChat bluetoothChat; DIYables_BluetoothSlider bluetoothSlider(0, 255, 1); DIYables_BluetoothJoystick bluetoothJoystick(false, 5); DIYables_BluetoothTemperature bluetoothTemperature(-10.0, 50.0, "°C"); DIYables_BluetoothPlotter bluetoothPlotter; DIYables_BluetoothTable bluetoothTable; DIYables_BluetoothAnalogGauge bluetoothGauge(0.0, 100.0, "%"); DIYables_BluetoothRotator bluetoothRotator(ROTATOR_MODE_CONTINUOUS); // State variables int currentSlider1 = 128; int currentSlider2 = 64; int currentJoystickX = 0; int currentJoystickY = 0; float currentTemperature = 25.0; float currentGaugeValue = 50.0; float currentRotatorAngle = 0.0; int messageCount = 0; // Timing variables unsigned long lastMonitorUpdate = 0; unsigned long lastTempUpdate = 0; unsigned long lastPlotUpdate = 0; unsigned long lastTableUpdate = 0; unsigned long lastGaugeUpdate = 0; float plotPhase = 0; void setup() { Serial.begin(9600); delay(1000); Serial.println("DIYables Bluetooth - Multiple Apps Example"); // Initialize built-in LED pinMode(LED_BUILTIN, OUTPUT); digitalWrite(LED_BUILTIN, LOW); // Initialize Bluetooth server bluetoothServer.begin(); // Register all apps with the server bluetoothServer.addApp(&bluetoothMonitor); bluetoothServer.addApp(&bluetoothChat); bluetoothServer.addApp(&bluetoothSlider); bluetoothServer.addApp(&bluetoothJoystick); bluetoothServer.addApp(&bluetoothTemperature); bluetoothServer.addApp(&bluetoothPlotter); bluetoothServer.addApp(&bluetoothTable); bluetoothServer.addApp(&bluetoothGauge); bluetoothServer.addApp(&bluetoothRotator); Serial.print("Registered apps: "); Serial.println(bluetoothServer.getAppCount()); // Configure Plotter bluetoothPlotter.setPlotTitle("Sensor Data"); bluetoothPlotter.setAxisLabels("Time", "Value"); bluetoothPlotter.setYAxisRange(-1.5, 1.5); bluetoothPlotter.setMaxSamples(100); bluetoothPlotter.setLegendLabels("Sine", "Cosine", "Random"); // Configure Table rows bluetoothTable.addRow("Status"); bluetoothTable.addRow("Uptime"); bluetoothTable.addRow("Slider 1"); bluetoothTable.addRow("Slider 2"); bluetoothTable.addRow("Joystick X"); bluetoothTable.addRow("Joystick Y"); bluetoothTable.addRow("Temperature"); bluetoothTable.addRow("Gauge Value"); bluetoothTable.addRow("Rotator Angle"); bluetoothTable.addRow("Messages"); // Set up all callbacks setupCallbacks(); Serial.println("Waiting for Bluetooth connection..."); } void setupCallbacks() { // ---- Connection events ---- bluetoothServer.setOnConnected([]() { Serial.println("Bluetooth connected!"); digitalWrite(LED_BUILTIN, HIGH); bluetoothMonitor.send("=== DIYables Multi-App Connected ==="); bluetoothMonitor.send("All apps are ready!"); bluetoothChat.send("Hello! Arduino Multi-App is connected."); }); bluetoothServer.setOnDisconnected([]() { Serial.println("Bluetooth disconnected!"); digitalWrite(LED_BUILTIN, LOW); }); // ---- Monitor callbacks ---- bluetoothMonitor.onMonitorMessage([](const String& message) { Serial.println("Monitor cmd: " + message); if (message == "HELP") { bluetoothMonitor.send("Commands: STATUS, HELP, LED_ON, LED_OFF"); } else if (message == "STATUS") { bluetoothMonitor.send("Slider1=" + String(currentSlider1) + " Slider2=" + String(currentSlider2)); bluetoothMonitor.send("Joystick X=" + String(currentJoystickX) + " Y=" + String(currentJoystickY)); bluetoothMonitor.send("Temp=" + String(currentTemperature, 1) + "°C"); bluetoothMonitor.send("Gauge=" + String(currentGaugeValue, 1) + "%"); bluetoothMonitor.send("Rotator=" + String(currentRotatorAngle, 0) + "°"); } else if (message == "LED_ON") { digitalWrite(LED_BUILTIN, HIGH); bluetoothMonitor.send("LED turned ON"); } else if (message == "LED_OFF") { digitalWrite(LED_BUILTIN, LOW); bluetoothMonitor.send("LED turned OFF"); } else { bluetoothMonitor.send("Unknown: " + message + " (type HELP)"); } }); // ---- Chat callbacks ---- bluetoothChat.onChatMessage([](const String& message) { Serial.println("Chat: " + message); bluetoothChat.send("Echo: " + message); if (message.equalsIgnoreCase("ping")) { bluetoothChat.send("pong!"); } else if (message.equalsIgnoreCase("status")) { bluetoothChat.send("Uptime: " + String(millis() / 1000) + "s, Apps: " + String(bluetoothServer.getAppCount())); } }); // ---- Slider callbacks ---- bluetoothSlider.onSliderValue([](int slider1, int slider2) { currentSlider1 = slider1; currentSlider2 = slider2; Serial.print("Slider 1: "); Serial.print(slider1); Serial.print(", Slider 2: "); Serial.println(slider2); // Update gauge based on slider 1 currentGaugeValue = map(slider1, 0, 255, 0, 100); bluetoothGauge.send(currentGaugeValue); // Update table bluetoothTable.sendValueUpdate("Slider 1", String(slider1)); bluetoothTable.sendValueUpdate("Slider 2", String(slider2)); bluetoothTable.sendValueUpdate("Gauge Value", String(currentGaugeValue, 1) + "%"); }); bluetoothSlider.onGetConfig([]() { bluetoothSlider.send(currentSlider1, currentSlider2); }); // ---- Joystick callbacks ---- bluetoothJoystick.onJoystickValue([](int x, int y) { currentJoystickX = x; currentJoystickY = y; Serial.print("Joystick X: "); Serial.print(x); Serial.print(", Y: "); Serial.println(y); // Update table bluetoothTable.sendValueUpdate("Joystick X", String(x)); bluetoothTable.sendValueUpdate("Joystick Y", String(y)); }); bluetoothJoystick.onGetConfig([]() { bluetoothJoystick.send(currentJoystickX, currentJoystickY); }); // ---- Temperature callbacks ---- bluetoothTemperature.onTemperatureRequest([]() { bluetoothTemperature.send(currentTemperature); }); // ---- Plotter callbacks ---- bluetoothPlotter.onDataRequest([]() { Serial.println("Plotter data requested"); }); // ---- Table callbacks ---- bluetoothTable.onDataRequest([]() { Serial.println("Table data requested"); bluetoothTable.sendTableStructure(); updateAllTableValues(); }); // ---- Gauge callbacks ---- bluetoothGauge.onValueRequest([]() { bluetoothGauge.send(currentGaugeValue); }); // ---- Rotator callbacks ---- bluetoothRotator.onRotatorAngle([](float angle) { currentRotatorAngle = angle; Serial.print("Rotator: "); Serial.print(angle); Serial.println("°"); bluetoothTable.sendValueUpdate("Rotator Angle", String(angle, 0) + "°"); }); } void updateAllTableValues() { bluetoothTable.sendValueUpdate("Status", "Running"); unsigned long uptime = millis() / 1000; String uptimeStr; if (uptime >= 60) { uptimeStr = String(uptime / 60) + "m " + String(uptime % 60) + "s"; } else { uptimeStr = String(uptime) + "s"; } bluetoothTable.sendValueUpdate("Uptime", uptimeStr); bluetoothTable.sendValueUpdate("Slider 1", String(currentSlider1)); bluetoothTable.sendValueUpdate("Slider 2", String(currentSlider2)); bluetoothTable.sendValueUpdate("Joystick X", String(currentJoystickX)); bluetoothTable.sendValueUpdate("Joystick Y", String(currentJoystickY)); bluetoothTable.sendValueUpdate("Temperature", String(currentTemperature, 1) + " °C"); bluetoothTable.sendValueUpdate("Gauge Value", String(currentGaugeValue, 1) + "%"); bluetoothTable.sendValueUpdate("Rotator Angle", String(currentRotatorAngle, 0) + "°"); bluetoothTable.sendValueUpdate("Messages", String(messageCount)); } void loop() { bluetoothServer.loop(); if (!bluetooth.isConnected()) { delay(10); return; } // ---- Monitor: periodic status every 5 seconds ---- if (millis() - lastMonitorUpdate >= 5000) { lastMonitorUpdate = millis(); messageCount++; bluetoothMonitor.send("[INFO] Heartbeat #" + String(messageCount) + " - Uptime: " + String(millis() / 1000) + "s"); } // ---- Temperature: update every 2 seconds ---- if (millis() - lastTempUpdate >= 2000) { lastTempUpdate = millis(); // Simulate temperature with slight variation static float tempOffset = 0; tempOffset += random(-10, 11) / 10.0; if (tempOffset > 5.0) tempOffset = 5.0; if (tempOffset < -5.0) tempOffset = -5.0; currentTemperature = 25.0 + tempOffset; bluetoothTemperature.send(currentTemperature); bluetoothTable.sendValueUpdate("Temperature", String(currentTemperature, 1) + " °C"); } // ---- Plotter: update every 100ms ---- if (millis() - lastPlotUpdate >= 100) { lastPlotUpdate = millis(); float sine = sin(plotPhase); float cosine = cos(plotPhase); float noise = random(-50, 51) / 100.0; bluetoothPlotter.send(sine, cosine, noise); plotPhase += 0.1; if (plotPhase > 2 * PI) plotPhase = 0; } // ---- Table: update uptime every 5 seconds ---- if (millis() - lastTableUpdate >= 5000) { lastTableUpdate = millis(); unsigned long uptime = millis() / 1000; String uptimeStr; if (uptime >= 60) { uptimeStr = String(uptime / 60) + "m " + String(uptime % 60) + "s"; } else { uptimeStr = String(uptime) + "s"; } bluetoothTable.sendValueUpdate("Uptime", uptimeStr); bluetoothTable.sendValueUpdate("Messages", String(messageCount)); } // ---- Gauge: simulate sensor every 3 seconds ---- if (millis() - lastGaugeUpdate >= 3000) { lastGaugeUpdate = millis(); float sensorValue = 50.0 + 30.0 * sin(millis() / 10000.0); currentGaugeValue = sensorValue; bluetoothGauge.send(currentGaugeValue); bluetoothTable.sendValueUpdate("Gauge Value", String(currentGaugeValue, 1) + "%"); } delay(10); }
  • Click Upload button on Arduino IDE to upload code to Arduino UNO R4 WiFi
  • Open the Serial Monitor
  • Check out the result on Serial Monitor. It looks like the below:
COM6
Send
DIYables Bluetooth - Multiple Apps Example Waiting for Bluetooth connection...
Autoscroll Show timestamp
Clear output
9600 baud  
Newline  

Mobile App

  • Install the DIYables Bluetooth App on your smartphone: Android | iOS

Note: The DIYables Bluetooth App supports both BLE and Classic Bluetooth on Android, and BLE on iOS. Since the Arduino UNO R4 WiFi uses BLE, the app works on both Android and iOS. No manual pairing is needed for BLE — just scan and connect.

  • Open the DIYables Bluetooth App
  • When opening the app for the first time, it will ask for permissions. Please grant the following:
    • Nearby Devices permission (Android 12+) / Bluetooth permission (iOS) - required to scan and connect to Bluetooth devices
    • Location permission (Android 11 and below only) - required by older Android versions to scan for BLE devices
  • Make sure Bluetooth is turned on on your phone
  • On the home screen, tap the Connect button. The app will scan for BLE devices.
DIYables Bluetooth App - Home Screen with Scan Button
  • Find and tap "DIYables Multi-App" in the scan results to connect.
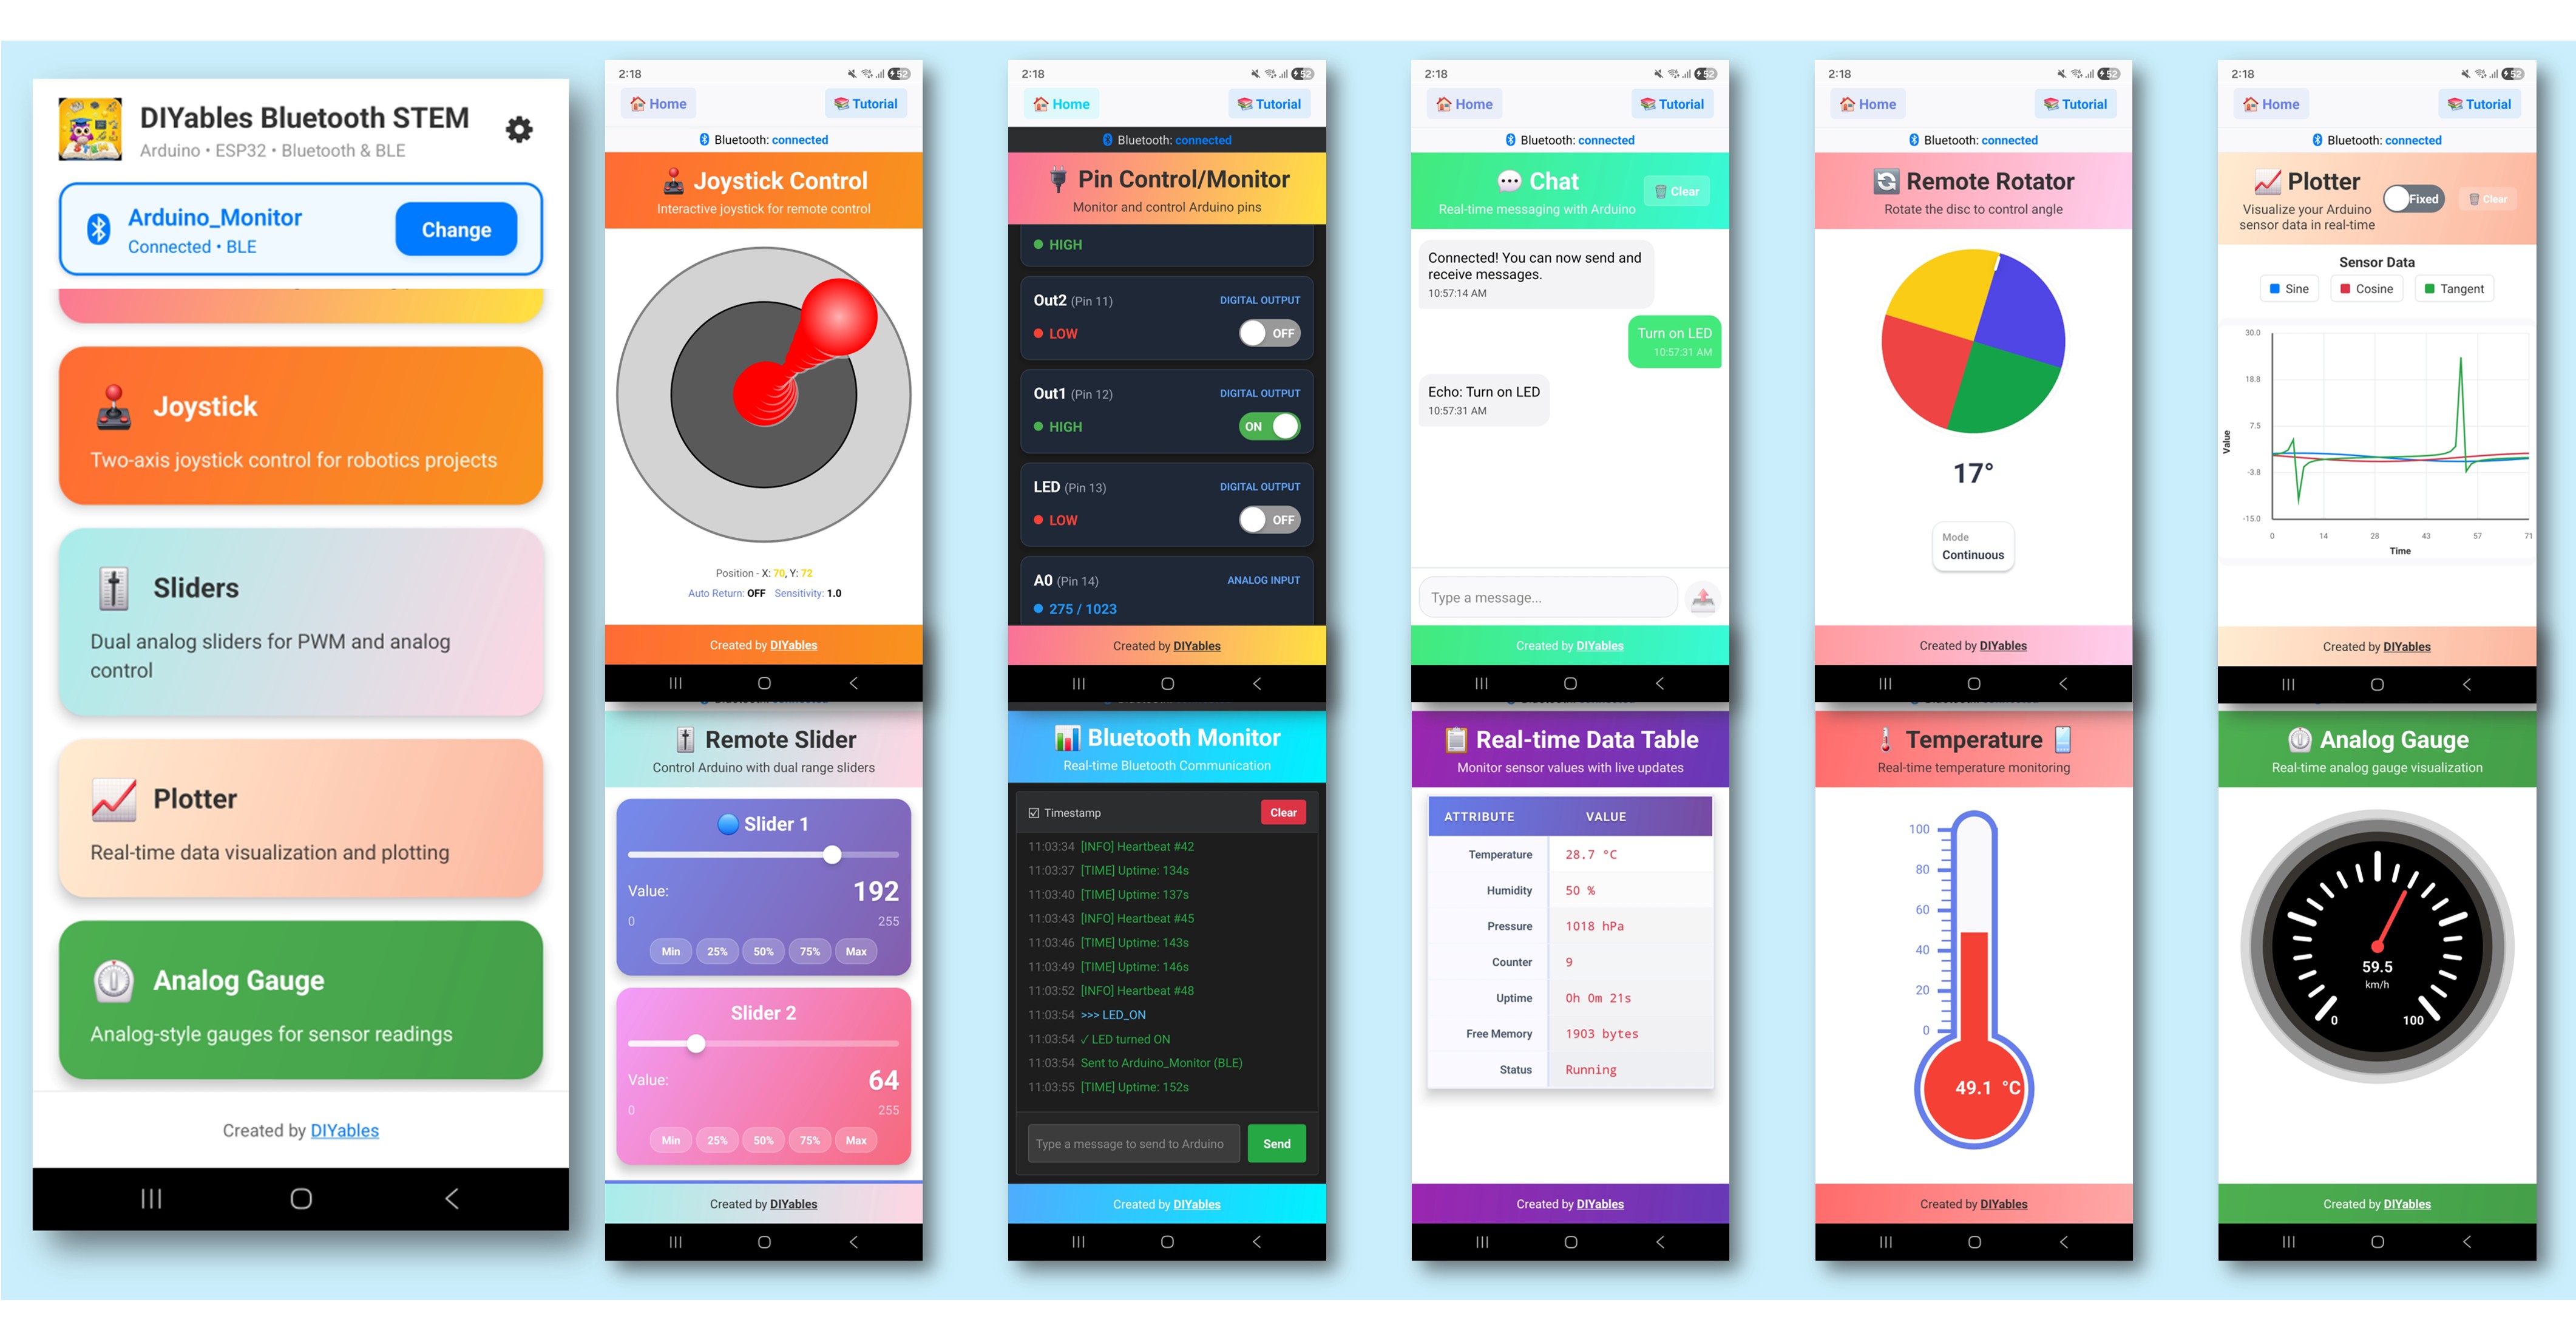
  • Once connected, the app automatically goes back to the home screen. The home screen shows all available apps. The 9 apps initialized in the Arduino code will respond and work — other apps on the home screen will appear but will not function with this sketch.
DIYables Bluetooth App - Home Screen with Multiple Apps

Note: You can tap the settings icon on the home screen to hide/show apps on the home screen. For more details, see the DIYables Bluetooth App User Manual.

  • Tap some of the following apps to open and interact with the Arduino: Monitor, Chat, Slider, Joystick, Temperature, Plotter, Table, Analog Gauge, Rotator
  • Switch between apps freely — they all share the same BLE connection

Now look back at the Serial Monitor on Arduino IDE. You will see:

COM6
Send
Bluetooth connected! Monitor: System running, uptime: 5s Chat message: Hello Slider value: 128 Joystick: X=0.50, Y=-0.30 Temperature: 22.50 °C
Autoscroll Show timestamp
Clear output
9600 baud  
Newline  

How It Works

App Initialization

Each app is created with its own configuration and callbacks:

// All apps share the same Bluetooth server DIYables_BluetoothServer bluetoothServer(bluetooth); // Create individual apps DIYables_BluetoothMonitor bluetoothMonitor(bluetoothServer); DIYables_BluetoothChat bluetoothChat(bluetoothServer); DIYables_BluetoothSlider bluetoothSlider(bluetoothServer, 0, 255, 1); DIYables_BluetoothJoystick bluetoothJoystick(bluetoothServer, false, 5); DIYables_BluetoothTemperature bluetoothTemp(bluetoothServer, -10.0, 50.0, "°C"); DIYables_BluetoothPlotter bluetoothPlotter(bluetoothServer); DIYables_BluetoothTable bluetoothTable(bluetoothServer); DIYables_BluetoothAnalogGauge bluetoothGauge(bluetoothServer, 0.0, 100.0, "%"); DIYables_BluetoothRotator bluetoothRotator(bluetoothServer, ROTATOR_MODE_CONTINUOUS);

Cross-App Interaction

Apps can interact with each other — when one app receives input, it can update other apps:

// Slider updates gauge and table bluetoothSlider.onSliderValue([](int value) { float percent = value * 100.0 / 255.0; bluetoothGauge.send(percent); bluetoothTable.sendValueUpdate("Slider 1", String(value)); }); // Joystick updates table bluetoothJoystick.onJoystickValue([](float x, float y) { bluetoothTable.sendValueUpdate("Joystick X", String(x, 2)); bluetoothTable.sendValueUpdate("Joystick Y", String(y, 2)); }); // Rotator updates table bluetoothRotator.onRotatorAngle([](float angle) { bluetoothTable.sendValueUpdate("Rotator Angle", String(angle, 1) + "°"); });

Update Timing

Each app has its own update interval to balance responsiveness and bandwidth:

void loop() { bluetoothServer.loop(); unsigned long now = millis(); // Plotter: fastest updates (100ms) if (now - lastPlotterTime >= 100) { ... } // Temperature: every 2 seconds if (now - lastTempTime >= 2000) { ... } // Gauge: every 3 seconds if (now - lastGaugeTime >= 3000) { ... } // Monitor, Table: every 5 seconds if (now - lastMonitorTime >= 5000) { ... } if (now - lastTableTime >= 5000) { ... } }

Table Structure

The example creates a table with 10 rows showing data from all apps:

RowLabelDescription
0StatusConnection/running status
1UptimeTime since boot
2Slider 1Current slider value
3Slider 2Second slider value
4Joystick XJoystick X position
5Joystick YJoystick Y position
6TemperatureCurrent temperature
7Gauge ValueCurrent gauge percentage
8Rotator AngleCurrent rotation angle
9MessagesChat message count

Creative Customization - Adapt the Code to Your Project

Add or Remove Apps

You don't need all 9 apps. Simply include only the ones you need:

// Minimal setup: just Monitor and Slider DIYables_BluetoothMonitor bluetoothMonitor(bluetoothServer); DIYables_BluetoothSlider bluetoothSlider(bluetoothServer, 0, 100, 1); // That's it! The app will only show these two

Custom Cross-App Logic

// Example: Temperature alarm via Monitor void checkTemperatureAlarm(float temp) { if (temp > 40.0) { bluetoothMonitor.send("⚠️ HIGH TEMP ALERT: " + String(temp, 1) + "°C"); bluetoothChat.send("Temperature alarm triggered!"); } }

Troubleshooting

Common Issues

1. Cannot find the device in the app

  • Make sure the Arduino UNO R4 WiFi is powered on and the sketch is uploaded
  • Ensure your phone's Bluetooth is enabled
  • On Android 11 and below, also enable Location services

2. Some apps not showing in the menu

  • All apps that are initialized will appear automatically
  • Check that each app object is properly created
  • The app discovers available apps from the Arduino

3. Updates seem slow

  • Each app has different update intervals — this is by design
  • BLE has limited bandwidth; too many fast updates can cause congestion
  • Reduce update frequency for apps that don't need real-time data

4. Cross-app updates not working

  • Verify the callback functions are properly set up
  • Check that table row names match exactly (case-sensitive)
  • Ensure the target app object is accessible in the callback scope

5. Memory issues or crashes

  • Running 9 apps uses significant memory
  • Remove unused apps to free resources
  • Reduce table row count if needed

6. Upload fails or board not recognized

  • Install the latest Arduino UNO R4 board package via Board Manager
  • Try a different USB cable or port

Project Ideas

  • Comprehensive IoT dashboard
  • Robot control panel (joystick + monitor + sliders)
  • Weather station (temperature + gauge + plotter + table)
  • Home automation hub (sliders + pins + monitor + chat)
  • STEM learning platform (all apps for experimentation)

Next Steps

After mastering the Multiple Apps example, explore individual app tutorials for deeper understanding:

  1. Bluetooth Chat - For messaging details
  2. Bluetooth Slider - For value control details
  3. Bluetooth Plotter - For data visualization details
  4. Bluetooth RTC - For time synchronization (uses built-in hardware RTC)

Support

For additional help:

※ OUR MESSAGES

  • As freelancers, We are AVAILABLE for HIRE. See how to outsource your project to us
  • Please feel free to share the link of this tutorial. However, Please do not use our content on any other websites. We invested a lot of effort and time to create the content, please respect our work!