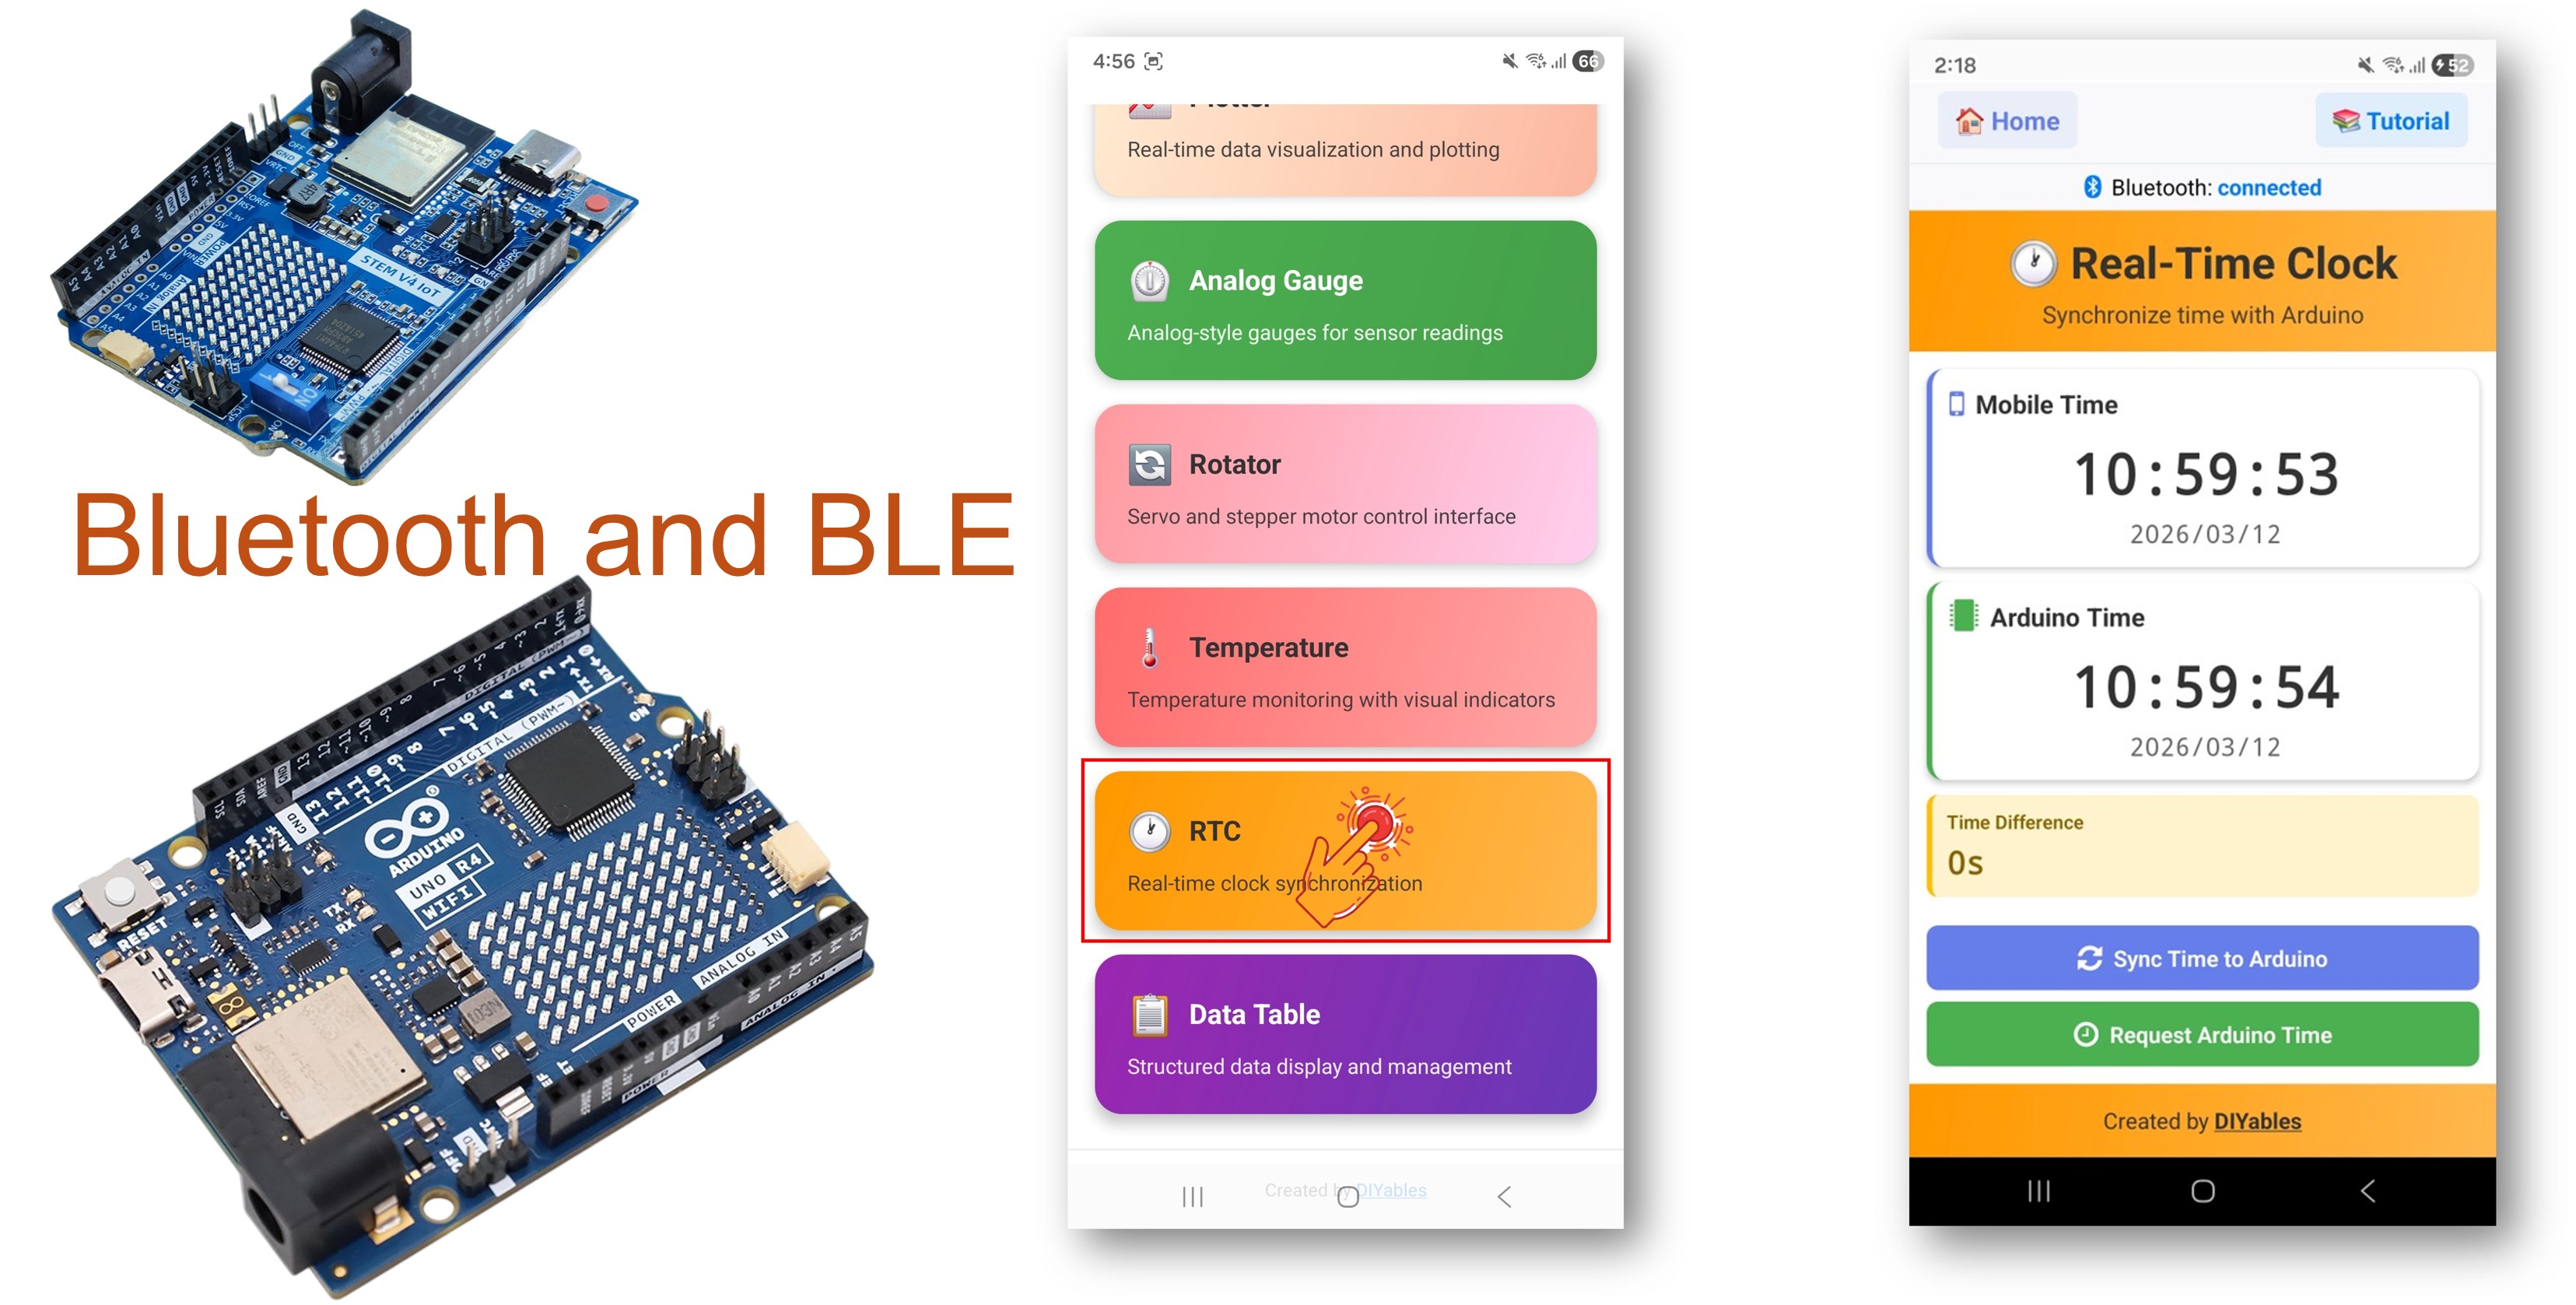
The Bluetooth RTC example provides real-time clock synchronization through the DIYables Bluetooth STEM app. Designed for Arduino UNO R4 WiFi using BLE (Bluetooth Low Energy) to sync the board's built-in hardware RTC with your smartphone's clock and display the time. The Arduino UNO R4 WiFi has a built-in RTC module, making it ideal for timekeeping projects without needing external RTC hardware. Perfect for clocks, data logging with timestamps, scheduled automation, and time-based projects.
Note: The Arduino UNO R4 WiFi only supports BLE (Bluetooth Low Energy). It does not support Classic Bluetooth. The DIYables Bluetooth App supports both BLE and Classic Bluetooth on Android, and BLE on iOS. Since this board uses BLE, the app works on both Android and iOS.
Features
Built-in Hardware RTC: Uses Arduino UNO R4 WiFi's onboard RTC — no external module needed
Phone Time Sync: Sync time from smartphone via Unix timestamp or local time components
Real-Time Display: Show current time on the app, updated every second
Time Request: App can request current time from the board
Persistent Timekeeping: RTC keeps time while board is powered
Works on Android & iOS: BLE is supported on both platforms
No Pairing Required: BLE auto-connects without manual pairing
Disclosure: Some of the links provided in this section are Amazon affiliate links. We may receive a commission for any purchases made through these links at no additional cost to you. Additionally, some of these links are for products from our own brand, DIYables .
Note: No external RTC module is needed! The Arduino UNO R4 WiFi has a built-in hardware RTC accessible via the RTC.h library.
Connect the Arduino UNO R4 WiFi board to your computer using a USB cable.
Launch the Arduino IDE on your computer.
Select Arduino UNO R4 WiFi board and the appropriate COM port.
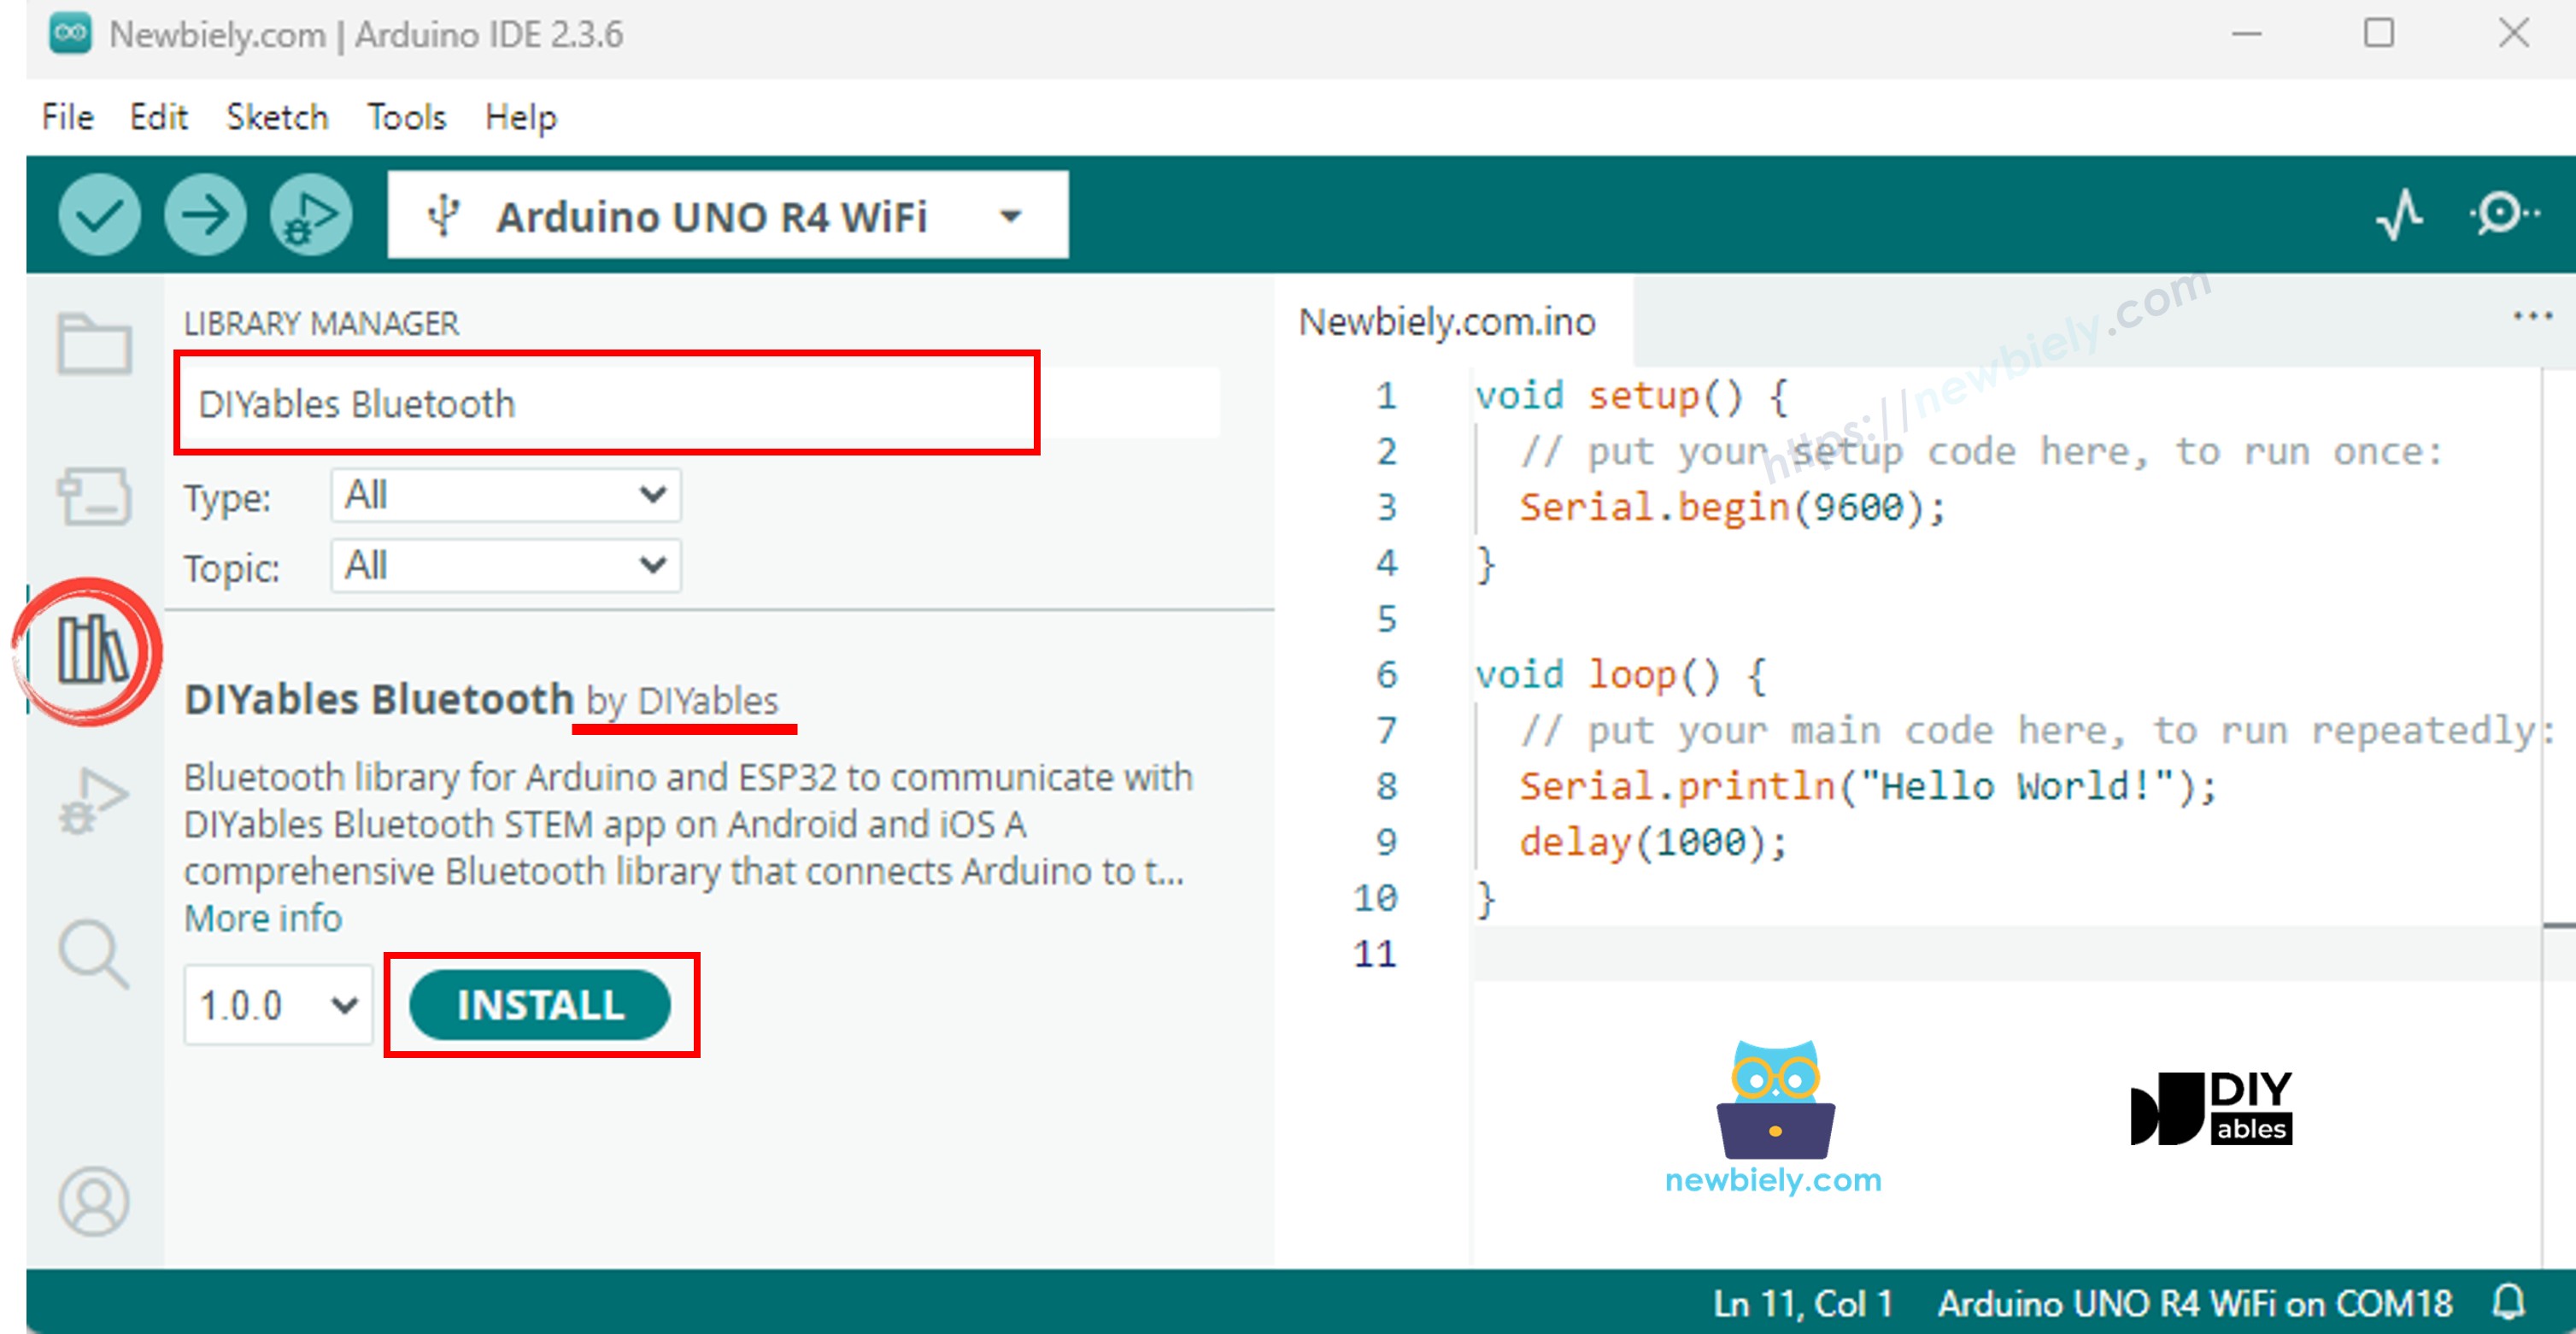
Navigate to the Libraries icon on the left bar of the Arduino IDE.
Search "DIYables Bluetooth", then find the DIYables Bluetooth library by DIYables
Click Install button to install the library.
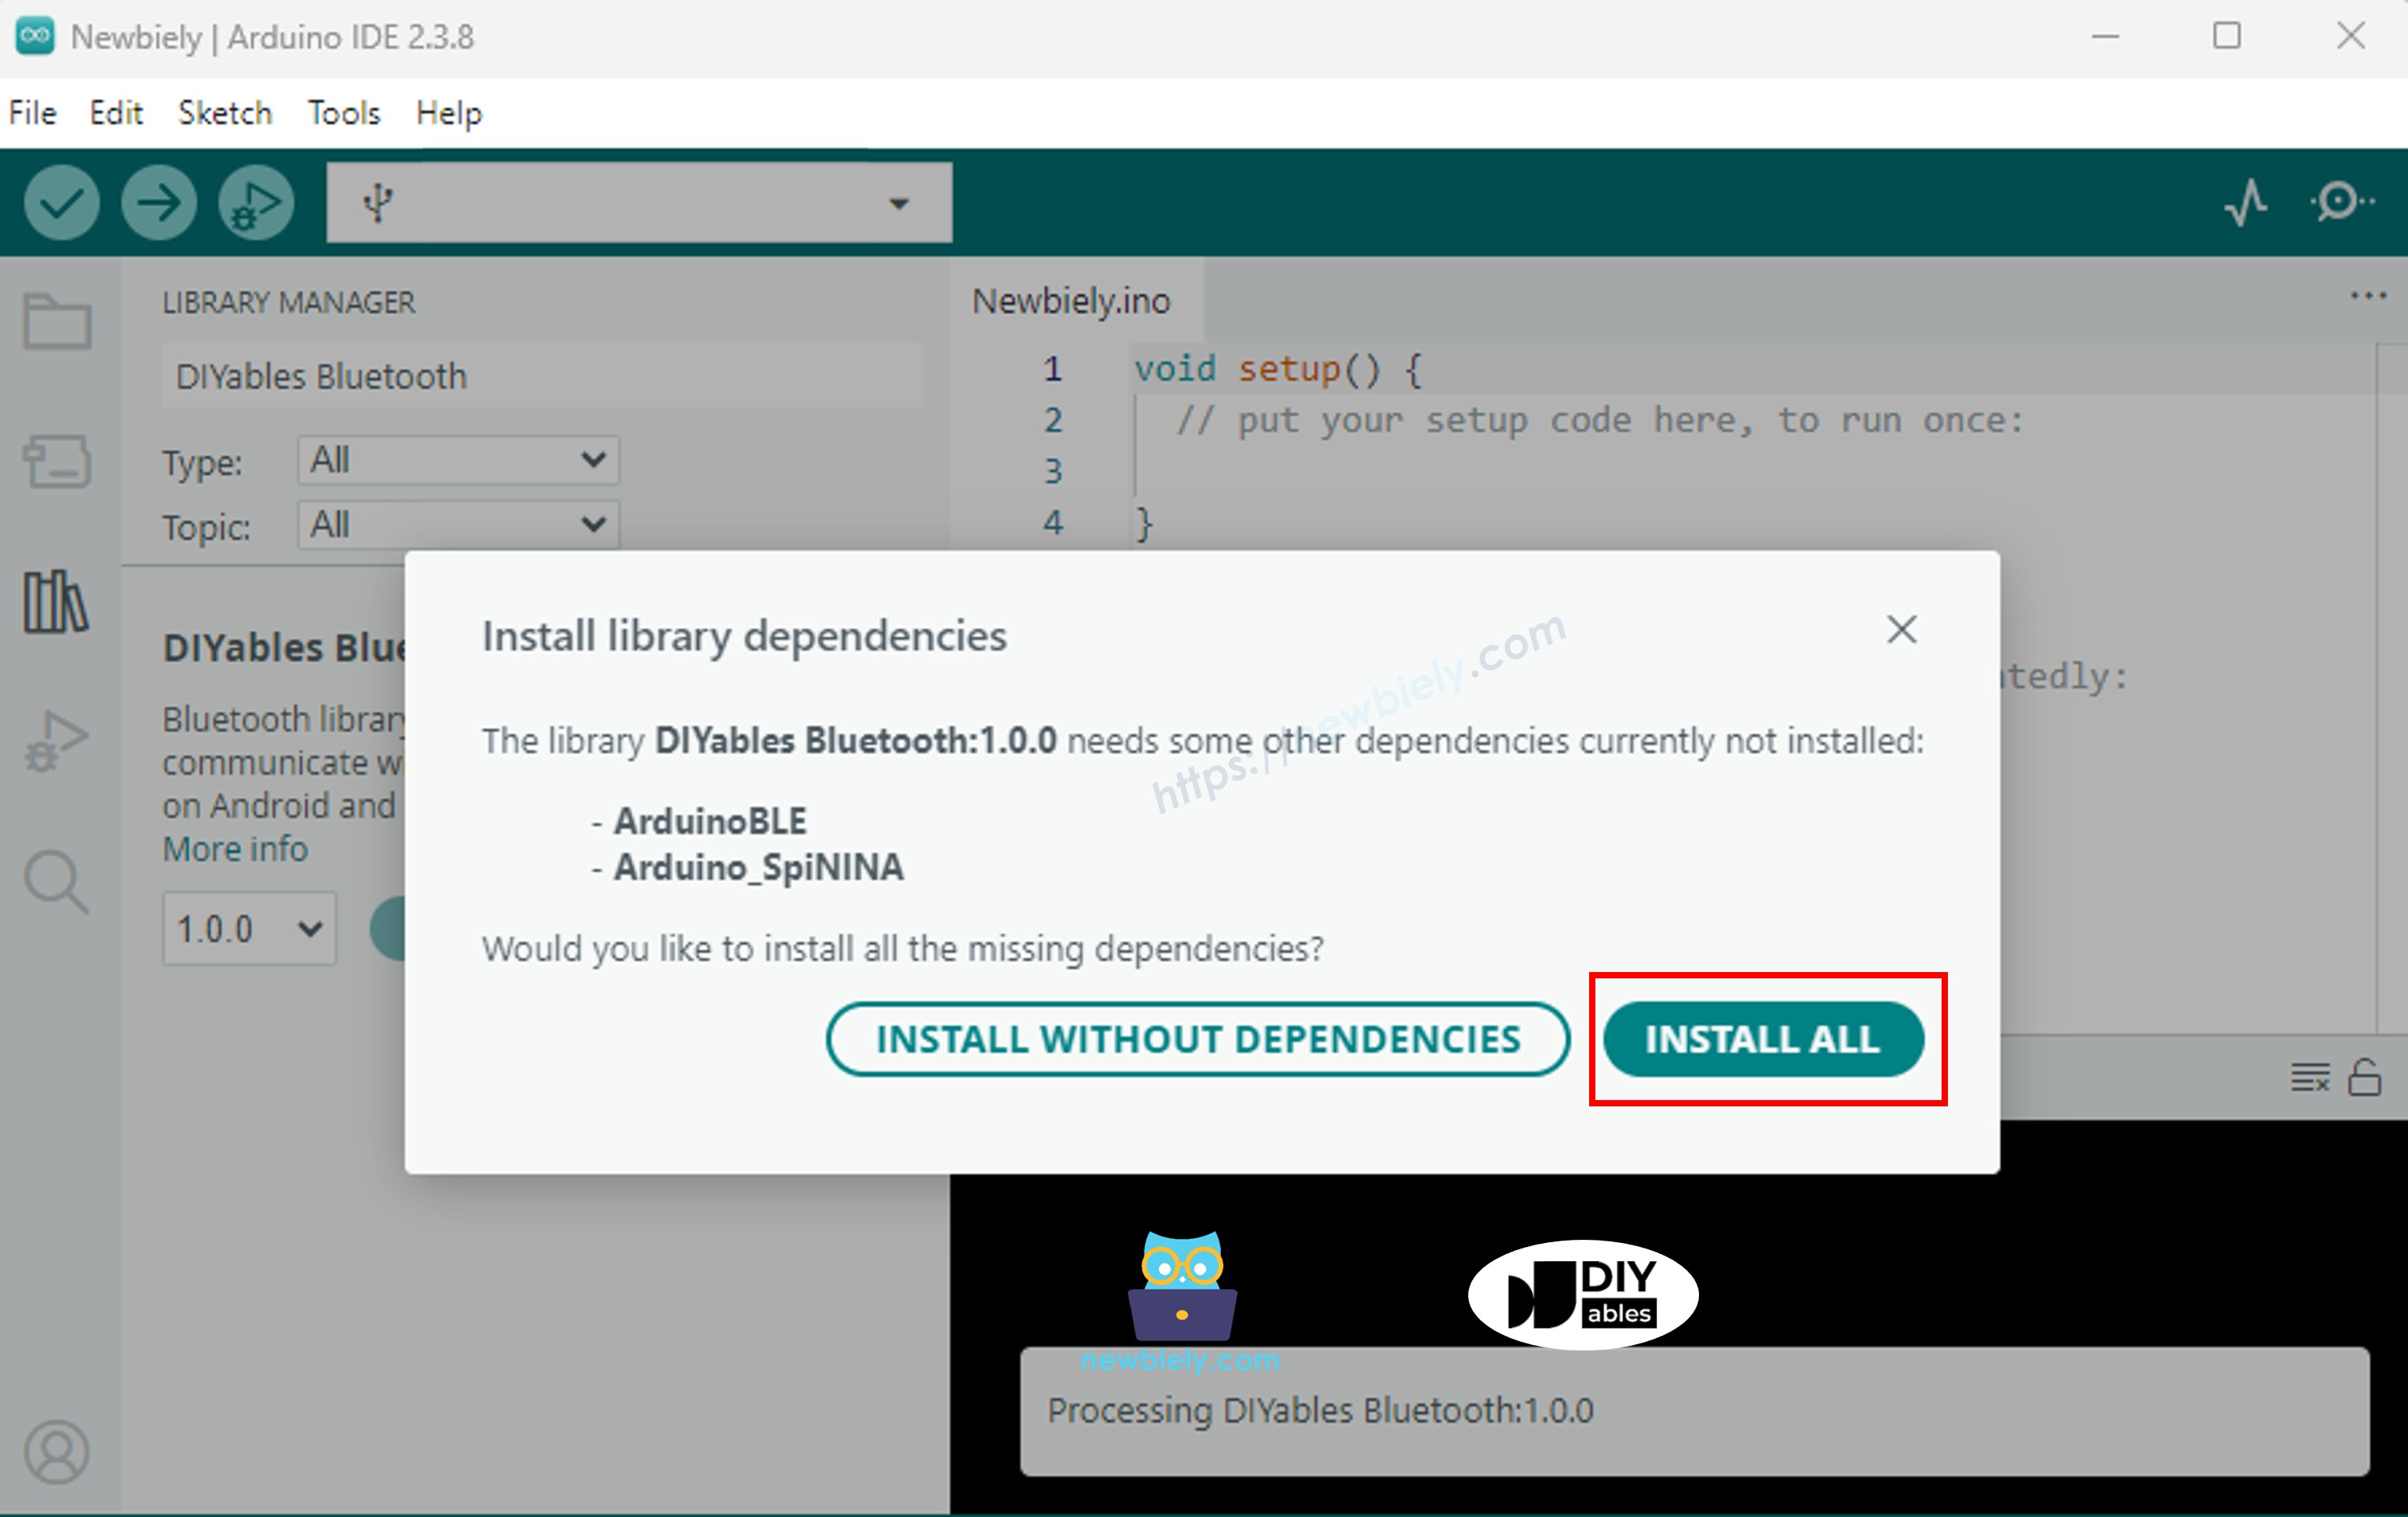
You will be asked for installing some other library dependencies
Click Install All button to install all library dependencies.
BLE Code
On Arduino IDE, Go to File Examples DIYables Bluetooth ArduinoBLE_RTC example, or copy the above code and paste it to the editor of Arduino IDE
/* * DIYables Bluetooth Library - Bluetooth RTC Example * Works with DIYables Bluetooth STEM app on Android and iOS * * This example demonstrates the Bluetooth RTC (Real-Time Clock) feature: * - Real-time clock display for both Arduino and mobile app * - One-click time synchronization from mobile app to Arduino * - Hardware RTC integration for persistent timekeeping * - Visual time difference monitoring * * Compatible Boards: * - Arduino UNO R4 WiFi (with built-in RTC) * Note: This example requires a board with hardware RTC. * Other BLE boards can be used with an external RTC module (e.g., DS3231). * * Setup: * 1. Upload the sketch to your Arduino * 2. Open Serial Monitor to see connection status * 3. Use DIYables Bluetooth App to connect and sync time * * Tutorial: https://diyables.io/bluetooth-app * Author: DIYables */#include <DIYables_BluetoothServer.h>#include <DIYables_BluetoothRTC.h>#include <platforms/DIYables_ArduinoBLE.h>#include"RTC.h"// BLE Configurationconst char* DEVICE_NAME = "Arduino_RTC";const char* SERVICE_UUID = "19B10000-E8F2-537E-4F6C-D104768A1214";const char* TX_UUID = "19B10001-E8F2-537E-4F6C-D104768A1214";const char* RX_UUID = "19B10002-E8F2-537E-4F6C-D104768A1214";// Create Bluetooth instancesDIYables_ArduinoBLE bluetooth(DEVICE_NAME, SERVICE_UUID, TX_UUID, RX_UUID);DIYables_BluetoothServer bluetoothServer(bluetooth);// Create RTC app instanceDIYables_BluetoothRTC bluetoothRTC;voidsetup() {Serial.begin(9600);delay(1000);Serial.println("DIYables Bluetooth - RTC Example");// Initialize RTC RTC.begin();// Check if RTC is running and set initial time if needed RTCTime savedTime; RTC.getTime(savedTime);if (!RTC.isRunning() || savedTime.getYear() == 2000) {Serial.println("RTC is NOT running, setting initial time...");// Set a default time - you can modify this to match current time RTCTime startTime(28, Month::AUGUST, 2025, 12, 0, 0, DayOfWeek::THURSDAY, SaveLight::SAVING_TIME_ACTIVE); RTC.setTime(startTime);Serial.println("RTC initialized with default time"); } else {Serial.println("RTC is already running"); }// Print initial RTC time RTCTime initialTime; RTC.getTime(initialTime);Serial.print("Initial RTC Time: ");Serial.print(initialTime.getYear());Serial.print("/");Serial.print(Month2int(initialTime.getMonth()));Serial.print("/");Serial.print(initialTime.getDayOfMonth());Serial.print(" - ");if (initialTime.getHour() < 10) Serial.print("0");Serial.print(initialTime.getHour());Serial.print(":");if (initialTime.getMinutes() < 10) Serial.print("0");Serial.print(initialTime.getMinutes());Serial.print(":");if (initialTime.getSeconds() < 10) Serial.print("0");Serial.print(initialTime.getSeconds());Serial.println();// Initialize Bluetooth server with platform-specific implementation bluetoothServer.begin();// Add RTC app to server bluetoothServer.addApp(&bluetoothRTC);// Set up connection event callbacks bluetoothServer.setOnConnected([]() {Serial.println("Bluetooth connected!");// Send current time to app on connection sendCurrentTimeToApp(); }); bluetoothServer.setOnDisconnected([]() {Serial.println("Bluetooth disconnected!"); });// Set callback for time sync from mobile app (Unix timestamp) bluetoothRTC.onTimeSync(onTimeSyncReceived);// Set callback for local time sync from mobile app (date/time components) bluetoothRTC.onLocalTimeSync(onLocalTimeSyncReceived);// Set callback for time request from mobile app bluetoothRTC.onTimeRequest(onTimeRequested);Serial.println("Waiting for Bluetooth connection...");Serial.println("Connect via app to sync time");}voidloop() {// Handle Bluetooth server communications bluetoothServer.loop();// Send current time to mobile app and print to Serial every 1 secondstaticunsignedlong lastUpdate = 0;if (millis() - lastUpdate >= 1000) { lastUpdate = millis();// Get current RTC time RTCTime currentTime; RTC.getTime(currentTime);// Send time to mobile app in human readable format bluetoothRTC.sendTime(currentTime.getYear(), Month2int(currentTime.getMonth()), currentTime.getDayOfMonth(), currentTime.getHour(), currentTime.getMinutes(), currentTime.getSeconds());// Print time to Serial MonitorSerial.print("RTC Time: ");Serial.print(currentTime.getYear());Serial.print("/");Serial.print(Month2int(currentTime.getMonth()));Serial.print("/");Serial.print(currentTime.getDayOfMonth());Serial.print(" - ");if (currentTime.getHour() < 10) Serial.print("0");Serial.print(currentTime.getHour());Serial.print(":");if (currentTime.getMinutes() < 10) Serial.print("0");Serial.print(currentTime.getMinutes());Serial.print(":");if (currentTime.getSeconds() < 10) Serial.print("0");Serial.print(currentTime.getSeconds());Serial.println(); }delay(10);}// Callback function called when mobile app sends time sync commandvoid onTimeSyncReceived(unsignedlong unixTimestamp) {Serial.print("Time sync received (Unix): ");Serial.println(unixTimestamp);// Convert Unix timestamp to RTCTime RTCTime newTime; newTime.setUnixTime(unixTimestamp);// Set RTC time RTC.setTime(newTime);Serial.println("Arduino RTC synchronized from Unix timestamp!");}// Callback function called when mobile app sends local time sync with componentsvoid onLocalTimeSyncReceived(intyear, intmonth, intday, inthour, intminute, intsecond) {Serial.print("Local time sync received: ");Serial.print(year);Serial.print("/");Serial.print(month);Serial.print("/");Serial.print(day);Serial.print(" ");Serial.print(hour);Serial.print(":");Serial.print(minute);Serial.print(":");Serial.println(second);// Create RTCTime from components (local time)// Convert month integer to Month enum Month monthEnum;switch(month) {case 1: monthEnum = Month::JANUARY; break;case 2: monthEnum = Month::FEBRUARY; break;case 3: monthEnum = Month::MARCH; break;case 4: monthEnum = Month::APRIL; break;case 5: monthEnum = Month::MAY; break;case 6: monthEnum = Month::JUNE; break;case 7: monthEnum = Month::JULY; break;case 8: monthEnum = Month::AUGUST; break;case 9: monthEnum = Month::SEPTEMBER; break;case 10: monthEnum = Month::OCTOBER; break;case 11: monthEnum = Month::NOVEMBER; break;case 12: monthEnum = Month::DECEMBER; break;default: monthEnum = Month::JANUARY; break; } RTCTime newTime(day, monthEnum, year, hour, minute, second, DayOfWeek::MONDAY, SaveLight::SAVING_TIME_ACTIVE);// Set RTC time RTC.setTime(newTime);Serial.println("Arduino RTC synchronized from local time components!");}// Callback function called when mobile app requests current Arduino timevoid onTimeRequested() {Serial.println("Time requested by app"); sendCurrentTimeToApp();}// Helper function to send current time to mobile appvoid sendCurrentTimeToApp() {// Get current RTC time and send to app in human readable format RTCTime currentTime; RTC.getTime(currentTime); bluetoothRTC.sendTime(currentTime.getYear(), Month2int(currentTime.getMonth()), currentTime.getDayOfMonth(), currentTime.getHour(), currentTime.getMinutes(), currentTime.getSeconds());}
Click Upload button on Arduino IDE to upload code to Arduino UNO R4 WiFi
Open the Serial Monitor
Check out the result on Serial Monitor. It looks like the below:
Newbiely | Arduino IDE 2.3.8
──
☐
✕
File
Edit
Sketch
Tools
Help
Arduino Uno R4 WiFi
Newbiely.ino
···
8Serial.println("Hello World!");
Output
Serial Monitor
Message (Enter to send message to 'Arduino Uno R4 WiFi' on 'COM15')
New Line
9600 baud
DIYables Bluetooth - RTC Example
Waiting for Bluetooth connection...
RTC not running or year is 2000, waiting for time sync...
Ln 11, Col 1
Arduino Uno R4 WiFi on COM15
2
Mobile App
Install the DIYables Bluetooth App on your smartphone: Android | iOS
Note: The DIYables Bluetooth App supports both BLE and Classic Bluetooth on Android, and BLE on iOS. Since the Arduino UNO R4 WiFi uses BLE, the app works on both Android and iOS. No manual pairing is needed for BLE — just scan and connect.
Open the DIYables Bluetooth App
When opening the app for the first time, it will ask for permissions. Please grant the following:
Nearby Devices permission (Android 12+) / Bluetooth permission (iOS) - required to scan and connect to Bluetooth devices
Location permission (Android 11 and below only) - required by older Android versions to scan for BLE devices
Make sure Bluetooth is turned on on your phone
On the home screen, tap the Connect button. The app will scan for BLE devices.
Find and tap "Arduino_RTC" in the scan results to connect.
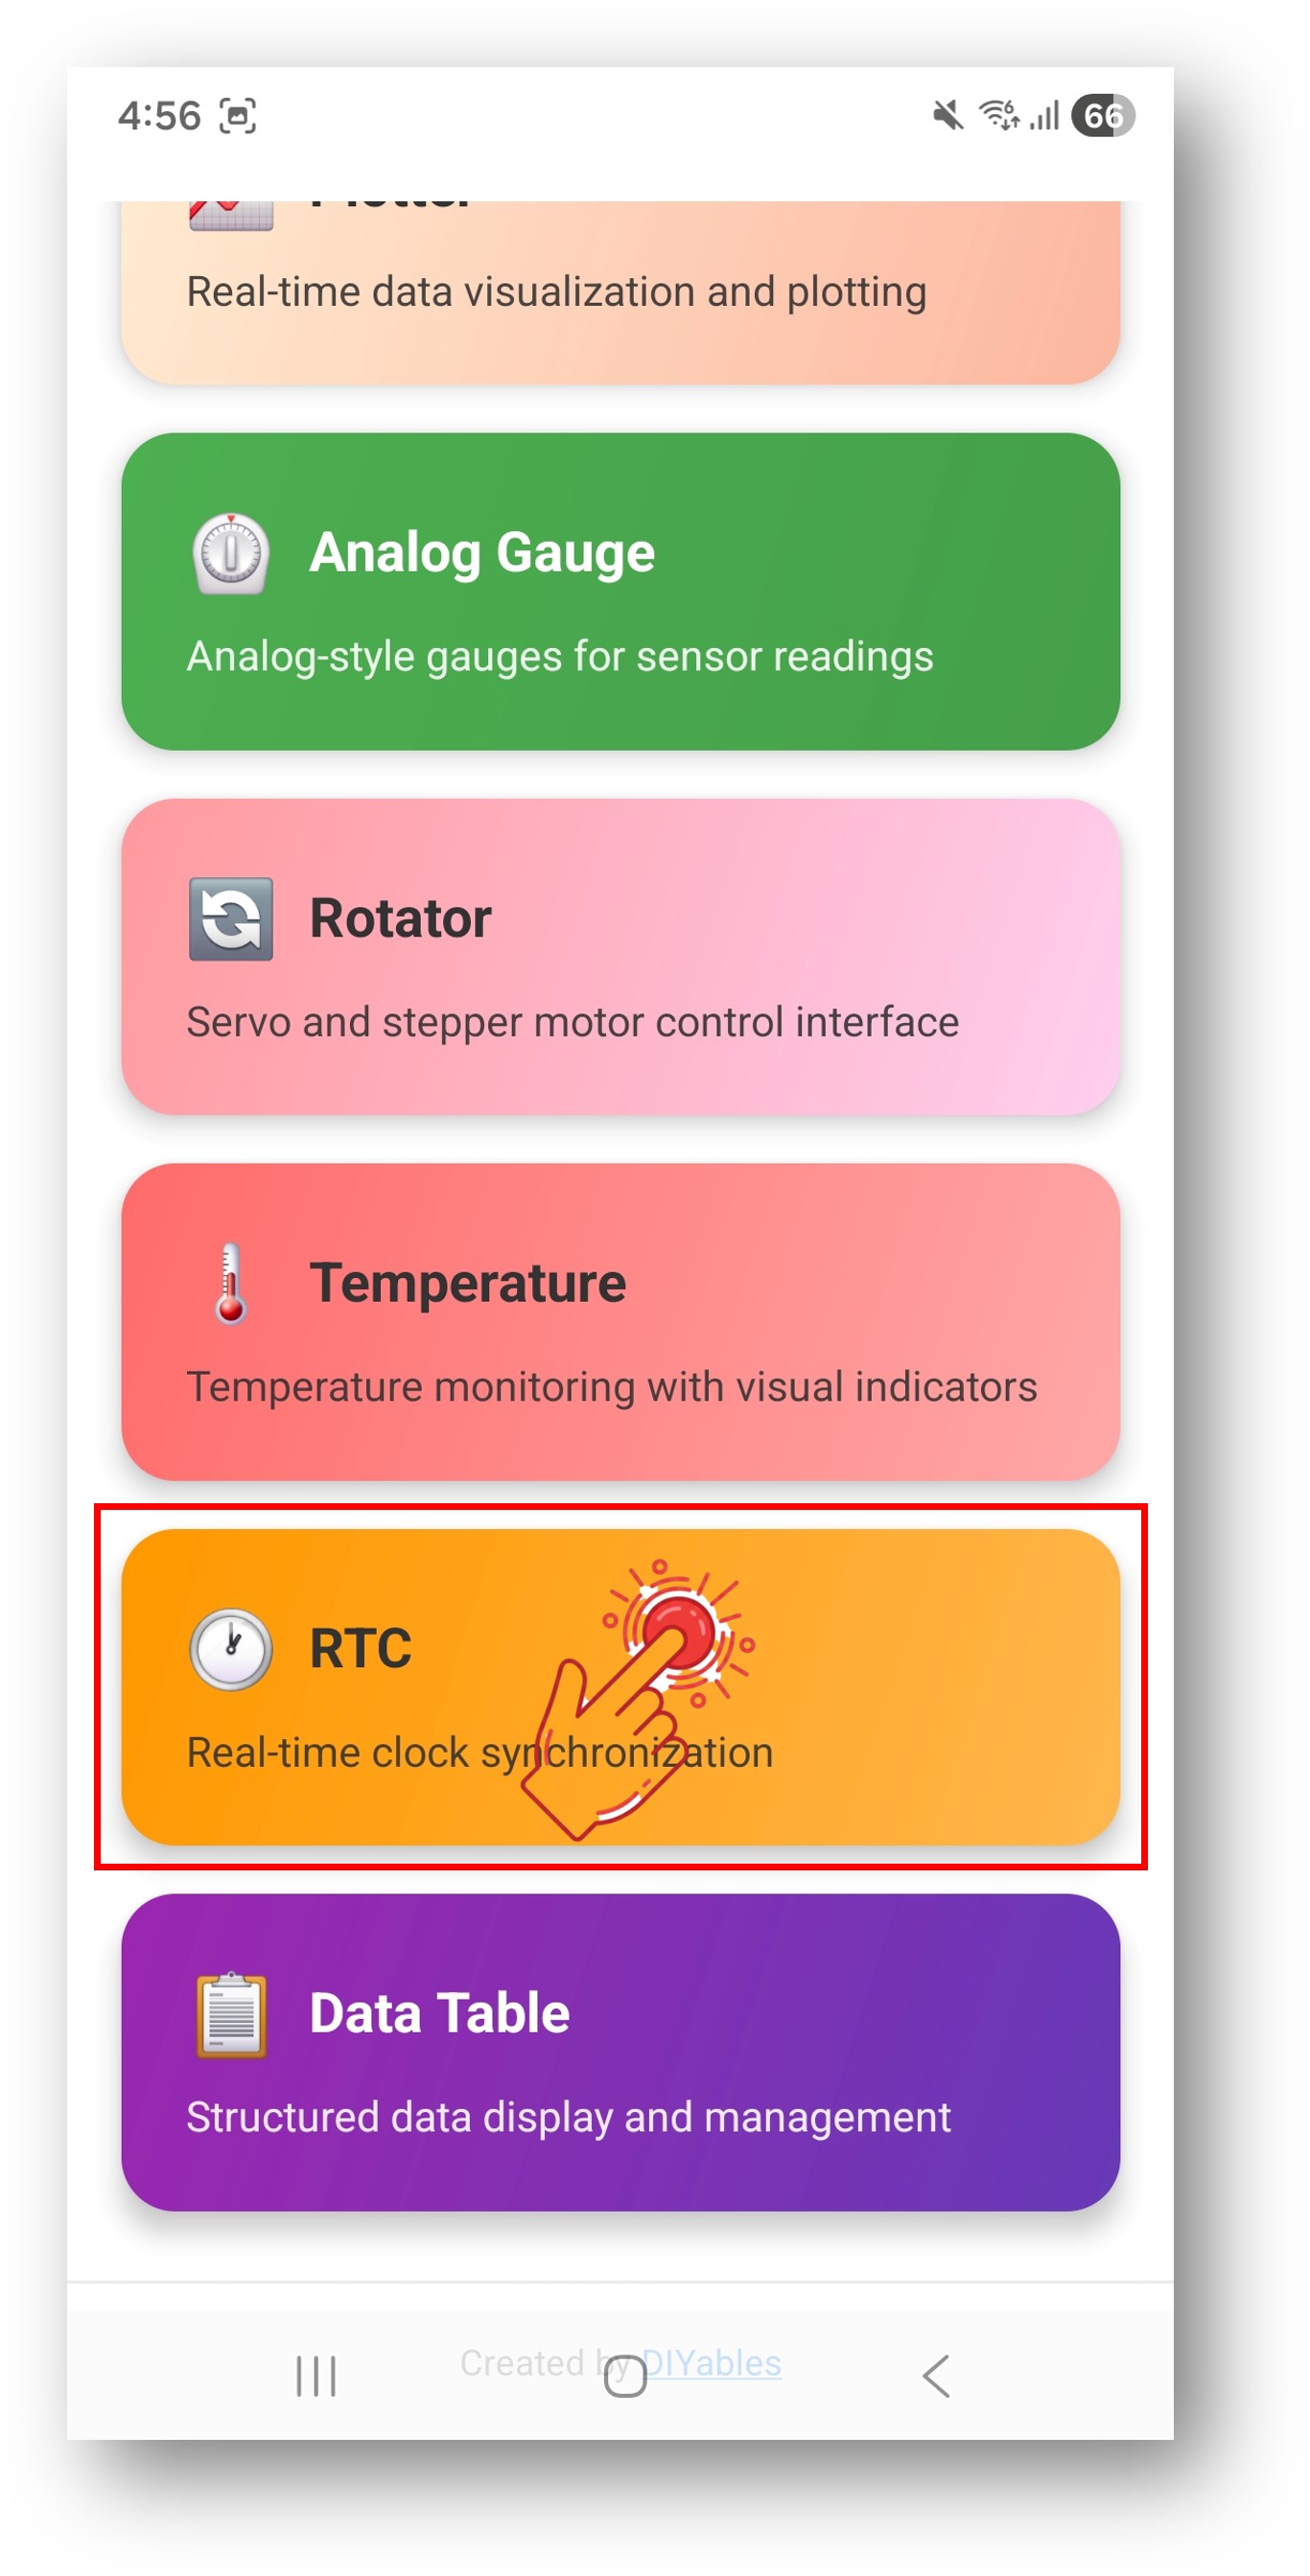
Once connected, the app automatically goes back to the home screen. Select the RTC app from the app menu.
Note: You can tap the settings icon on the home screen to hide/show apps on the home screen. For more details, see the DIYables Bluetooth App User Manual.
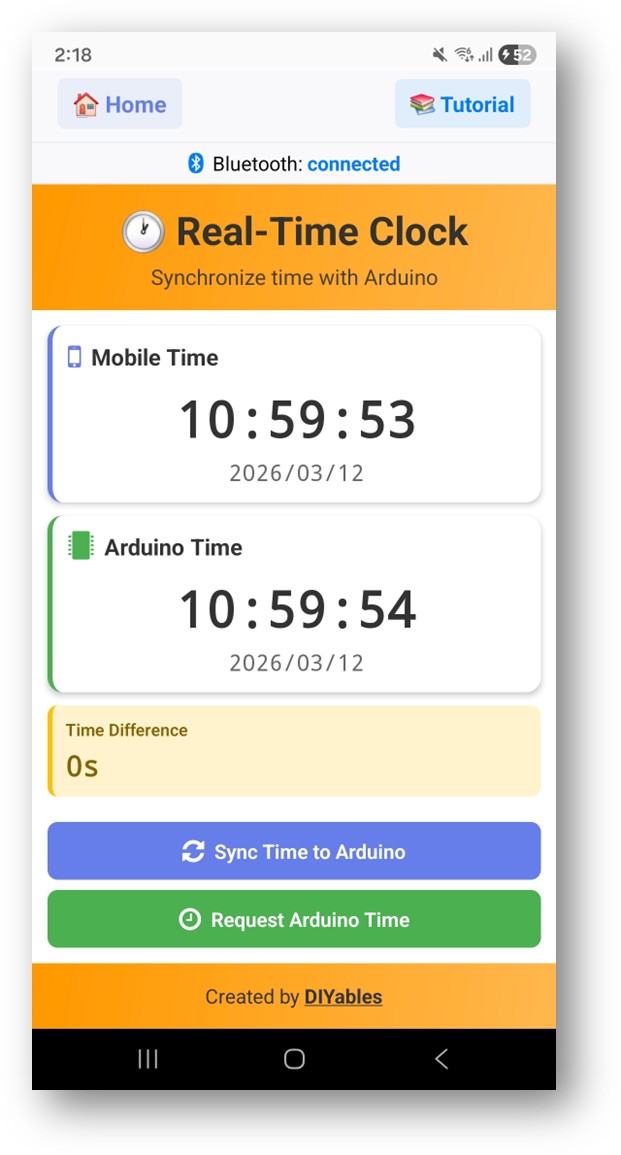
The app will display the current time from the Arduino's RTC
Use the Sync button to sync the phone's time to the Arduino
The time updates every second
Now look back at the Serial Monitor on Arduino IDE. You will see:
Newbiely | Arduino IDE 2.3.8
──
☐
✕
File
Edit
Sketch
Tools
Help
Arduino Uno R4 WiFi
Newbiely.ino
···
8Serial.println("Hello World!");
Output
Serial Monitor
Message (Enter to send message to 'Arduino Uno R4 WiFi' on 'COM15')
New Line
9600 baud
Bluetooth connected!
Time sync received (unix): 1719849600
RTC set to: 2025/07/01 12:00:00
Current time: 2025/07/01 12:00:01
Current time: 2025/07/01 12:00:02
Ln 11, Col 1
Arduino Uno R4 WiFi on COM15
2
Creative Customization - Adapt the Code to Your Project
Time Sync Methods
The app can sync time to the Arduino using two methods:
// Method 1: Unix timestamp syncbluetoothRTC.onTimeSync([](unsignedlong unixTime) {// Convert Unix timestamp and set RTCSerial.print("Unix time: ");Serial.println(unixTime);});// Method 2: Local time components syncbluetoothRTC.onLocalTimeSync([](intyear, intmonth, intday, inthour, intminute, intsecond) {// Set RTC directly with componentsSerial.print("Local time: ");Serial.print(year);Serial.print("/");Serial.print(month);Serial.print("/");Serial.println(day);});
Send Time to App
// Send current time to the appbluetoothRTC.sendTime(year, month, day, hour, minute, second);
Handle Time Requests
bluetoothRTC.onTimeRequest([]() {// App is requesting the current time// Read RTC and send time back RTCTime currentTime; RTC.getTime(currentTime); bluetoothRTC.sendTime( currentTime.getYear(), Month2int(currentTime.getMonth()), currentTime.getDayOfMonth(), currentTime.getHour(), currentTime.getMinutes(), currentTime.getSeconds() );});
Using the Built-in RTC
The Arduino UNO R4 WiFi's built-in RTC is accessed via the RTC.h library:
#include"RTC.h"voidsetup() { RTC.begin(); // Initialize the hardware RTC}// Set time on the RTCRTCTime timeToSet;timeToSet.setYear(2025);timeToSet.setMonth(Month::JULY);timeToSet.setDayOfMonth(1);timeToSet.setHour(12);timeToSet.setMinute(0);timeToSet.setSecond(0);RTC.setTime(timeToSet);// Read time from the RTCRTCTime currentTime;RTC.getTime(currentTime);intyear = currentTime.getYear();intmonth = Month2int(currentTime.getMonth());intday = currentTime.getDayOfMonth();inthour = currentTime.getHour();intminute = currentTime.getMinutes();intsecond = currentTime.getSeconds();
Please feel free to share the link of this tutorial. However, Please do not use our content on any other websites. We invested a lot of effort and time to create the content, please respect our work!