Arduino UNO R4 - DC Motor Shield

The Arduino Uno R4 - available as Minima and WiFi - brings more processing power, additional memory, and a 14-bit ADC while keeping the classic Uno header layout. That means the Motor Shield Rev3 plugs straight onto the Uno R4 with zero extra wiring.

In this guide you will:

Arduino Uno R4 DC Motor Shield

Motor Shield Rev3 Overview

At the heart of the Motor Shield Rev3 sits the L298P dual full-bridge driver. This chip gives you independent control over two DC motors - each with its own direction line, PWM speed line, brake line, and current-sensing analog input.

Here is what each control line does:

  • Direction - a digital output that sets the spin direction. Writing HIGH spins one way; LOW spins the other.
  • PWM - an analog (PWM) output that sets the work duty. Values range from 0 (stopped) to 255 (full speed).
  • Brake - a digital output. Setting it HIGH locks the motor shaft; setting it LOW lets the motor spin freely.
  • Current Sensing - an analog input that reports how much current the motor is drawing.

Because the Uno R4 shares the exact same header positions as the original Uno R3, every pin lines up automatically:

Function Channel A Channel B
Direction D12 D13
PWM (Speed) D3 D11
Brake D9 D8
Current Sensing A0 A1

Powering the Motors

Motors need more current than USB can provide. Connect a 6-12 V external supply (such as two 18650 lithium cells in series) to the shield's power screw terminals. The Arduino itself can continue running from USB.

Wiring Diagram

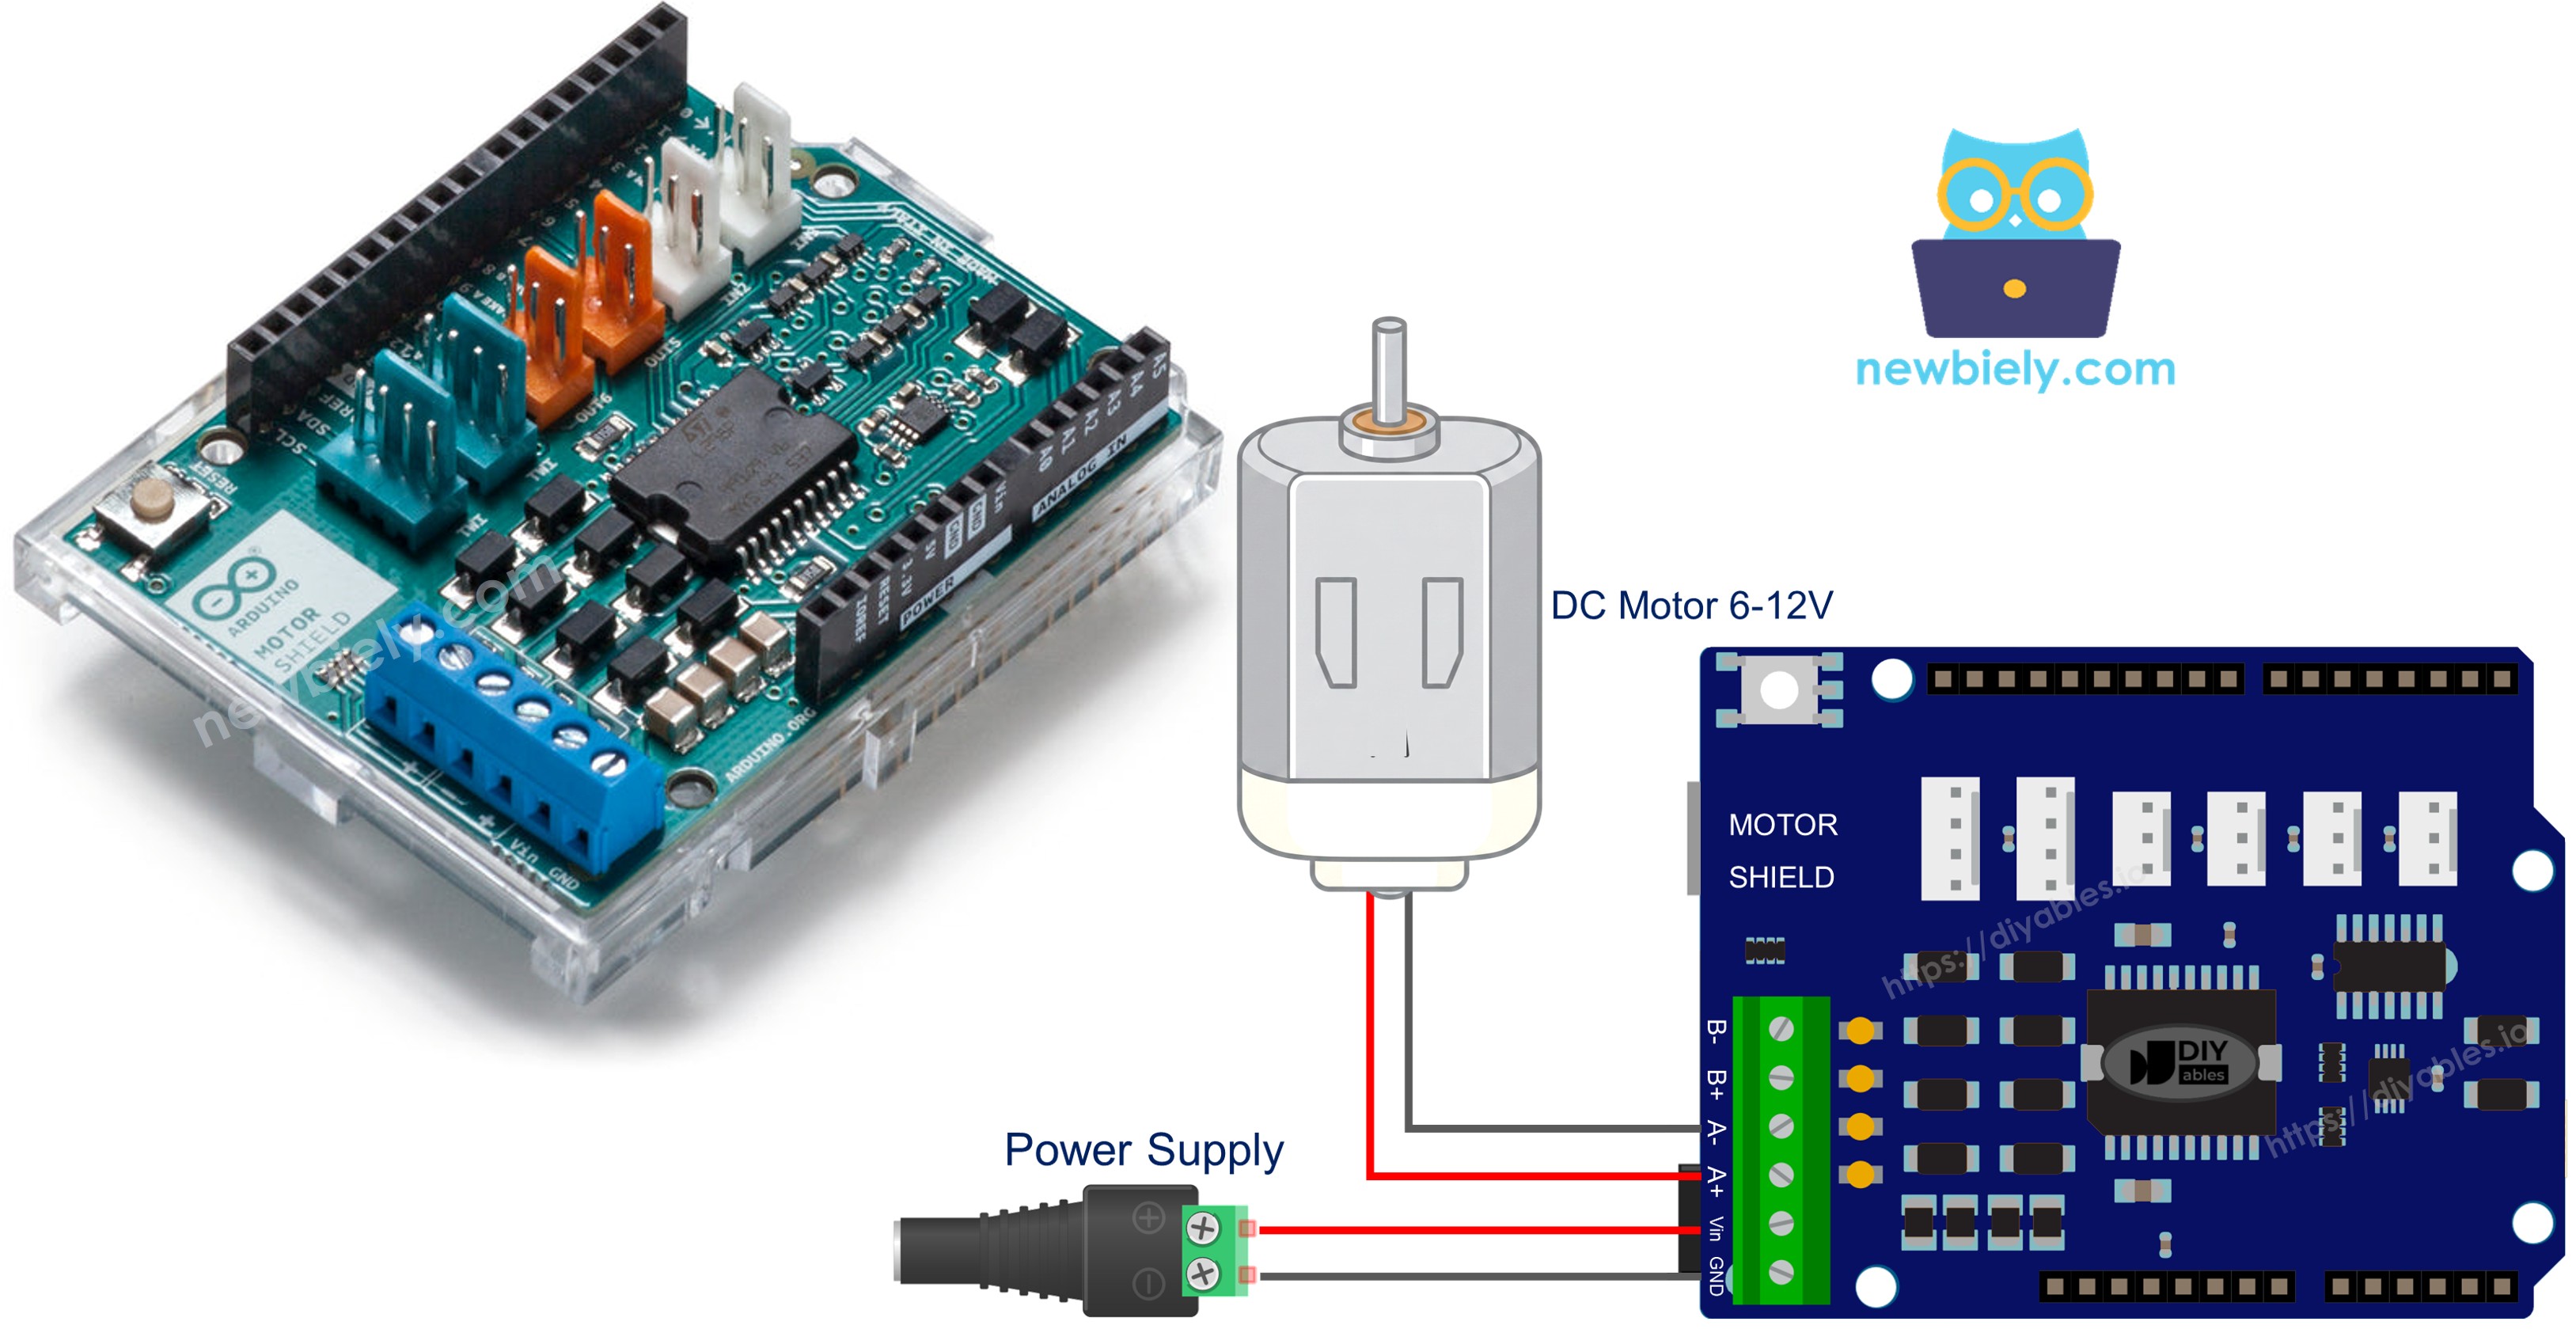
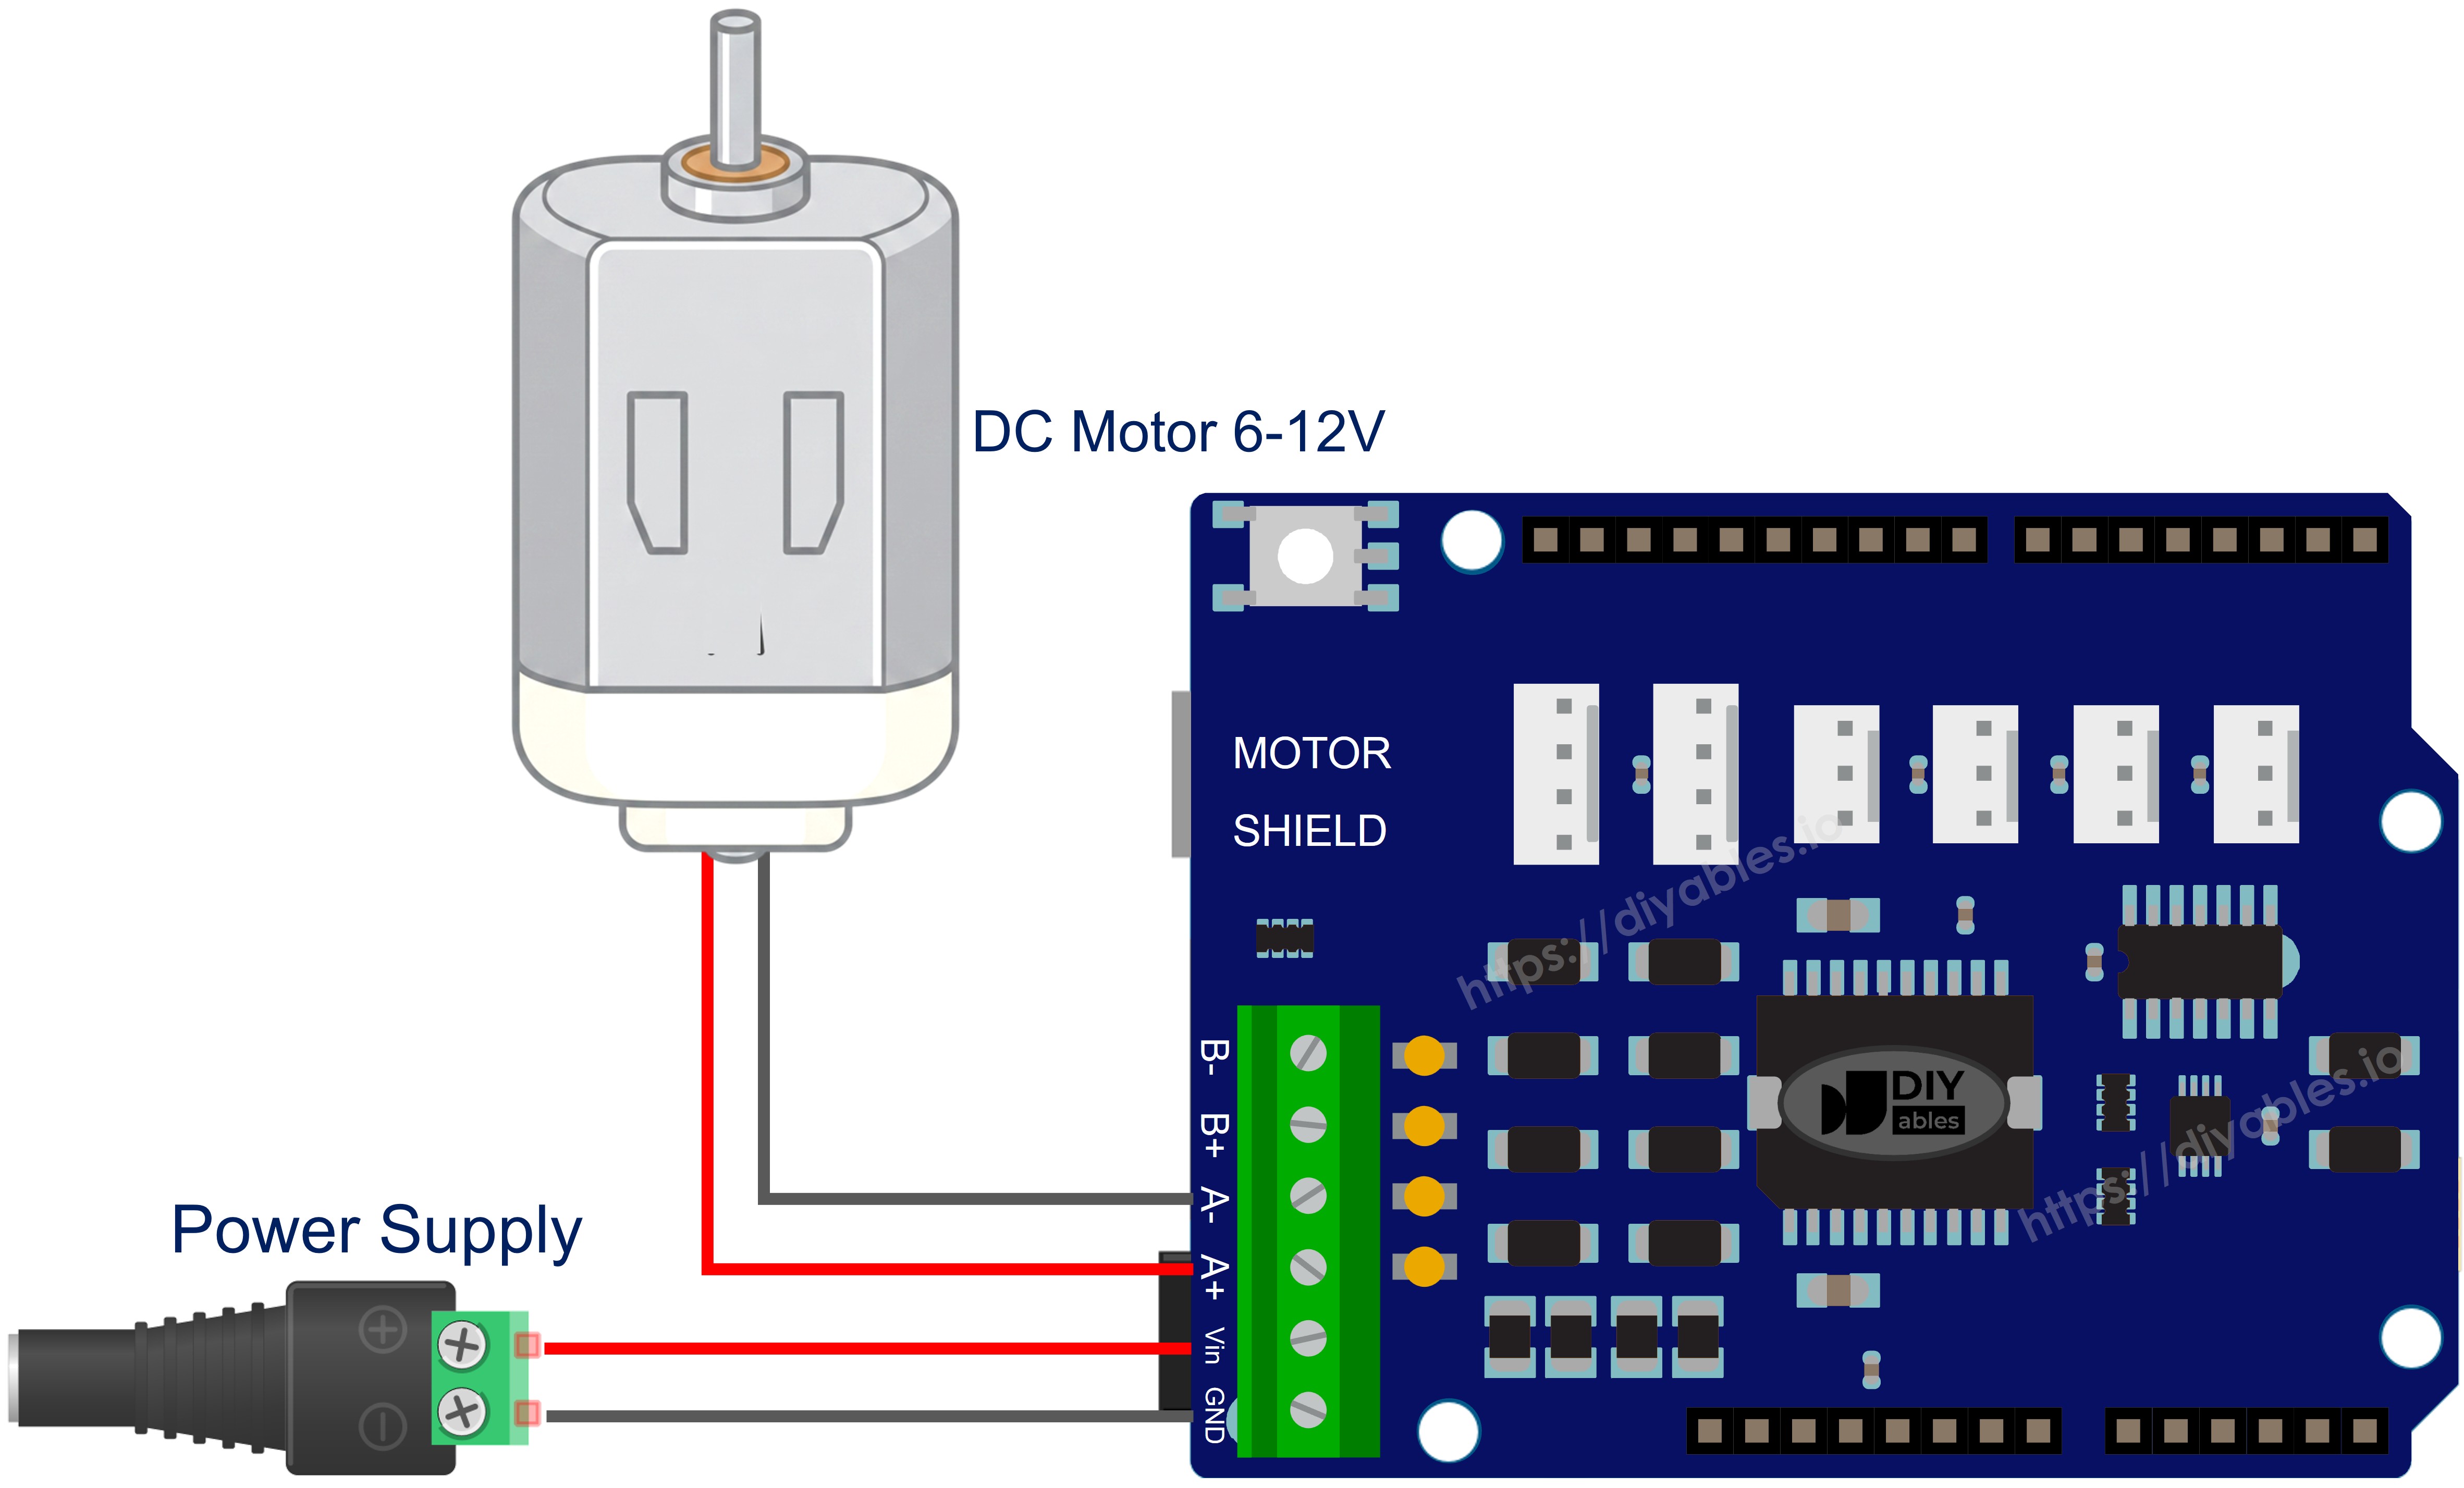
Place the Motor Shield Rev3 onto the Uno R4 headers, making sure every pin seats properly.

Attach the DC motor leads to the Channel A screw terminals - the channel labels are printed on the board.

Hook up the external battery pack to the power screw terminals.

The wiring diagram between Arduino Uno R4 DC Motor Shield

This image is created using Fritzing. Click to enlarge image

See The best way to supply power to the Arduino Uno R4 and other components.

How to Install the Library

  1. Plug the Arduino Uno R4 into your computer using a USB Type-C cable.
  2. In the Arduino IDE, verify that the correct board (Arduino Uno R4 Minima or WiFi) and serial port are selected.
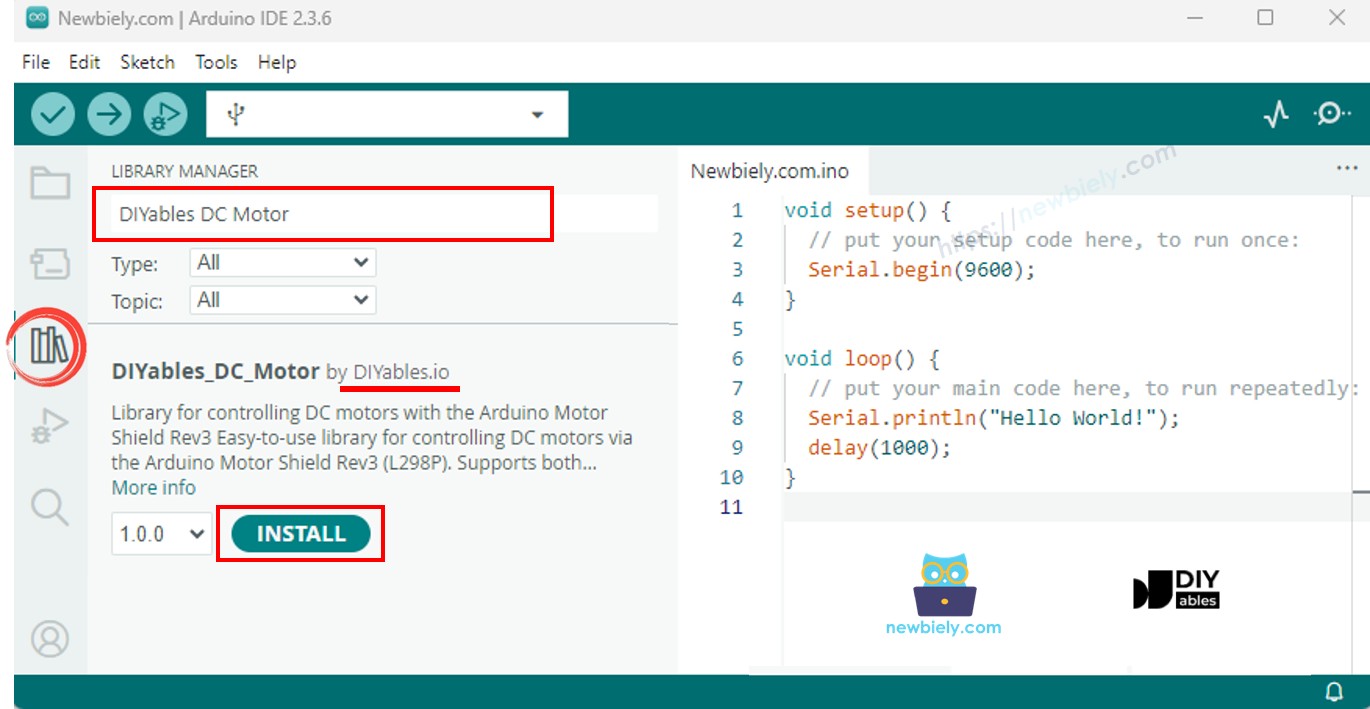
  3. Click the Libraries icon in the left sidebar.
  4. Type "DIYables_DC_Motor" into the search box and locate the library published by DIYables.
  5. Hit Install to add the library to your IDE.
Arduino DC Motor Shield library

No additional dependencies are needed - the library is entirely self-contained.

Minimal Sketch Structure

All motor control sketches share this skeleton:

#include <DIYables_DC_Motor.h> DIYables_DC_Motor motor(MOTOR_CH_A); void setup() { motor.begin(); } void loop() { motor.run(MOTOR_FORWARD, 100); delay(2000); motor.brake(); delay(1000); }

motor.begin() configures the direction, PWM, and brake pins. Calling motor.run() sets the direction, releases the brake, and applies the requested speed. motor.brake() engages the brake and cuts the PWM to zero.

Single Motor on Channel A

Run a motor on Channel A, toggling between forward and backward every two seconds with a full stop in between.

/* * This Arduino UNO R4 code was developed by newbiely.com * * This Arduino UNO R4 code is made available for public use without any restriction * * For comprehensive instructions and wiring diagrams, please visit: * https://newbiely.com/tutorials/arduino-uno-r4/arduino-uno-r4-dc-motor-shield */ /* * DIYables_DC_Motor - ChannelA Example * * This example demonstrates how to control a DC motor connected to * Channel A of the Arduino Motor Shield Rev3. The motor alternates * direction every 2 seconds with braking in between. * * Channel A pins: D12 (Direction), D3 (PWM), D9 (Brake), A0 (Current) * * Tutorial: https://diyables.io/motor-shield * * TESTED HARDWARE: * - Arduino Uno R3 * - Arduino Uno R4 WiFi * - Arduino Uno R4 Minima * - Arduino Mega * - Arduino Due * - Arduino Giga * - DIYables STEM V3: https://diyables.io/stem-v3 * - DIYables STEM V4 IoT: https://diyables.io/stem-v4-iot * - DIYables STEM V4B IoT: https://diyables.io/stem-v4b-iot * - DIYables STEM V4B Edu: https://diyables.io/stem-v4-edu * - DIYables MEGA2560 R3: https://diyables.io/atmega2560-board * - It is expected to work with other boards */ #include <DIYables_DC_Motor.h> DIYables_DC_Motor motor(MOTOR_CH_A); bool directionState = false; void setup() { Serial.begin(9600); motor.begin(); Serial.println("Motor Shield - Channel A"); } void loop() { // Toggle direction each cycle directionState = !directionState; int direction = directionState ? MOTOR_FORWARD : MOTOR_BACKWARD; // Run motor with speed 30 (out of 255) motor.run(direction, 30); Serial.print("Running "); Serial.println(directionState ? "FORWARD" : "BACKWARD"); delay(2000); // Brake the motor motor.brake(); Serial.println("Braking"); delay(2000); }

How to Run

  • Place the shield on the Uno R4 and connect the motor to Channel A.
  • Connect the battery pack to the power terminals.
  • Plug in the USB Type-C cable.
  • Paste the code in Arduino IDE, choose the correct board and port, and press Upload.
  • Open the Serial Monitor to follow the direction changes.

The motor alternates between forward and backward at speed 30, pausing for 2 seconds between each direction change.

Method Quick Reference

Method What It Does Usage
run(dir, speed) Spins the motor in the given direction at the given speed motor.run(MOTOR_FORWARD, 100)
setSpeed(speed) Changes speed without touching direction or brake motor.setSpeed(200)
setDirection(dir) Changes direction without touching speed or brake motor.setDirection(MOTOR_BACKWARD)
brake() Engages the brake and drops speed to zero motor.brake()
release() Disengages the brake motor.release()
readCurrent() Returns raw ADC from the current-sensing pin motor.readCurrent()

Single Motor on Channel B

Identical behavior, but on Channel B - just swap the channel constant.

/* * This Arduino UNO R4 code was developed by newbiely.com * * This Arduino UNO R4 code is made available for public use without any restriction * * For comprehensive instructions and wiring diagrams, please visit: * https://newbiely.com/tutorials/arduino-uno-r4/arduino-uno-r4-dc-motor-shield */ /* * DIYables_DC_Motor - ChannelB Example * * This example demonstrates how to control a DC motor connected to * Channel B of the Arduino Motor Shield Rev3. The motor alternates * direction every 2 seconds with braking in between. * * Channel B pins: D13 (Direction), D11 (PWM), D8 (Brake), A1 (Current) * * Tutorial: https://diyables.io/motor-shield * * TESTED HARDWARE: * - Arduino Uno R3 * - Arduino Uno R4 WiFi * - Arduino Uno R4 Minima * - Arduino Mega * - Arduino Due * - Arduino Giga * - DIYables STEM V3: https://diyables.io/stem-v3 * - DIYables STEM V4 IoT: https://diyables.io/stem-v4-iot * - DIYables STEM V4B IoT: https://diyables.io/stem-v4b-iot * - DIYables STEM V4B Edu: https://diyables.io/stem-v4-edu * - DIYables MEGA2560 R3: https://diyables.io/atmega2560-board * - It is expected to work with other boards */ #include <DIYables_DC_Motor.h> DIYables_DC_Motor motor(MOTOR_CH_B); bool directionState = false; void setup() { Serial.begin(9600); motor.begin(); Serial.println("Motor Shield - Channel B"); } void loop() { // Toggle direction each cycle directionState = !directionState; int direction = directionState ? MOTOR_FORWARD : MOTOR_BACKWARD; // Run motor with speed 30 (out of 255) motor.run(direction, 30); Serial.print("Running "); Serial.println(directionState ? "FORWARD" : "BACKWARD"); delay(2000); // Brake the motor motor.brake(); Serial.println("Braking"); delay(2000); }

How to Run

  • Wire the motor to the Channel B screw terminals.
  • Upload the sketch and open the Serial Monitor.

Everything works the same way; only the underlying pins differ.

Two Motors - Both Channels

Drive two motors independently: same direction, opposite direction, and synchronized braking.

/* * This Arduino UNO R4 code was developed by newbiely.com * * This Arduino UNO R4 code is made available for public use without any restriction * * For comprehensive instructions and wiring diagrams, please visit: * https://newbiely.com/tutorials/arduino-uno-r4/arduino-uno-r4-dc-motor-shield */ /* * DIYables_DC_Motor - BothChannels Example * * This example demonstrates how to control two DC motors simultaneously, * one on Channel A and one on Channel B of the Arduino Motor Shield Rev3. * * Channel A pins: D12 (Direction), D3 (PWM), D9 (Brake), A0 (Current) * Channel B pins: D13 (Direction), D11 (PWM), D8 (Brake), A1 (Current) * * Tutorial: https://diyables.io/motor-shield * * TESTED HARDWARE: * - Arduino Uno R3 * - Arduino Uno R4 WiFi * - Arduino Uno R4 Minima * - Arduino Mega * - Arduino Due * - Arduino Giga * - DIYables STEM V3: https://diyables.io/stem-v3 * - DIYables STEM V4 IoT: https://diyables.io/stem-v4-iot * - DIYables STEM V4B IoT: https://diyables.io/stem-v4b-iot * - DIYables STEM V4B Edu: https://diyables.io/stem-v4-edu * - DIYables MEGA2560 R3: https://diyables.io/atmega2560-board * - It is expected to work with other boards */ #include <DIYables_DC_Motor.h> DIYables_DC_Motor motorA(MOTOR_CH_A); DIYables_DC_Motor motorB(MOTOR_CH_B); void setup() { Serial.begin(9600); motorA.begin(); motorB.begin(); Serial.println("Motor Shield - Both Channels"); } void loop() { // Both motors forward motorA.run(MOTOR_FORWARD, 100); motorB.run(MOTOR_FORWARD, 100); Serial.println("Both FORWARD"); delay(2000); // Brake both motors motorA.brake(); motorB.brake(); Serial.println("Both BRAKING"); delay(1000); // Both motors backward motorA.run(MOTOR_BACKWARD, 100); motorB.run(MOTOR_BACKWARD, 100); Serial.println("Both BACKWARD"); delay(2000); // Brake both motors motorA.brake(); motorB.brake(); Serial.println("Both BRAKING"); delay(1000); // Motors in opposite directions motorA.run(MOTOR_FORWARD, 150); motorB.run(MOTOR_BACKWARD, 150); Serial.println("A FORWARD, B BACKWARD"); delay(2000); // Brake both motors motorA.brake(); motorB.brake(); Serial.println("Both BRAKING"); delay(1000); }

How to Run

  • Attach one motor to Channel A and another to Channel B.
  • Upload and open the Serial Monitor.

The sketch cycles through three patterns: both forward, both backward, and motors spinning in opposite directions.

Reading Motor Current

Monitor the current consumption of a motor in real time.

/* * This Arduino UNO R4 code was developed by newbiely.com * * This Arduino UNO R4 code is made available for public use without any restriction * * For comprehensive instructions and wiring diagrams, please visit: * https://newbiely.com/tutorials/arduino-uno-r4/arduino-uno-r4-dc-motor-shield */ /* * DIYables_DC_Motor - CurrentSensing Example * * This example demonstrates how to read the current drawn by a DC motor * connected to Channel A of the Arduino Motor Shield Rev3. * * The Motor Shield Rev3 provides current sensing via analog pins: * Channel A: A0 * Channel B: A1 * * Tutorial: https://diyables.io/motor-shield * * TESTED HARDWARE: * - Arduino Uno R3 * - Arduino Uno R4 WiFi * - Arduino Uno R4 Minima * - Arduino Mega * - Arduino Due * - Arduino Giga * - DIYables STEM V3: https://diyables.io/stem-v3 * - DIYables STEM V4 IoT: https://diyables.io/stem-v4-iot * - DIYables STEM V4B IoT: https://diyables.io/stem-v4b-iot * - DIYables STEM V4B Edu: https://diyables.io/stem-v4-edu * - DIYables MEGA2560 R3: https://diyables.io/atmega2560-board * - It is expected to work with other boards */ #include <DIYables_DC_Motor.h> DIYables_DC_Motor motor(MOTOR_CH_A); void setup() { Serial.begin(9600); motor.begin(); Serial.println("Motor Shield - Current Sensing"); } void loop() { // Run motor forward motor.run(MOTOR_FORWARD, 100); // Read and print current sensing value int current = motor.readCurrent(); Serial.print("Current sensing (raw ADC): "); Serial.println(current); delay(500); }

How to Run

  • Wire a motor to Channel A.
  • Upload the sketch and open the Serial Monitor.
  • The raw ADC value refreshes every 500 ms.

About Current Sensing

Analog pins A0 and A1 carry a voltage proportional to the motor current on Channel A and Channel B respectively. readCurrent() returns the raw ADC reading - on the Uno R4 this is a 14-bit value (0-16383) thanks to the Renesas RA4M1 ADC. Convert to milliamps using the shield's documented sensitivity factor.

Custom Pin Assignment

If you need to override the default pin mapping - for example, when using a third-party motor driver board - pass the pins directly to the constructor.

/* * This Arduino UNO R4 code was developed by newbiely.com * * This Arduino UNO R4 code is made available for public use without any restriction * * For comprehensive instructions and wiring diagrams, please visit: * https://newbiely.com/tutorials/arduino-uno-r4/arduino-uno-r4-dc-motor-shield */ /* * DIYables_DC_Motor - CustomPins Example * * This example demonstrates how to create a motor object with * custom pin assignments instead of using the predefined channels. * * Tutorial: https://diyables.io/motor-shield * * TESTED HARDWARE: * - Arduino Uno R3 * - Arduino Uno R4 WiFi * - Arduino Uno R4 Minima * - Arduino Mega * - Arduino Due * - Arduino Giga * - DIYables STEM V3: https://diyables.io/stem-v3 * - DIYables STEM V4 IoT: https://diyables.io/stem-v4-iot * - DIYables STEM V4B IoT: https://diyables.io/stem-v4b-iot * - DIYables STEM V4B Edu: https://diyables.io/stem-v4-edu * - DIYables MEGA2560 R3: https://diyables.io/atmega2560-board * - It is expected to work with other boards */ #include <DIYables_DC_Motor.h> // Custom pin assignment: direction=12, pwm=3, brake=9, currentSensing=A0 DIYables_DC_Motor motor(12, 3, 9, A0); bool directionState = false; void setup() { Serial.begin(9600); motor.begin(); Serial.println("Motor Shield - Custom Pins"); } void loop() { // Toggle direction each cycle directionState = !directionState; int direction = directionState ? MOTOR_FORWARD : MOTOR_BACKWARD; // Run motor motor.run(direction, 30); Serial.print("Running "); Serial.println(directionState ? "FORWARD" : "BACKWARD"); delay(2000); // Brake the motor motor.brake(); Serial.println("Braking"); delay(2000); }

How to Run

  • Update the pin numbers in the constructor to match your hardware.
  • Upload and verify motor operation.

Troubleshooting

  • Motor stays still - Confirm the motor wires sit firmly in the screw terminals and that the channel matches the code (MOTOR_CH_A vs. MOTOR_CH_B).
  • No torque - Raise the speed value. Very low PWM values may not overcome the motor's inertia.
  • External supply dead - Recharge or replace the batteries. Check that polarity is correct at the power terminals.
  • Direction seems wrong - Swap the two motor leads at the screw terminal, or flip the direction constant in software.
  • Current reading always zero - Make sure you used the channel constructor or the 4-pin constructor that includes the current-sensing pin.

Platform Support

The library relies exclusively on Arduino standard APIs (pinMode, digitalWrite, analogWrite, analogRead) and runs on all Arduino-compatible platforms.

※ OUR MESSAGES

  • As freelancers, We are AVAILABLE for HIRE. See how to outsource your project to us
  • Please feel free to share the link of this tutorial. However, Please do not use our content on any other websites. We invested a lot of effort and time to create the content, please respect our work!