Arduino Nano - Door Sensor - Piezo Buzzer
This tutorial instructs you how to use Arduino Nano and door sensor to trigger piezo buzzer. In detail:
- Arduino Nano produces a sound when the door is opened.
- Arduino Nano stops the sound when the door is closed.
- Arduino Nano plays a melody when the door is opened.
Hardware Preparation
Or you can buy the following kits:
| 1 | × | DIYables Sensor Kit (18 sensors/displays) |
Disclosure: Some of the links provided in this section are Amazon affiliate links. We may receive a commission for any purchases made through these links at no additional cost to you.
Additionally, some of these links are for products from our own brand, DIYables .
Additionally, some of these links are for products from our own brand, DIYables .
Overview of Piezo Buzzer and Door Sensor
If you are not familiar with piezo buzzer and door sensor (including pinout, functioning, programming, etc.), the following tutorials can help:
Wiring Diagram
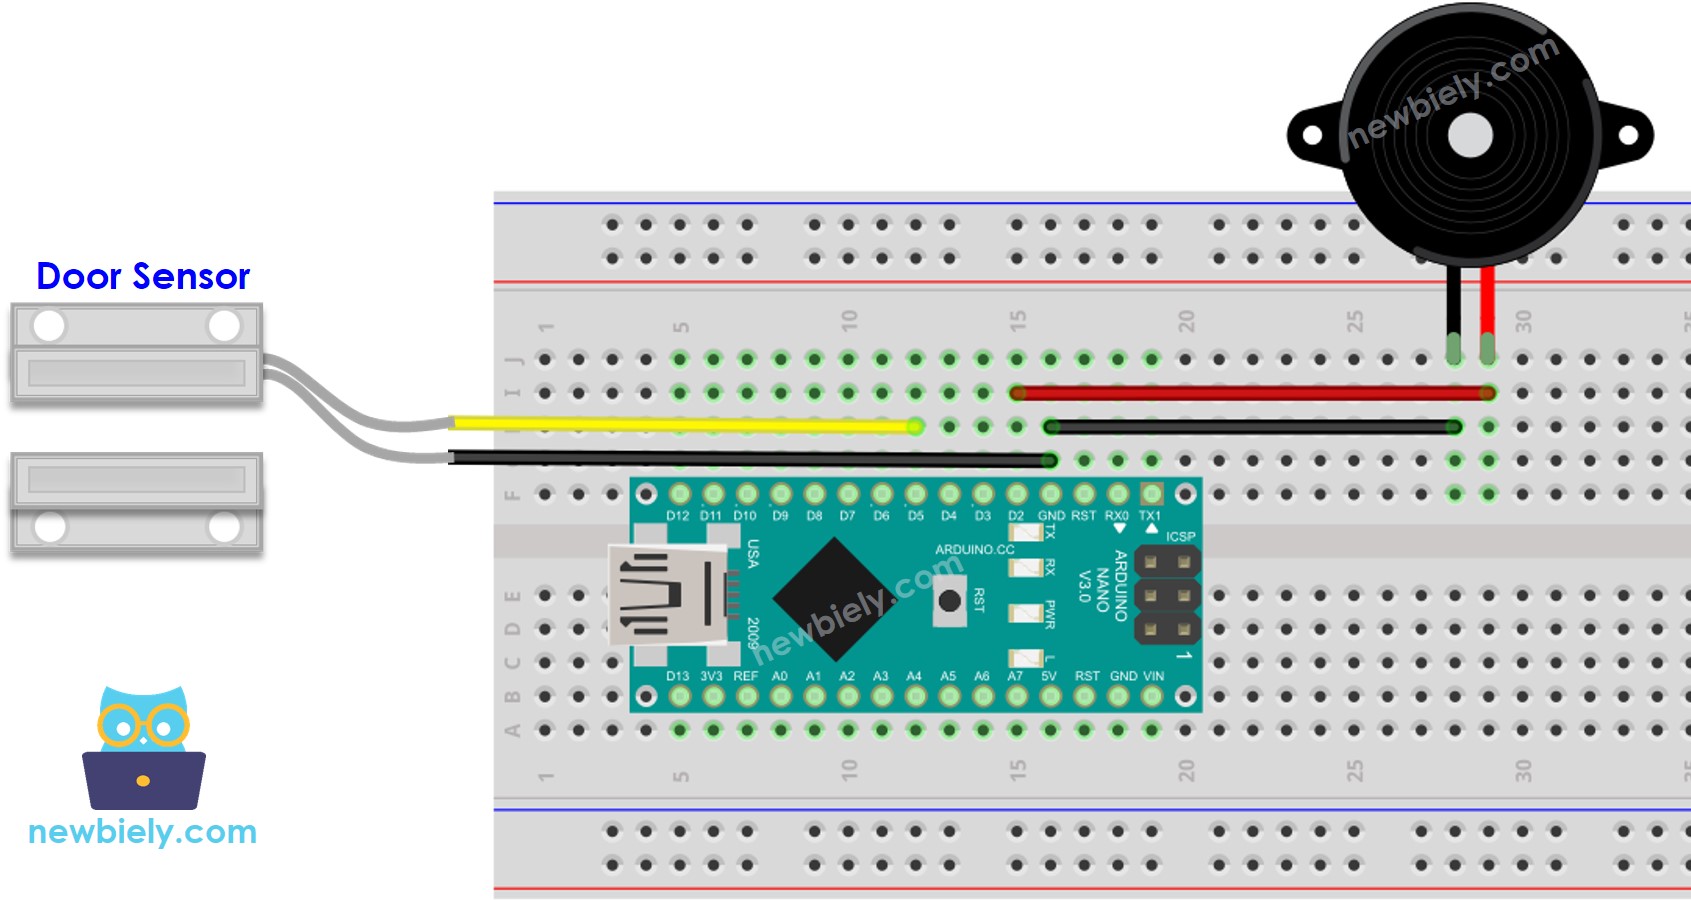
This image is created using Fritzing. Click to enlarge image
See The best way to supply power to the Arduino Nano and other components.
Arduino Nano Code - Simple Sound
/*
* This Arduino Nano code was developed by newbiely.com
*
* This Arduino Nano code is made available for public use without any restriction
*
* For comprehensive instructions and wiring diagrams, please visit:
* https://newbiely.com/tutorials/arduino-nano/arduino-nano-door-sensor-piezo-buzzer
*/
#define DOOR_SENSOR_PIN 5 // The Arduino Nano pin connected to the door sensor's pin
#define BUZZER_PIN 2 // The Arduino Nano pin connected to the piezo buzzer
int door_state;
void setup() {
Serial.begin(9600); // Initialize the Serial to communicate with the Serial Monitor.
pinMode(DOOR_SENSOR_PIN, INPUT_PULLUP); // set arduino pin to input pull-up mode
pinMode(BUZZER_PIN, OUTPUT); // set arduino pin to output mode
}
void loop() {
door_state = digitalRead(DOOR_SENSOR_PIN); // read state
if (door_state == HIGH) {
Serial.println("The door is open");;
digitalWrite(BUZZER_PIN, HIGH); // turn on Piezo Buzzer
} else {
Serial.println("The door is closed");
digitalWrite(BUZZER_PIN, LOW); // turn off Piezo Buzzer
}
}
Detailed Instructions
- Connect an Arduino Nano to your computer with a USB cable.
- Open the Arduino IDE, select the correct board and port.
- Copy the code above and open it in the Arduino IDE.
- Click the Upload button in the Arduino IDE to compile and upload the code to the Arduino Nano.
- Bring the magnet close to the reed switch and then move it away.
- Listen to the sound of the piezo buzzer.
Code Explanation
Check out the line-by-line explanation contained in the comments of the source code!
Arduino Nano Code - Melody
/*
* This Arduino Nano code was developed by newbiely.com
*
* This Arduino Nano code is made available for public use without any restriction
*
* For comprehensive instructions and wiring diagrams, please visit:
* https://newbiely.com/tutorials/arduino-nano/arduino-nano-door-sensor-piezo-buzzer
*/
#include "pitches.h"
#define DOOR_SENSOR_PIN 5 // The Arduino Nano pin connected to the door sensor's pin
#define BUZZER_PIN 2 // The Arduino Nano pin connected to the piezo buzzer
int door_state;
// notes in the melody:
int melody[] = {
NOTE_E5, NOTE_E5, NOTE_E5,
NOTE_E5, NOTE_E5, NOTE_E5,
NOTE_E5, NOTE_G5, NOTE_C5, NOTE_D5,
NOTE_E5,
NOTE_F5, NOTE_F5, NOTE_F5, NOTE_F5,
NOTE_F5, NOTE_E5, NOTE_E5, NOTE_E5, NOTE_E5,
NOTE_E5, NOTE_D5, NOTE_D5, NOTE_E5,
NOTE_D5, NOTE_G5
};
// note durations: 4 = quarter note, 8 = eighth note, etc, also called tempo:
int noteDurations[] = {
8, 8, 4,
8, 8, 4,
8, 8, 8, 8,
2,
8, 8, 8, 8,
8, 8, 8, 16, 16,
8, 8, 8, 8,
4, 4
};
void setup() {
Serial.begin(9600); // Initialize the Serial to communicate with the Serial Monitor.
pinMode(DOOR_SENSOR_PIN, INPUT_PULLUP); // set arduino pin to input pull-up mode
}
void loop() {
door_state = digitalRead(DOOR_SENSOR_PIN); // read state
if (door_state == HIGH) {
Serial.println("The door is open");
buzzer();
}
}
void buzzer() {
// iterate over the notes of the melody:
int size = sizeof(noteDurations) / sizeof(int);
for (int thisNote = 0; thisNote < size; thisNote++) {
// to calculate the note duration, take one second divided by the note type.
//e.g. quarter note = 1000 / 4, eighth note = 1000/8, etc.
int noteDuration = 1000 / noteDurations[thisNote];
tone(BUZZER_PIN, melody[thisNote], noteDuration);
// to distinguish the notes, set a minimum time between them.
// The note's duration + 30% seems to work well:
int pauseBetweenNotes = noteDuration * 1.30;
delay(pauseBetweenNotes);
// stop the tone playing:
noTone(BUZZER_PIN);
}
}
Detailed Instructions
- Copy the code and open it with the Arduino IDE.
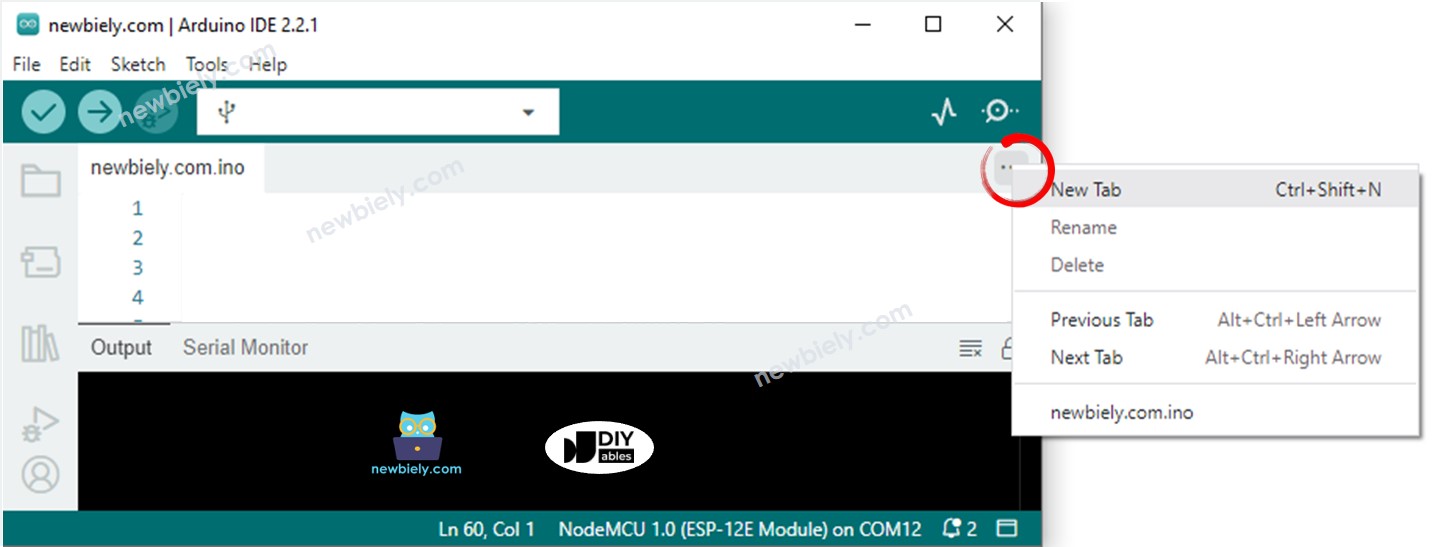
- Create the pitches.h file On Arduino IDE by:
- Either click on the button just below the serial monitor icon and choose New Tab, or use Ctrl+Shift+N keys.
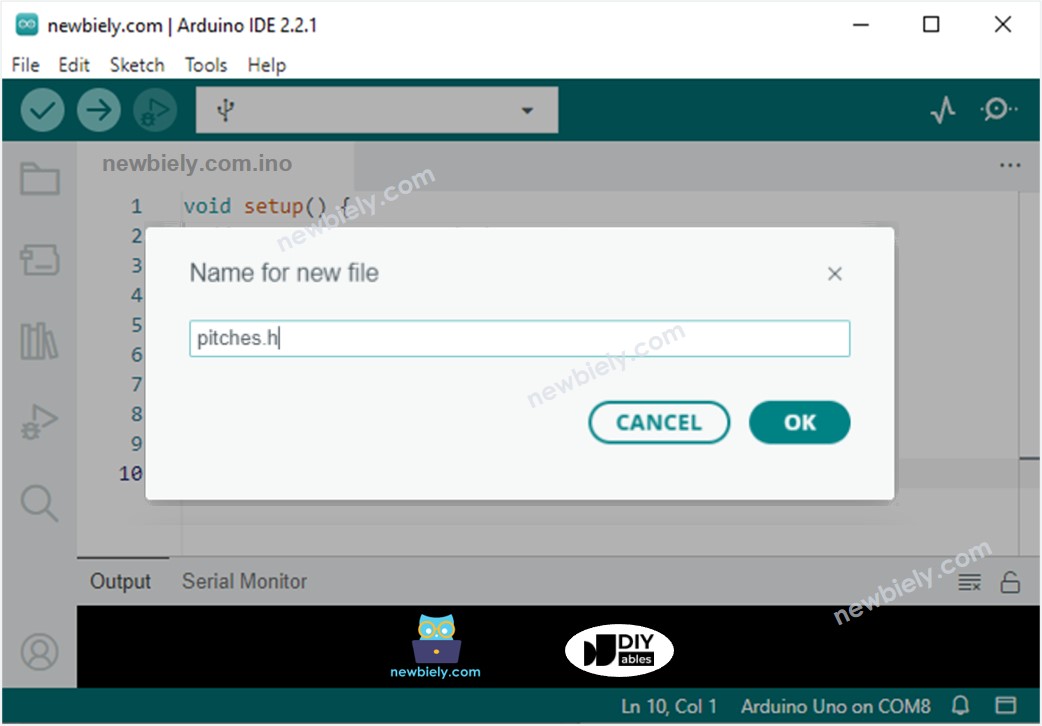
- Give file's name pitches.h and click OK button
- Copy the below code and paste it to the created pitches.h file.
- Click the Upload button on the Arduino IDE to compile and upload the code to the Arduino Nano.
- Move the magnet far from the reed switch of door sensor to simulate the door open.
- Hear the tune from the piezo buzzer.
/*************************************************
* Public Constants
*************************************************/
#define NOTE_B0 31
#define NOTE_C1 33
#define NOTE_CS1 35
#define NOTE_D1 37
#define NOTE_DS1 39
#define NOTE_E1 41
#define NOTE_F1 44
#define NOTE_FS1 46
#define NOTE_G1 49
#define NOTE_GS1 52
#define NOTE_A1 55
#define NOTE_AS1 58
#define NOTE_B1 62
#define NOTE_C2 65
#define NOTE_CS2 69
#define NOTE_D2 73
#define NOTE_DS2 78
#define NOTE_E2 82
#define NOTE_F2 87
#define NOTE_FS2 93
#define NOTE_G2 98
#define NOTE_GS2 104
#define NOTE_A2 110
#define NOTE_AS2 117
#define NOTE_B2 123
#define NOTE_C3 131
#define NOTE_CS3 139
#define NOTE_D3 147
#define NOTE_DS3 156
#define NOTE_E3 165
#define NOTE_F3 175
#define NOTE_FS3 185
#define NOTE_G3 196
#define NOTE_GS3 208
#define NOTE_A3 220
#define NOTE_AS3 233
#define NOTE_B3 247
#define NOTE_C4 262
#define NOTE_CS4 277
#define NOTE_D4 294
#define NOTE_DS4 311
#define NOTE_E4 330
#define NOTE_F4 349
#define NOTE_FS4 370
#define NOTE_G4 392
#define NOTE_GS4 415
#define NOTE_A4 440
#define NOTE_AS4 466
#define NOTE_B4 494
#define NOTE_C5 523
#define NOTE_CS5 554
#define NOTE_D5 587
#define NOTE_DS5 622
#define NOTE_E5 659
#define NOTE_F5 698
#define NOTE_FS5 740
#define NOTE_G5 784
#define NOTE_GS5 831
#define NOTE_A5 880
#define NOTE_AS5 932
#define NOTE_B5 988
#define NOTE_C6 1047
#define NOTE_CS6 1109
#define NOTE_D6 1175
#define NOTE_DS6 1245
#define NOTE_E6 1319
#define NOTE_F6 1397
#define NOTE_FS6 1480
#define NOTE_G6 1568
#define NOTE_GS6 1661
#define NOTE_A6 1760
#define NOTE_AS6 1865
#define NOTE_B6 1976
#define NOTE_C7 2093
#define NOTE_CS7 2217
#define NOTE_D7 2349
#define NOTE_DS7 2489
#define NOTE_E7 2637
#define NOTE_F7 2794
#define NOTE_FS7 2960
#define NOTE_G7 3136
#define NOTE_GS7 3322
#define NOTE_A7 3520
#define NOTE_AS7 3729
#define NOTE_B7 3951
#define NOTE_C8 4186
#define NOTE_CS8 4435
#define NOTE_D8 4699
#define NOTE_DS8 4978
Code Explanation
Examine the line-by-line description in the comments of the source code!