Arduino Nano - MP3 Player

This tutorial instructs how to make a MP3 player using Arduino Nano, MP3 player module, Micro SD Card, and speaker. The MP3 files (music, or recorded audio) are stored in the micro SD Card. Then, Arduino Nano can control the MP3 player module to read a selected song from SD Car, convert it to audio signal, snd send the signal to the speaker. In detail, we will learn:

Then, you can modify the code to add a potentiometer or rotatry encoder to change the volume.

Hardware Preparation

1×Arduino Nano
1×USB A to Mini-B USB cable
1×Serial MP3 Player Module
1×Micro SD Card
1×3.5mm Aux Speaker
1×Jumper Wires
1×Breadboard
1×(Recommended) Screw Terminal Expansion Board for Arduino Nano
1×(Recommended) Breakout Expansion Board for Arduino Nano
1×(Recommended) Power Splitter For Arduino Nano

Or you can buy the following sensor kits:

1×DIYables Sensor Kit (30 sensors/displays)
1×DIYables Sensor Kit (18 sensors/displays)
Disclosure: Some of the links provided in this section are Amazon affiliate links. We may receive a commission for any purchases made through these links at no additional cost to you.
Additionally, some of these links are for products from our own brand, DIYables .

Overview of Serial MP3 Player Module and Speaker

Serial MP3 Player Module Pinout

A serial MP3 player module has three interfaces:

  • The interface to Arduino Nano includes 4 pins:
    • RX pin: data pin, needs to be connected a TX pin of Arduino Nano (Hardware or Software Serial)
    • TX pin: data pin, needs to be connected a RX pin of Arduino Nano (Hardware or Software Serial)
    • VCC pin: power pin, needs to be connected to VCC (5V)
    • GND pin: power pin, needs to be connected to GND (0V)
  • The interface to the speaker is a 3.5mm Aux output female jack.
  • The interface to the Micro SD Card is a Micro SD Card Socket in the back of the module.
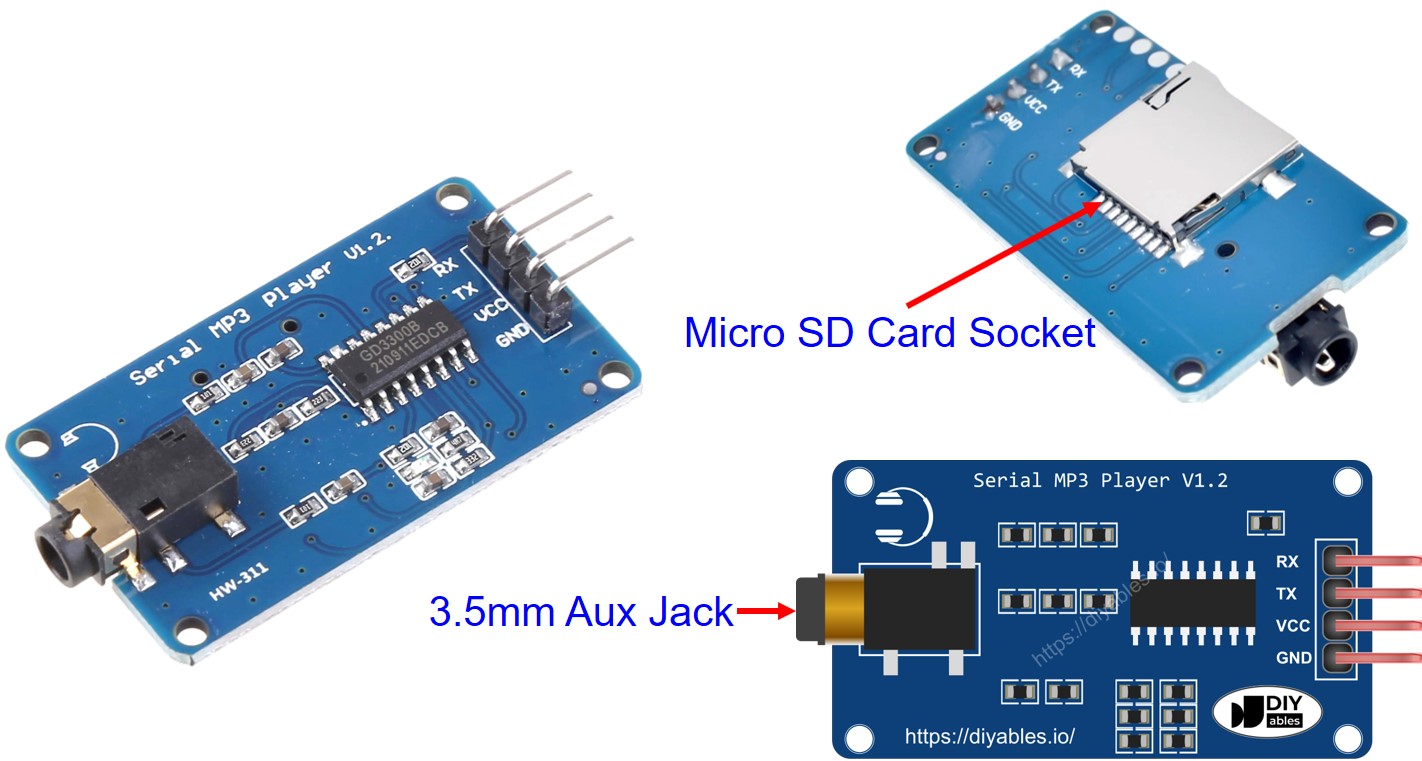
Serial MP3 Player Module Pinout
image source: diyables.io

Speaker Pinout

A speaker usually has two interfaces:

  • Audio signal interface: it is 3.5mm Aux male connector that connects to the MP3 player module
  • Poweer interface: it can be USB, 5V power adapter or any other power interface

How It Works

What we need to prepare:

  • Pre-store a list of songs or recorded audio that we want to play to micro SD Card.
  • Insert the micro SD Card to the MP3 player module
  • Connect the MP3 player module to Arduino Nano
  • Connect the speaker to the MP3 player module to a
  • Connect the speaker to a power source.

Each MP3 file stored on Micro SD Card will have an index. The index is the order of stored song, start from 0.

Then we can program Arduino Nano to send command to the MP3 player module. It supports the following commands:

  • Play
  • Pause
  • Play Next
  • Play Previous
  • Change volume

When the MP3 player module, it reads the MP3 file from the micro SD Card, converts the MP3 files to audio signal and outputs the audio signal to the speaker via the 3.5mm Aux interface.

Wiring Diagram
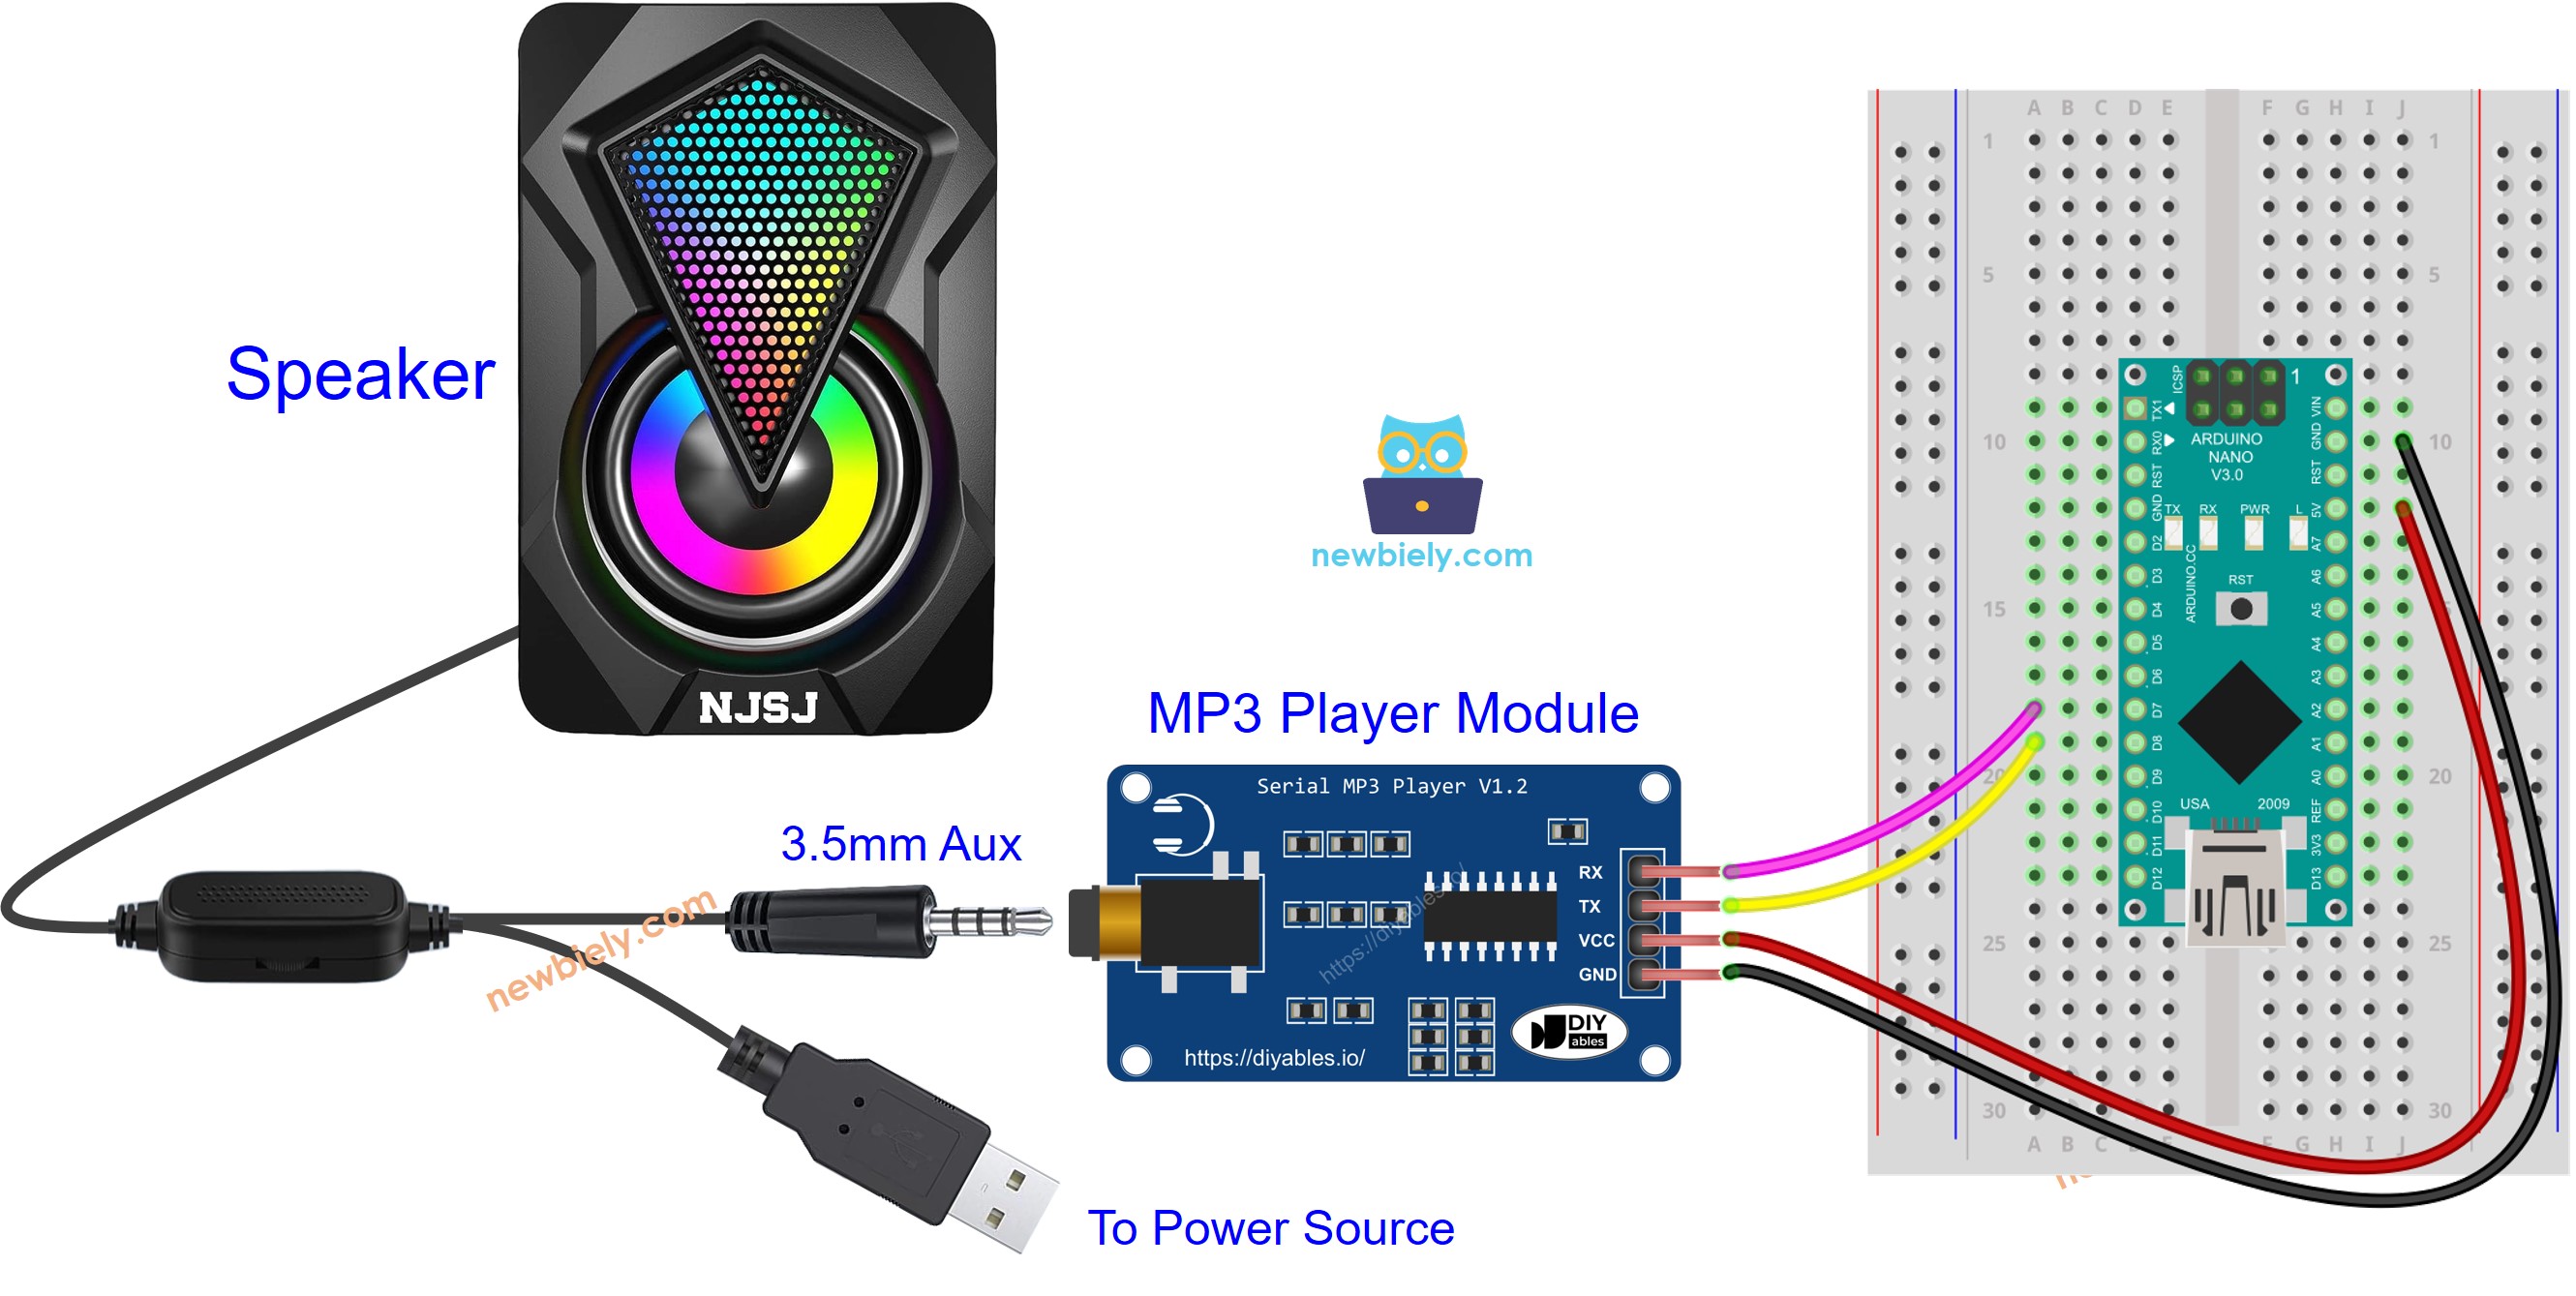
The wiring diagram between Arduino Nano and MP3 player module

This image is created using Fritzing. Click to enlarge image

Arduino Nano Code - Play Music

The below code plays the first song stored on the Micro SD Card.

/* * This Arduino Nano code was developed by newbiely.com * * This Arduino Nano code is made available for public use without any restriction * * For comprehensive instructions and wiring diagrams, please visit: * https://newbiely.com/tutorials/arduino-nano/arduino-nano-mp3-player */ #include <SoftwareSerial.h> #define CMD_PLAY_NEXT 0x01 #define CMD_PLAY_PREV 0x02 #define CMD_PLAY_W_INDEX 0x03 #define CMD_SET_VOLUME 0x06 #define CMD_SEL_DEV 0x09 #define CMD_PLAY_W_VOL 0x22 #define CMD_PLAY 0x0D #define CMD_PAUSE 0x0E #define CMD_SINGLE_CYCLE 0x19 #define DEV_TF 0x02 #define SINGLE_CYCLE_ON 0x00 #define SINGLE_CYCLE_OFF 0x01 #define ARDUINO_RX 8 // Arduino Nano Pin connected to the TX of the Serial MP3 Player module #define ARDUINO_TX 7 // Arduino Nano Pin connected to the RX of the Serial MP3 Player module SoftwareSerial mp3(ARDUINO_RX, ARDUINO_TX); void setup() { Serial.begin(9600); mp3.begin(9600); delay(500); // wait chip initialization is complete mp3_command(CMD_SEL_DEV, DEV_TF); // select the TF card delay(200); // wait for 200ms mp3_command(CMD_PLAY, 0x0000); // Play mp3 //mp3_command(CMD_PAUSE, 0x0000); // Pause mp3 //mp3_command(CMD_PLAY_NEXT, 0x0000); // Play next mp3 //mp3_command(CMD_PLAY_PREV, 0x0000); // Play previous mp3 //mp3_command(CMD_SET_VOLUME, 30); // Change volume to 30 } void loop() { } void mp3_command(int8_t command, int16_t dat) { int8_t frame[8] = { 0 }; frame[0] = 0x7e; // starting byte frame[1] = 0xff; // version frame[2] = 0x06; // The number of bytes of the command without starting byte and ending byte frame[3] = command; // frame[4] = 0x00; // 0x00 = no feedback, 0x01 = feedback frame[5] = (int8_t)(dat >> 8); // data high byte frame[6] = (int8_t)(dat); // data low byte frame[7] = 0xef; // ending byte for (uint8_t i = 0; i < 8; i++) { mp3.write(frame[i]); } }

Detailed Instructions

  • Follow the instructions on the How It Works
  • Copy the above code and open with Arduino IDE
  • Click Upload button on Arduino IDE to upload code to Arduino Nano
  • Enjoy the music

Arduino Nano Code - Play Music with control buttons

The below code is an upgrade of the previous code. It adds foyr buttons to let you interact with MP3 player.

/* * This Arduino Nano code was developed by newbiely.com * * This Arduino Nano code is made available for public use without any restriction * * For comprehensive instructions and wiring diagrams, please visit: * https://newbiely.com/tutorials/arduino-nano/arduino-nano-mp3-player */ #include <SoftwareSerial.h> #include <ezButton.h> #define CMD_PLAY_NEXT 0x01 #define CMD_PLAY_PREV 0x02 #define CMD_PLAY_W_INDEX 0x03 #define CMD_SET_VOLUME 0x06 #define CMD_SEL_DEV 0x09 #define CMD_PLAY_W_VOL 0x22 #define CMD_PLAY 0x0D #define CMD_PAUSE 0x0E #define CMD_SINGLE_CYCLE 0x19 #define DEV_TF 0x02 #define SINGLE_CYCLE_ON 0x00 #define SINGLE_CYCLE_OFF 0x01 #define ARDUINO_RX 8 // Arduino Nano Pin connected to the TX of the Serial MP3 Player module #define ARDUINO_TX 7 // Arduino Nano Pin connected to the RX of the Serial MP3 Player module SoftwareSerial mp3(ARDUINO_RX, ARDUINO_TX); ezButton button_play(2); // create ezButton object for pin 2 ezButton button_pause(3); // create ezButton object for pin 3 ezButton button_next(4); // create ezButton object for pin 4 ezButton button_prev(5); // create ezButton object for pin 5 void setup() { Serial.begin(9600); mp3.begin(9600); delay(500); // wait chip initialization is complete mp3_command(CMD_SEL_DEV, DEV_TF); // select the TF card delay(200); // wait for 200ms button_play.setDebounceTime(50); // set debounce time to 50 milliseconds button_pause.setDebounceTime(50); // set debounce time to 50 milliseconds button_next.setDebounceTime(50); // set debounce time to 50 milliseconds button_prev.setDebounceTime(50); // set debounce time to 50 milliseconds } void loop() { button_play.loop(); // MUST call the loop() function first button_pause.loop(); // MUST call the loop() function first button_next.loop(); // MUST call the loop() function first button_prev.loop(); // MUST call the loop() function first if (button_play.isPressed()) { Serial.println("Play mp3"); mp3_command(CMD_PLAY, 0x0000); } if (button_pause.isPressed()) { Serial.println("Pause mp3"); mp3_command(CMD_PAUSE, 0x0000); } if (button_next.isPressed()) { Serial.println("Play next mp3"); mp3_command(CMD_PLAY_NEXT, 0x0000); } if (button_prev.isPressed()) { Serial.println("Play previous mp3"); mp3_command(CMD_PLAY_PREV, 0x0000); } } void mp3_command(int8_t command, int16_t dat) { int8_t frame[8] = { 0 }; frame[0] = 0x7e; // starting byte frame[1] = 0xff; // version frame[2] = 0x06; // The number of bytes of the command without starting byte and ending byte frame[3] = command; // frame[4] = 0x00; // 0x00 = no feedback, 0x01 = feedback frame[5] = (int8_t)(dat >> 8); // data high byte frame[6] = (int8_t)(dat); // data low byte frame[7] = 0xef; // ending byte for (uint8_t i = 0; i < 8; i++) { mp3.write(frame[i]); } }

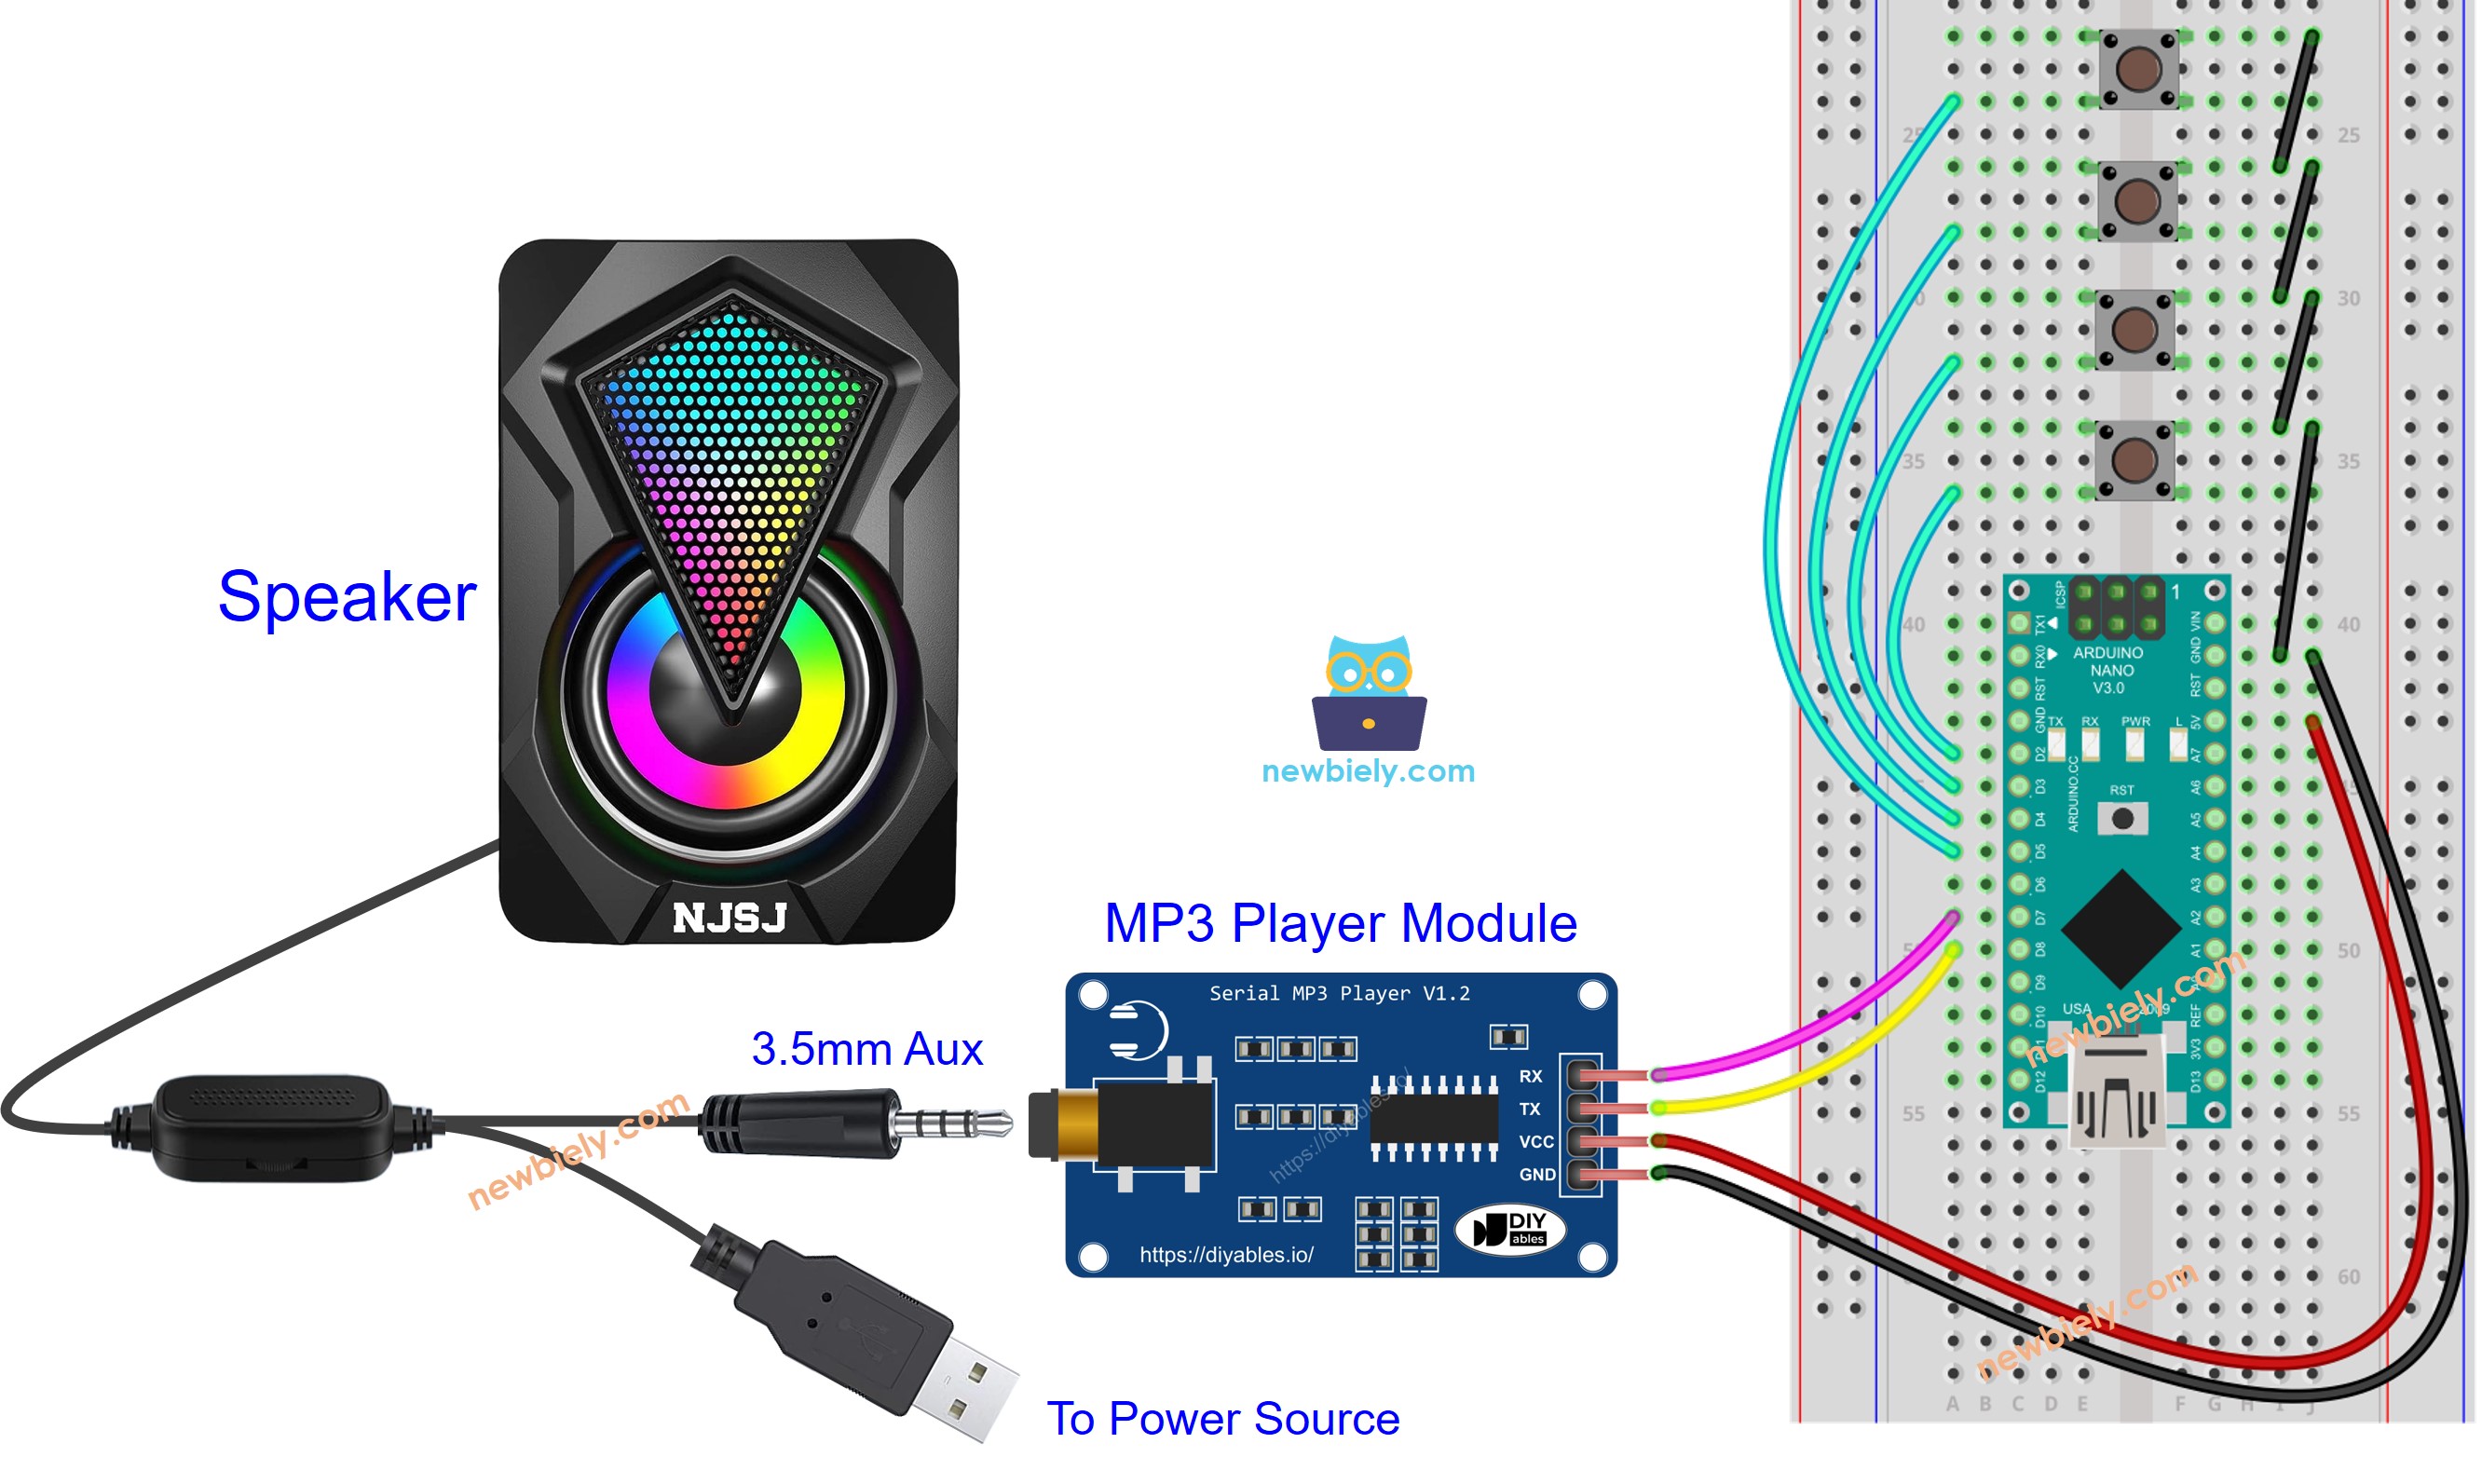
The wiring diagram for the above code:

The wiring diagram between Arduino Nano and MP3 player speaker

This image is created using Fritzing. Click to enlarge image

See The best way to supply power to the Arduino Nano and other components.

Now, you can modify the projects to add more functions, for example:

Video Tutorial

Function References

Learn More

※ OUR MESSAGES

  • As freelancers, We are AVAILABLE for HIRE. See how to outsource your project to us
  • Please feel free to share the link of this tutorial. However, Please do not use our content on any other websites. We invested a lot of effort and time to create the content, please respect our work!