Arduino Nano - LED - Blink Without Delay
Let us envision that Arduino Nano has two tasks to accomplish: blinking an LED and monitoring the state of a button which can be pressed at any time. If we use the delay() function (as discussed in a prior tutorial), Arduino Nano may overlook some of the button presses. In other words, Arduino Nano is not able to fully complete the second task.
This tutorial instructs you how to make Arduino Nano blink an LED and detect the state of a button without any pressing events being missed.
We will go through three examples and compare the differences between them:
- Arduino Nano blinking an LED with the delay() function
- Arduino Nano blinking an LED with the millis() function
- Arduino Nano blinking an LED with the ezLED library
This method is not just limited to blinking an LED and checking the button's state. Generally, it allows Arduino Nano to perform multiple tasks simultaneously without blocking with each other.
Hardware Preparation
Or you can buy the following kits:
| 1 | × | DIYables Sensor Kit (30 sensors/displays) | |
| 1 | × | DIYables Sensor Kit (18 sensors/displays) |
Additionally, some of these links are for products from our own brand, DIYables .
Buy Note: Use the LED Module for easier wiring. It includes an integrated resistor.
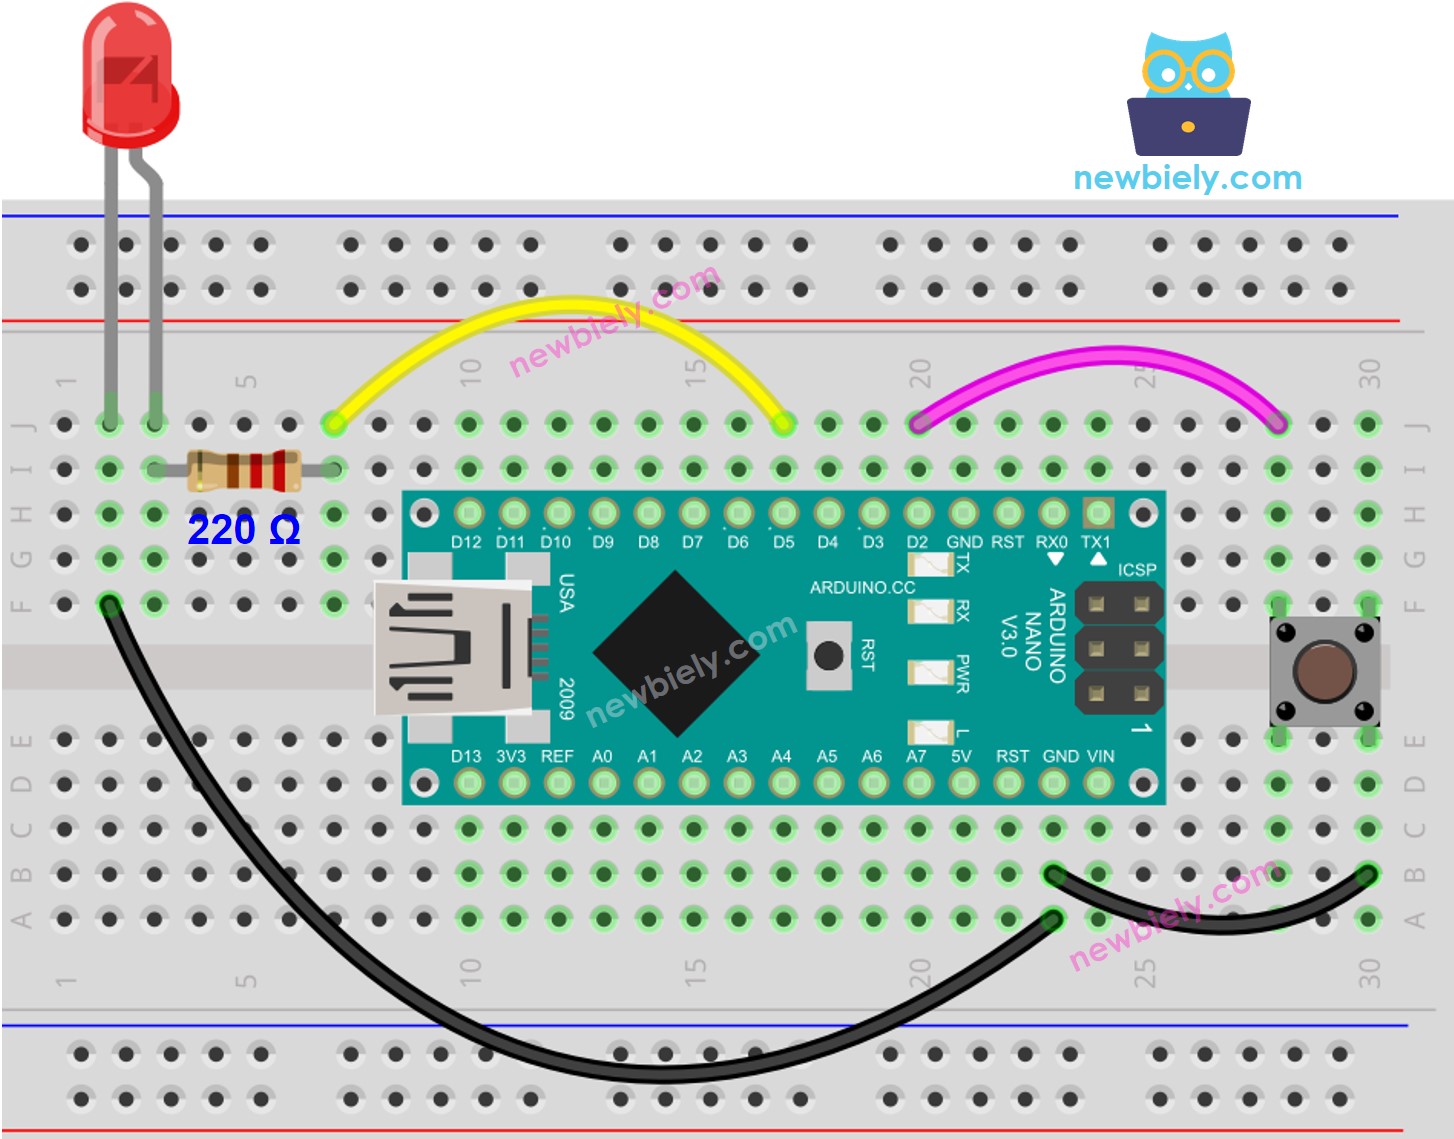
Wiring Diagram

This image is created using Fritzing. Click to enlarge image
See The best way to supply power to the Arduino Nano and other components.
Arduino Nano Code - With Delay
Detailed Instructions
- Connect your Arduino Nano to your computer using a USB cable.
- Launch the Arduino IDE, select the correct board and port.
- Copy the code and open it in the Arduino IDE.
- Click the Upload button in the Arduino IDE to compile and upload the code to the Arduino Nano.

- Open the Serial Monitor.
- Press the button four times.
- Check out the LED; it will alternate between being on and off every second.
- Check the output in the Serial Monitor.
- On Serial Monitor, some pressing times were not registered. This is due to the fact that during delay time, Arduino Nano is unable to perform any actions. Consequently, it is not able to detect the pressing event.
Arduino Nano Code - Without Delay
Detailed Instructions
- Execute the code and press the button four times.
- Check out the LED; it will switch between ON and OFF at one-second intervals.
- Check the output in the Serial Monitor.
- All occurrences of urgent matters were identified.
Code Explanation
Check out the line-by-line explanation contained in the comments of the source code!
Adding More Tasks
The Arduino Nano code below does:
- Makes two LEDs blink with different intervals.
- Checks the state of the button
Video Tutorial
Extendability
This method can be used to enable Arduino Nano to execute multiple tasks concurrently, without one task blocking the progress of the other. For instance, sending a request to the Internet and waiting for the response, while simultaneously flashing some LED indicators and monitoring the cancel button.
