Arduino Nano - Servo Motor
This tutorial instructs you how to use Arduino Nano to control servo motor. In detail, we will learn:
- How to connect servo motor to Arduino Nano
- How to program for Arduino Nano to control a servo motor
- How to control the speed of a servo motor using Arduino Nano
Hardware Preparation
Or you can buy the following kits:
| 1 | × | DIYables Sensor Kit (30 sensors/displays) | |
| 1 | × | DIYables Sensor Kit (18 sensors/displays) |
Additionally, some of these links are for products from our own brand, DIYables .
Overview of Servo Motor
A servo motor is a component that is capable of rotating its shaft, typically between 0° and 180°. It is commonly utilized to control the angular position of an object.
The Servo Motor Pinout
The servo motor has three pins:
- VCC pin (usually red) must be connected to VCC (5V)
- GND pin (generally black or brown) must be connected to GND (0V)
- Signal pin (commonly yellow or orange) receives the PWM control signal from a pin of an Arduino Nano.

Arduino Nano - Servo Motor
Some of the Arduino Nano pins can be programmed to produce a PWM signal. We can connect the servo motor's signal pin to one of these pins and program it to generate a PWM output. This will allow us to control the servo motor.
Thanks to the Arduino Nano Servo library, controlling a servo motor is easy. We don't need to understand how servo motors work or how to generate PWM signals. All we need to do is learn how to use the library.
Wiring Diagram

This image is created using Fritzing. Click to enlarge image
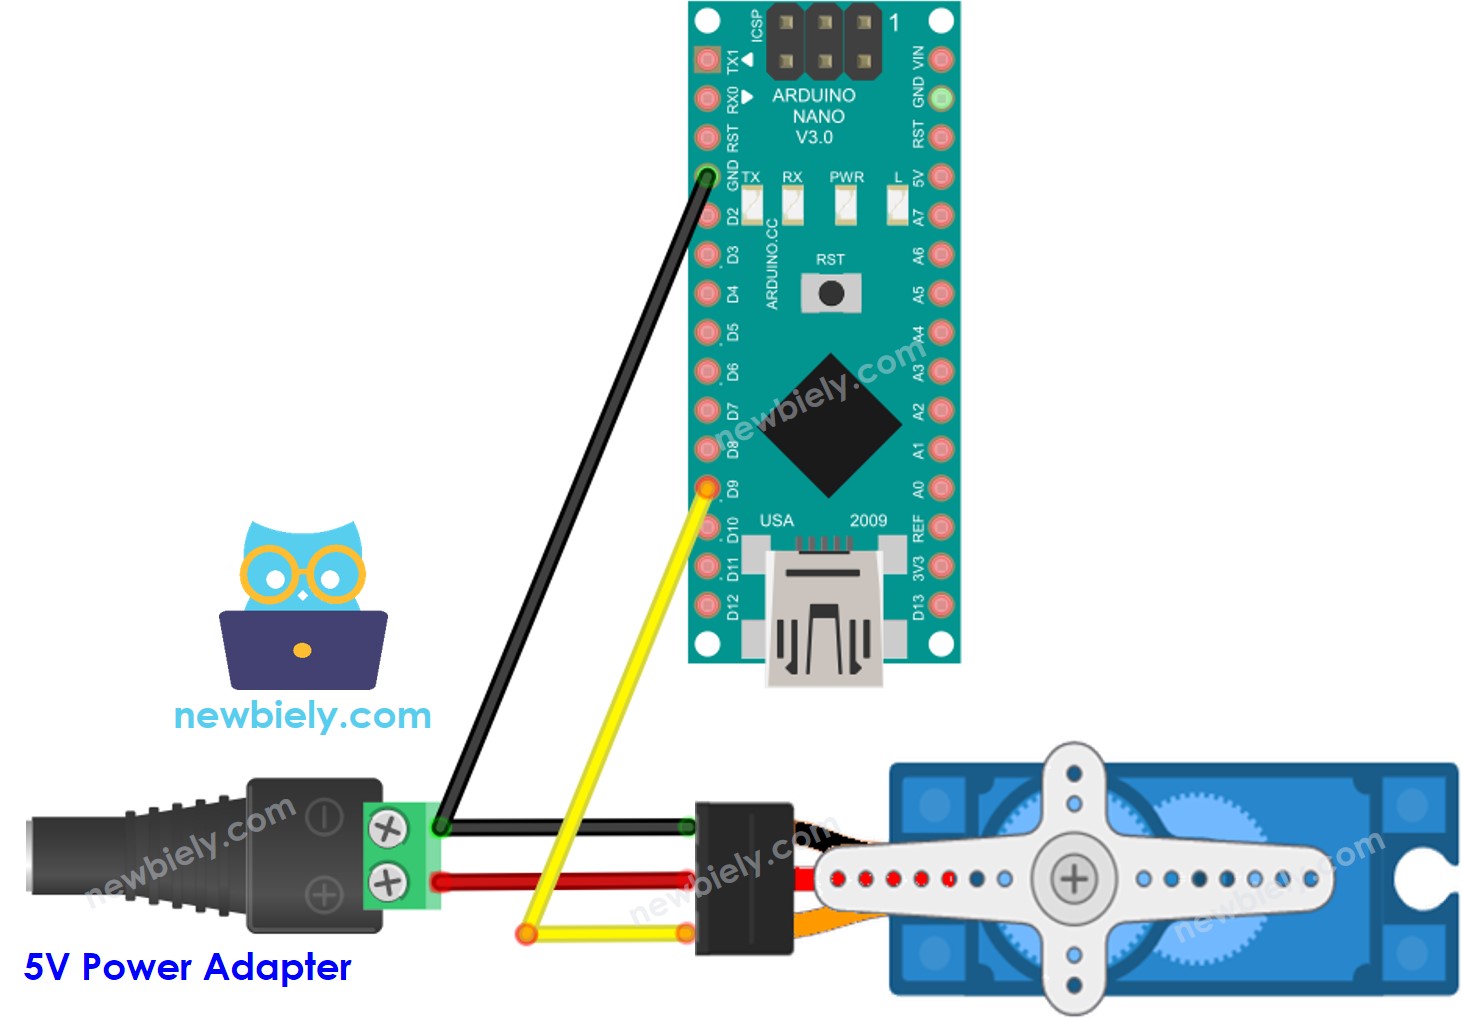
For the sake of simplicity, the above wiring diagram is used for testing or educational purposes, and for a servo motor with a small torque. We strongly suggest using an external power source for the servo motor in practice. The wiring diagram below illustrates how to connect the servo motor to an external power source.

This image is created using Fritzing. Click to enlarge image
See The best way to supply power to the Arduino Nano and other components.
Please do not forget to connect GND of the external power to GND of Arduino.
How To Program For Servo Motor
- Include the library:
- Create a Servo object:
- If you have more than one servo motor, simply declare additional Servo objects:
- Assign the Arduino Nano that connects to the signal pin of the servo motor. As an example, use pin 9:
- Finally, control the servo motor to the required angle. For instance, 90°
Arduino Nano Code
Detailed Instructions
- Attach the Arduino Nano to your computer using a USB cable.
- Launch the Arduino IDE, select the correct board and port.
- Copy the code and open it in the Arduino IDE.
- Click the Upload button in the Arduino IDE to compile and upload the code to the Arduino Nano.

- Check out the outcome: The servo motor rotates in both clockwise and counter-clockwise directions.
Code Explanation
Check out the line-by-line explanation contained in the comments of the source code!
How to Control Speed of Servo Motor
Utilizing the map() and millis() functions, we can adjust the speed of a servo motor in a steady manner while not impeding other code.
