Arduino Nano - Temperature Humidity Sensor - OLED
This tutorial instructs you how to read the temperature and humidity from a DHT11/DHT22 sensor and display it on an OLED.
You can use DHT22 sensor instead of DHT11 sensor.
Or you can buy the following kits:
Disclosure: Some of the links provided in this section are Amazon affiliate links. We may receive a commission for any purchases made through these links at no additional cost to you.
Additionally, some of these links are for products from our own brand,
DIYables .
Buy Note: If you want a bigger OLED display, use the 2.42 inch OLED Display 128x64 .
If you are unfamiliar with OLED display, DHT11 and DHT22 temperature humidity sensor (pinout, functionality, programming ...), the following tutorials can help you:
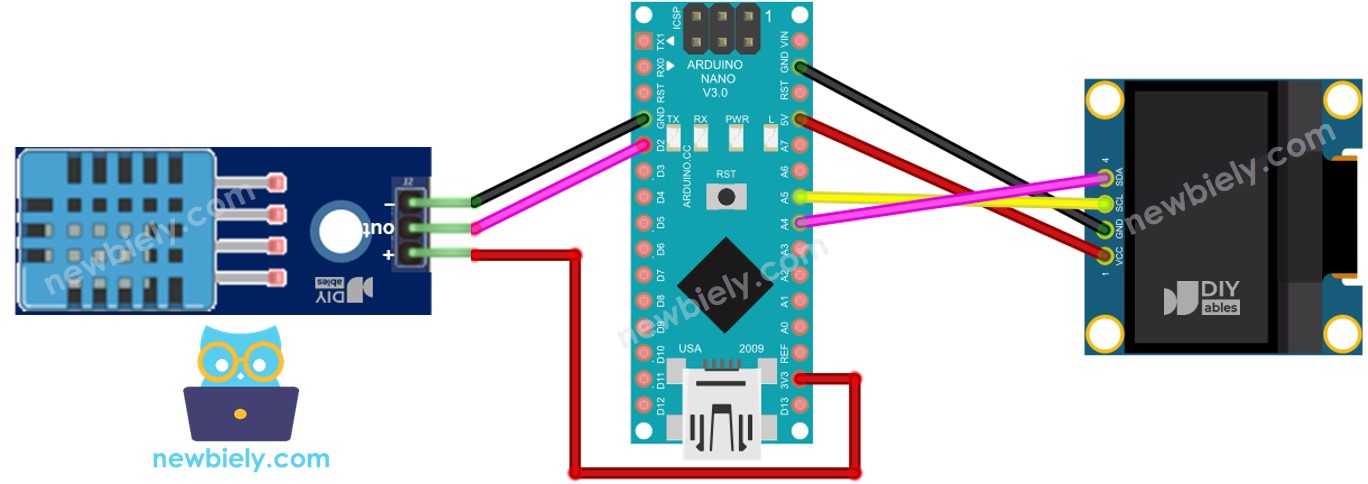
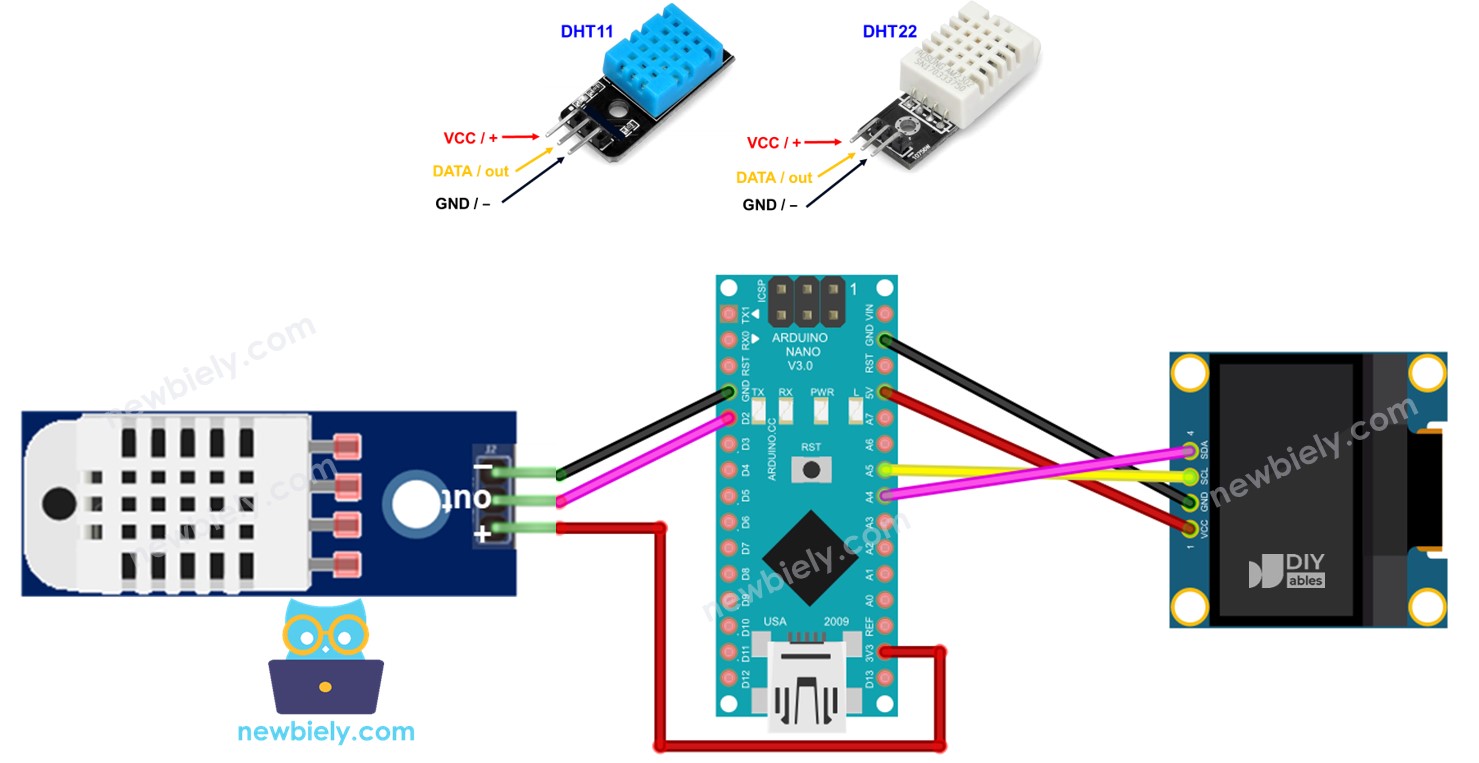
This image is created using Fritzing. Click to enlarge image
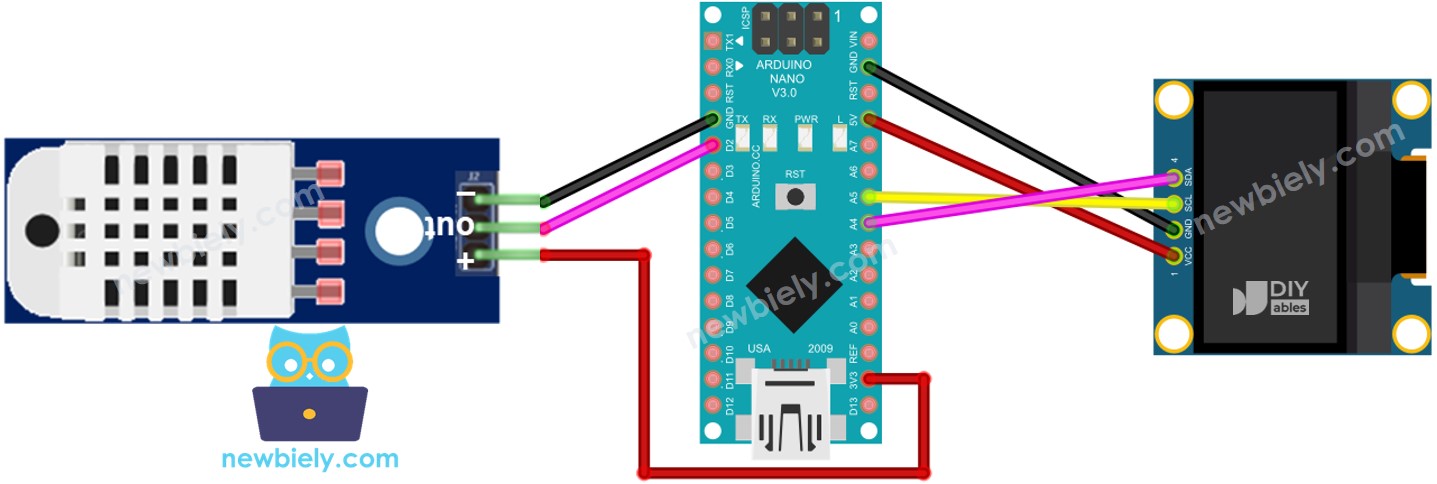
This image is created using Fritzing. Click to enlarge image
See The best way to supply power to the Arduino Nano and other components.
#include <Wire.h>
#include <Adafruit_GFX.h>
#include <Adafruit_SSD1306.h>
#include <DHT.h>
#define OLED_WIDTH 128
#define OLED_HEIGHT 64
#define DHT_PIN 2
#define DHT_TYPE DHT11
Adafruit_SSD1306 oled(OLED_WIDTH, OLED_HEIGHT, &Wire, -1);
DHT dht(DHT_PIN, DHT_TYPE);
String temperature;
String humidity;
void setup() {
Serial.begin(9600);
if (!oled.begin(SSD1306_SWITCHCAPVCC, 0x3C)) {
Serial.println(F("SSD1306 allocation failed"));
while (true)
;
}
delay(2000);
oled.clearDisplay();
oled.setTextSize(3);
oled.setTextColor(WHITE);
oled.setCursor(0, 10);
dht.begin();
temperature.reserve(10);
humidity.reserve(10);
}
void loop() {
float humi = dht.readHumidity();
float tempC = dht.readTemperature();
if (isnan(humi) || isnan(tempC)) {
temperature = "Failed";
humidity = "Failed";
} else {
temperature = String(tempC, 1);
temperature += char(247);
temperature += "C";
humidity = String(humi, 1);
humidity += "%";
}
Serial.print(tempC);
Serial.print("°C | " );
Serial.print(humi);
Serial.println("%");
oledDisplayCenter(temperature, humidity);
}
void oledDisplayCenter(String temperature, String humidity) {
int16_t x1;
int16_t y1;
uint16_t width_T;
uint16_t height_T;
uint16_t width_H;
uint16_t height_H;
oled.getTextBounds(temperature, 0, 0, &x1, &y1, &width_T, &height_T);
oled.getTextBounds(temperature, 0, 0, &x1, &y1, &width_H, &height_H);
oled.clearDisplay();
oled.setCursor((SCREEN_WIDTH - width_T) / 2, SCREEN_HEIGHT / 2 - height_T - 5);
oled.println(temperature);
oled.setCursor((SCREEN_WIDTH - width_H) / 2, SCREEN_HEIGHT / 2 + 5);
oled.println(humidity);
oled.display();
}
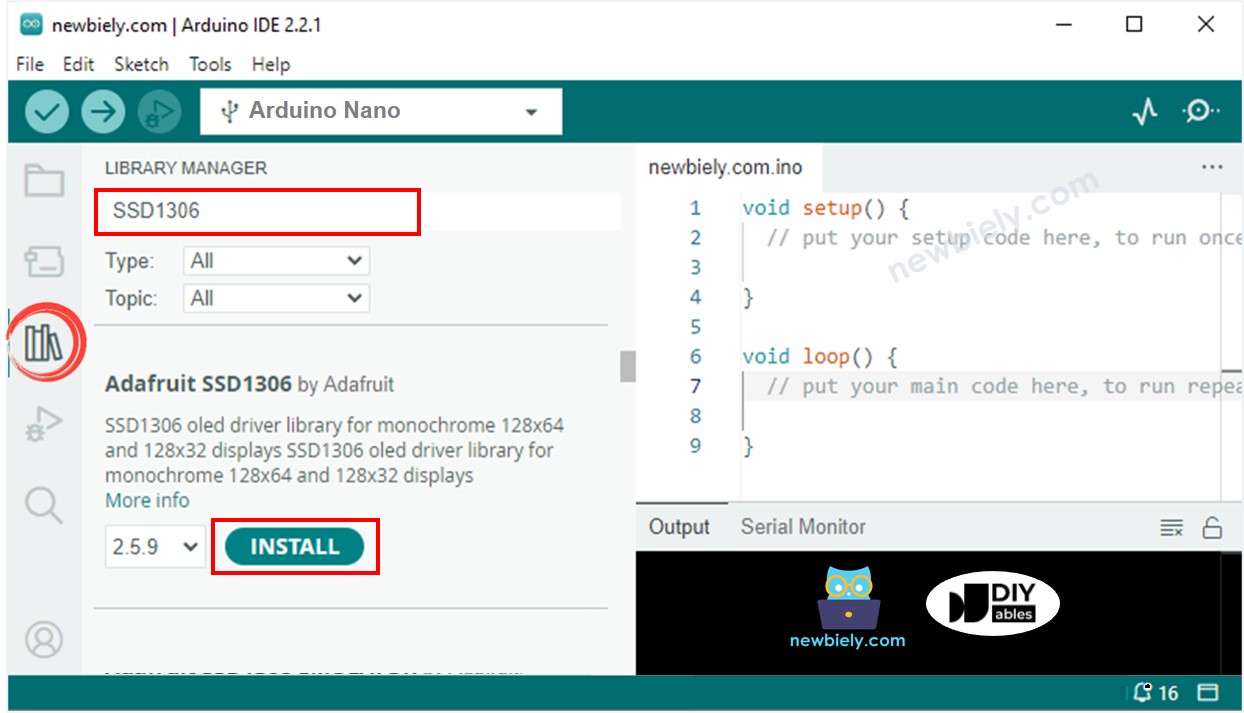
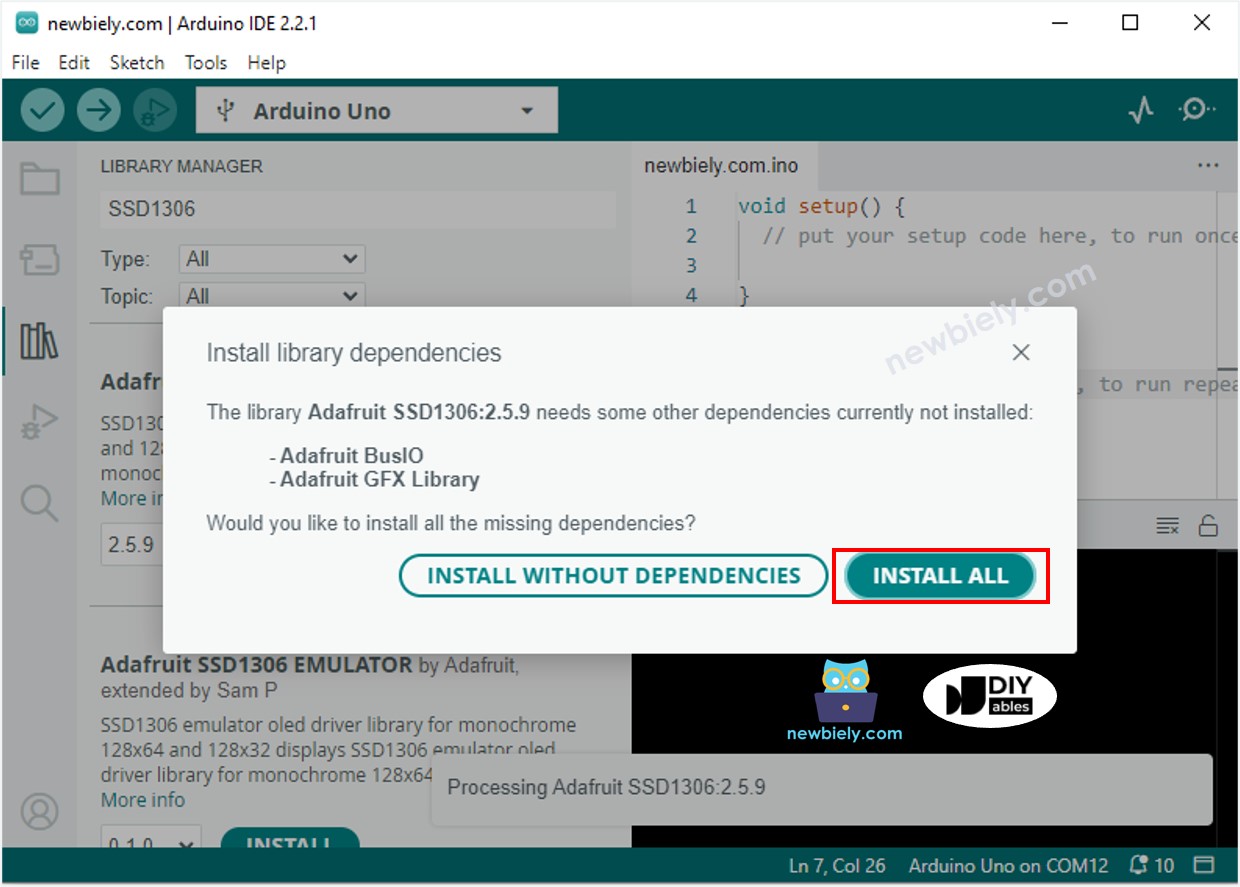
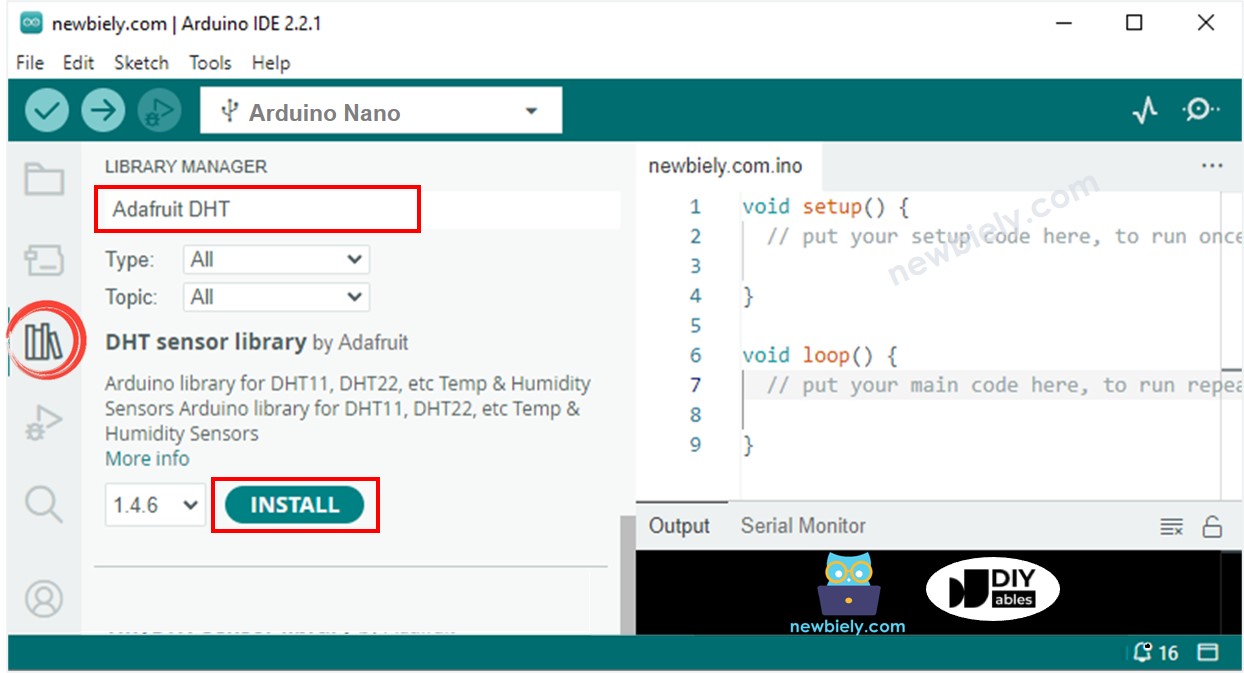
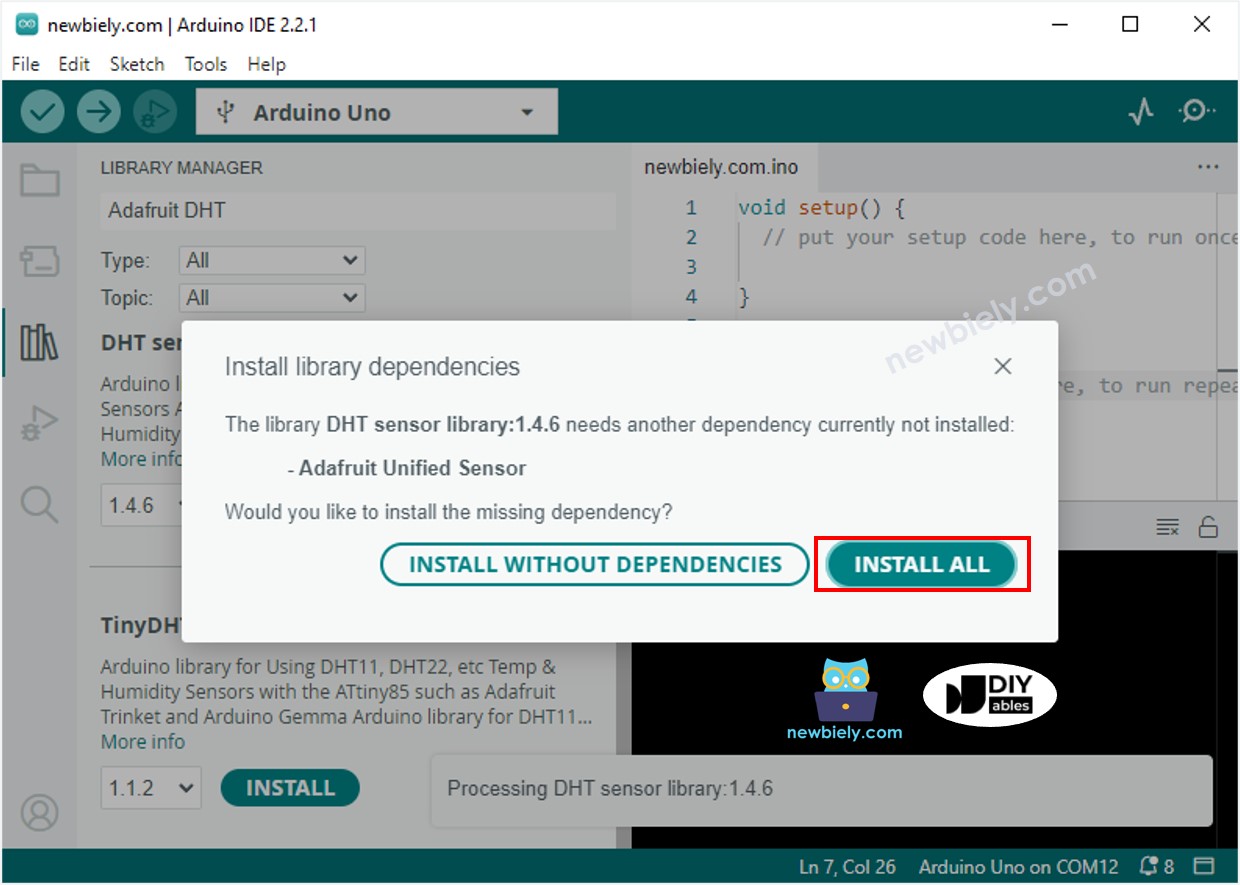
Click to the Libraries icon on the left bar of the Arduino IDE.
Look for “SSD1306” and then locate the SSD1306 library from Adafruit.
Press the Install button to install the library.
Copy the code above and open it in the Arduino IDE.
Click the Upload button in the Arduino IDE to send the code to the Arduino Nano.
Place the sensor in hot and cold water, or hold it in your hand.
Check the result on the OLED and Serial Monitor.
※ NOTE THAT:
The code in question automatically centers the text both horizontally and vertically on an OLED display.
#include <Wire.h>
#include <Adafruit_GFX.h>
#include <Adafruit_SSD1306.h>
#include <DHT.h>
#define OLED_WIDTH 128
#define OLED_HEIGHT 64
#define DHT_PIN 2
#define DHT_TYPE DHT22
Adafruit_SSD1306 oled(OLED_WIDTH, OLED_HEIGHT, &Wire, -1);
DHT dht(DHT_PIN, DHT_TYPE);
String temperature;
String humidity;
void setup() {
Serial.begin(9600);
if (!oled.begin(SSD1306_SWITCHCAPVCC, 0x3C)) {
Serial.println(F("SSD1306 allocation failed"));
while (true)
;
}
delay(2000);
oled.clearDisplay();
oled.setTextSize(3);
oled.setTextColor(WHITE);
oled.setCursor(0, 10);
dht.begin();
temperature.reserve(10);
humidity.reserve(10);
}
void loop() {
float humi = dht.readHumidity();
float tempC = dht.readTemperature();
if (isnan(humi) || isnan(tempC)) {
temperature = "Failed";
humidity = "Failed";
} else {
temperature = String(tempC, 1);
temperature += char(247);
temperature += "C";
humidity = String(humi, 1);
humidity += "%";
Serial.print(tempC);
Serial.print("°C | " );
Serial.print(humi);
Serial.println("%");
}
oledDisplayCenter(temperature, humidity);
}
void oledDisplayCenter(String temperature, String humidity) {
int16_t x1;
int16_t y1;
uint16_t width_T;
uint16_t height_T;
uint16_t width_H;
uint16_t height_H;
oled.getTextBounds(temperature, 0, 0, &x1, &y1, &width_T, &height_T);
oled.getTextBounds(temperature, 0, 0, &x1, &y1, &width_H, &height_H);
oled.clearDisplay();
oled.setCursor((SCREEN_WIDTH - width_T) / 2, SCREEN_HEIGHT / 2 - height_T - 5);
oled.println(temperature);
oled.setCursor((SCREEN_WIDTH - width_H) / 2, SCREEN_HEIGHT / 2 + 5);
oled.println(humidity);
oled.display();
}
※ NOTE THAT:
The code for DHT11 and DHT22 is the same, apart from one line. The library used for both is also the same.