Arduino Nano - Web Server

In this guide, we’ll show you how to program an Arduino Nano board with an Ethernet module to act as a web server. You’ll be able to view data and control the Arduino Nano through web pages accessible from your computer or smartphone. We'll start with simple tasks and move to more advanced ones, as outlined below:

Arduino Nano relay web browser

Hardware Preparation

1×Arduino Nano
1×USB A to Mini-B USB cable
1×W5500 Ethernet Module
1×Ethernet Cable
1×Jumper Wires
1×Breadboard
1×(Recommended) Screw Terminal Expansion Board for Arduino Nano
1×(Recommended) Breakout Expansion Board for Arduino Nano

Or you can buy the following sensor kits:

1×DIYables Sensor Kit (30 sensors/displays)
1×DIYables Sensor Kit (18 sensors/displays)
Disclosure: Some of the links provided in this section are Amazon affiliate links. We may receive a commission for any purchases made through these links at no additional cost to you.
Additionally, some of these links are for products from our own brand, DIYables.

Wiring Diagram between Arduino Nano and W5500 Ethernet module

The wiring diagram between Arduino Nano and Ethernet module

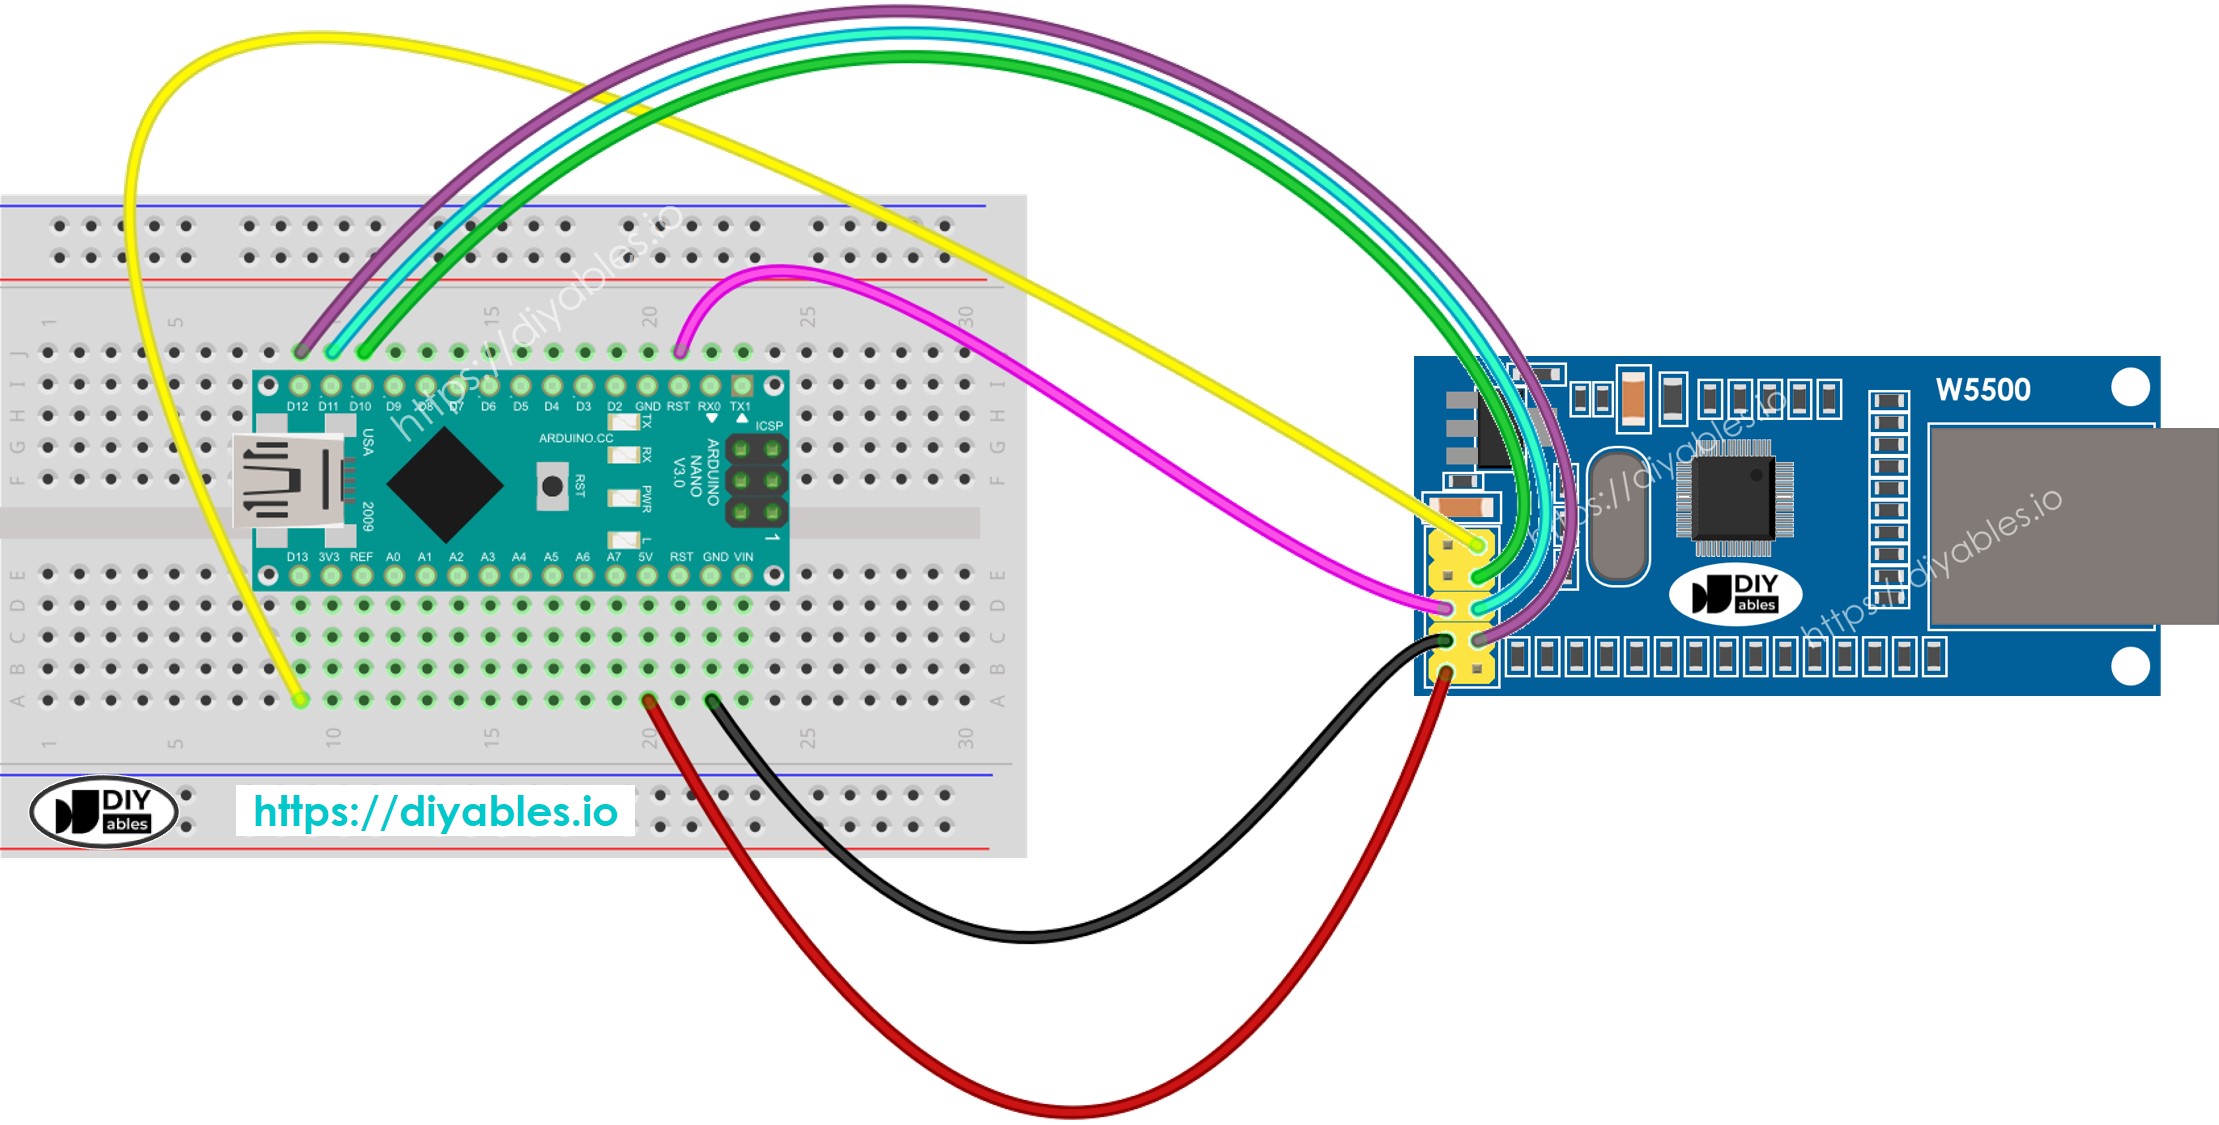
This image is created using Fritzing. Click to enlarge image

image source: diyables.io

Arduino Nano Web Server - Hello World

This is relatively simple. The Arduino Nano code does the following tasks:

  • Creating a web server that listens for HTTP requests from a web browser.
  • Upon receiving a request from a web browser, the Arduino Nano responds with the following information:
    • HTTP header
    • HTTP body: includes "Hello World!".

    Below is the Arduino Nano code that performs the above tasks:

    /* * This Arduino Nano code was developed by newbiely.com * * This Arduino Nano code is made available for public use without any restriction * * For comprehensive instructions and wiring diagrams, please visit: * https://newbiely.com/tutorials/arduino-nano/arduino-nano-web-server */ #include <SPI.h> #include <Ethernet.h> // MAC address for the Ethernet module, you can modify it as needed byte mac[] = { 0xDE, 0xAD, 0xBE, 0xEF, 0xFE, 0xED }; IPAddress ip(192, 168, 1, 177); // Set a static IP address EthernetServer server(80); // Create an Ethernet server that listens on port 80 void setup() { //Initialize serial communication: Serial.begin(9600); // Start the Ethernet connection: if (Ethernet.begin(mac) == 0) { Serial.println(F("Failed to configure Ethernet using DHCP")); // Try with a static IP: Ethernet.begin(mac, ip); } // Start the server: server.begin(); // Print the Ethernet board's IP address: Serial.print(F("Arduino Nano Web Server's IP address: ")); Serial.println(Ethernet.localIP()); } void loop() { // Listen for incoming clients EthernetClient client = server.available(); if (client) { // read the HTTP request header line by line while (client.connected()) { if (client.available()) { String HTTP_header = client.readStringUntil('\n'); // read the header line of HTTP request if (HTTP_header.equals("\r")) // the end of HTTP request break; Serial.print(F("<< ")); Serial.println(HTTP_header); // print HTTP request to Serial Monitor } } // send the HTTP response // send the HTTP response header client.println(F("HTTP/1.1 200 OK")); client.println(F("Content-Type: text/html")); client.println(F("Connection: close")); // the connection will be closed after completion of the response client.println(); // the separator between HTTP header and body // send the HTTP response body client.println(F("<!DOCTYPE HTML>")); client.println(F("<html>")); client.println(F("<head>")); client.println(F("<link rel=\"icon\" href=\"data:,\">")); client.println(F("</head>")); client.println(F("<p>")); client.println(F("Hello World!")); client.println(F("</p>")); client.println(F("</html>")); client.flush(); // give the web browser time to receive the data delay(10); // close the connection: client.stop(); } }

    Detailed Instructions

    • Connect the Arduino Nano to the Ethernet module according to the above wiring diagram.
    • Connect an Ethernet cable to the Ethernet module.
    • Connect the Arduino Nano to a PC using a USB cable.
    • Launch the Arduino IDE on your PC.
    • Select Arduino Nano board and corresponding COM port
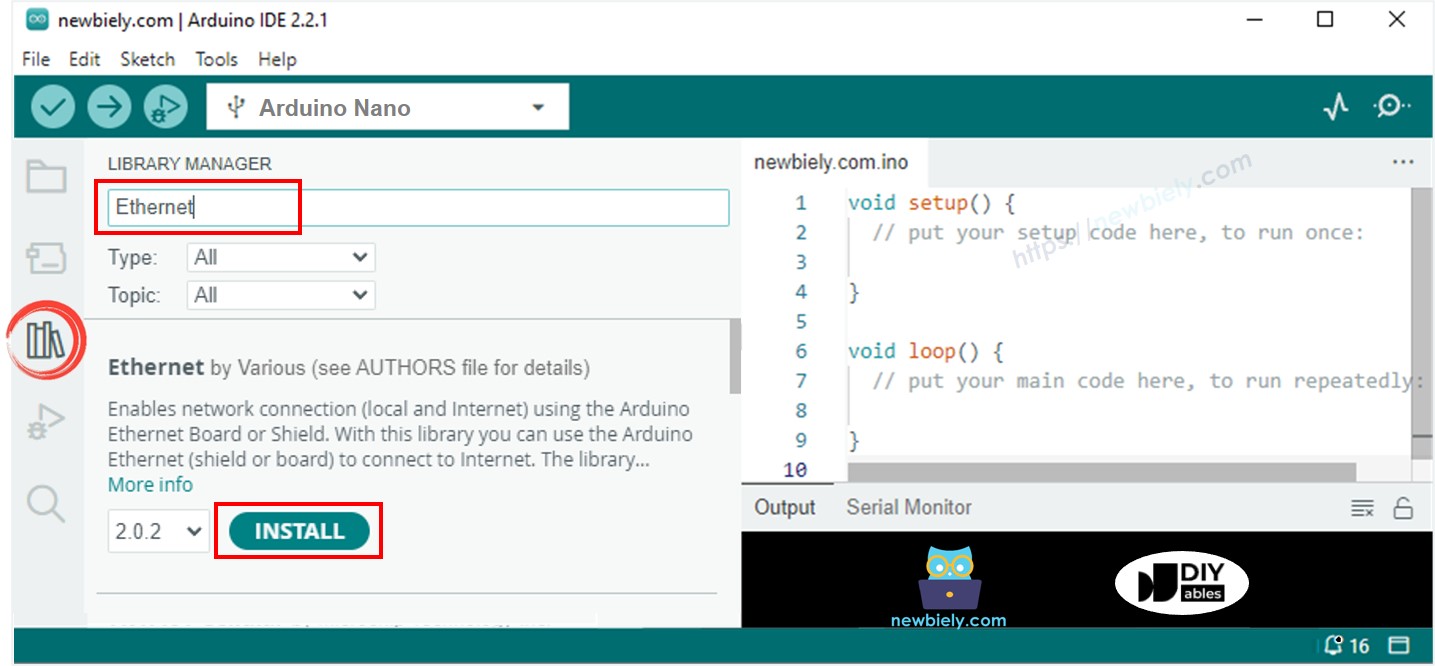
    • Click to the Libraries icon on the left bar of the Arduino IDE.
    • Search “Ethernet”, then find the Ethernet library by Various
    • Click Install button to install Ethernet library.
    Arduino Nano Ethernet library
    • Copy the above code and open with Arduino IDE
    • Click Upload button on Arduino IDE to upload code to Arduino Nano
    • Open the Serial Monitor
    • Check out the result on Serial Monitor.
    COM6
    Send
    Arduino Nano Web Server's IP address: 192.168.0.3
    Autoscroll Show timestamp
    Clear output
    9600 baud  
    Newline  
    • Note the IP address displayed and enter it into the address bar of a web browser on your smartphone or PC.
    • You will then see the following output on the Serial Monitor.
    COM6
    Send
    Arduino Nano Web Server's IP address: 192.168.0.3 << GET / HTTP/1.1 << Host: 192.168.0.3 << Connection: keep-alive << Upgrade-Insecure-Requests: 1 << User-Agent: Mozilla/5.0 (Windows NT 10.0; Win64; x64) AppleWebKit/537.36 (KHTML, like Gecko) Chrome/129.0.0.0 Safari/537.36 Edg/129.0.0.0 << Accept: text/html,application/xhtml+xml,application/xml;q=0.9,image/avif,image/webp,image/apng,*/*;q=0.8,application/signed-exchange;v=b3;q=0.7 << Accept-Encoding: gzip, deflate << Accept-Language: en-US,en;q=0.9,ko;q=0.8
    Autoscroll Show timestamp
    Clear output
    9600 baud  
    Newline  
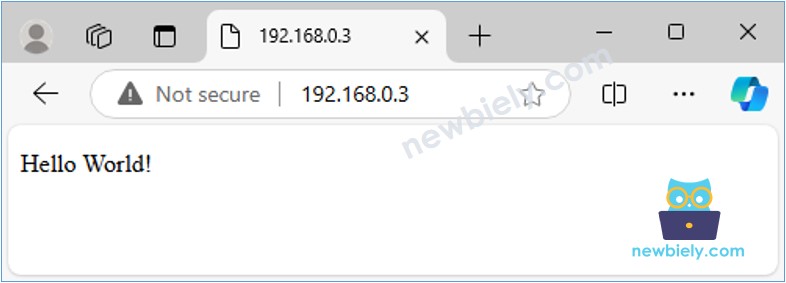
    • Once you access the web browser using the IP address, you’ll see a simple web page displaying "Hello World!". The page will look like this:
    Arduino Nano web server Hello World

Arduino Nano Web Server - Monitoring sensor values via a webpage.

The below Arduino Nano code does the following tasks:

  • Creating a web server that listens for HTTP requests from a web browser.
  • Upon receiving a request from a web browser, the Arduino Nano responds with the following information:
    • HTTP header
    • HTTP body: This includes HTML, CSS content and the value read from the sensor.
    /* * This Arduino Nano code was developed by newbiely.com * * This Arduino Nano code is made available for public use without any restriction * * For comprehensive instructions and wiring diagrams, please visit: * https://newbiely.com/tutorials/arduino-nano/arduino-nano-web-server */ #include <SPI.h> #include <Ethernet.h> // MAC address for the Ethernet module, you can modify it as needed byte mac[] = { 0xDE, 0xAD, 0xBE, 0xEF, 0xFE, 0xED }; IPAddress ip(192, 168, 1, 177); // Set a static IP address EthernetServer server(80); // Create an Ethernet server that listens on port 80 float getTemperature() { // YOUR SENSOR IMPLEMENTATION HERE // simulate the temperature value float temp_x100 = random(0, 10000); // a random value from 0 to 10000 return temp_x100 / 100; // return the simulated temperature value from 0 to 100 in float } void setup() { //Initialize serial communication: Serial.begin(9600); // Start the Ethernet connection: if (Ethernet.begin(mac) == 0) { Serial.println(F("Failed to configure Ethernet using DHCP")); // Try with a static IP: Ethernet.begin(mac, ip); } // Start the server: server.begin(); // Print the Ethernet board's IP address: Serial.print(F("Server is at: ")); Serial.println(Ethernet.localIP()); } void loop() { // Listen for incoming clients EthernetClient client = server.available(); if (client) { // read the HTTP request header line by line while (client.connected()) { if (client.available()) { String HTTP_header = client.readStringUntil('\n'); // read the header line of HTTP request if (HTTP_header.equals("\r")) // the end of HTTP request break; Serial.print(F("<< ")); Serial.println(HTTP_header); // print HTTP request to Serial Monitor } } // send the HTTP response // send the HTTP response header client.println(F("HTTP/1.1 200 OK")); client.println(F("Content-Type: text/html")); client.println(F("Connection: close")); // the connection will be closed after completion of the response client.println(); // the separator between HTTP header and body // send the HTTP response body client.println(F("<!DOCTYPE HTML>")); client.println(F("<html>")); client.println(F("<head>")); client.println(F("<link rel=\"icon\" href=\"data:,\">")); client.println(F("</head>")); client.println(F("<p>")); client.print(F("Temperature: <span style=\"color: red;\">")); float temperature = getTemperature(); client.print(temperature, 2); client.println(F("&deg;C</span>")); client.println(F("</p>")); client.println(F("</html>")); client.flush(); // give the web browser time to receive the data delay(10); // close the connection: client.stop(); } }

    Detailed Instructions

    • Copy the code above and open it in the Arduino IDE.
    • Click the Upload button in the Arduino IDE to upload the code to the Arduino Nano.
    • Reload the previous web page (Ctrl + F5), and you’ll see it as shown below:
    Arduino Nano web server monitoring

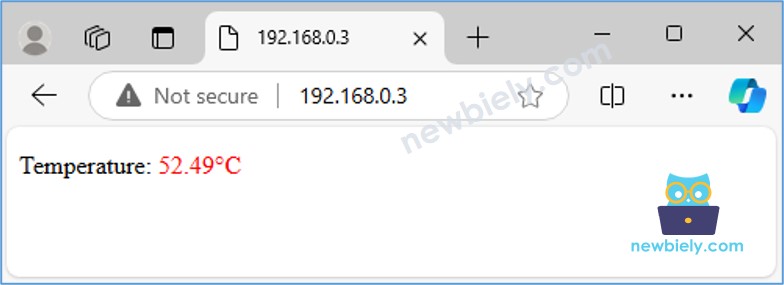
    With the provided code, to update the temperature, you need to reload the page in the web browser. In the next section, Let's learn how to make the webpage automatically update the temperature value in the background without reloading.

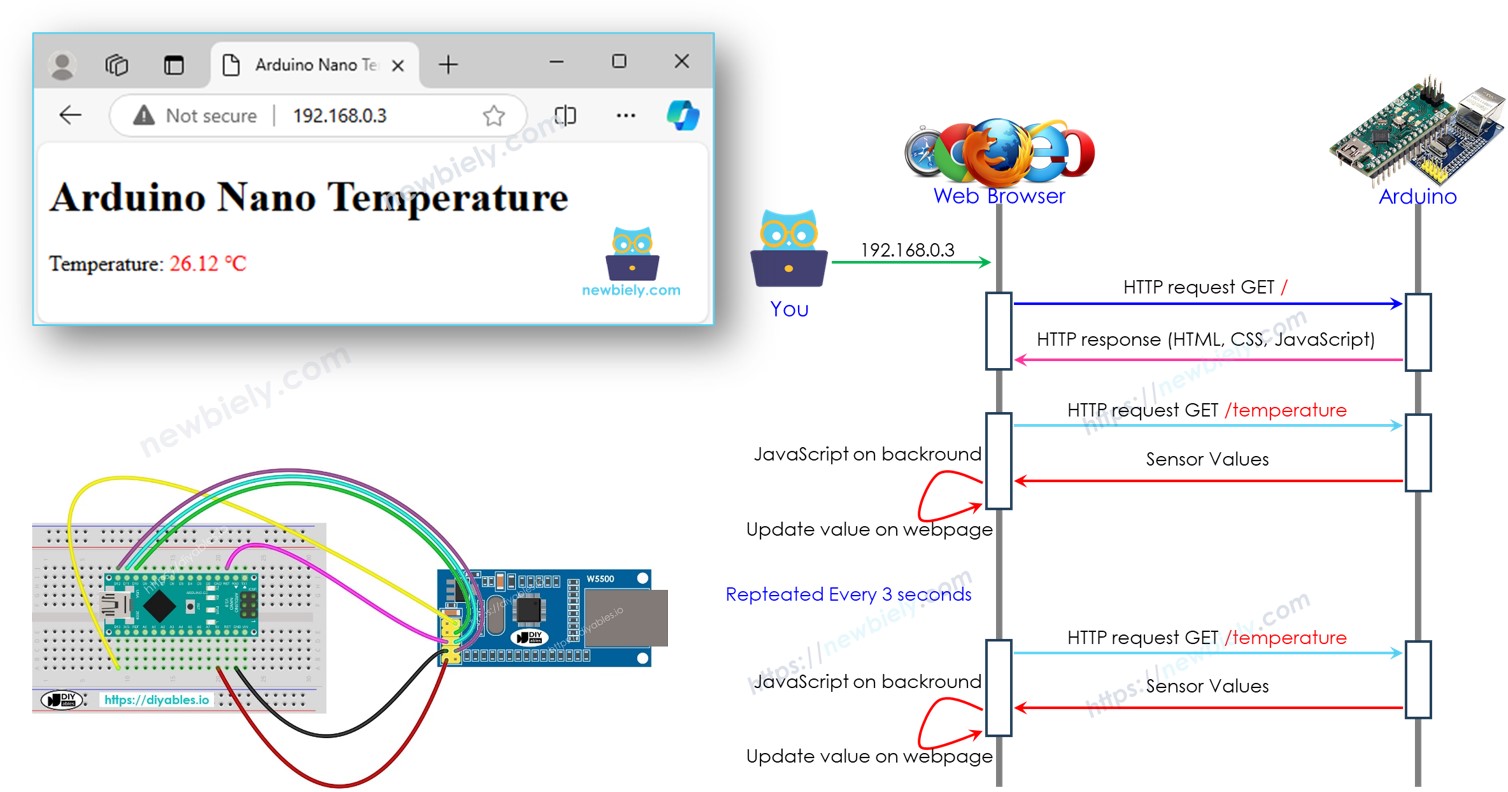
Arduino Nano Web Server - Auto-Updating Values on the Webpage

How Auto-Updating Works

  1. The user enters the Arduino Nano's IP address in the web browser.
  2. The web browser sends an HTTP request to the Arduino Nano's home page (/).
  3. The Arduino responds with HTML, CSS, and JavaScript.
  4. The web browser displays the webpage using the received HTML and CSS.
  5. Every 3 seconds, the web browser runs the JavaScript code, which makes an HTTP request to the /temperature endpoint.
  6. The Arduino reads the sensor value and sends it back as a response.
  7. The web browser receives the sensor value and updates the webpage accordingly.
Arduino Nano web server how it works

Below is the Arduino Nano code that performs the above tasks:

/* * This Arduino Nano code was developed by newbiely.com * * This Arduino Nano code is made available for public use without any restriction * * For comprehensive instructions and wiring diagrams, please visit: * https://newbiely.com/tutorials/arduino-nano/arduino-nano-web-server */ #include <SPI.h> #include <Ethernet.h> // MAC address and IP address for the Ethernet module (modify if necessary) byte mac[] = { 0xDE, 0xAD, 0xBE, 0xEF, 0xFE, 0xED }; IPAddress ip(192, 168, 1, 177); // Static IP address for the Arduino Nano EthernetServer server(80); // Set up the Ethernet server to listen on port 80 const char* HTML_CONTENT = R"=====( <!DOCTYPE html> <html> <head> <title>Arduino Nano Temperature</title> </head> <body> <h1>Arduino Nano Temperature</h1> <p>Temperature: <span style="color: red;"><span id="temperature">Loading...</span> &#8451;</span></p> <script> function fetchTemperature() { fetch("/temperature") .then(response => response.text()) .then(data => { document.getElementById("temperature").textContent = data; }); } fetchTemperature(); setInterval(fetchTemperature, 3000); // Update temperature every 3 seconds </script> </body> </html> )====="; float getTemperature() { // YOUR SENSOR IMPLEMENTATION HERE // simulate the temperature value float temp_x100 = random(0, 10000); // a random value from 0 to 10000 return temp_x100 / 100; // return the simulated temperature value from 0 to 100 in float } void setup() { // Start serial communication Serial.begin(9600); // Start Ethernet connection if (Ethernet.begin(mac) == 0) { Serial.println(F("Failed to configure Ethernet using DHCP")); // Try with a static IP address if DHCP fails Ethernet.begin(mac, ip); } // Start the server server.begin(); // Print the Arduino Nano's IP address Serial.print(F("Arduino Nano Web Server's IP address: ")); Serial.println(Ethernet.localIP()); } void loop() { // Listen for incoming clients EthernetClient client = server.available(); if (client) { Serial.println(F("Client connected")); // Wait until the client sends some data while (client.connected()) { if (client.available()) { // Read the first line of the HTTP request String request = client.readStringUntil('\r'); Serial.print(F("Request: ")); Serial.println(request); client.flush(); // Serve the HTML page from the index.h file if the request is "/" if (request.indexOf("GET / ") >= 0) { client.println(F("HTTP/1.1 200 OK")); client.println(F("Content-Type: text/html")); client.println(F("Connection: close")); // Connection will be closed after the response client.println(); client.println(HTML_CONTENT); // Send the HTML page from index.h } // Serve the temperature data if the request is "/temperature" else if (request.indexOf("GET /temperature") >= 0) { float temperature = getTemperature(); client.println(F("HTTP/1.1 200 OK")); client.println(F("Content-Type: text/plain")); client.println(F("Connection: close")); // Connection will be closed after the response client.println(); client.print(temperature, 2); // Send the temperature as plain text } // Close the connection client.stop(); Serial.println(F("Client disconnected")); } } } }

Detailed Instructions

  • Copy the code above and open it in the Arduino IDE.
  • Click the Upload button in the Arduino IDE to upload the code to the Arduino Nano.
  • Reload the previous web page (Ctrl + F5), and you’ll see it as shown below:
Arduino Nano web server auto reload

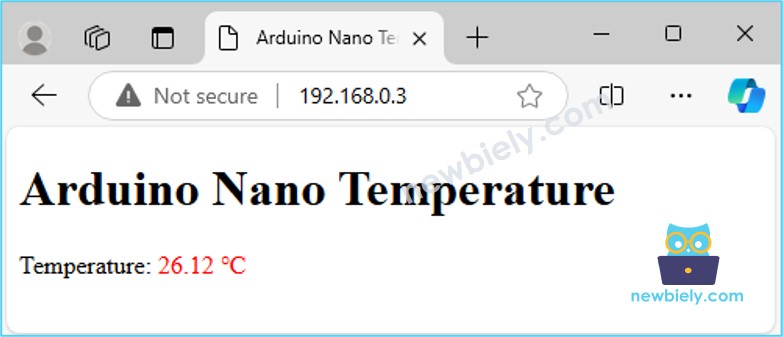
You will see that, the value is automatically updated every 3 seconds.

Separating HTML content into another file on Arduino IDE

If you want to create a simple web page with minimal content, you can embed the HTML directly in the Arduino Nano code, as previously explained.

However, for more complex and feature-rich web pages, embedding all the HTML, CSS, and JavaScript directly in the Arduino Nano code can become cumbersome. In such cases, it's better to use a different approach to manage the code:

  • The Arduino Nano code will still be stored in a .ino file as usual.
  • The web page content (HTML, CSS, JavaScript) will be placed in a separate .h file. This separation makes it easier to manage and update the web page without cluttering the Arduino code.

Detailed Instructions

  • Open the Arduino IDE and create a new sketch. Give it a name, for example, newbiely.com.ino.
  • Copy the code provided below and paste it to the created file.
/* * This Arduino Nano code was developed by newbiely.com * * This Arduino Nano code is made available for public use without any restriction * * For comprehensive instructions and wiring diagrams, please visit: * https://newbiely.com/tutorials/arduino-nano/arduino-nano-web-server */ #include <SPI.h> #include <Ethernet.h> #include "index.h" // Include the index.h file // MAC address and IP address for the Ethernet module (modify if necessary) byte mac[] = { 0xDE, 0xAD, 0xBE, 0xEF, 0xFE, 0xED }; IPAddress ip(192, 168, 1, 177); // Static IP address for the Arduino Nano EthernetServer server(80); // Set up the Ethernet server to listen on port 80 float getTemperature() { // YOUR SENSOR IMPLEMENTATION HERE // simulate the temperature value float temp_x100 = random(0, 10000); // a random value from 0 to 10000 return temp_x100 / 100; // return the simulated temperature value from 0 to 100 in float } void setup() { // Start serial communication Serial.begin(9600); // Start Ethernet connection if (Ethernet.begin(mac) == 0) { Serial.println(F("Failed to configure Ethernet using DHCP")); // Try with a static IP address if DHCP fails Ethernet.begin(mac, ip); } // Start the server server.begin(); // Print the Arduino Nano's IP address Serial.print(F("Arduino Nano Web Server's IP address: ")); Serial.println(Ethernet.localIP()); } void loop() { // Listen for incoming clients EthernetClient client = server.available(); if (client) { Serial.println(F("Client connected")); // Wait until the client sends some data while (client.connected()) { if (client.available()) { // Read the first line of the HTTP request String request = client.readStringUntil('\r'); Serial.print(F("Request: ")); Serial.println(request); client.flush(); // Serve the HTML page from the index.h file if the request is "/" if (request.indexOf("GET / ") >= 0) { client.println(F("HTTP/1.1 200 OK")); client.println(F("Content-Type: text/html")); client.println(F("Connection: close")); // Connection will be closed after the response client.println(); client.println(HTML_CONTENT); // Send the HTML page from index.h } // Serve the temperature data if the request is "/temperature" else if (request.indexOf("GET /temperature") >= 0) { float temperature = getTemperature(); client.println(F("HTTP/1.1 200 OK")); client.println(F("Content-Type: text/plain")); client.println(F("Connection: close")); // Connection will be closed after the response client.println(); client.print(temperature, 2); // Send the temperature as plain text } // Close the connection client.stop(); Serial.println(F("Client disconnected")); } } } }
  • Create the index.h file On Arduino IDE by:
Arduino IDE 2 adds file
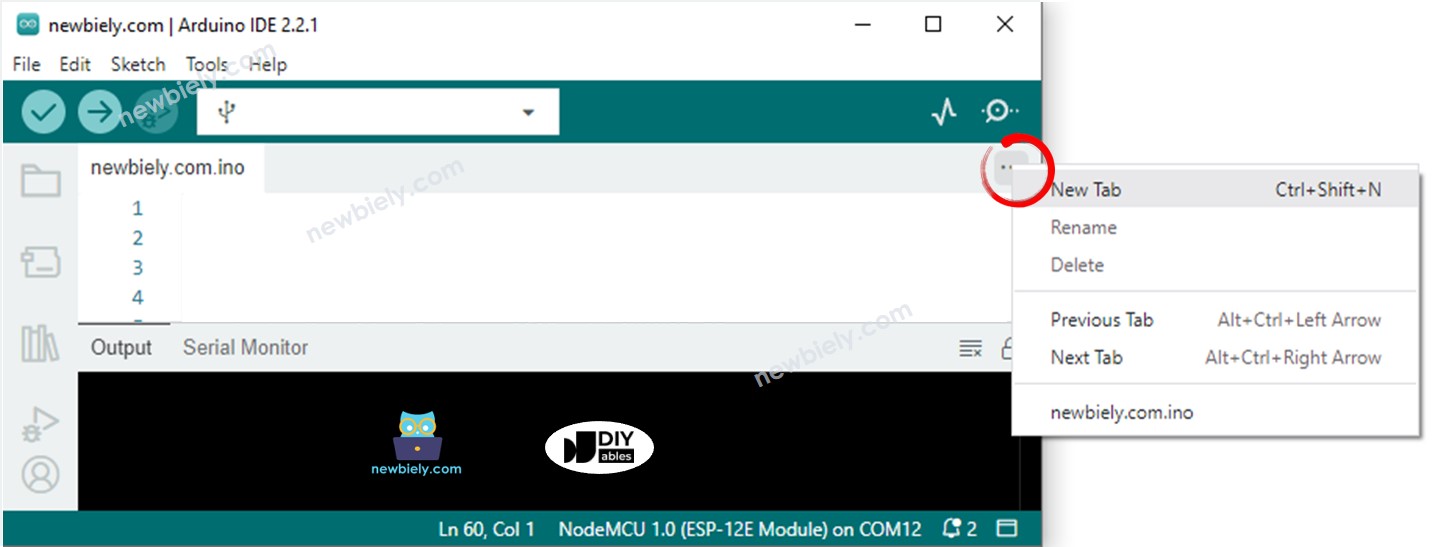
  • Either click on the button just below the serial monitor icon and choose New Tab, or use Ctrl+Shift+N keys.
  • Give file's name index.h and click OK button
Arduino IDE 2 adds file index.h
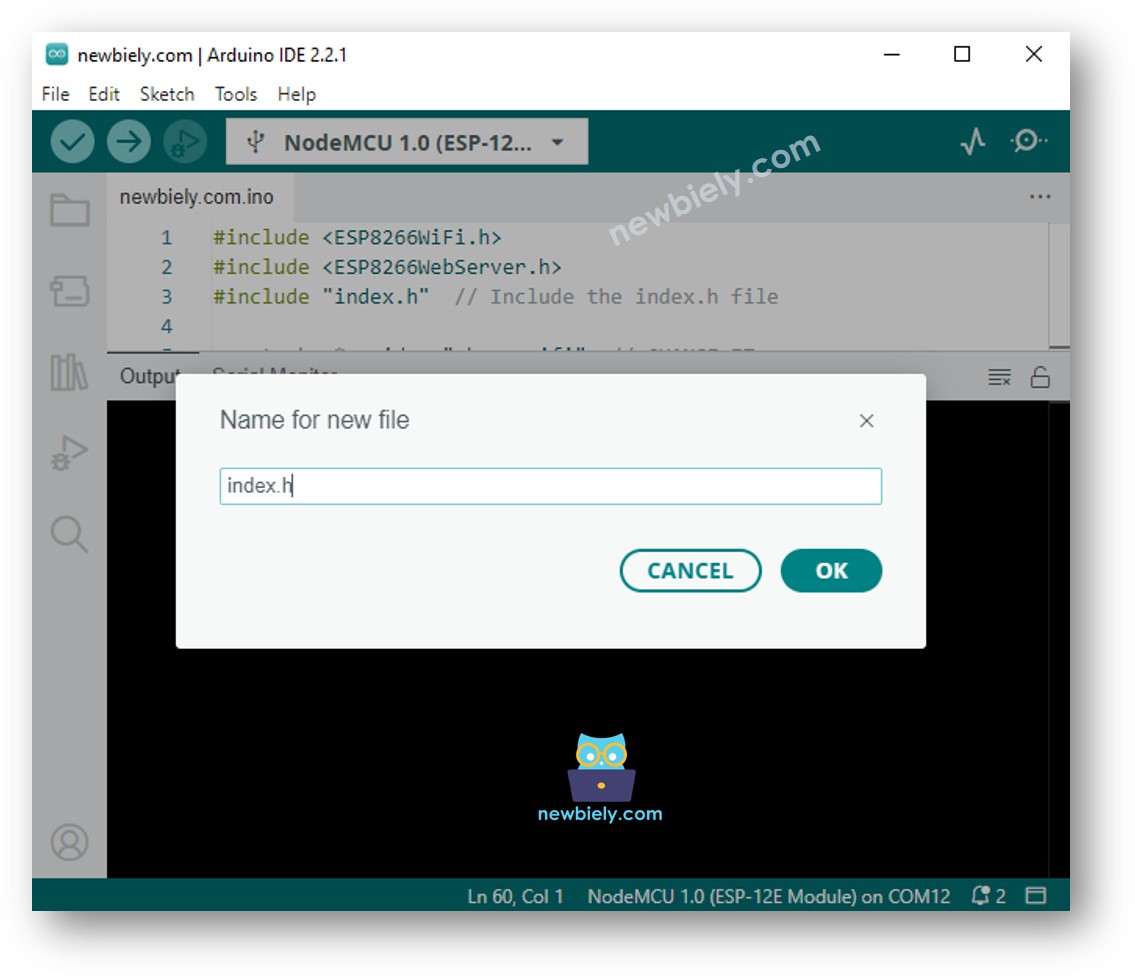
  • Copy the below code and paste it to the index.h.
/* * This Arduino Nano code was developed by newbiely.com * * This Arduino Nano code is made available for public use without any restriction * * For comprehensive instructions and wiring diagrams, please visit: * https://newbiely.com/tutorials/arduino-nano/arduino-nano-web-server */ /* * This Arduino Nano code was developed by newbiely.com * * This Arduino Nano code is made available for public use without any restriction * * For comprehensive instructions and wiring diagrams, please visit: * http://localhost/web/newbiely.com/public/tutorials/arduino-nano-esp32/arduino-nano-esp32-web-server */ #ifndef WEBPAGE_H #define WEBPAGE_H const char* HTML_CONTENT = R"=====( <!DOCTYPE html> <html> <head> <title>Arduino Nano Temperature</title> </head> <body> <h1>Arduino Nano Temperature</h1> <p>Temperature: <span style="color: red;"><span id="temperature">Loading...</span> &#8451;</span></p> <script> function fetchTemperature() { fetch("/temperature") .then(response => response.text()) .then(data => { document.getElementById("temperature").textContent = data; }); } fetchTemperature(); setInterval(fetchTemperature, 3000); // Update temperature every 3 seconds </script> </body> </html> )====="; #endif
  • Now you have the code in two files: newbiely.com.ino and index.h
  • Click Upload button on Arduino IDE to upload code to Arduino Nano
  • Reload the web page (using Ctrl + F5), and it will appear the same as before

※ NOTE THAT:

  • If you update the HTML content in the index.h file without changing anything in the newbiely.com.ino file, the Arduino IDE won’t refresh or include the updated HTML content when you compile and upload the code to the Arduino Nano.
  • To ensure the Arduino IDE updates the HTML content, you need to make a small change in the newbiely.com.ino file, such as adding a blank line or a comment. This forces the IDE to detect changes, ensuring the updated HTML content is included in the upload.

Controlling the Arduino Nano via Web

Controlling something connected to Arduino Nano is a bit more challenging than just reading a value. That's because Arduino Nano has to understand the request it receives from the web browser to know what action to take.

For a more comprehensive and detailed example, I recommend checking out the tutorials listed below:

Learn More

※ OUR MESSAGES

  • As freelancers, We are AVAILABLE for HIRE. See how to outsource your project to us
  • Please feel free to share the link of this tutorial. However, Please do not use our content on any other websites. We invested a lot of effort and time to create the content, please respect our work!