Arduino Nano - Read Config from SD Card

This tutorial instructs you how to use a config file on a Micro SD Card. Specifically, we will be looking at:

Arduino Nano Micro SD Card Config File

Hardware Preparation

1×Arduino Nano
1×USB A to Mini-B USB cable
1×Micro SD Card
1×Micro SD Card Module
1×Jumper Wires
1×USB 3.0 SD Card Reader
1×(Optional) 9V Power Adapter for Arduino Nano
1×(Recommended) Screw Terminal Adapter for Arduino Nano

Or you can buy the following sensor kits:

1×DIYables Sensor Kit (30 sensors/displays)
1×DIYables Sensor Kit (18 sensors/displays)
Disclosure: Some of the links provided in this section are Amazon affiliate links. We may receive a commission for any purchases made through these links at no additional cost to you. We appreciate your support.

Overview of Micro SD Card Module

If you are unfamiliar with the Micro SD Card Module, including its pinout, how it works, and how to program it, check out the Arduino Nano - Micro SD Card tutorial.

How It Works

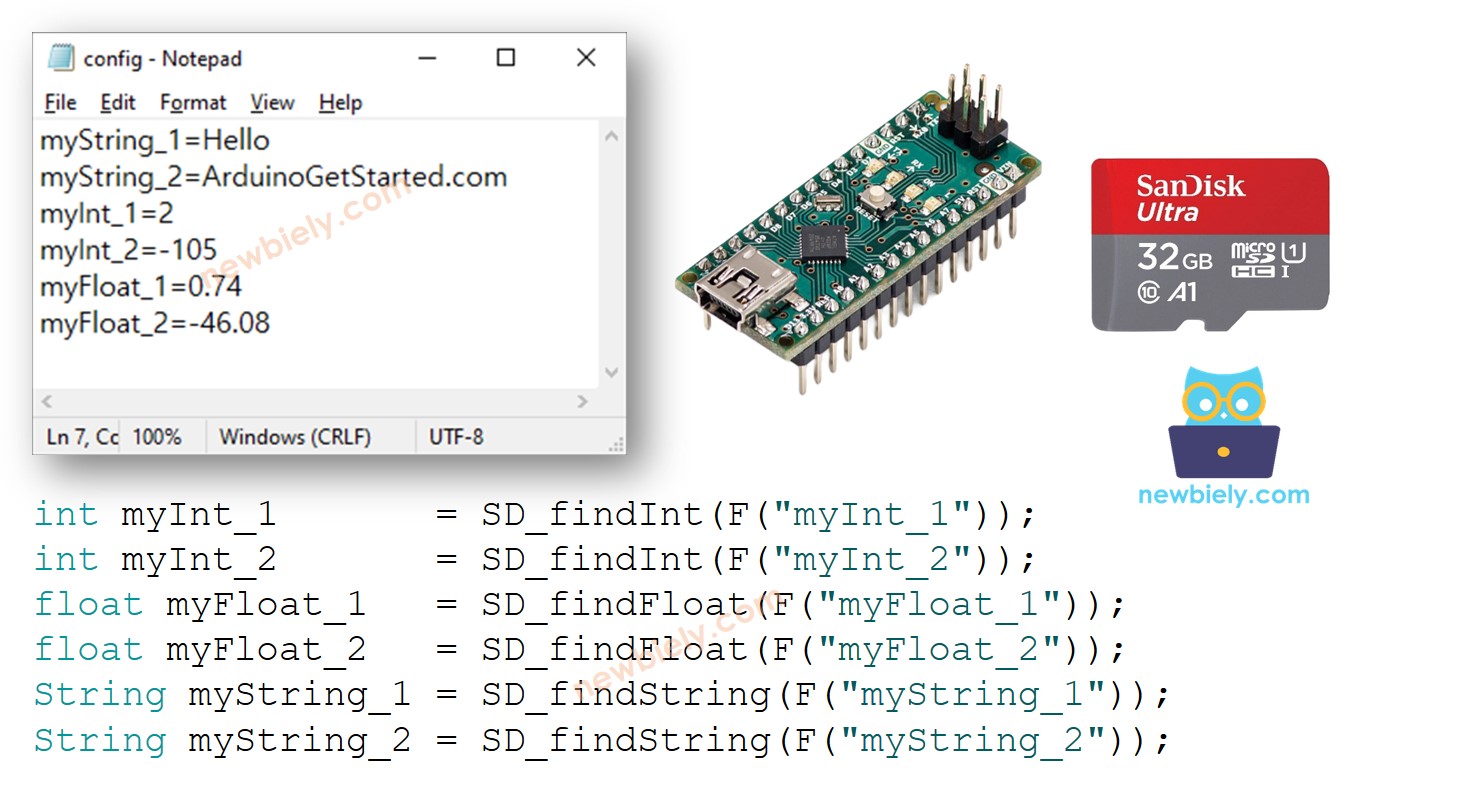
Each key-value pair is stored on the Micro SD Card in its own line. The key and value are divided by an = sign. A newline character separates each key-value pair from the others.

The Arduino Nano code will search for the key and locate the associated value, storing it in a variable. The variable can be of type int, float, or String.

Wiring Diagram

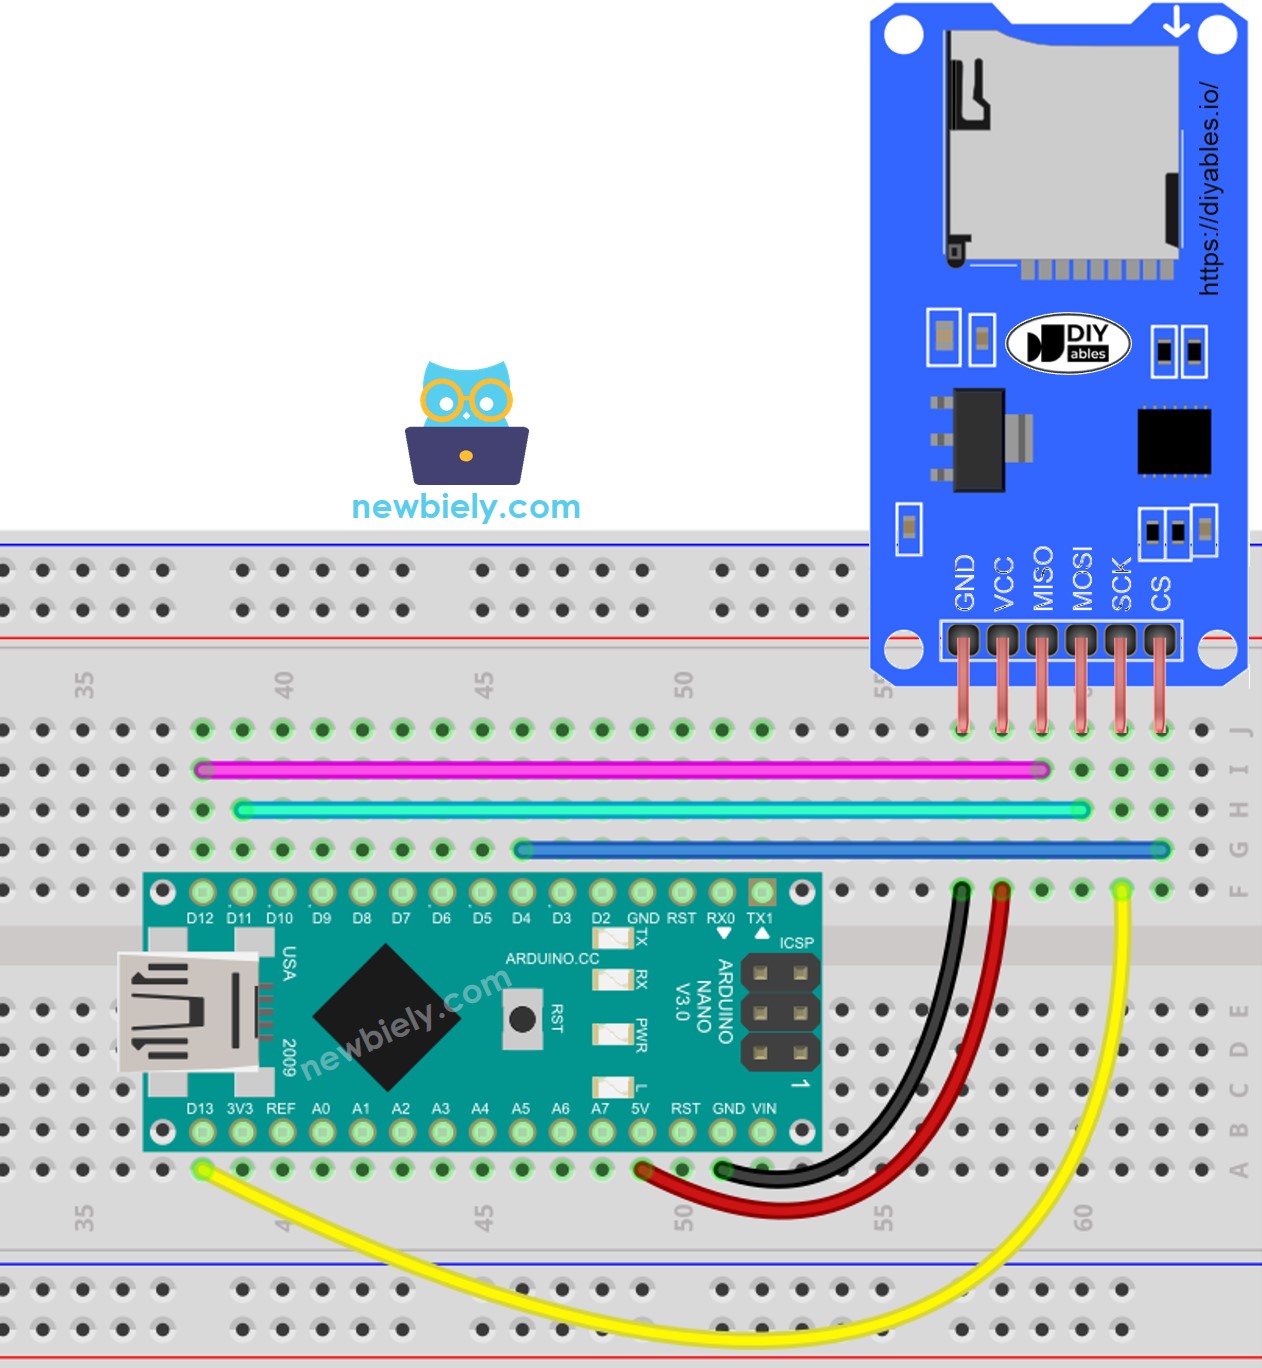
  • You can use male-to-female jumper wires to connect the micro SD Card module to Arduino Nano
The wiring diagram between Arduino Nano and Micro SD Card Module

This image is created using Fritzing. Click to enlarge image

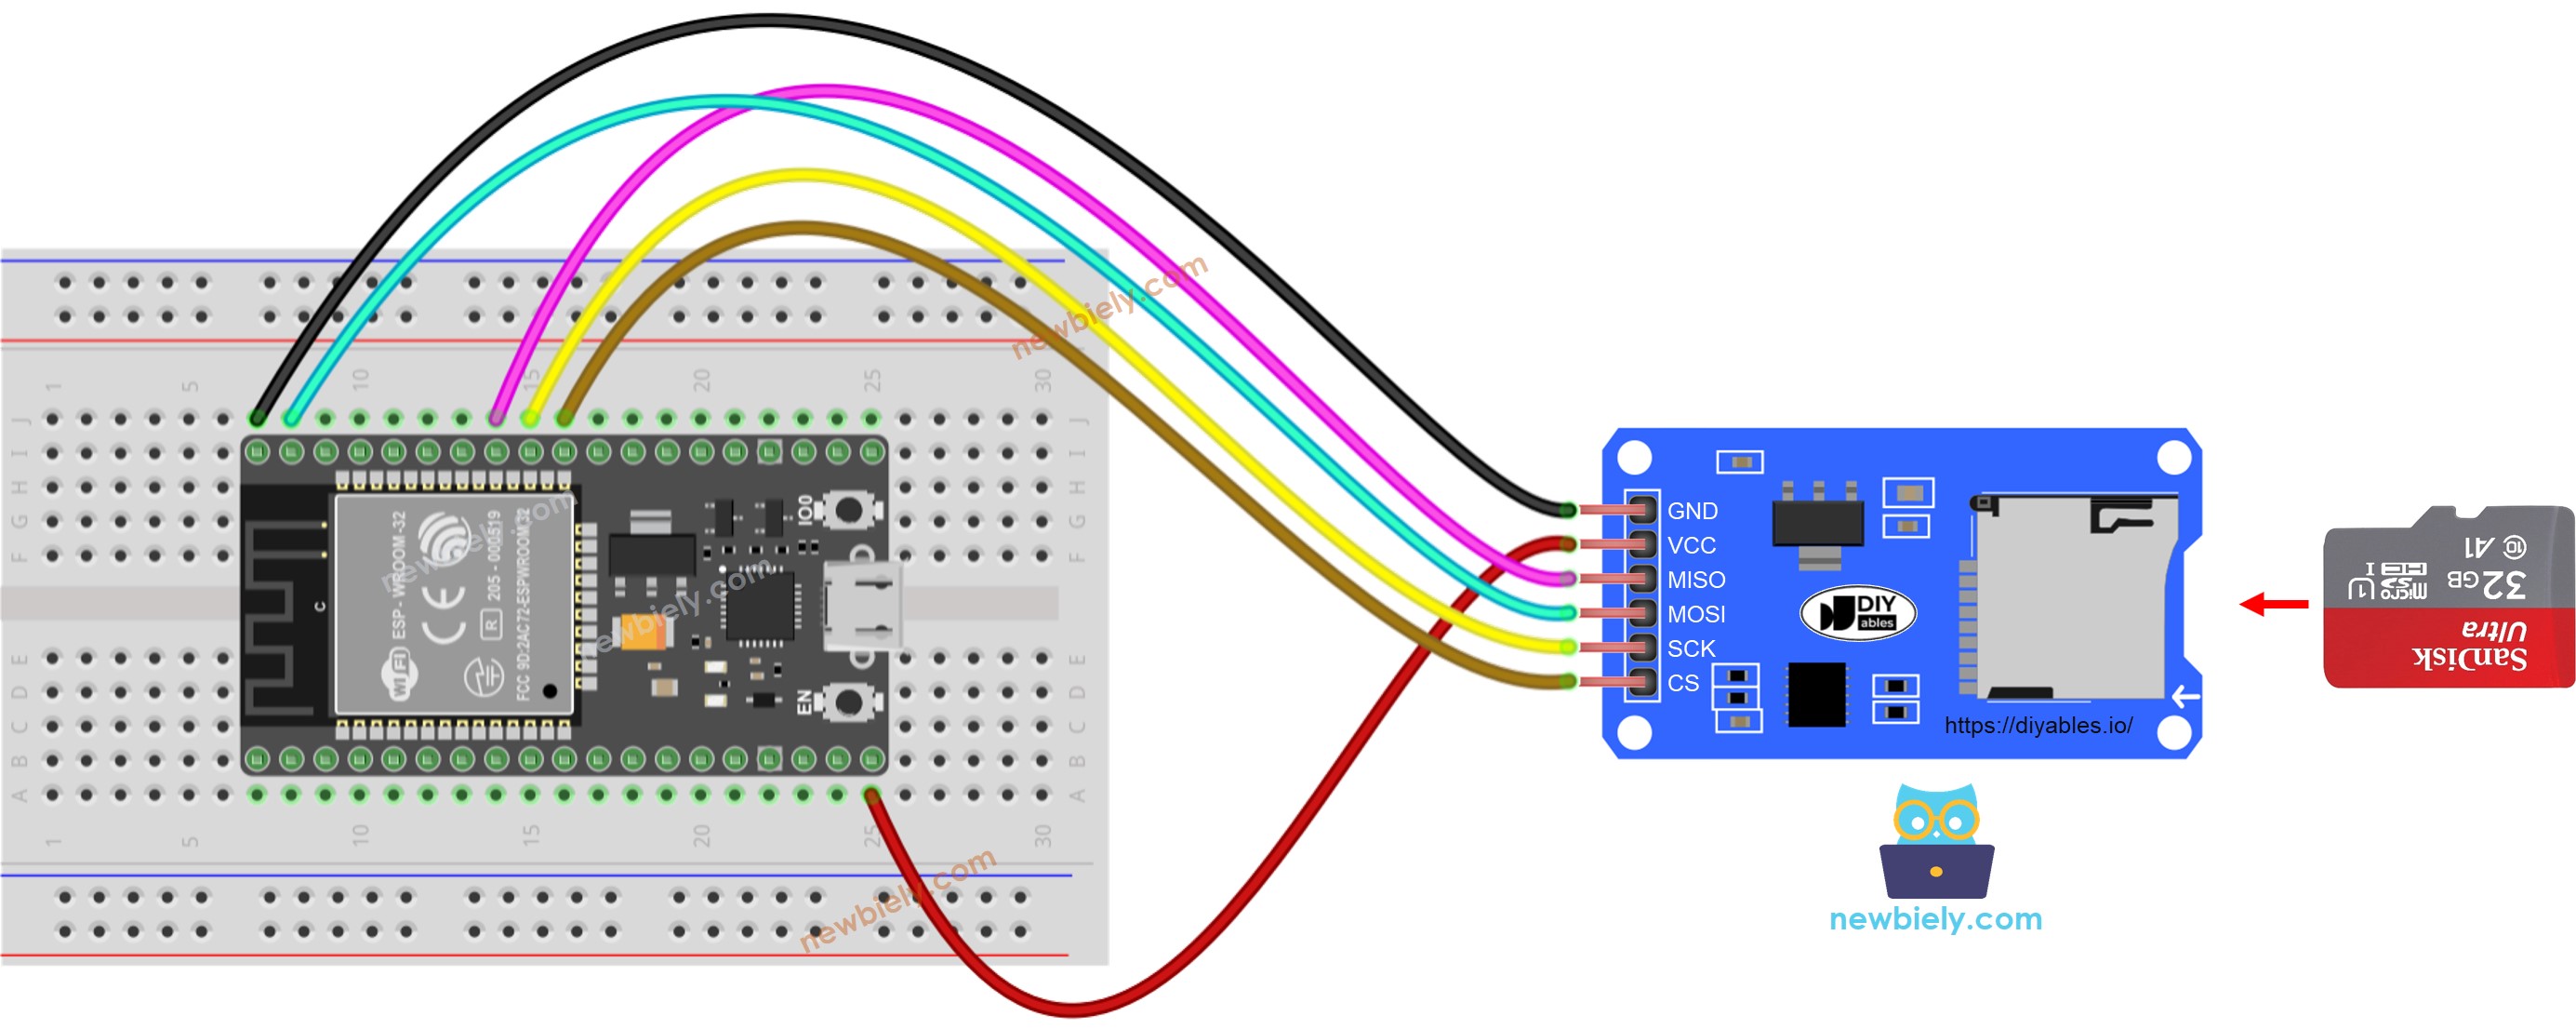
  • Or you can plug the micro SD Card module to breadboard and then use the male-to-male jumper wires
The wiring diagram between Arduino Nano and Micro SD Card Module

This image is created using Fritzing. Click to enlarge image

How To read config to variables

  • Generate a config.txt file on your PC using Notepad or Notepad++.
  • Copy the following key-value pairs and paste them into the config.txt:
myString_1=Hello myString_2=ArduinoGetStarted.com myInt_1=2 myInt_2=-105 myFloat_1=0.74 myFloat_2=-46.08
  • Attach the Micro SD Card to the PC with a USB 3.0 SD Card Reader.
  • Ensure that the Micro SD Card is formatted FAT16 or FAT32 (you can search online for instructions).
  • Place the config.txt file in the main folder of the Micro SD Card.
  • Detach the Micro SD Card from the PC.
  • Connect the Micro SD Card to the Arduino Nano using the Micro SD Card Module, following the wiring diagram.
  • Copy the code below and open it with the Arduino IDE.
/* * This Arduino Nano code was developed by newbiely.com * * This Arduino Nano code is made available for public use without any restriction * * For comprehensive instructions and wiring diagrams, please visit: * https://newbiely.com/tutorials/arduino-nano/arduino-nano-read-config-from-sd-card */ #include <SD.h> #define PIN_SPI_CS 4 #define FILE_NAME "config.txt" #define KEY_MAX_LENGTH 30 // change it if key is longer #define VALUE_MAX_LENGTH 30 // change it if value is longer // variables int myInt_1; int myInt_2; float myFloat_1; float myFloat_2; String myString_1; String myString_2; void setup() { Serial.begin(9600); if (!SD.begin(PIN_SPI_CS)) { Serial.println(F("SD Card failed, or not present")); while (1); // don't do anything more: } Serial.println(F("SD Card initialized.")); myInt_1 = SD_findInt(F("myInt_1")); myInt_2 = SD_findInt(F("myInt_2")); myFloat_1 = SD_findFloat(F("myFloat_1")); myFloat_2 = SD_findFloat(F("myFloat_2")); myString_1 = SD_findString(F("myString_1")); myString_2 = SD_findString(F("myString_2")); Serial.print(F("myInt_1 = ")); Serial.println(myInt_1); Serial.print(F("myInt_2 = ")); Serial.println(myInt_2); Serial.print(F("myFloat_1 = ")); Serial.println(myFloat_1); Serial.print(F("myFloat_2 = ")); Serial.println(myFloat_2); Serial.print(F("myString_1 = ")); Serial.println(myString_1); Serial.print(F("myString_2 = ")); Serial.println(myString_2); } void loop() { } bool SD_available(const __FlashStringHelper * key) { char value_string[VALUE_MAX_LENGTH]; int value_length = SD_findKey(key, value_string); return value_length > 0; } int SD_findInt(const __FlashStringHelper * key) { char value_string[VALUE_MAX_LENGTH]; int value_length = SD_findKey(key, value_string); return HELPER_ascii2Int(value_string, value_length); } float SD_findFloat(const __FlashStringHelper * key) { char value_string[VALUE_MAX_LENGTH]; int value_length = SD_findKey(key, value_string); return HELPER_ascii2Float(value_string, value_length); } String SD_findString(const __FlashStringHelper * key) { char value_string[VALUE_MAX_LENGTH]; int value_length = SD_findKey(key, value_string); return HELPER_ascii2String(value_string, value_length); } int SD_findKey(const __FlashStringHelper * key, char * value) { File configFile = SD.open(FILE_NAME); if (!configFile) { Serial.print(F("SD Card: error on opening file ")); Serial.println(FILE_NAME); return; } char key_string[KEY_MAX_LENGTH]; char SD_buffer[KEY_MAX_LENGTH + VALUE_MAX_LENGTH + 1]; // 1 is = character int key_length = 0; int value_length = 0; // Flash string to string PGM_P keyPoiter; keyPoiter = reinterpret_cast<PGM_P>(key); byte ch; do { ch = pgm_read_byte(keyPoiter++); if (ch != 0) key_string[key_length++] = ch; } while (ch != 0); // check line by line while (configFile.available()) { int buffer_length = configFile.readBytesUntil('\n', SD_buffer, 100); if (SD_buffer[buffer_length - 1] == '\r') buffer_length--; // trim the \r if (buffer_length > (key_length + 1)) { // 1 is = character if (memcmp(SD_buffer, key_string, key_length) == 0) { // equal if (SD_buffer[key_length] == '=') { value_length = buffer_length - key_length - 1; memcpy(value, SD_buffer + key_length + 1, value_length); break; } } } } configFile.close(); // close the file return value_length; } int HELPER_ascii2Int(char *ascii, int length) { int sign = 1; int number = 0; for (int i = 0; i < length; i++) { char c = *(ascii + i); if (i == 0 && c == '-') sign = -1; else { if (c >= '0' && c <= '9') number = number * 10 + (c - '0'); } } return number * sign; } float HELPER_ascii2Float(char *ascii, int length) { int sign = 1; int decimalPlace = 0; float number = 0; float decimal = 0; for (int i = 0; i < length; i++) { char c = *(ascii + i); if (i == 0 && c == '-') sign = -1; else { if (c == '.') decimalPlace = 1; else if (c >= '0' && c <= '9') { if (!decimalPlace) number = number * 10 + (c - '0'); else { decimal += ((float)(c - '0') / pow(10.0, decimalPlace)); decimalPlace++; } } } } return (number + decimal) * sign; } String HELPER_ascii2String(char *ascii, int length) { String str; str.reserve(length); str = ""; for (int i = 0; i < length; i++) { char c = *(ascii + i); str += String(c); } return str; }
  • Click the Upload button on the Arduino IDE to compile and upload the code to the Arduino Nano.
  • Check the Serial Monitor for the outcome.
COM6
Send
SD Card initialized. myInt_1 = 2 myInt_2 = -105 myFloat_1 = 0.74 myFloat_2 = -46.08 myString_1 = Hello myString_2 = ArduinoGetStarted.com
Autoscroll Show timestamp
Clear output
9600 baud  
Newline  
  • The Serial Monitor displays values from variables that are the same as those stored on the micro SD Card.

You can now alter the code in order to include additional variables.

※ NOTE THAT:

The code does not take into account the sequence of key-value pairs. It will search through the file from the start to the finish until the key is found.

Video Tutorial

※ OUR MESSAGES

  • As freelancers, We are AVAILABLE for HIRE. See how to outsource your project to us
  • Please feel free to share the link of this tutorial. However, Please do not use our content on any other websites. We invested a lot of effort and time to create the content, please respect our work!