Disclosure: Some of the links provided in this section are Amazon affiliate links. We may receive a commission for any purchases made through these links at no additional cost to you. Additionally, some of these links are for products from our own brand, DIYables .
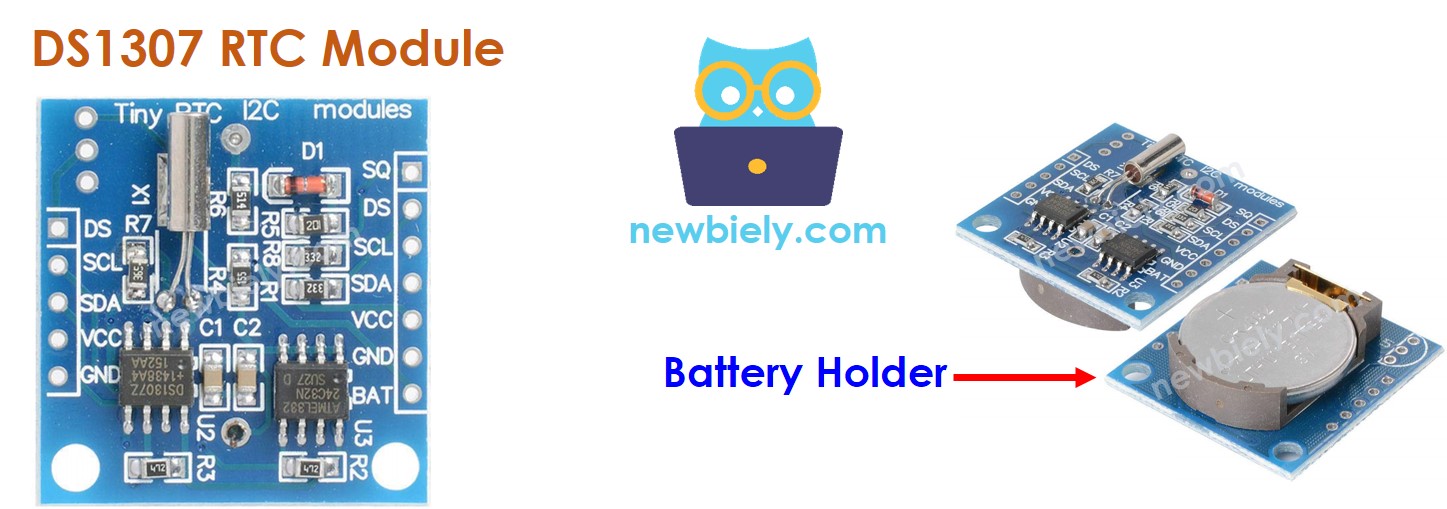
Overview of Real-Time Clock DS1307 Module
Arduino Nano includes some time-related functions, such as millis() and micros(). However, these do not provide date and time information (seconds, minutes, hours, day, date, month, and year). To obtain this data, we must use a Real-Time Clock (RTC) module, such as DS3231 or DS1370. The DS3231 Module is more precise than the DS1370. See DS3231 vs DS1307 for more details.
The DS1307 RTC Module Pinout
The Real-Time Clock DS1307 Module has 12 pins, but only 4 of them are necessary for its normal use: SCL, SDA, VCC, and GND.
SCL pin: This is a serial clock pin for the I2C interface.
SDA pin: This is a serial data pin for the I2C interface.
VCC pin: This supplies power to the module and can range from 3.3V to 5.5V.
GND pin: This is the ground pin.
The DS1307 Module has a battery holder for a CR2032 battery.
If the battery is inserted, the time on the module will remain even when the main power is disconnected.
If the battery is not inserted, the time information will be lost if the main power is disconnected and it must be reset.
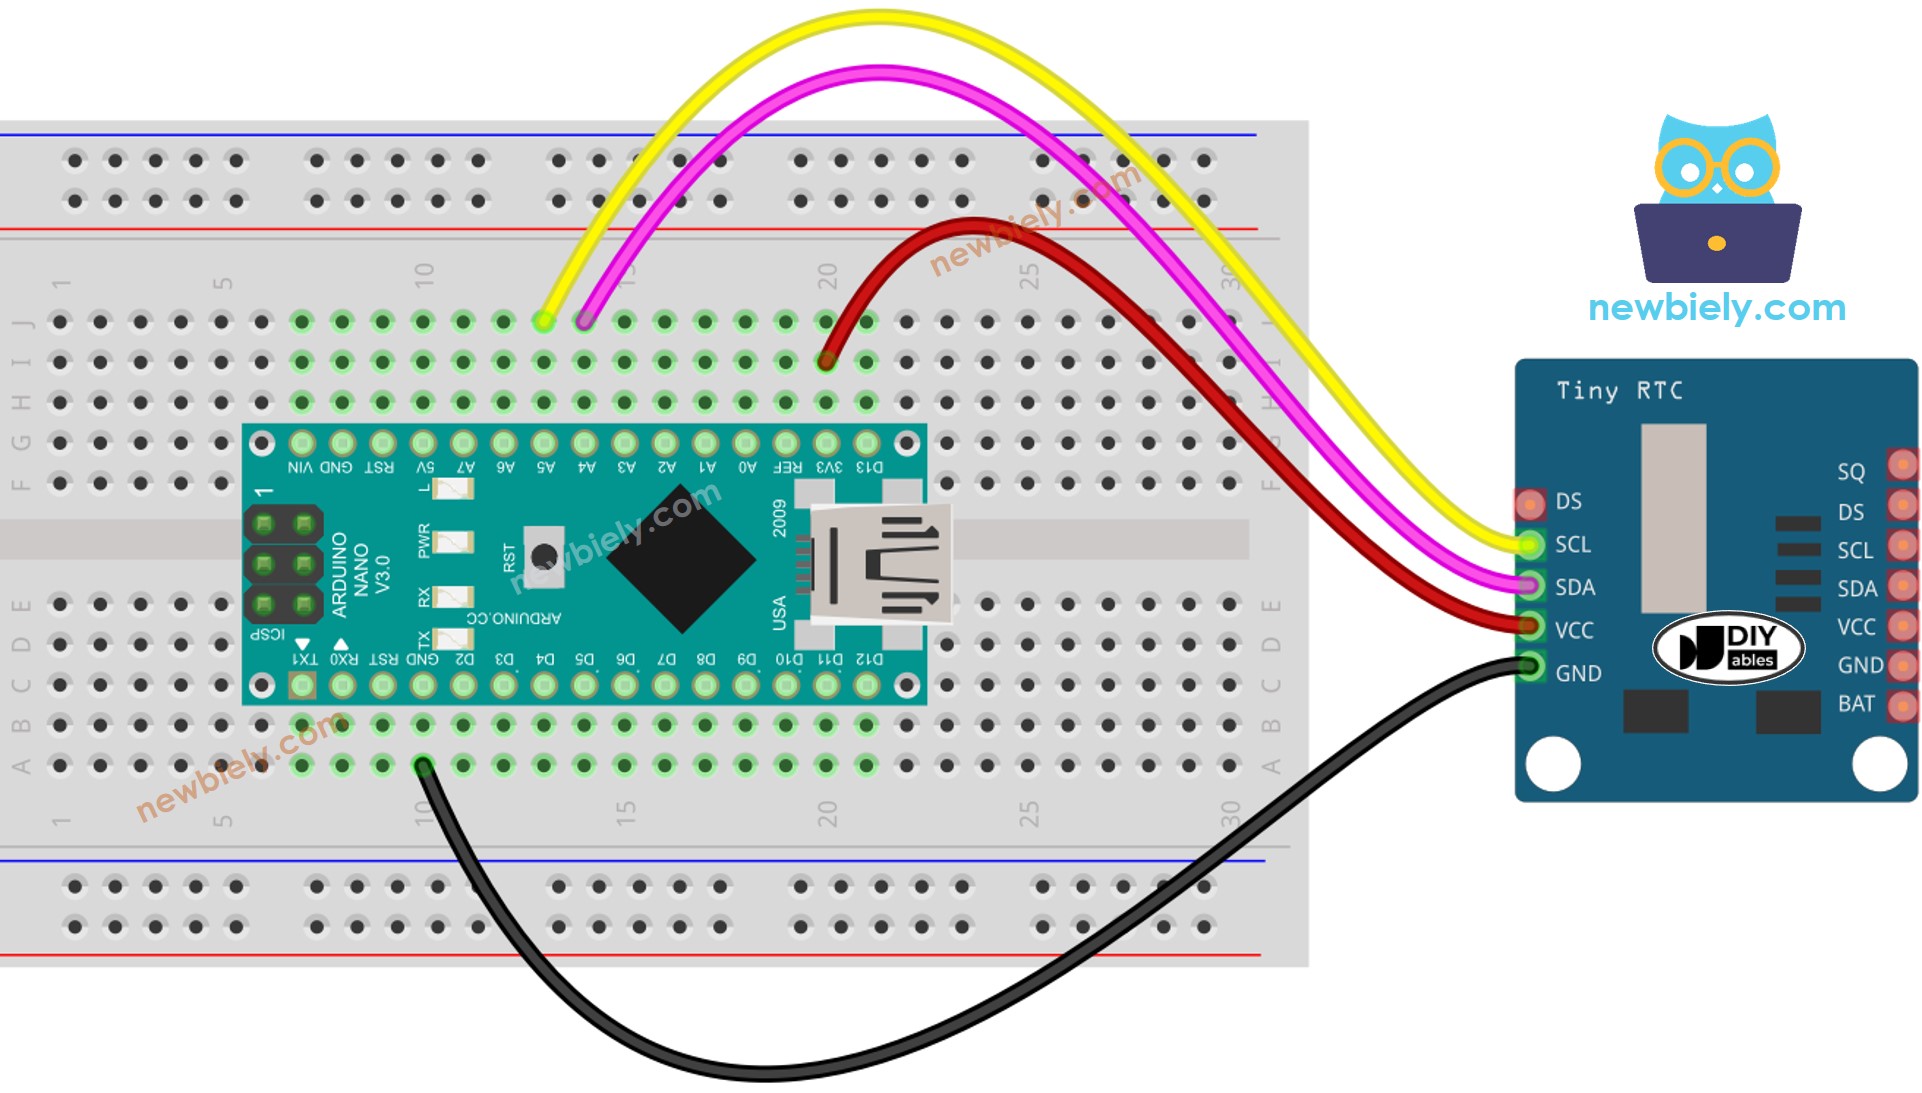
Wiring Diagram
This image is created using Fritzing. Click to enlarge image
/* * This Arduino Nano code was developed by newbiely.com * * This Arduino Nano code is made available for public use without any restriction * * For comprehensive instructions and wiring diagrams, please visit: * https://newbiely.com/tutorials/arduino-nano/arduino-nano-ds1307-rtc-module */#include <RTClib.h>RTC_DS1307 rtc;char daysOfTheWeek[7][12] = {"Sunday","Monday","Tuesday","Wednesday","Thursday","Friday","Saturday"};voidsetup () {Serial.begin(9600);// SETUP RTC MODULEif (! rtc.begin()) {Serial.println("Couldn't find RTC");Serial.flush();while (1); }// automatically sets the RTC to the date & time on PC this sketch was compiled rtc.adjust(DateTime(F(__DATE__), F(__TIME__)));// manually sets the RTC with an explicit date & time, for example to set// January 21, 2021 at 3am you would call:// rtc.adjust(DateTime(2021, 1, 21, 3, 0, 0));}voidloop () {DateTimenow = rtc.now();Serial.print("Date & Time: ");Serial.print(now.year(), DEC);Serial.print('/');Serial.print(now.month(), DEC);Serial.print('/');Serial.print(now.day(), DEC);Serial.print(" (");Serial.print(daysOfTheWeek[now.dayOfTheWeek()]);Serial.print(") ");Serial.print(now.hour(), DEC);Serial.print(':');Serial.print(now.minute(), DEC);Serial.print(':');Serial.println(now.second(), DEC);delay(1000); // delay 1 seconds}
Detailed Instructions
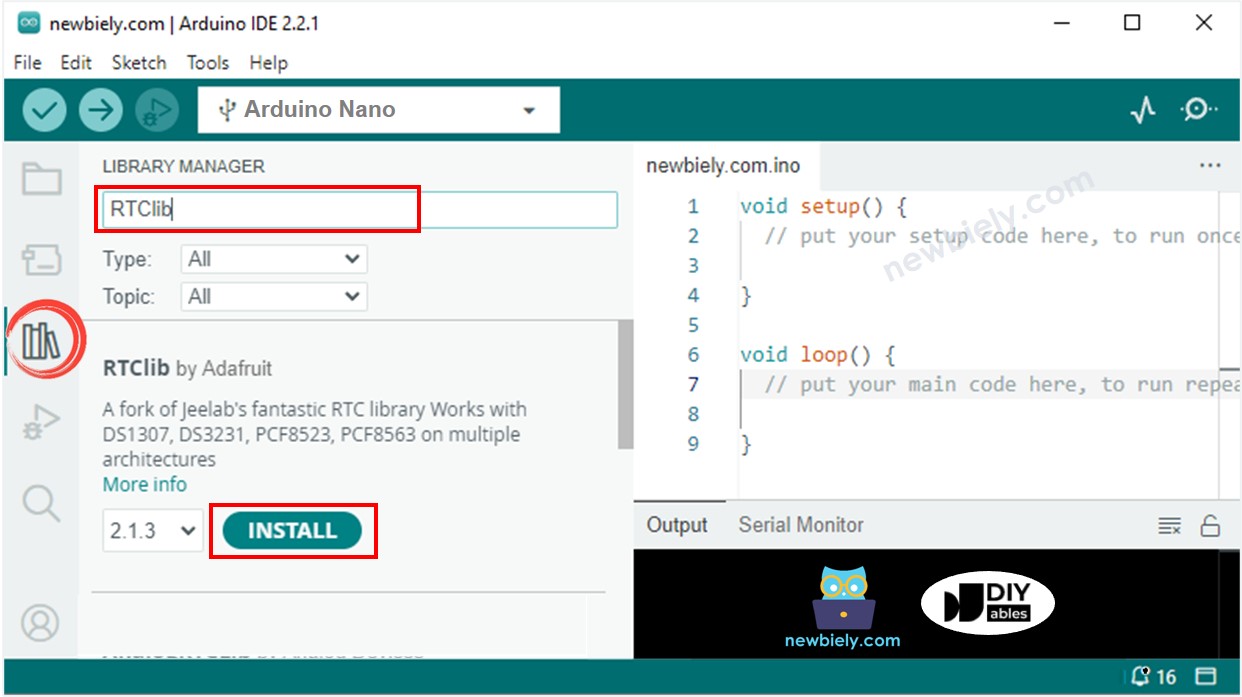
Click to the Libraries icon on the left bar of the Arduino IDE.
Search for “RTClib” and locate the RTC library by Adafruit.
Press the Install button to install the RTC library.
Copy the code and open it with Arduino IDE.
Click the Upload button to send the code to Arduino Nano.
Open the Serial Monitor.
Check out the result on the Serial Monitor.
Newbiely | Arduino IDE 2.3.8
──
☐
✕
File
Edit
Sketch
Tools
Help
Arduino Nano
Newbiely.ino
···
8Serial.println("Hello World!");
Output
Serial Monitor
Message (Enter to send message to 'Arduino Nano' on 'COM15')
New Line
9600 baud
Date & Time: 2021/10/6 (Wednesday) 9:9:35
Date & Time: 2021/10/6 (Wednesday) 9:9:36
Date & Time: 2021/10/6 (Wednesday) 9:9:37
Date & Time: 2021/10/6 (Wednesday) 9:9:38
Date & Time: 2021/10/6 (Wednesday) 9:9:39
Date & Time: 2021/10/6 (Wednesday) 9:9:40
Date & Time: 2021/10/6 (Wednesday) 9:9:41
Date & Time: 2021/10/6 (Wednesday) 9:9:42
Date & Time: 2021/10/6 (Wednesday) 9:9:43
Date & Time: 2021/10/6 (Wednesday) 9:9:44
Ln 11, Col 1
Arduino Nano on COM15
2
Arduino Nano Code – How to make daily schedule
/* * This Arduino Nano code was developed by newbiely.com * * This Arduino Nano code is made available for public use without any restriction * * For comprehensive instructions and wiring diagrams, please visit: * https://newbiely.com/tutorials/arduino-nano/arduino-nano-ds1307-rtc-module */// Date and time functions using a DS1307 RTC connected via I2C and Wire lib#include <RTClib.h>// event from 13:50 to 14:10uint8_t DAILY_EVENT_START_HH = 13; // event start time: houruint8_t DAILY_EVENT_START_MM = 50; // event start time: minuteuint8_t DAILY_EVENT_END_HH = 14; // event end time: houruint8_t DAILY_EVENT_END_MM = 10; // event end time: minuteRTC_DS1307 rtc;char daysOfTheWeek[7][12] = {"Sunday","Monday","Tuesday","Wednesday","Thursday","Friday","Saturday"};voidsetup () {Serial.begin(9600);// SETUP RTC MODULEif (! rtc.begin()) {Serial.println("Couldn't find RTC");while (1); }// sets the RTC to the date & time on PC this sketch was compiled rtc.adjust(DateTime(F(__DATE__), F(__TIME__)));// sets the RTC with an explicit date & time, for example to set// January 21, 2021 at 3am you would call:// rtc.adjust(DateTime(2021, 1, 21, 3, 0, 0));}voidloop () {DateTimenow = rtc.now();if (now.hour() >= DAILY_EVENT_START_HH &&now.minute() >= DAILY_EVENT_START_MM &&now.hour() < DAILY_EVENT_END_HH &&now.minute() < DAILY_EVENT_END_MM) {Serial.println("It is on scheduled time");// TODO: write your code" } else {Serial.println("It is NOT on scheduled time"); } printTime(now);}void printTime(DateTime time) {Serial.print("TIME: ");Serial.print(time.year(), DEC);Serial.print('/');Serial.print(time.month(), DEC);Serial.print('/');Serial.print(time.day(), DEC);Serial.print(" (");Serial.print(daysOfTheWeek[time.dayOfTheWeek()]);Serial.print(") ");Serial.print(time.hour(), DEC);Serial.print(':');Serial.print(time.minute(), DEC);Serial.print(':');Serial.println(time.second(), DEC);}
Arduino Nano Code – How to make weekly schedule
/* * This Arduino Nano code was developed by newbiely.com * * This Arduino Nano code is made available for public use without any restriction * * For comprehensive instructions and wiring diagrams, please visit: * https://newbiely.com/tutorials/arduino-nano/arduino-nano-ds1307-rtc-module */// Date and time functions using a DS1307 RTC connected via I2C and Wire lib#include <RTClib.h>// UNCHANGABLE PARAMATERS#define SUNDAY 0#define MONDAY 1#define TUESDAY 2#define WEDNESDAY 3#define THURSDAY 4#define FRIDAY 5#define SATURDAY 6// event on Monday, from 13:50 to 14:10uint8_t WEEKLY_EVENT_DAY = MONDAY;uint8_t WEEKLY_EVENT_START_HH = 13; // event start time: houruint8_t WEEKLY_EVENT_START_MM = 50; // event start time: minuteuint8_t WEEKLY_EVENT_END_HH = 14; // event end time: houruint8_t WEEKLY_EVENT_END_MM = 10; // event end time: minuteRTC_DS1307 rtc;char daysOfTheWeek[7][12] = {"Sunday","Monday","Tuesday","Wednesday","Thursday","Friday","Saturday"};voidsetup () {Serial.begin(9600);// SETUP RTC MODULEif (! rtc.begin()) {Serial.println("Couldn't find RTC");while (1); }// sets the RTC to the date & time on PC this sketch was compiled rtc.adjust(DateTime(F(__DATE__), F(__TIME__)));// sets the RTC with an explicit date & time, for example to set// January 21, 2021 at 3am you would call:// rtc.adjust(DateTime(2021, 1, 21, 3, 0, 0));}voidloop () {DateTimenow = rtc.now();if (now.dayOfTheWeek() == WEEKLY_EVENT_DAY &&now.hour() >= WEEKLY_EVENT_START_HH &&now.minute() >= WEEKLY_EVENT_START_MM &&now.hour() < WEEKLY_EVENT_END_HH &&now.minute() < WEEKLY_EVENT_END_MM) {Serial.println("It is on scheduled time");// TODO: write your code" } else {Serial.println("It is NOT on scheduled time"); } printTime(now);}void printTime(DateTime time) {Serial.print("TIME: ");Serial.print(time.year(), DEC);Serial.print('/');Serial.print(time.month(), DEC);Serial.print('/');Serial.print(time.day(), DEC);Serial.print(" (");Serial.print(daysOfTheWeek[time.dayOfTheWeek()]);Serial.print(") ");Serial.print(time.hour(), DEC);Serial.print(':');Serial.print(time.minute(), DEC);Serial.print(':');Serial.println(time.second(), DEC);}
Arduino Nano Code – How to make schedule on speficic date
/* * This Arduino Nano code was developed by newbiely.com * * This Arduino Nano code is made available for public use without any restriction * * For comprehensive instructions and wiring diagrams, please visit: * https://newbiely.com/tutorials/arduino-nano/arduino-nano-ds1307-rtc-module */// Date and time functions using a DS1307 RTC connected via I2C and Wire lib#include <RTClib.h>// UNCHANGABLE PARAMATERS#define SUNDAY 0#define MONDAY 1#define TUESDAY 2#define WEDNESDAY 3#define THURSDAY 4#define FRIDAY 5#define SATURDAY 6#define JANUARY 1#define FEBRUARY 2#define MARCH 3#define APRIL 4#define MAY 5#define JUNE 6#define JULY 7#define AUGUST 8#define SEPTEMBER 9#define OCTOBER 10#define NOVEMBER 11#define DECEMBER 12// event from 13:50 August 15, 2021 to 14:10 September 29, 2021DateTime EVENT_START(2021, AUGUST, 15, 13, 50);DateTime EVENT_END(2021, SEPTEMBER, 29, 14, 10);RTC_DS1307 rtc;char daysOfTheWeek[7][12] = {"Sunday","Monday","Tuesday","Wednesday","Thursday","Friday","Saturday"};voidsetup () {Serial.begin(9600);// SETUP RTC MODULEif (! rtc.begin()) {Serial.println("Couldn't find RTC");Serial.flush();while (1); }// sets the RTC to the date & time on PC this sketch was compiled rtc.adjust(DateTime(F(__DATE__), F(__TIME__)));// sets the RTC with an explicit date & time, for example to set// January 21, 2021 at 3am you would call:// rtc.adjust(DateTime(2021, 1, 21, 3, 0, 0));}voidloop () {DateTimenow = rtc.now();if (now.secondstime() >= EVENT_START.secondstime() &&now.secondstime() < EVENT_END.secondstime()) {Serial.println("It is on scheduled time");// TODO: write your code" } else {Serial.println("It is NOT on scheduled time"); } printTime(now);}void printTime(DateTime time) {Serial.print("TIME: ");Serial.print(time.year(), DEC);Serial.print('/');Serial.print(time.month(), DEC);Serial.print('/');Serial.print(time.day(), DEC);Serial.print(" (");Serial.print(daysOfTheWeek[time.dayOfTheWeek()]);Serial.print(") ");Serial.print(time.hour(), DEC);Serial.print(':');Serial.print(time.minute(), DEC);Serial.print(':');Serial.println(time.second(), DEC);}
Please feel free to share the link of this tutorial. However, Please do not use our content on any other websites. We invested a lot of effort and time to create the content, please respect our work!