Arduino Nano - LM35 Temperature Sensor

This tutorial instructs you how to use Arduino Nano to read the temperature from LM35 sensor. In detail, we will learn:

Hardware Preparation

1×Arduino Nano
1×USB A to Mini-B USB cable
1×LM35 Temperature Sensor
1×Breadboard
1×Jumper Wires
1×(Optional) 9V Power Adapter for Arduino Nano
1×(Recommended) Screw Terminal Adapter for Arduino Nano

Or you can buy the following sensor kits:

1×DIYables Sensor Kit (30 sensors/displays)
1×DIYables Sensor Kit (18 sensors/displays)
Disclosure: Some of the links provided in this section are Amazon affiliate links. We may receive a commission for any purchases made through these links at no additional cost to you. We appreciate your support.

Overview of LM35 Temperature Sensor

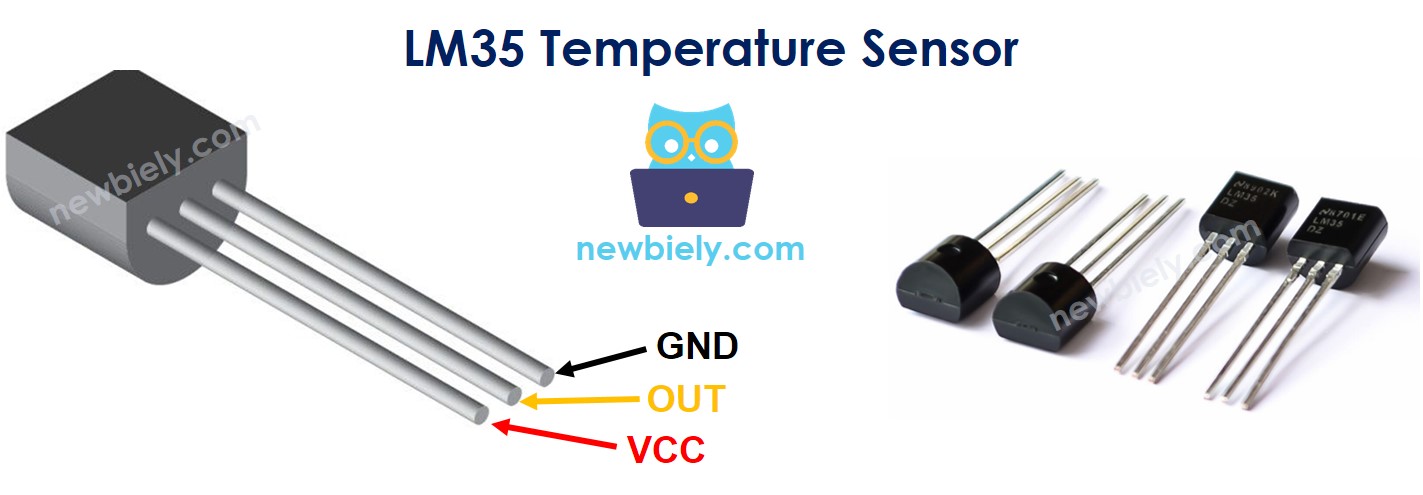
The LM35 Temperature Sensor Pinout

The LM35 temperature sensor has three pins:

  • GND pin: This should be connected to the ground (0V).
  • VCC pin: This should be connected to the VCC (5V).
  • OUT pin: This signal pin gives an output voltage that is linearly proportional to the temperature and should be connected to an analog pin on Arduino Nano.
LM35 temperature sensor pinout

How It Works

The LM35 produces a voltage that is linearly proportional to the Centigrade temperature. Its output scale factor is 10 mV/°C, which means that the temperature can be determined by dividing the voltage (in mV) at the output pin by 10.

Wiring Diagram

The wiring diagram between Arduino Nano and LM35 temperature sensor

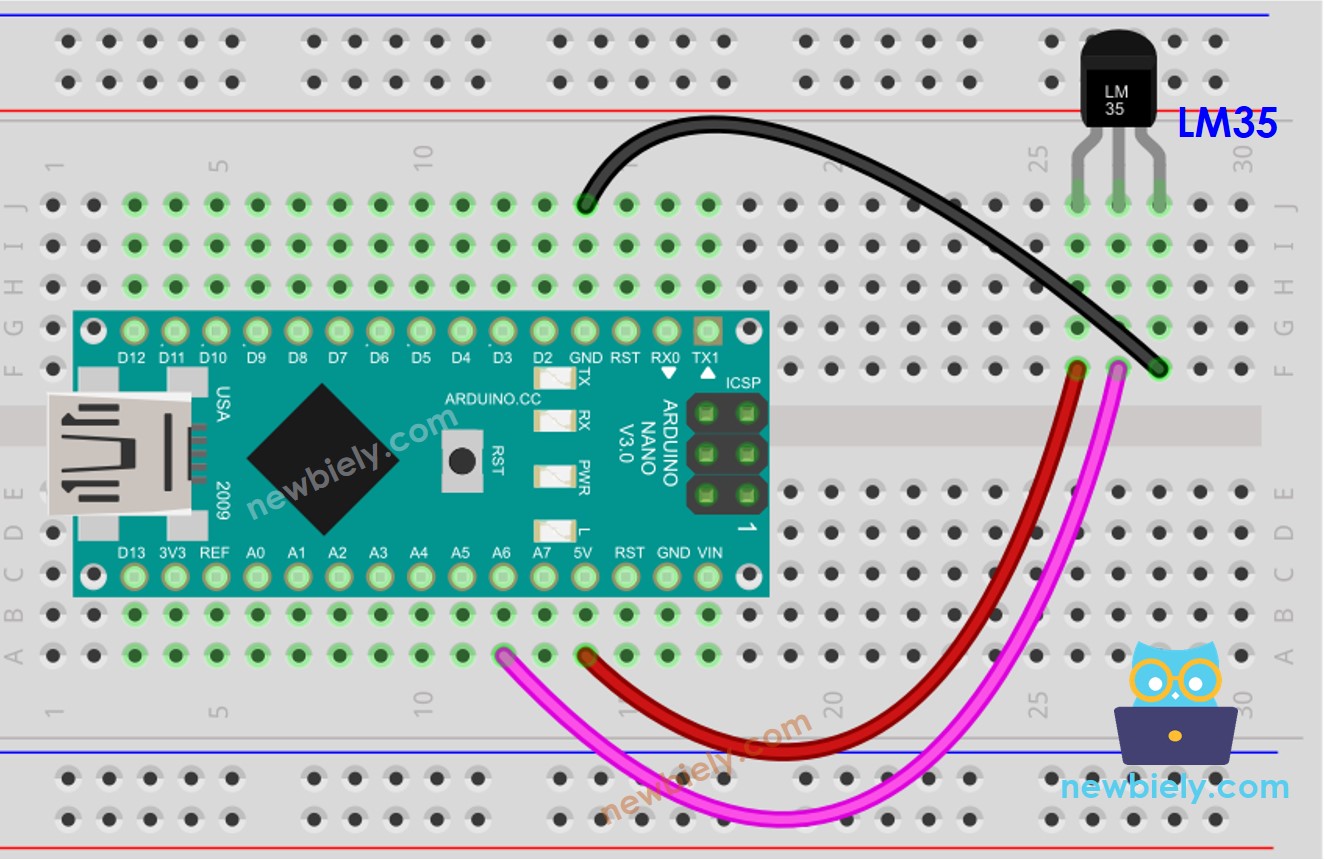
This image is created using Fritzing. Click to enlarge image

How To Program For LM35 Temperature Sensor

  • Obtain the ADC value from the temperature sensor by utilizing the analogRead() function.
int adcVal = analogRead(PIN_LM35);
  • Transform the ADC value into a voltage in millivolts.
float milliVolt = adcVal * (ADC_VREF_mV / ADC_RESOLUTION);
  • Transform the voltage into Celsius temperature.
float temperature_C = milliVolt / 10;
  • Optional: Convert Celsius to Fahrenheit.
float temperature_F = temperature_C * 9 / 5 + 32;

Arduino Nano Code

/* * This Arduino Nano code was developed by newbiely.com * * This Arduino Nano code is made available for public use without any restriction * * For comprehensive instructions and wiring diagrams, please visit: * https://newbiely.com/tutorials/arduino-nano/arduino-nano-lm35-temperature-sensor */ #define ADC_VREF_mV 5000.0 // in millivolt #define ADC_RESOLUTION 1024.0 #define PIN_LM35 A6 // The Arduino Nano pin connected to LM35 sensor void setup() { Serial.begin(9600); } void loop() { // get the ADC value from the temperature sensor int adcVal = analogRead(PIN_LM35); // convert the ADC value to voltage in millivolt float milliVolt = adcVal * (ADC_VREF_mV / ADC_RESOLUTION); // convert the voltage to the temperature in Celsius float temperature_C = milliVolt / 10; // convert the Celsius to Fahrenheit float temperature_F = temperature_C * 9 / 5 + 32; // print the temperature in the Serial Monitor: Serial.print("Temperature: "); Serial.print(temperature_C); // print the temperature in Celsius Serial.print("°C"); Serial.print(" ~ "); // separator between Celsius and Fahrenheit Serial.print(temperature_F); // print the temperature in Fahrenheit Serial.println("°F"); delay(1000); }

Detailed Instructions

  • Copy the code and open it in the Arduino IDE.
  • Click the Upload button in the IDE to send it to your Arduino Nano.
  • Hold the sensor in your hand.
  • Check out the result on the Serial Monitor.
COM6
Send
Temperature: 26.31°C ~ 79.36°F Temperature: 26.44°C ~ 79.59°F Temperature: 26.50°C ~ 79.70°F Temperature: 26.56°C ~ 79.81°F Temperature: 27.06°C ~ 80.71°F Temperature: 27.75°C ~ 81.95°F Temperature: 28.37°C ~ 83.07°F Temperature: 29.00°C ~ 84.20°F Temperature: 29.56°C ~ 85.21°F Temperature: 30.00°C ~ 86.00°F Temperature: 30.31°C ~ 86.56°F Temperature: 30.62°C ~ 87.12°F Temperature: 30.87°C ~ 87.57°F
Autoscroll Show timestamp
Clear output
9600 baud  
Newline  

Improving the Temperature Precision

In the code above, the ADC reference voltage is set to the default value of 5V to 5000mV. To increase the temperature resolution, the reference voltage can be changed to INTERNAL, which is 1.1V to 1100mV, using the analogReference() function.

This table displays the contrast between 5000mV and 1100mV reference voltages.

Vref(mV) 5000 mV (by default) 1100 mV (INTERNAL)
Reading Resolution 5000/1024 = 4.88 mV 1100/1024 = 1.07 mV
Temperature Resolution 0.488 °C 0.107 °C
Temperature Range 0 to 500 °C 0 to 110 °C

Arduino Nano Code

/* * This Arduino Nano code was developed by newbiely.com * * This Arduino Nano code is made available for public use without any restriction * * For comprehensive instructions and wiring diagrams, please visit: * https://newbiely.com/tutorials/arduino-nano/arduino-nano-lm35-temperature-sensor */ #define ADC_VREF_mV 1100.0 // in millivolt #define ADC_RESOLUTION 1024.0 #define PIN_LM35 A6 // The Arduino Nano pin connected to LM35 sensor void setup() { Serial.begin(9600); // switch to Internal 1.1V Reference analogReference(INTERNAL); } void loop() { // get the ADC value from the temperature sensor int adcVal = analogRead(PIN_LM35); // convert the ADC value to voltage in millivolt float milliVolt = adcVal * (ADC_VREF_mV / ADC_RESOLUTION); // ADC_VREF_mV = 1100 mV // convert the voltage to the temperature in Celsius float temperature_C = milliVolt / 10; // convert the Celsius to Fahrenheit float temperature_F = temperature_C * 9 / 5 + 32; // print the temperature in the Serial Monitor: Serial.print("Temperature: "); Serial.print(temperature_C); // print the temperature in Celsius Serial.print("°C"); Serial.print(" ~ "); // separator between Celsius and Fahrenheit Serial.print(temperature_F); // print the temperature in Fahrenheit Serial.println("°F"); delay(1000); }

Video Tutorial

※ OUR MESSAGES

  • As freelancers, We are AVAILABLE for HIRE. See how to outsource your project to us
  • Please feel free to share the link of this tutorial. However, Please do not use our content on any other websites. We invested a lot of effort and time to create the content, please respect our work!