Arduino Nano - Dotstar LED Strip
In this tutorial, we are going to learn how to use Arduino Nano to control DotStar RGB LED strip. In detail, we will learn:
- How to connect Arduino Nano to the DotStar LED Strip
- How to program Arduino Nano control the color and brightness of each individual LED on the led strip
- How to program Arduino Nano to create the comet effect for the DotStar LED strip
Hardware Preparation
Or you can buy the following kits:
| 1 | × | DIYables Sensor Kit (18 sensors/displays) |
Disclosure: Some of the links provided in this section are Amazon affiliate links. We may receive a commission for any purchases made through these links at no additional cost to you.
Additionally, some of these links are for products from our own brand, DIYables .
Additionally, some of these links are for products from our own brand, DIYables .
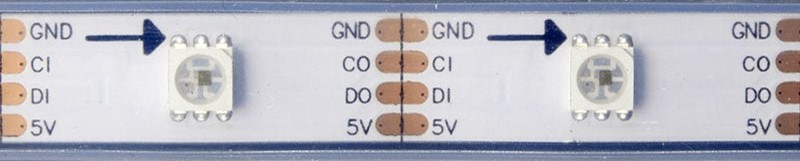
Overview of DotStar RGB LED Strip
Pinout
the DotStar RGB LED Strip has three pins:
- GND pin: needs to be connected to GND (0V)
- CI pin: Clock pin that receives the clock signal. It should be connected to an Arduino Nano pin.
- DI pin: Data pin that receives the control signal. It should be connected to an Arduino Nano pin.
- 5V pin: needs to be connected to 5V of external power supply
Wiring Diagram
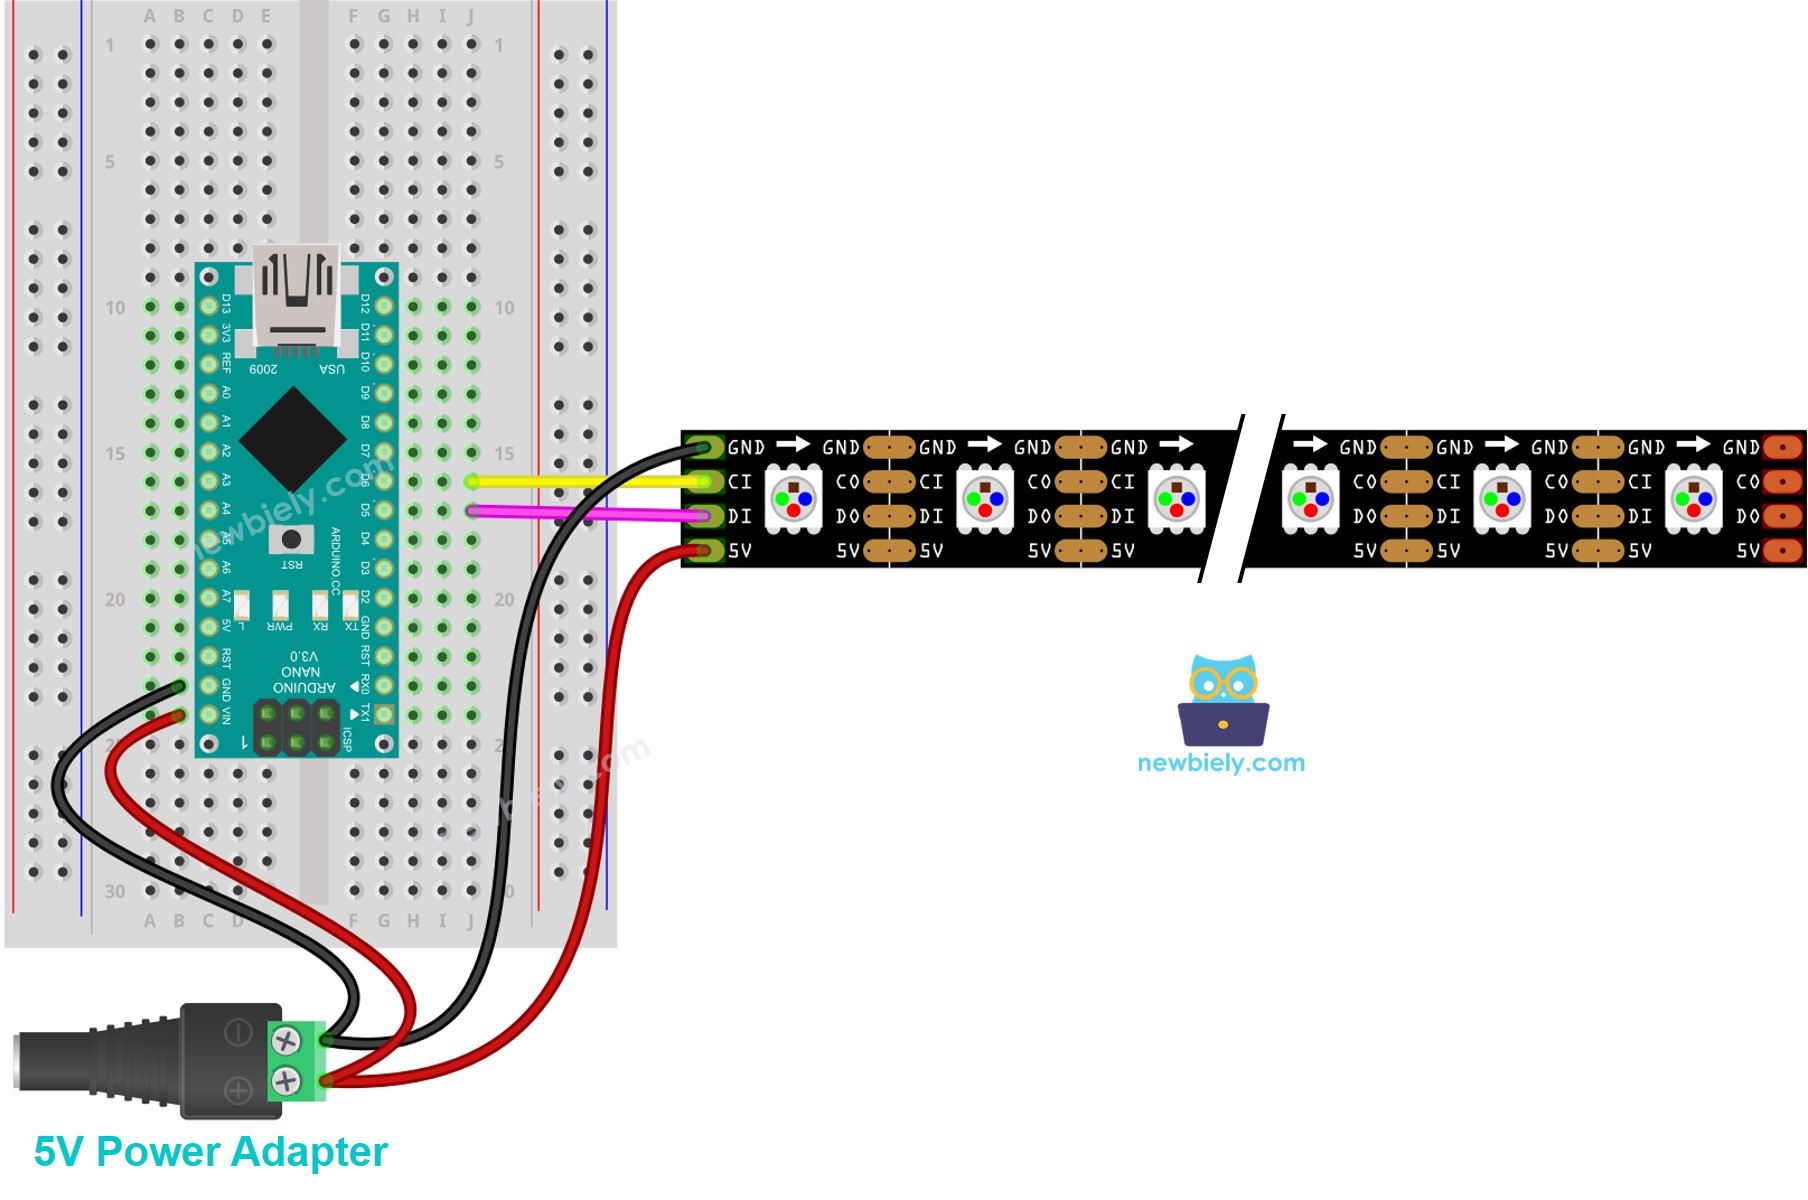
This image is created using Fritzing. Click to enlarge image
See The best way to supply power to the Arduino Nano and other components.
How To Program For DotStar RGB LED Strip
- Include a DotStar library
#include <Adafruit_DotStar.h>
#include <SPI.h> // COMMENT OUT THIS LINE FOR GEMMA OR TRINKET
- Declare a DotStar object
#define NUMPIXELS 144 // Number of LEDs in strip
// Here's how to control the LEDs from any two pins:
#define DATAPIN D5 // The Arduino Nano pin
#define CLOCKPIN D6 // The Arduino Nano pin
Adafruit_DotStar strip(NUMPIXELS, DATAPIN, CLOCKPIN, DOTSTAR_BRG);
- Initializes the DotStar
strip.begin(); // Initialize pins for output
strip.setBrightness(255);
strip.show(); // Turn all LEDs off ASAP
- Set color (r. g, b) of each individual LED (called pixel) .
strip.setPixelColor(pixel, g, r, b);
- Set brightness of all strip.
strip.setBrightness(100); // a value from 0 to 255
※ NOTE THAT:
- DotStar.setBrightness() is used for all pixel on LED strip. To set the brightness for each individual pixel, we can scale the color value.
- The values set by DotStar.setBrightness() and DotStar.setPixelColor() only take effect when DotStar.show() is called.
Arduino Nano Code
The below code turns pixels to red one by one with a delay between each pixel
/*
* This Arduino Nano code was developed by newbiely.com
*
* This Arduino Nano code is made available for public use without any restriction
*
* For comprehensive instructions and wiring diagrams, please visit:
* https://newbiely.com/tutorials/arduino-nano/arduino-nano-dotstar-led-strip
*/
#include <Adafruit_DotStar.h>
#include <SPI.h> // COMMENT OUT THIS LINE FOR GEMMA OR TRINKET
#define NUMPIXELS 144 // Number of LEDs in strip
// Here's how to control the LEDs from any two pins:
#define DATAPIN D5 // The Arduino Nano pin
#define CLOCKPIN D6 // The Arduino Nano pin
Adafruit_DotStar strip(NUMPIXELS, DATAPIN, CLOCKPIN, DOTSTAR_BRG);
void setup() {
Serial.begin(9600);
strip.begin(); // INITIALIZE NeoPixel strip object (REQUIRED)
strip.show(); // Turn OFF all pixels ASAP
strip.setBrightness(255);
}
void loop() {
for (int pixel = 0; pixel < NUMPIXELS; pixel++) {
// red color
int r = 255; // CHANGE COLOR AS YOUR DESIRE
int g = 0; // CHANGE COLOR AS YOUR DESIRE
int b = 0; // CHANGE COLOR AS YOUR DESIRE
strip.clear(); // turn off all pixel
strip.setPixelColor(pixel, g, r, b); // turn on a single pixel
strip.show();
delay(1000); // keep each pixel on 1 seconds
}
}
Detailed Instructions
- Wire the components according to the provided diagram.
- Connect the Arduino Nano board to your computer using a USB cable.
- Launch the Arduino IDE on your computer.
- Select the Arduino Nano) board and its corresponding COM port.
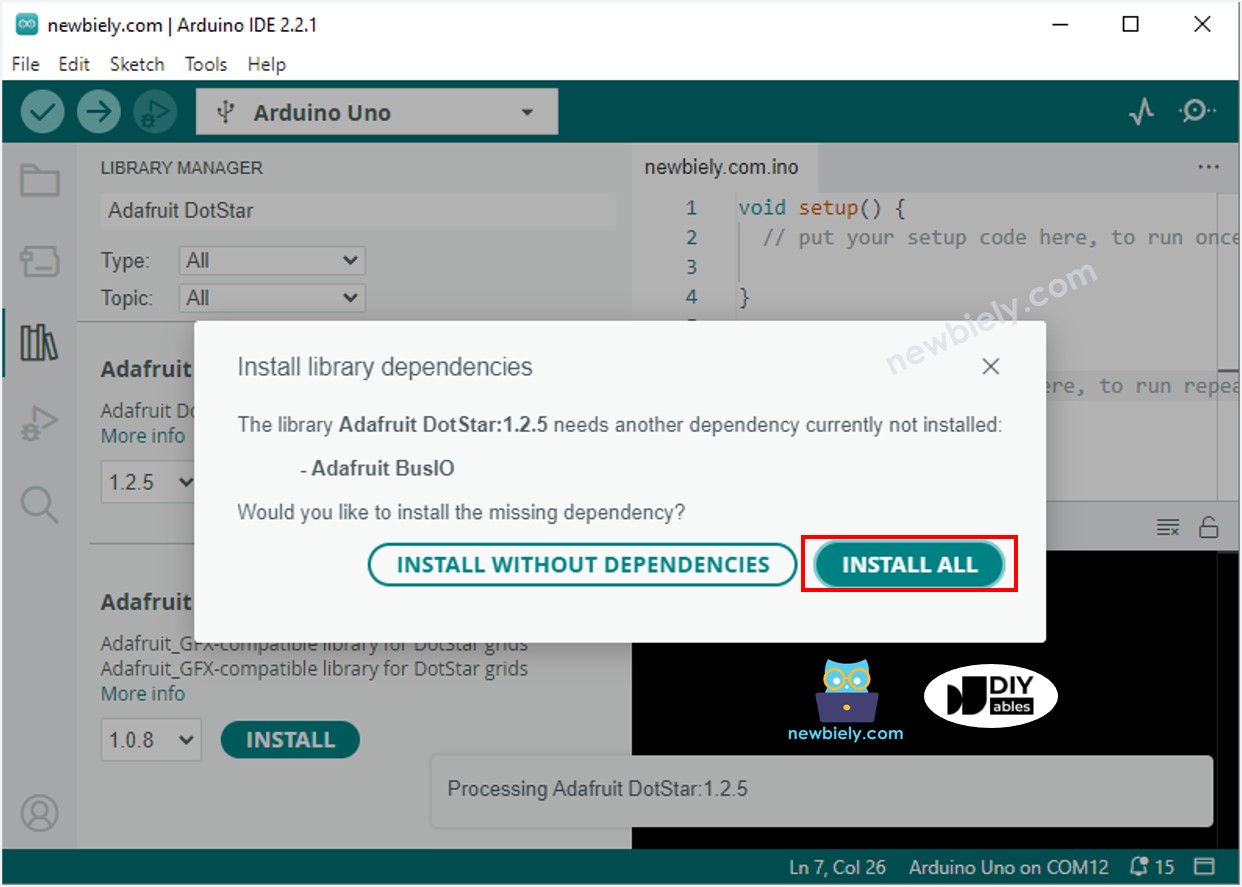
- Open the Library Manager by clicking on the Library Manager icon on the left navigation bar of Arduino IDE
- Search “Adafruit DotStar”, then find the DotStar library by Adafruit
- Click Install button to install DotStar library.

- You will be asked to install the dependency. Click Install All button.
- Copy the above code and open with Arduino IDE
- Click Upload button on Arduino IDE to upload code to Arduino Nano
- See the LED effect
Arduino Nano Code - LED Strip Comet Effect
The below code provides the comet effect for the DotStar LED strip
/*
* This Arduino Nano code was developed by newbiely.com
*
* This Arduino Nano code is made available for public use without any restriction
*
* For comprehensive instructions and wiring diagrams, please visit:
* https://newbiely.com/tutorials/arduino-nano/arduino-nano-dotstar-led-strip
*/
#include <Adafruit_DotStar.h>
#include <SPI.h> // COMMENT OUT THIS LINE FOR GEMMA OR TRINKET
#define COMET_LENGTH_ALL 30 // in pixel COMET_LENGTH_ALL = COMET_LENGTH_BODY + COMET_LENGTH_HEAD
#define COMET_LENGTH_BODY 25 // in pixel
#define COMET_LENGTH_HEAD 5 // in pixel
#define TWO_COMET_DISTANCE 10 // in pixel
#define COMET_SPEED 2000 // in millisecond, the time need to move through 144 pixels
#define COMET_COLOR_R 204 // color
#define COMET_COLOR_G 255 // color
#define COMET_COLOR_B 255 // color
#define COMET_BRIGHTNESS_MIN 1
#define COMET_BRIGHTNESS_MAX 200
#define COMET_BRIGHTNESS_HEAD 80
#define FLICKER_MAX 255
#define FLICKER_MIN 100
#define FLICKER_SPEED 800 // in millisecond
#define NUMPIXELS 144 // Number of LEDs in strip
// Here's how to control the LEDs from any two pins:
#define DATAPIN D5 // The Arduino Nano pin
#define CLOCKPIN D6 // The Arduino Nano pin
Adafruit_DotStar strip(NUMPIXELS, DATAPIN, CLOCKPIN, DOTSTAR_BRG);
int pos_head = 0;
unsigned long cometTimeStart;
unsigned long flickerTimeStart;
unsigned long progress;
unsigned long cometBrightness;
unsigned long flickerBrightness;
unsigned long TIME_PER_PIXEL;
void setup() {
Serial.begin(9600);
strip.begin(); // INITIALIZE NeoPixel strip object (REQUIRED)
strip.show(); // Turn OFF all pixels ASAP
strip.setBrightness(255);
TIME_PER_PIXEL = map(1, 0, NUMPIXELS, 0, COMET_SPEED);
cometTimeStart = millis();
flickerTimeStart = millis();
}
void loop() {
progress = millis() - flickerTimeStart;
if (progress >= 2 * FLICKER_SPEED) {
progress = 2 * FLICKER_SPEED;
flickerTimeStart = millis();
}
if (progress > FLICKER_SPEED)
progress = 2 * FLICKER_SPEED - progress;
flickerBrightness = map(progress, 0, FLICKER_SPEED, FLICKER_MIN, FLICKER_MAX);
strip.setBrightness(flickerBrightness);
progress = millis() - cometTimeStart;
if (progress >= TIME_PER_PIXEL) {
pos_head++;
pos_head %= (COMET_LENGTH_ALL + TWO_COMET_DISTANCE);
int offset = COMET_LENGTH_ALL - pos_head;
for (int pixel = 0; pixel < NUMPIXELS; pixel++) {
int pos_offset = pixel + offset;
pos_offset %= (COMET_LENGTH_ALL + TWO_COMET_DISTANCE);
if (pos_offset < COMET_LENGTH_BODY)
cometBrightness = map(pos_offset, 0, COMET_LENGTH_BODY - 1, COMET_BRIGHTNESS_MIN, COMET_BRIGHTNESS_MAX);
else if (pos_offset >= COMET_LENGTH_BODY && pos_offset < COMET_LENGTH_ALL)
cometBrightness = map(pos_offset - COMET_LENGTH_BODY + 1, 0, COMET_LENGTH_ALL - COMET_LENGTH_BODY, COMET_BRIGHTNESS_MAX, COMET_BRIGHTNESS_HEAD);
else
cometBrightness = 0;
int r = (COMET_COLOR_R * cometBrightness) >> 8;
int g = (COMET_COLOR_G * cometBrightness) >> 8;
int b = (COMET_COLOR_B * cometBrightness) >> 8;
strip.setPixelColor(pixel, g, r, b);
}
strip.show();
cometTimeStart = millis(); // new circle
}
}
※ NOTE THAT:
For any other LED effects, we offer the paid programming service