Arduino Nano - Ultrasonic Sensor - OLED
This tutorial instructs you how to use Arduino Nano obtain the distance from an ultrasonic sensor and show it on an OLED display.
Hardware Preparation
Or you can buy the following kits:
| 1 | × | DIYables Sensor Kit (18 sensors/displays) |
Disclosure: Some of the links provided in this section are Amazon affiliate links. We may receive a commission for any purchases made through these links at no additional cost to you.
Additionally, some of these links are for products from our own brand, DIYables .
Additionally, some of these links are for products from our own brand, DIYables .
Buy Note: If you want a bigger OLED display, use the 2.42 inch OLED Display 128x64 .
Overview of OLED and Ultrasonic Sensor
If you are unfamiliar with OLED and Ultrasonic Sensor (including pinout, functionality, and programming), the following tutorials can provide you with the necessary information:
- Arduino Nano - OLED tutorial
- Arduino Nano - Ultrasonic Sensor tutorial
Wiring Diagram
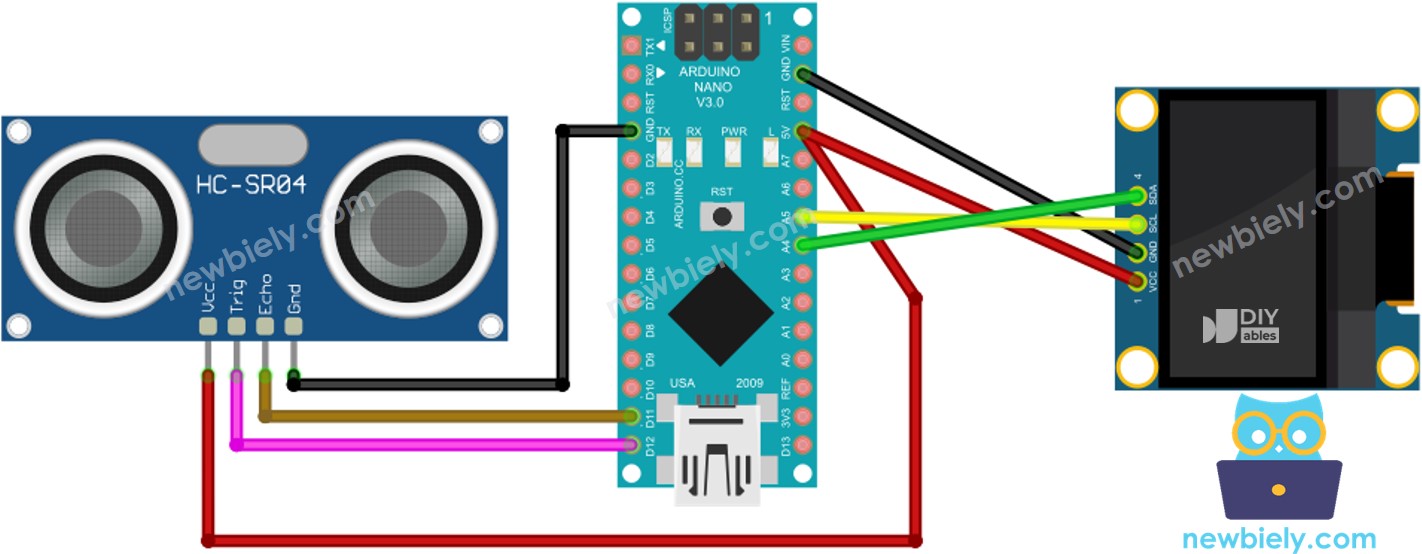
This image is created using Fritzing. Click to enlarge image
See The best way to supply power to the Arduino Nano and other components.
Arduino Nano Code - Ultrasonic Sensor - OLED
/*
* This Arduino Nano code was developed by newbiely.com
*
* This Arduino Nano code is made available for public use without any restriction
*
* For comprehensive instructions and wiring diagrams, please visit:
* https://newbiely.com/tutorials/arduino-nano/arduino-nano-ultrasonic-sensor-oled
*/
#include <Wire.h>
#include <Adafruit_GFX.h>
#include <Adafruit_SSD1306.h>
#define TRIG_PIN 12 // The Arduino Nano pin connected to TRIG pin of ultrasonic sensor
#define ECHO_PIN 11 // The Arduino Nano pin connected to ECHO pin of ultrasonic sensor
#define OLED_WIDTH 128 // OLED display width, in pixels
#define OLED_HEIGHT 64 // OLED display height, in pixels
Adafruit_SSD1306 oled(OLED_WIDTH, OLED_HEIGHT, &Wire, -1); // create SSD1306 display object connected to I2C
String distance_str;
void setup() {
Serial.begin(9600);
// initialize OLED display with address 0x3C for 128x64
if (!oled.begin(SSD1306_SWITCHCAPVCC, 0x3C)) {
Serial.println(F("SSD1306 allocation failed"));
while (true);
}
delay(2000); // wait for initializing
oled.clearDisplay(); // clear display
oled.setTextSize(2); // text size
oled.setTextColor(WHITE); // text color
oled.setCursor(0, 10); // position to display
distance_str.reserve(10); // to avoid fragmenting memory when using String
}
void loop() {
// Produce a 10-microsecond pulse to the TRIG pin.
digitalWrite(TRIG_PIN, HIGH);
delayMicroseconds(10);
digitalWrite(TRIG_PIN, LOW);
// Measure the pulse duration from the ECHO pin
long duration_us = pulseIn(ECHO_PIN, HIGH);
// calculate the distance
float distance_cm = 0.017 * duration_us;
// print the value to Serial Monitor
Serial.print("distance: ");
Serial.print(distance_cm);
Serial.println(" cm");
distance_str = String(distance_cm, 2); // two decimal places
distance_str += " cm";
Serial.println(distance_str); // print the temperature in Celsius to Serial Monitor
oled_display_center(distance_str); // display temperature on OLED
}
void oled_display_center(String text) {
int16_t x1;
int16_t y1;
uint16_t width;
uint16_t height;
oled.getTextBounds(text, 0, 0, &x1, &y1, &width, &height);
// center the display both horizontally and vertically
oled.clearDisplay(); // clear display
oled.setCursor((OLED_WIDTH - width) / 2, (OLED_HEIGHT - height) / 2);
oled.println(text); // text to display
oled.display();
}
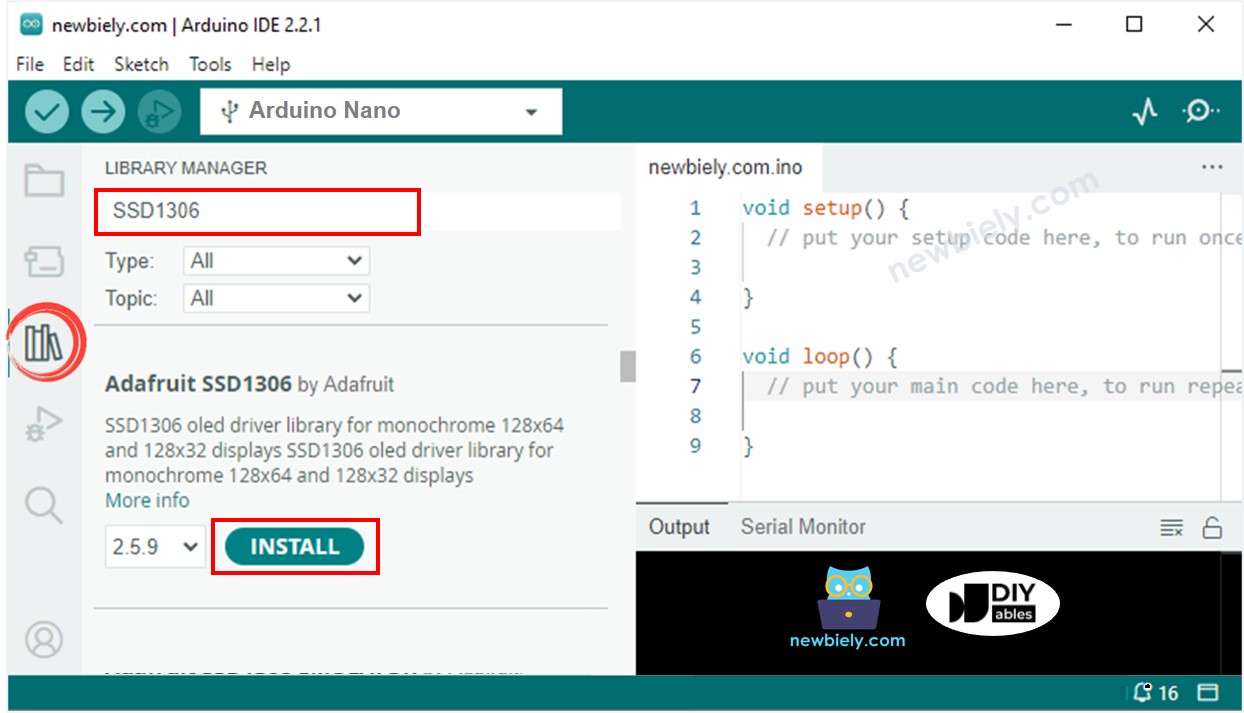
Detailed Instructions
- Click to the Libraries icon on the left bar of the Arduino IDE.
- Search for “SSD1306” and locate the SSD1306 library provided by Adafruit.
- Press the Install button to complete the installation.
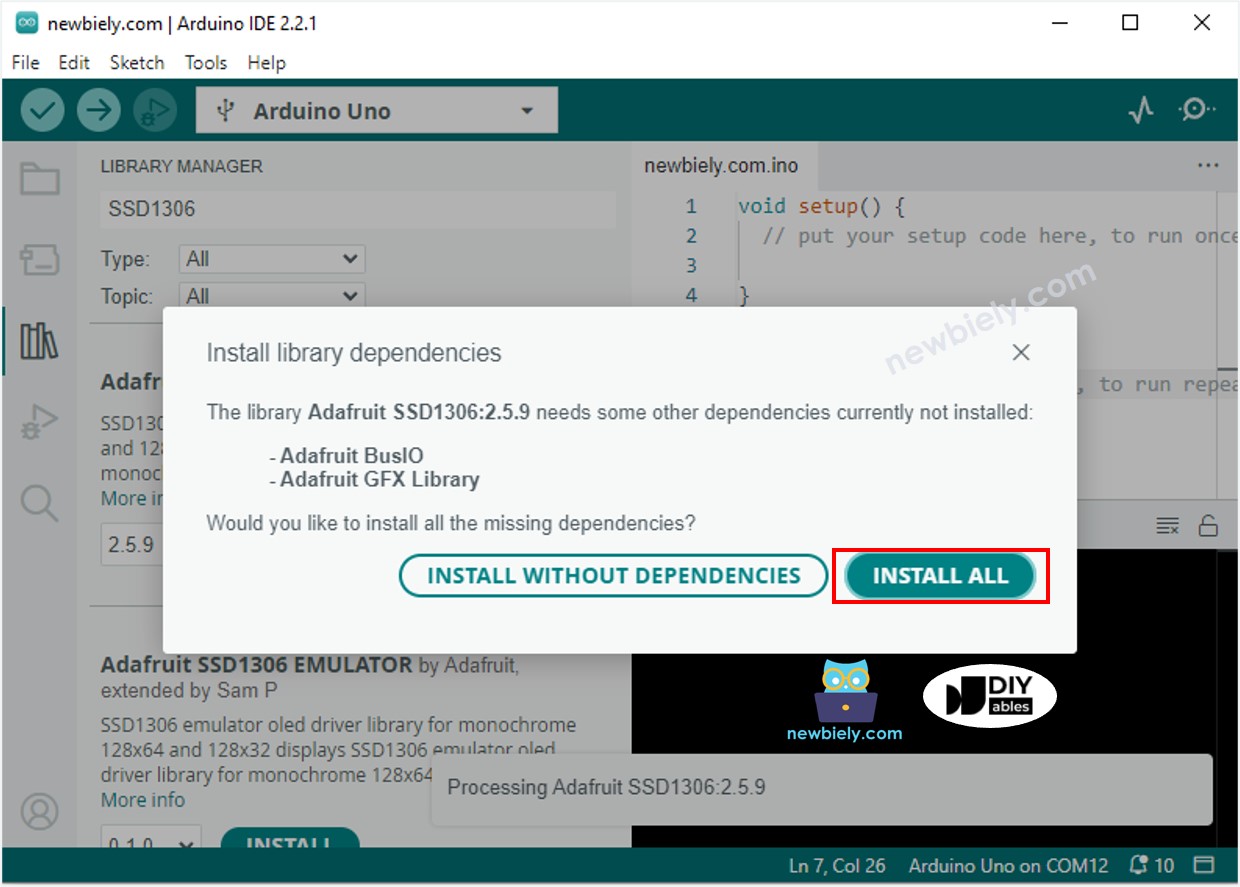
- You will be prompted to install additional library dependencies.
- To install them all at once, click the Install All button.
- Copy the code and open it with the Arduino IDE.
- Click the Upload button on the Arduino IDE to compile and upload the code to the Arduino Nano.
- Move your hand in front of the sensor.
- Check the result on the OLED and the Serial Monitor.
※ NOTE THAT:
This code will horizontally and vertically center the text on an OLED display. For more information, please refer to How to vertical/horizontal center on OLED.