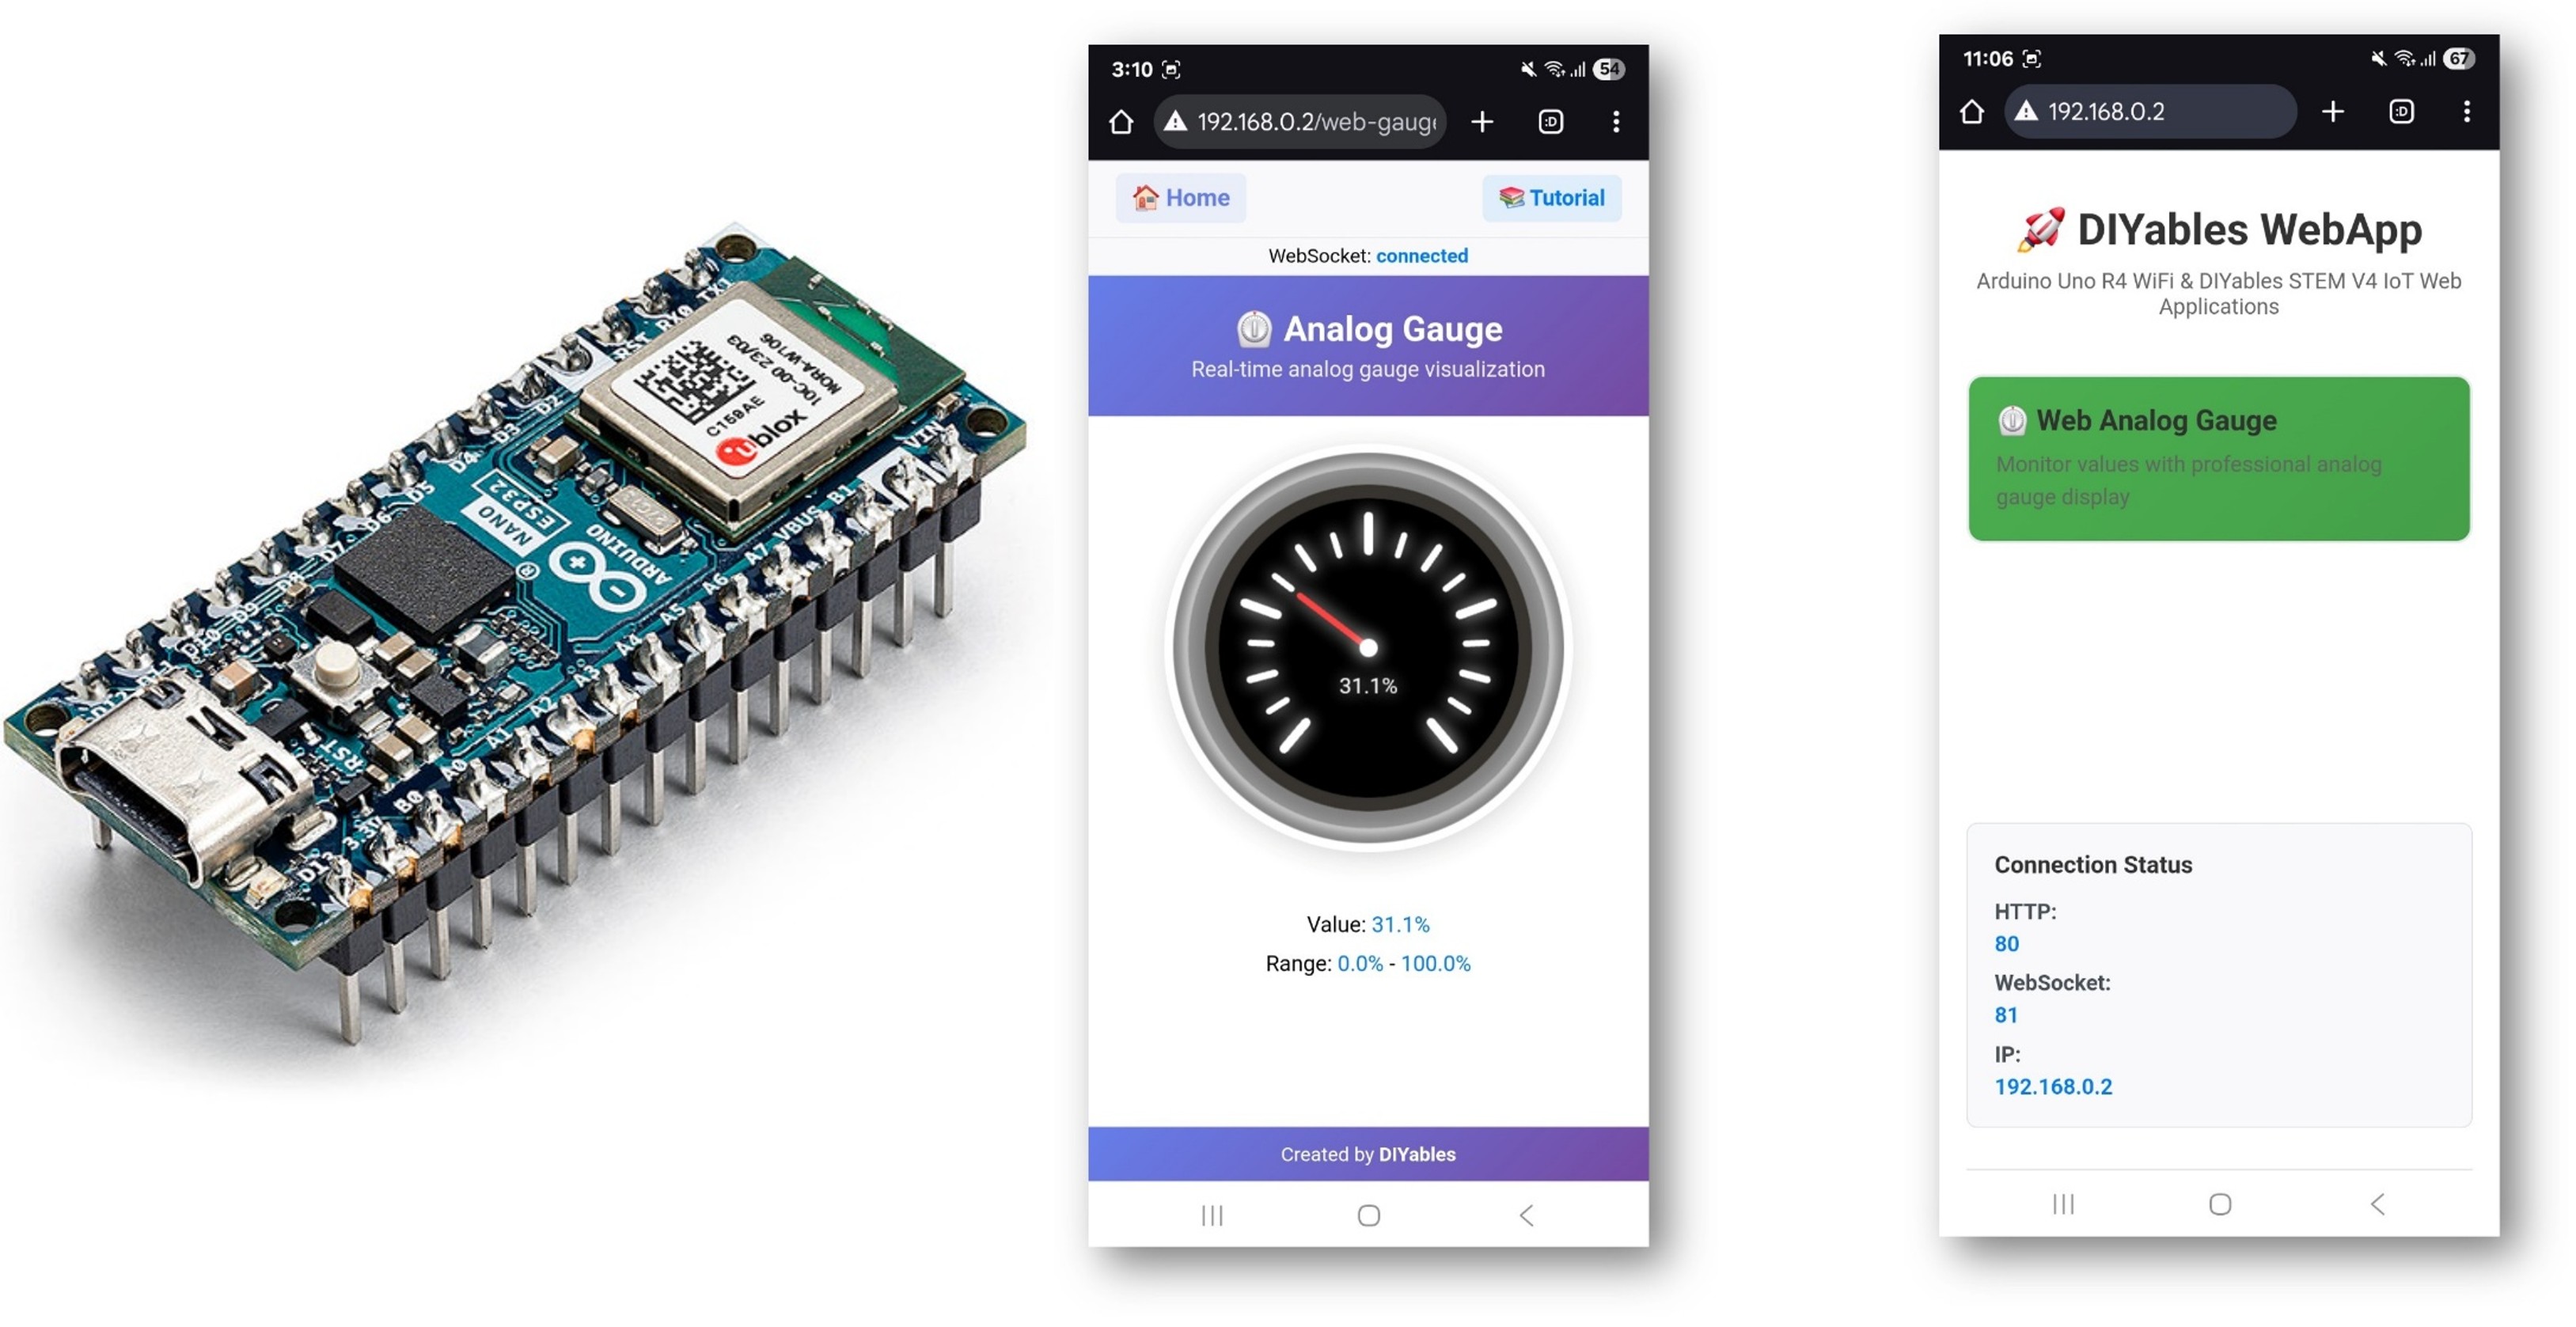
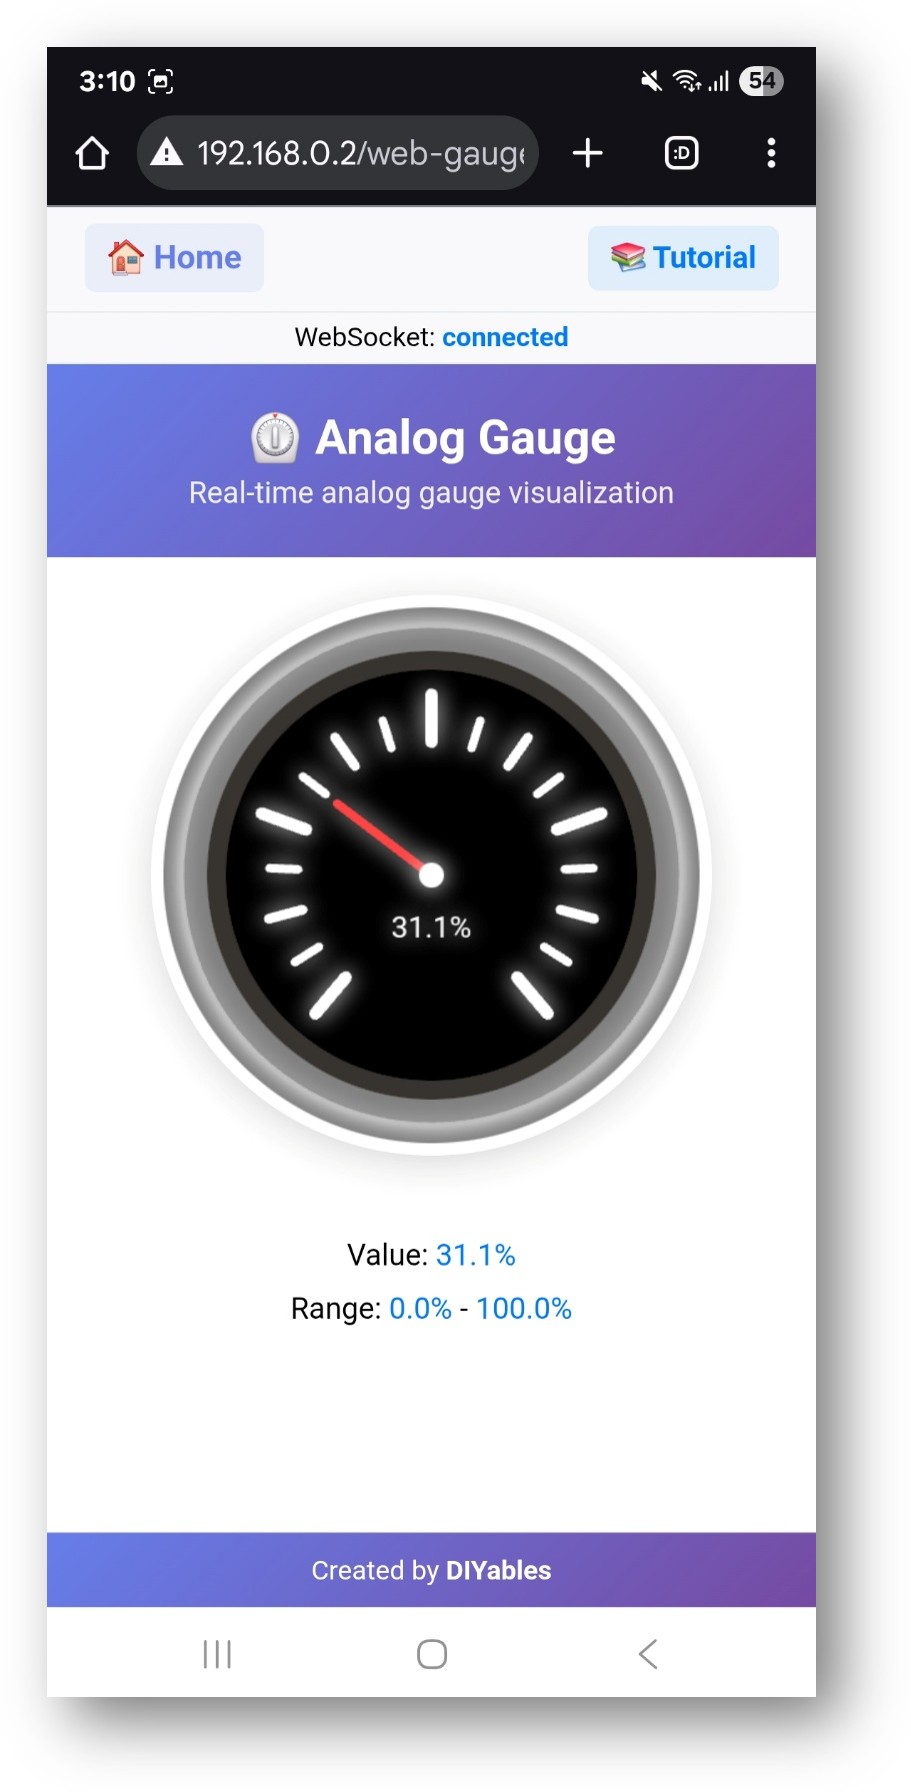
This tutorial covers the DIYablesWebAnalogGaugePage class from the DIYables ESP32 WebApps Library. The page renders a circular gauge in the browser and receives value updates from the Arduino Nano ESP32 over WebSocket. The gauge range, units, and decimal precision are defined in the constructor — the browser reads this configuration automatically.
Watch this step-by-step video tutorial demonstrating how to use a potentiometer with the Web Analog Gauge app:
What This Tutorial Covers
Configuring a gauge page with a custom range and unit label
Sending sensor readings to the browser on demand using a callback
Streaming continuous gauge updates from the main loop
Integrating a potentiometer as the analog input source
Disclosure: Some of the links provided in this section are Amazon affiliate links. We may receive a commission for any purchases made through these links at no additional cost to you. Additionally, some of these links are for products from our own brand, DIYables .
Connect the Arduino Nano ESP32 board to your computer using a USB cable.
Launch the Arduino IDE on your computer.
Select the appropriate board (e.g. Arduino Nano ESP32) and COM port.
Navigate to the Libraries icon on the left bar of the Arduino IDE.
Search "DIYables ESP32 WebApps", then find the DIYables ESP32 WebApps Library by DIYables
Click Install button to install the library.
Search for DIYables ESP32 WebApps created by DIYables and click the Install button.
Newbiely | Arduino IDE 2.3.8
──
☐
✕
File
Edit
Sketch
Tools
Help
Arduino Nano ESP32
Library Manager
DIYables ESP32 WebApps
Type:
All
Topic:
All
DIYables ESP32 WebAppsby DIYables
A comprehensive library designed for ESP32 that provides multiple professional web applications including Web Monitor, Chat, Digital Pin Control, Sliders, Joystick, Analog Gauge, Rotator Control, and Temperature Display via WebSocket communication. Features modular architecture for memory efficiency, automatic config handling, and perfect for IoT projects, robotics, sensor monitoring, servo/stepper control, temperature monitoring, and remote ESP32 control.
More info
1.0.1
INSTALL
Newbiely.ino
···
1
voidsetup() {
Output
Serial Monitor
Ln 1, Col 1
Arduino Nano ESP32 on COM15
1
You will be asked for installing some other library dependencies
Click Install All button to install all library dependencies.
On Arduino IDE, Go to File Examples DIYables ESP32 WebApps WebAnalogGauge example, or copy the above code and paste it to the editor of Arduino IDE
/* * DIYables WebApp Library - Web Analog Gauge Example * * This Serial.println("\nWebAnalogGauge is ready!"); Serial.print("IP Address: "); Serial.println(webAppsServer.getLocalIP()); Serial.println("Open your web browser and navigate to:"); Serial.print("1. http://"); Serial.print(webAppsServer.getLocalIP()); Serial.println("/ (Home page)"); Serial.print("2. http://"); Serial.print(webAppsServer.getLocalIP()); Serial.println("/webanalogGauge (Analog Gauge)"); Serial.println("\nSimulating sensor data...");monstrates the Web Analog Gauge application: * - Real-time analog gauge visualization * - Simulated sensor data with smooth animation * - WebSocket communication for live updates * - Beautiful analog gauge with tick marks and smooth pointer movement * * Features: * - Automatic gauge value simulation * - Smooth animation between values * - Range: 0° to 280° (customizable) * - Real-time WebSocket updates * - Professional analog gauge appearance * * Hardware: ESP32 Boards * * Setup: * 1. Update WiFi credentials below * 2. Upload the sketch to your Arduino * 3. Open Serial Monitor to see the IP address * 4. Navigate to http://[esp32-ip]/web-gauge in your web browser */#include <DIYables_ESP32_Platform.h>#include <DIYablesWebApps.h>// WiFi credentials - UPDATE THESE WITH YOUR NETWORKconstchar WIFI_SSID[] = "YOUR_WIFI_SSID";constchar WIFI_PASSWORD[] = "YOUR_WIFI_PASSWORD";// Create WebApp server and page instancesESP32ServerFactory serverFactory;DIYablesWebAppServerwebAppsServer(serverFactory, 80, 81);DIYablesHomePage homePage;// Gauge configuration constantsconstfloat GAUGE_MIN_VALUE = 0.0;constfloat GAUGE_MAX_VALUE = 100.0;constString GAUGE_UNIT = "%";DIYablesWebAnalogGaugePage webAnalogGaugePage(GAUGE_MIN_VALUE, GAUGE_MAX_VALUE, GAUGE_UNIT); // Range: 0-100%// Other examples:// DIYablesWebAnalogGaugePage webAnalogGaugePage(-50.0, 150.0, "°C"); // Temperature: -50°C to 150°C// DIYablesWebAnalogGaugePage webAnalogGaugePage(0.0, 1023.0, ""); // Analog sensor: 0-1023 (no unit)// DIYablesWebAnalogGaugePage webAnalogGaugePage(0.0, 5.0, "V"); // Voltage: 0-5V// Simulation variablesunsignedlong lastUpdateTime = 0;constunsignedlong UPDATE_INTERVAL = 500; // Update every 500ms (0.5 second)constfloat STEP_SIZE = 1.0; // Step size for simulationfloat currentGaugeValue = GAUGE_MIN_VALUE; // Start at minimum valuefloatstep = STEP_SIZE; // Positive step means increasing, negative means decreasingvoidsetup() {Serial.begin(9600);delay(1000);Serial.println("DIYables ESP32 WebApp - Web Analog Gauge Example");// Add web applications to the serverwebAppsServer.addApp(&homePage);webAppsServer.addApp(&webAnalogGaugePage);// Optional: Add 404 page for better user experiencewebAppsServer.setNotFoundPage(DIYablesNotFoundPage());// Start the WebApp serverif (!webAppsServer.begin(WIFI_SSID, WIFI_PASSWORD)) {while (1) {Serial.println("Failed to start WebApp server!");delay(1000); } } setupCallbacks();}void setupCallbacks() {// Handle gauge value requests (when web page loads/reconnects) webAnalogGaugePage.onGaugeValueRequest([]() { webAnalogGaugePage.sendToWebAnalogGauge(currentGaugeValue);Serial.println("Web client requested gauge value - Sent: " + String(currentGaugeValue, 1) + GAUGE_UNIT); });}voidloop() {// Handle WebApp server communicationswebAppsServer.loop();// Update gauge with simulated sensor dataif (millis() - lastUpdateTime >= UPDATE_INTERVAL) { lastUpdateTime = millis();Serial.println("Updating gauge value..."); // Debug message// Simple linear simulation: step changes direction at boundaries currentGaugeValue += step;// Change direction when reaching boundariesif (currentGaugeValue >= GAUGE_MAX_VALUE || currentGaugeValue <= GAUGE_MIN_VALUE) {step *= -1; // Reverse direction }// Ensure value stays within bounds (safety check)if (currentGaugeValue < GAUGE_MIN_VALUE) currentGaugeValue = GAUGE_MIN_VALUE;if (currentGaugeValue > GAUGE_MAX_VALUE) currentGaugeValue = GAUGE_MAX_VALUE;// Send the new value to all connected web clients webAnalogGaugePage.sendToWebAnalogGauge(currentGaugeValue);// Print to serial for debuggingSerial.println("Gauge: " + String(currentGaugeValue, 1) + GAUGE_UNIT + " (" + (step > 0 ? "↑" : "↓") + ")"); }delay(10);}
Click Upload button on Arduino IDE to upload code to Arduino Nano ESP32
Open the Serial Monitor
The Serial Monitor output should resemble the following:
Newbiely | Arduino IDE 2.3.8
──
☐
✕
File
Edit
Sketch
Tools
Help
Arduino Nano ESP32
Newbiely.ino
···
8Serial.println("Hello World!");
Output
Serial Monitor
Message (Enter to send message to 'Arduino Nano ESP32' on 'COM15')
New Line
9600 baud
DIYables WebApp - Web Analog Gauge Example
INFO: Added app /
INFO: Added app /web-gauge
DIYables WebApp Library
Platform: Arduino Nano ESP32
Network connected!
IP address: 192.168.0.2
HTTP server started on port 80
Configuring WebSocket server callbacks...
WebSocket server started on port 81
WebSocket URL: ws://192.168.0.2:81
WebSocket server started on port 81
==========================================
DIYables WebApp Ready!
==========================================
Web Interface: http://192.168.0.2
WebSocket: ws://192.168.0.2:81
Available Applications:
Home Page: http://192.168.0.2/
Web Analog Gauge: http://192.168.0.2/web-gauge
==========================================
Ln 11, Col 1
Arduino Nano ESP32 on COM15
2
If nothing appears, press the reset button on the board.
Enter the IP address shown in the Serial Monitor into a browser on a device on the same network.
Example: http://192.168.0.2
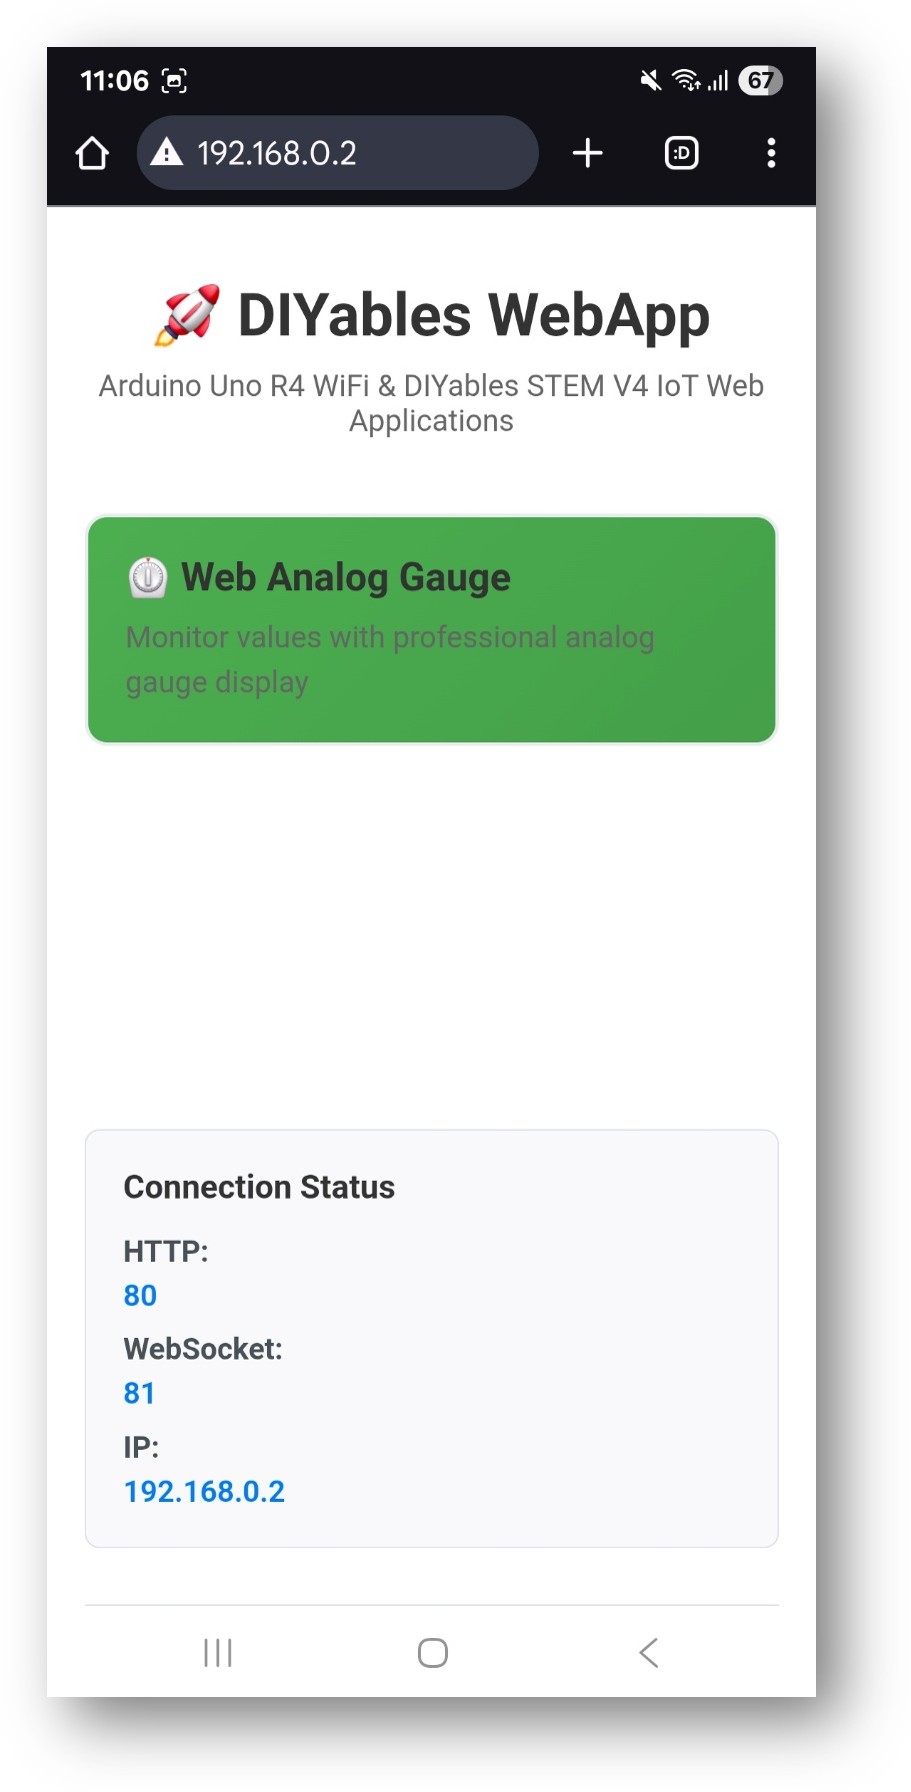
The home page displays a card for the gauge application:
Select the Web Analog Gauge card to open the gauge page:
The gauge is also accessible directly at http://192.168.0.2/web-gauge.
Gauge Configuration
The range and units are set in the constructor and sent to the browser once on connection:
// Parameters: minimum, maximum, unit stringDIYablesWebAnalogGaugePage gaugePage(0.0, 100.0, "V");
The value request callback is called each time a browser connects and requests the current reading:
Please feel free to share the link of this tutorial. However, Please do not use our content on any other websites. We invested a lot of effort and time to create the content, please respect our work!