Arduino Nano ESP32 - Web Apps Web Rtc

Overview

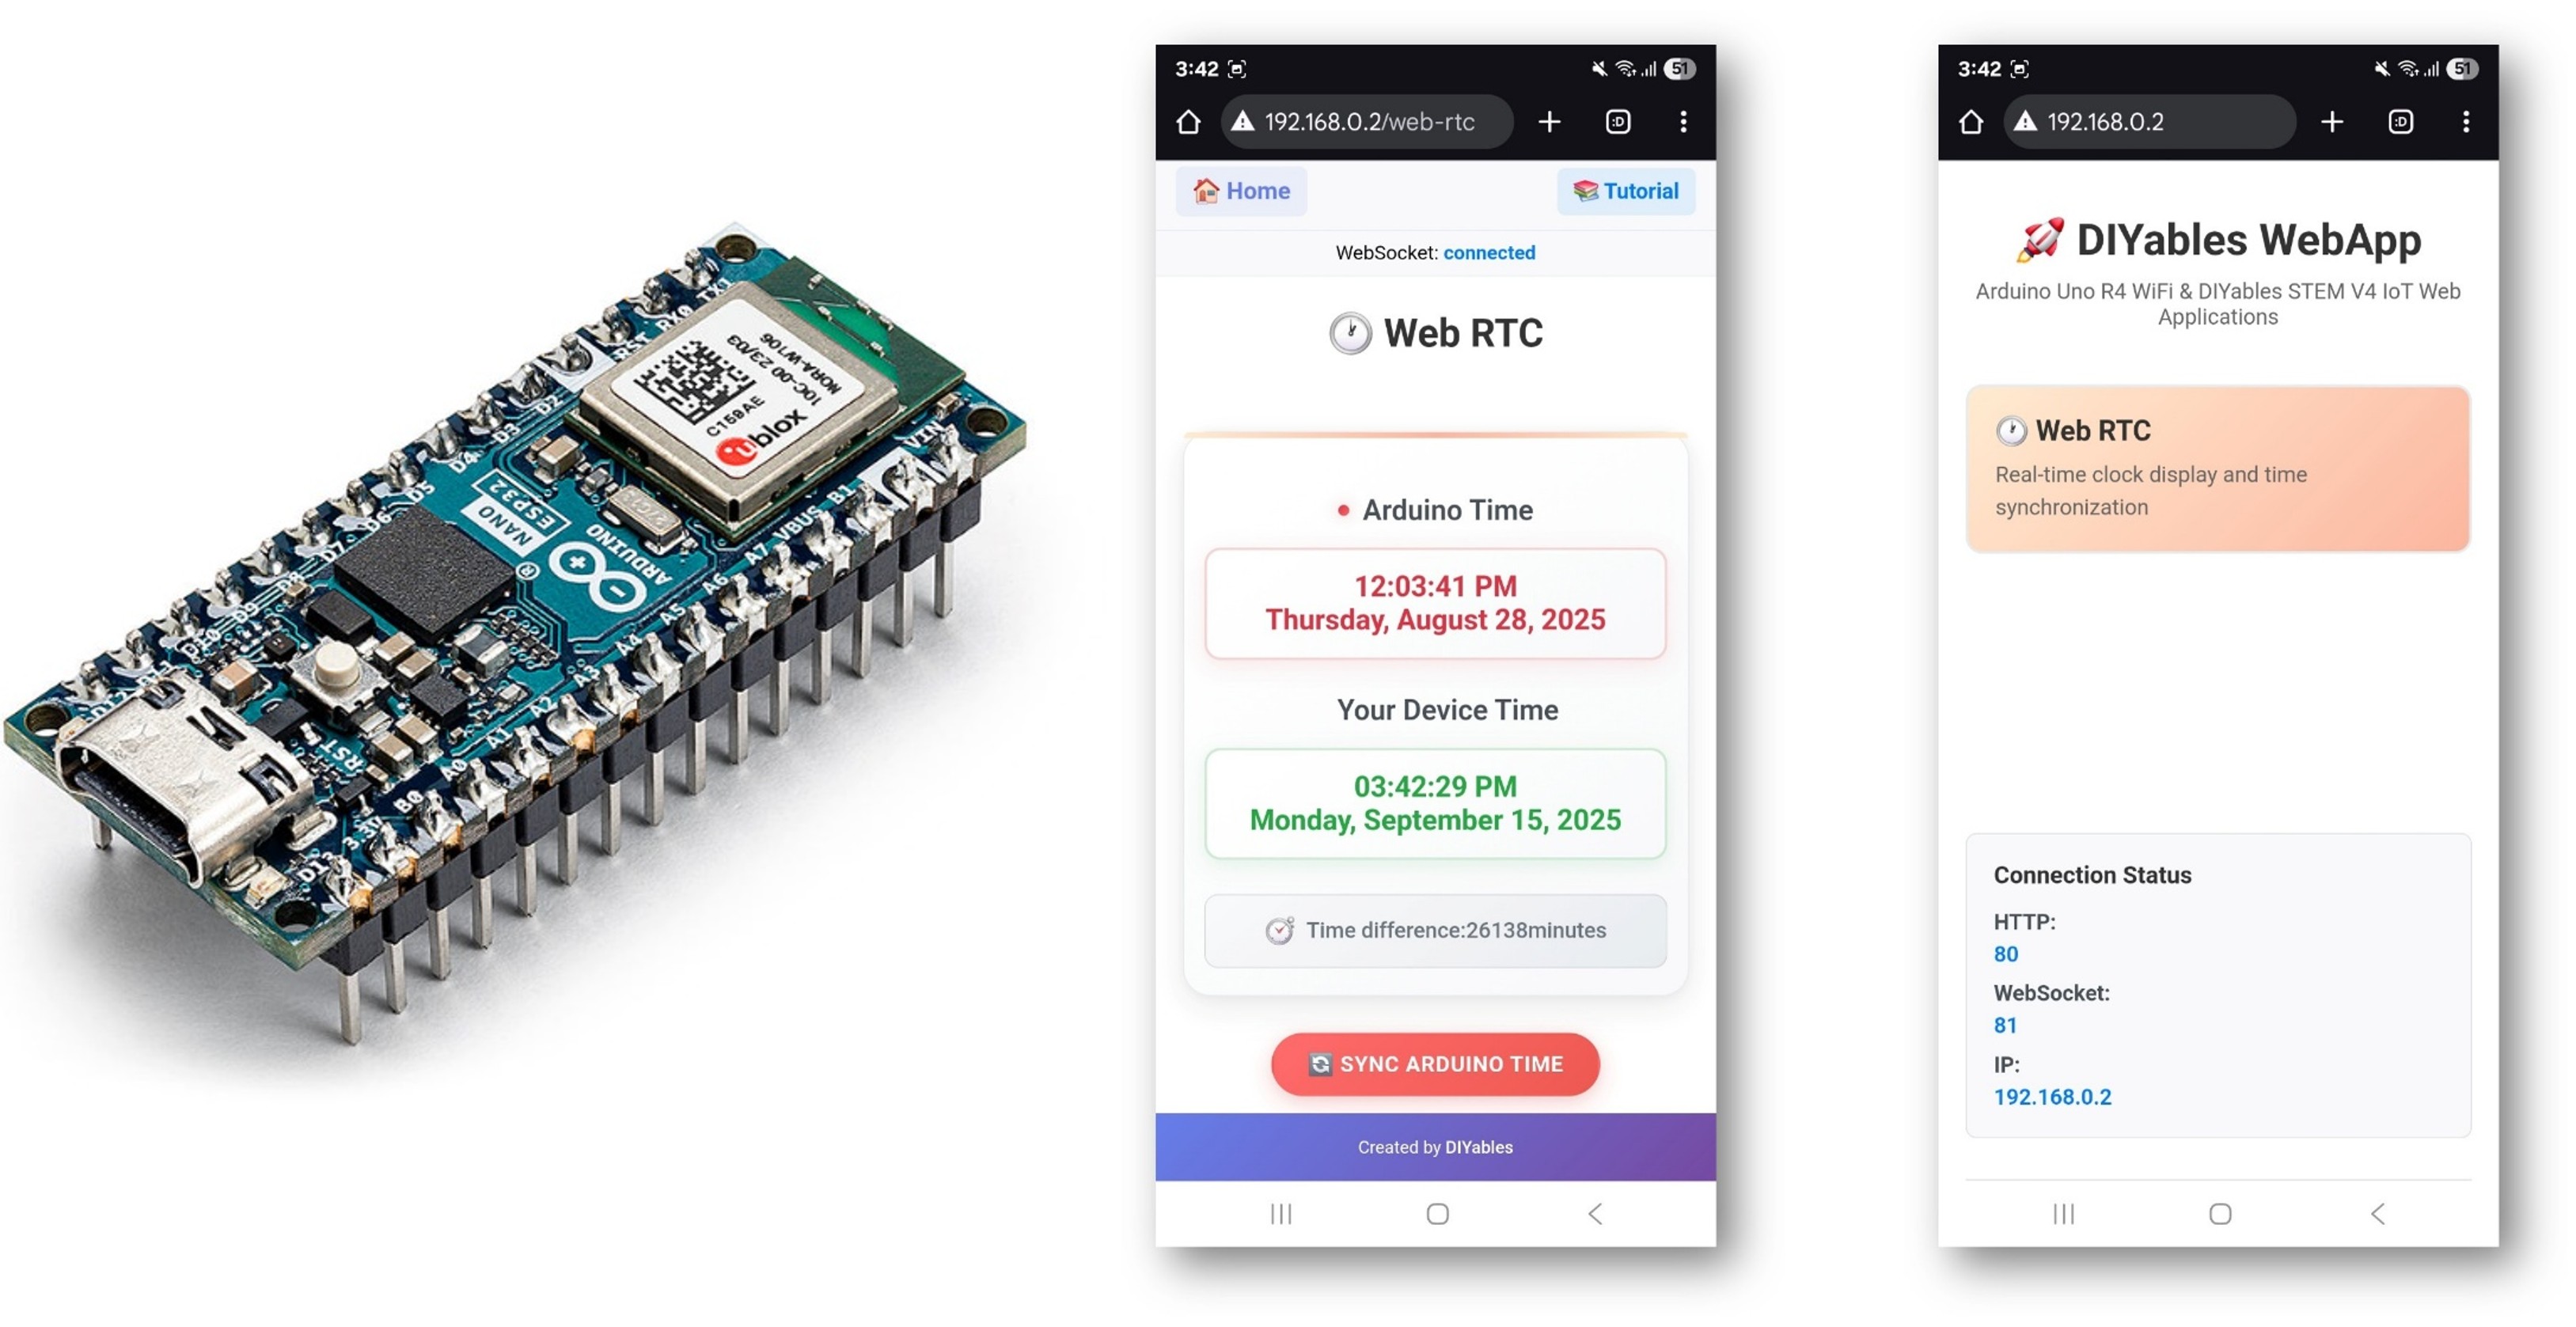
This tutorial covers the DIYablesWebRTCPage class from the DIYables ESP32 WebApps Library. The browser page displays the Arduino Nano ESP32's current RTC time alongside the browser's local time, and calculates the drift between them. A single button sends the browser's local time to the board, which updates its RTC module.

The board requires a DS3231 hardware RTC module connected over I2C. The RTClib library from Adafruit handles time read/write on the board side.

Arduino Nano ESP32 Web RTC

What This Tutorial Covers

  • Wiring a DS3231 RTC module to the Arduino Nano ESP32
  • Installing the RTClib dependency
  • Reading and displaying RTC time in the browser
  • Synchronizing the board RTC from the browser with one button press

Hardware Preparation

1×Arduino Nano ESP32
1×USB Cable Type-A to Type-C (for USB-A PC)
1×USB Cable Type-C to Type-C (for USB-C PC)
1×Real-Time Clock DS3231 Module
1×CR2032 battery
1×Jumper Wires
1×Breadboard
1×Recommended: Screw Terminal Expansion Board for Arduino Nano
1×Recommended: Breakout Expansion Board for Arduino Nano
1×Recommended: Power Splitter for Arduino Nano ESP32

Or you can buy the following kits:

1×DIYables Sensor Kit (18 sensors/displays)
Disclosure: Some of the links provided in this section are Amazon affiliate links. We may receive a commission for any purchases made through these links at no additional cost to you.
Additionally, some of these links are for products from our own brand, DIYables .

Wiring Diagram

The wiring diagram between Arduino Nano ESP32 and Real-Time Clock DS3231

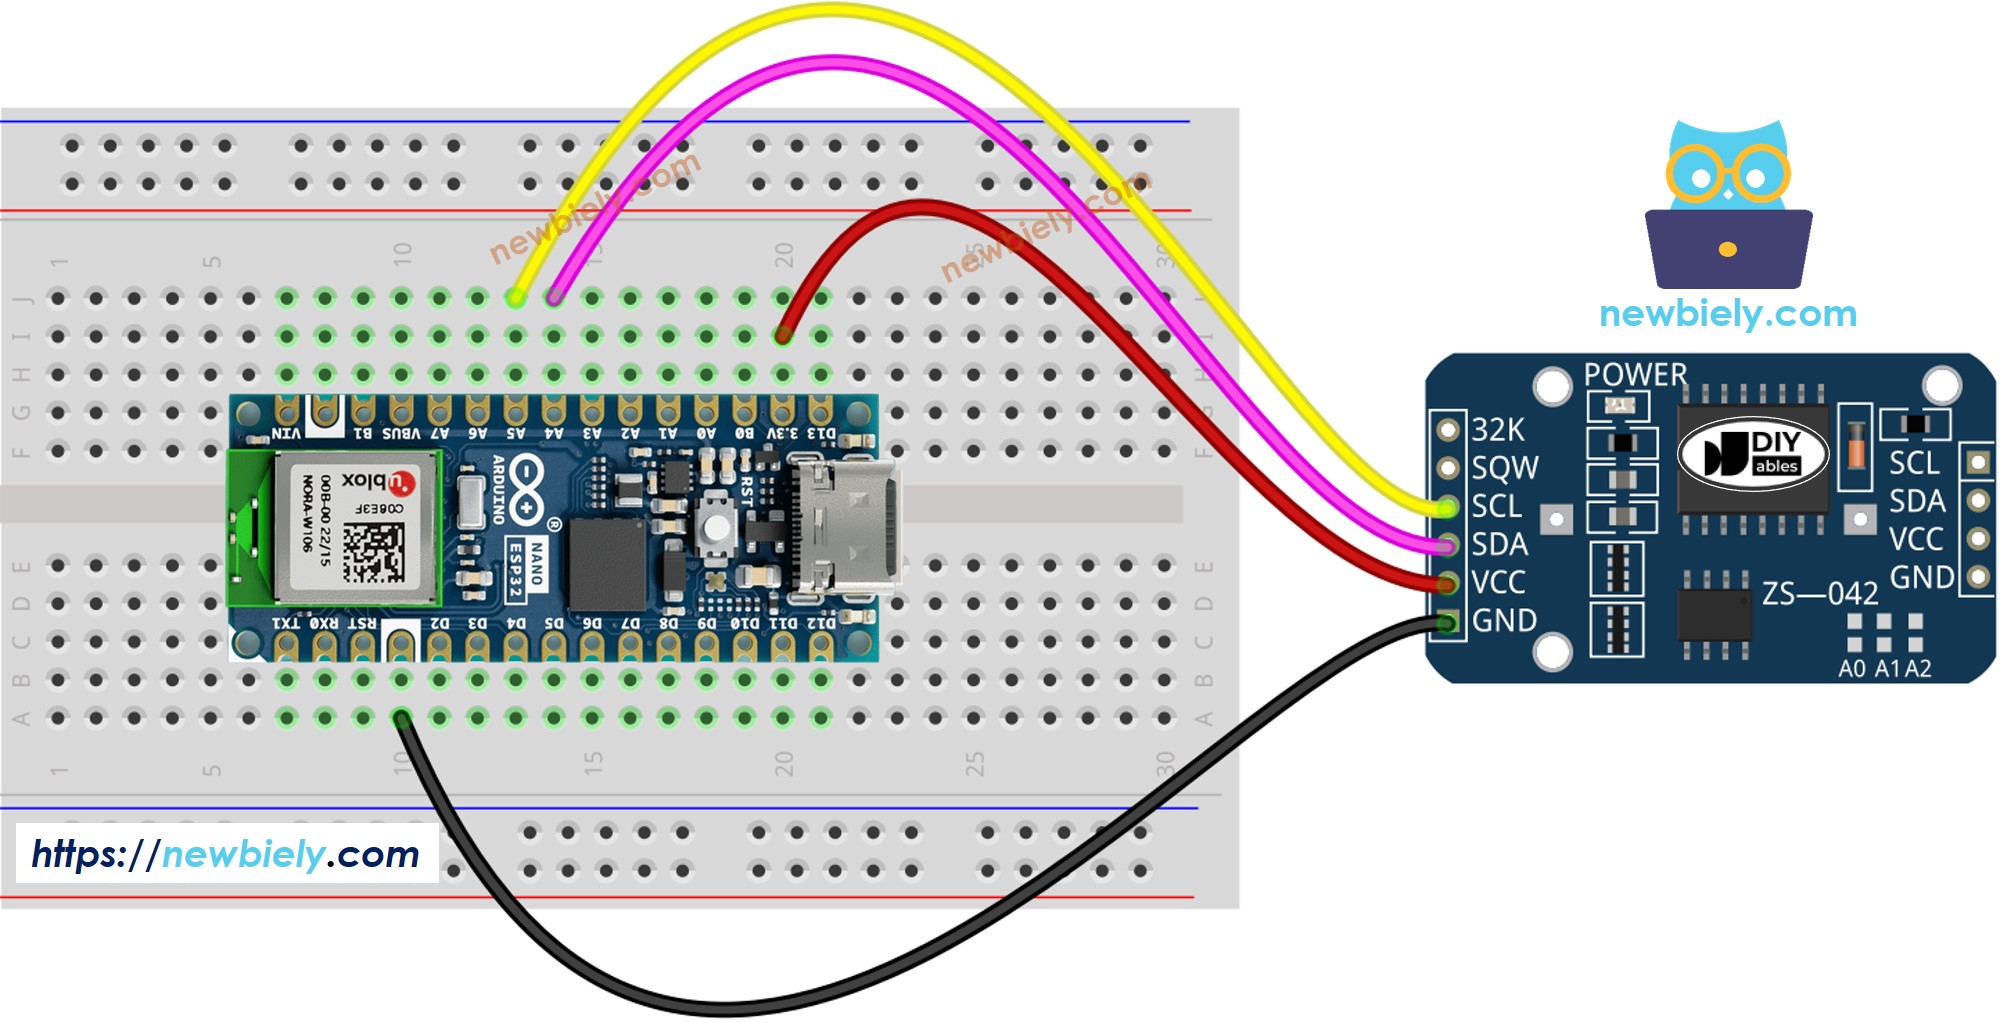
This image is created using Fritzing. Click to enlarge image

Arduino Nano ESP32 - DS3231 RTC Module

DS1307 RTC Module Arduino Nano ESP32
Vin 3.3V
GND GND
SDA GPIO21
SCL GPIO22

Steps

Follow these instructions step by step:

  • If this is your first time using the Arduino Nano ESP32, refer to the tutorial on setting up the Arduino Nano ESP32 development environment.
  • Connect the Arduino Nano ESP32 board to your computer using a USB cable.
  • Launch the Arduino IDE on your computer.
  • Select the appropriate board (e.g. Arduino Nano ESP32) and COM port.
  • Navigate to the Libraries icon on the left bar of the Arduino IDE.
  • Search "DIYables ESP32 WebApps", then find the DIYables ESP32 WebApps Library by DIYables
  • Click Install button to install the library.
  • Search for DIYables ESP32 WebApps created by DIYables and click the Install button.
Newbiely | Arduino IDE 2.3.8
──
File
Edit
Sketch
Tools
Help
Arduino Nano ESP32
Library Manager
Type:
All
Topic:
All
DIYables ESP32 WebApps by DIYables
A comprehensive library designed for ESP32 that provides multiple professional web applications including Web Monitor, Chat, Digital Pin Control, Sliders, Joystick, Analog Gauge, Rotator Control, and Temperature Display via WebSocket communication. Features modular architecture for memory efficiency, automatic config handling, and perfect for IoT projects, robotics, sensor monitoring, servo/stepper control, temperature monitoring, and remote ESP32 control. More info
1.0.1
INSTALL
Newbiely.ino
···
1 void setup() {
Output
Serial Monitor
Ln 1, Col 1
Arduino Nano ESP32 on COM15
1
  • You will be asked for installing some other library dependencies
  • Click Install All button to install all library dependencies.
  • Search "RTClib", then find the RTC library by Adafruit
  • Click Install button to install RTC library.
  • Search for RTClib created by Adafruit and click the Install button.
Newbiely | Arduino IDE 2.3.8
──
File
Edit
Sketch
Tools
Help
Arduino Nano ESP32
Library Manager
Type:
All
Topic:
All
RTClib by Adafruit
Works with DS1307, DS3231, PCF8523, PCF8563 on multiple architectures More info
2.1.3
INSTALL
Newbiely.ino
···
1 void setup() {
Output
Serial Monitor
Ln 1, Col 1
Arduino Nano ESP32 on COM15
1
  • You may be asked to install dependencies for the library
  • Install all dependencies for the library by clicking on Install All button.
  • On Arduino IDE, Go to File Examples DIYables ESP32 WebApps WebRTC example, or copy the above code and paste it to the editor of Arduino IDE
/* * DIYables WebApp Library - Web RTC Example * * This example demonstrates the Web RTC feature: * - Real-time clock display for both ESP32 and client device * - One-click time synchronization from web browser to ESP32 * - Hardware RTC integration for persistent timekeeping * - Visual time difference monitoring * * Hardware Required: * - ESP32 development board * - DS3231 RTC module (connected via I2C) * * Required Libraries: * - RTClib library (install via Library Manager) * * Setup: * 1. Connect DS3231 RTC module to ESP32 I2C pins (SDA/SCL) * 2. Install RTClib library in Arduino IDE * 3. Update WiFi credentials below * 4. Upload the sketch to your ESP32 * 5. Open Serial Monitor to see the IP address * 6. Navigate to http://[IP_ADDRESS]/web-rtc */ #include <DIYables_ESP32_Platform.h> #include <DIYablesWebApps.h> #include <RTClib.h> // RTC object RTC_DS3231 rtc; char daysOfWeek[7][12] = { "Sunday", "Monday", "Tuesday", "Wednesday", "Thursday", "Friday", "Saturday" }; // WiFi credentials - UPDATE THESE WITH YOUR NETWORK const char WIFI_SSID[] = "YOUR_WIFI_SSID"; const char WIFI_PASSWORD[] = "YOUR_WIFI_PASSWORD"; // Create WebApp server and page instances ESP32ServerFactory serverFactory; DIYablesWebAppServer webAppsServer(serverFactory, 80, 81); DIYablesHomePage homePage; DIYablesWebRTCPage webRTCPage; void setup() { Serial.begin(9600); delay(1000); Serial.println("DIYables ESP32 WebApp - Web RTC Example"); // Initialize RTC if (!rtc.begin()) { Serial.println("RTC module is NOT found"); Serial.flush(); while (1); } // Check if RTC lost power and if so, set the time if (rtc.lostPower()) { Serial.println("RTC lost power, setting time!"); // When time needs to be set on a new device, or after a power loss, the // following line sets the RTC to the date & time this sketch was compiled rtc.adjust(DateTime(F(__DATE__), F(__TIME__))); // This line sets the RTC with an explicit date & time, for example to set // January 21, 2021 at 3am you would call: // rtc.adjust(DateTime(2021, 1, 21, 3, 0, 0)); } // Print initial RTC time DateTime initialTime = rtc.now(); Serial.print("Initial RTC Time: "); Serial.print(initialTime.year(), DEC); Serial.print("/"); Serial.print(initialTime.month(), DEC); Serial.print("/"); Serial.print(initialTime.day(), DEC); Serial.print(" ("); Serial.print(daysOfWeek[initialTime.dayOfTheWeek()]); Serial.print(") "); if (initialTime.hour() < 10) Serial.print("0"); Serial.print(initialTime.hour(), DEC); Serial.print(":"); if (initialTime.minute() < 10) Serial.print("0"); Serial.print(initialTime.minute(), DEC); Serial.print(":"); if (initialTime.second() < 10) Serial.print("0"); Serial.print(initialTime.second(), DEC); Serial.println(); // Add pages to server webAppsServer.addApp(&homePage); webAppsServer.addApp(&webRTCPage); // Optional: Add 404 page for better user experience webAppsServer.setNotFoundPage(DIYablesNotFoundPage()); // Set callback for time sync from web webRTCPage.onTimeSyncFromWeb(onTimeSyncReceived); // Set callback for time request from web webRTCPage.onTimeRequestToWeb(onTimeRequested); // Start the WebApp server if (!webAppsServer.begin(WIFI_SSID, WIFI_PASSWORD)) { while (1) { Serial.println("Failed to connect to WiFi"); delay(1000); } } } void loop() { // Handle web server webAppsServer.loop(); // Send current time to web clients and print to Serial every 1 second static unsigned long lastUpdate = 0; if (millis() - lastUpdate >= 1000) { lastUpdate = millis(); // Get current RTC time DateTime currentTime = rtc.now(); // Send time to web clients in human readable format webRTCPage.sendTimeToWeb(currentTime.year(), currentTime.month(), currentTime.day(), currentTime.hour(), currentTime.minute(), currentTime.second()); // Print time to Serial Monitor Serial.print("RTC Time: "); Serial.print(currentTime.year(), DEC); Serial.print("/"); Serial.print(currentTime.month(), DEC); Serial.print("/"); Serial.print(currentTime.day(), DEC); Serial.print(" ("); Serial.print(daysOfWeek[currentTime.dayOfTheWeek()]); Serial.print(") "); if (currentTime.hour() < 10) Serial.print("0"); Serial.print(currentTime.hour(), DEC); Serial.print(":"); if (currentTime.minute() < 10) Serial.print("0"); Serial.print(currentTime.minute(), DEC); Serial.print(":"); if (currentTime.second() < 10) Serial.print("0"); Serial.print(currentTime.second(), DEC); Serial.println(); } delay(10); } // Callback function called when web client sends time sync command void onTimeSyncReceived(unsigned long unixTimestamp) { Serial.print("Time sync received: "); Serial.println(unixTimestamp); // Convert Unix timestamp to DateTime and set RTC time DateTime newTime(unixTimestamp); rtc.adjust(newTime); Serial.println("ESP32 RTC synchronized!"); } // Callback function called when web client requests current ESP32 time void onTimeRequested() { // Get current RTC time and send to web in human readable format DateTime currentTime = rtc.now(); webRTCPage.sendTimeToWeb(currentTime.year(), currentTime.month(), currentTime.day(), currentTime.hour(), currentTime.minute(), currentTime.second()); }
  • Update the WiFi credentials in the sketch:
const char WIFI_SSID[] = "YOUR_WIFI_NETWORK"; const char WIFI_PASSWORD[] = "YOUR_WIFI_PASSWORD";
  • Click Upload button on Arduino IDE to upload code to Arduino Nano ESP32
  • Open the Serial Monitor
  • The Serial Monitor output should resemble the following:
Newbiely | Arduino IDE 2.3.8
──
File
Edit
Sketch
Tools
Help
Arduino Nano ESP32
Newbiely.ino
···
8 Serial.println("Hello World!");
Output
Serial Monitor
Message (Enter to send message to 'Arduino Nano ESP32' on 'COM15')
New Line
9600 baud
DIYables ESP32 WebApp - Web RTC Example Initial RTC Time: 2025/8/28 (Thursday) 12:00:08 INFO: Added app / INFO: Added app /web-rtc DIYables WebApp Library Platform: Arduino Nano ESP32 Network connected! IP address: 192.168.0.2 HTTP server started on port 80 Configuring WebSocket server callbacks... WebSocket server started on port 81 WebSocket URL: ws://192.168.0.2:81 WebSocket server started on port 81 ========================================== DIYables WebApp Ready! ========================================== Web Interface: http://192.168.0.2 WebSocket: ws://192.168.0.2:81 Available Applications: Home Page: http://192.168.0.2/ Web RTC: http://192.168.0.2/web-rtc ==========================================
Ln 11, Col 1
Arduino Nano ESP32 on COM15
2
  • If nothing appears, press the reset button on the board.
  • Enter the IP address from the Serial Monitor into a browser on the same network.
  • Example: http://192.168.0.2
  • The home page shows a card for the RTC application:
Arduino Nano ESP32 DIYables WebApp Home page with Web RTC app
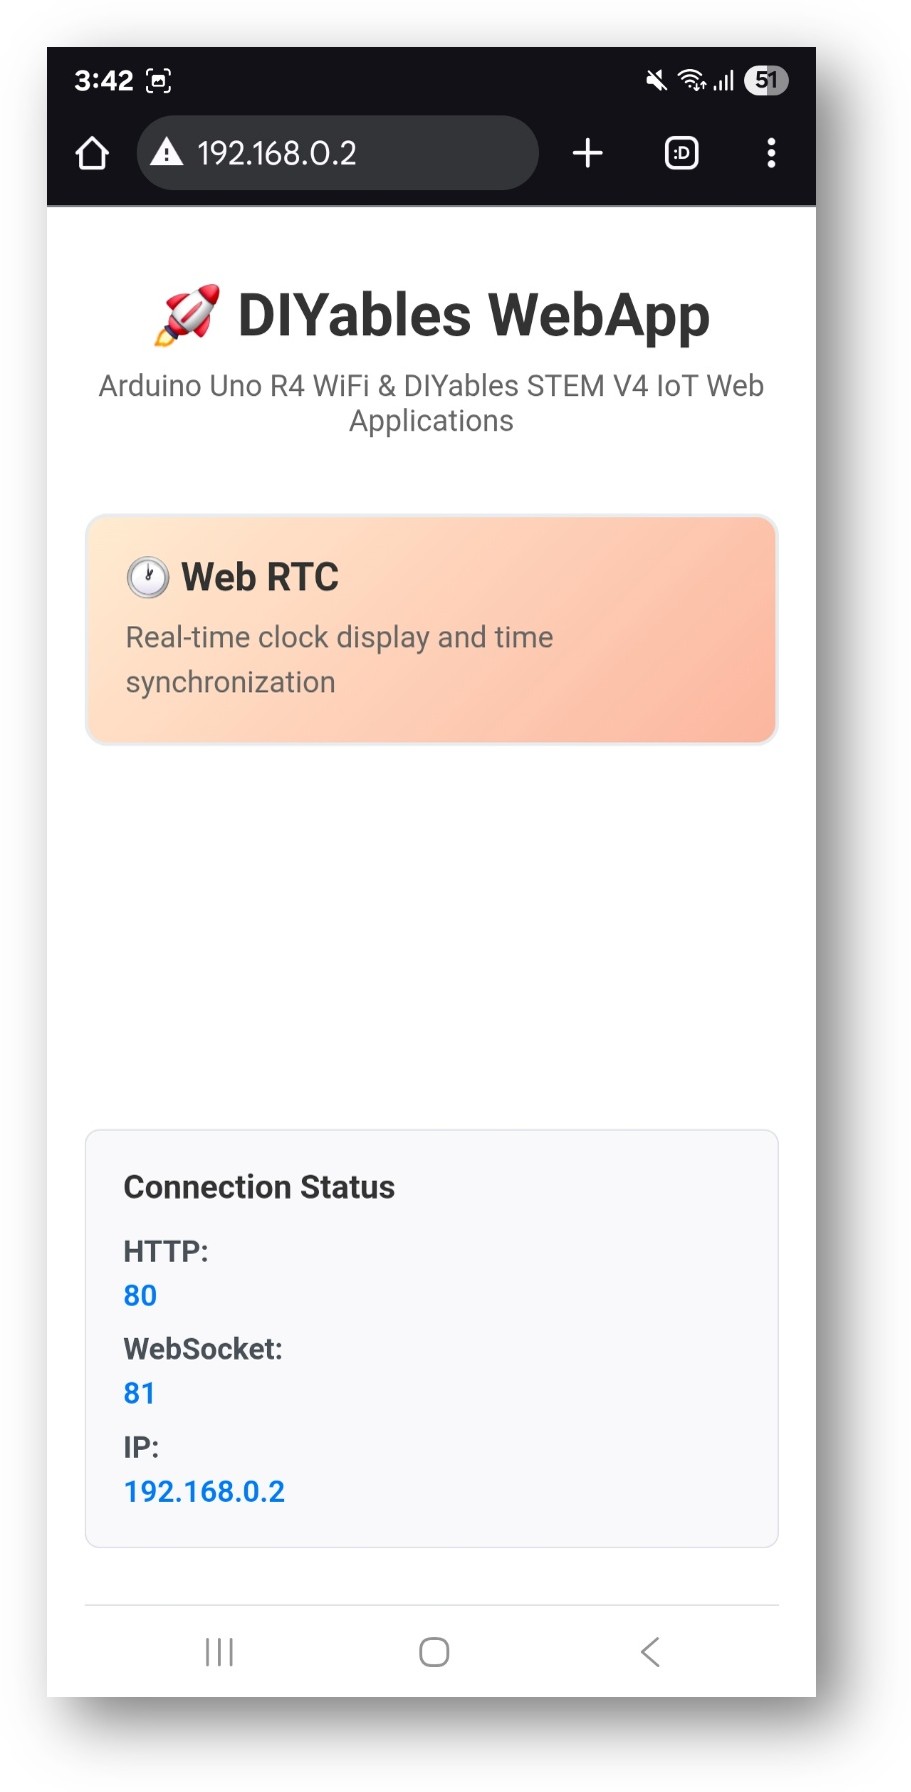
  • Select the Web RTC card to open the clock interface:
Arduino Nano ESP32 DIYables WebApp Web RTC app
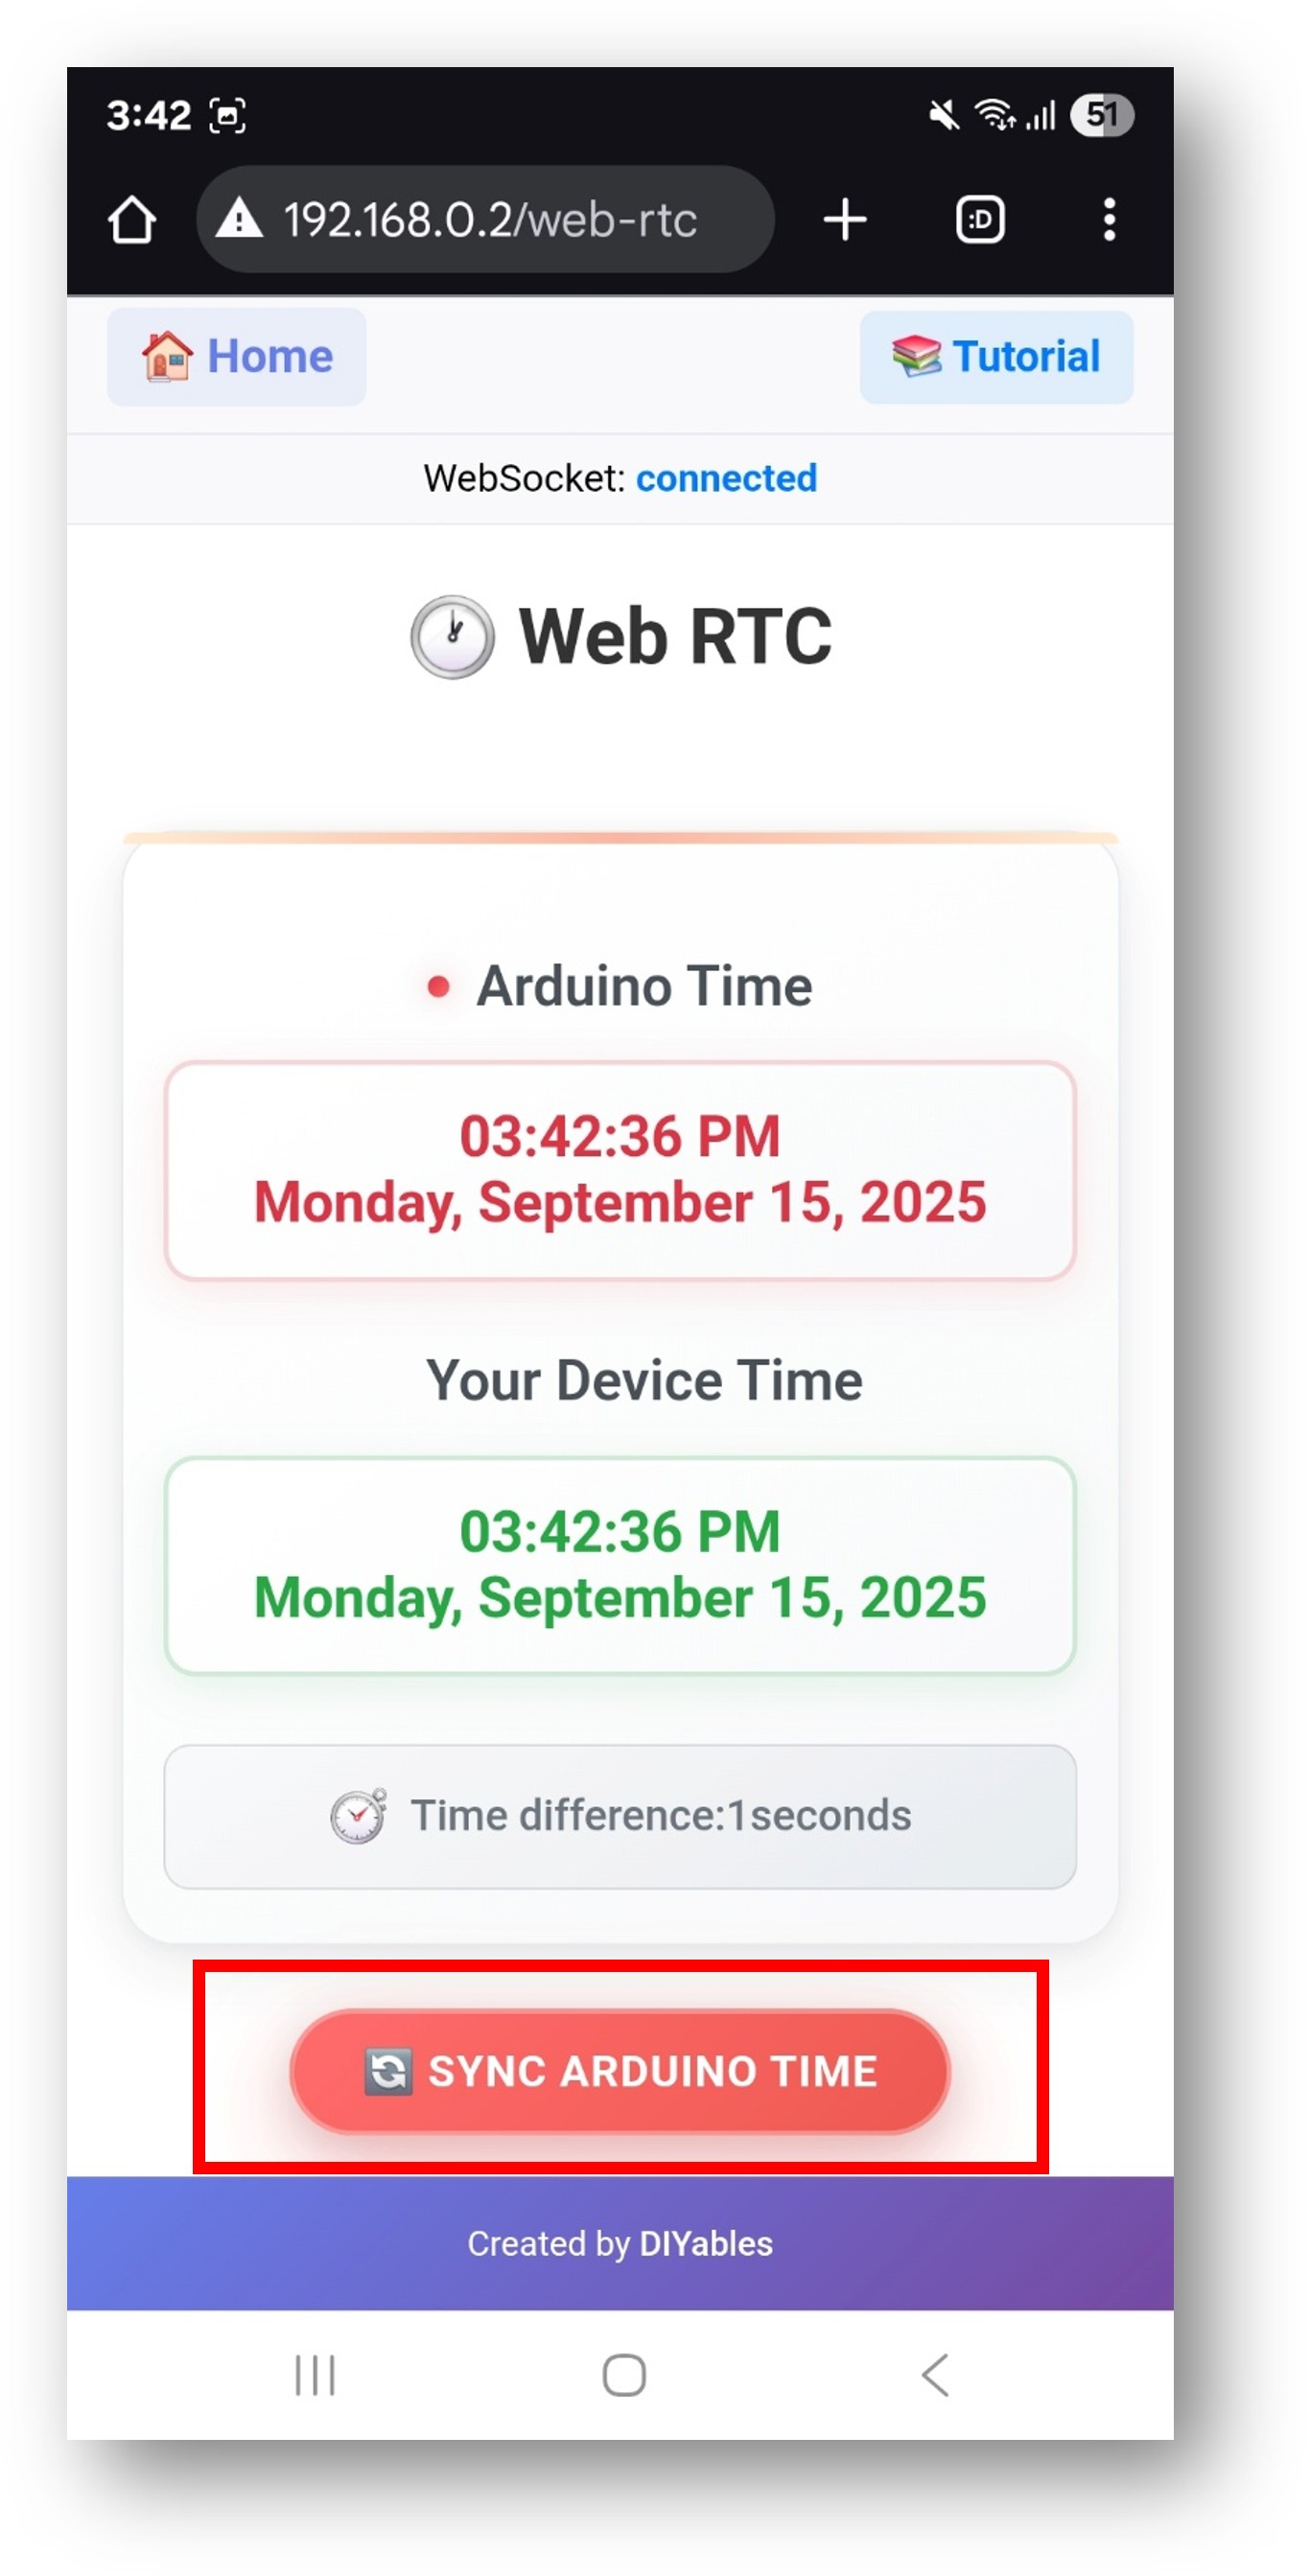
  • The page is also directly accessible at http://192.168.0.2/web-rtc.

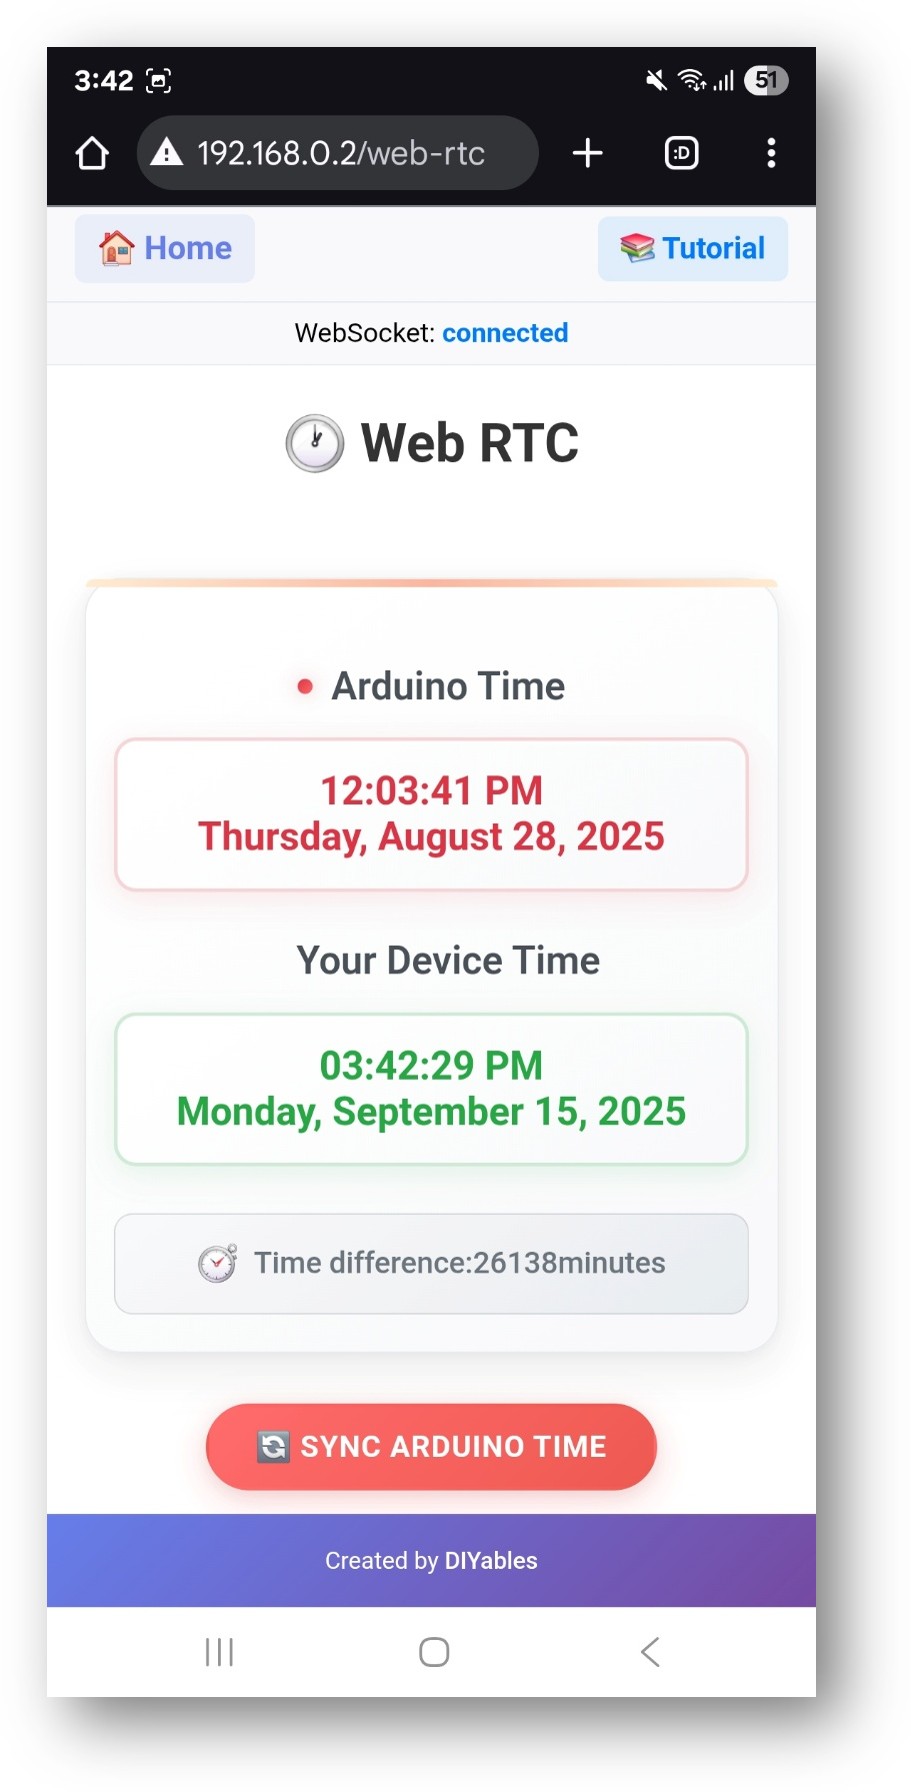
Using the Web Interface

The RTC page displays three sections:

  • Arduino Time — the current time from the board's DS3231 module
  • Your Device Time — the current local time reported by the browser
  • Time Difference — the difference between the two, in minutes

Synchronizing Time

Click the Sync ESP32 Time button to transfer the browser's local time to the board:

Arduino Nano ESP32 DIYables WebApp Web RTC sync

The synchronization process:

  1. The browser reads its local time (accounting for the local timezone offset)
  2. The timestamp is sent to the board over WebSocket
  3. The sketch writes the received time to the DS3231
  4. The page refreshes to display the updated board time

After synchronization the time difference is typically 0–1 minutes.

Troubleshooting

RTC time shows wrong value

  • The DS3231 retains time from its battery even when the board is powered off
  • Perform a sync from the browser to set the correct time
  • Check that the CR2032 battery is installed in the RTC module

I2C not detected

  • Verify the SDA and SCL wiring matches the table above
  • Confirm the DS3231 VCC is connected to 3.3 V, not 5 V
  • Add a Serial.println(rtc.isrunning()) check in setup

WebSocket drops frequently

  • Confirm webAppsServer.loop() is called on every iteration of loop()
  • Avoid long blocking delays after the server starts

Cannot access the page

  • Check the IP address in the Serial Monitor
  • Ensure the browser device and board are on the same 2.4 GHz WiFi network

※ OUR MESSAGES

  • As freelancers, We are AVAILABLE for HIRE. See how to outsource your project to us
  • Please feel free to share the link of this tutorial. However, Please do not use our content on any other websites. We invested a lot of effort and time to create the content, please respect our work!