This tutorial covers the DIYablesWebTablePage class from the DIYables ESP32 WebApps Library. The page renders a two-column attribute-value table in the browser. Rows are defined once on the Arduino Nano ESP32 at startup using addRow(). During operation, individual values are updated over WebSocket by calling updateValue(). The browser automatically highlights values that are actively changing (red) versus values that have stabilized (blue), without any additional sketch code.
What This Tutorial Covers
Defining table rows with attribute names in setup()
Sending value updates at runtime
Understanding the browser's automatic change-detection highlighting
Disclosure: Some of the links provided in this section are Amazon affiliate links. We may receive a commission for any purchases made through these links at no additional cost to you. Additionally, some of these links are for products from our own brand, DIYables .
Connect the Arduino Nano ESP32 board to your computer using a USB cable.
Launch the Arduino IDE on your computer.
Select the appropriate board (e.g. Arduino Nano ESP32) and COM port.
Navigate to the Libraries icon on the left bar of the Arduino IDE.
Search "DIYables ESP32 WebApps", then find the DIYables ESP32 WebApps Library by DIYables
Click Install button to install the library.
Search for DIYables ESP32 WebApps created by DIYables and click the Install button.
Newbiely | Arduino IDE 2.3.8
──
☐
✕
File
Edit
Sketch
Tools
Help
Arduino Nano ESP32
Library Manager
DIYables ESP32 WebApps
Type:
All
Topic:
All
DIYables ESP32 WebAppsby DIYables
A comprehensive library designed for ESP32 that provides multiple professional web applications including Web Monitor, Chat, Digital Pin Control, Sliders, Joystick, Analog Gauge, Rotator Control, and Temperature Display via WebSocket communication. Features modular architecture for memory efficiency, automatic config handling, and perfect for IoT projects, robotics, sensor monitoring, servo/stepper control, temperature monitoring, and remote ESP32 control.
More info
1.0.1
INSTALL
Newbiely.ino
···
1
voidsetup() {
Output
Serial Monitor
Ln 1, Col 1
Arduino Nano ESP32 on COM15
1
You will be asked for installing some other library dependencies
Click Install All button to install all library dependencies.
On Arduino IDE, Go to File Examples DIYables ESP32 WebApps WebTable example, or copy the above code and paste it to the editor of Arduino IDE
/* * DIYables ESP32 WebApps Library - WebTable Example * * This example demonstrates how to create a web-based table interface * that displays real-time data in a two-column format (attribute-value pairs). * * Features: * - Two-column table with attributes and real-time values * - WebSocket-based real-time updates * - Configurable table rows in setup() * - Dynamic value updates during runtime * - Modern responsive web interface * * Hardware: ESP32 Boards * * Instructions: * 1. Update WiFi credentials below * 2. Upload the code to your Arduino * 3. Open Serial Monitor to get the IP address * 4. Open web browser and go to: * - Home page: http://[ARDUINO_IP]/ * - WebTable: http://[ARDUINO_IP]/web-table * 5. Watch real-time data updates in the table * * Created by DIYables * Visit: https://diyables.com for more tutorials and projects */#include <DIYables_ESP32_Platform.h>#include <DIYablesWebApps.h>// WiFi credentials - Update these with your network detailsconstchar WIFI_SSID[] = "YOUR_WIFI_SSID";constchar WIFI_PASSWORD[] = "YOUR_WIFI_PASSWORD";// Initialize web server and pagesESP32ServerFactory serverFactory;DIYablesWebAppServer server(serverFactory, 80, 81);DIYablesHomePage homePage;DIYablesWebTablePage tablePage;// Variables to simulate sensor datafloat temperature = 20.5;float humidity = 65.0;int lightLevel = 512;unsignedlong uptime = 0;bool ledState = false;int counter = 0;voidsetup() {Serial.begin(9600);Serial.println("DIYables ESP32 WebApp - Web Table Example");// Initialize built-in LEDpinMode(LED_BUILTIN, OUTPUT);// Add web apps server.addApp(&homePage); server.addApp(&tablePage);// Optional: Add 404 page for better user experience server.setNotFoundPage(DIYablesNotFoundPage());// Start the WebApp server server.begin(WIFI_SSID, WIFI_PASSWORD);// Set up callback for data requests tablePage.onTableValueRequest(onDataRequested);// Configure table structure in setup - attributes are set once setupTableStructure();Serial.println("WebTable Server started!");}voidloop() { server.loop();// Update sensor values every 2 secondsstaticunsignedlong lastUpdate = 0;if (millis() - lastUpdate > 2000) { updateSensorValues(); sendRealTimeUpdates(); lastUpdate = millis(); }// Toggle LED every 5 secondsstaticunsignedlong lastLedToggle = 0;if (millis() - lastLedToggle > 5000) { ledState = !ledState;digitalWrite(LED_BUILTIN, ledState);// Send LED status update to web interface tablePage.sendValueUpdate("LED Status", ledState ? "ON" : "OFF"); lastLedToggle = millis(); }delay(10);}// Setup table structure - called once in setup()void setupTableStructure() {Serial.println("Setting up table structure...");// Add table rows with attributes only (no values stored) tablePage.addRow("Device Name"); tablePage.addRow("Temperature"); tablePage.addRow("Humidity"); tablePage.addRow("Light Level"); tablePage.addRow("Uptime"); tablePage.addRow("LED Status"); tablePage.addRow("Counter"); tablePage.addRow("WiFi SSID"); tablePage.addRow("IP Address"); tablePage.addRow("Free Memory");Serial.println("Table structure configured with " + String(tablePage.getRowCount()) + " rows");}// Simulate sensor readings and send values to web interfacevoid updateSensorValues() {// Simulate temperature sensor (20-30°C range) temperature = 20.0 + (sin(millis() / 10000.0) * 5.0) + random(-10, 10) / 10.0;// Simulate humidity sensor (40-80% range) humidity = 60.0 + (cos(millis() / 8000.0) * 15.0) + random(-20, 20) / 10.0;// Simulate light sensor (0-1023 range) lightLevel = 512 + (sin(millis() / 5000.0) * 400) + random(-50, 50);if (lightLevel < 0) lightLevel = 0;if (lightLevel > 1023) lightLevel = 1023;// Update uptime uptime = millis() / 1000;// Increment counter counter++;}// Send real-time updates to web interfacevoid sendRealTimeUpdates() {// Send individual value updates to web clients tablePage.sendValueUpdate("Temperature", String(temperature, 1) + "°C"); tablePage.sendValueUpdate("Humidity", String(humidity, 1) + "%"); tablePage.sendValueUpdate("Light Level", String(lightLevel)); tablePage.sendValueUpdate("Uptime", formatUptime(uptime)); tablePage.sendValueUpdate("Counter", String(counter)); tablePage.sendValueUpdate("Free Memory", String(getFreeMemory()) + " bytes");}// Callback function called when web client requests table datavoid onDataRequested() {Serial.println("Web client requested table data");// Send all current values to web interface tablePage.sendValueUpdate("Device Name", "ESP32"); tablePage.sendValueUpdate("Temperature", String(temperature, 1) + "°C"); tablePage.sendValueUpdate("Humidity", String(humidity, 1) + "%"); tablePage.sendValueUpdate("Light Level", String(lightLevel)); tablePage.sendValueUpdate("Uptime", formatUptime(uptime)); tablePage.sendValueUpdate("LED Status", ledState ? "ON" : "OFF"); tablePage.sendValueUpdate("Counter", String(counter)); tablePage.sendValueUpdate("WiFi SSID", WIFI_SSID); tablePage.sendValueUpdate("IP Address", WiFi.localIP().toString()); tablePage.sendValueUpdate("Free Memory", String(getFreeMemory()) + " bytes");}// Format uptime in human-readable formatString formatUptime(unsignedlongseconds) {unsignedlongdays = seconds / 86400;unsignedlonghours = (seconds % 86400) / 3600;unsignedlongminutes = (seconds % 3600) / 60;unsignedlong secs = seconds % 60;String result = "";if (days > 0) result += String(days) + "d ";if (hours > 0) result += String(hours) + "h ";if (minutes > 0) result += String(minutes) + "m "; result += String(secs) + "s";return result;}// Get approximate free memoryint getFreeMemory() {// Simple approximation for demonstration// In a real application, you might use a more accurate methodreturn 2048 - (counter % 1024);}
Click Upload button on Arduino IDE to upload code to Arduino Nano ESP32
Open the Serial Monitor
The Serial Monitor output should resemble the following:
Newbiely | Arduino IDE 2.3.8
──
☐
✕
File
Edit
Sketch
Tools
Help
Arduino Nano ESP32
Newbiely.ino
···
8Serial.println("Hello World!");
Output
Serial Monitor
Message (Enter to send message to 'Arduino Nano ESP32' on 'COM15')
New Line
9600 baud
DIYables WebApp - Web Table Example
INFO: Added app /
INFO: Added app /web-table
DIYables WebApp Library
Platform: Arduino Nano ESP32
Network connected!
IP address: 192.168.0.2
HTTP server started on port 80
Configuring WebSocket server callbacks...
WebSocket server started on port 81
WebSocket URL: ws://192.168.0.2:81
WebSocket server started on port 81
==========================================
DIYables WebApp Ready!
==========================================
Web Interface: http://192.168.0.2
WebSocket: ws://192.168.0.2:81
Available Applications:
Home Page: http://192.168.0.2/
Web Table: http://192.168.0.2/web-table
==========================================
Ln 11, Col 1
Arduino Nano ESP32 on COM15
2
If nothing appears, press the reset button on the board.
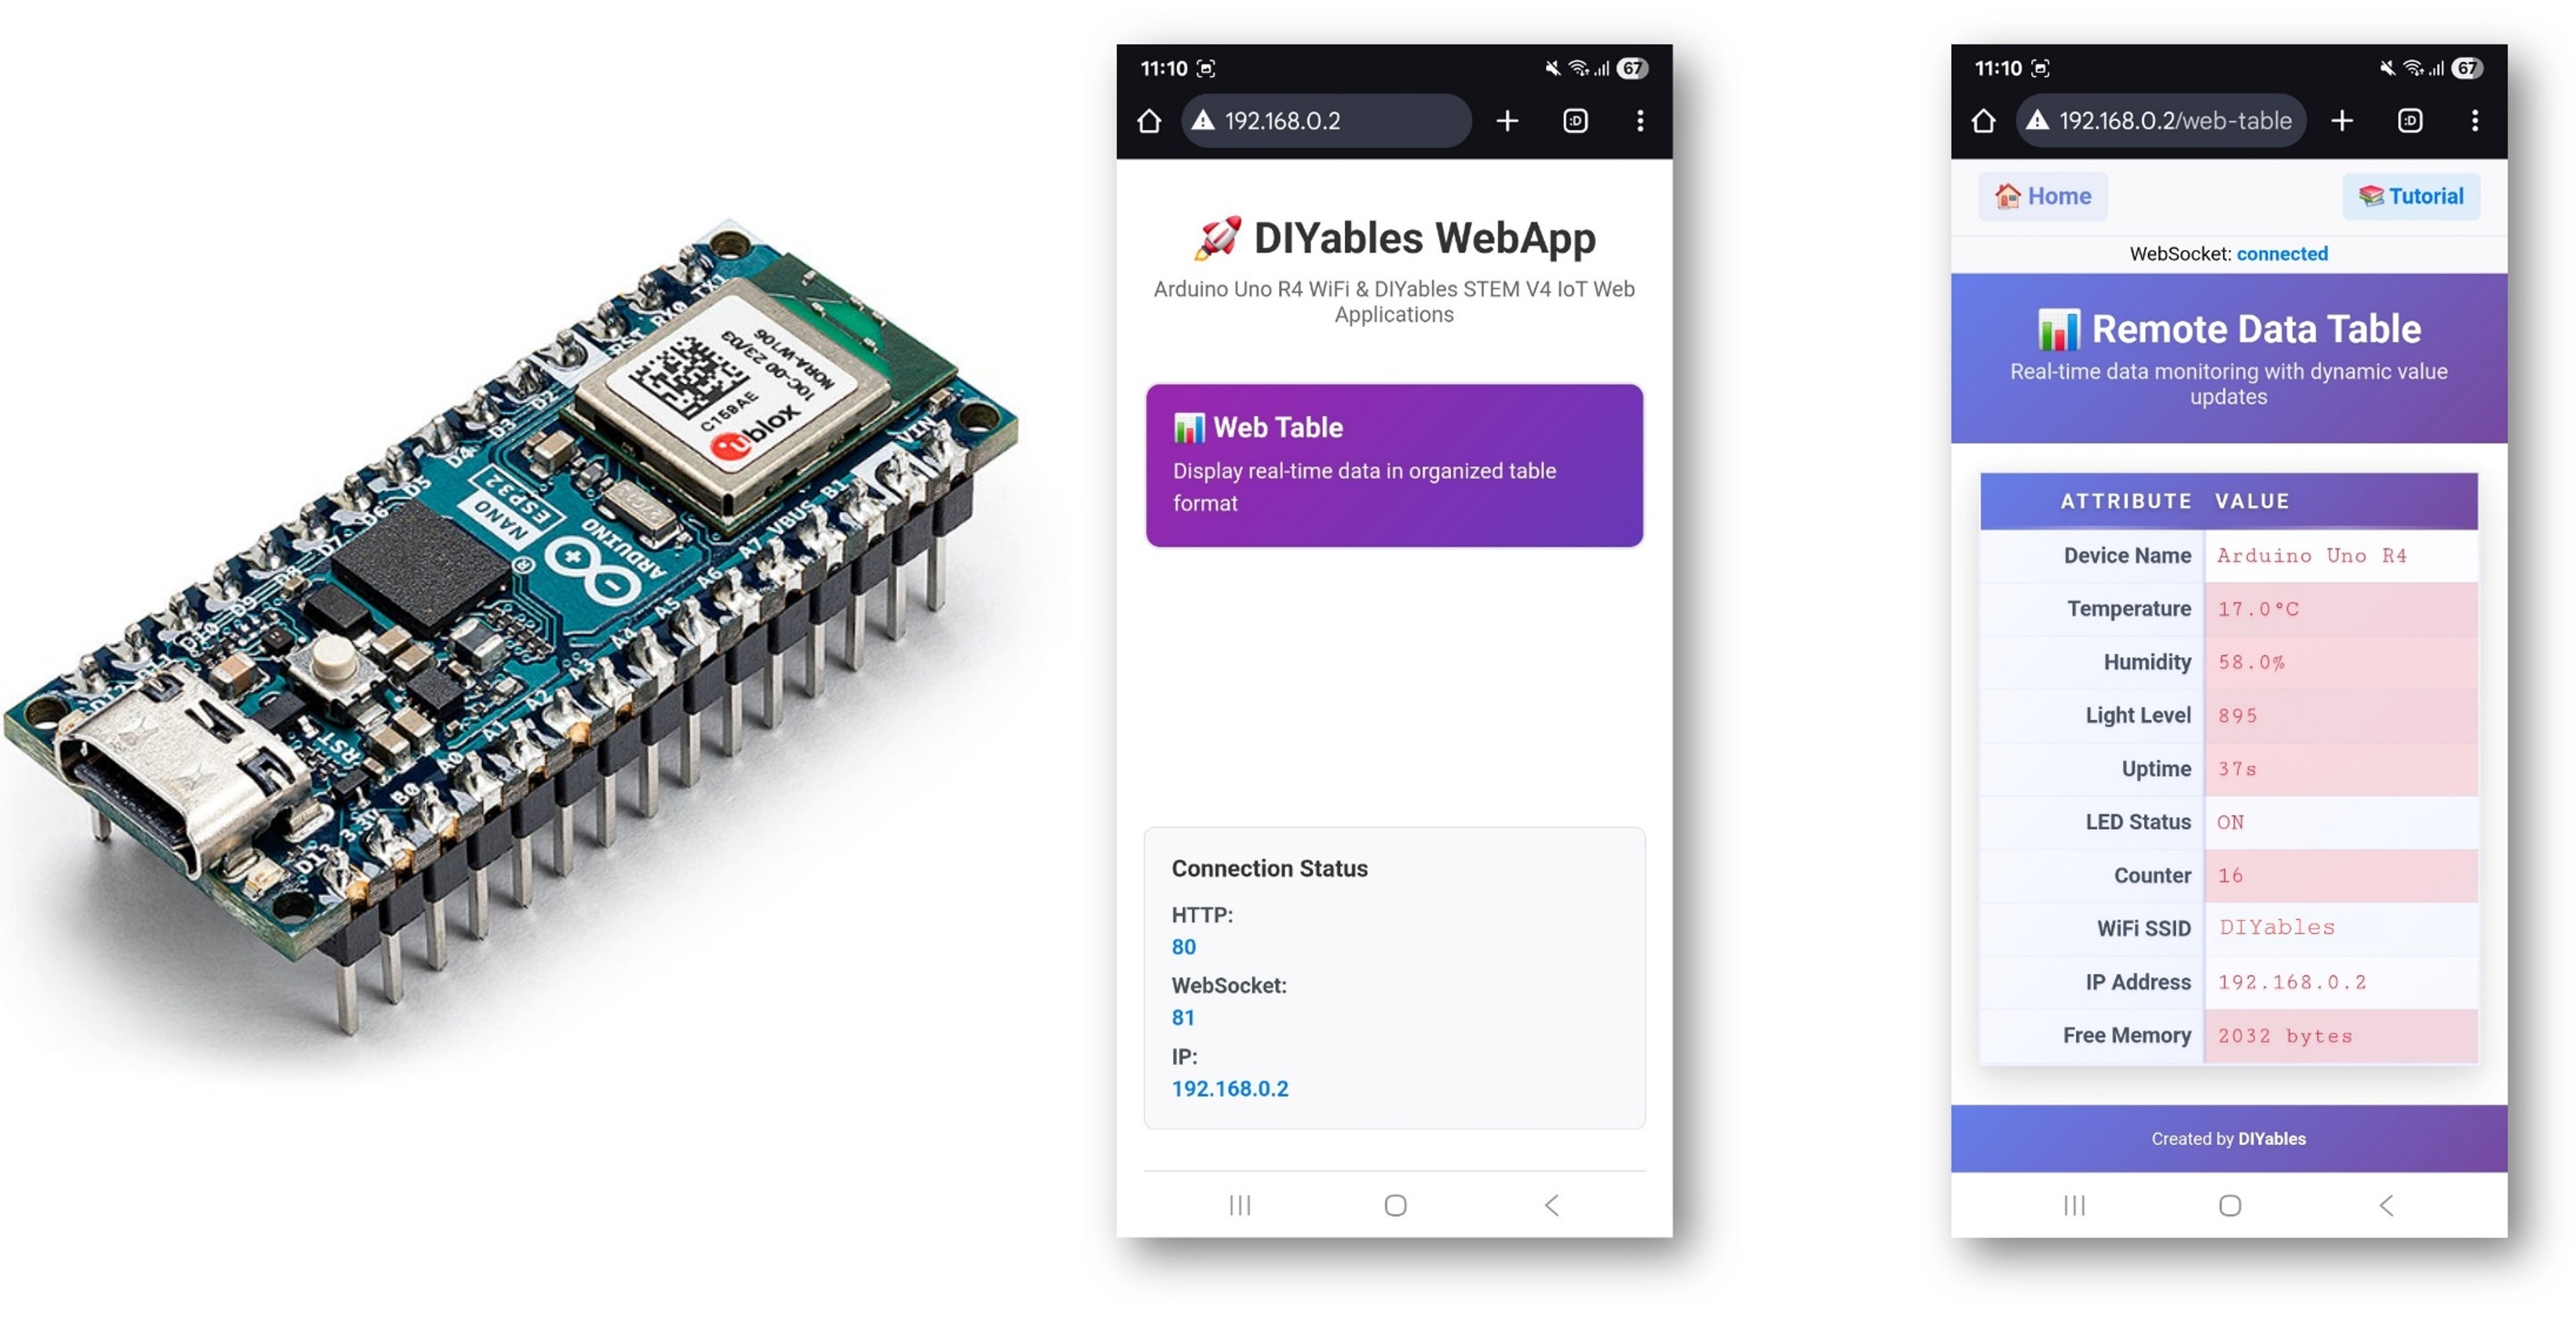
Enter the IP address from the Serial Monitor into a browser on the same network.
Example: http://192.168.0.2
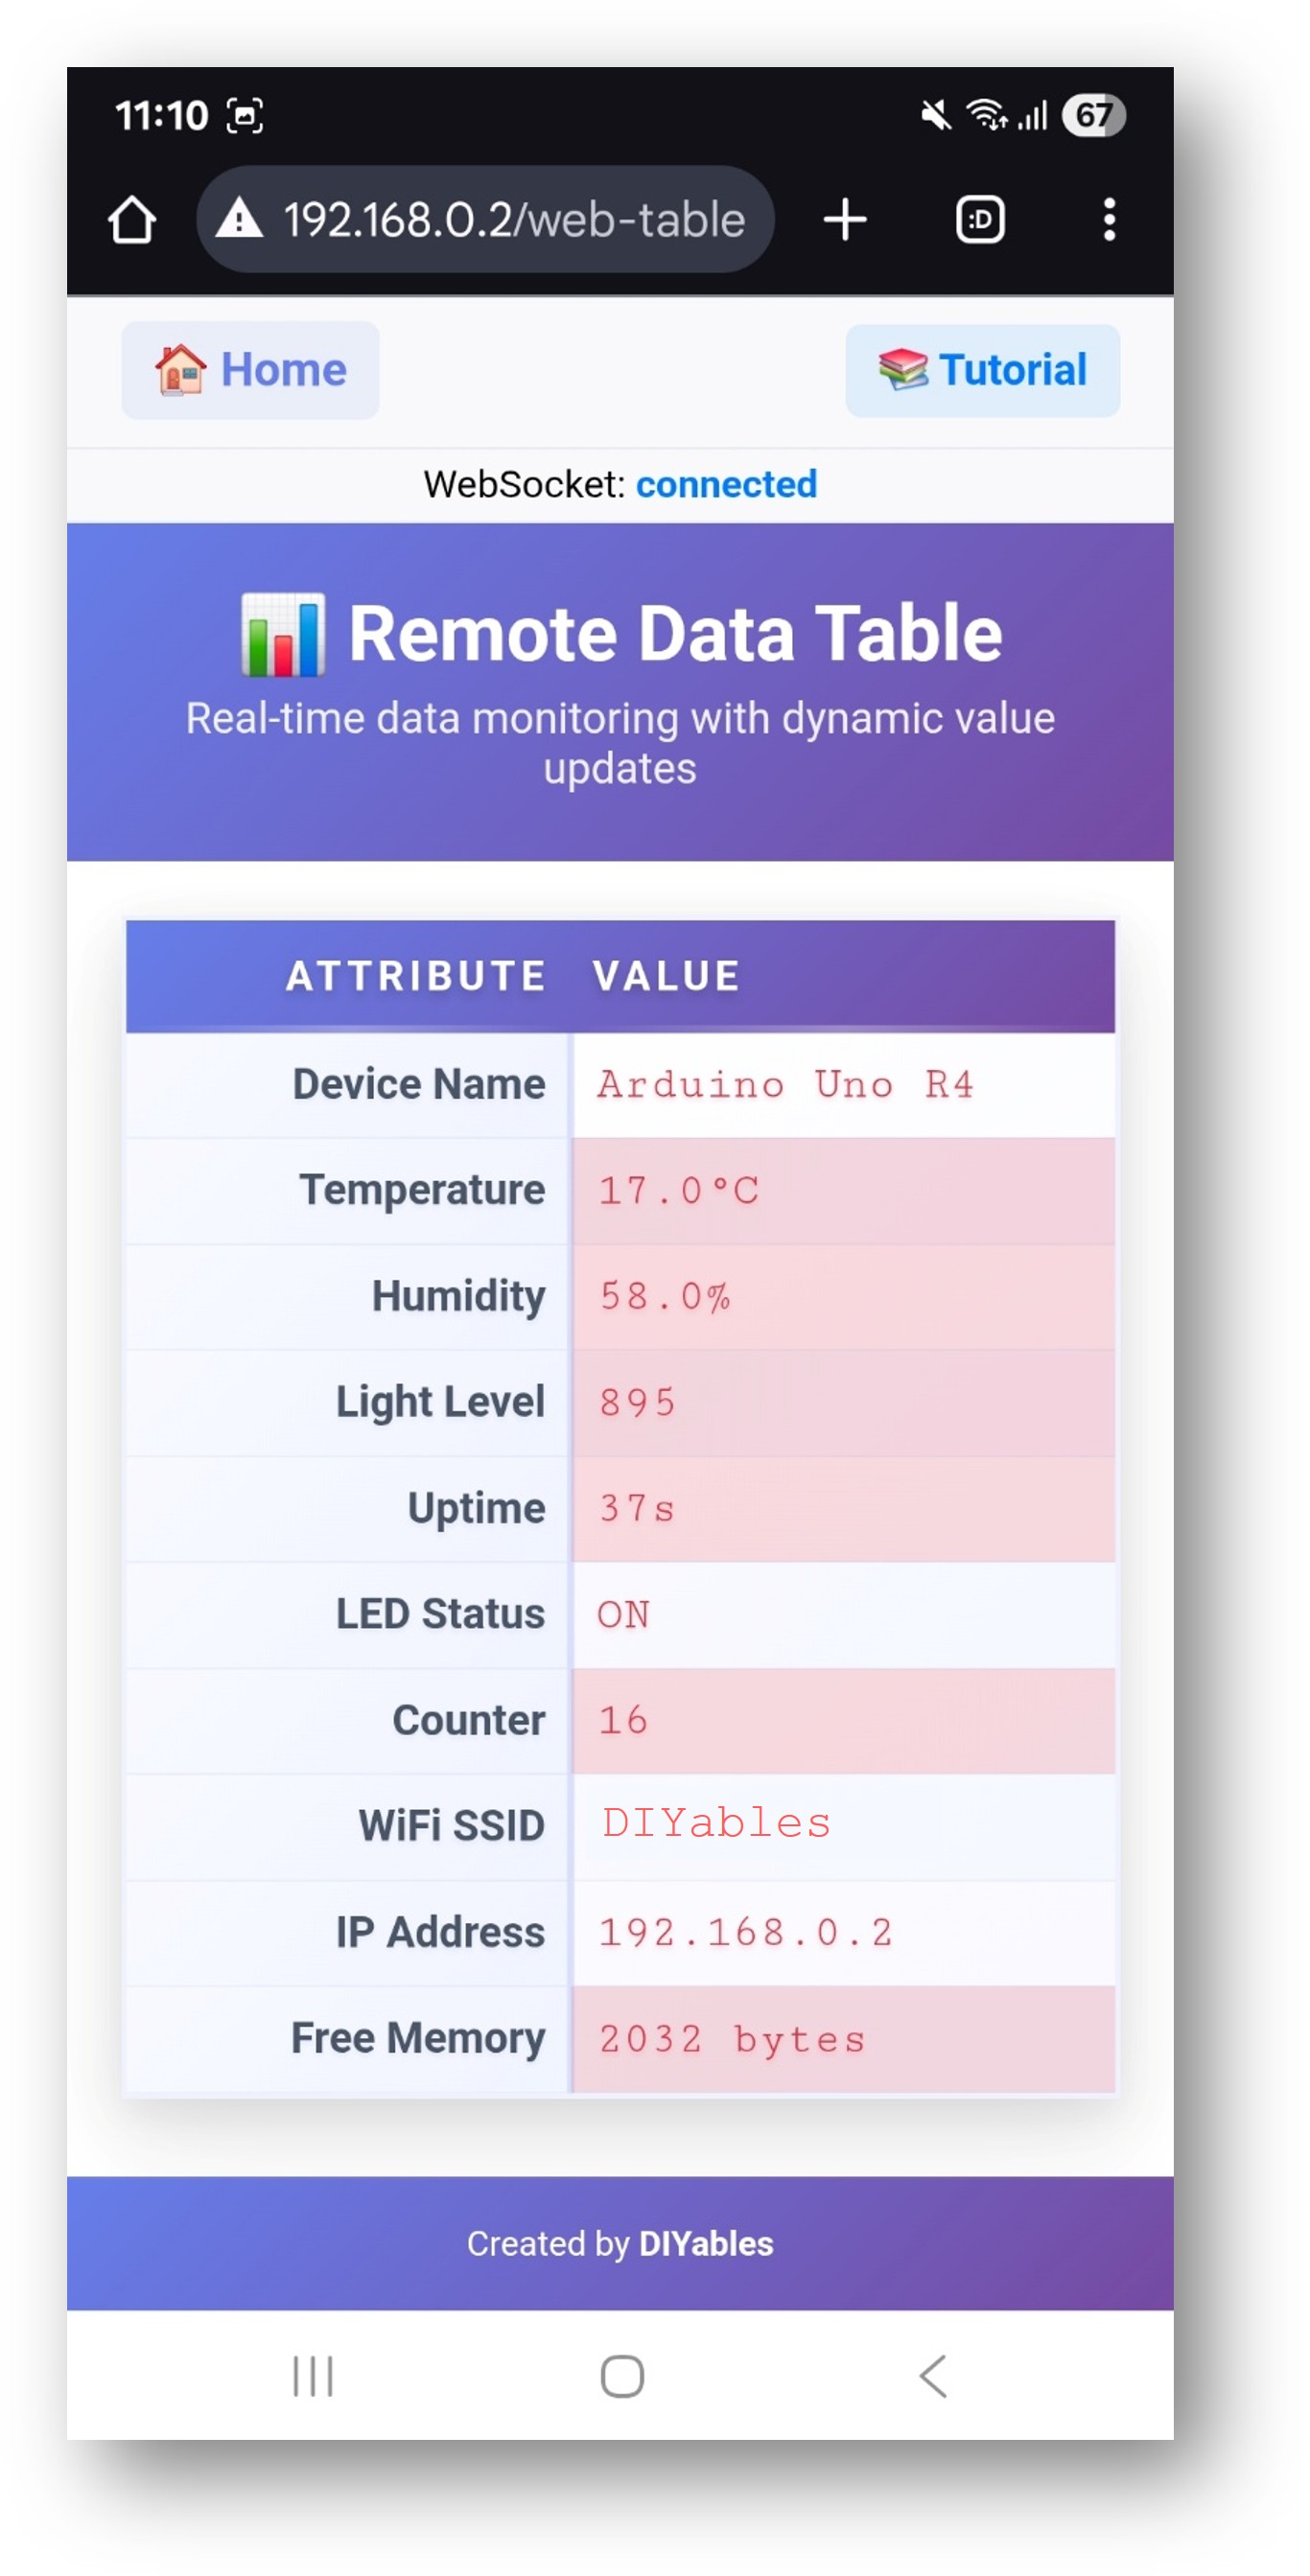
The home page shows a card for the table application:
Select the Web Table card to open the data table page:
The page is also directly accessible at http://192.168.0.2/web-table.
Defining Table Structure
Call addRow() inside setupTableStructure() to define each attribute name. The order of addRow() calls determines the display order in the browser.
Please feel free to share the link of this tutorial. However, Please do not use our content on any other websites. We invested a lot of effort and time to create the content, please respect our work!