Arduino Nano - Mini Mp3 Player Module

This guide shows you everything you need to get the DIYables Mini Mp3 Player module working with an Arduino Nano. By the end, you will know how to:

Arduino Nano Mini Mp3 Player

What You'll Need

1×Official Arduino Nano
1×Alternatively, DIYables ATMEGA328P Nano Development Board
1×USB A to Mini-B USB cable
1×DIYables Mini Mp3 Player module
1×Micro SD Card
1×Speaker
1×Breadboard
1×Jumper Wires
1×Recommended: Screw Terminal Expansion Board for Arduino Nano
1×Recommended: Breakout Expansion Board for Arduino Nano
1×Recommended: Power Splitter for Arduino Nano

Or you can buy the following kits:

1×DIYables Sensor Kit (30 sensors/displays)
1×DIYables Sensor Kit (18 sensors/displays)
Disclosure: Some of the links provided in this section are Amazon affiliate links. We may receive a commission for any purchases made through these links at no additional cost to you.
Additionally, some of these links are for products from our own brand, DIYables .

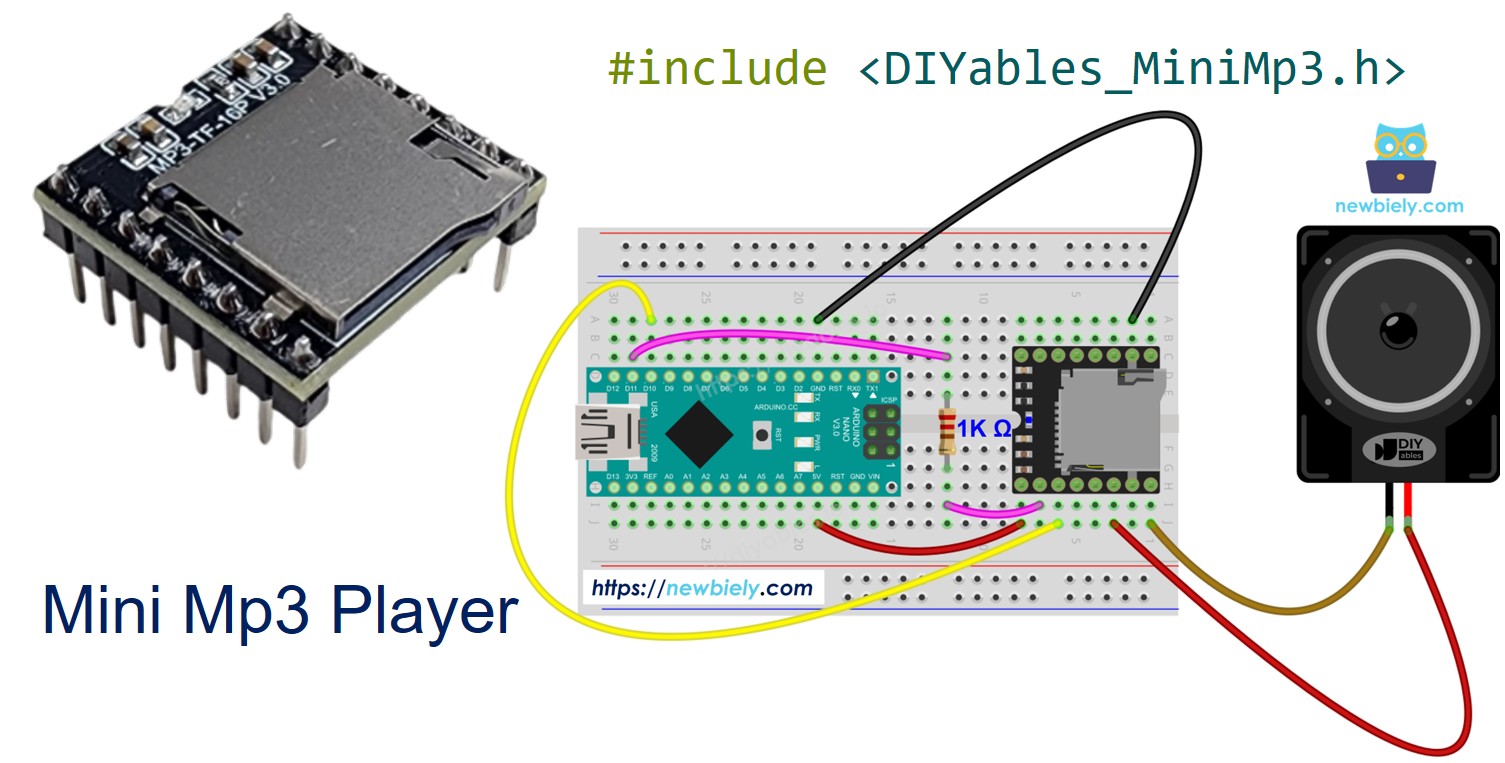
Getting to Know the Mini Mp3 Player Module

The DIYables Mini Mp3 Player module packs the YX5200-24SS decoder chip into a tiny board. Slide in a micro SD card loaded with mp3 files, hook up a speaker, and you have a standalone audio player that your Nano controls over a simple serial connection.

Here is what the module can do:

  • Playback controls: play, pause, resume, stop, next, previous
  • Volume: adjustable from 0 (silent) to 30 (maximum)
  • EQ presets: Normal, Pop, Rock, Jazz, Classic, Bass
  • Repeat modes: loop one track, loop a folder, loop all, shuffle
  • Folders: organize tracks into numbered folders for easy selection
  • Advertisements: interrupt the current track, then continue where you left off
  • Status queries: ask the module what track is playing, the current volume, etc.

All communication happens over UART at 9600 baud — just two wires (TX and RX) plus power.
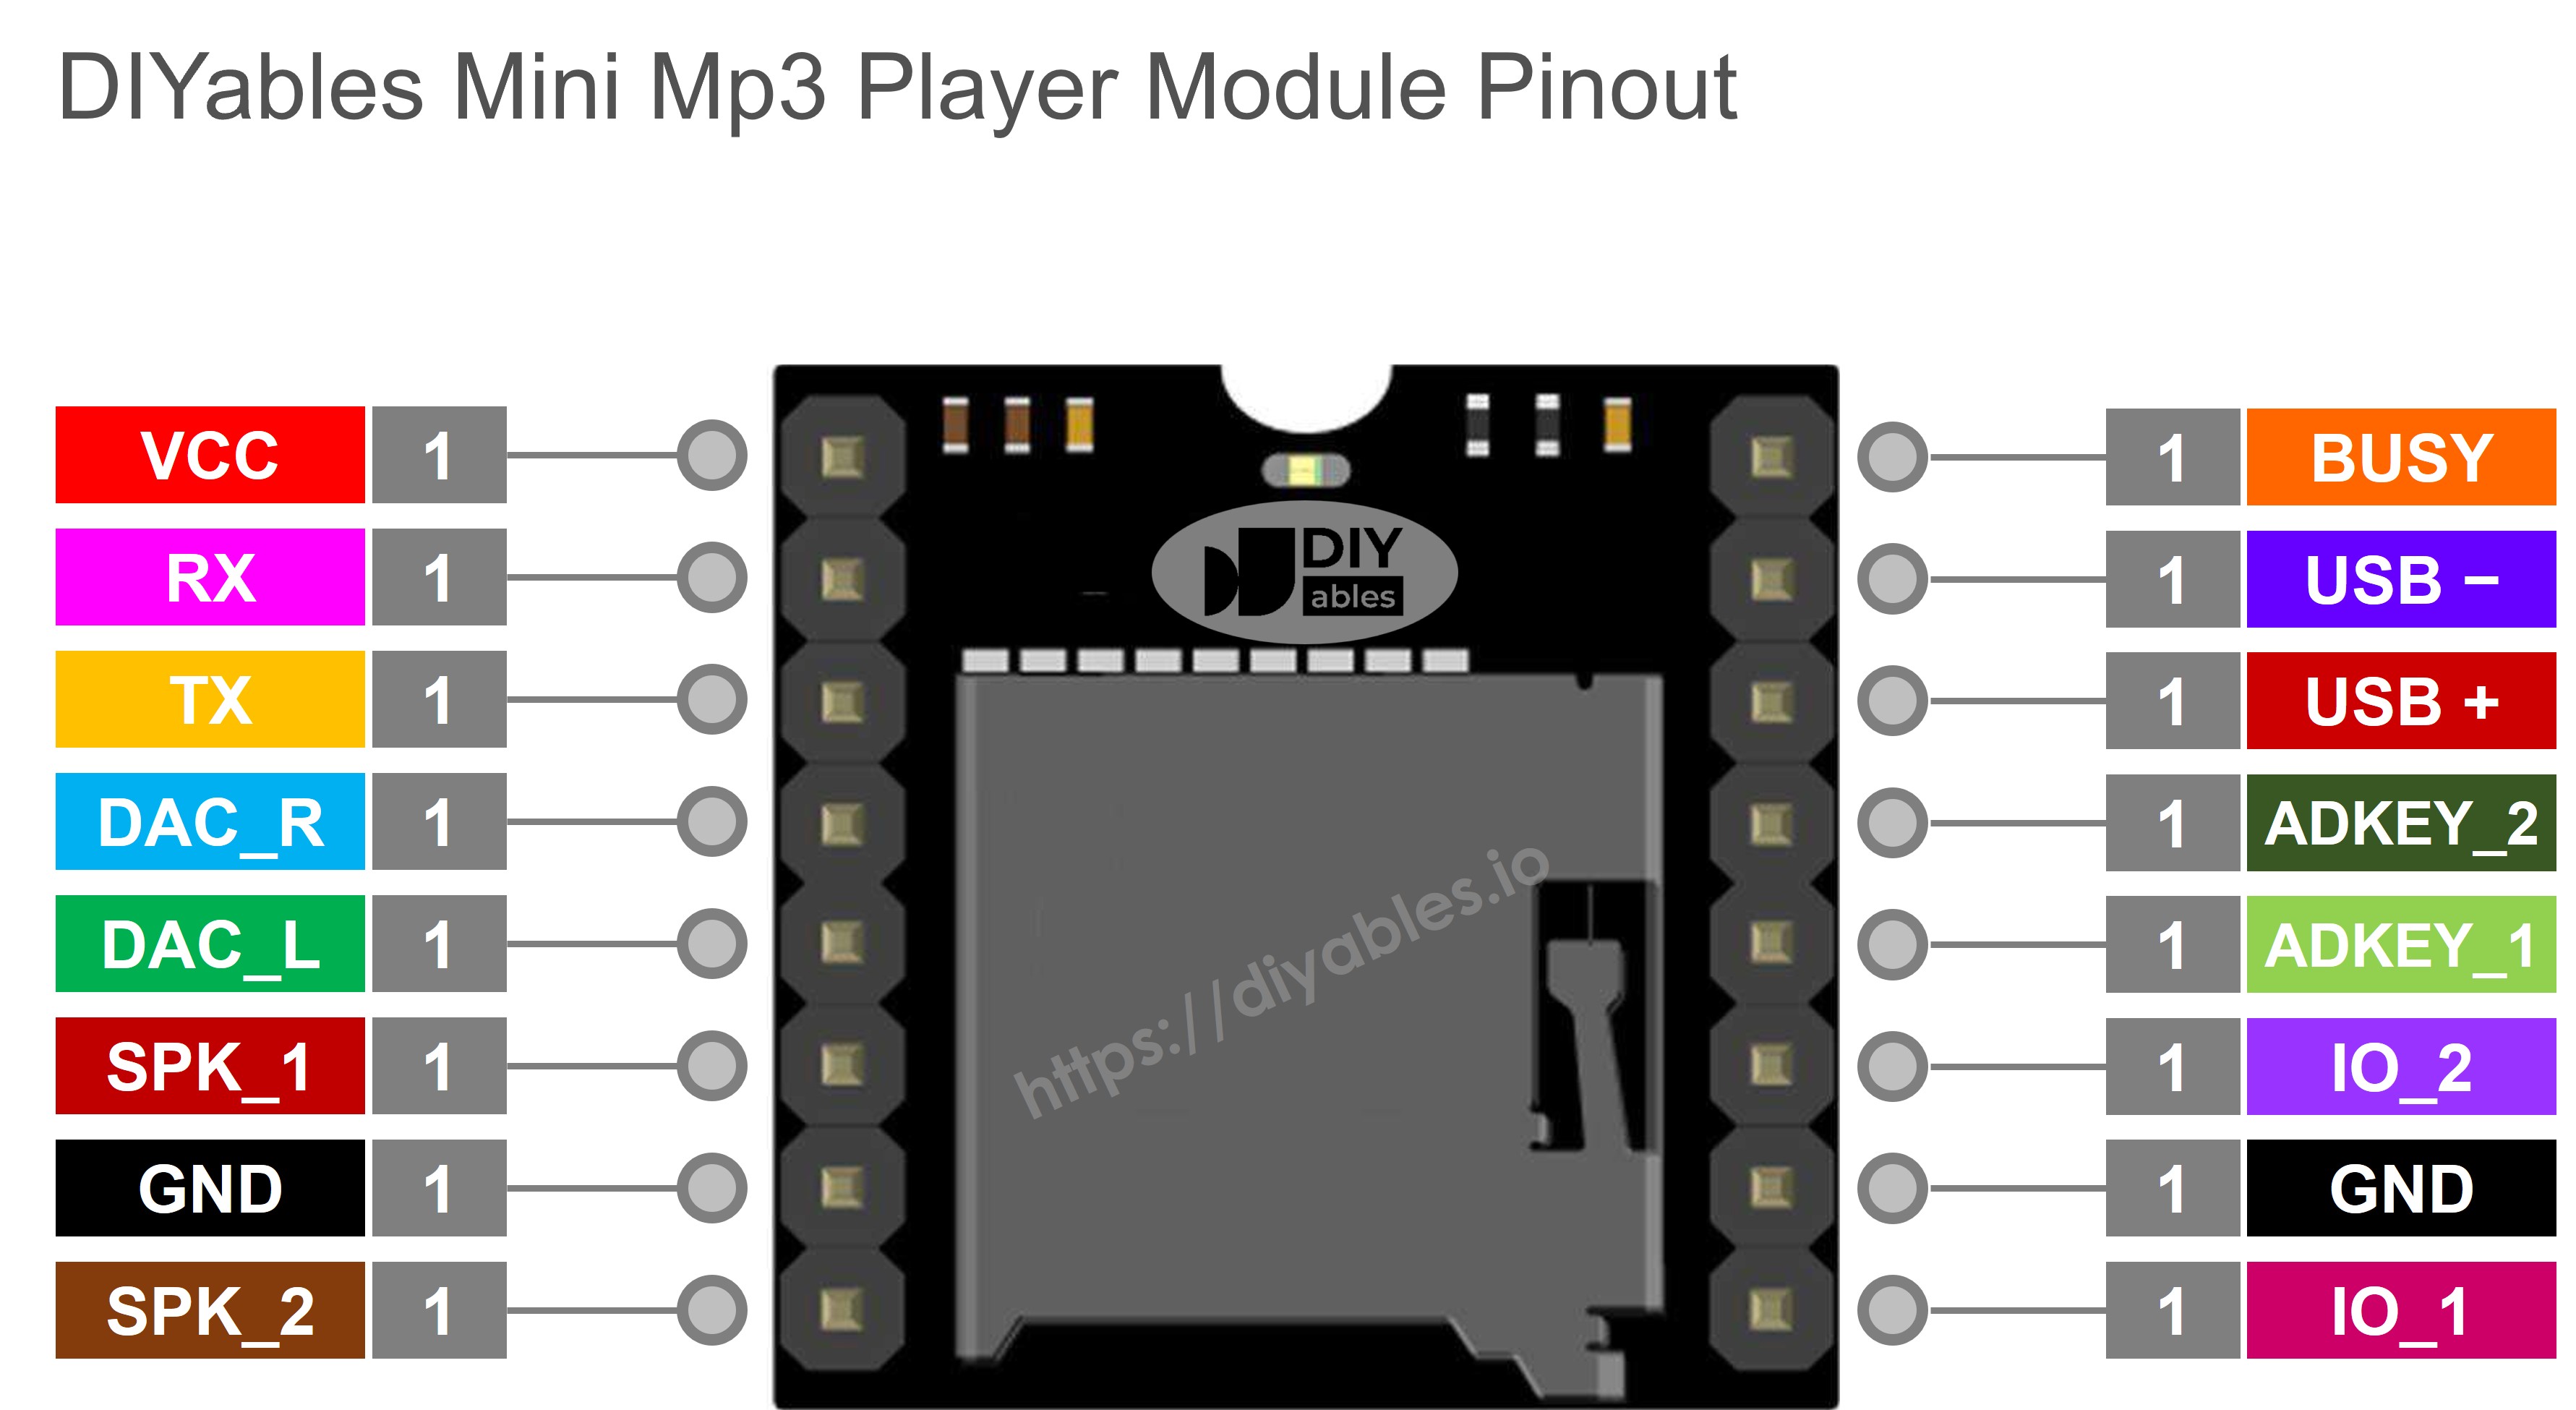
Pinout Reference

Pin What It Does
VCC Power in (3.2V – 5.0V)
GND Ground connection
RX Receives serial commands from the Nano (through 1K resistor)
TX Sends serial data back to the Nano
SPK_1 Positive speaker terminal (built-in 3W amp)
SPK_2 Negative speaker terminal
DAC_R Right audio line out (for external amp)
DAC_L Left audio line out (for external amp)
BUSY Goes LOW while a track is playing
IO_1 Trigger short press = previous, long press = vol down
IO_2 Trigger short press = next, long press = vol up
Mini Mp3 Player Pinout

How to Wire It Up

Since the Arduino Nano runs at 5V, you must place a 1K resistor between the Nano's TX pin and the module's RX pin. This drops the voltage to a safe level for the module's 3.3V logic.

Mini Mp3 Player Arduino Nano Notes
VCC 5V
GND GND
RX D11 Use a 1K resistor in series!
TX D10
SPK_1 Speaker +
SPK_2 Speaker −

Both the Nano and the Mini Mp3 Player fit comfortably on a standard breadboard, making this a very compact build.

The wiring diagram between Arduino Nano and Mini Mp3 Player

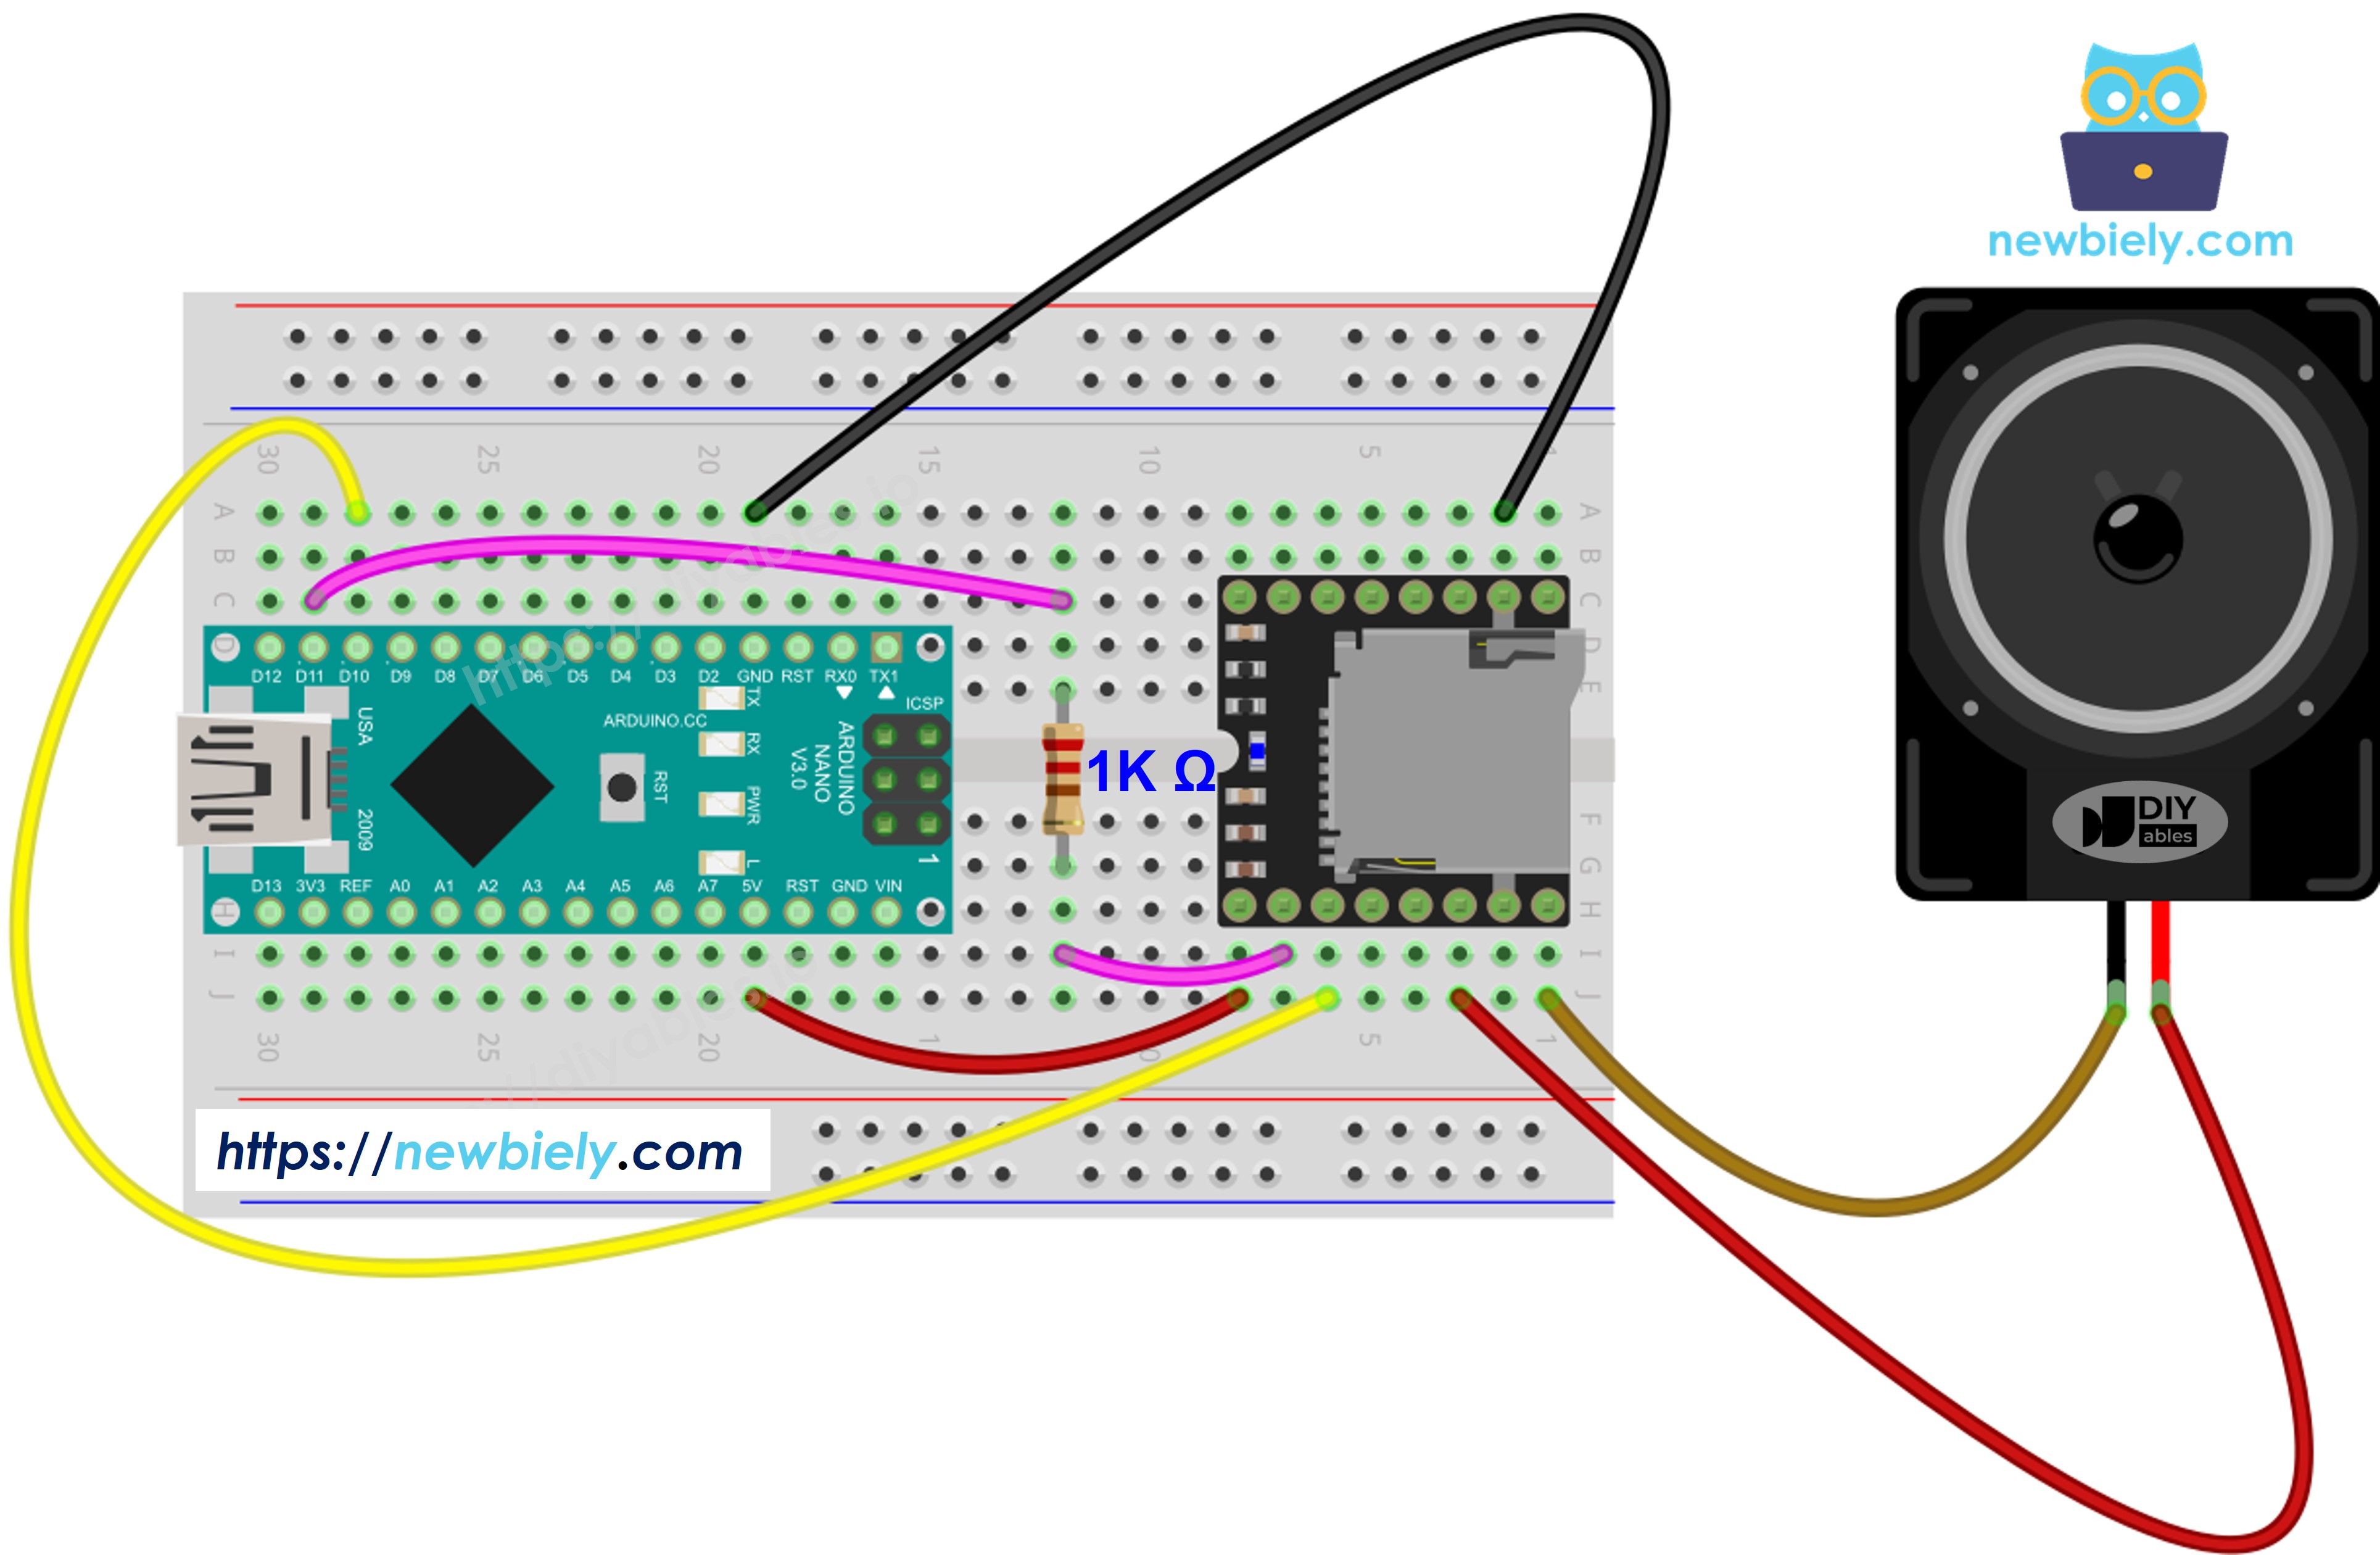
This image is created using Fritzing. Click to enlarge image

See The best way to supply power to the Arduino Nano and other components.

Setting Up the SD Card

Before inserting the card into the module:

  1. Format it as FAT16 or FAT32.
  2. Copy mp3 files to the root with zero-padded numbers:
/001.mp3 /002.mp3 /003.mp3
  1. For folder playback, create numbered folders:
/01/001.mp3 /01/002.mp3 /02/001.mp3

Watch out: The module numbers tracks by the order they were copied to the card, not by the filename. Format the card first, then copy each file one at a time in the right order.

  • Folder names: 01 to 99 (two digits, zero-padded)
  • File names inside folders: 001 to 255 (three digits, zero-padded)
  • Track numbering starts at 1, not 0

Library Installation

  • Plug the Nano into your computer via the Mini-B USB cable.
  • Open Arduino IDE, choose Arduino Nano as the board and pick the right COM port.
  • Click the Libraries icon in the left sidebar of the Arduino IDE.
  • Search for "DIYables_MiniMp3" and find the library by DIYables.
  • Hit Install.
Arduino Nano Mini Mp3 Player library

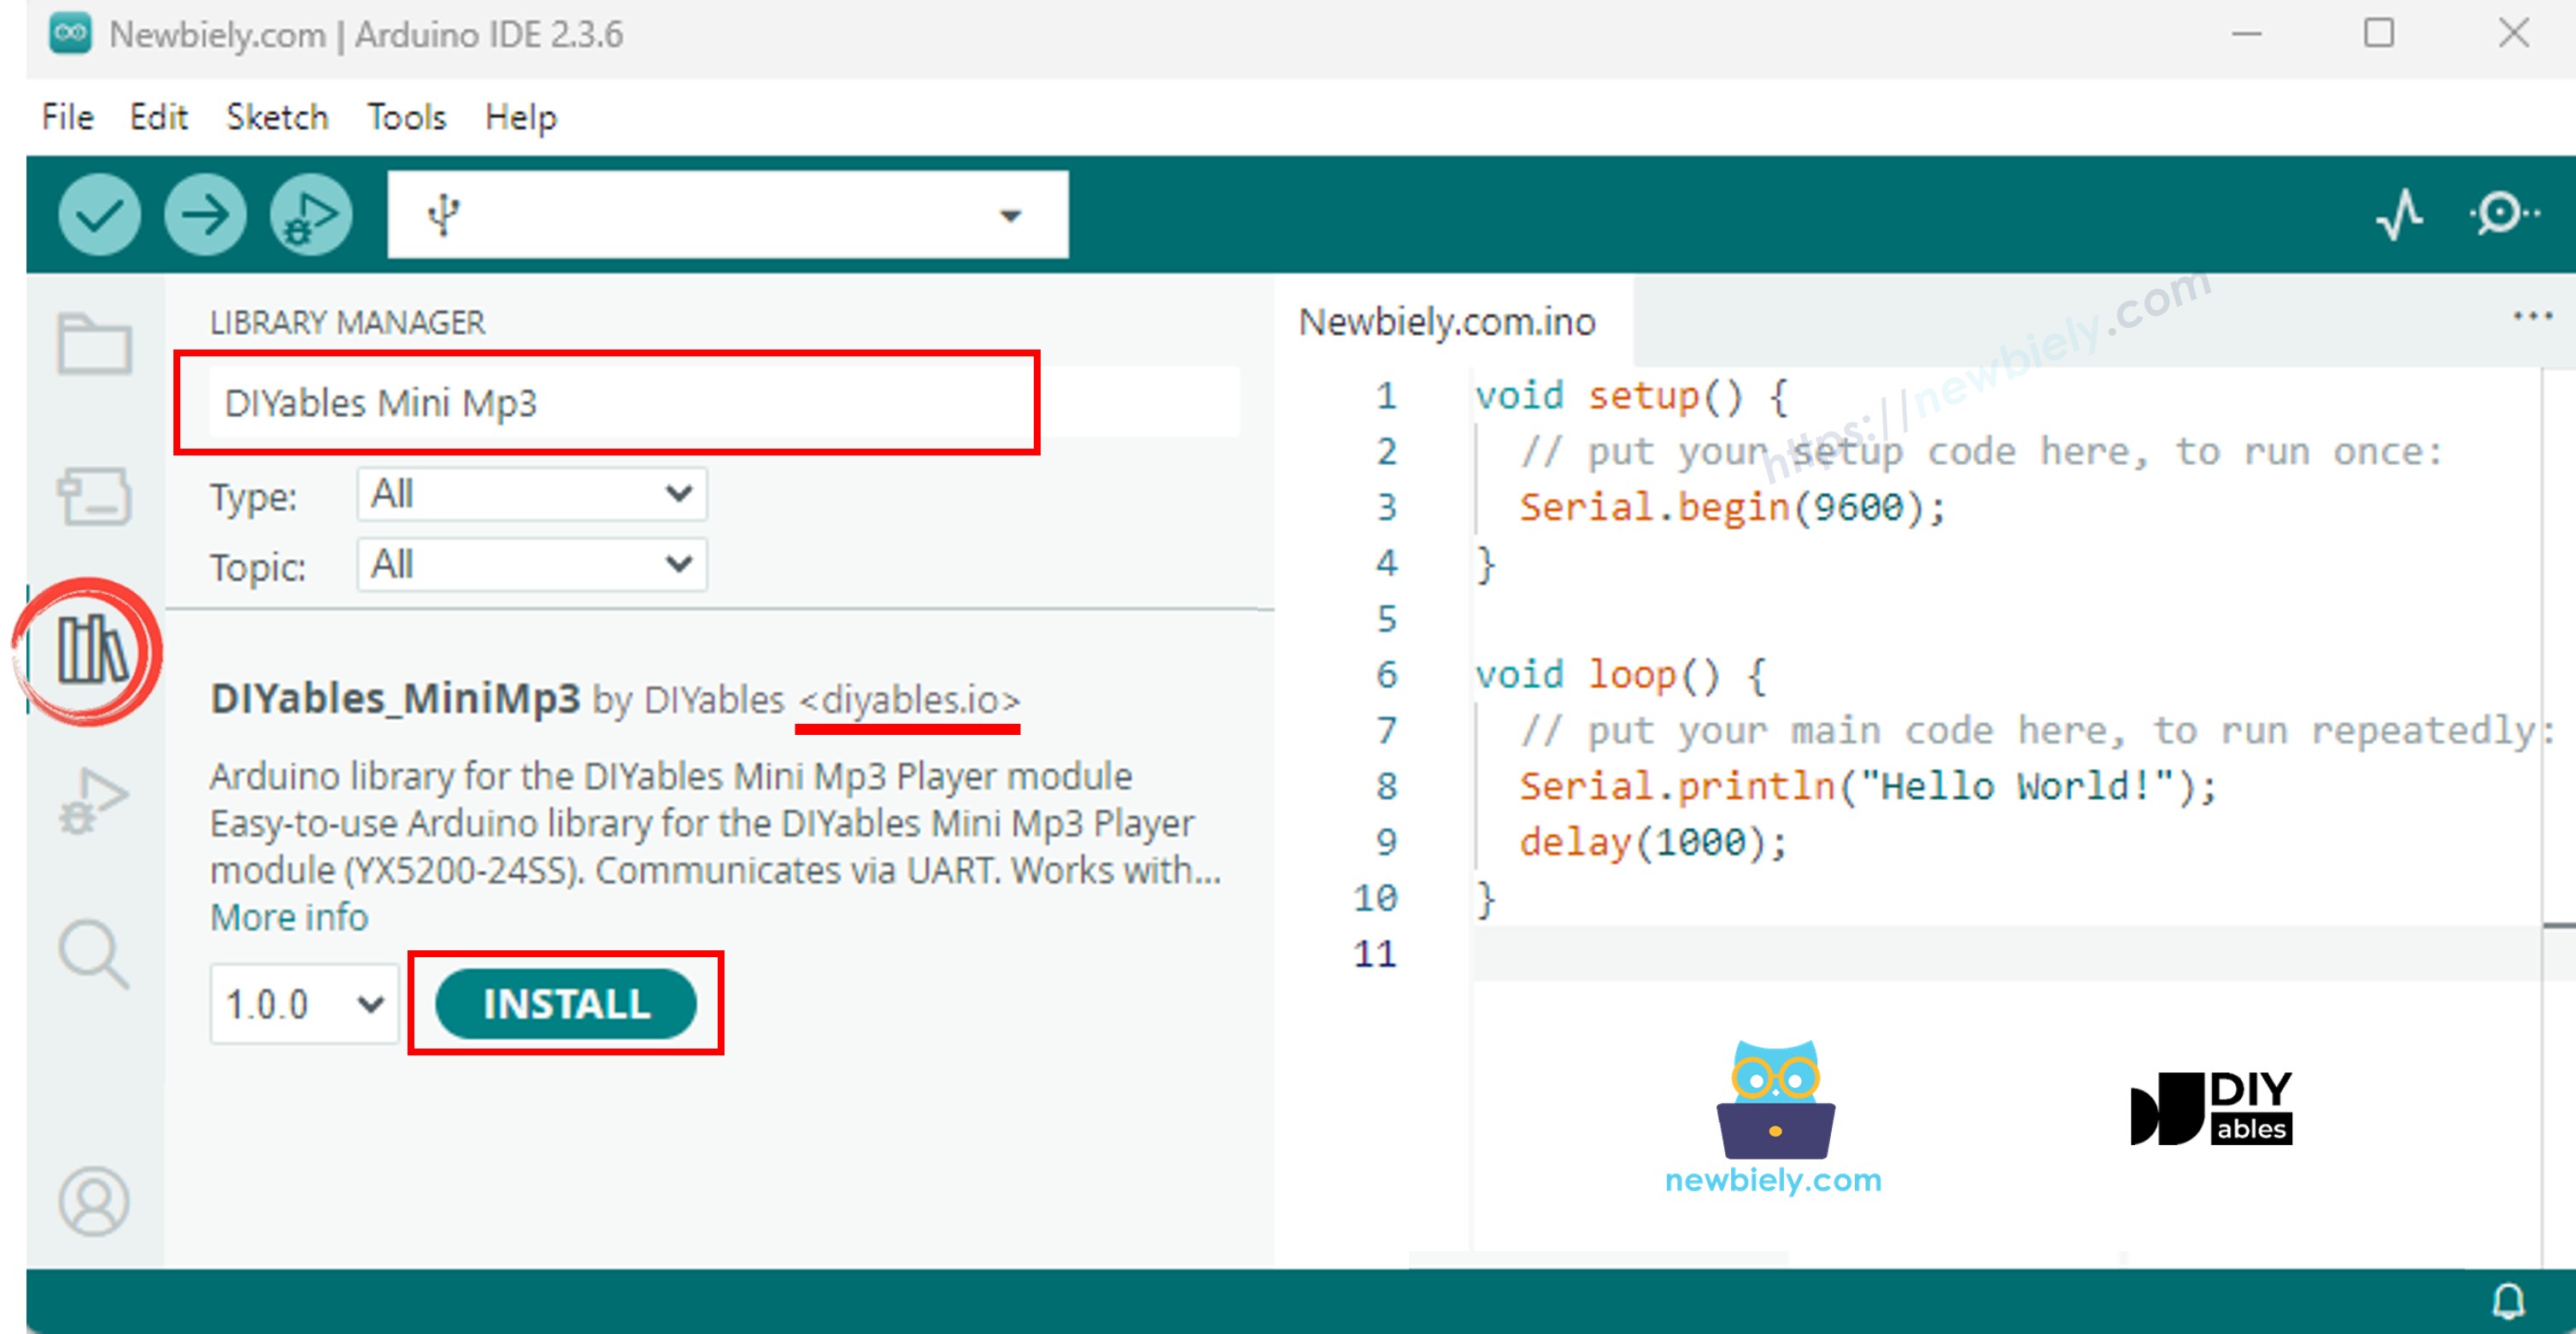
No additional dependencies are needed — the library is completely self-contained.

Starter Template

Here is the minimum code structure you need for every sketch using this module:

#include <DIYables_MiniMp3.h> #include <SoftwareSerial.h> SoftwareSerial mp3Serial(10, 11); // RX on D10, TX on D11 DIYables_MiniMp3 mp3; void setup() { mp3Serial.begin(9600); mp3.begin(mp3Serial); delay(1000); // Let the module boot up mp3.setVolume(25); // Range: 0 to 30 } void loop() { // Your playback logic here }

The delay(1000) after begin() is important — the module needs about a second to initialize after power-on. Always set the volume explicitly, because the default may be 0 (silent).

Code Example — Play One Track

Plays track 001.mp3 once and stops.

/* * DIYables Mini Mp3 Player - Play One Track * * Product: DIYables Mini Mp3 Player Module * https://diyables.io/products/mini-mp3-player-module * * Tested with: * - Arduino Uno R3 * - Arduino Uno R4 WiFi / R4 Minima * - Arduino Mega * - Arduino Due * - Arduino Giga * - DIYables STEM V3 https://diyables.io/stem-v3 * - DIYables STEM V4 IoT https://diyables.io/stem-v4-iot * - DIYables STEM V4B IoT https://diyables.io/stem-v4b-iot * - DIYables STEM V4 Edu https://diyables.io/stem-v4-edu * - DIYables MEGA2560 R3 https://diyables.io/atmega2560-board * - DIYables Nano R3 https://diyables.io/nano-board * - DIYables ESP32 Board https://diyables.io/esp32-board * - DIYables ESP32 S3 (Uno) https://diyables.io/esp32-s3-uno * - Expected to work with other Arduino-compatible boards * * Plays track 001 once, then stops. * * Wiring (Arduino Uno): * Mini Mp3 RX -> Arduino Pin 11 (via 1K resistor) * Mini Mp3 TX -> Arduino Pin 10 * Mini Mp3 VCC -> 5V * Mini Mp3 GND -> GND * Speaker connected to SPK_1 and SPK_2 pins * * SD Card: Put mp3 files in root, named 001.mp3, 002.mp3, etc. */ #include <DIYables_MiniMp3.h> #include <SoftwareSerial.h> SoftwareSerial mp3Serial(10, 11); // RX, TX DIYables_MiniMp3 mp3; void setup() { Serial.begin(9600); mp3Serial.begin(9600); mp3.begin(mp3Serial); delay(1000); // Wait for the module to initialize mp3.setVolume(25); // Set volume (0 to 30) Serial.println("Playing track 1..."); mp3.play(1); // Play track 001.mp3 } void loop() { // Nothing to do here }

Steps to Try It

  • Load your SD card with at least one mp3 file (001.mp3).
  • Insert the SD card into the module and wire everything as shown above.
  • Connect the Nano to your PC via USB.
  • In the Arduino IDE, select Arduino Nano and the correct port.
  • Paste the code and click Upload.

Track 1 plays through the speaker.

Playback Quick Reference

Function Description Example Code
play(track) Play a specific track mp3.play(1)
playNext() Jump to next track mp3.playNext()
playPrevious() Jump to previous track mp3.playPrevious()
pause() Pause current track mp3.pause()
resume() Continue paused track mp3.resume()
stop() Stop playback mp3.stop()

Code Example — Play Multiple Tracks

Cycles through several tracks one at a time.

/* * DIYables Mini Mp3 Player - Play Multiple Tracks * * Product: DIYables Mini Mp3 Player Module * https://diyables.io/products/mini-mp3-player-module * * Tested with: * - Arduino Uno R3 * - Arduino Uno R4 WiFi / R4 Minima * - Arduino Mega * - Arduino Due * - Arduino Giga * - DIYables STEM V3 https://diyables.io/stem-v3 * - DIYables STEM V4 IoT https://diyables.io/stem-v4-iot * - DIYables STEM V4B IoT https://diyables.io/stem-v4b-iot * - DIYables STEM V4 Edu https://diyables.io/stem-v4-edu * - DIYables MEGA2560 R3 https://diyables.io/atmega2560-board * - DIYables Nano R3 https://diyables.io/nano-board * - DIYables ESP32 Board https://diyables.io/esp32-board * - DIYables ESP32 S3 (Uno) https://diyables.io/esp32-s3-uno * - Expected to work with other Arduino-compatible boards * * Plays tracks one after another with a delay between them. * * Wiring (Arduino Uno): * Mini Mp3 RX -> Arduino Pin 11 (via 1K resistor) * Mini Mp3 TX -> Arduino Pin 10 * Mini Mp3 VCC -> 5V * Mini Mp3 GND -> GND * Speaker connected to SPK_1 and SPK_2 pins * * SD Card: Put mp3 files in root, named 001.mp3, 002.mp3, 003.mp3 */ #include <DIYables_MiniMp3.h> #include <SoftwareSerial.h> SoftwareSerial mp3Serial(10, 11); // RX, TX DIYables_MiniMp3 mp3; int currentTrack = 1; int totalTracks = 3; // Change this to match your SD card unsigned long lastTrackTime = 0; unsigned long trackDuration = 5000; // Wait 5 seconds between tracks (adjust as needed) void setup() { Serial.begin(9600); mp3Serial.begin(9600); mp3.begin(mp3Serial); delay(1000); mp3.setVolume(20); Serial.println("Playing track 1..."); mp3.play(currentTrack); lastTrackTime = millis(); } void loop() { // After trackDuration, play the next track if (millis() - lastTrackTime >= trackDuration) { currentTrack++; if (currentTrack > totalTracks) currentTrack = 1; // Loop back to first track Serial.print("Playing track "); Serial.println(currentTrack); mp3.play(currentTrack); lastTrackTime = millis(); } }

Steps to Try It

  • Put at least 3 mp3 files on the SD card.
  • Upload the code. Tracks play in a loop with a 5-second interval.

Code Example — Volume Up/Down Buttons

Two physical buttons raise and lower the volume in real time.

/* * DIYables Mini Mp3 Player - Volume Control * * Product: DIYables Mini Mp3 Player Module * https://diyables.io/products/mini-mp3-player-module * * Tested with: * - Arduino Uno R3 * - Arduino Uno R4 WiFi / R4 Minima * - Arduino Mega * - Arduino Due * - Arduino Giga * - DIYables STEM V3 https://diyables.io/stem-v3 * - DIYables STEM V4 IoT https://diyables.io/stem-v4-iot * - DIYables STEM V4B IoT https://diyables.io/stem-v4b-iot * - DIYables STEM V4 Edu https://diyables.io/stem-v4-edu * - DIYables MEGA2560 R3 https://diyables.io/atmega2560-board * - DIYables Nano R3 https://diyables.io/nano-board * - DIYables ESP32 Board https://diyables.io/esp32-board * - DIYables ESP32 S3 (Uno) https://diyables.io/esp32-s3-uno * - Expected to work with other Arduino-compatible boards * * Use two buttons to increase/decrease the volume. * Press button on pin 2 to volume up, pin 3 to volume down. * * Wiring (Arduino Uno): * Mini Mp3 RX -> Arduino Pin 11 (via 1K resistor) * Mini Mp3 TX -> Arduino Pin 10 * Mini Mp3 VCC -> 5V * Mini Mp3 GND -> GND * Speaker connected to SPK_1 and SPK_2 pins * Button UP -> Pin 2 (other leg to GND) * Button DOWN -> Pin 3 (other leg to GND) * * SD Card: Put mp3 files in root, named 001.mp3, 002.mp3, etc. */ #include <DIYables_MiniMp3.h> #include <SoftwareSerial.h> SoftwareSerial mp3Serial(10, 11); // RX, TX DIYables_MiniMp3 mp3; const int BUTTON_VOL_UP = 2; const int BUTTON_VOL_DOWN = 3; int volume = 15; // Start at half volume void setup() { Serial.begin(9600); mp3Serial.begin(9600); pinMode(BUTTON_VOL_UP, INPUT_PULLUP); pinMode(BUTTON_VOL_DOWN, INPUT_PULLUP); mp3.begin(mp3Serial); delay(1000); mp3.setVolume(volume); mp3.loopTrack(1); // Play track 1 on repeat Serial.print("Volume: "); Serial.println(volume); } void loop() { // Volume Up button (pressed = LOW because of INPUT_PULLUP) if (digitalRead(BUTTON_VOL_UP) == LOW) { if (volume < 30) { volume++; mp3.setVolume(volume); Serial.print("Volume: "); Serial.println(volume); } delay(200); // Simple debounce } // Volume Down button if (digitalRead(BUTTON_VOL_DOWN) == LOW) { if (volume > 0) { volume--; mp3.setVolume(volume); Serial.print("Volume: "); Serial.println(volume); } delay(200); // Simple debounce } }

Steps to Try It

  • Wire two buttons as described in the code, then upload.
  • Press buttons while a track plays. Watch the Serial Monitor for the volume level.

Volume Quick Reference

Function Description Example Code
setVolume(val) Set volume (0 = mute, 30 = max) mp3.setVolume(20)
volumeUp() Bump volume up by 1 mp3.volumeUp()
volumeDown() Bump volume down by 1 mp3.volumeDown()
getVolume() Read current volume level mp3.getVolume()

Code Example — Next / Previous Buttons

Skip tracks with two buttons.

/* * DIYables Mini Mp3 Player - Next/Previous with Buttons * * Product: DIYables Mini Mp3 Player Module * https://diyables.io/products/mini-mp3-player-module * * Tested with: * - Arduino Uno R3 * - Arduino Uno R4 WiFi / R4 Minima * - Arduino Mega * - Arduino Due * - Arduino Giga * - DIYables STEM V3 https://diyables.io/stem-v3 * - DIYables STEM V4 IoT https://diyables.io/stem-v4-iot * - DIYables STEM V4B IoT https://diyables.io/stem-v4b-iot * - DIYables STEM V4 Edu https://diyables.io/stem-v4-edu * - DIYables MEGA2560 R3 https://diyables.io/atmega2560-board * - DIYables Nano R3 https://diyables.io/nano-board * - DIYables ESP32 Board https://diyables.io/esp32-board * - DIYables ESP32 S3 (Uno) https://diyables.io/esp32-s3-uno * - Expected to work with other Arduino-compatible boards * * Use two buttons to play next/previous tracks. * Displays the current track number on the Serial Monitor. * * Wiring (Arduino Uno): * Mini Mp3 RX -> Arduino Pin 11 (via 1K resistor) * Mini Mp3 TX -> Arduino Pin 10 * Mini Mp3 VCC -> 5V * Mini Mp3 GND -> GND * Speaker connected to SPK_1 and SPK_2 pins * Button NEXT -> Pin 2 (other leg to GND) * Button PREV -> Pin 3 (other leg to GND) * * SD Card: Put mp3 files in root, named 001.mp3, 002.mp3, etc. */ #include <DIYables_MiniMp3.h> #include <SoftwareSerial.h> SoftwareSerial mp3Serial(10, 11); // RX, TX DIYables_MiniMp3 mp3; const int BUTTON_NEXT = 2; const int BUTTON_PREV = 3; void setup() { Serial.begin(9600); mp3Serial.begin(9600); pinMode(BUTTON_NEXT, INPUT_PULLUP); pinMode(BUTTON_PREV, INPUT_PULLUP); mp3.begin(mp3Serial); delay(1000); mp3.setVolume(20); mp3.play(1); // Start with track 1 Serial.println("Press NEXT or PREV button to change track"); } void loop() { if (digitalRead(BUTTON_NEXT) == LOW) { Serial.println("Next track"); mp3.playNext(); delay(300); // Simple debounce } if (digitalRead(BUTTON_PREV) == LOW) { Serial.println("Previous track"); mp3.playPrevious(); delay(300); // Simple debounce } }

Steps to Try It

  • Wire buttons to pins 2 and 3, upload, and press to skip.

Code Example — Pause / Resume Button

One button toggles between pause and resume.

/* * DIYables Mini Mp3 Player - Pause and Resume * * Product: DIYables Mini Mp3 Player Module * https://diyables.io/products/mini-mp3-player-module * * Tested with: * - Arduino Uno R3 * - Arduino Uno R4 WiFi / R4 Minima * - Arduino Mega * - Arduino Due * - Arduino Giga * - DIYables STEM V3 https://diyables.io/stem-v3 * - DIYables STEM V4 IoT https://diyables.io/stem-v4-iot * - DIYables STEM V4B IoT https://diyables.io/stem-v4b-iot * - DIYables STEM V4 Edu https://diyables.io/stem-v4-edu * - DIYables MEGA2560 R3 https://diyables.io/atmega2560-board * - DIYables Nano R3 https://diyables.io/nano-board * - DIYables ESP32 Board https://diyables.io/esp32-board * - DIYables ESP32 S3 (Uno) https://diyables.io/esp32-s3-uno * - Expected to work with other Arduino-compatible boards * * Demonstrates pausing and resuming playback using a single button. * Press the button to toggle between pause and resume. * * Wiring (Arduino Uno): * Mini Mp3 RX -> Arduino Pin 11 (via 1K resistor) * Mini Mp3 TX -> Arduino Pin 10 * Mini Mp3 VCC -> 5V * Mini Mp3 GND -> GND * Speaker connected to SPK_1 and SPK_2 pins * Button -> Pin 2 (other leg to GND) * * SD Card: Put mp3 files in root, named 001.mp3, 002.mp3, etc. */ #include <DIYables_MiniMp3.h> #include <SoftwareSerial.h> SoftwareSerial mp3Serial(10, 11); // RX, TX DIYables_MiniMp3 mp3; const int BUTTON_PIN = 2; bool paused = false; void setup() { Serial.begin(9600); mp3Serial.begin(9600); pinMode(BUTTON_PIN, INPUT_PULLUP); mp3.begin(mp3Serial); delay(1000); mp3.setVolume(20); mp3.play(1); Serial.println("Playing. Press button to pause/resume."); } void loop() { if (digitalRead(BUTTON_PIN) == LOW) { if (paused) { mp3.resume(); Serial.println("Resumed"); } else { mp3.pause(); Serial.println("Paused"); } paused = !paused; delay(300); // Simple debounce } }

Steps to Try It

  • Wire a button to pin 2. Upload and press to toggle pause/resume.

Code Example — Loop a Track Forever

Repeats a single track on an endless loop.

/* * DIYables Mini Mp3 Player - Loop Track * * Product: DIYables Mini Mp3 Player Module * https://diyables.io/products/mini-mp3-player-module * * Tested with: * - Arduino Uno R3 * - Arduino Uno R4 WiFi / R4 Minima * - Arduino Mega * - Arduino Due * - Arduino Giga * - DIYables STEM V3 https://diyables.io/stem-v3 * - DIYables STEM V4 IoT https://diyables.io/stem-v4-iot * - DIYables STEM V4B IoT https://diyables.io/stem-v4b-iot * - DIYables STEM V4 Edu https://diyables.io/stem-v4-edu * - DIYables MEGA2560 R3 https://diyables.io/atmega2560-board * - DIYables Nano R3 https://diyables.io/nano-board * - DIYables ESP32 Board https://diyables.io/esp32-board * - DIYables ESP32 S3 (Uno) https://diyables.io/esp32-s3-uno * - Expected to work with other Arduino-compatible boards * * Loops (repeats) a track continuously with EQ setting. * * Wiring (Arduino Uno): * Mini Mp3 RX -> Arduino Pin 11 (via 1K resistor) * Mini Mp3 TX -> Arduino Pin 10 * Mini Mp3 VCC -> 5V * Mini Mp3 GND -> GND * Speaker connected to SPK_1 and SPK_2 pins * * SD Card file structure: * /001.mp3 * /002.mp3 * ... */ #include <DIYables_MiniMp3.h> #include <SoftwareSerial.h> SoftwareSerial mp3Serial(10, 11); // RX, TX DIYables_MiniMp3 mp3; void setup() { Serial.begin(9600); mp3Serial.begin(9600); mp3.begin(mp3Serial); delay(1000); // Wait for the module to initialize mp3.setVolume(25); // Volume: 0 to 30 mp3.setEQ(DIYables_MiniMp3::EQ_NORMAL); Serial.println("Playing track 1 on loop..."); mp3.loopTrack(1); } void loop() { // Your code here }

Steps to Try It

  • Upload the code. Track 1 repeats indefinitely.

Repeat & Shuffle Quick Reference

Function Description Example Code
loopTrack(track) Repeat one track nonstop mp3.loopTrack(1)
loopFolder(folder) Repeat all tracks in a folder mp3.loopFolder(1)
loopAll() Repeat every track on the card mp3.loopAll()
stopLoop() Cancel the current loop mp3.stopLoop()
shuffle() Random playback of all tracks mp3.shuffle()

Code Example — Folder Playback

Select and play tracks from specific numbered folders on the SD card.

/* * DIYables Mini Mp3 Player - Play from Folder * * Product: DIYables Mini Mp3 Player Module * https://diyables.io/products/mini-mp3-player-module * * Tested with: * - Arduino Uno R3 * - Arduino Uno R4 WiFi / R4 Minima * - Arduino Mega * - Arduino Due * - Arduino Giga * - DIYables STEM V3 https://diyables.io/stem-v3 * - DIYables STEM V4 IoT https://diyables.io/stem-v4-iot * - DIYables STEM V4B IoT https://diyables.io/stem-v4b-iot * - DIYables STEM V4 Edu https://diyables.io/stem-v4-edu * - DIYables MEGA2560 R3 https://diyables.io/atmega2560-board * - DIYables Nano R3 https://diyables.io/nano-board * - DIYables ESP32 Board https://diyables.io/esp32-board * - DIYables ESP32 S3 (Uno) https://diyables.io/esp32-s3-uno * - Expected to work with other Arduino-compatible boards * * Plays tracks from specific folders on the SD card. * * Wiring (Arduino Uno): * Mini Mp3 RX -> Arduino Pin 11 (via 1K resistor) * Mini Mp3 TX -> Arduino Pin 10 * Mini Mp3 VCC -> 5V * Mini Mp3 GND -> GND * Speaker connected to SPK_1 and SPK_2 pins * * SD Card file structure: * /01/001.mp3 <- playFolder(1, 1) * /01/002.mp3 <- playFolder(1, 2) * /02/001.mp3 <- playFolder(2, 1) * /02/002.mp3 <- playFolder(2, 2) * * IMPORTANT: * - Numbering starts from 1, NOT 0 * - Folder names must be 2-digit zero-padded (01-99) * - Track names must be 3-digit zero-padded (001-255) * - Format SD card as FAT32, then copy files one by one in order * - Track order is determined by the order files were copied, * NOT by filename. So copy them in the correct sequence. */ #include <DIYables_MiniMp3.h> #include <SoftwareSerial.h> SoftwareSerial mp3Serial(10, 11); // RX, TX DIYables_MiniMp3 mp3; void setup() { Serial.begin(9600); mp3Serial.begin(9600); mp3.begin(mp3Serial); delay(1000); mp3.setVolume(20); // Play track 1 from folder 01 Serial.println("Playing folder 01, track 001..."); mp3.playFolder(1, 1); delay(5000); // Play track 2 from folder 01 Serial.println("Playing folder 01, track 002..."); mp3.playFolder(1, 2); delay(5000); // Play track 1 from folder 02 Serial.println("Playing folder 02, track 001..."); mp3.playFolder(2, 1); } void loop() { // Nothing to do here }

Steps to Try It

  • Create folders (01, 02) on the SD card with numbered mp3 files inside.
  • Upload the code. It plays from folder 01, then folder 02.

Folder Playback Quick Reference

Function Description Example Code
playFolder(f, t) Play track t from folder f (99 folders max, 255 tracks) mp3.playFolder(1, 1)
playLargeFolder(f, t) Play from folder (15 folders max, 3000 tracks) mp3.playLargeFolder(1, 500)
playFromMP3Folder(t) Play from the special /mp3 folder mp3.playFromMP3Folder(1)

Code Example — Serial Monitor Remote

Control playback entirely from the Serial Monitor — great for testing.

/* * DIYables Mini Mp3 Player - Serial Command Control * * Product: DIYables Mini Mp3 Player Module * https://diyables.io/products/mini-mp3-player-module * * Tested with: * - Arduino Uno R3 * - Arduino Uno R4 WiFi / R4 Minima * - Arduino Mega * - Arduino Due * - Arduino Giga * - DIYables STEM V3 https://diyables.io/stem-v3 * - DIYables STEM V4 IoT https://diyables.io/stem-v4-iot * - DIYables STEM V4B IoT https://diyables.io/stem-v4b-iot * - DIYables STEM V4 Edu https://diyables.io/stem-v4-edu * - DIYables MEGA2560 R3 https://diyables.io/atmega2560-board * - DIYables Nano R3 https://diyables.io/nano-board * - DIYables ESP32 Board https://diyables.io/esp32-board * - DIYables ESP32 S3 (Uno) https://diyables.io/esp32-s3-uno * - Expected to work with other Arduino-compatible boards * * Control the Mp3 player by typing commands in the Serial Monitor. * Great for testing all functions without extra hardware. * * Commands (type in Serial Monitor, then press Enter): * 1-9 Play track 1 to 9 * + Volume up * - Volume down * p Pause * r Resume * s Stop * n Next track * b Previous track (back) * ? Show current status * * Wiring (Arduino Uno): * Mini Mp3 RX -> Arduino Pin 11 (via 1K resistor) * Mini Mp3 TX -> Arduino Pin 10 * Mini Mp3 VCC -> 5V * Mini Mp3 GND -> GND * Speaker connected to SPK_1 and SPK_2 pins * * SD Card: Put mp3 files in root, named 001.mp3, 002.mp3, etc. */ #include <DIYables_MiniMp3.h> #include <SoftwareSerial.h> SoftwareSerial mp3Serial(10, 11); // RX, TX DIYables_MiniMp3 mp3; void setup() { Serial.begin(9600); mp3Serial.begin(9600); mp3.begin(mp3Serial); delay(1000); mp3.setVolume(20); Serial.println("=== DIYables Mini Mp3 Player ==="); Serial.println("Commands:"); Serial.println(" 1-9 Play track number"); Serial.println(" + Volume up"); Serial.println(" - Volume down"); Serial.println(" p Pause"); Serial.println(" r Resume"); Serial.println(" s Stop"); Serial.println(" n Next track"); Serial.println(" b Previous track"); Serial.println(" ? Show status"); Serial.println("================================"); } void loop() { if (Serial.available()) { char cmd = Serial.read(); switch (cmd) { case '1': case '2': case '3': case '4': case '5': case '6': case '7': case '8': case '9': Serial.print("Playing track "); Serial.println(cmd - '0'); mp3.play(cmd - '0'); break; case '+': Serial.println("Volume up"); mp3.volumeUp(); break; case '-': Serial.println("Volume down"); mp3.volumeDown(); break; case 'p': Serial.println("Paused"); mp3.pause(); break; case 'r': Serial.println("Resumed"); mp3.resume(); break; case 's': Serial.println("Stopped"); mp3.stop(); break; case 'n': Serial.println("Next track"); mp3.playNext(); break; case 'b': Serial.println("Previous track"); mp3.playPrevious(); break; case '?': { Serial.println("--- Status ---"); int16_t vol = mp3.getVolume(); Serial.print("Volume: "); Serial.println(vol); int16_t track = mp3.getCurrentTrack(); Serial.print("Current track: "); Serial.println(track); bool playing = mp3.isPlaying(); Serial.print("Playing: "); Serial.println(playing ? "Yes" : "No"); int16_t total = mp3.getTrackCount(); Serial.print("Total tracks: "); Serial.println(total); Serial.println("--------------"); break; } default: break; } } }

Steps to Try It

  • Upload the code, open Serial Monitor at 9600 baud, and type commands.

Command Reference

Type What Happens
1–9 Plays that track number
+ Volume up
Volume down
p Pause
r Resume
s Stop
n Next track
b Back (previous track)
? Show status info

EQ Presets

Constant Value Style
DIYables_MiniMp3EQ_NORMAL 0 Flat
DIYables_MiniMp3EQ_POP 1 Pop
DIYables_MiniMp3EQ_ROCK 2 Rock
DIYables_MiniMp3EQ_JAZZ 3 Jazz
DIYables_MiniMp3EQ_CLASSIC 4 Classical
DIYables_MiniMp3EQ_BASS 5 Bass heavy
mp3.setEQ(DIYables_MiniMp3::EQ_JAZZ);

Reading Module Status

These calls let you check what the module is doing. Each one blocks briefly (up to 100 ms) while waiting for the reply. Returns −1 if the module doesn't respond.

Function Returns What You Get
isPlaying() bool true if audio is currently playing
getVolume() int16_t Volume level (0–30)
getEQ() int16_t Active equalizer preset (0–5)
getTrackCount() int16_t Total number of tracks on the card
getCurrentTrack() int16_t Track number that's playing right now
getFolderCount() int16_t How many folders are on the card
getTrackCountInFolder(f) int16_t How many tracks are in folder f

※ OUR MESSAGES

  • As freelancers, We are AVAILABLE for HIRE. See how to outsource your project to us
  • Please feel free to share the link of this tutorial. However, Please do not use our content on any other websites. We invested a lot of effort and time to create the content, please respect our work!