
ESP32 S3 - Ultrasonic Sensor - Piezo Buzzer
This tutorial shows you how to use the ESP32 S3 with an ultrasonic sensor and a piezo buzzer to build a proximity-triggered audio alert system. You will implement two practical applications — one that produces a continuous tone when an object is detected nearby, and one that plays a musical melody when the object enters the detection zone.
What you'll build:
- An ESP32 S3 circuit with an ultrasonic sensor and piezo buzzer wired to the board
- Application 1: Buzzer sounds automatically when an object is close to the sensor and stops when the object moves away
- Application 2: Buzzer plays a musical melody each time an object enters the detection range
- A foundation for real-world proximity alert, parking sensor, and security projects
Hardware Preparation
Or you can buy the following kits:
| 1 | × | DIYables ESP32 S3 Starter Kit (ESP32 S3 included) | |
| 1 | × | DIYables Sensor Kit (18 sensors/displays) |
Additionally, some of these links are for products from our own brand, DIYables .
Overview of Piezo Buzzer and Ultrasonic Sensor
The ultrasonic sensor measures distance by emitting a sound pulse and timing its echo, while the piezo buzzer converts electrical signals into audible tones that alert the user when an object enters the detection zone. Together on the ESP32 S3 they form a complete sense-and-respond loop — the sensor feeds distance data to the board, the board evaluates it against a threshold, and the buzzer delivers immediate audio feedback. This pattern is the foundation of proximity alarms, parking sensors, and obstacle-avoidance robots.
Key Specifications
For detailed background on each component, refer to these dedicated ESP32 S3 tutorials:
- ESP32 S3 - Piezo Buzzer tutorial — Learn how to generate tones and melodies
- ESP32 S3 - Ultrasonic Sensor tutorial — Understand distance measurement and echo timing
Please note that this tutorial uses a 3–5V buzzer, but you can adapt it for a 12V buzzer. Learn more in the ESP32 S3 - Buzzer tutorial.
Wiring Diagram
Connect the ultrasonic sensor and piezo buzzer to your ESP32 S3 by following the diagram below. Verify every connection before powering the board to avoid accidental short circuits.
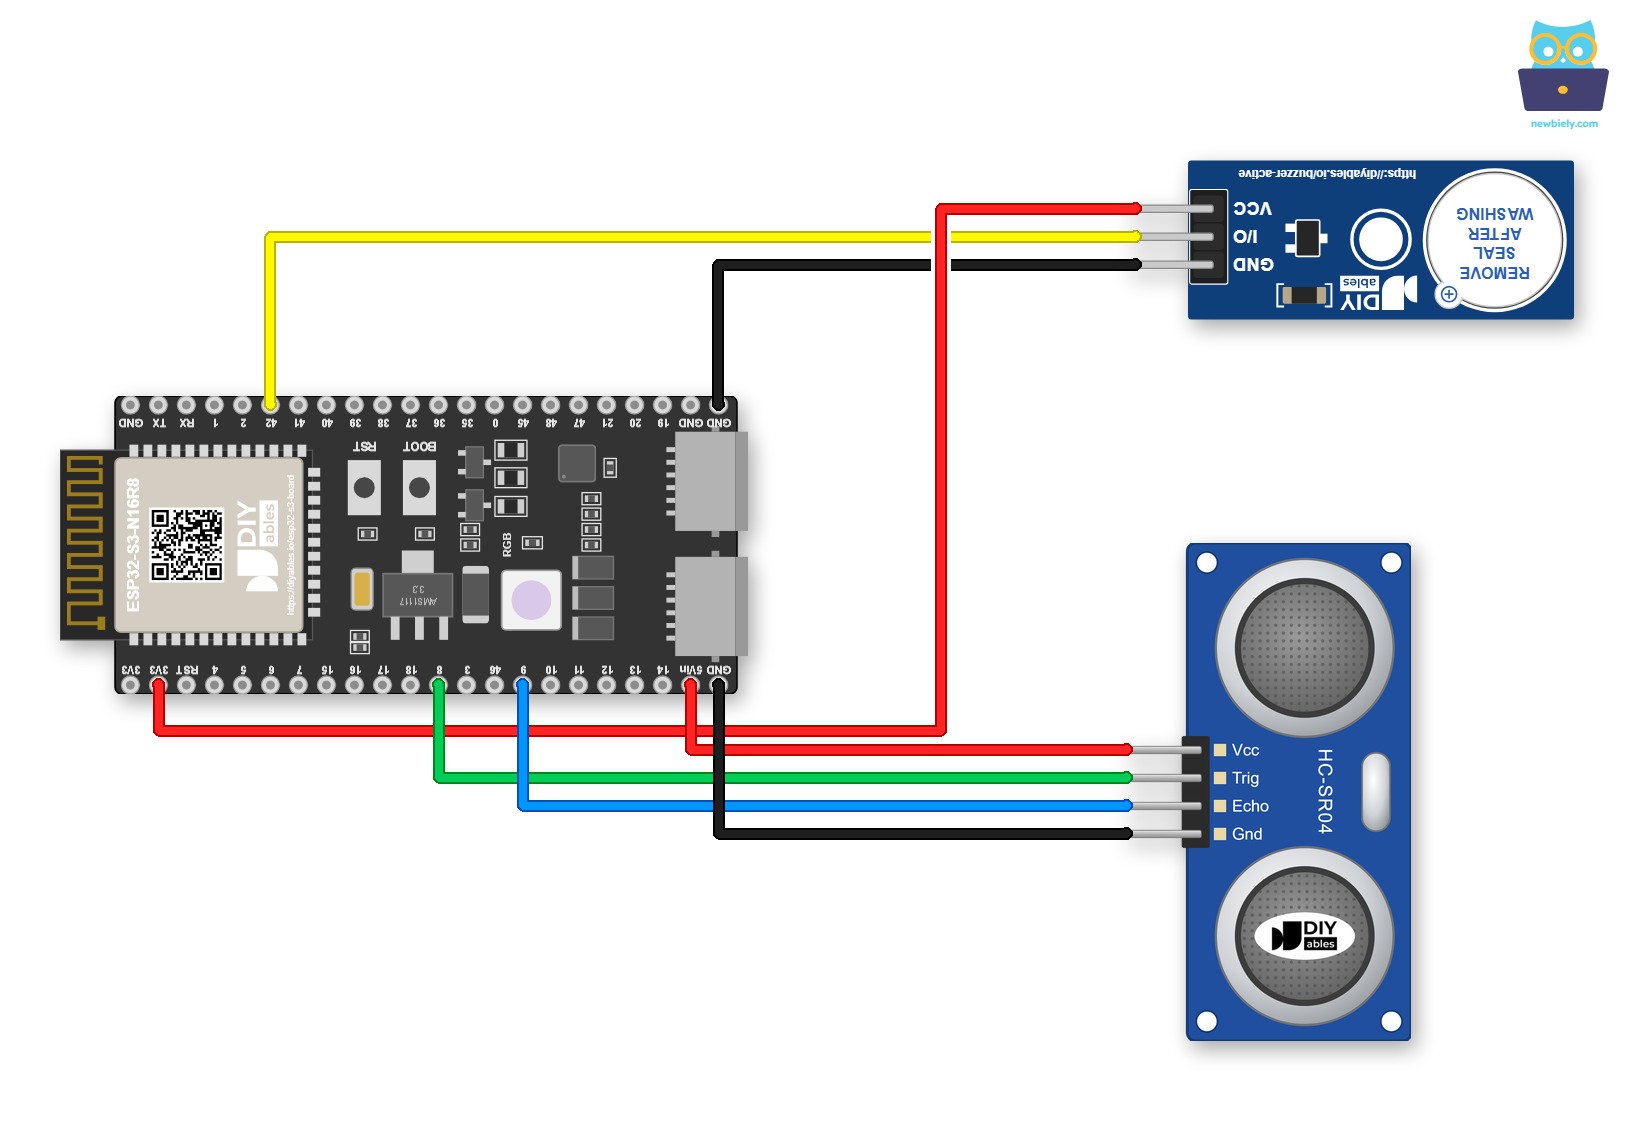
This image is created using Fritzing. Click to enlarge image
Jumper wires are good for a quick test, but not for a final build. A Screw Terminal Block for ESP32 S3 solves this. Plug the ESP32 S3 into it and screw the wires in. The diagram below shows the same wiring with the screw terminal board.
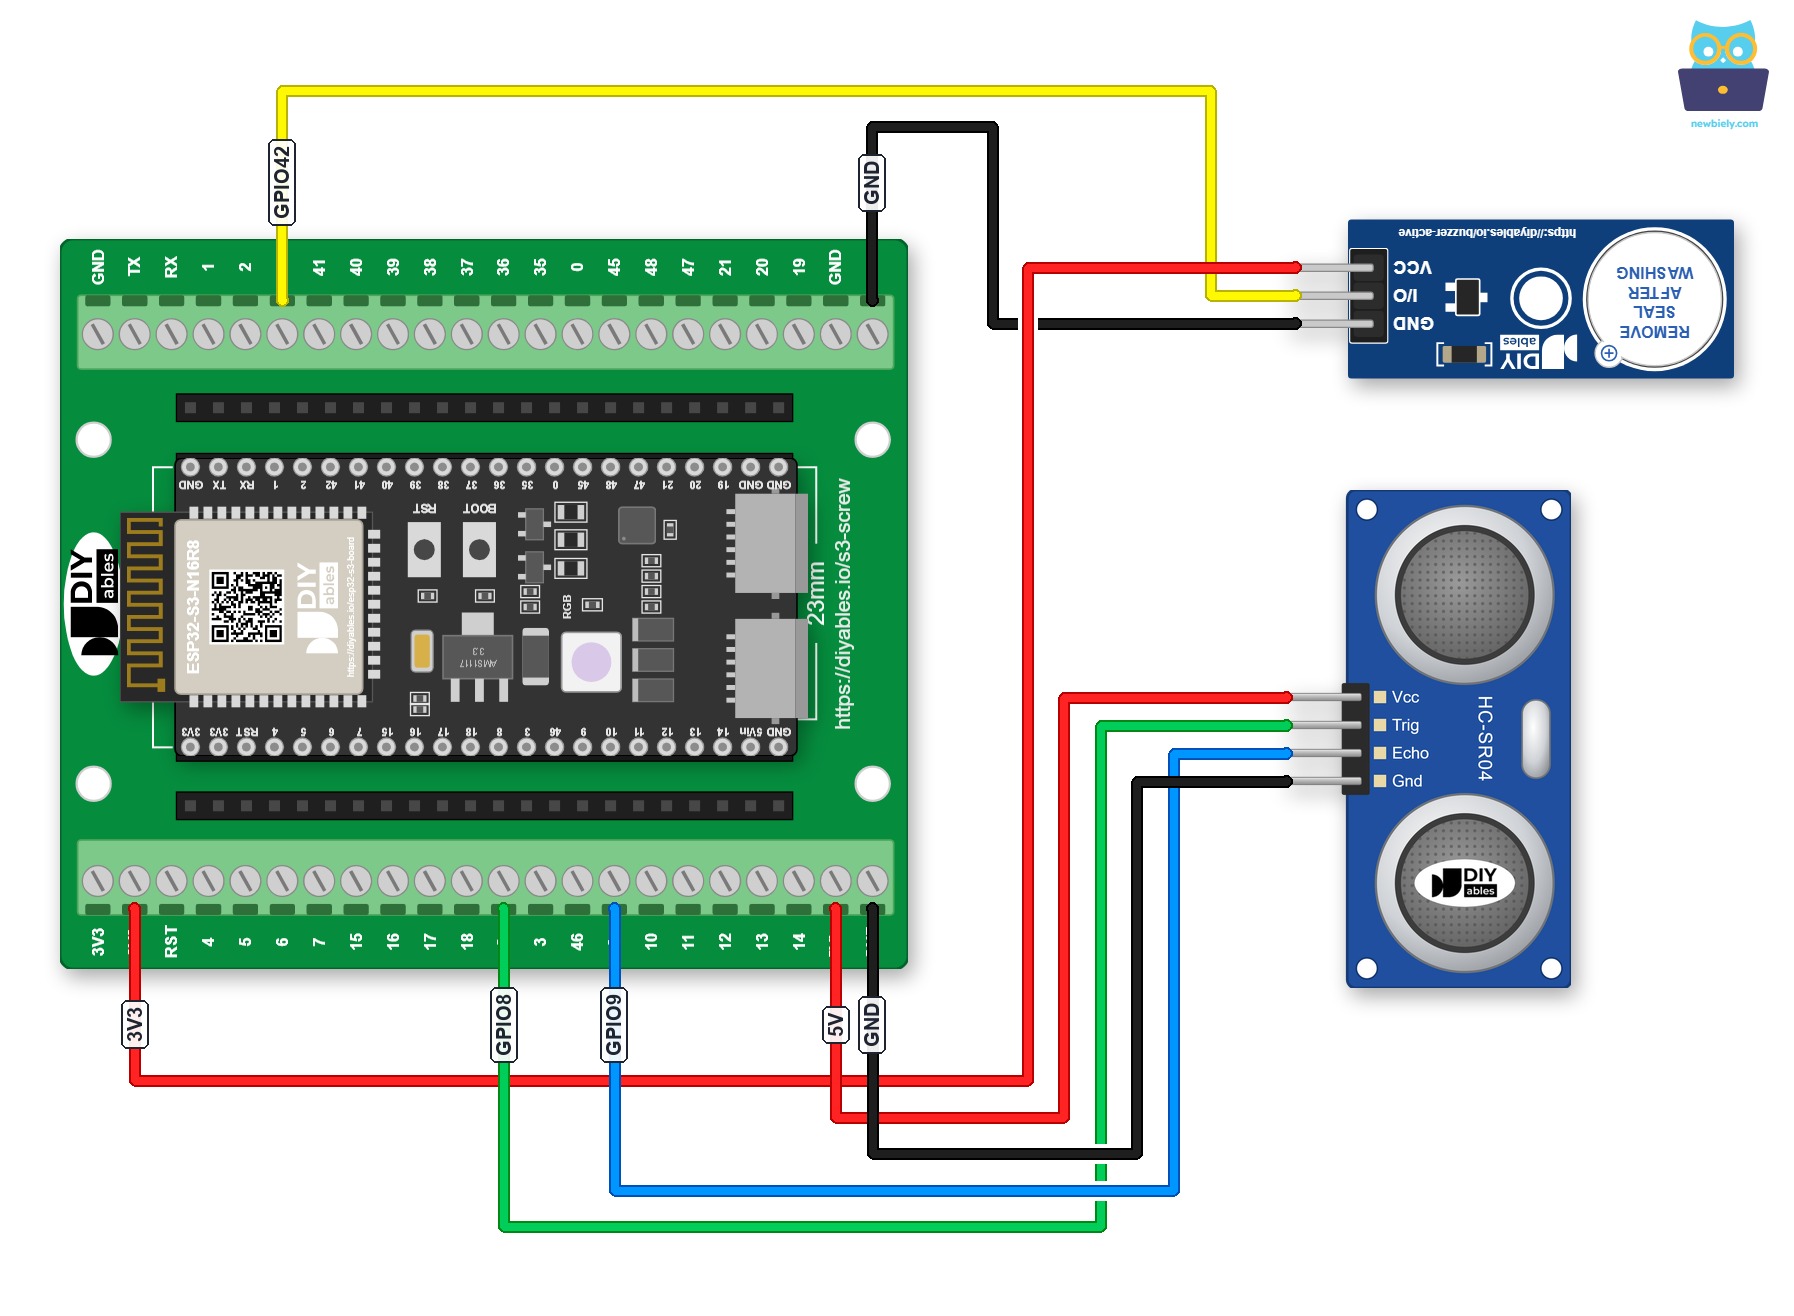
This image is created using Fritzing. Click to enlarge image
Another choice is a GPIO Breakout Board for ESP32 S3. Each GPIO has a signal pin with 3.3V and GND pins next to it, as shown below:
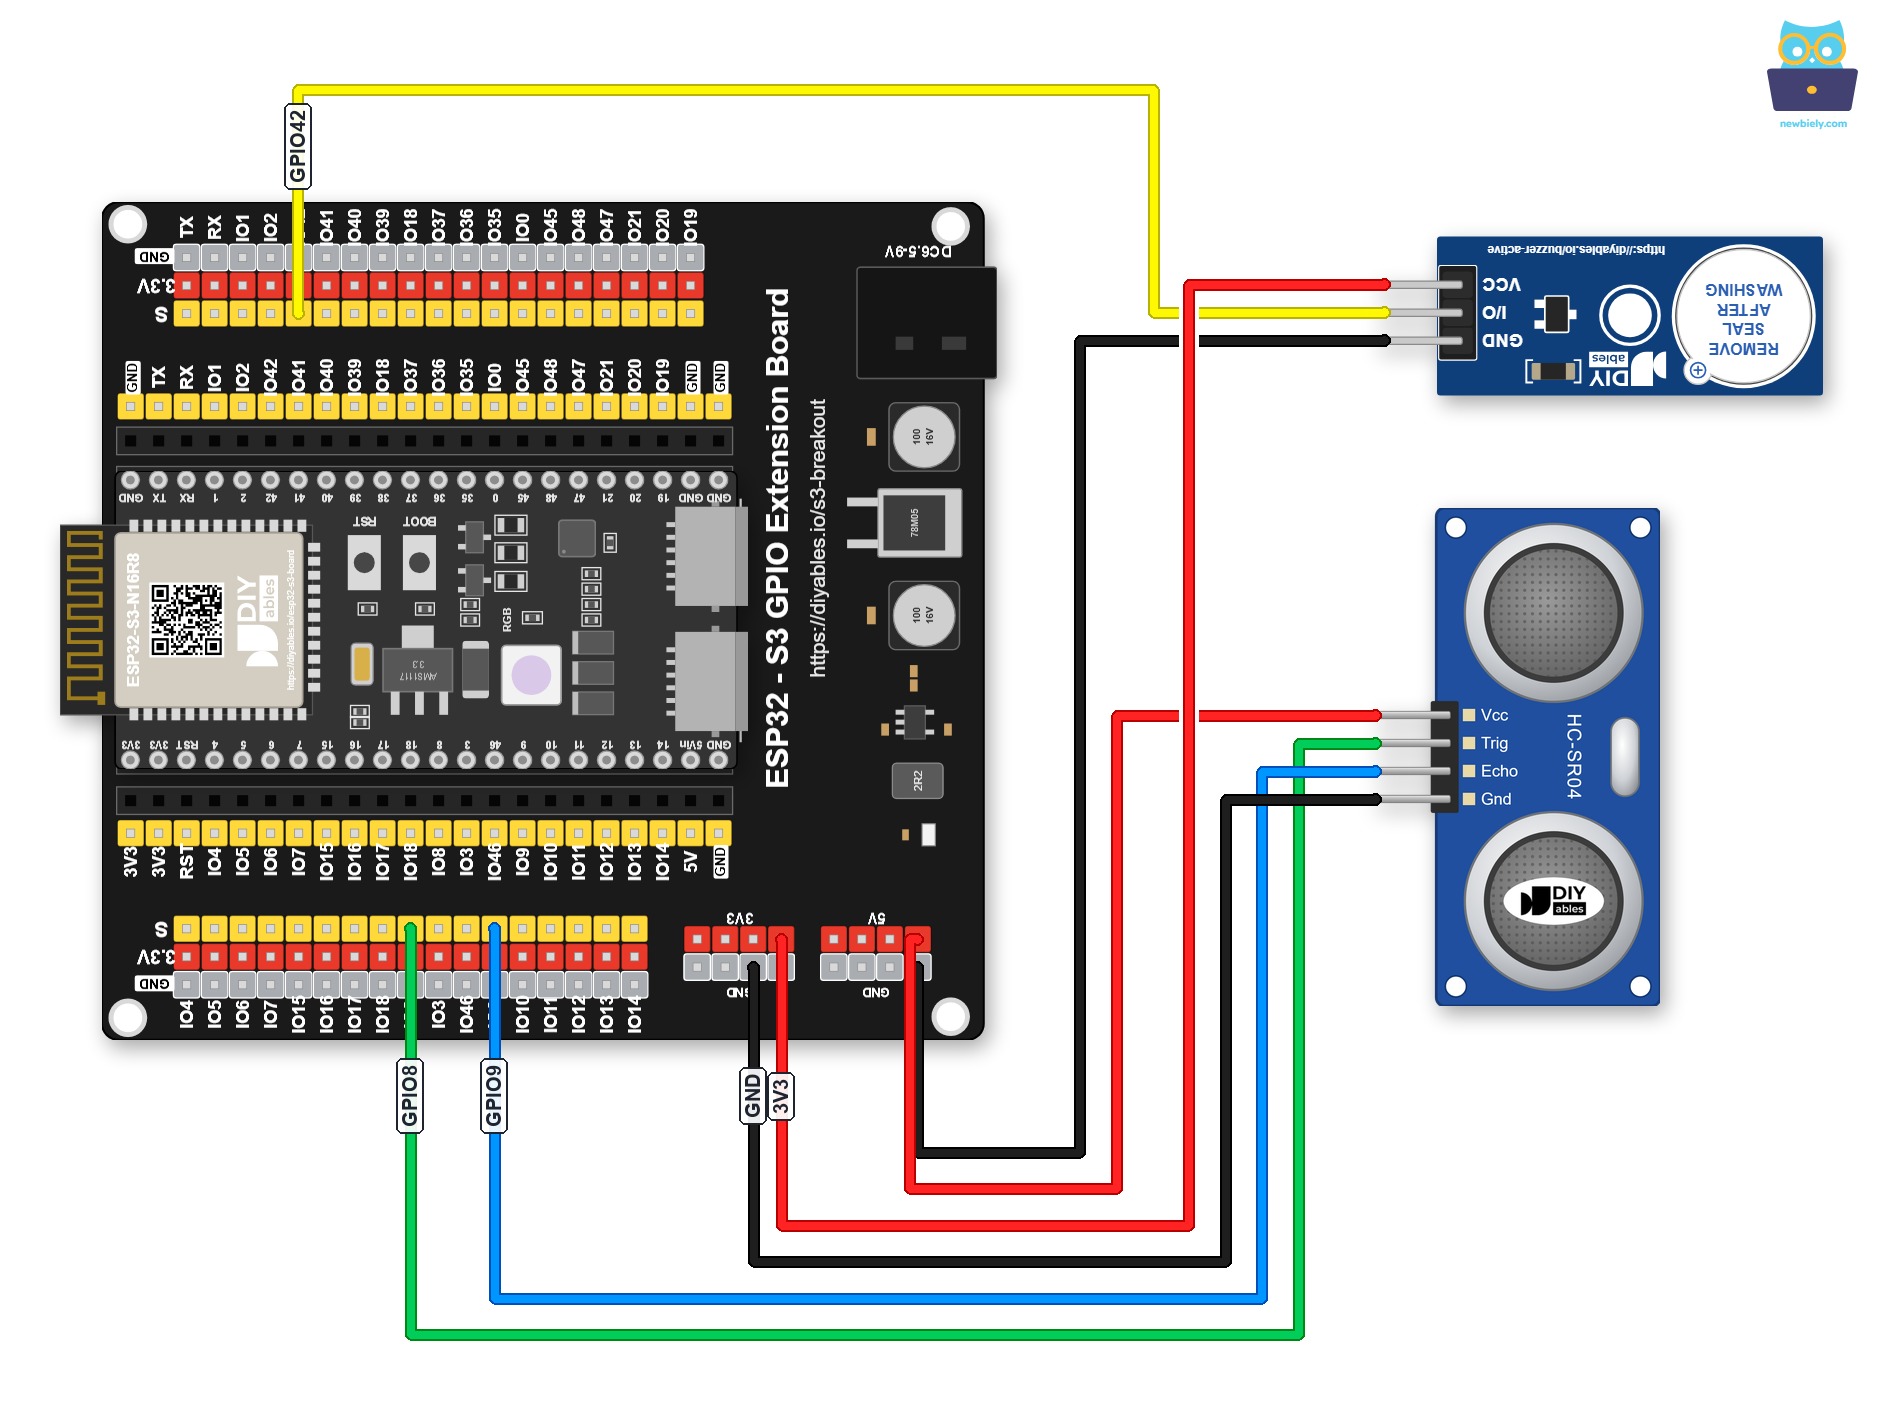
This image is created using Fritzing. Click to enlarge image
Safety Notes
The GPIO pins on the ESP32 S3 operate at 3.3V logic, but the HC-SR04 ultrasonic sensor's VCC pin requires 5V for reliable operation — connect VCC to the board's 5V pin, not 3.3V. The TRIG and ECHO lines operate at 3.3V logic on most modules, so they connect directly to the ESP32 S3 GPIO pins without a level shifter. A bare piezo buzzer draws minimal current from a GPIO pin and is safe at 3.3V, but never connect a high-voltage buzzer directly without a relay or driver circuit.
| Component | Pin | ESP32 S3 Pin |
|---|---|---|
| Ultrasonic Sensor | VCC | 5V |
| Ultrasonic Sensor | GND | GND |
| Ultrasonic Sensor | TRIG | GPIO8 |
| Ultrasonic Sensor | ECHO | GPIO9 |
| Piezo Buzzer | Positive (+) | GPIO42 |
| Piezo Buzzer | Negative (-) | GND |
ESP32 S3 Code - Simple Sound
The following sketch reads the ultrasonic sensor on every loop iteration, calculates the distance to the nearest object, and drives the piezo buzzer based on whether that distance is below a set threshold. When the object is close the buzzer sounds continuously; when the object moves away the buzzer stops immediately. This direct coupling between sensor reading and buzzer output is the simplest form of proximity-triggered audio you can implement on the ESP32 S3.
Detailed Instructions
- New to ESP32 S3? Complete our Getting Started with ESP32 S3 guide first.
- Wire the components: Follow the wiring diagram shown above.
- Connect ESP32 S3: Use a USB Type-C cable to connect to your computer.
- Setup Arduino IDE: If this is the first time you use ESP32 S3, see how to setup environment for ESP32 S3 on Arduino IDE.
- Select your board: Choose the ESP32 S3 board and its COM port in Arduino IDE.
- Upload the code: Copy the code above and upload it to your ESP32 S3.
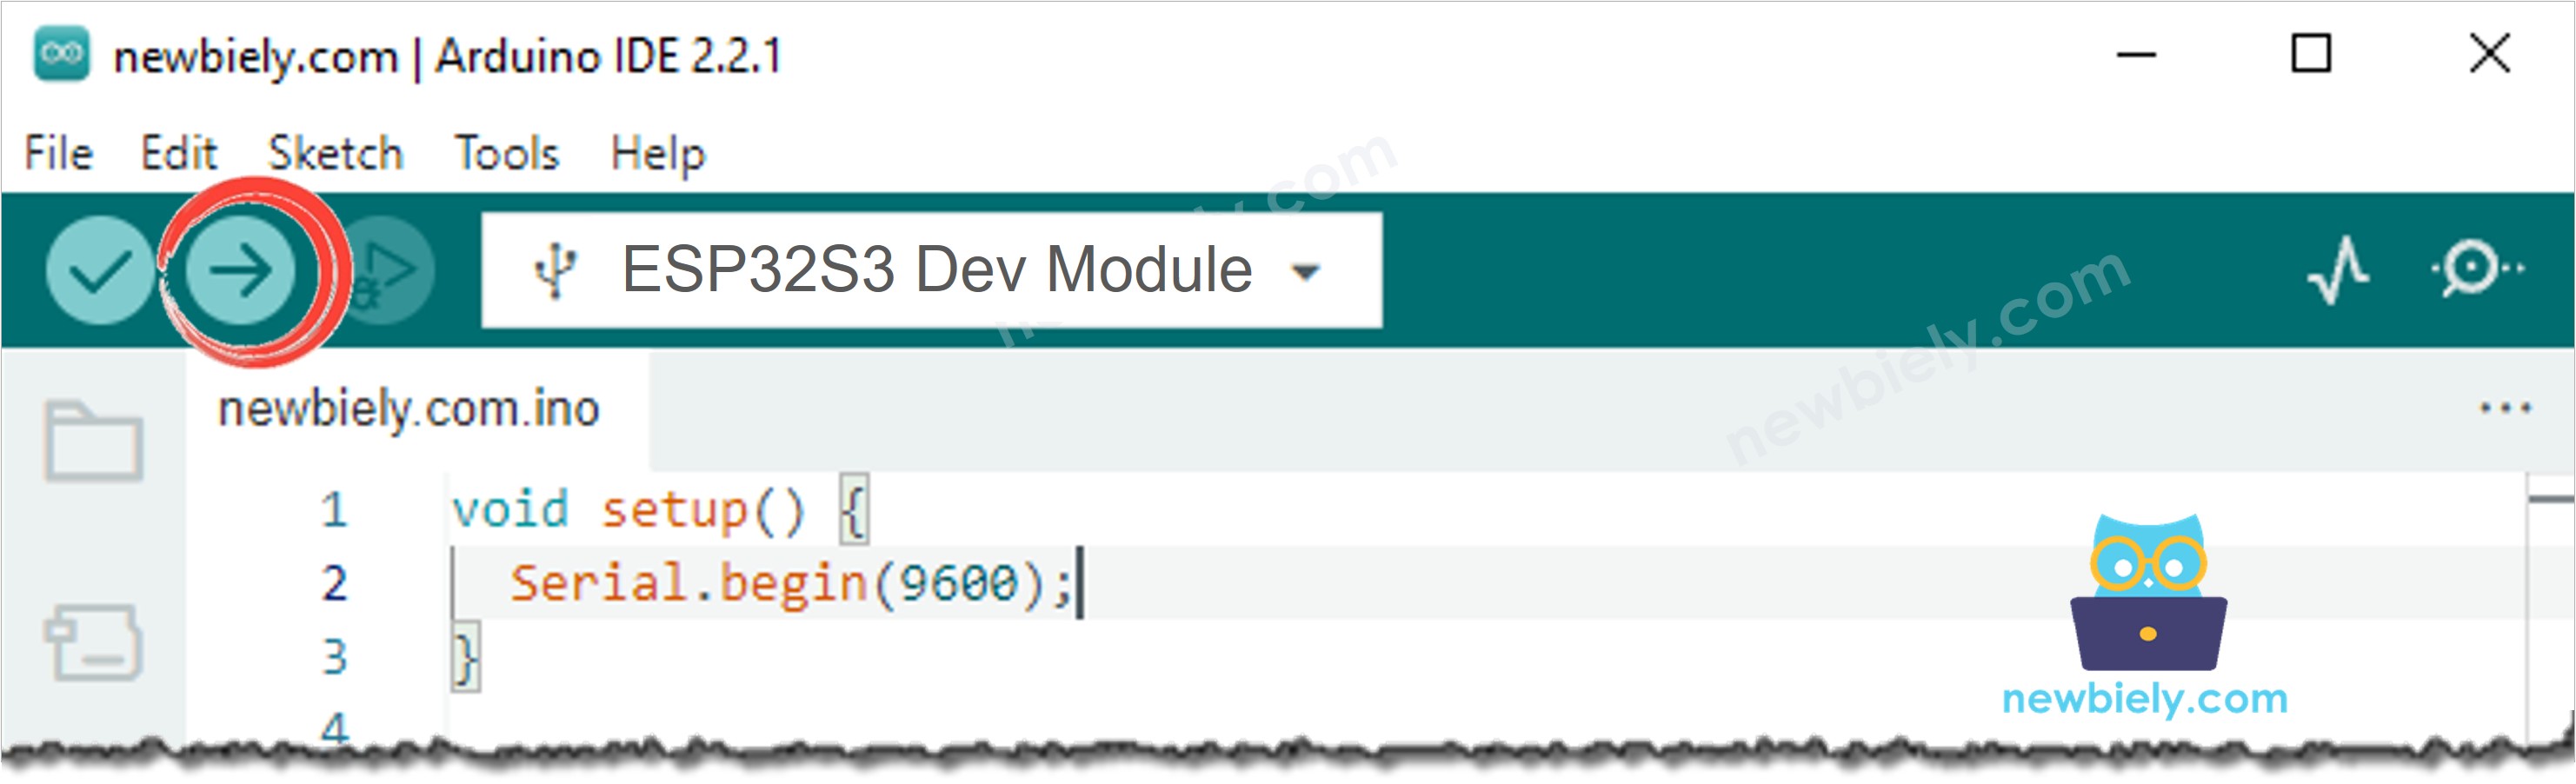
- Move your hand in front of the ultrasonic sensor.
- Listen to the buzzer: The piezo buzzer will sound when your hand is close and stop when you pull it away.
- Pro Tip: If the sensor gives erratic readings, make sure the TRIG and ECHO wires are not running parallel to power wires — keep signal lines separated to reduce noise.
Serial Monitor Output
Open the Arduino IDE Serial Monitor at 9600 baud to observe the distance readings and buzzer state in real time.
Line-by-line Code Explanation
The above ESP32 S3 code contains line-by-line explanation. Please read the comments in the code!
ESP32 S3 Code - Melody
The following sketch plays a full musical melody through the piezo buzzer each time an object enters the detection range of the ultrasonic sensor. It uses a companion pitches.h header file that maps note names such as NOTE_C4 and NOTE_G3 to their frequencies in Hz, keeping the melody array easy to read and modify for any tune you choose.
Detailed Instructions
- New to ESP32 S3? Complete our Getting Started with ESP32 S3 guide first.
- Upload the melody sketch: Copy the code above and paste it to Arduino IDE.
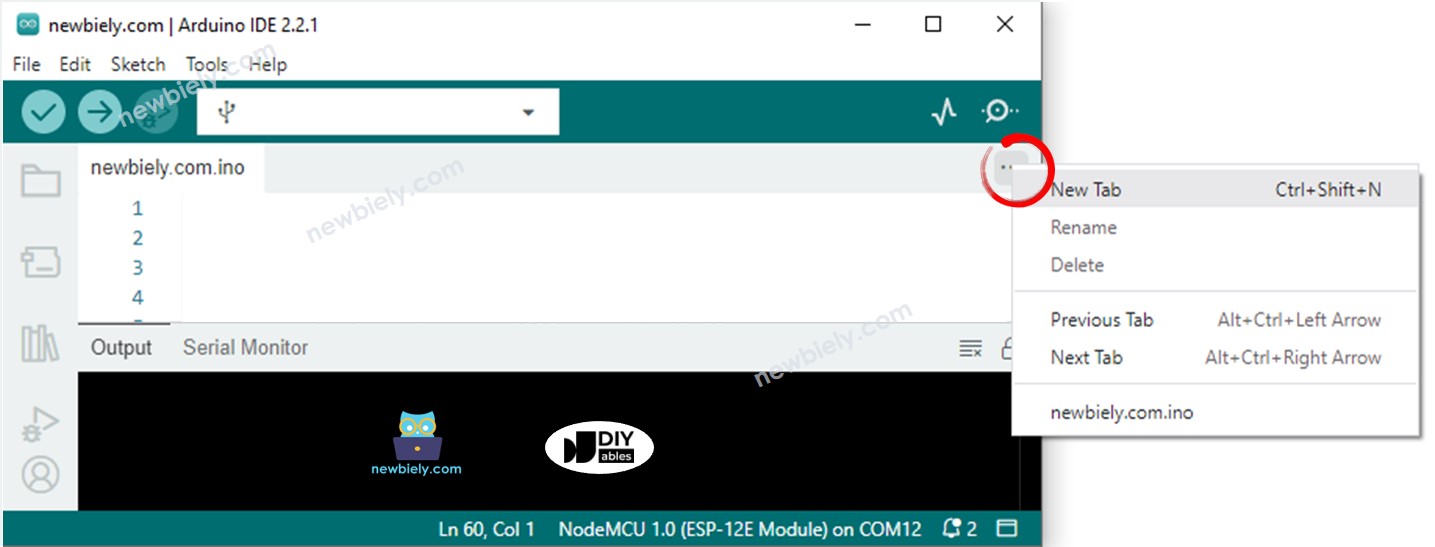
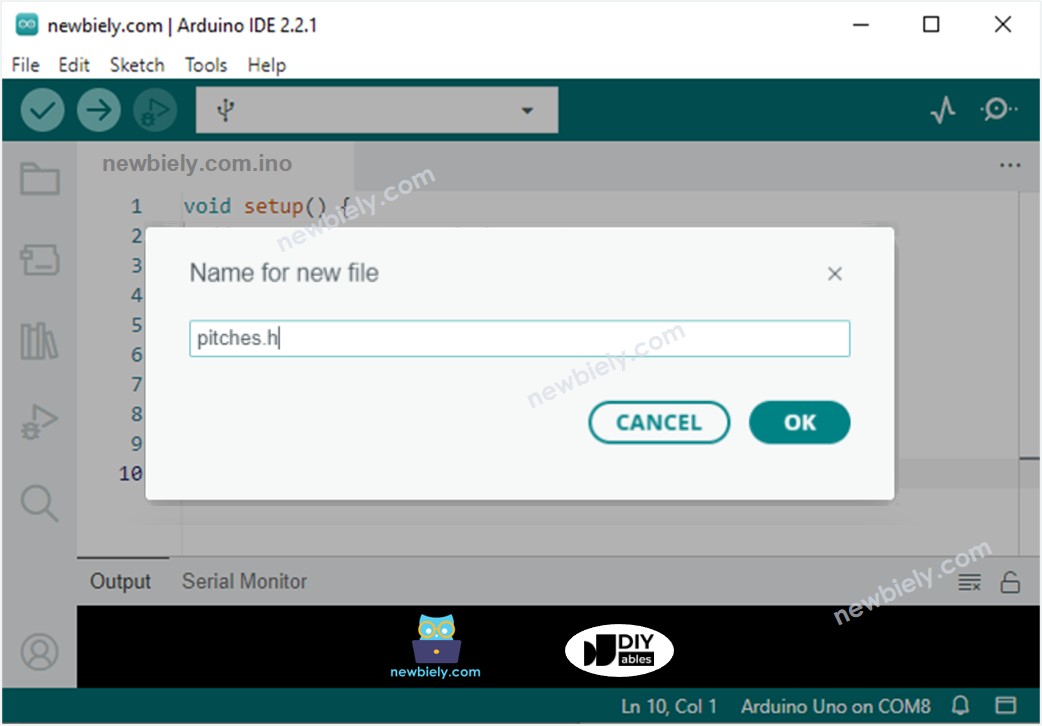
- Create the pitches.h file in Arduino IDE by:
- Either click on the button just below the serial monitor icon and choose New Tab, or use Ctrl+Shift+N keys.
- Give file's name pitches.h and click OK button
- Copy the below code and paste it to the created pitches.h file.
- Compile and upload: Click the Upload button in Arduino IDE.
- Move your hand in front of the ultrasonic sensor to enter the detection zone.
- Listen to the melody: The piezo buzzer plays the full tune from start to finish each time an object is detected.
- Pro Tip: The delay() function inside the melody loop blocks other code during playback. To avoid blocking, replace it with the ezBuzzer library, which is designed to play melodies without blocking other code.
Serial Monitor Output
Open the Arduino IDE Serial Monitor at 9600 baud to watch melody playback triggered by proximity detection.
Line-by-line Code Explanation
The above ESP32 S3 code contains line-by-line explanation. Please read the comments in the code!
Application Ideas
The ESP32 S3 ultrasonic sensor and piezo buzzer combination is a versatile building block for dozens of proximity-aware projects. Here are some ideas to spark your imagination:
- Parking sensor: Build a car parking aid that beeps faster as a vehicle gets closer to a wall or obstacle.
- Intruder alarm: Create a security alert that sounds a loud tone whenever someone enters a monitored zone.
- Blind-assist cane: Attach the sensor to a walking cane and alert the user to obstacles with buzzer patterns.
- Liquid level alert: Mount the sensor above a tank and trigger the buzzer when the liquid level drops below a threshold.
- Proximity doorbell: Play a chime melody automatically when a visitor approaches your door.
- Obstacle-avoidance robot: Use the buzzer as an audible warning while the robot navigates around objects.
Video Section
Watch the step-by-step video walkthrough for this ESP32 S3 project below.
Challenge Yourself
Now that you have a working ESP32 S3 ultrasonic sensor and piezo buzzer circuit, push your skills further with these challenges ranked by difficulty:
- Beginner: Change the distance threshold so the buzzer activates only when an object is within 5 cm instead of the default value.
- Beginner: Make the buzzer beep three short times instead of sounding continuously when an object is detected.
- Intermediate: Vary the buzzer tone frequency based on distance — a higher pitch for closer objects and a lower pitch for farther ones.
- Intermediate: Use the ezBuzzer library to play a melody in the background without blocking the distance measurement loop.
- Advanced: Add an OLED display that shows the live distance reading alongside the buzzer state.
- Advanced: Implement a multi-zone alarm with three distance thresholds that trigger different buzzer patterns for each zone.