
ESP32 S3 - Temperature Sensor - LCD
This tutorial shows you how to use the ESP32 S3 to read temperature data from a DS18B20 sensor and display it live on an LCD I2C 16x2 display. By combining two popular peripherals on a single board, you build a self-contained temperature monitor that requires no computer once programmed.
What you'll build:
- A circuit connecting the DS18B20 temperature sensor and LCD I2C to the ESP32 S3
- Arduino code that reads temperature and writes it to the LCD in real time
- A display that shows both Celsius and Fahrenheit values on separate lines
- A foundation you can extend into smart thermostats, data loggers, or environmental monitors
https://newbiely.com/images/cover/esp32-s3-temperature-sensor-lcd.jpg
Hardware Preparation
Or you can buy the following kits:
| 1 | × | DIYables ESP32 S3 Starter Kit (ESP32 S3 included) | |
| 1 | × | DIYables Sensor Kit (18 sensors/displays) |
Additionally, some of these links are for products from our own brand, DIYables .
Buy Note: Many DS18B20 sensors available in the market are unreliable. We strongly recommend buying the sensor from the DIYables brand using the link provided above. We tested it, and it worked reliably.
Buy Note: Most LCD I2C displays available on the market are 5V displays. They may work with this board, but it is unsafe and can damage the board. We strongly recommend using the 3.3V LCD I2C display recommended above.
Overview of Temperature Sensor and LCD
The DS18B20 temperature sensor and LCD I2C 16x2 are two of the most popular peripherals used with the ESP32 S3. The DS18B20 communicates over a single-wire 1-Wire bus and delivers accurate digital temperature readings, while the LCD I2C uses just two I2C lines to display characters on a 16-column by 2-row screen. Combining them creates a standalone temperature monitor that is both compact and easy to wire.
We have dedicated tutorials covering each component individually with detailed pinout information, wiring diagrams, and standalone code examples. Review them before starting this project if you are not yet familiar with either peripheral:
Key Specifications
The DS18B20 operates on 3.0V to 5.5V and is fully compatible with the ESP32 S3's 3.3V GPIO pins. It measures temperatures from -55°C to +125°C with ±0.5°C accuracy between -10°C and +85°C, communicating over a single data wire that supports multiple sensors in parallel. The LCD I2C 16x2 runs on 5V and communicates at the standard I2C address of 0x27 or 0x3F, providing a 16-column by 2-row display with adjustable contrast and a built-in backlight for clear reading in low-light conditions.
Wiring Diagram
Connect the DS18B20 temperature sensor and the LCD I2C display to your ESP32 S3 following the diagrams below. Both components share the same power and ground rails, so a breadboard makes the build straightforward. Use a DS18B20 adapter module with a built-in pull-up resistor to simplify wiring and avoid the need for a separate 4.7kΩ resistor.
Safety Notes
Power the DS18B20 from the ESP32 S3's 3.3V pin and power the LCD I2C from the VBUS (5V) pin — do not swap these, as applying 5V to the DS18B20 data pin without level shifting can cause damage. Always ensure the ground lines of both components are connected to the same GND on the ESP32 S3 to prevent floating references. If using the bare TO-92 DS18B20 package without an adapter, never omit the 4.7kΩ pull-up resistor between the DATA and VCC lines, as the 1-Wire protocol requires it.
Wiring diagram:
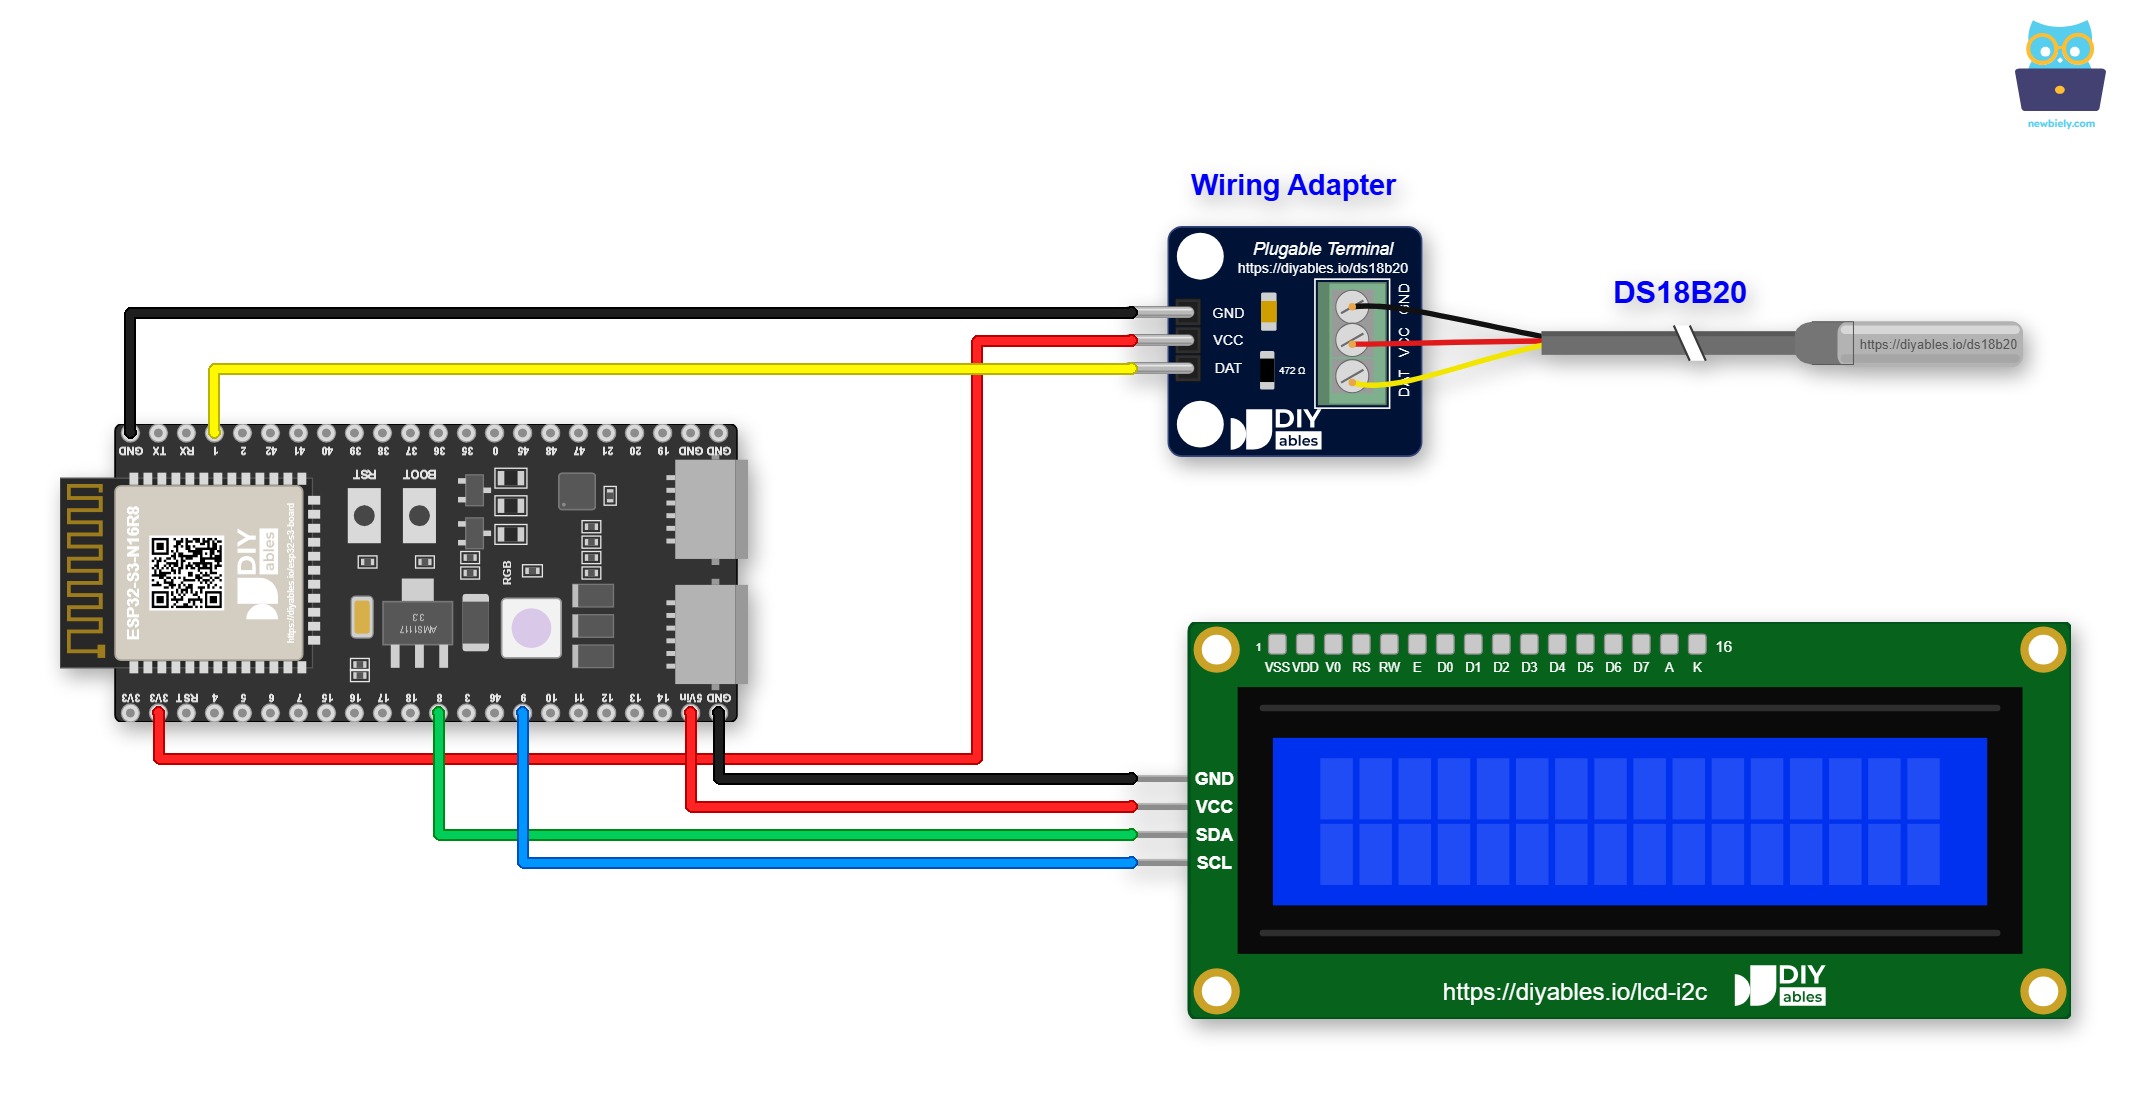
This image is created using Fritzing. Click to enlarge image
If the project will run for a long time, or sit inside a box, it is better to fix the wires with screws. Try a Screw Terminal Block for ESP32 S3: the ESP32 S3 sits on it, and each pin gets its own screw terminal. The wiring stays the same. Only the wires now go to the screw terminals, as shown below.
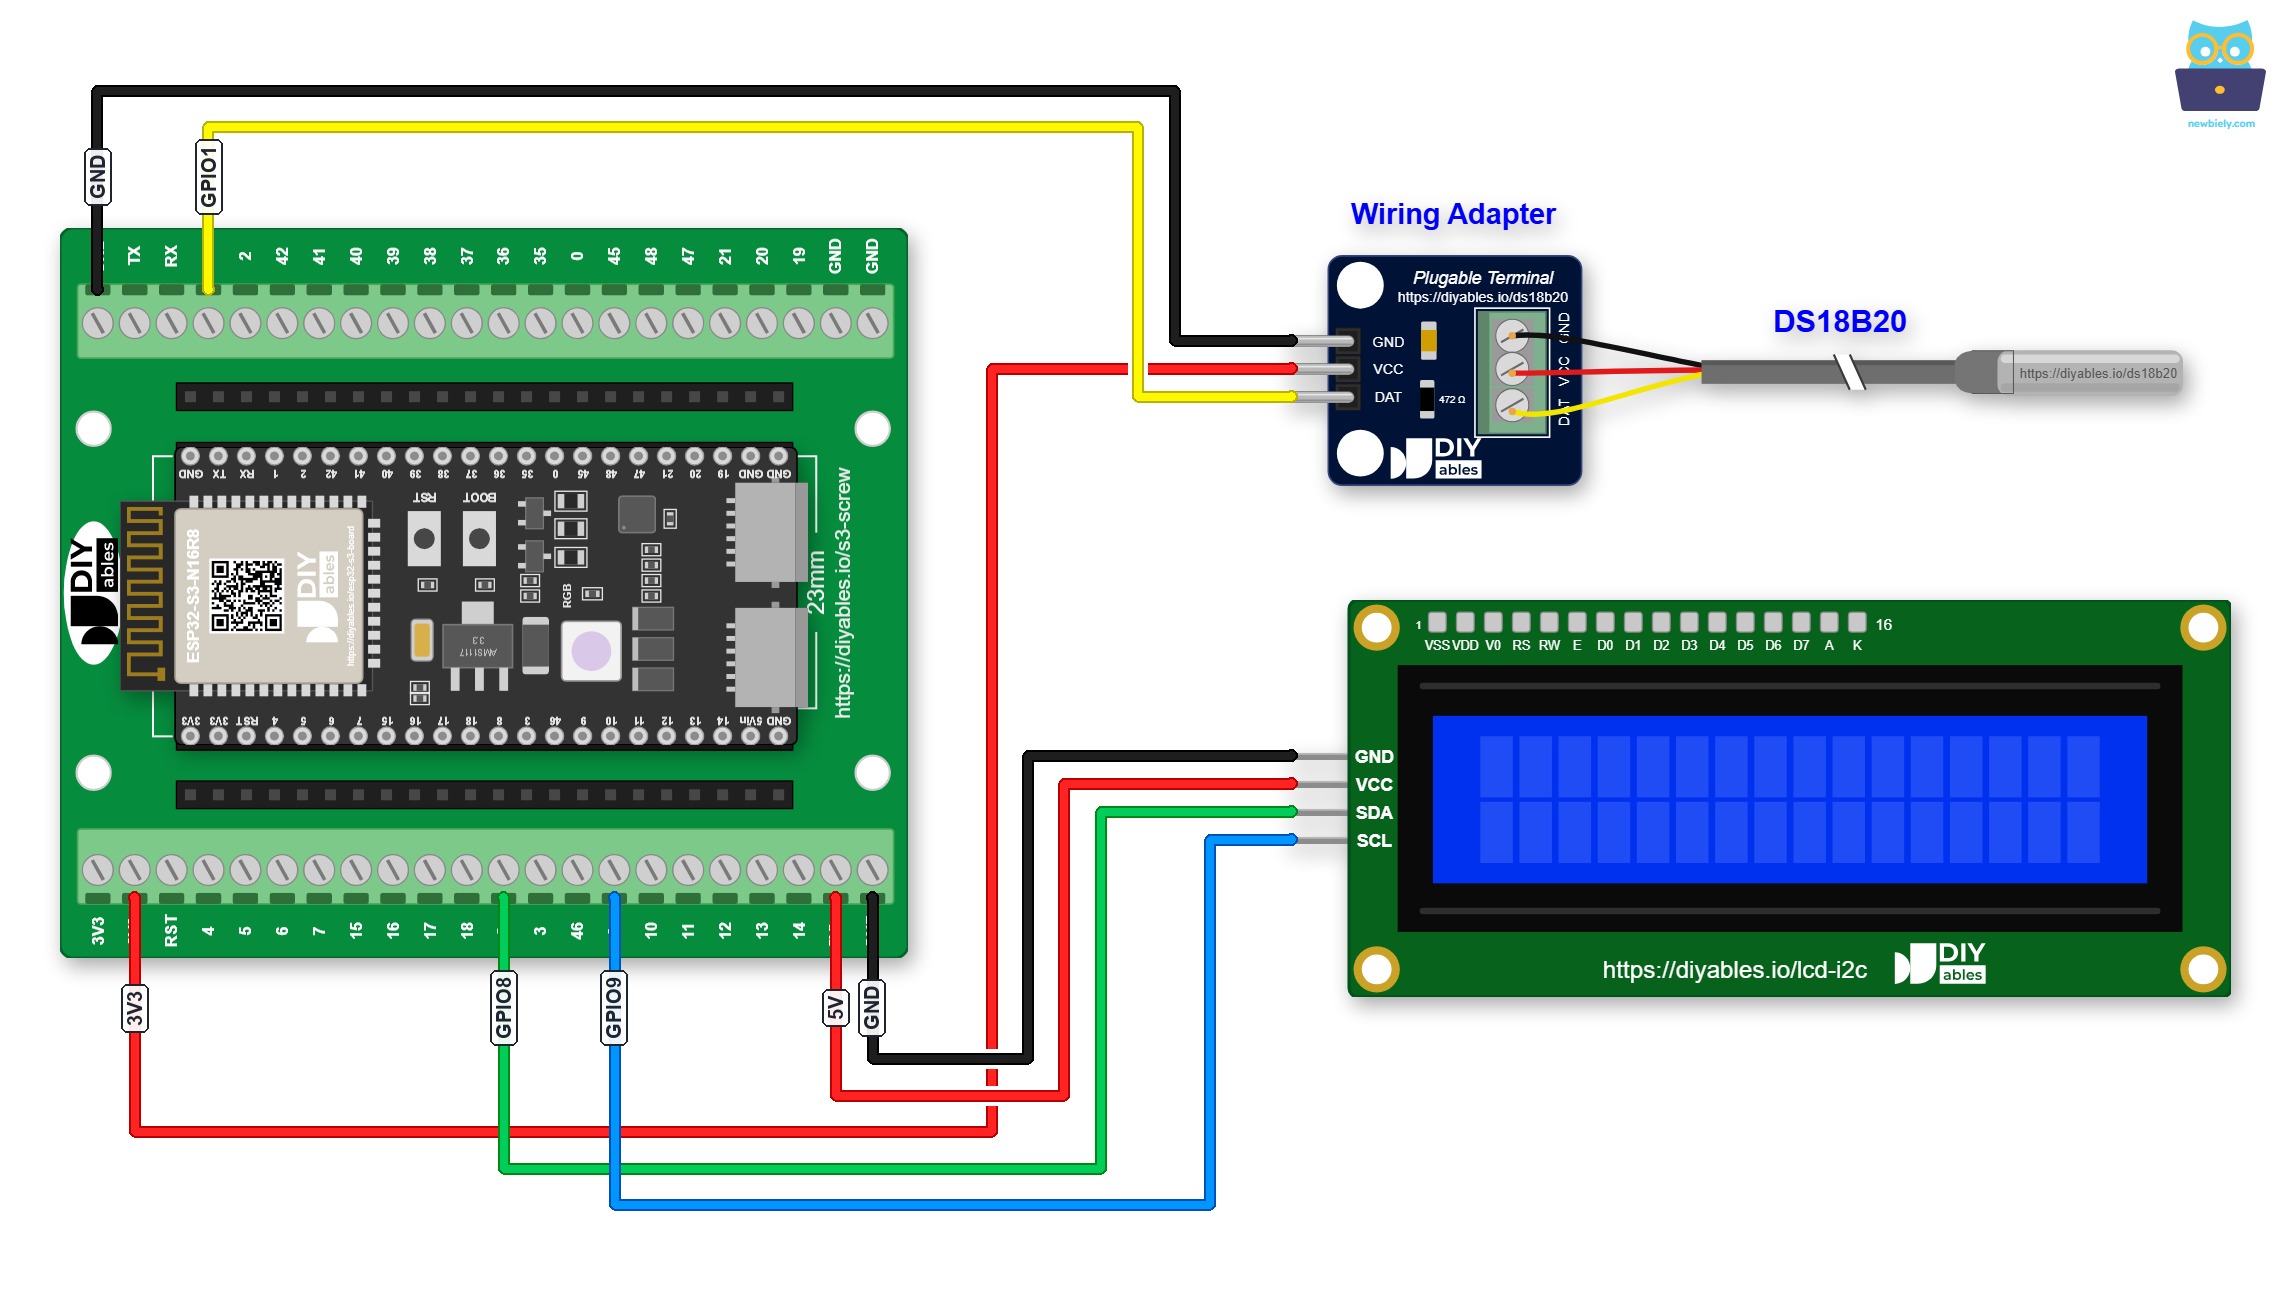
This image is created using Fritzing. Click to enlarge image
You can also use a GPIO Breakout Board for ESP32 S3. It gives each GPIO its own S, 3.3V and GND pins, so module wires plug straight in:
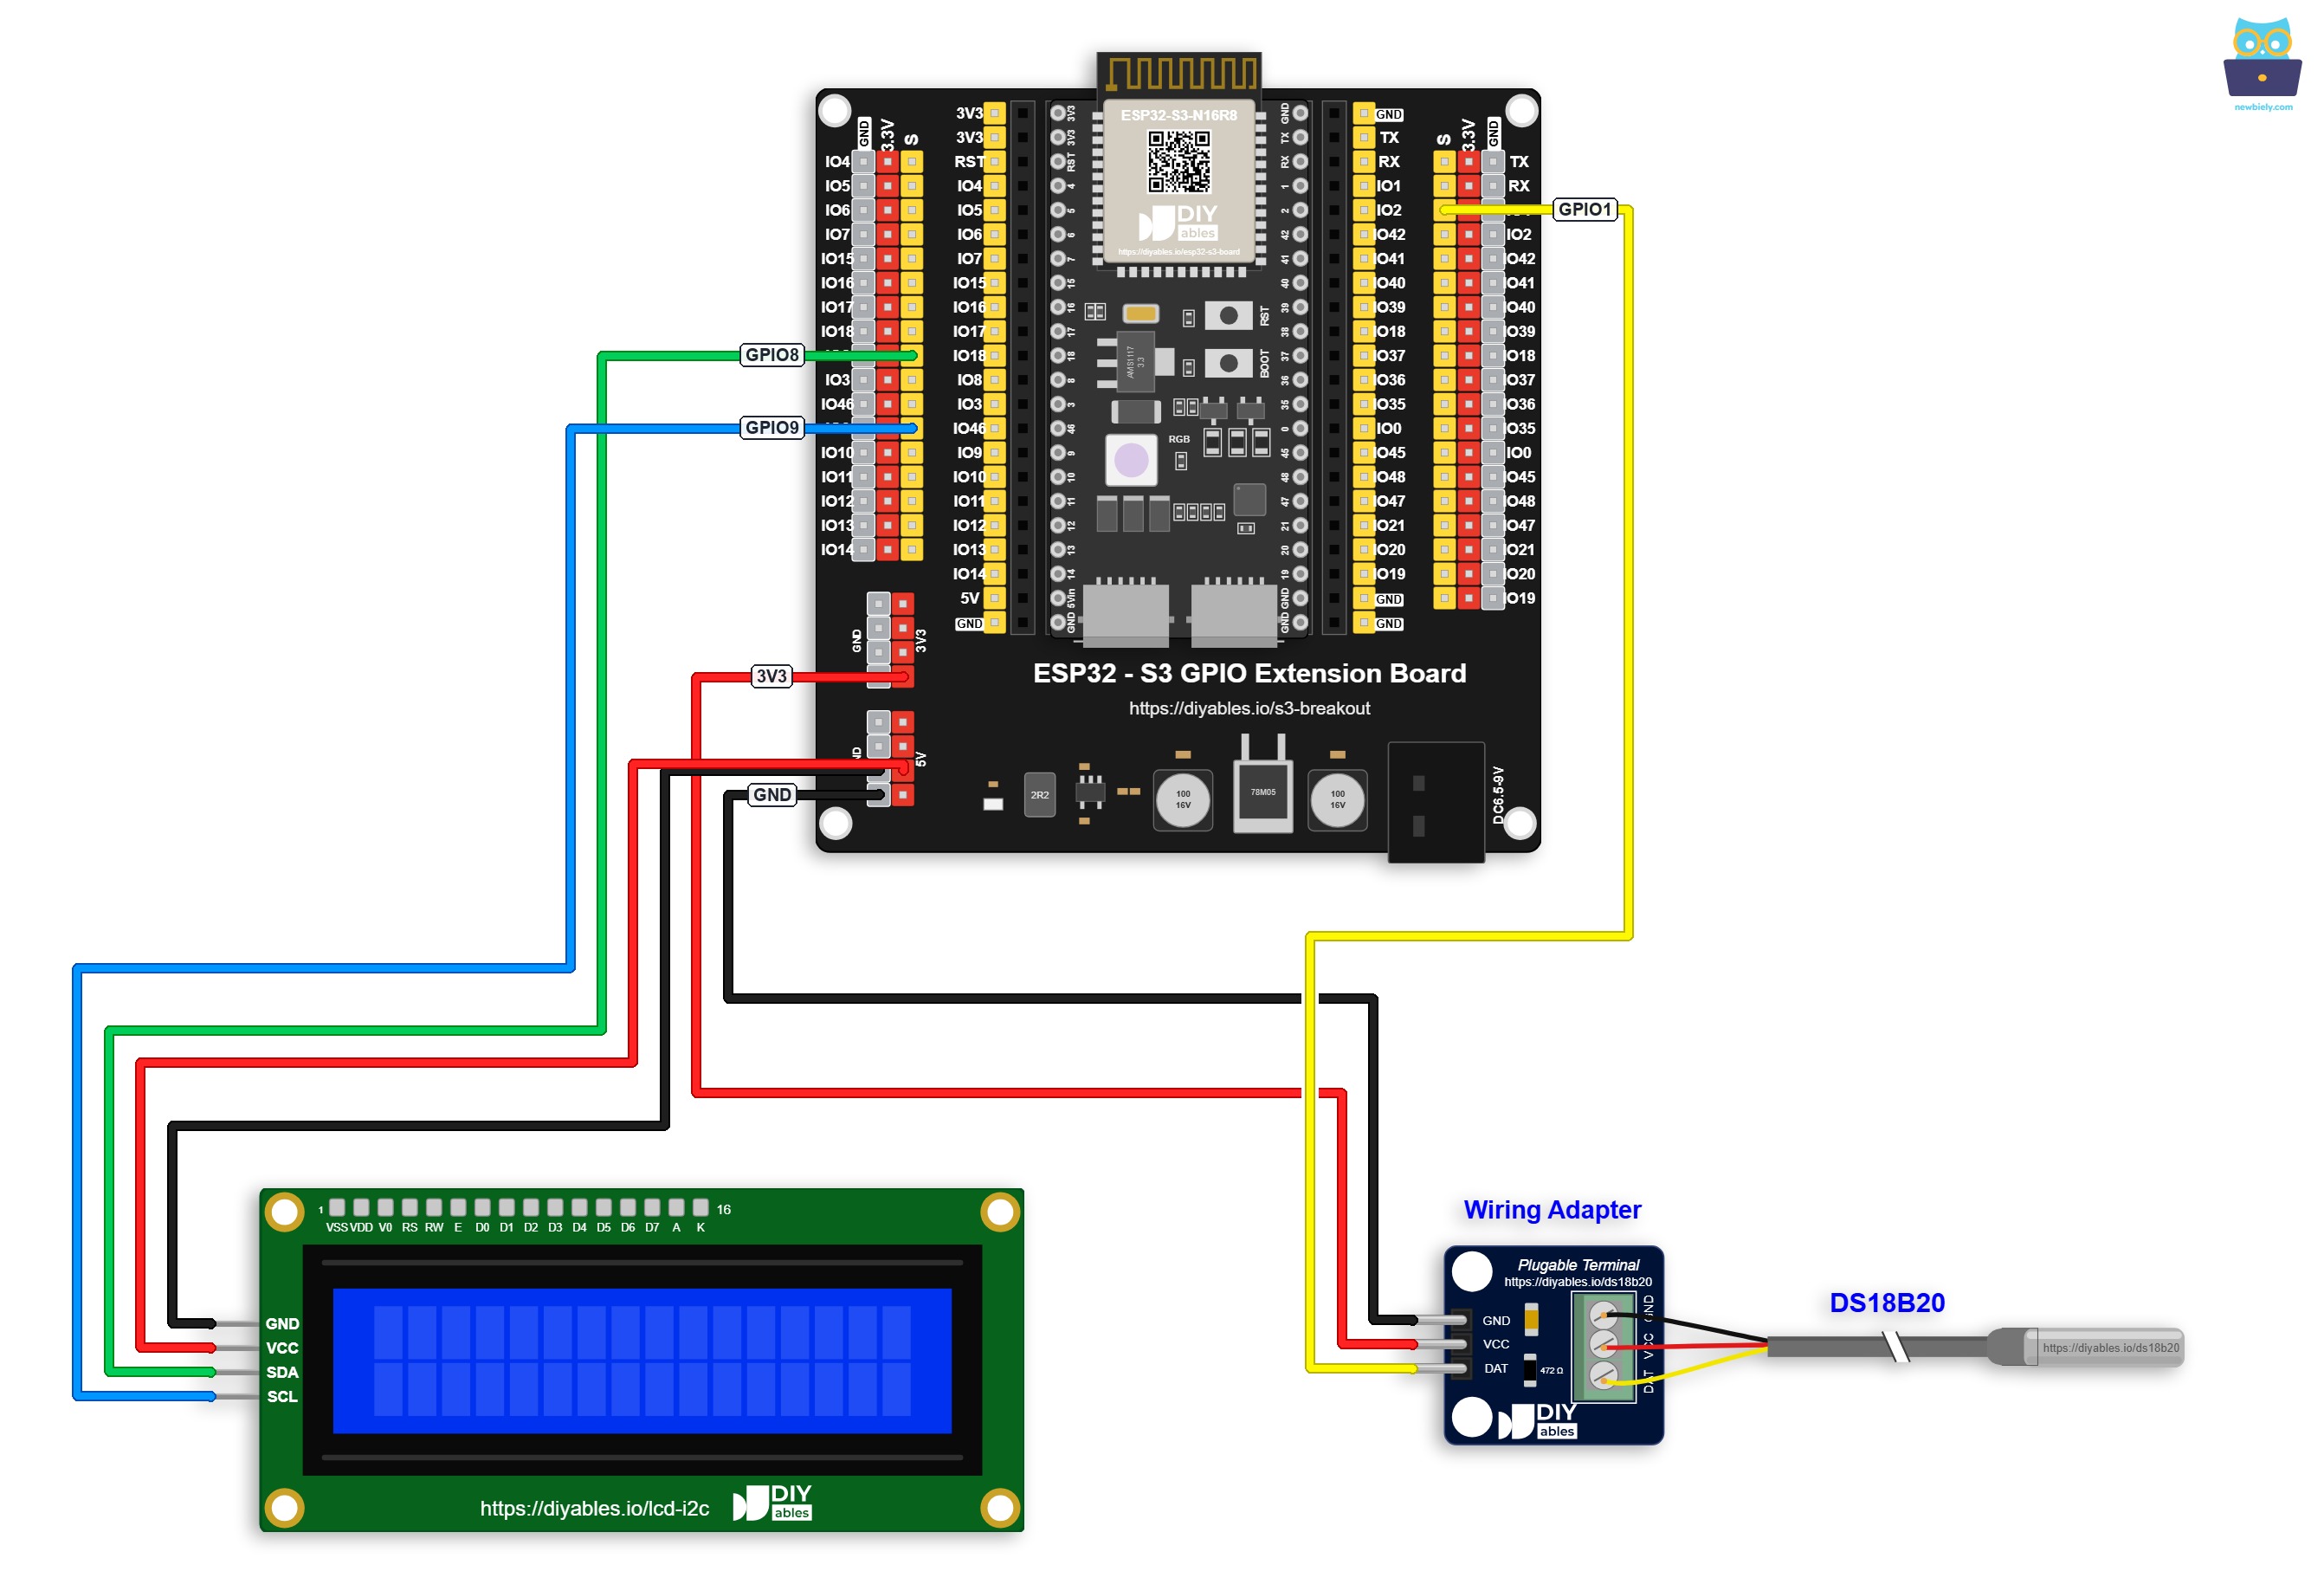
This image is created using Fritzing. Click to enlarge image
DS18B20 Temperature Sensor connections:
| DS18B20 Pin | ESP32 S3 Pin |
|---|---|
| GND | GND |
| VCC | 3.3V |
| DATA | GPIO1 (or any digital pin) |
LCD I2C connections:
| LCD I2C Pin | ESP32 S3 Pin |
|---|---|
| VCC | VBUS (5V) |
| GND | GND |
| SCL | GPIO9 (I2C Clock) |
| SDA | GPIO8 (I2C Data) |
ESP32 S3 Code
The following code reads temperature from the DS18B20 sensor using the DallasTemperature library and displays both Celsius and Fahrenheit values on the LCD I2C 16x2 display, updating once per second. It initializes the 1-Wire bus on the configured data pin, requests a conversion from the sensor, and then writes the formatted temperature strings to the LCD rows using the DIYables LCD I2C library. The DallasTemperature library handles all 1-Wire protocol communication, keeping your sketch readable and easy to modify.
※ NOTE THAT:
The LCD I2C address can be different from each manufacturer. In the code, we used address of 0x27 that is specified by DIYables manufacturer. If your LCD doesn't display anything, try address 0x3F instead.
Detailed Instructions
- New to ESP32 S3? Complete our Getting Started with ESP32 S3 guide first.
- Open Library Manager: Click the Libraries icon on the left sidebar of Arduino IDE.
- Install DallasTemperature: Type "DallasTemperature" in the search box, find the library by Miles Burton, and click Install.
- Search for DallasTemperature created by Miles Burton
- Install dependency: When prompted, click Install All to also install the required OneWire library.
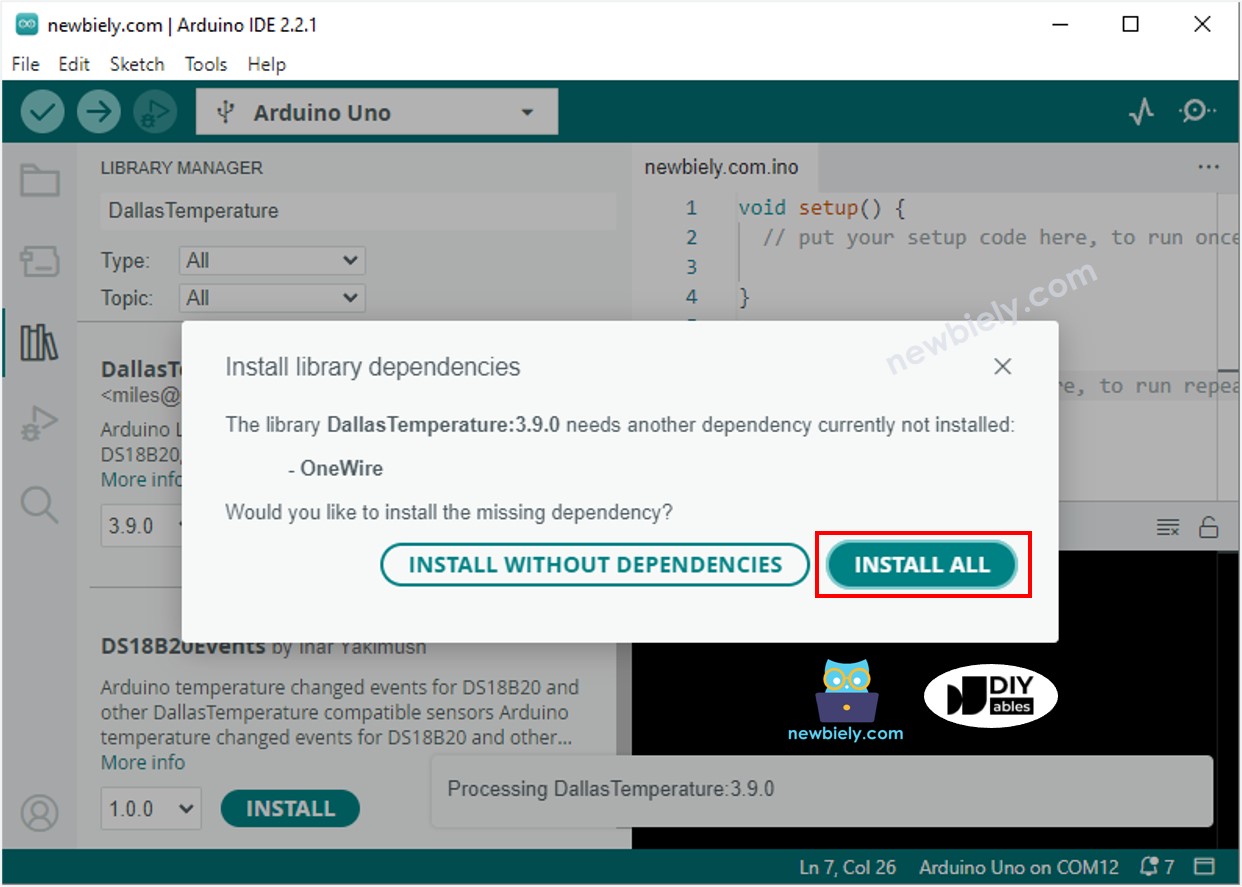
- Install DIYables LCD I2C library: Type "DIYables LCD I2C" in the search box, find the DIYables_LCD_I2C library by DIYables, and click Install.
- Search for DIYables LCD I2C created by DIYables.io and click the Install button.
- Wire the components: Follow the wiring diagram above to connect both the DS18B20 sensor and the LCD I2C to your ESP32 S3.
- Connect your board: Plug the ESP32 S3 into your computer using a USB Type-C cable.
- Select your board: In Arduino IDE, choose the ESP32 S3 board and the correct COM port.
- Upload the code: Copy the code above, paste it into Arduino IDE, and click the Upload button.
- View the LCD: The display will show the current temperature in Celsius on the top row and Fahrenheit on the bottom row, updating every second.
- Test the sensor: Hold the DS18B20 probe in your hand or place it in warm or cold water to see the readings change on the LCD.
- Pro Tip: If the LCD shows nothing at all, adjust the small contrast potentiometer on the back of the LCD module — turning it slightly is often all that is needed to make the text visible.
Serial Monitor Output
Once you upload the code and open the Serial Monitor at 115200 baud, you will see temperature readings printed every second alongside what is displayed on the LCD. The output below shows a typical session as the sensor warms up from room temperature.
Applications and Project Ideas
Combining a temperature sensor and an LCD display with the ESP32 S3 opens the door to a wide variety of practical and educational projects.
- Home thermometer: Display indoor temperature on the LCD so you always have a quick reading without opening a phone app.
- Aquarium monitor: Place a waterproof DS18B20 probe in a fish tank and show water temperature on an LCD mounted outside the tank.
- Smart thermostat: Read temperature on the LCD and trigger a relay to switch a heater or fan on and off based on set-point thresholds.
- Greenhouse controller: Monitor growing-space temperature and display alerts on the LCD when values go outside safe ranges for your plants.
- Server room monitor: Mount the sensor and display in a rack to show ambient temperature at a glance without accessing a network dashboard.
- Food storage tracker: Keep an eye on refrigerator or freezer temperatures with a visible LCD readout and audible buzzer alert for unsafe values.
Video Tutorial
Watch the step-by-step video walkthrough for this ESP32 S3 project below.
Challenge Yourself
Once your temperature sensor and LCD are working together, these challenges will push your ESP32 S3 skills further with progressively more complex tasks.
- Beginner: Add a second DS18B20 sensor and display both readings simultaneously — one on each row of the LCD.
- Beginner: Show a warning message on the LCD when the temperature rises above a threshold you define in the code.
- Intermediate: Add a push button that toggles the LCD display between Celsius-only and Fahrenheit-only modes when pressed.
- Intermediate: Log temperature readings with timestamps to the Serial Monitor every minute while the LCD shows a live reading every second.
- Advanced: Build a web server on the ESP32 S3 that serves a real-time temperature graph accessible from any browser on your local network, with the LCD showing the current value locally.
- Advanced: Add an RTC module so the LCD displays both the current time and temperature, and log data with timestamps to an SD card for long-term analysis.