
ESP32 S3 - Keypad Door Lock
This tutorial shows you how to build a password-controlled door lock system using a keypad and solenoid lock with the ESP32 S3. When the user enters the correct password on the keypad, the ESP32 S3 activates the solenoid lock to unlock the door, keeps it open for 20 seconds, and then automatically relocks it.
The ESP32 S3 code supports multiple passwords, so you can register more than one valid entry code for different users or scenarios.
What you'll build:
- A circuit connecting a 3x4 keypad, relay, and solenoid lock to the ESP32 S3
- A sketch that reads a password from the keypad and unlocks the door when the correct password is entered
- An auto-relock mechanism that secures the door again after 20 seconds
- A foundation for access-control and smart-lock projects using the ESP32 S3
Hardware Preparation
Or you can buy the following kits:
| 1 | × | DIYables ESP32 S3 Starter Kit (ESP32 S3 included) | |
| 1 | × | DIYables Sensor Kit (18 sensors/displays) |
Additionally, some of these links are for products from our own brand, DIYables .
Overview of Keypad and Solenoid Lock
A keypad gives users a familiar and secure way to enter numeric or alphanumeric passwords directly into an embedded system without any external device. A solenoid lock converts an electrical signal from the ESP32 S3 (via a relay) into a mechanical bolt movement, making it the ideal actuator for physical access control. Together, they form a self-contained, low-cost door lock that requires no smartphone or network connection.
Key Specifications
We have dedicated tutorials covering each component in depth. Each tutorial contains detailed information and step-by-step instructions about hardware pinout, working principle, wiring connection to the ESP32 S3, and Arduino code. Learn more about them at the following links:
Wiring Diagram
Connect the keypad, relay, and solenoid lock to your ESP32 S3 by following the diagram below. Double-check all connections before applying power, especially on the high-voltage side of the relay that drives the solenoid lock.
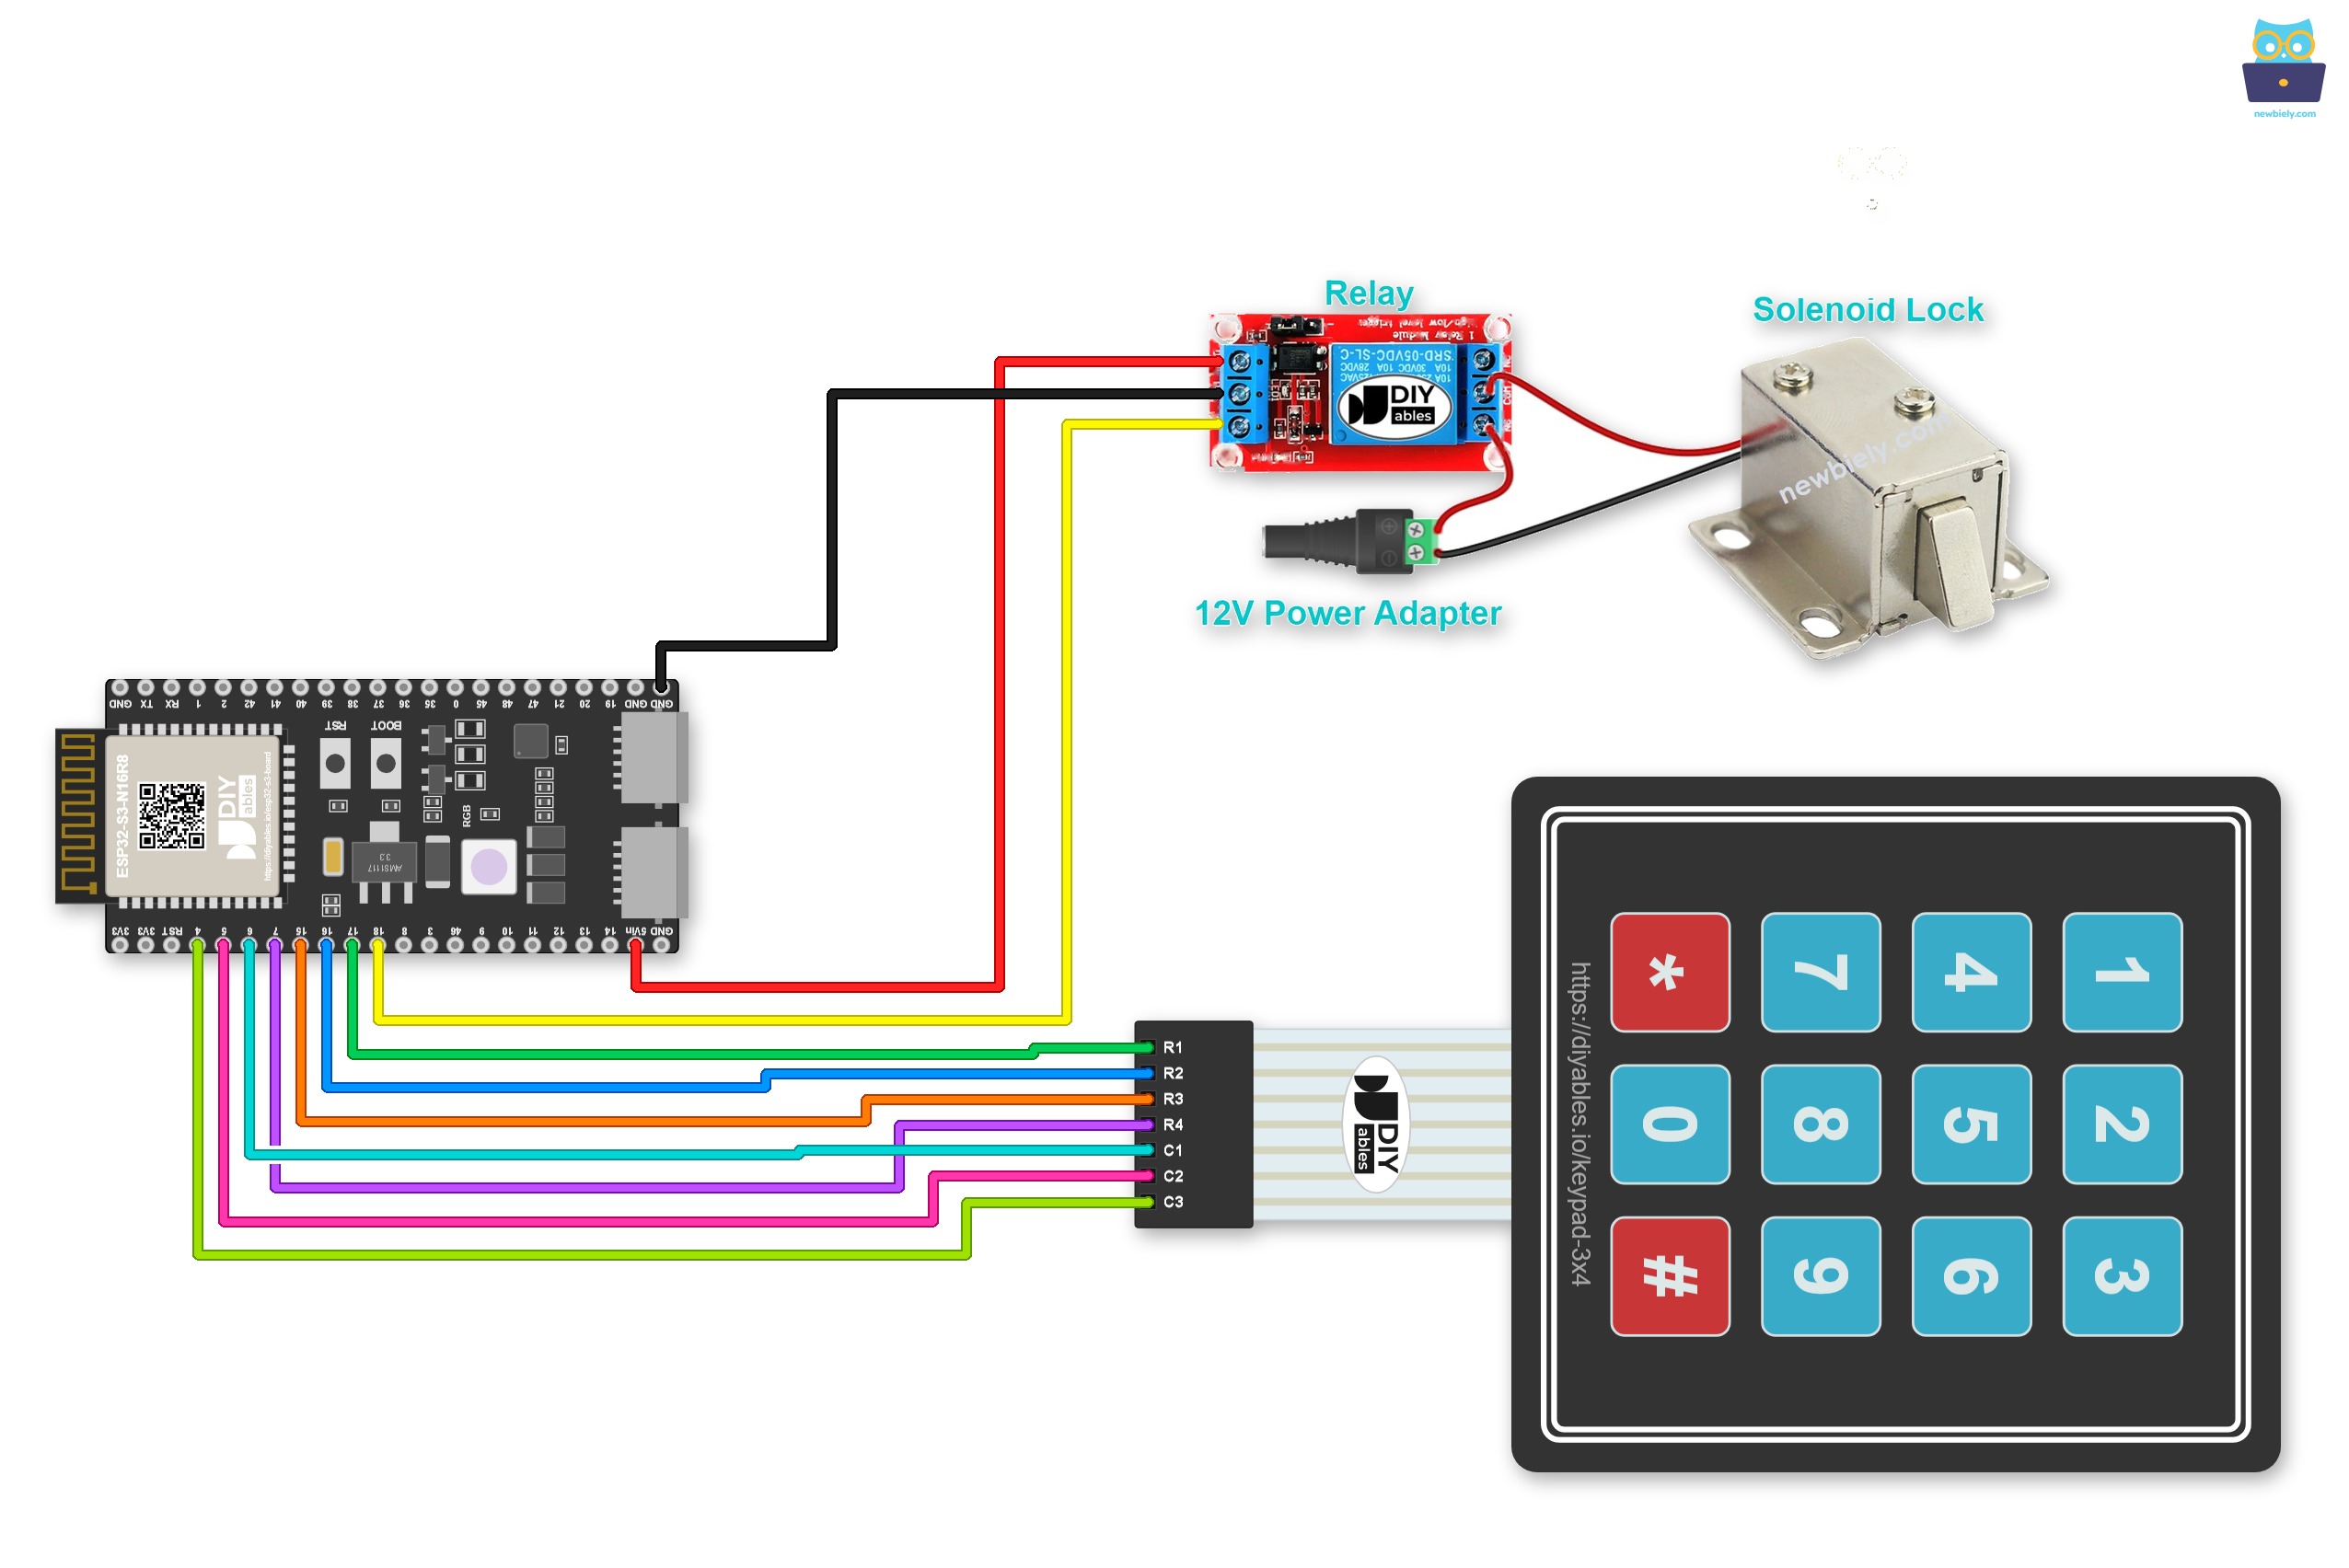
This image is created using Fritzing. Click to enlarge image
A screw terminal keeps each wire tight, even when the board shakes. Try a Screw Terminal Block for ESP32 S3: the ESP32 S3 sits on it, and each pin gets its own screw terminal. The pins do not change. Just connect each wire to the matching screw terminal:
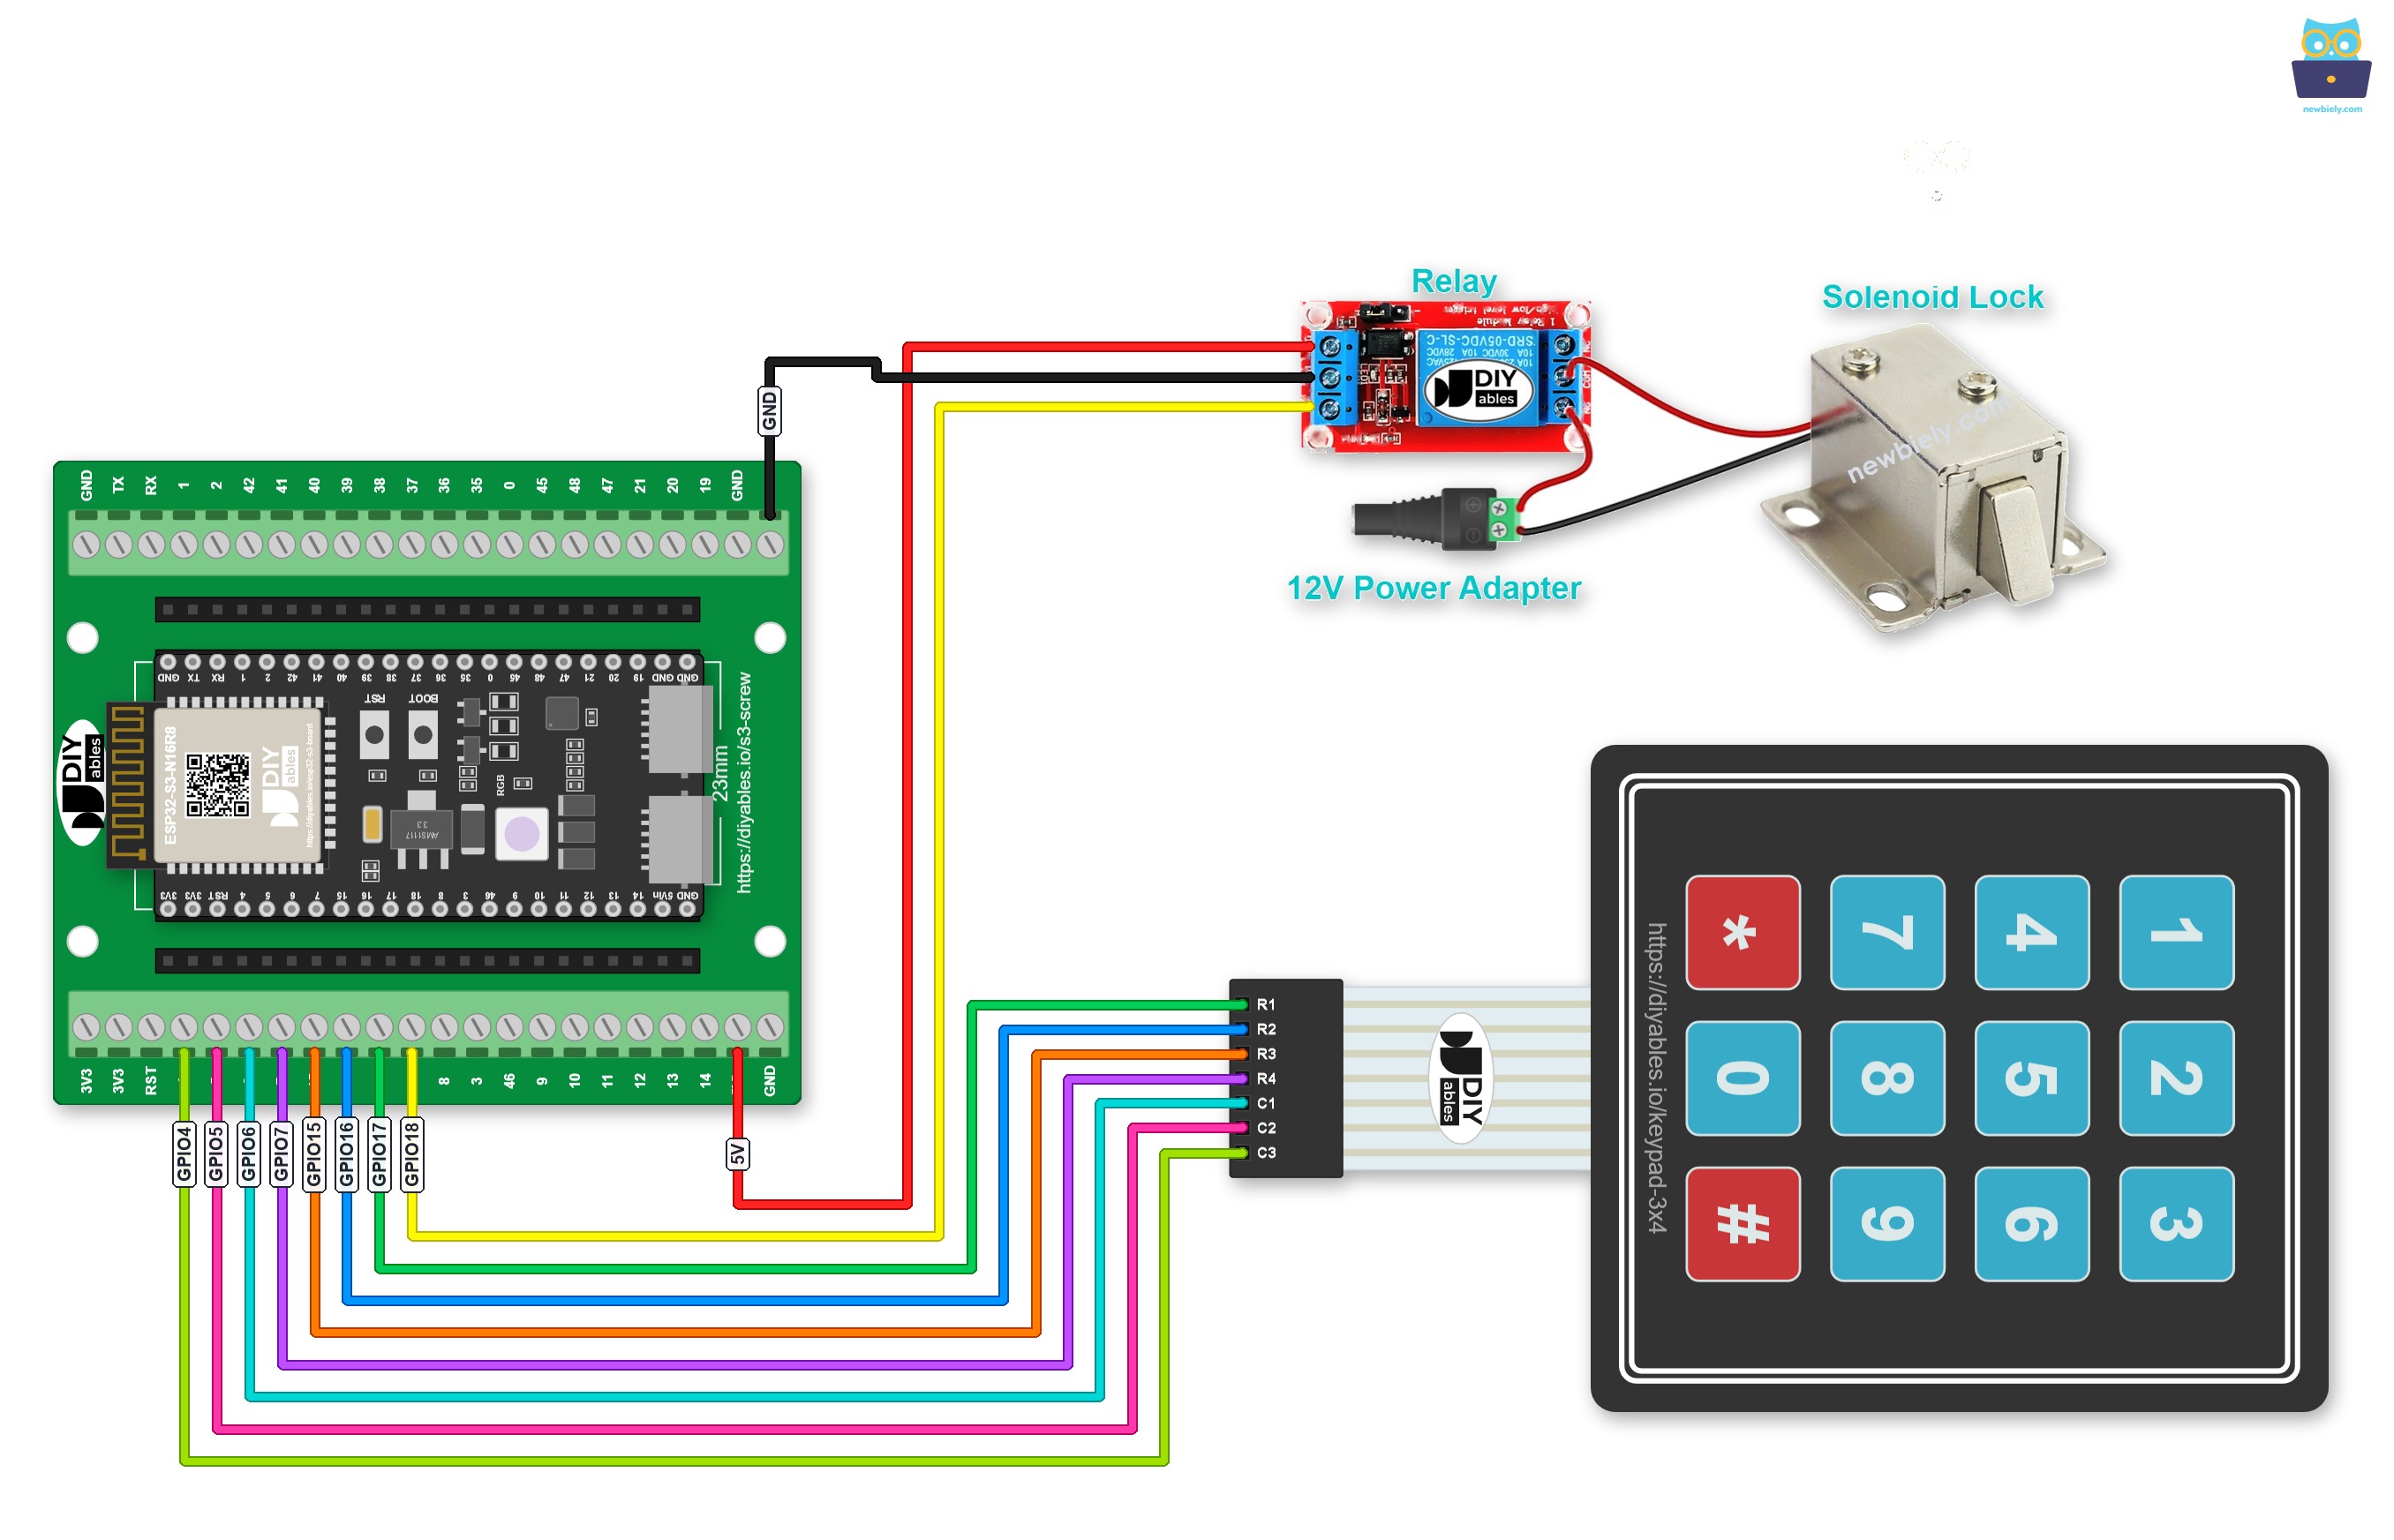
This image is created using Fritzing. Click to enlarge image
Or plug the ESP32 S3 into a GPIO Breakout Board for ESP32 S3. The same wiring then looks like this:
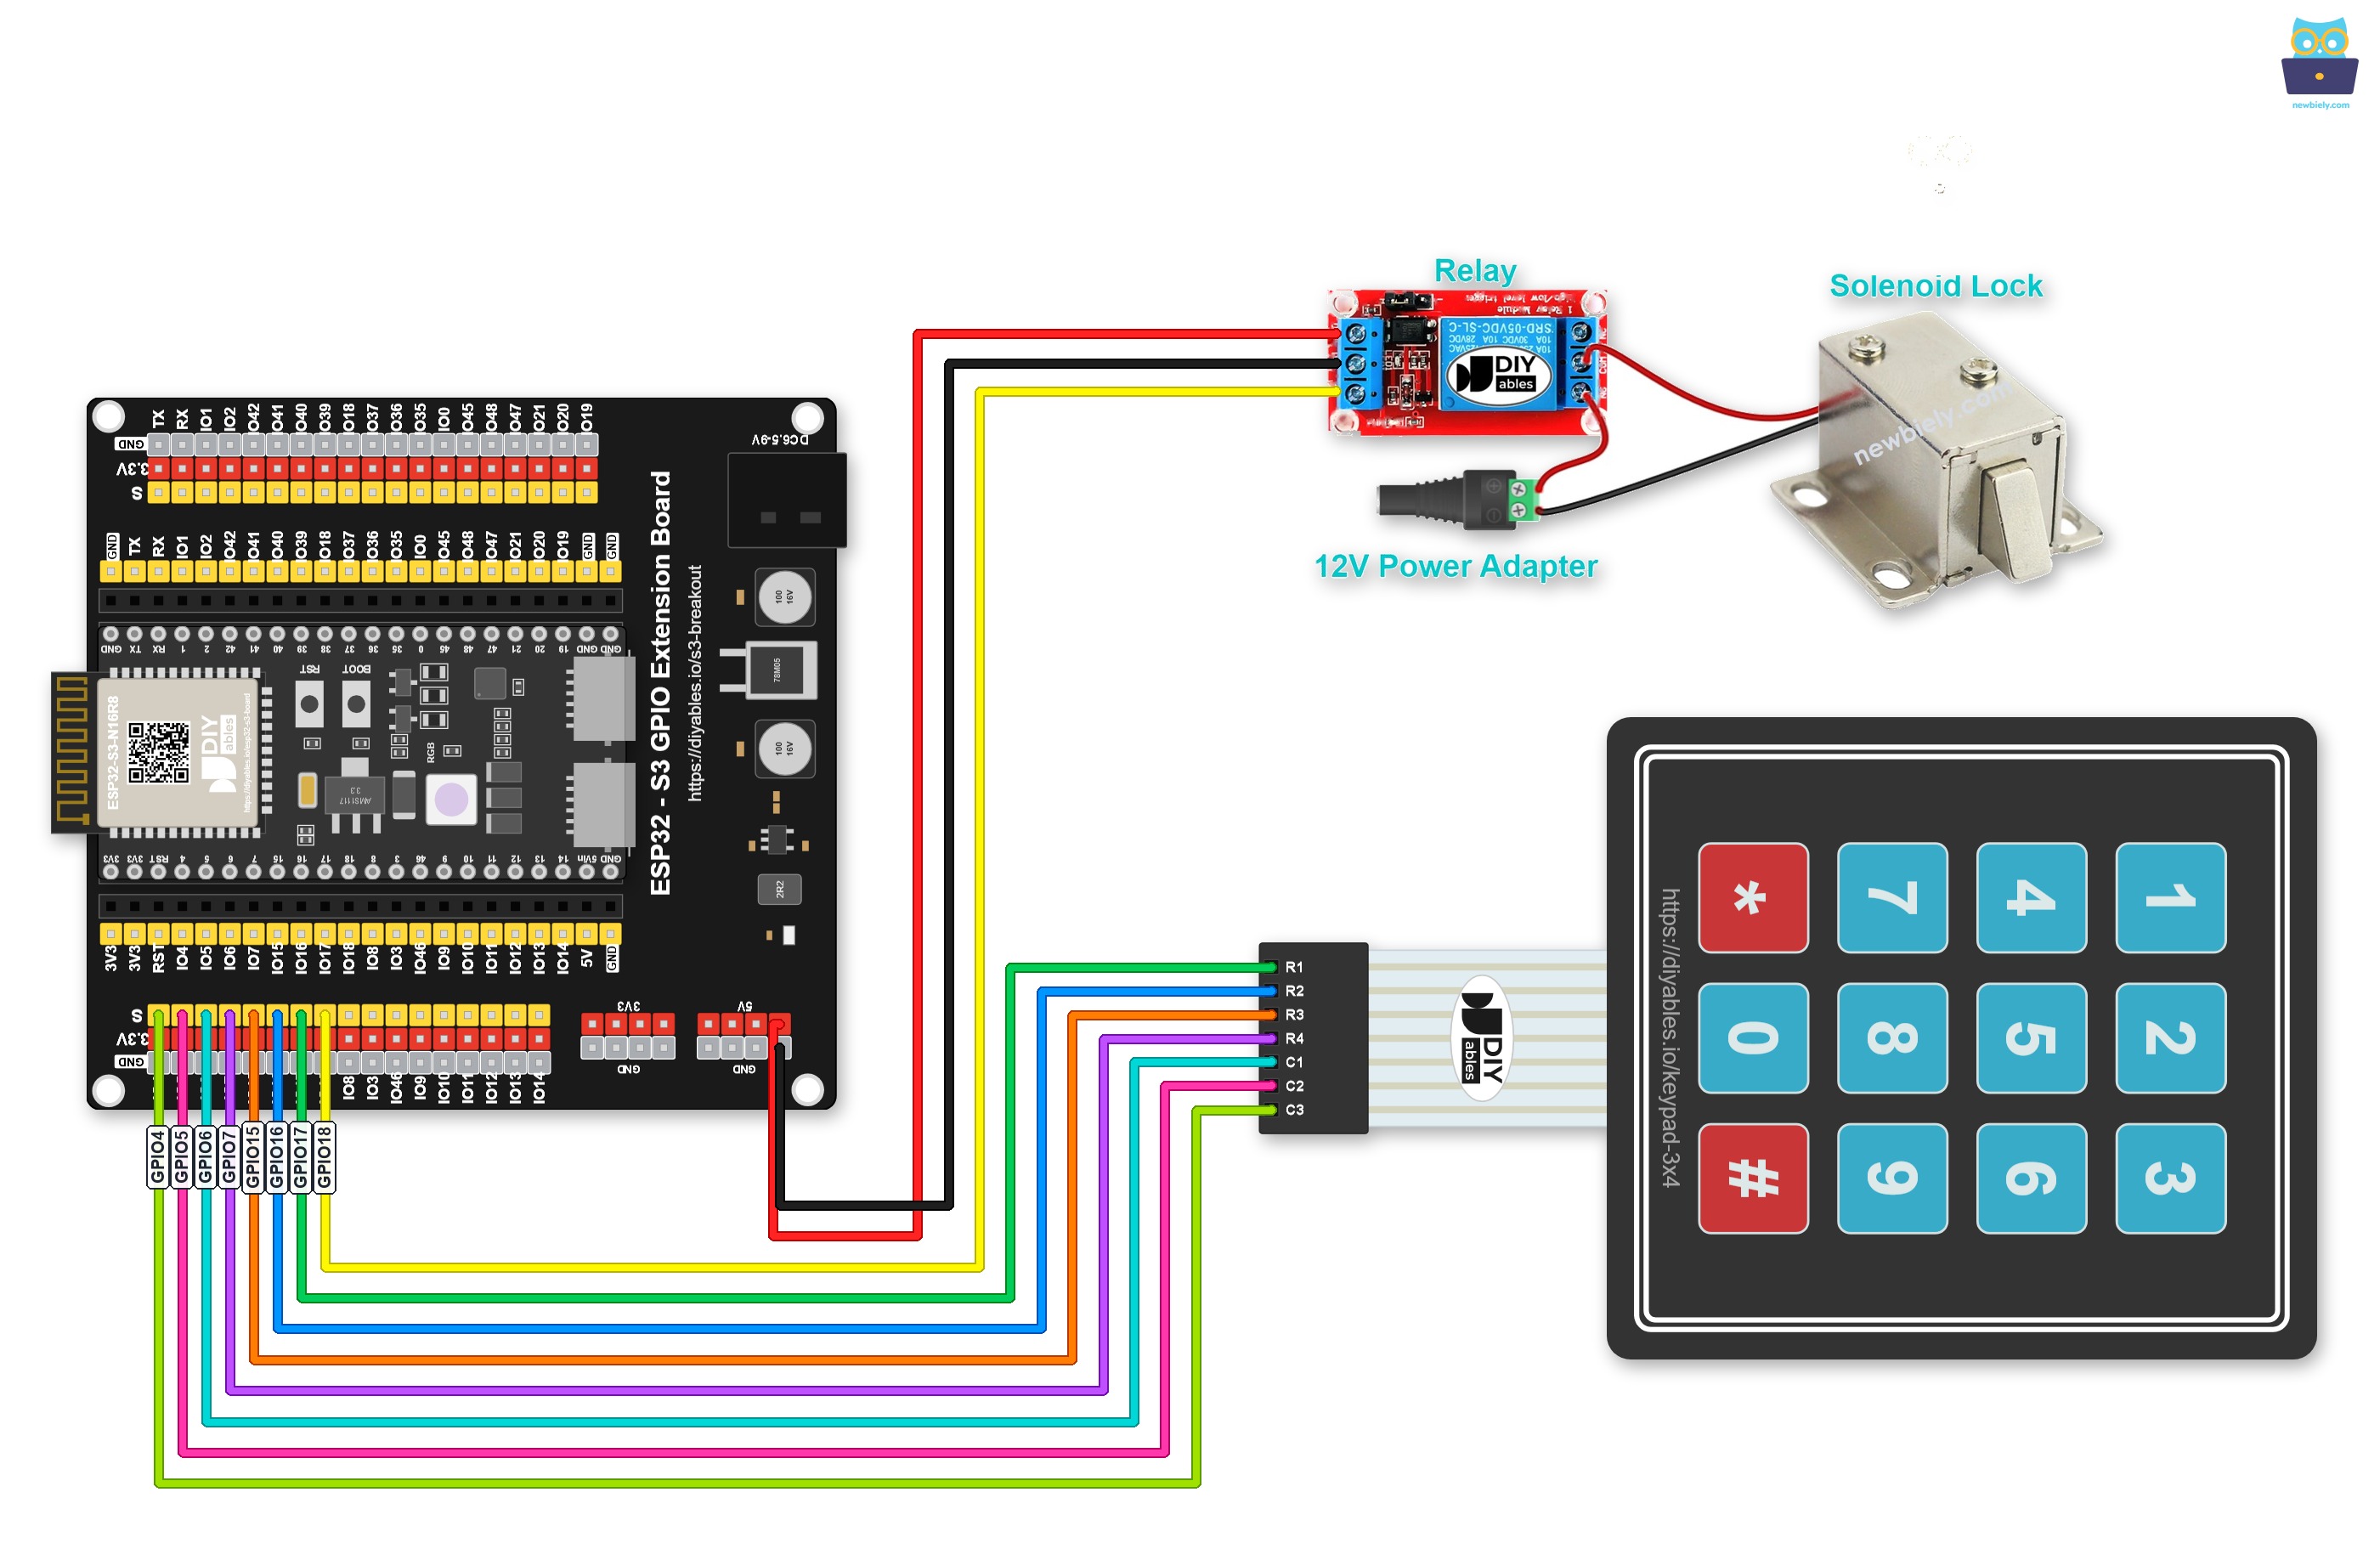
This image is created using Fritzing. Click to enlarge image
Safety Notes
The solenoid lock runs on 12 V DC and must be powered through the relay, not directly from the ESP32 S3's GPIO pins. Keep the 12 V wiring physically separated from the low-voltage keypad wiring, and ensure all screw terminals on the relay are tightened before energising the circuit.
| Component | Pin | ESP32 S3 Pin |
|---|---|---|
| Keypad | Row 1 | GPIO17 |
| Keypad | Row 2 | GPIO16 |
| Keypad | Row 3 | GPIO15 |
| Keypad | Row 4 | GPIO7 |
| Keypad | Col 1 | GPIO6 |
| Keypad | Col 2 | GPIO5 |
| Keypad | Col 3 | GPIO4 |
| Relay | DC- | GND |
| Relay | DC+ | 5V |
| Relay | IN | GPIO18 |
| Solenoid Lock | + | Relay NO |
| Solenoid Lock | - | 12V GND |
ESP32 S3 Code - Door Lock System with Password using Keypad and Solenoid Lock
The following code reads key presses from the keypad on the ESP32 S3, accumulates them into an input string, and activates the solenoid lock via the relay when the entered password matches one of the pre-defined passwords. When unlocked, the door stays open for 20 seconds and then the ESP32 S3 automatically closes the relay to relock it.
Detailed Instructions
- New to ESP32 S3? Complete our Getting Started with ESP32 S3 guide first.
- Wire the components following the wiring diagram shown above.
- Connect the ESP32 S3 board to your PC using a USB Type-C cable.
- Open Arduino IDE on your PC.
- Select the correct ESP32 S3 board and COM port from the Tools menu.
- Click the Libraries icon on the left bar of Arduino IDE.
- Search "keypad", then find the Keypad library by Mark Stanley and Alexander Brevig.
- Click Install to install the Keypad library.
- Search for DIYables_Keypad created by DIYables.io and click the Install button.
- Copy the above code and paste it into Arduino IDE.
- Click the Upload button to compile and upload the code to the ESP32 S3.
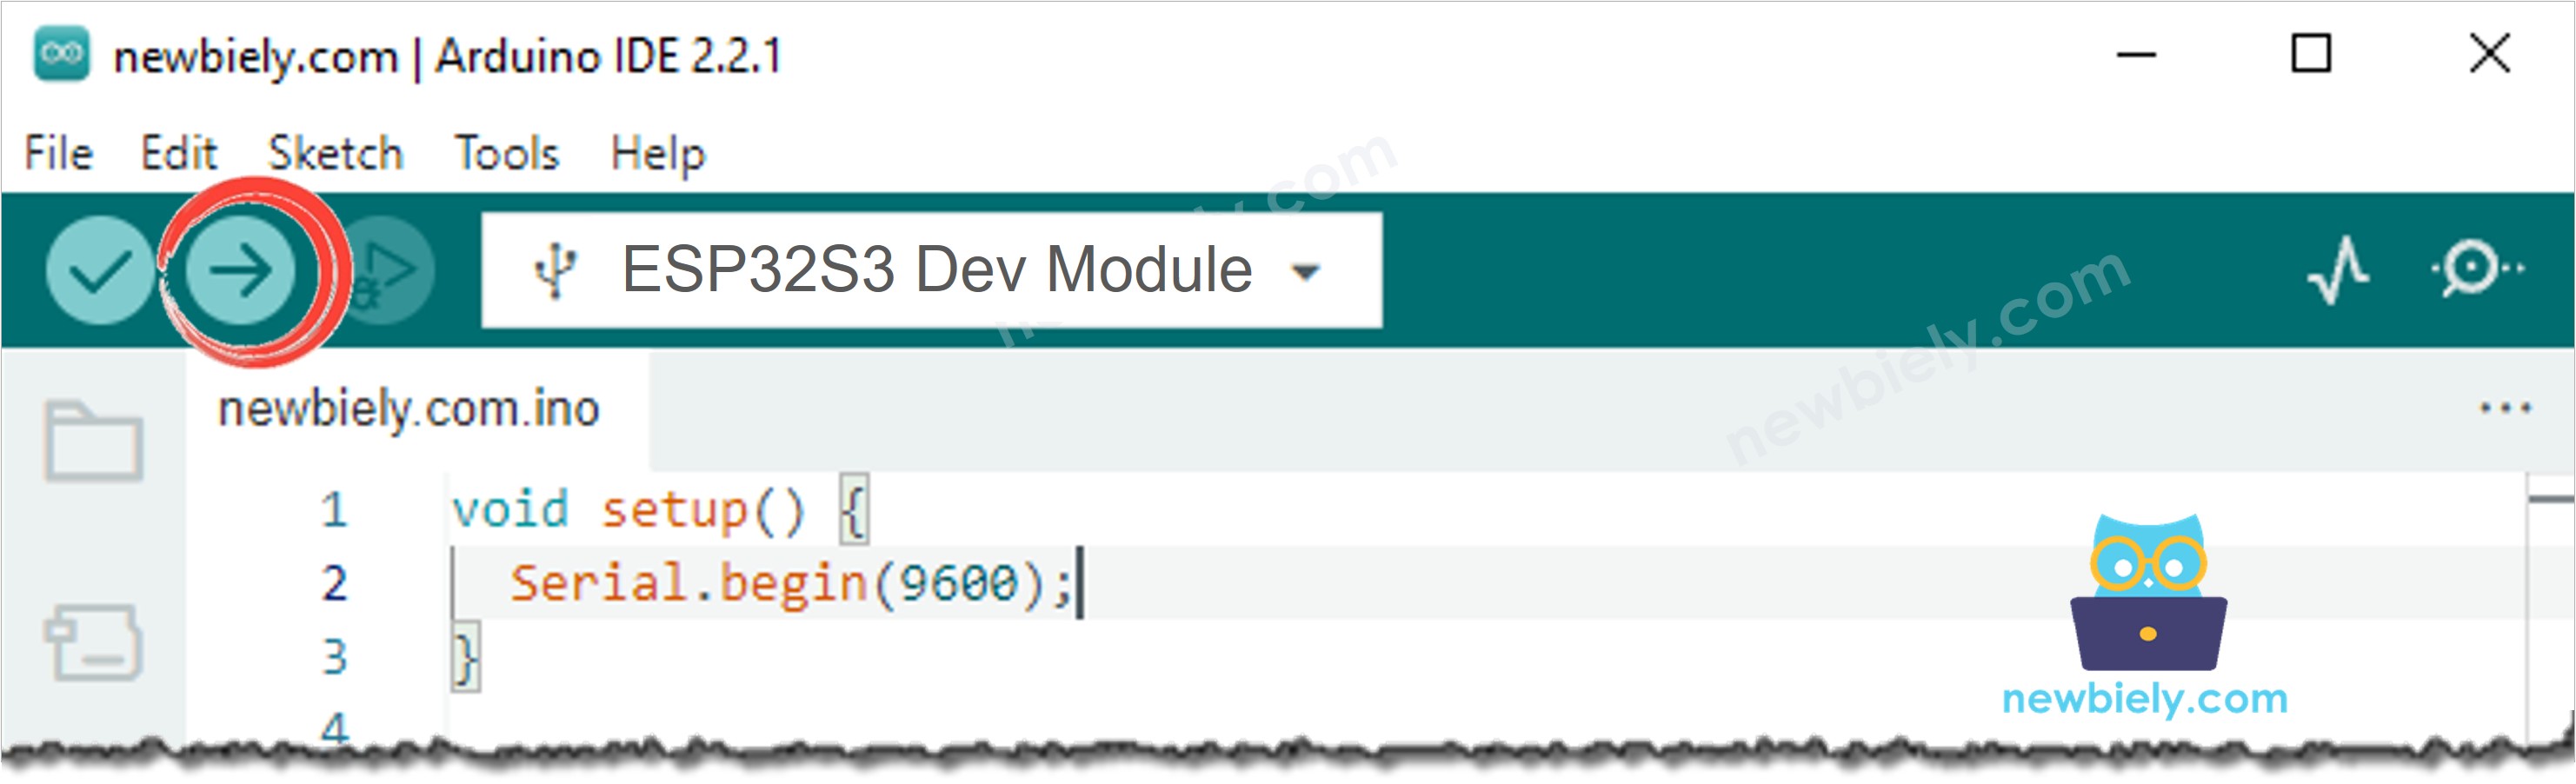
- Open the Serial Monitor in Arduino IDE.
- Press keys 12345 then press # on the keypad.
- Press keys 1234567 then press # on the keypad.
- Observe the state of the solenoid lock tongue for 20 seconds.
- Pro Tip: Use the * key at any time to clear your current input and start entering the password again from scratch.
Serial Monitor Output
The following Serial Monitor output shows the ESP32 S3 responding to password entries in real time. Correct and incorrect attempts are logged so you can verify access control behaviour at a glance.
Code Explanation
Authorised passwords are pre-defined in the ESP32 S3 code. A string variable called the input string accumulates each key that the user presses. Two special keys on the keypad control the flow: * clears the input string so you can restart entry, and # terminates it and triggers a comparison. When # is pressed, the input string is compared against every pre-defined password — if it matches any of them, the relay is activated to unlock the door for 20 seconds and then the door is automatically locked again; regardless of the result, the input string is cleared ready for the next attempt.
※ NOTE THAT:
- In the above code, to keep things simple we used the delay() function. For a non-blocking approach, consider using millis() instead. See How to use millis() instead of delay().
- You can add a piezo buzzer to emit a beep each time a key is pressed on the keypad.
- In the above code, the door relocks after 20 seconds. You can replace this with a door sensor so the door locks as soon as the sensor detects it is closed.
Application and Project Ideas
Once you master password-controlled door locking with the ESP32 S3, you can extend this pattern into a wide range of access control and security projects.
- Home front door: Replace a traditional key lock with a keypad-controlled solenoid bolt and set a family PIN for everyday entry.
- Office cabinet lock: Secure a filing cabinet or server rack with a numeric PIN that only authorised staff know.
- Safe deposit box: Add a solenoid lock to a strongbox and require the correct PIN before the lid can be released.
- Locker room system: Assign individual PINs to each locker and use one ESP32 S3 per unit for stand-alone operation.
- Shared workspace access: Update the password by reflashing the firmware so only current members can enter.
- Prototype security lab: Build a test rig that logs every access attempt to a serial console or SD card for audit purposes.
Video Tutorial
Watch the step-by-step video walkthrough for this ESP32 S3 project below.
Challenge Yourself
Now that you can build a keypad door lock with the ESP32 S3, try these progressively challenging extensions to deepen your understanding and build more capable projects.
- Beginner: Change the pre-defined password in the code to a six-digit PIN and verify that shorter inputs are always rejected.
- Beginner: Add an LED indicator that lights green for a correct password and red for an incorrect one, giving instant visual feedback.
- Intermediate: Implement a lockout mechanism that disables the keypad for 60 seconds after three consecutive incorrect password attempts.
- Intermediate: Store the authorised passwords in EEPROM or flash so they persist across power cycles and can be updated without reflashing the firmware.
- Advanced: Replace the fixed 20-second unlock window with a door sensor so the door relocks the moment it is physically closed.
- Advanced: Add a web interface over WiFi so an administrator can change passwords and view the full access log from a browser.