
ESP32 S3 - Touch Sensor - Relay
This tutorial shows you how to use the ESP32 S3 to control a relay based on the state of a touch sensor, letting you activate high-voltage devices with a simple finger touch. By the end, you will have a solid foundation for building touch-activated switching and automation projects with your ESP32 S3.
What you'll build:
- A circuit connecting a touch sensor and relay module to the ESP32 S3
- A sketch that activates the relay while the touch sensor is touched and deactivates it on release
- A system that can switch high-voltage loads like lamps, pumps, or motors via the relay
- A foundation for extending into home automation and touch-activated smart switching projects
We also have another tutorial: ESP32 S3 - Touch Sensor Toggles Relay, which toggles the relay's state between ON and OFF each time the touch sensor is touched.
We can extend this tutorial to use the touch sensor to control an LED strip, siren, light bulb, or motor by connecting them to the relay.
Hardware Preparation
Or you can buy the following kits:
| 1 | × | DIYables ESP32 S3 Starter Kit (ESP32 S3 included) | |
| 1 | × | DIYables Sensor Kit (18 sensors/displays) |
Additionally, some of these links are for products from our own brand, DIYables .
Overview of Relay and Touch Sensor
The relay and touch sensor are a powerful combination for building intuitive, buttonless control systems with the ESP32 S3. A touch sensor detects the presence of a human finger through capacitive sensing, providing a HIGH digital signal that the ESP32 S3 reads in real time, while a relay safely switches high-voltage or high-current loads that would otherwise damage the board's GPIO pins. Together they allow you to create sleek, touch-activated automation where a simple finger contact determines whether a device is active.
Key Specifications
We have dedicated tutorials covering each component in depth. Each tutorial contains detailed information and step-by-step instructions about hardware pinout, working principle, wiring connection to the ESP32 S3, and Arduino code. Learn more about them at the following links:
Wiring Diagram
Connect the touch sensor and relay to your ESP32 S3 by following the diagram below. Double-check all connections before applying power, especially on the high-voltage side of the relay.
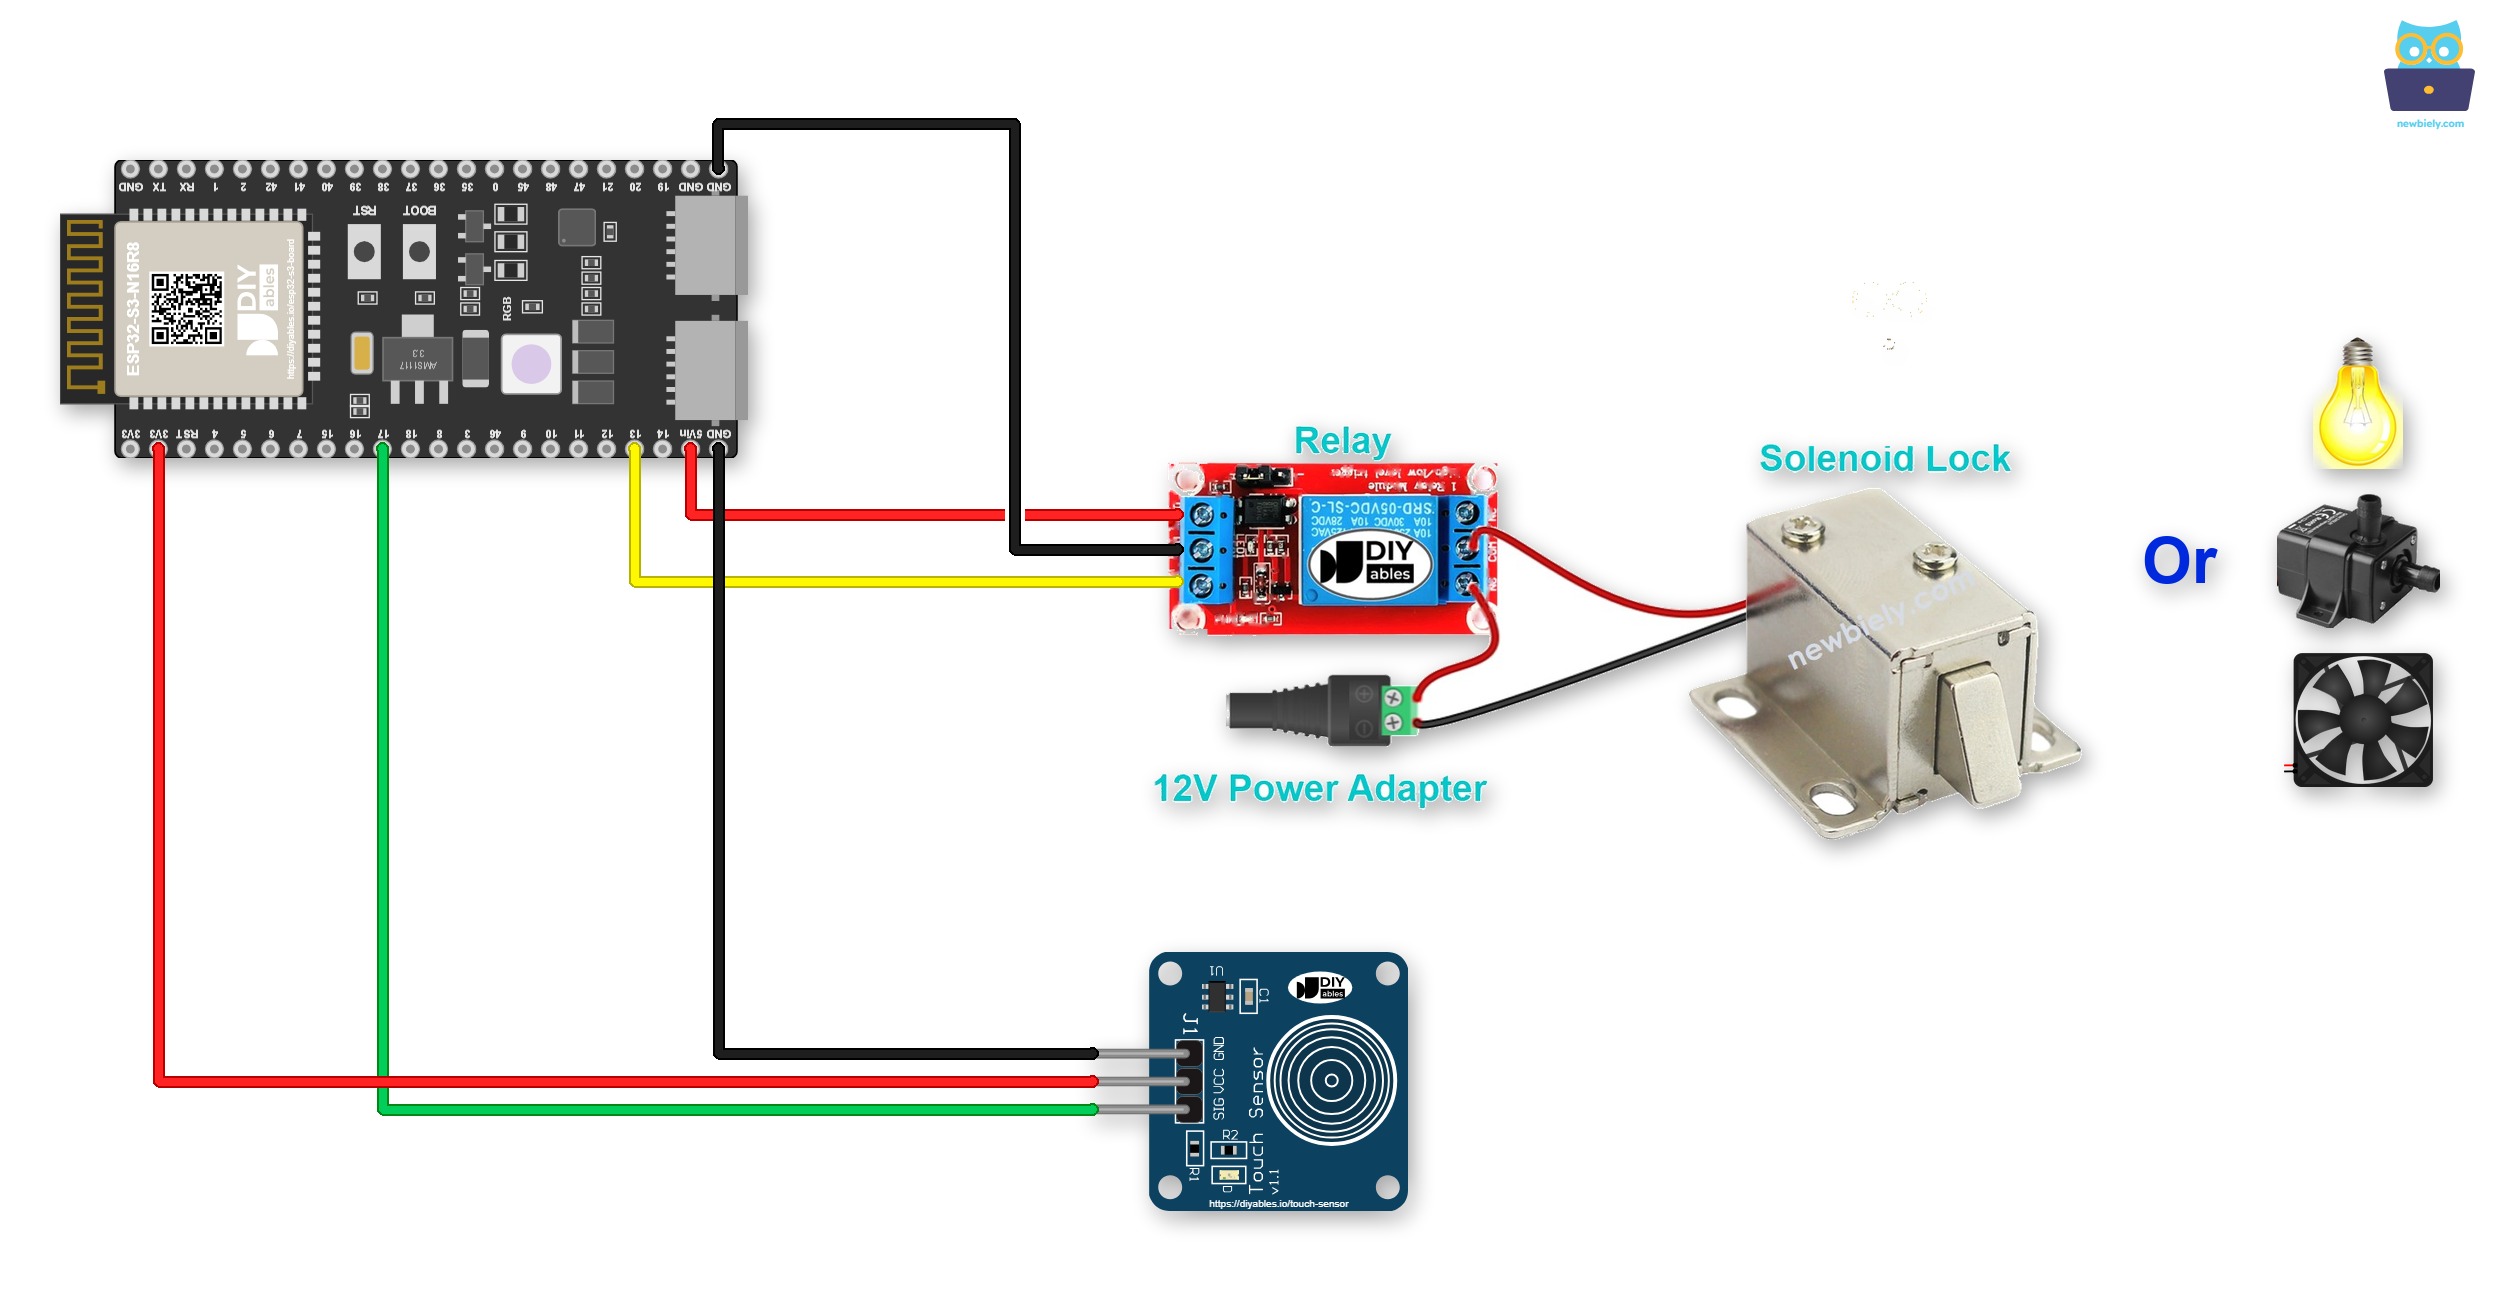
This image is created using Fritzing. Click to enlarge image
For a project that lasts, screw terminals hold the wires better than jumper wires. Simply plug the ESP32 S3 into a Screw Terminal Block for ESP32 S3. The pins do not change. Just connect each wire to the matching screw terminal:
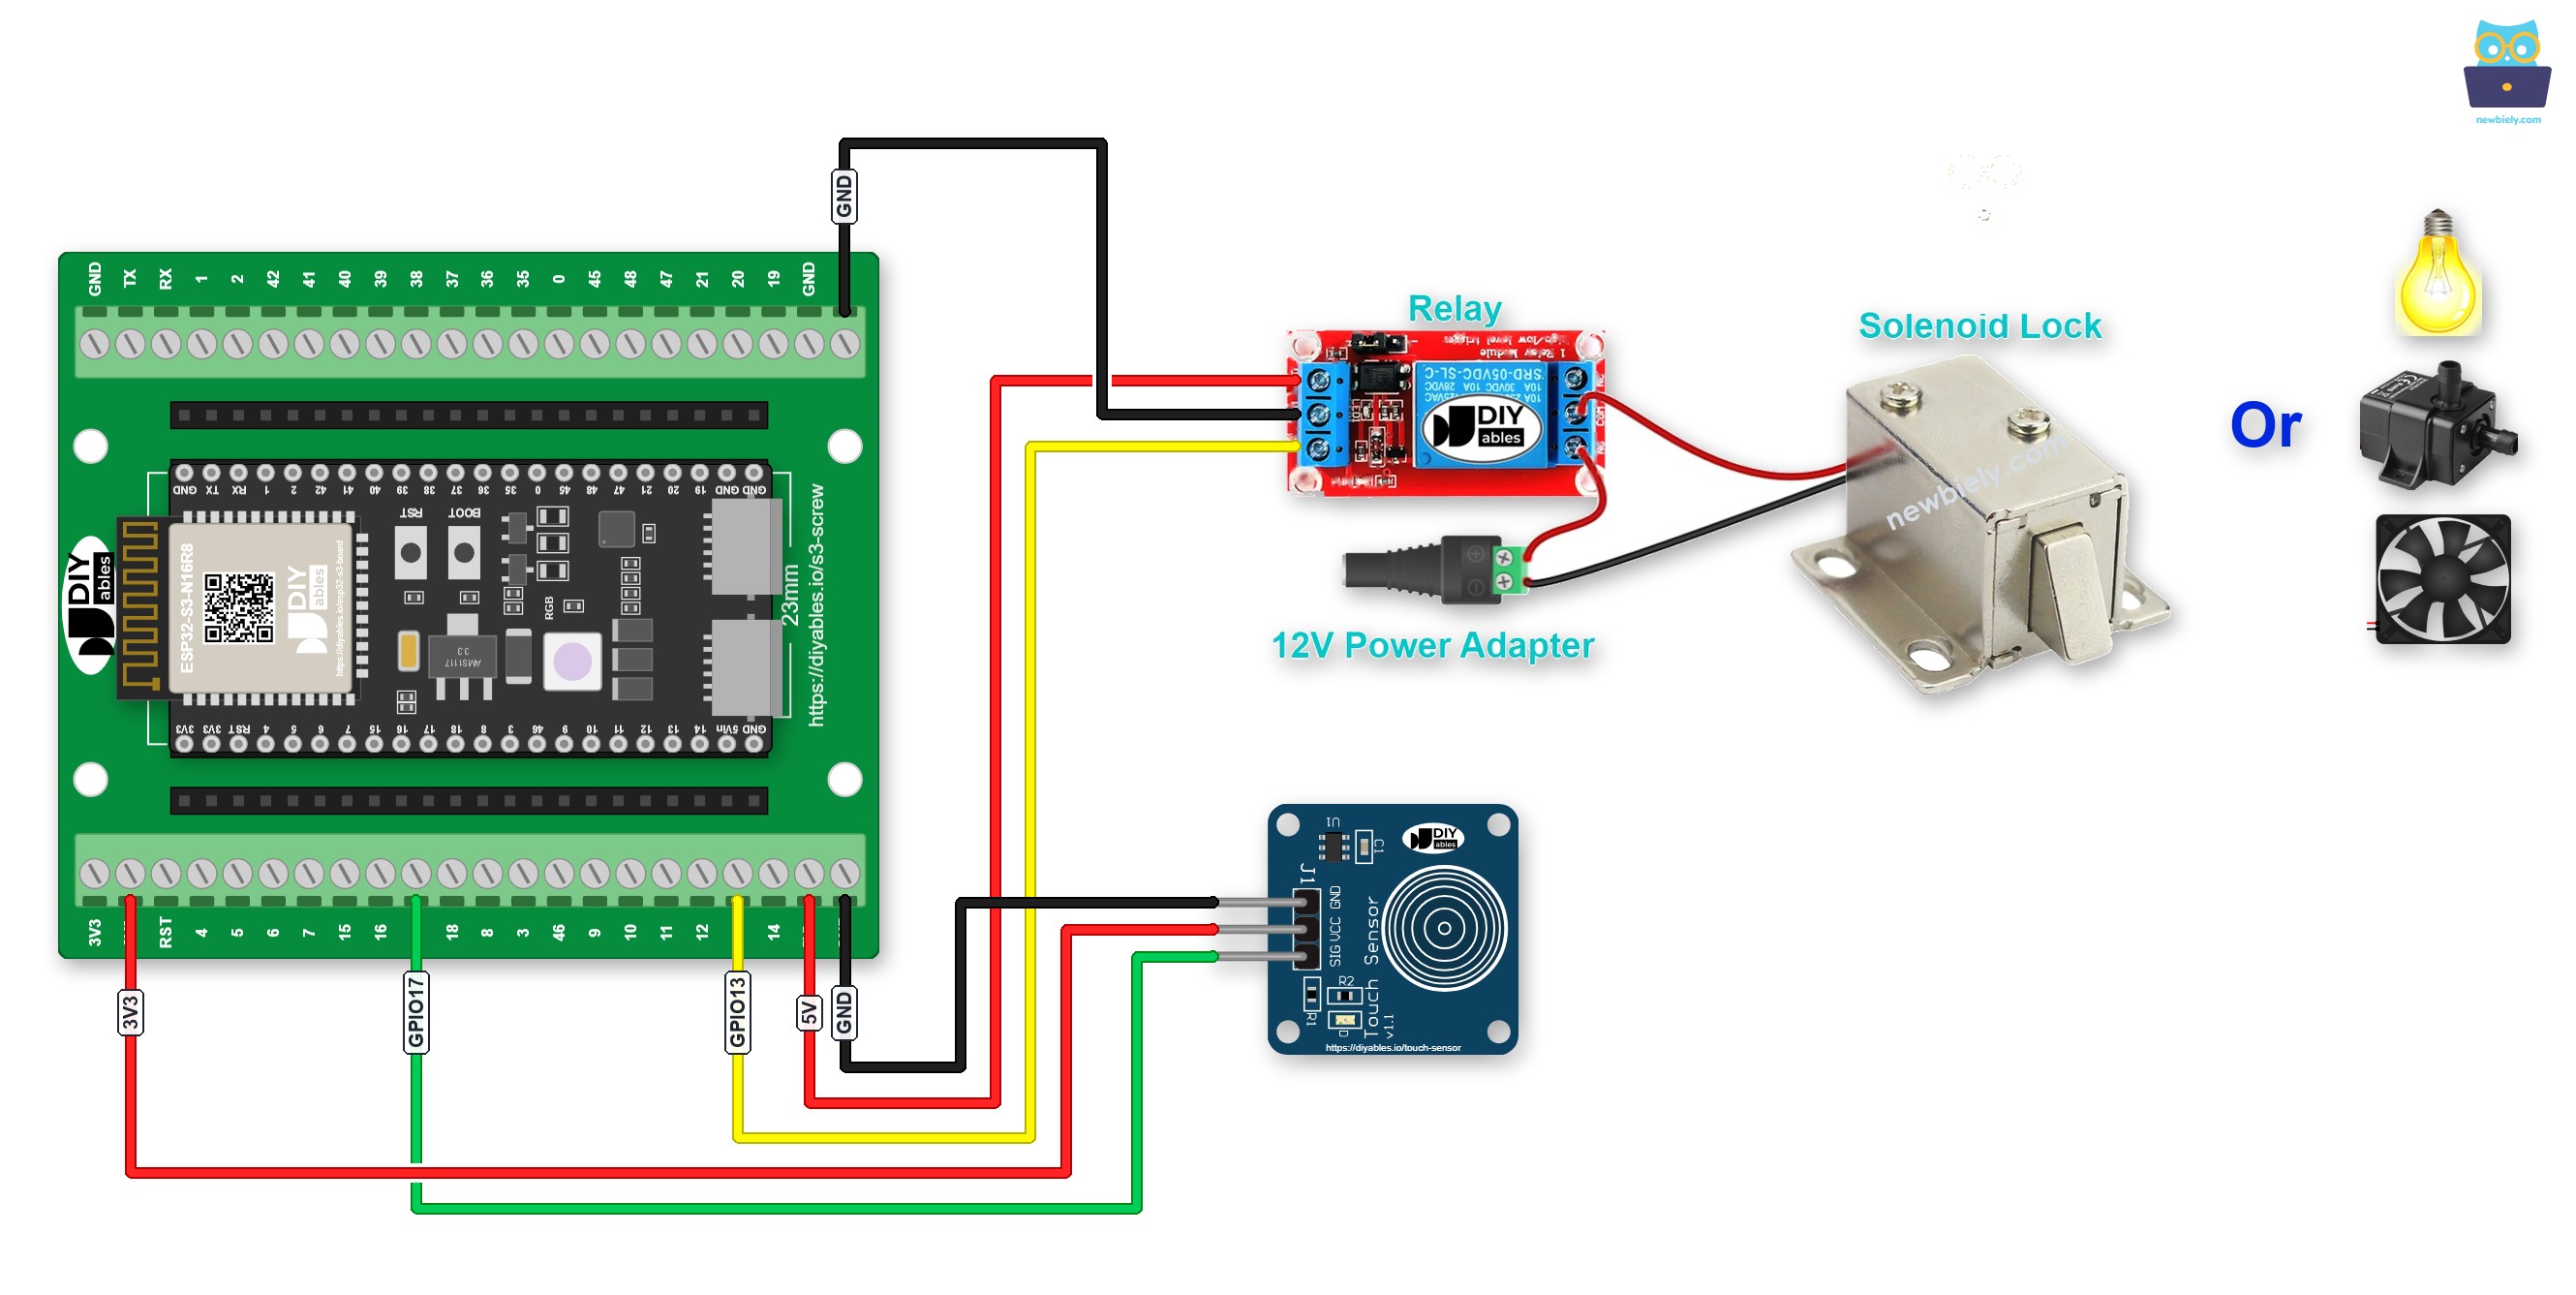
This image is created using Fritzing. Click to enlarge image
Here is the same circuit with a GPIO Breakout Board for ESP32 S3, which breaks out every GPIO to pin headers:
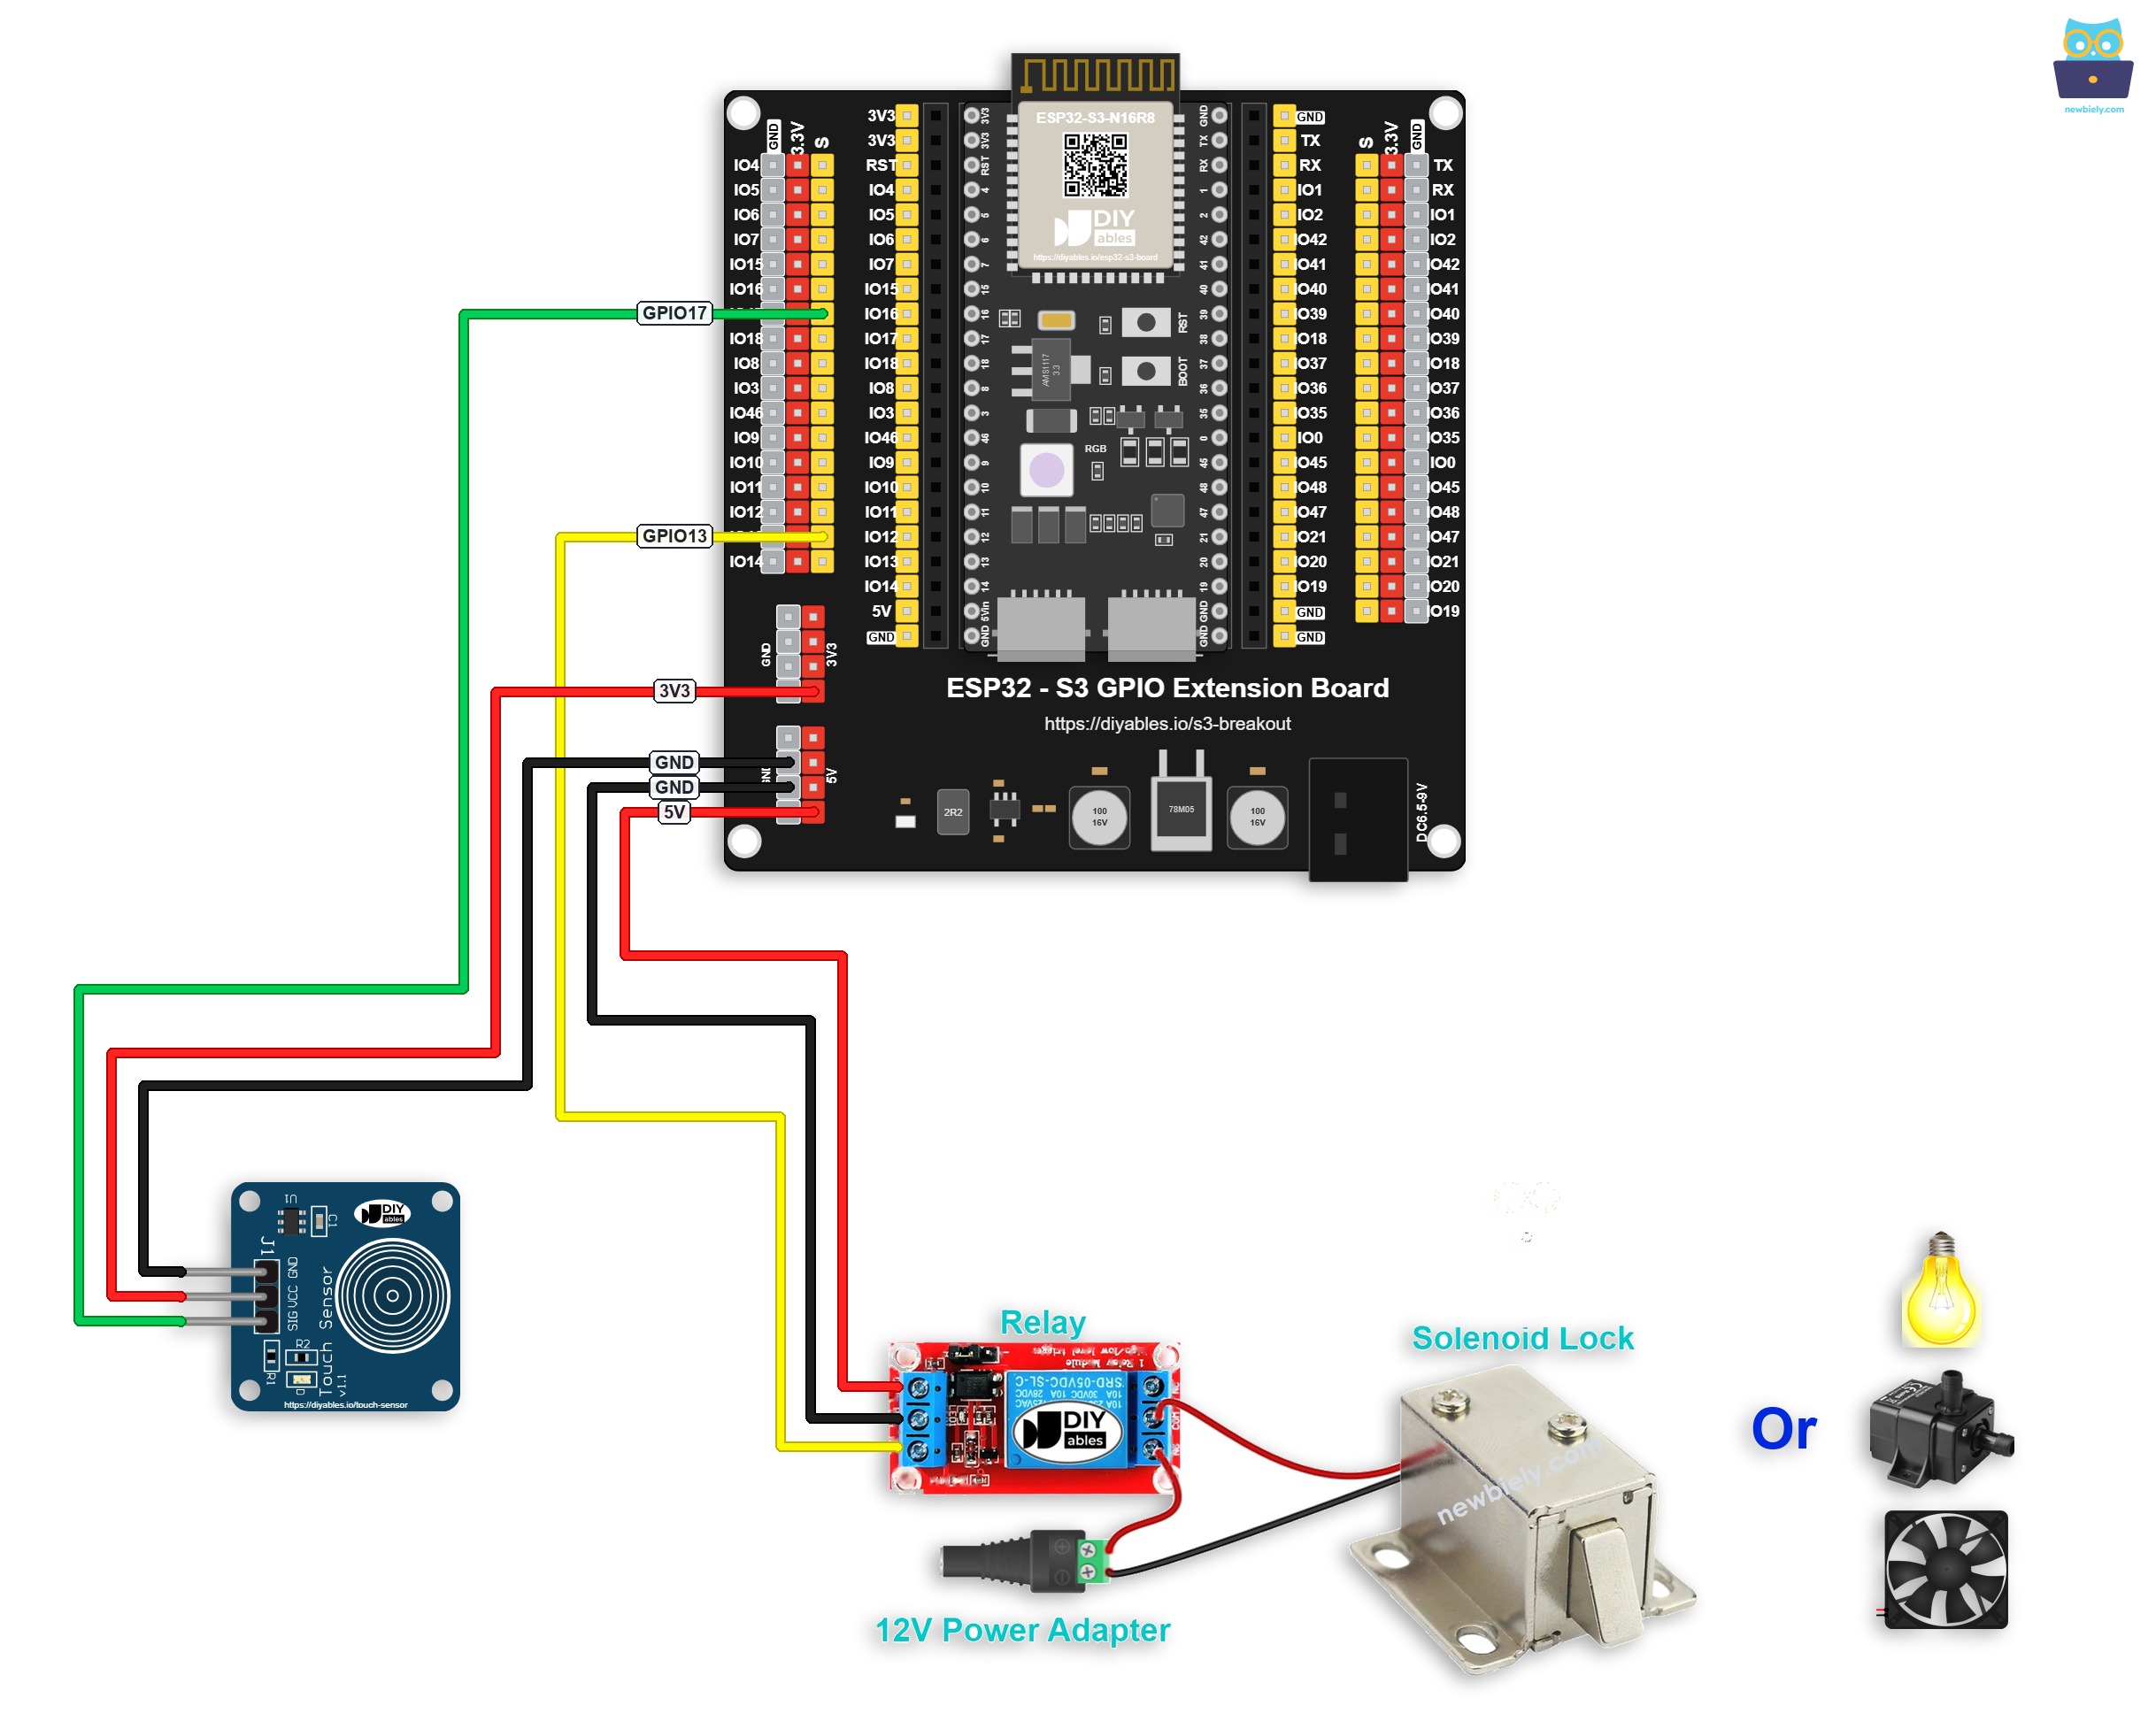
This image is created using Fritzing. Click to enlarge image
Safety Notes
Always verify that the relay's COM and NO (or NC) terminals are securely fastened and that no bare wires are exposed before powering the circuit. Keep the low-voltage control wiring to the ESP32 S3 physically separated from any high-voltage load wiring to reduce the risk of accidental contact.
| Component | Pin | ESP32 S3 Pin |
|---|---|---|
| Touch Sensor | GND | GND |
| Touch Sensor | VCC | 3.3V |
| Touch Sensor | SIGNAL | GPIO17 |
| Relay | DC- | GND |
| Relay | DC+ | 5V |
| Relay | IN | GPIO13 |
ESP32 S3 Code
The following code reads the state of a touch sensor connected to the ESP32 S3 and controls a relay accordingly — activating the relay while the sensor is touched and deactivating it when released. All logic is handled with standard Arduino digitalRead() and digitalWrite() calls, so no external libraries are required.
Detailed Instructions
- New to ESP32 S3? Complete our Getting Started with ESP32 S3 guide first.
- Wire the components following the wiring diagram shown above.
- Connect the ESP32 S3 board to your PC using a USB Type-C cable.
- Open Arduino IDE on your PC.
- Select the correct ESP32 S3 board and COM port from the Tools menu.
- Copy the above code and paste it into Arduino IDE.
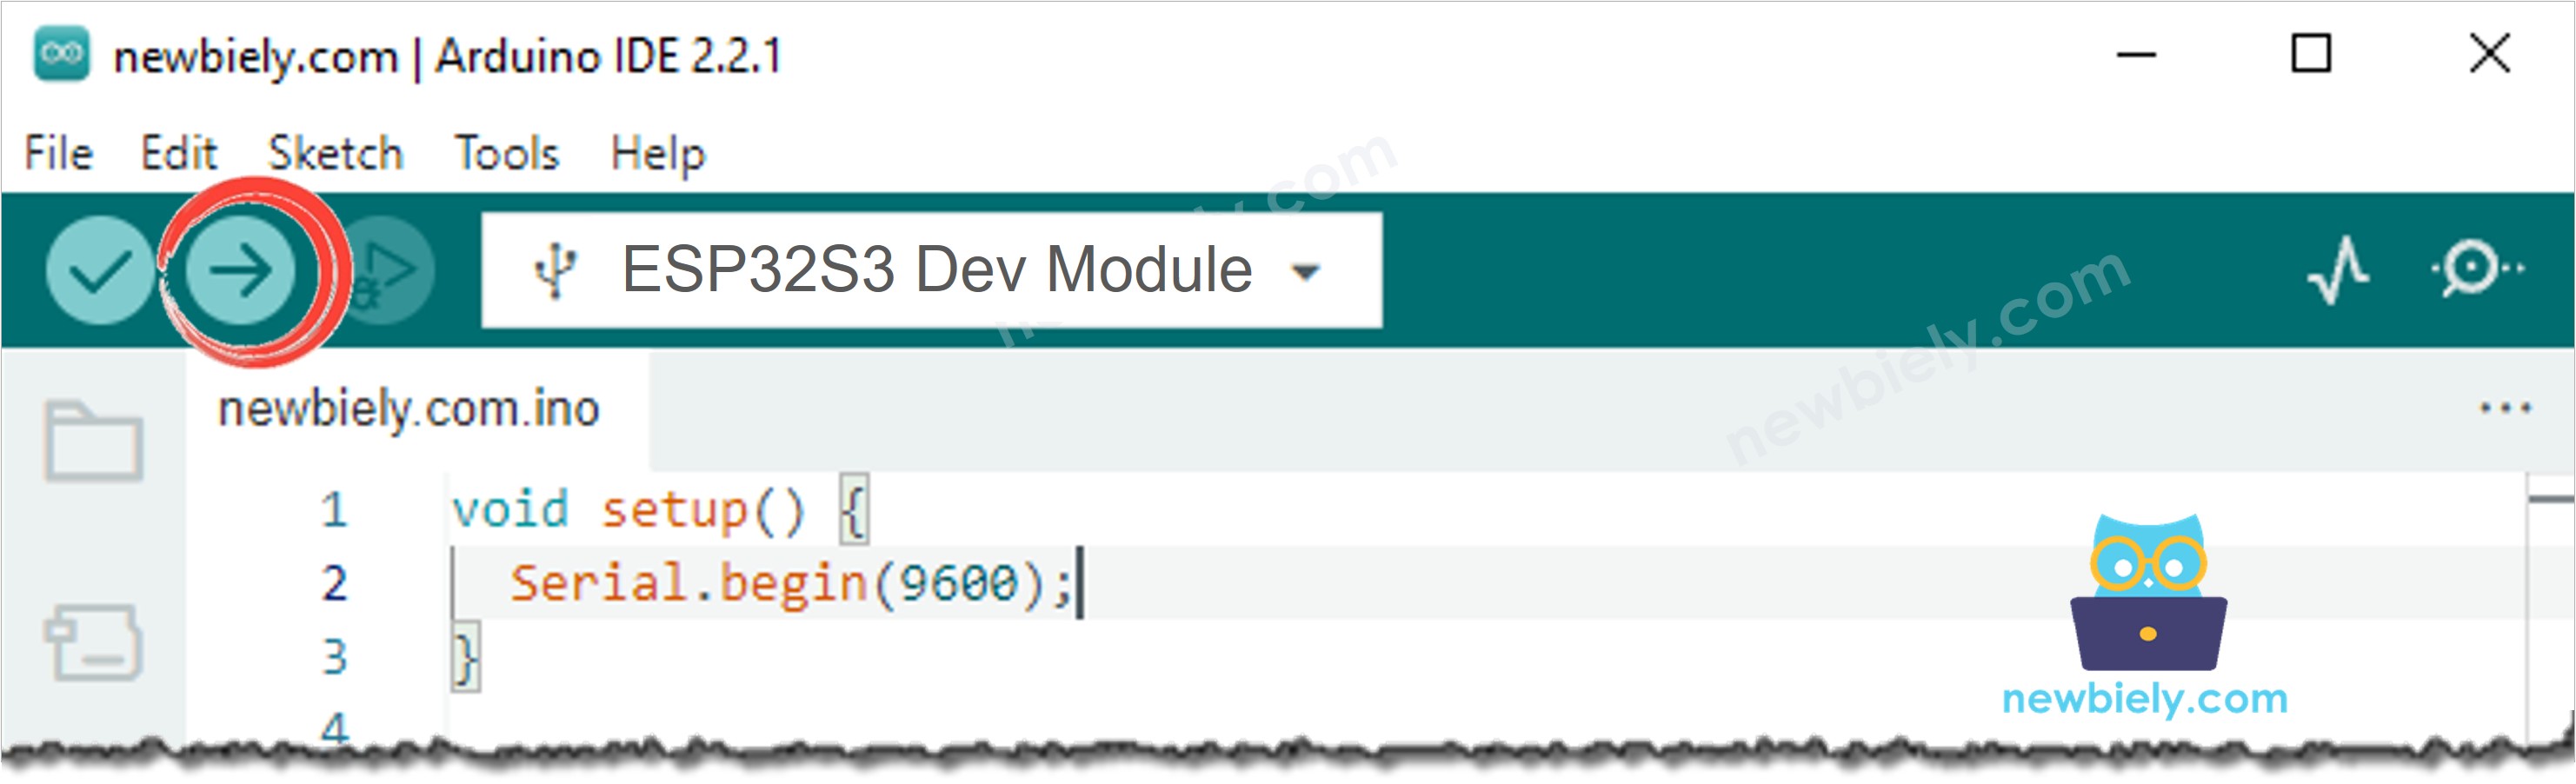
- Click the Upload button to compile and upload the code to the ESP32 S3.
- Touch and hold the touch sensor for several seconds.
- Observe the relay activating (you will hear a click) while your finger is on the sensor.
- Remove your finger and observe the relay deactivating.
- Pro Tip: Open the Serial Monitor at 115200 baud to print relay state messages in real time — this makes it much easier to debug unexpected behavior.
Serial Monitor Output
The following Serial Monitor output shows the ESP32 S3 responding to touch events and releases in real time. Each line is timestamped so you can verify the timing between touch and release events.
Application and Project Ideas
Once you master touch-sensor-controlled relay switching with the ESP32 S3, you can extend this pattern into a wide range of practical automation and smart-home projects.
- Touch-activated lamp: Tap a sensor pad to switch a table lamp or LED strip on while your finger remains in contact, and have it turn off automatically on release.
- Touch-based door lock: Use a capacitive touch pad to momentarily energise a solenoid lock relay for a sleek, buttonless entry system.
- Kitchen appliance control: Integrate a touch sensor into a countertop surface so a dishwasher or blender can be activated without a mechanical switch.
- Emergency stop panel: Wire a large touch pad to a relay that cuts power to a machine, providing an easy-to-activate safety shutoff.
- Fan or heater override: Allow manual relay activation via touch to override an automated temperature-control loop without pressing a physical button.
- Interactive exhibit trigger: Activate lighting effects, audio, or motors in museum or retail displays by simply having a visitor touch a sensor surface.
Video Tutorial
Watch the step-by-step video walkthrough for this ESP32 S3 project below.
Challenge Yourself
Now that you can control a relay with a touch sensor on the ESP32 S3, try these progressively challenging extensions to deepen your understanding and build more capable projects.
- Beginner: Modify the code so the relay stays ON for exactly five seconds after the touch sensor is touched, regardless of how long the finger remains on the pad.
- Beginner: Add a second LED indicator that lights up whenever the relay is active so you have a visual confirmation alongside the audible relay click.
- Intermediate: Implement a toggle mode so the first touch turns the relay ON and the second touch turns it OFF, using state-change detection for reliable single-event triggering.
- Intermediate: Add a second touch sensor that activates a second relay independently, giving you two-channel touch control from a single ESP32 S3.
- Advanced: Build a timed relay controller where a short touch activates the relay for 10 seconds and a long touch (over 2 seconds) keeps it ON until touched again.
- Advanced: Extend the project with WiFi so the relay can be controlled both by the physical touch sensor and remotely via a web page served by the ESP32 S3.