
ESP32 S3 - Door Sensor - Piezo Buzzer
This tutorial shows you how to use the ESP32 S3 with a door sensor and a piezo buzzer to build an audio-alert system that responds to door open and close events. You will implement two practical applications — one that makes a continuous sound whenever the door is open, and one that plays a musical melody each time the door is opened.
What you'll build:
- An ESP32 S3 circuit with a door sensor and piezo buzzer wired to the board
- Application 1: Buzzer produces a continuous sound when the door is open and stops when the door is closed
- Application 2: Buzzer plays a complete melody each time the door is opened
- A foundation for real-world door alarm and notification projects
Hardware Preparation
Or you can buy the following kits:
| 1 | × | DIYables ESP32 S3 Starter Kit (ESP32 S3 included) | |
| 1 | × | DIYables Sensor Kit (18 sensors/displays) |
Additionally, some of these links are for products from our own brand, DIYables .
Overview of Piezo Buzzer and Door Sensor
The door sensor (also called a reed switch or magnetic contact sensor) and the piezo buzzer are a natural pair for building entry-alert systems on the ESP32 S3. The door sensor outputs a digital signal that changes state when the magnet is moved away from the reed switch — the ESP32 S3 reads this signal on every loop iteration and drives the piezo buzzer accordingly, producing an audible tone whenever the door transitions to an open state.
Key Specifications
For detailed background on each component, refer to these dedicated ESP32 S3 tutorials:
- ESP32 S3 - Piezo Buzzer tutorial — Learn how to generate tones and melodies
- ESP32 S3 - Door Sensor tutorial — Understand door sensor reading and state detection
Please note that this tutorial uses a 3–5V buzzer, but you can adapt it for a 12V buzzer. Learn more in the ESP32 S3 - Buzzer tutorial.
Wiring Diagram
Connect the door sensor and piezo buzzer to your ESP32 S3 by following the diagram below. Verify every connection before powering the board to avoid accidental short circuits.
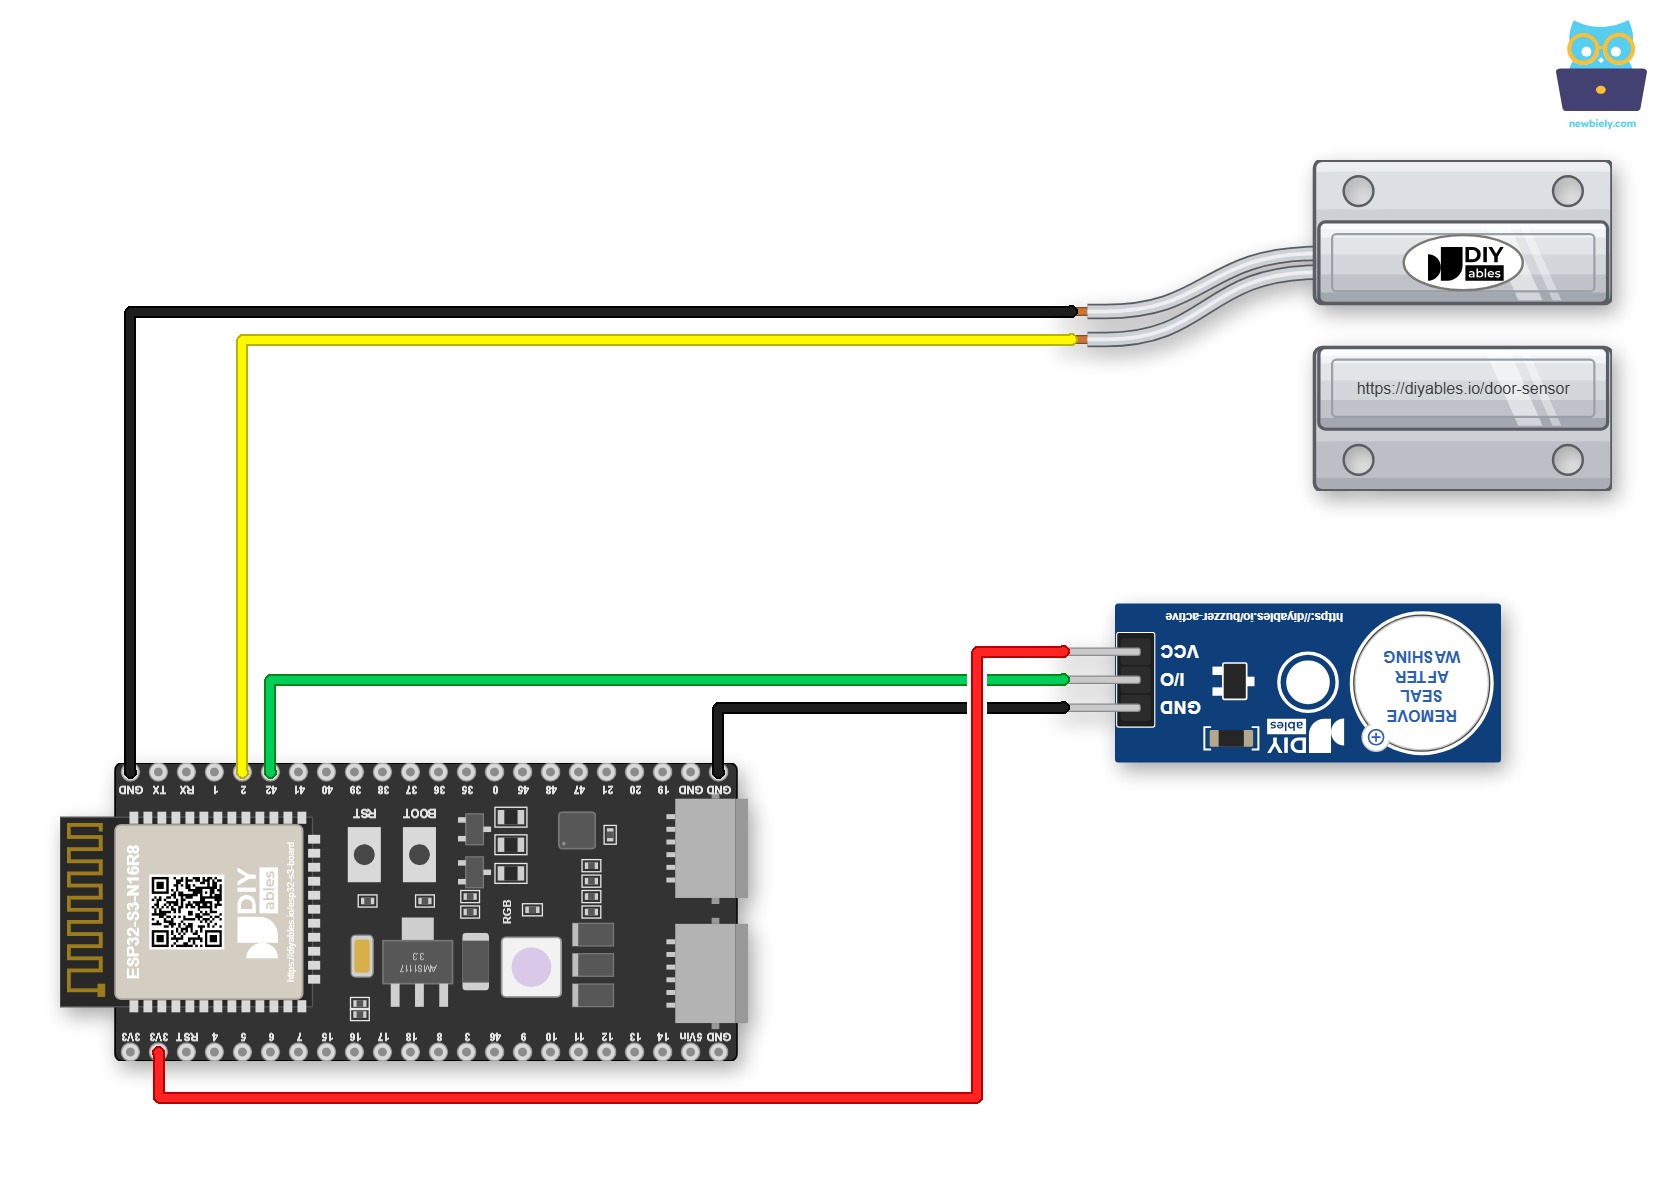
This image is created using Fritzing. Click to enlarge image
Do you want the wiring to stay in place? To do that, mount the ESP32 S3 on a Screw Terminal Block for ESP32 S3. Here is the same circuit wired through the screw terminal board:
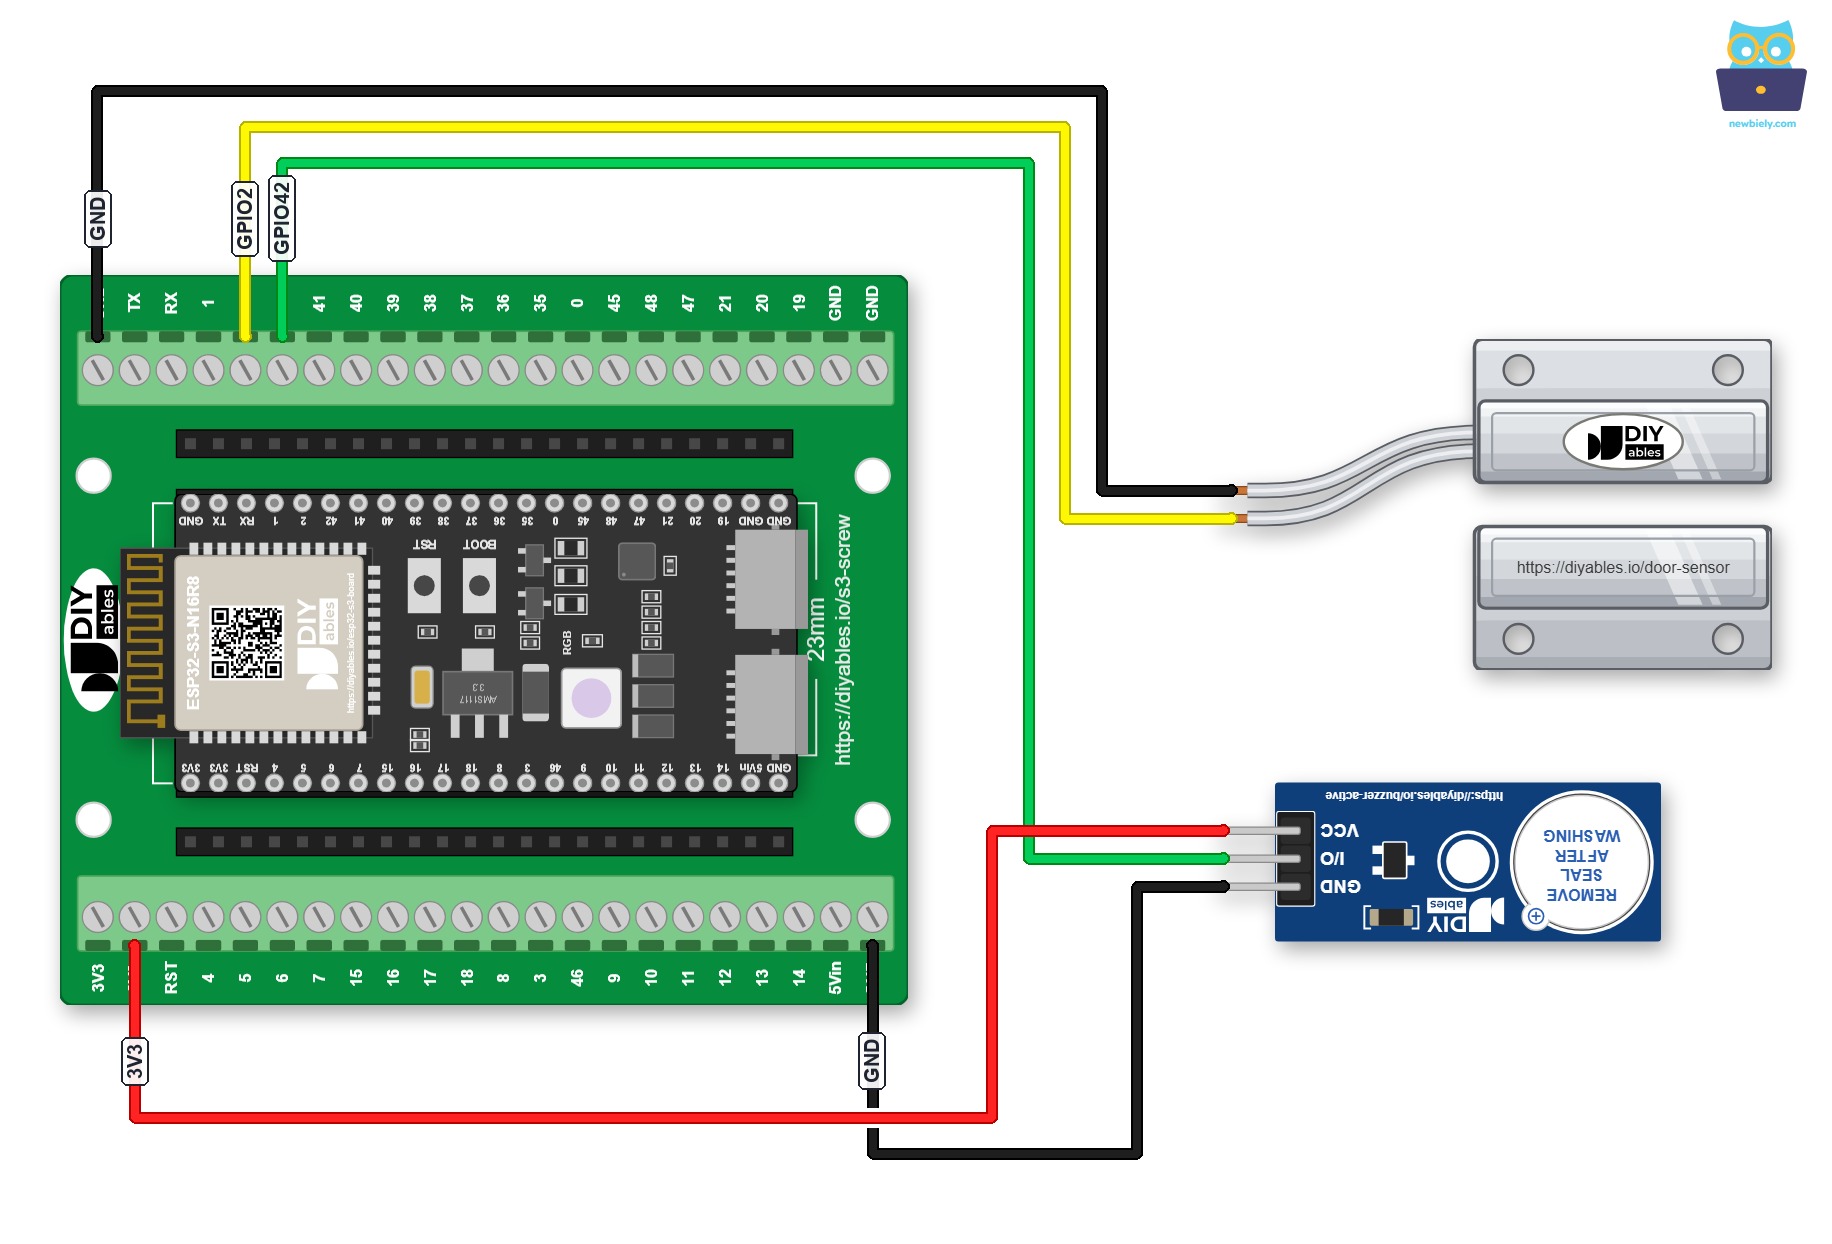
This image is created using Fritzing. Click to enlarge image
Prefer pin headers to screws? Plug the ESP32 S3 into a GPIO Breakout Board for ESP32 S3 instead:
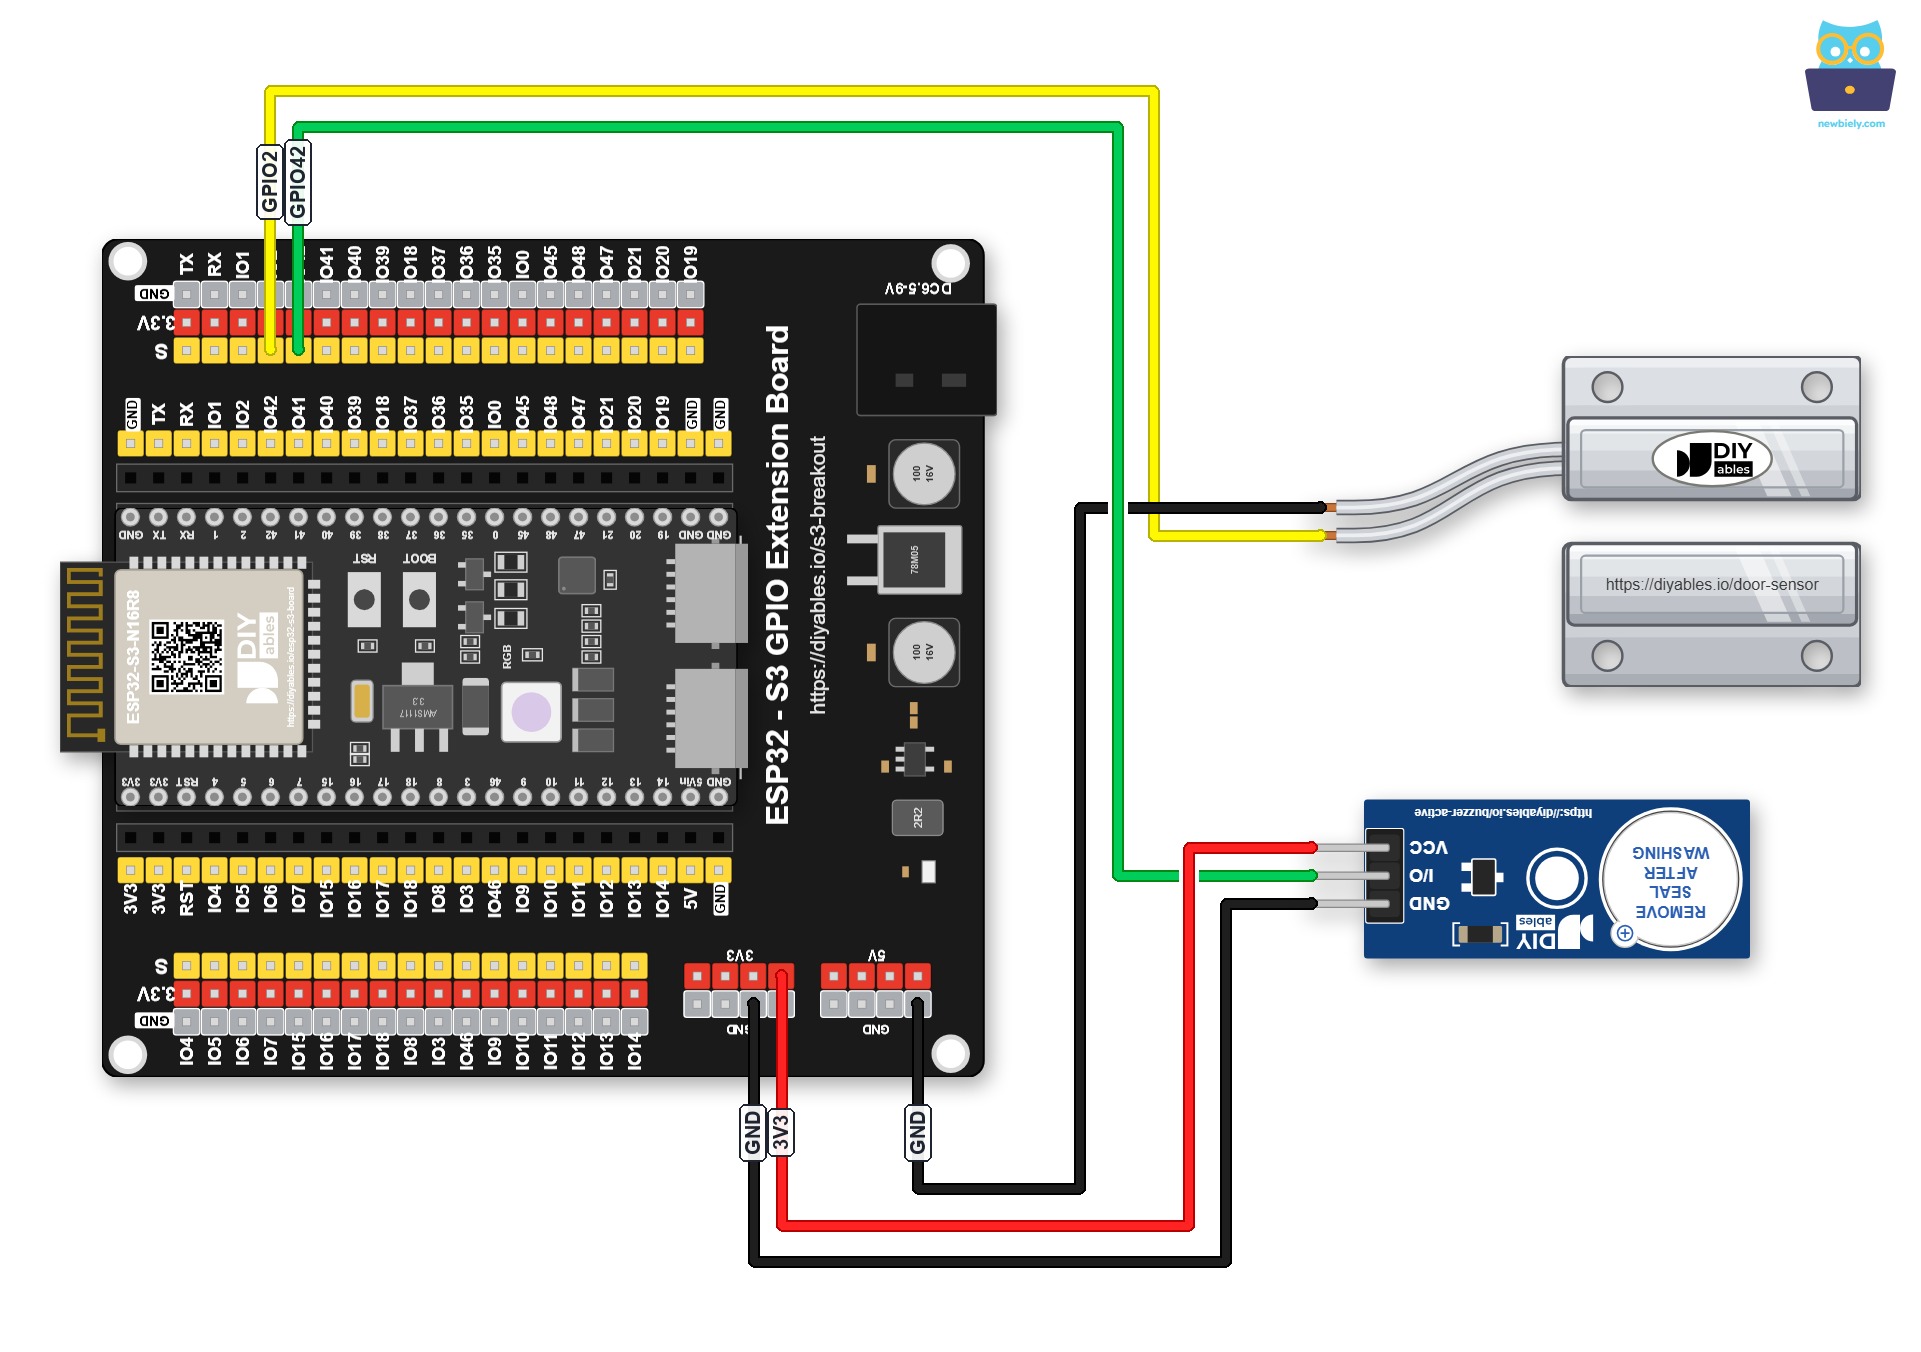
This image is created using Fritzing. Click to enlarge image
Safety Notes
The GPIO pins on the ESP32 S3 operate at 3.3V logic. A bare piezo buzzer connected directly to a GPIO pin draws minimal current and is safe at this voltage, but never connect a high-voltage buzzer directly without a relay or driver circuit. The door sensor relies on the ESP32 S3's internal pull-up resistor, so no external resistor is needed for the sensor side of the circuit.
| Component | Pin | ESP32 S3 Pin |
|---|---|---|
| Door Sensor | One terminal | GPIO2 |
| Door Sensor | Other terminal | GND |
| Piezo Buzzer | Positive (+) | GPIO42 |
| Piezo Buzzer | Negative (-) | GND |
ESP32 S3 Code - Simple Sound
The following sketch reads the door sensor state on every loop iteration and drives the piezo buzzer directly from that state — when the door is open the buzzer sounds, and when the door is closed the buzzer stops. This tight synchronization between the sensor input and audio output is the simplest form of door-driven alert you can implement on the ESP32 S3.
Detailed Instructions
- New to ESP32 S3? Complete our Getting Started with ESP32 S3 guide first.
- Wire the components: Follow the wiring diagram shown above.
- Connect ESP32 S3: Use a USB Type-C cable to connect to your computer.
- Setup Arduino IDE: If this is the first time you use ESP32 S3, see how to setup environment for ESP32 S3 on Arduino IDE.
- Select your board: Choose the ESP32 S3 board and its COM port in Arduino IDE.
- Upload the code: Copy the code above and upload it to your ESP32 S3.
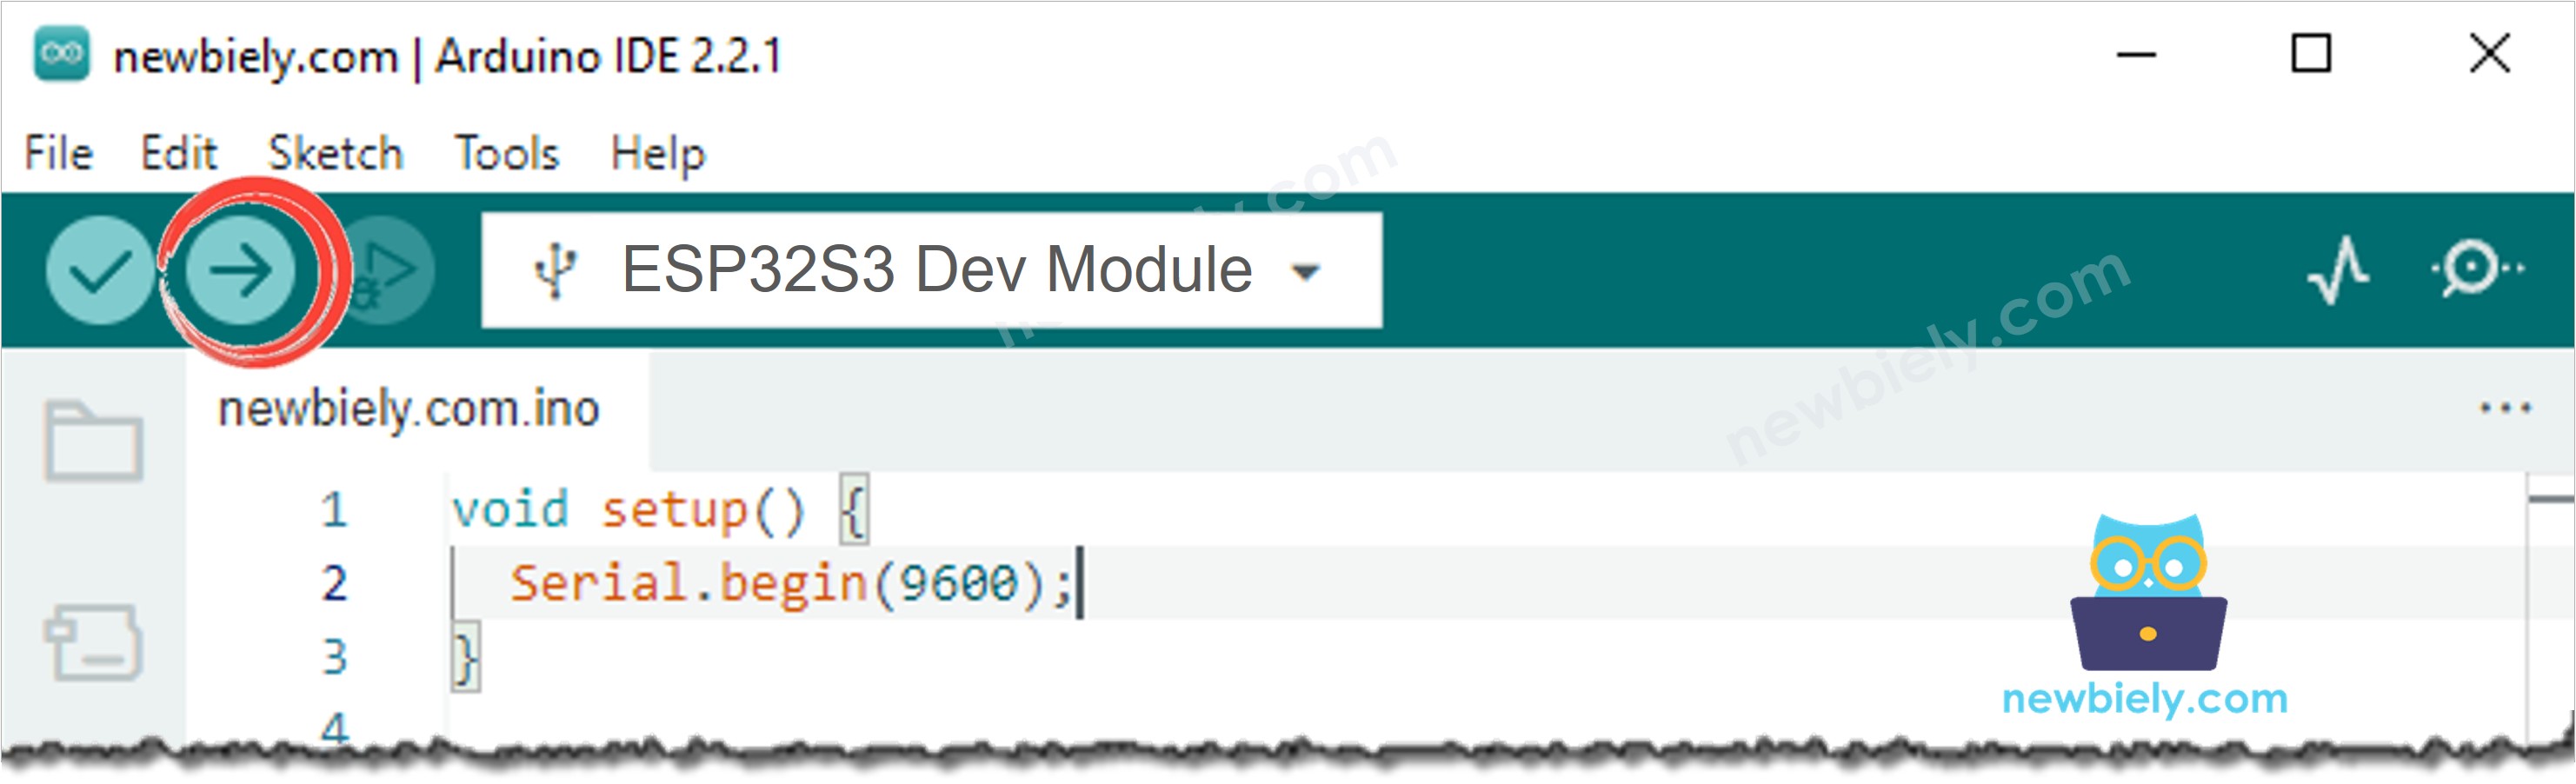
- Test the sensor: Move the magnet close to the reed switch, then move it away to simulate opening the door.
- Listen to the buzzer: The piezo buzzer will sound while the door is open and stop when the door is closed.
- Pro Tip: If you hear no sound, double-check the buzzer polarity — the positive (+) pin must connect to the GPIO pin, and the negative (−) pin to GND.
Serial Monitor Output
Open the Arduino IDE Serial Monitor at 9600 baud to observe the door sensor and buzzer states in real time.
Line-by-line Code Explanation
The above ESP32 S3 code contains line-by-line explanation. Please read the comments in the code!
ESP32 S3 Code - Melody
The following sketch plays a full musical melody through the piezo buzzer each time the door is opened. It uses a companion pitches.h header file that maps note names such as NOTE_C4 and NOTE_G3 to their frequencies in Hz, keeping the melody array easy to read and modify for any tune you choose.
Detailed Instructions
- New to ESP32 S3? Complete our Getting Started with ESP32 S3 guide first.
- Upload the melody sketch: Copy the code above and paste it to Arduino IDE.
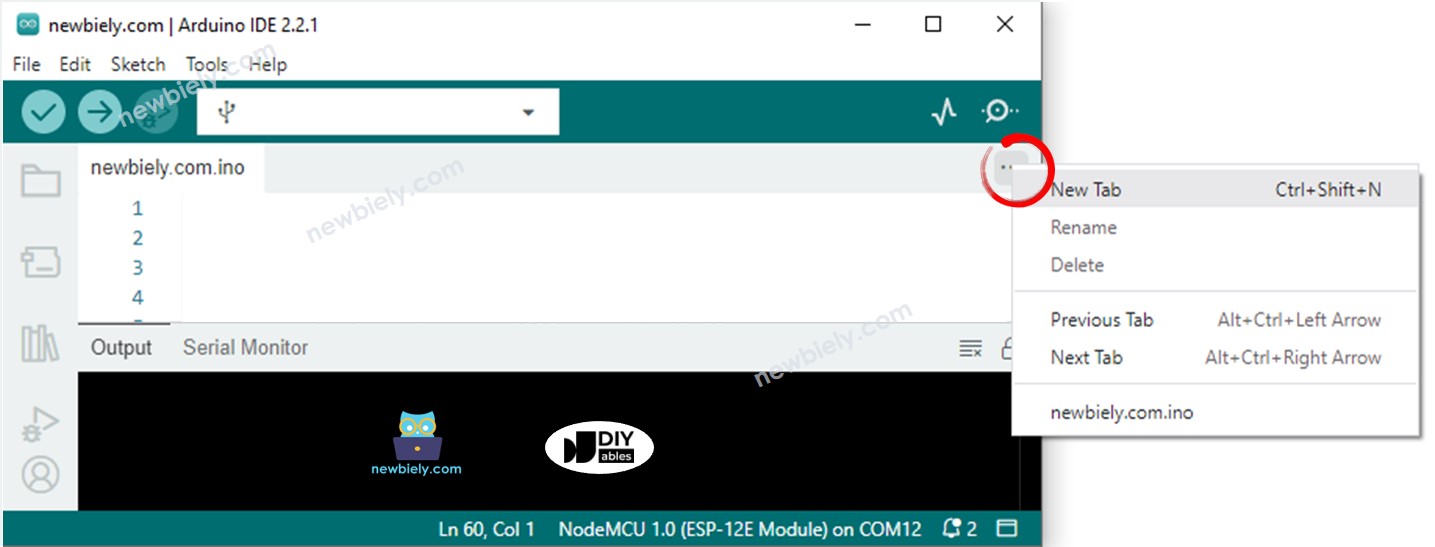
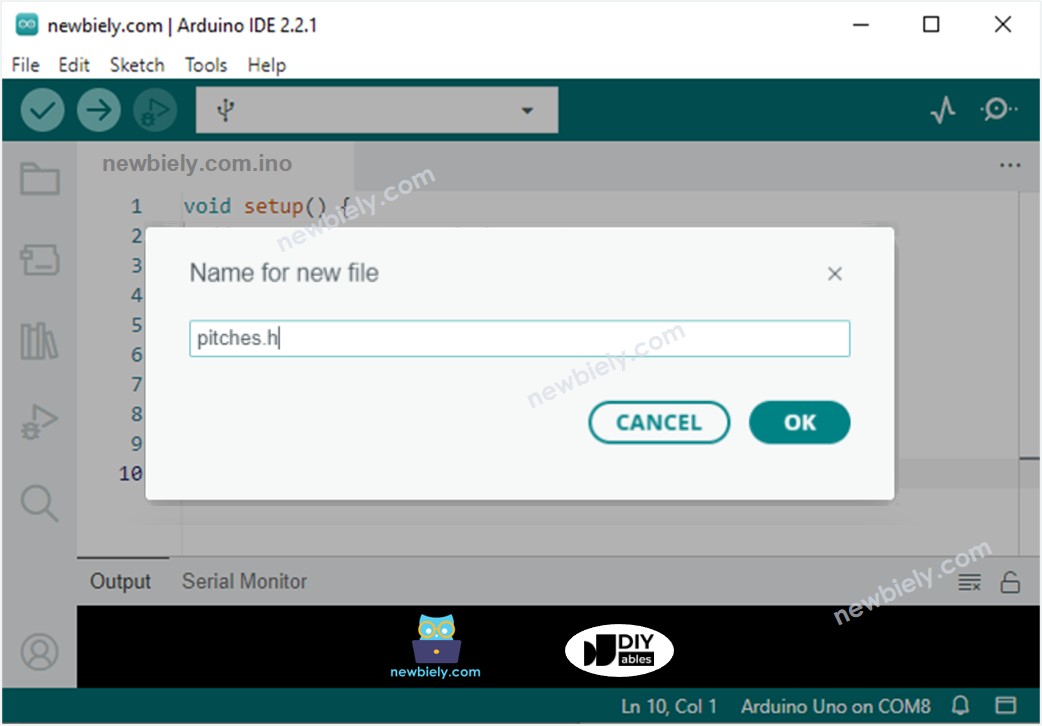
- Create the pitches.h file in Arduino IDE by:
- Either click on the button just below the serial monitor icon and choose New Tab, or use Ctrl+Shift+N keys.
- Give file's name pitches.h and click OK button
- Copy the below code and paste it to the created pitches.h file.
- Compile and upload: Click the Upload button in Arduino IDE.
- Open the door: Move the magnet away from the reed switch to trigger melody playback.
- Listen to the melody: The piezo buzzer plays the full tune from start to finish.
- Pro Tip: The delay() function inside the melody loop blocks other code during playback. To avoid blocking, replace it with the ezBuzzer library, which is designed to play melodies without blocking.
Serial Monitor Output
Open the Arduino IDE Serial Monitor at 9600 baud to watch melody playback progress.
Line-by-line Code Explanation
The above ESP32 S3 code contains line-by-line explanation. Please read the comments in the code!
Application Ideas
The ESP32 S3 door sensor and piezo buzzer combination is a versatile building block for dozens of practical security and notification projects. Here are some ideas to spark your imagination:
- Door alarm: Sound a continuous tone whenever a door or window is opened without authorization.
- Entry chime: Play a welcoming melody each time a customer enters a shop or office.
- Cabinet monitor: Alert when a storage cabinet, safe, or drawer is accessed unexpectedly.
- Multi-zone alert: Connect multiple door sensors and assign a distinct beep pattern to each zone.
- Sleep mode alert: Wake a sleeping device and play a tone when a monitored door is opened during off-hours.
- Logging trigger: Pair the buzzer alert with an SD card or cloud log entry every time the door changes state.
Video Section
Watch the step-by-step video walkthrough for this ESP32 S3 project below.
Challenge Yourself
Now that you have a working ESP32 S3 door sensor and piezo buzzer circuit, push your skills further with these challenges ranked by difficulty:
- Beginner: Change the melody array to play "Happy Birthday" using constants from pitches.h when the door opens.
- Beginner: Make the buzzer beep three short times instead of continuously when the door is open.
- Intermediate: Add a time limit so the buzzer only sounds for 10 seconds after the door opens, even if the door stays open.
- Intermediate: Use the ezBuzzer library to play a melody in the background without blocking other code.
- Advanced: Implement a PIN-code disable feature using a keypad so the alarm can be silenced by entering the correct code.
- Advanced: Connect the ESP32 S3 to Wi-Fi and send an email or push notification whenever the door is opened.