
ESP32 S3 - Soil Moisture Sensor Pump
In this tutorial, you will learn how to use the ESP32 S3 to automatically control a water pump based on readings from a capacitive soil moisture sensor. This is a practical skill for building smart irrigation systems that keep plants healthy without manual watering.
What you'll build:
- A system that periodically reads soil moisture levels using a capacitive sensor connected to the ESP32 S3
- An automatic pump activation circuit that turns the pump on when soil is too dry
- An automatic pump deactivation circuit that turns the pump off when soil reaches adequate moisture
- A reusable ESP32 S3 soil-monitoring foundation you can extend into a full automatic irrigation system
Hardware Preparation
Or you can buy the following kits:
| 1 | × | DIYables ESP32 S3 Starter Kit (ESP32 S3 included) | |
| 1 | × | DIYables Sensor Kit (18 sensors/displays) |
Additionally, some of these links are for products from our own brand, DIYables .
Buy Note: Many soil moisture sensors available in the market are unreliable, regardless of their version. We strongly recommend buying the sensor with TLC555I Chip from the DIYables brand using the link provided above. We tested it, and it worked reliably.
Overview of Soil Moisture Sensor and Pump
A capacitive soil moisture sensor measures the volumetric water content of soil by detecting changes in capacitance rather than conductivity, which makes it more durable and corrosion-resistant than resistive alternatives. The analog output voltage of the sensor decreases as moisture increases, so lower ADC readings correspond to wetter soil. A relay module acts as the switch between the ESP32 S3 and the 12 V pump circuit, allowing the low-power microcontroller to safely control a high-current load without any risk of damage.
Key Specifications
If you are not yet familiar with the soil moisture sensor or the pump — including their pinouts, operating principles, and programming — review the following tutorials before proceeding:
- ESP32 S3 - Soil Moisture Sensor tutorial
- ESP32 S3 - Controls Pump tutorial
How It Works
The ESP32 S3 periodically reads the analog voltage from the capacitive soil moisture sensor and compares it against a calibrated threshold value. Based on the result, the ESP32 S3 takes one of two actions:
- If the soil moisture value is below the threshold (soil is dry), the ESP32 S3 activates the relay to turn the pump on.
- Otherwise, the ESP32 S3 deactivates the relay to turn the pump off.
Wiring Diagram
Connect the soil moisture sensor's analog output to an ADC-capable GPIO pin on the ESP32 S3, and wire the relay control pin to a digital output GPIO. Power the relay module from the ESP32 S3's 3.3 V or 5 V rail as required by your relay module, and supply the 12 V pump through the relay's normally-open contact and common terminal.
Safety Notes
Always power the pump from a dedicated 12 V external adapter rather than from the ESP32 S3 board, as the pump draw far exceeds what the USB port can safely provide. Ensure the relay's COM and NO terminals are correctly wired to the 12 V supply and pump leads — reversing polarity can damage the pump motor.
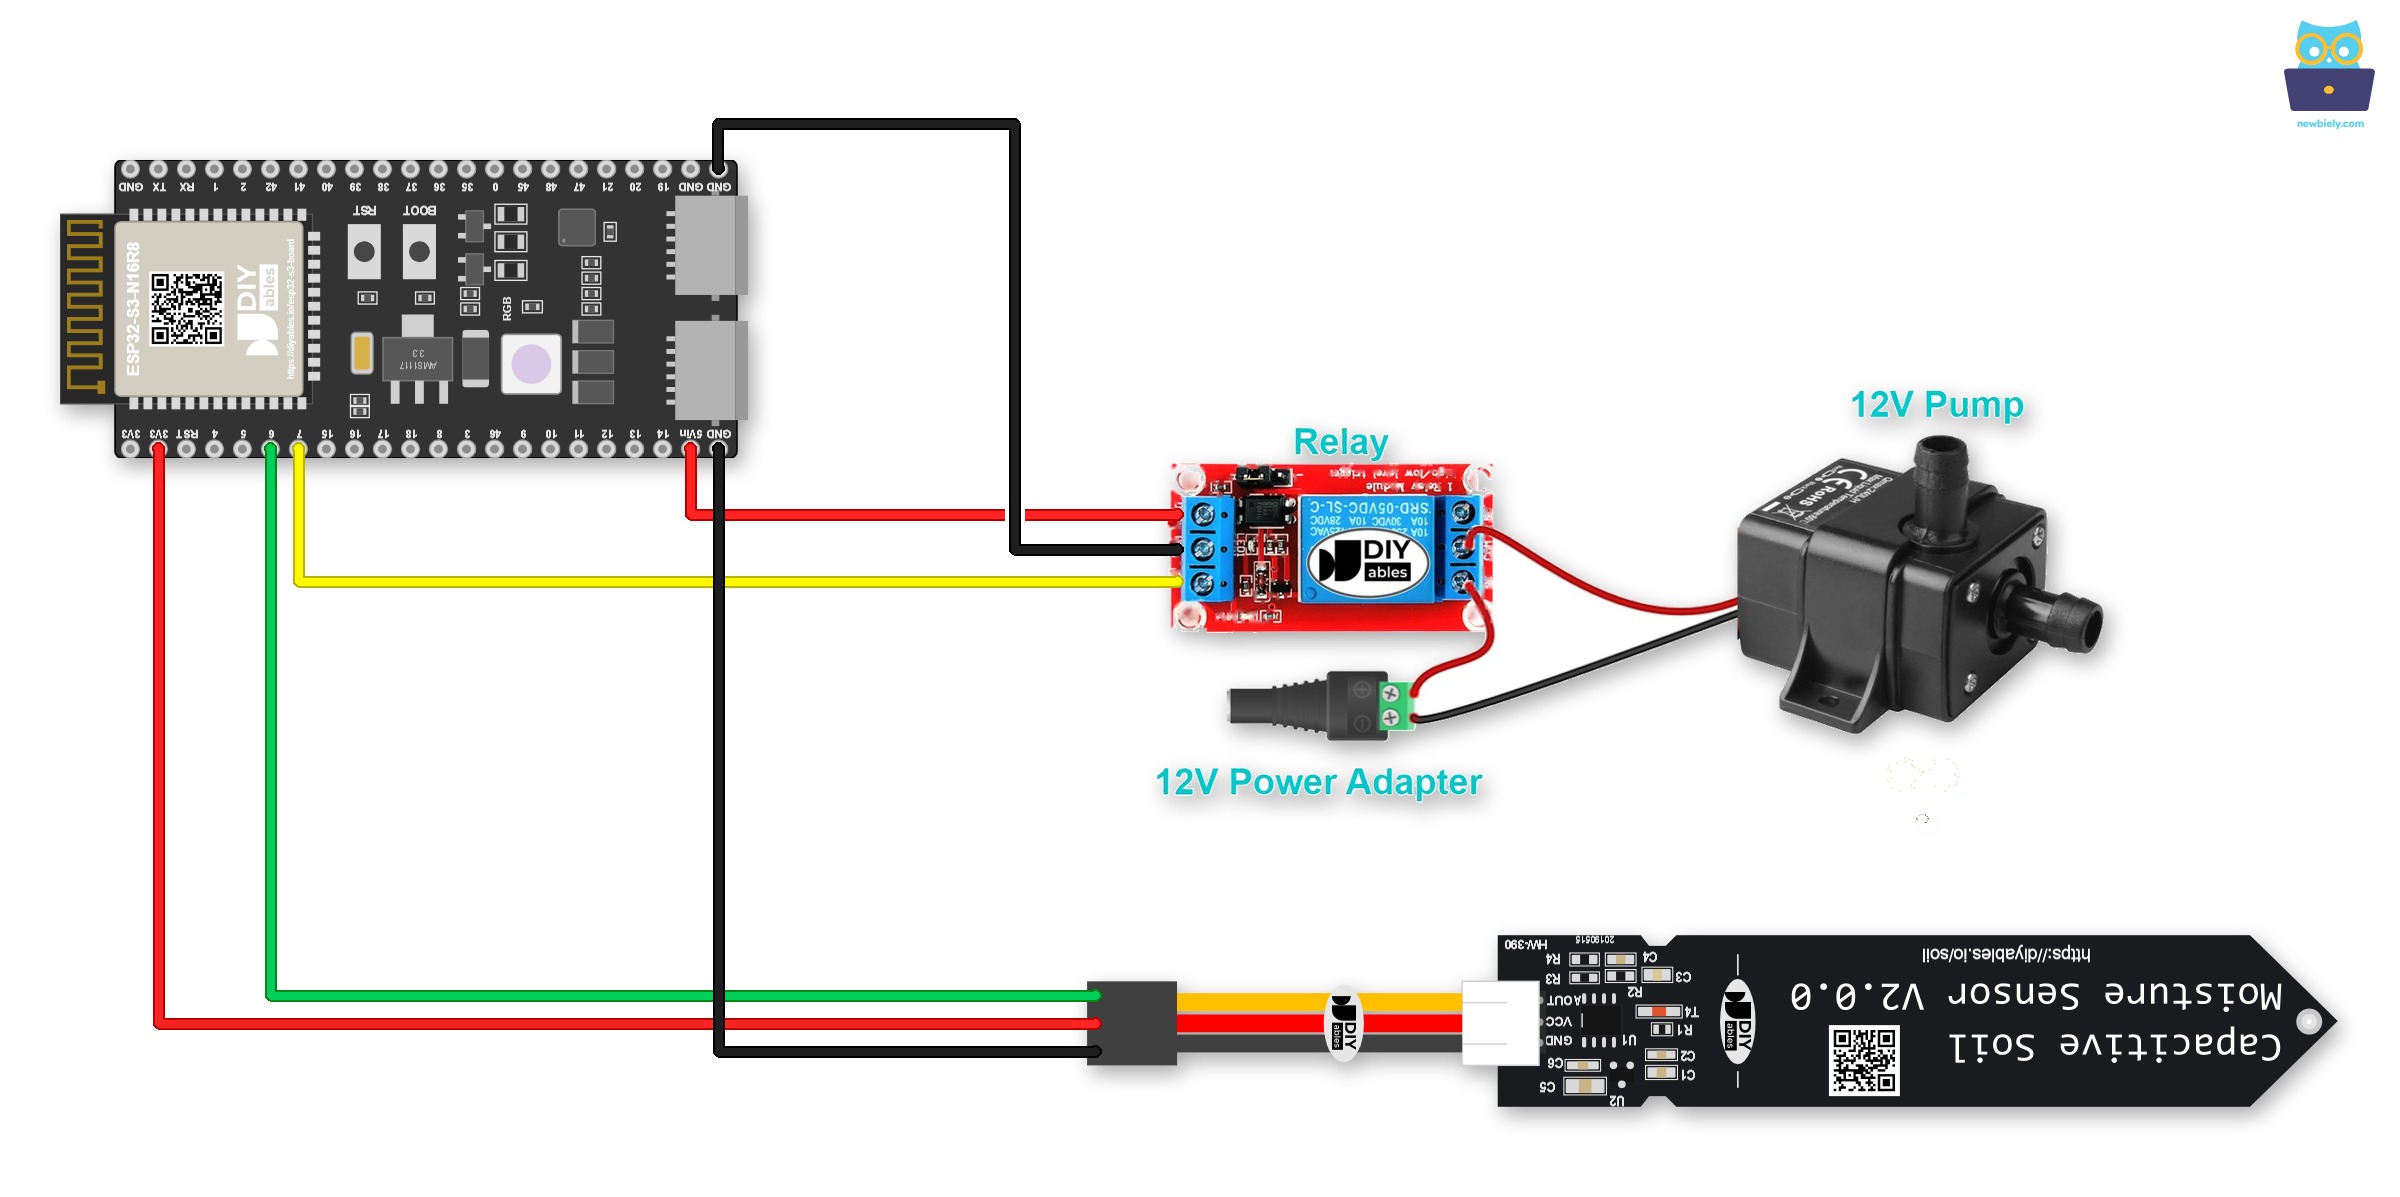
This image is created using Fritzing. Click to enlarge image
If you plan to keep this circuit, think about screw terminals. To do that, mount the ESP32 S3 on a Screw Terminal Block for ESP32 S3. The pins do not change. Just connect each wire to the matching screw terminal:
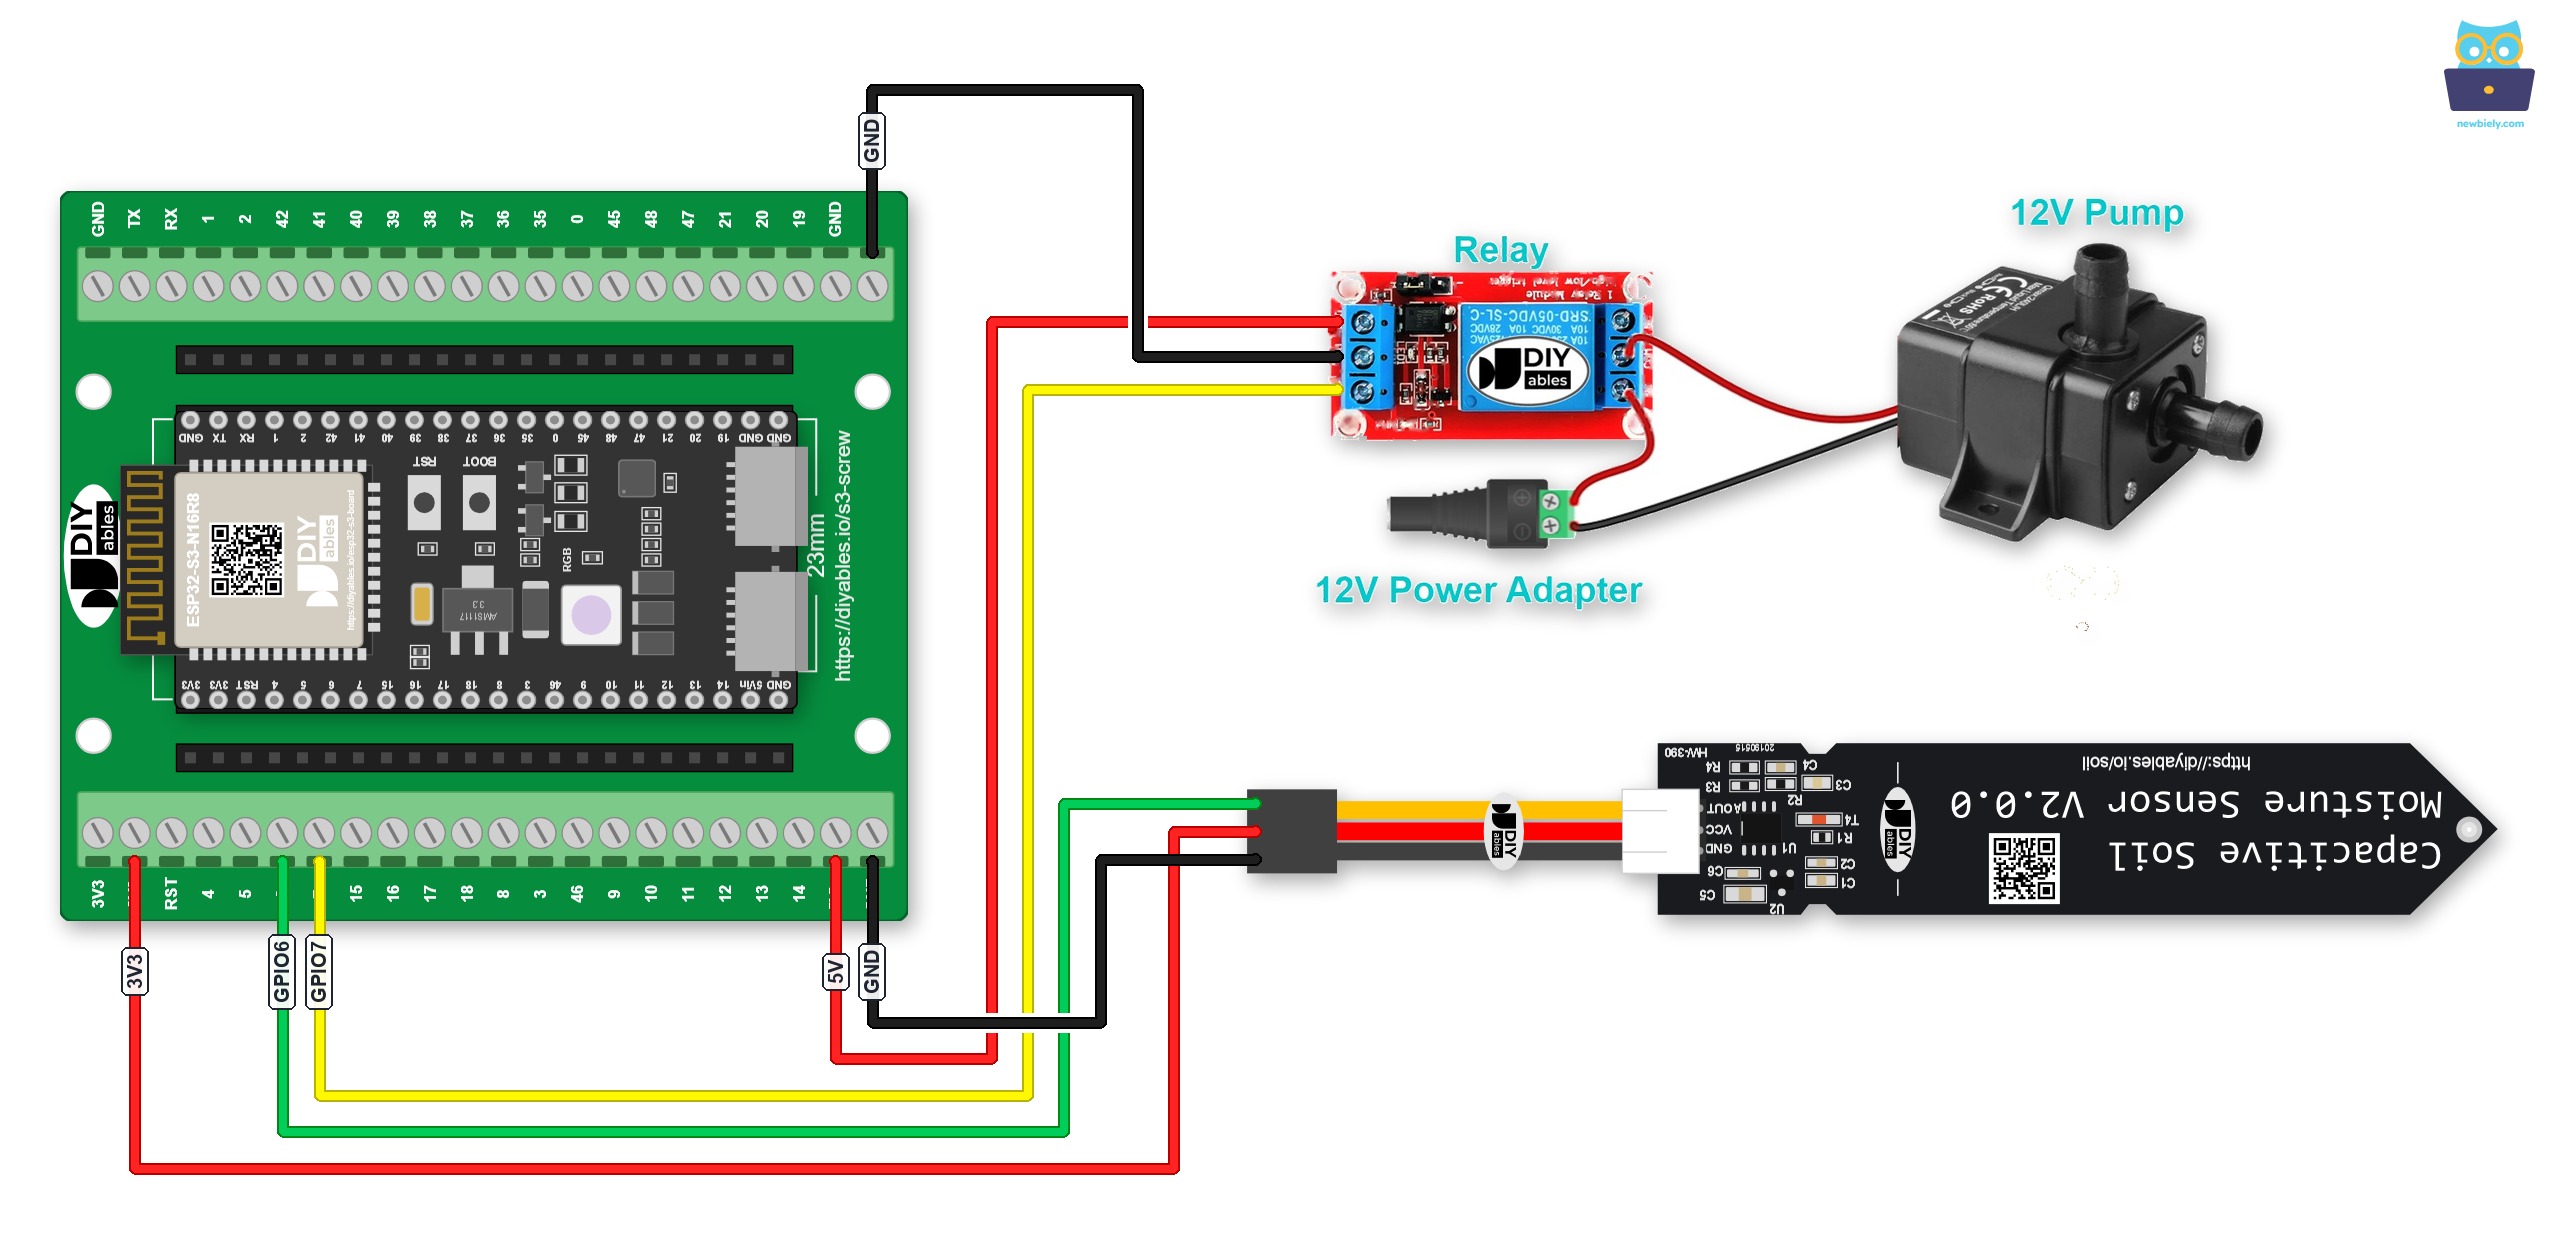
This image is created using Fritzing. Click to enlarge image
Or plug the ESP32 S3 into a GPIO Breakout Board for ESP32 S3. The same wiring then looks like this:
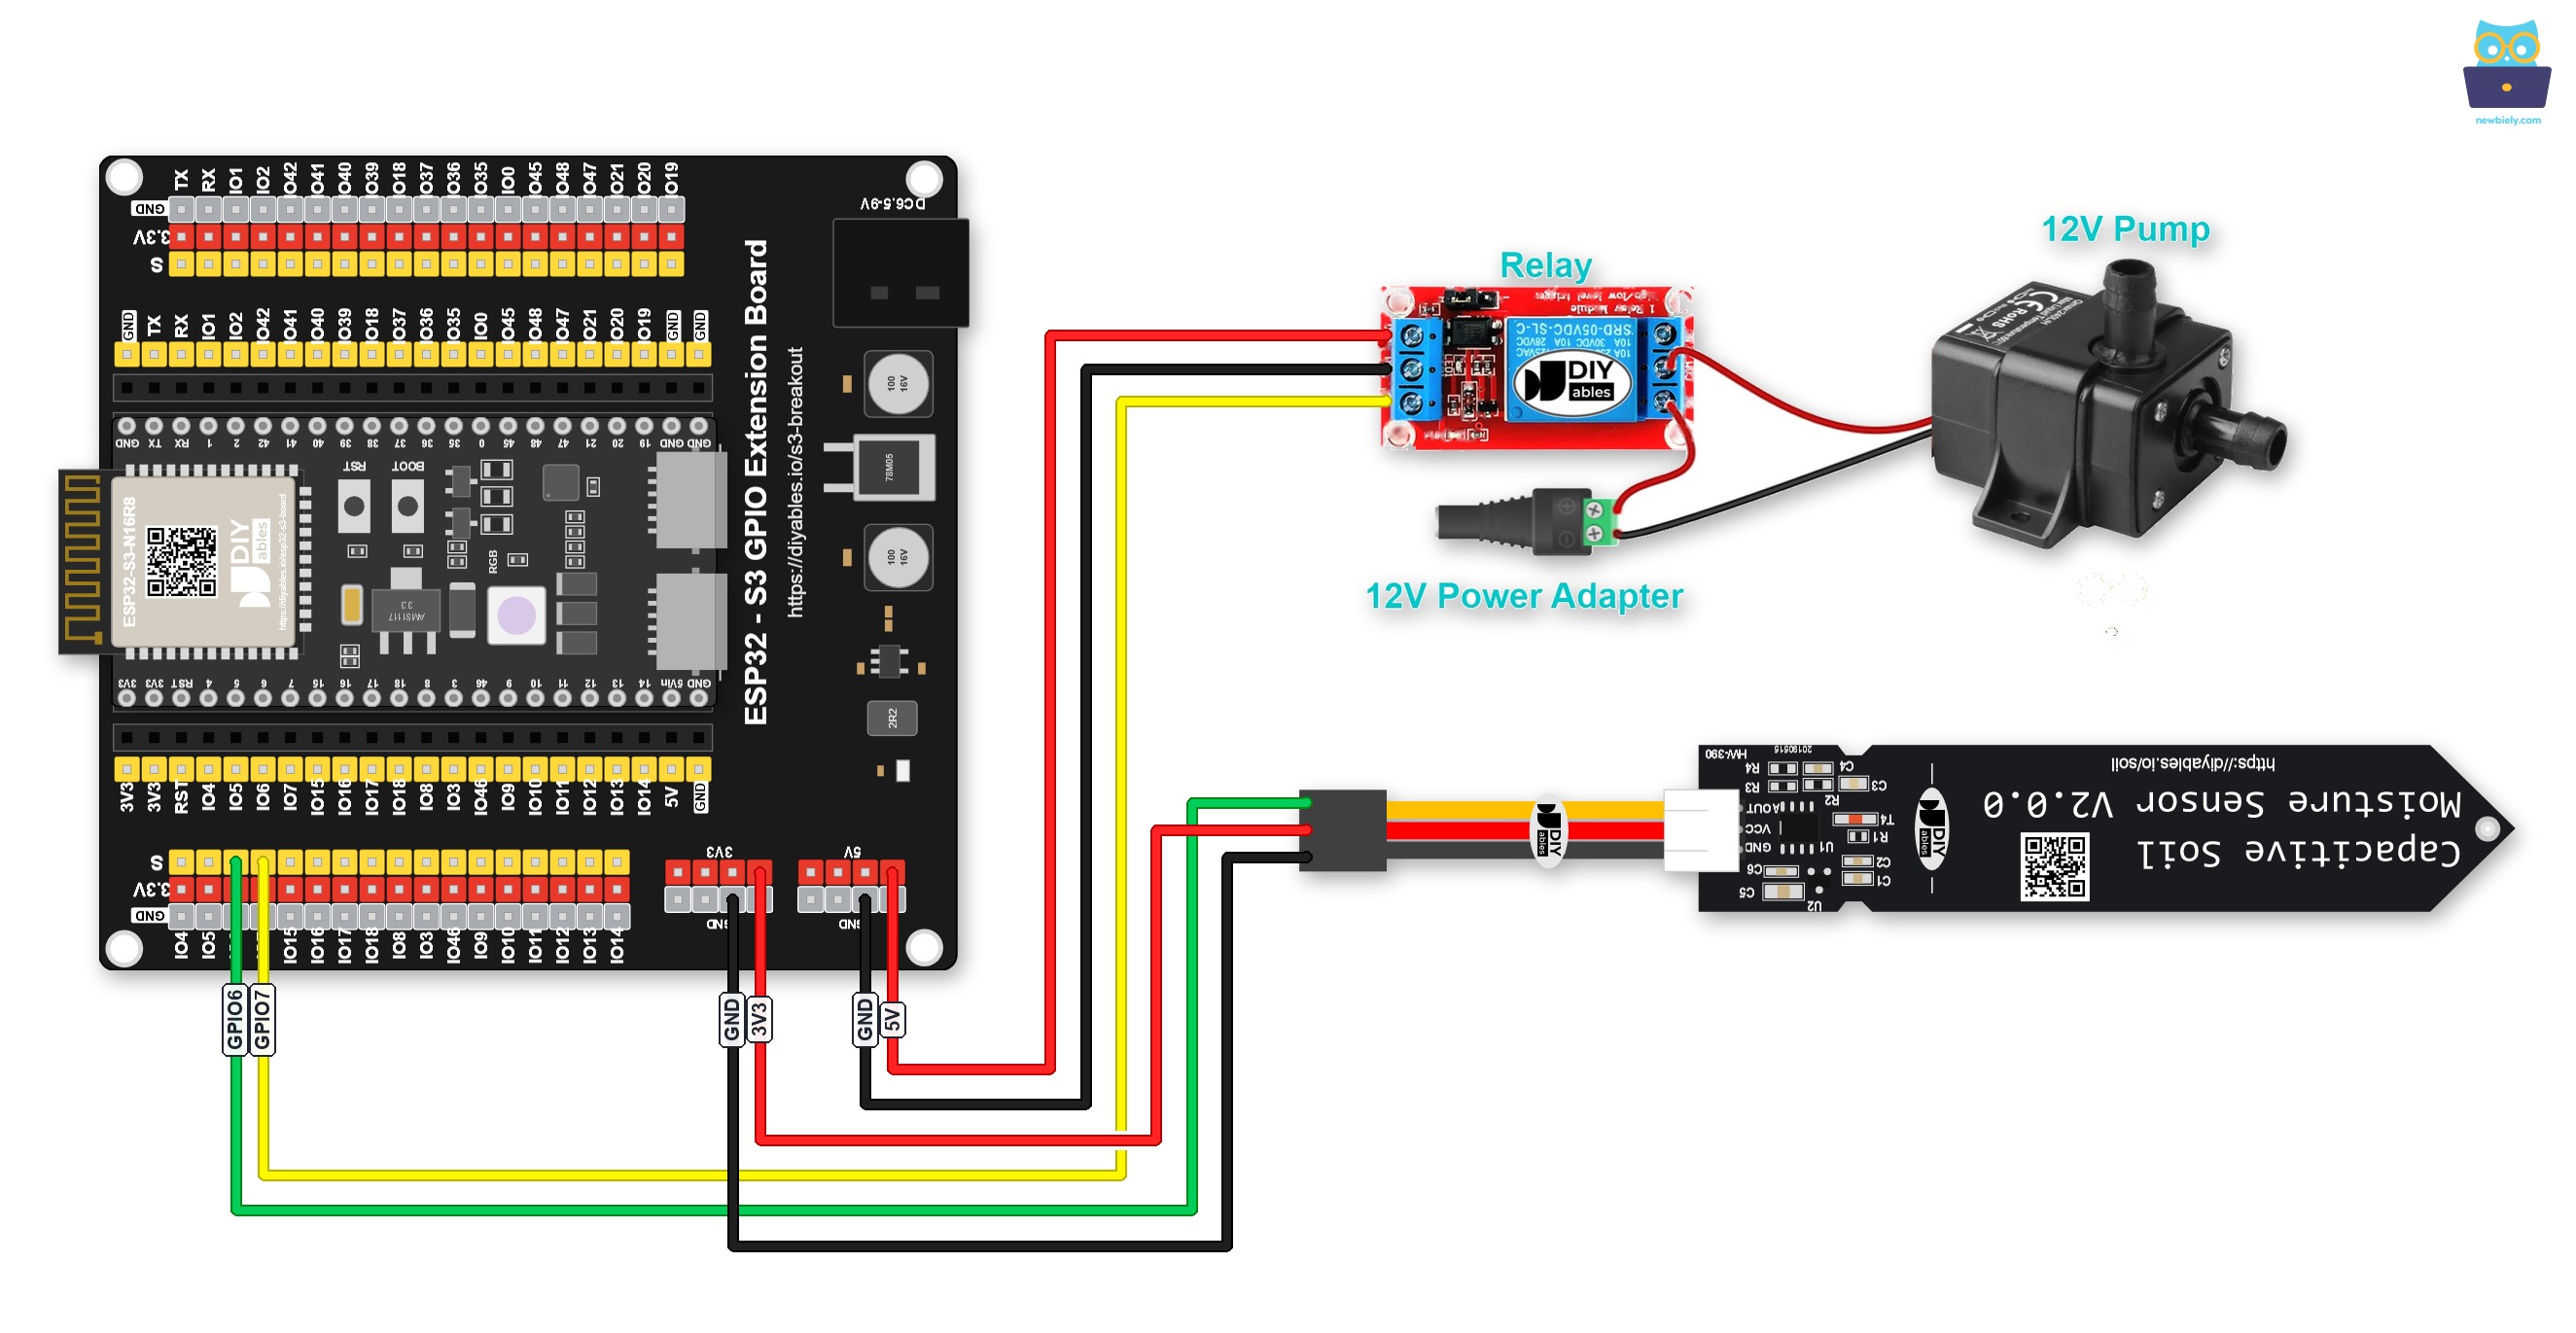
This image is created using Fritzing. Click to enlarge image
ESP32 S3 Code
The following code configures the ESP32 S3 to continuously monitor soil moisture and automatically switch the relay — and therefore the pump — on or off based on a user-defined threshold. Calibrate the THRESHOLD constant in the sketch to match the dry and wet ADC readings from your specific sensor and soil type before uploading.
Detailed Instructions
- New to ESP32 S3? Complete our Getting Started with ESP32 S3 guide first.
- Calibrate your sensor to determine the wet/dry THRESHOLD by following the ESP32 S3 - Soil Moisture Sensor tutorial.
- Update the calibrated value to THRESHOLD in the code.
- Wire the hardware as shown in the wiring diagram above.
- Connect the ESP32 S3 board to your PC via a USB Type-C cable.
- Open Arduino IDE on your PC.
- Select the right ESP32 S3 board and COM port in the Arduino IDE toolbar.
- Copy the above code and open it with Arduino IDE.
- Click Upload to upload the code to the ESP32 S3.
- Open the Serial Monitor at 9600 baud.
- Insert the soil moisture sensor probe into dry soil and observe the pump activating.
- Water the soil until the sensor reads above the threshold and observe the pump deactivating.
- Pro Tip: If the pump cycles on and off rapidly near the threshold (chattering), add a small hysteresis band in the code — for example, activate at readings below 30 % and deactivate only when readings rise above 35 % — to prevent unnecessary relay wear.
Serial Monitor Output
Open the Serial Monitor at 9600 baud. The following readings are representative of typical operation in 2026:
Code Explanation
Read the line-by-line explanation in the comment lines of the code above.
※ NOTE THAT:
This tutorial uses the analogRead() function to read values from an ADC (Analog-to-Digital Converter) connected to a soil moisture sensor. The ESP32 S3 ADC is good for projects that do NOT need high accuracy. However, for projects that need precise measurements, please note:
- The ESP32 S3 ADC is not perfectly accurate and might need calibration for correct results. Each ESP32 S3 board can be a bit different, so you need to calibrate the ADC for each individual board.
- Calibration can be difficult, especially for beginners, and might not always give the exact results you want.
For projects that need high precision, consider using an external ADC (e.g ADS1115) with the ESP32 S3 or using an Arduino, which has a more reliable ADC. If you still want to calibrate the ESP32 S3 ADC, refer to ESP32 ADC Calibration Driver
Applications
Combining a capacitive soil moisture sensor and a pump on the ESP32 S3 enables a broad range of smart watering and environmental-monitoring applications across home, garden, and agricultural settings.
- Automated plant watering: The ESP32 S3 monitors potted-plant soil and activates a small pump whenever moisture drops below the set threshold, ensuring plants are never under- or over-watered.
- Greenhouse irrigation control: Multiple sensors distributed across grow beds feed data to an ESP32 S3, which controls individual zone pumps to maintain optimal moisture in each section.
- Smart garden drip system: Schedule watering windows with the ESP32 S3 and override them with live moisture readings, delivering water only when the soil genuinely needs it.
- Agricultural field monitoring: Deploy ESP32 S3 nodes across a field; each node reads soil moisture independently and triggers a local pump or valve to irrigate its zone.
- Hydroponic nutrient delivery: Use the moisture sensor as a proxy for reservoir level in small hydroponic systems, triggering a pump to replenish nutrient solution when levels fall.
Video Tutorial
Watch the step-by-step video walkthrough for this ESP32 S3 project below.
Challenges
Now that you have a working soil moisture sensor and pump system on the ESP32 S3, try these challenges to deepen your understanding and extend the project further.
- Beginner: Add an LED indicator that lights up whenever the pump is active — wire the LED to a spare GPIO pin and toggle it in the same code block that controls the relay.
- Intermediate: Connect an OLED display to show the live soil moisture percentage and current pump state, updating the display every second so you can monitor soil conditions at a glance.
- Advanced: Add Wi-Fi connectivity so the ESP32 S3 logs moisture readings and pump events to a web server or cloud dashboard, enabling remote monitoring and threshold adjustment without reflashing the firmware.