
ESP32 S3 - Automatic Irrigation System
Building an automatic irrigation system with the ESP32 S3 lets your garden water itself intelligently — the board reads a capacitive soil moisture sensor and switches a relay-controlled pump on or off based on whether the soil is dry or wet. This tutorial walks you through every step from wiring the hardware to uploading the finished sketch and reading live pump status from the Serial Monitor.
What you'll build:
- A circuit connecting the ESP32 S3, a capacitive soil moisture sensor, a relay module, and a 12V water pump
- A calibrated moisture threshold that triggers the pump only when the soil is genuinely dry
- Serial Monitor output showing real-time soil status and pump state with timestamps
- A fully autonomous irrigation controller that waters your plants and stops automatically when the soil is wet
https://newbiely.com/images/cover/esp32-s3-automatic-irrigation.jpg
Hardware Preparation
Or you can buy the following kits:
| 1 | × | DIYables ESP32 S3 Starter Kit (ESP32 S3 included) | |
| 1 | × | DIYables Sensor Kit (18 sensors/displays) |
Additionally, some of these links are for products from our own brand, DIYables .
Buy Note: Many soil moisture sensors available in the market are unreliable, regardless of their version. We strongly recommend buying the sensor with TLC555I Chip from the DIYables brand using the link provided above. We tested it, and it worked reliably.
Overview of Soil Moisture Sensor and Pump
The ESP32 S3 reads the capacitive soil moisture sensor through its built-in ADC and uses that reading to decide whether to switch the relay on or off, which in turn controls the 12V pump. Understanding how each component works individually makes the combined system much easier to wire, calibrate, and troubleshoot.
Key Specifications
We have dedicated tutorials covering each component in detail — including pinouts, operating principles, wiring diagrams, and standalone code examples. Review them at the links below before building the combined irrigation system:
- ESP32 S3 - Soil Moisture Sensor tutorial
- ESP32 S3 - Controls Pump tutorial
Wiring Diagram
Connect the ESP32 S3, capacitive soil moisture sensor, relay module, and 12V pump following the diagram below. Route the sensor wires away from the 12V pump wiring to avoid interference, and double-check polarity on the power adapter before applying voltage.
Safety Notes
The relay module keeps the ESP32 S3's 3.3V logic circuit physically isolated from the 12V pump circuit. Always use the COM and NO terminals on the relay for pump control — never NC. Keep the sensor circuit board (the top electronics section) above the soil line at all times; only the probe should contact the soil or moisture.
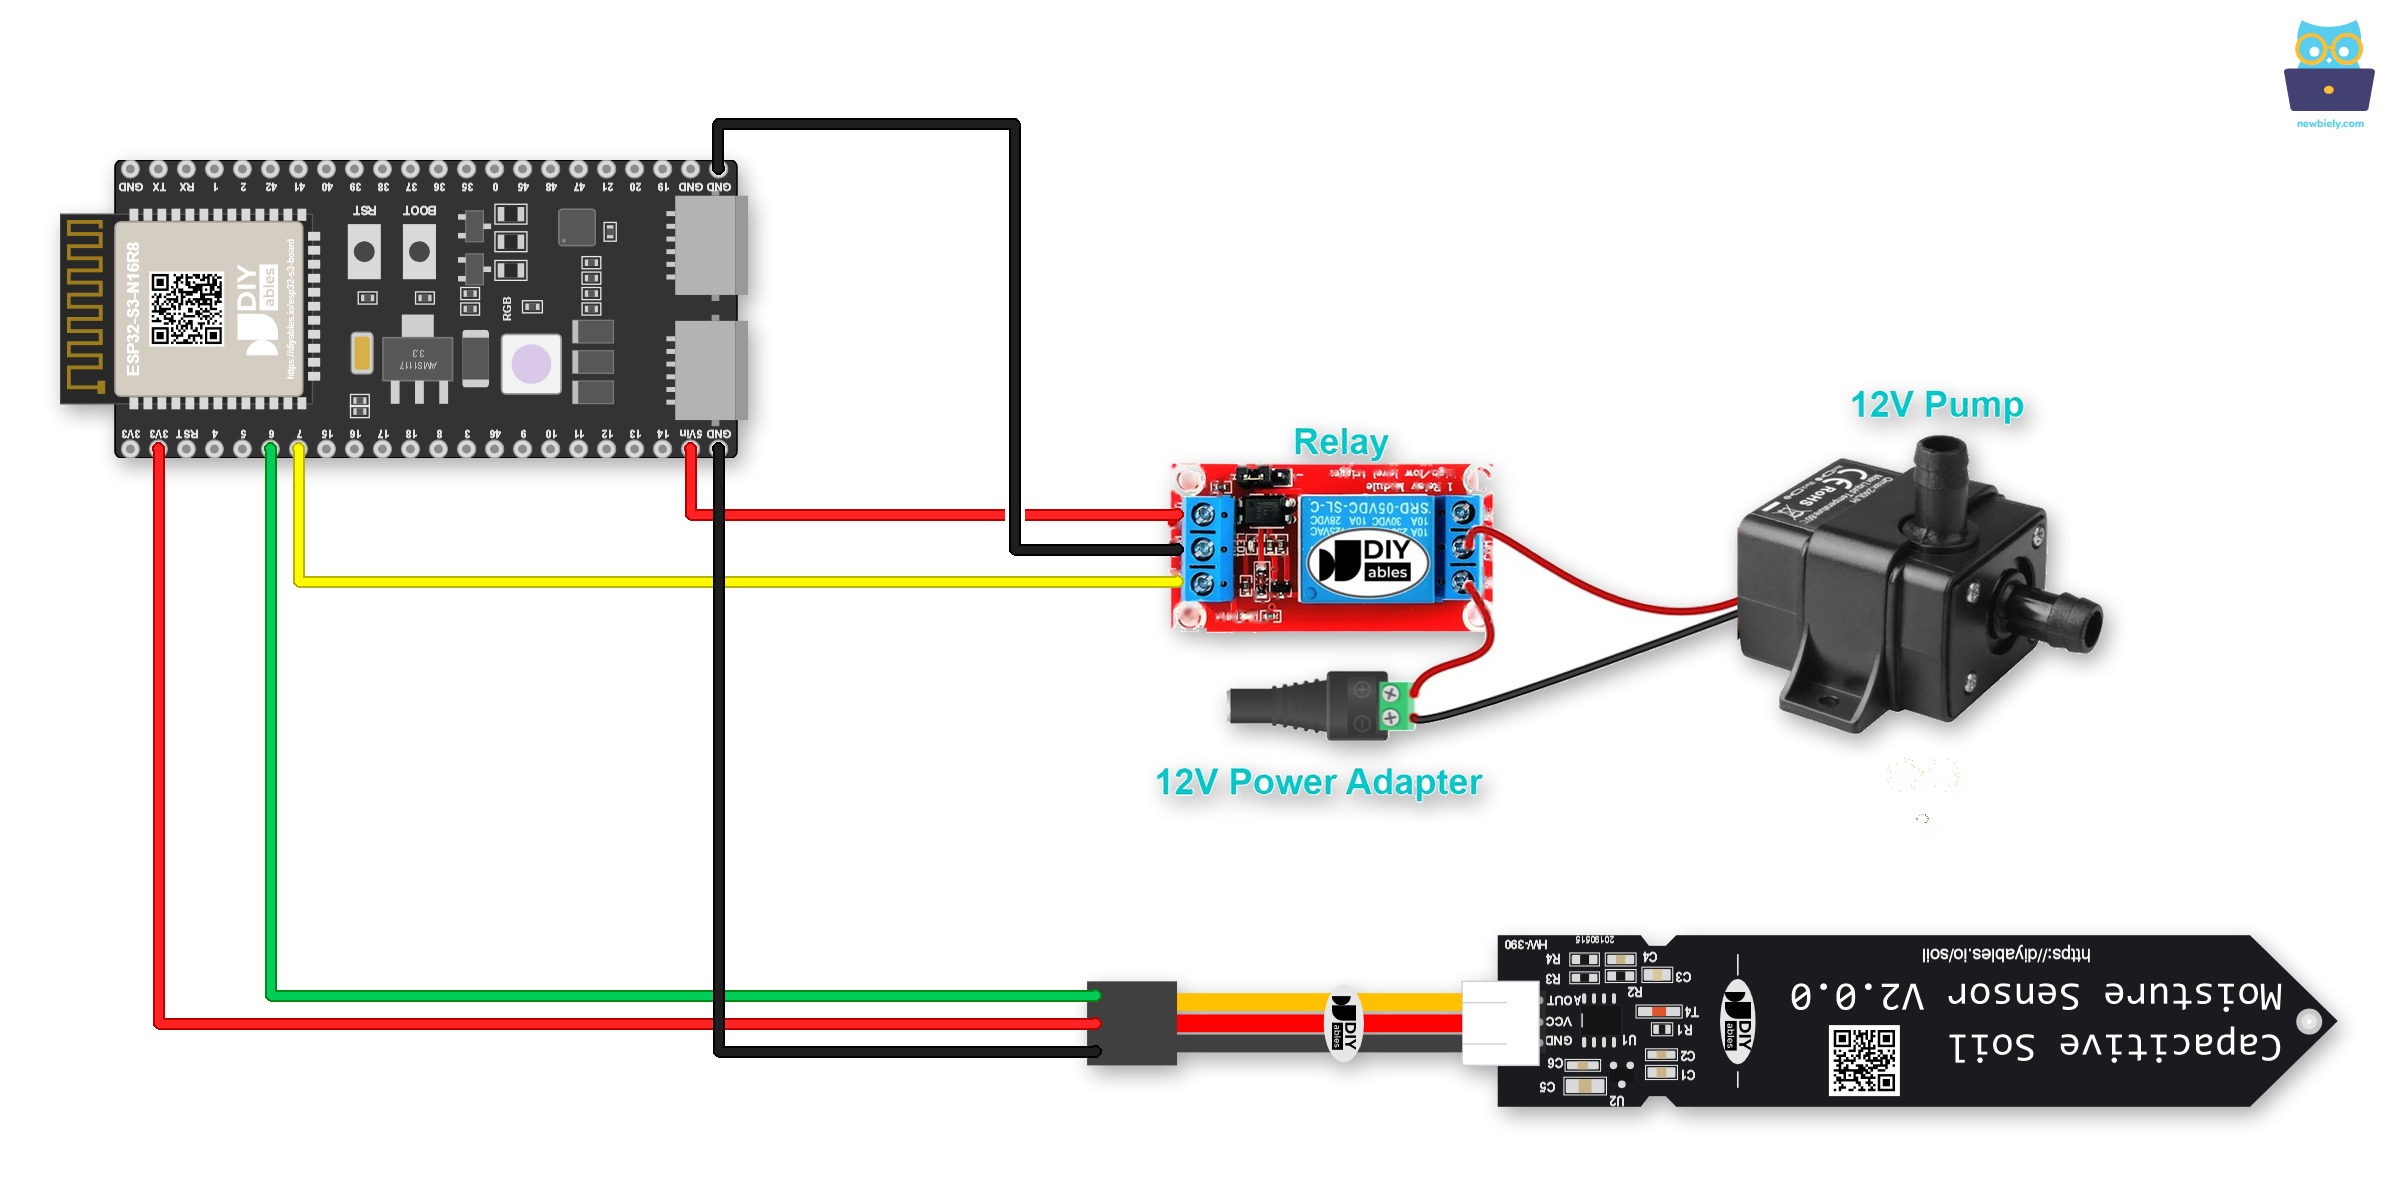
This image is created using Fritzing. Click to enlarge image
| Moisture Sensor Pin | ESP32 S3 Pin |
|---|---|
| GND | GND |
| VCC | 3.3V |
| AOUT | GPIO6 |
If you plan to keep this circuit, think about screw terminals. The ESP32 S3 fits a Screw Terminal Block for ESP32 S3, which turns every pin into a screw terminal. The diagram below shows the same wiring with the screw terminal board.
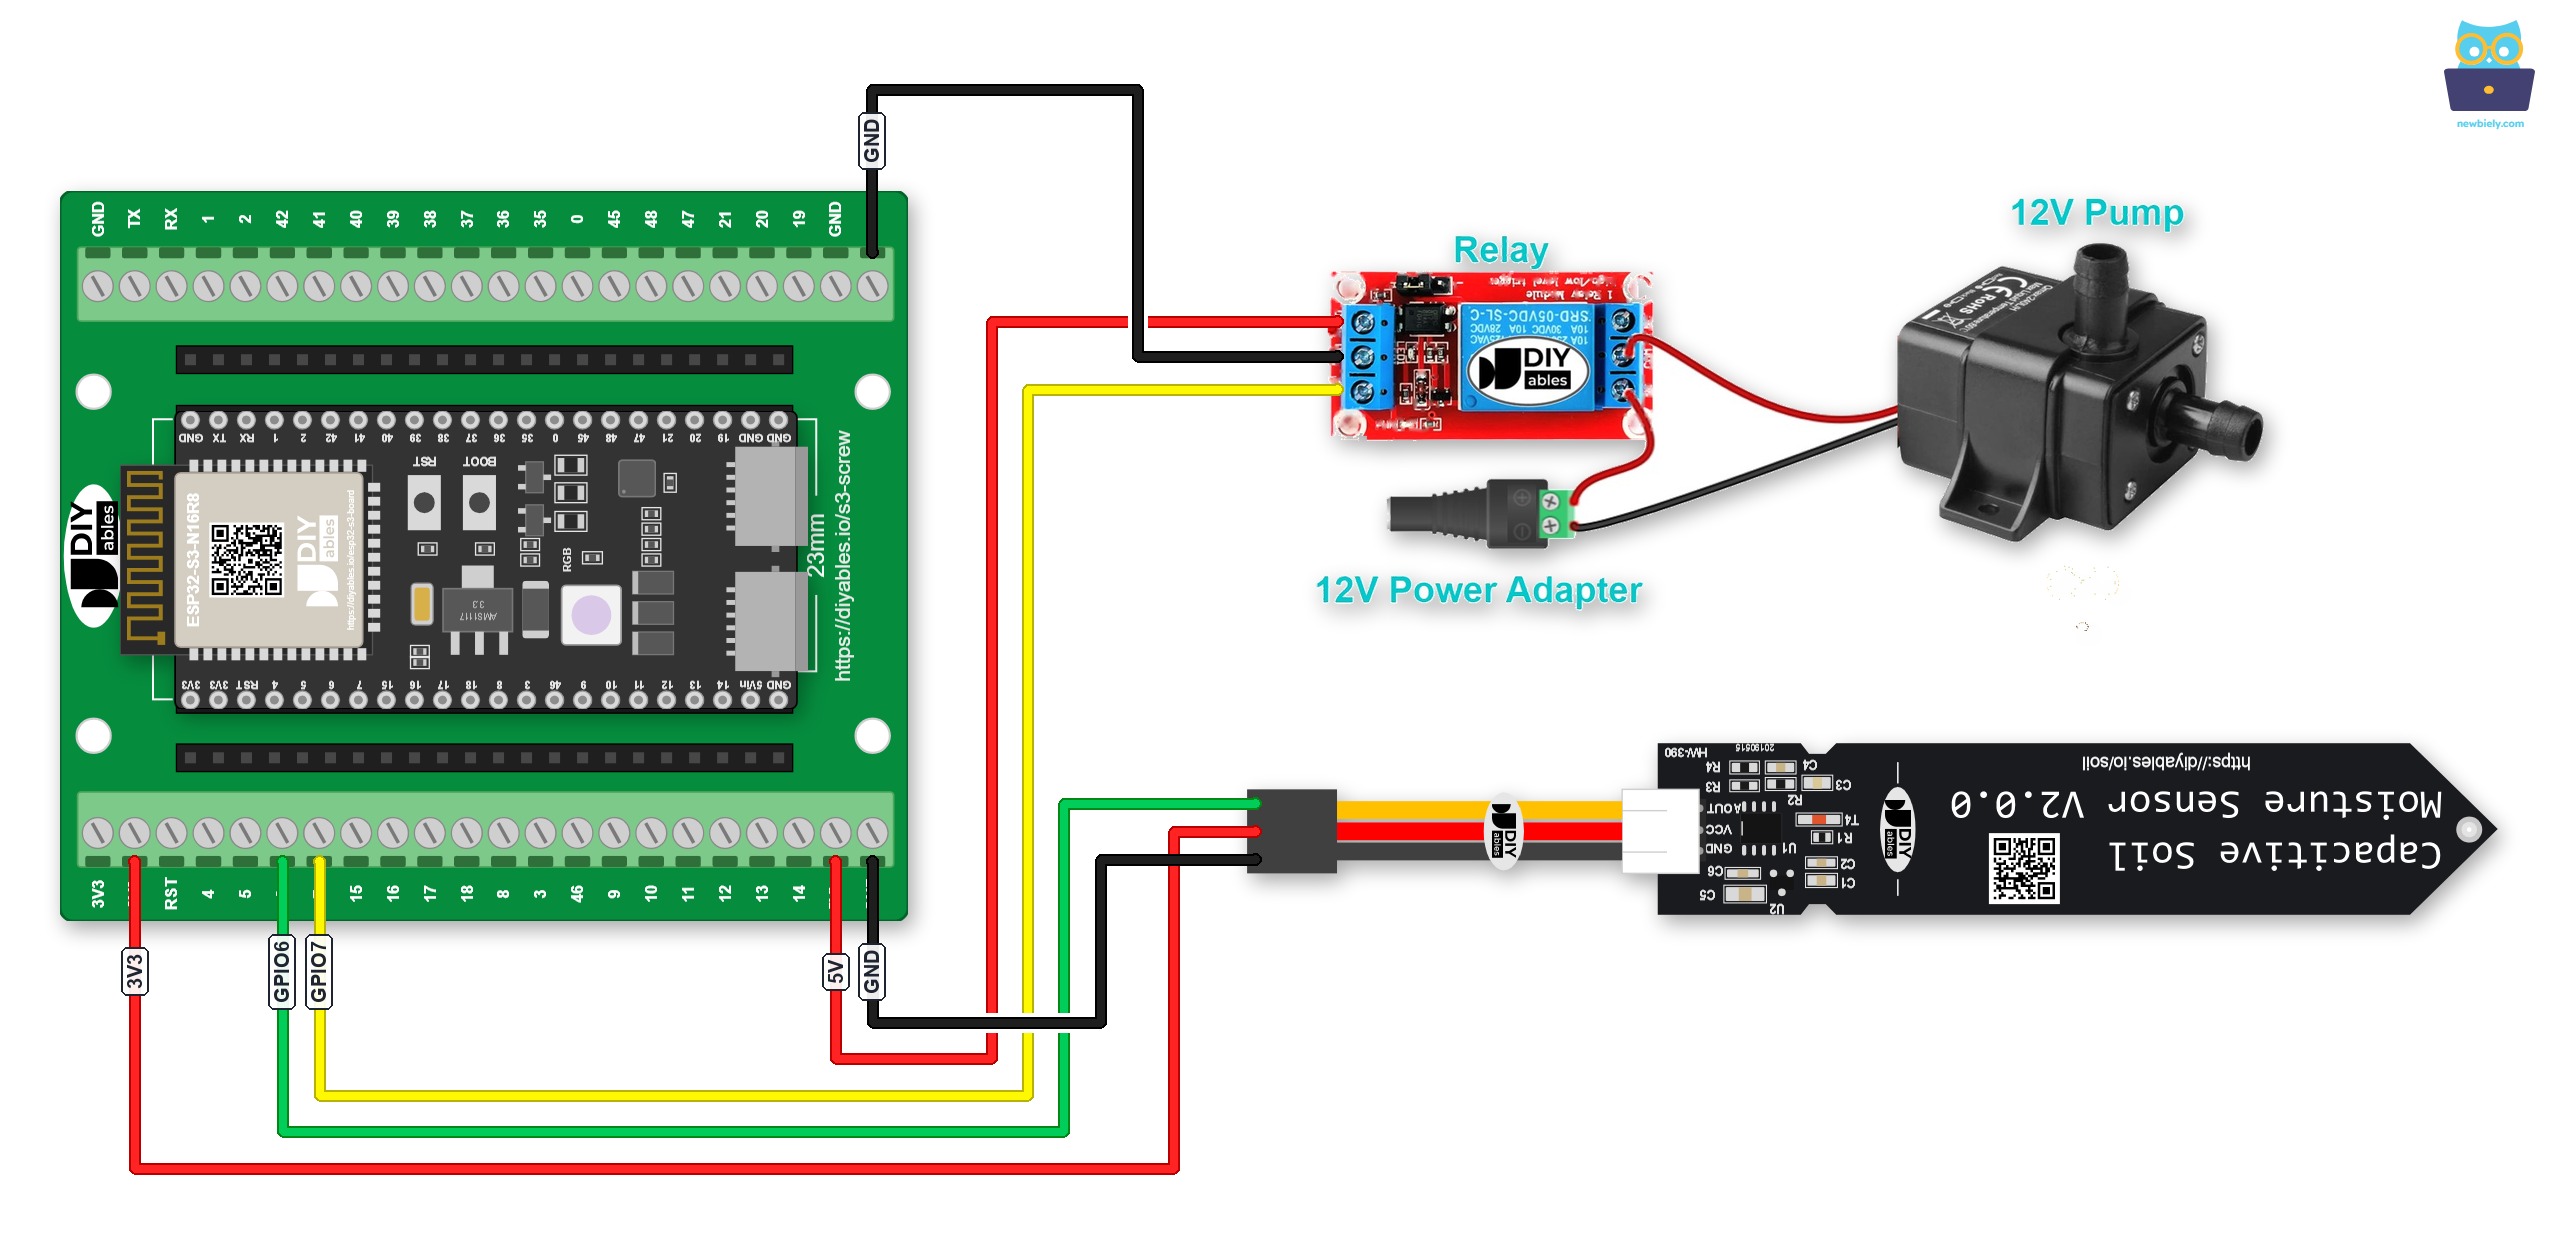
This image is created using Fritzing. Click to enlarge image
Prefer pin headers to screws? Plug the ESP32 S3 into a GPIO Breakout Board for ESP32 S3 instead:
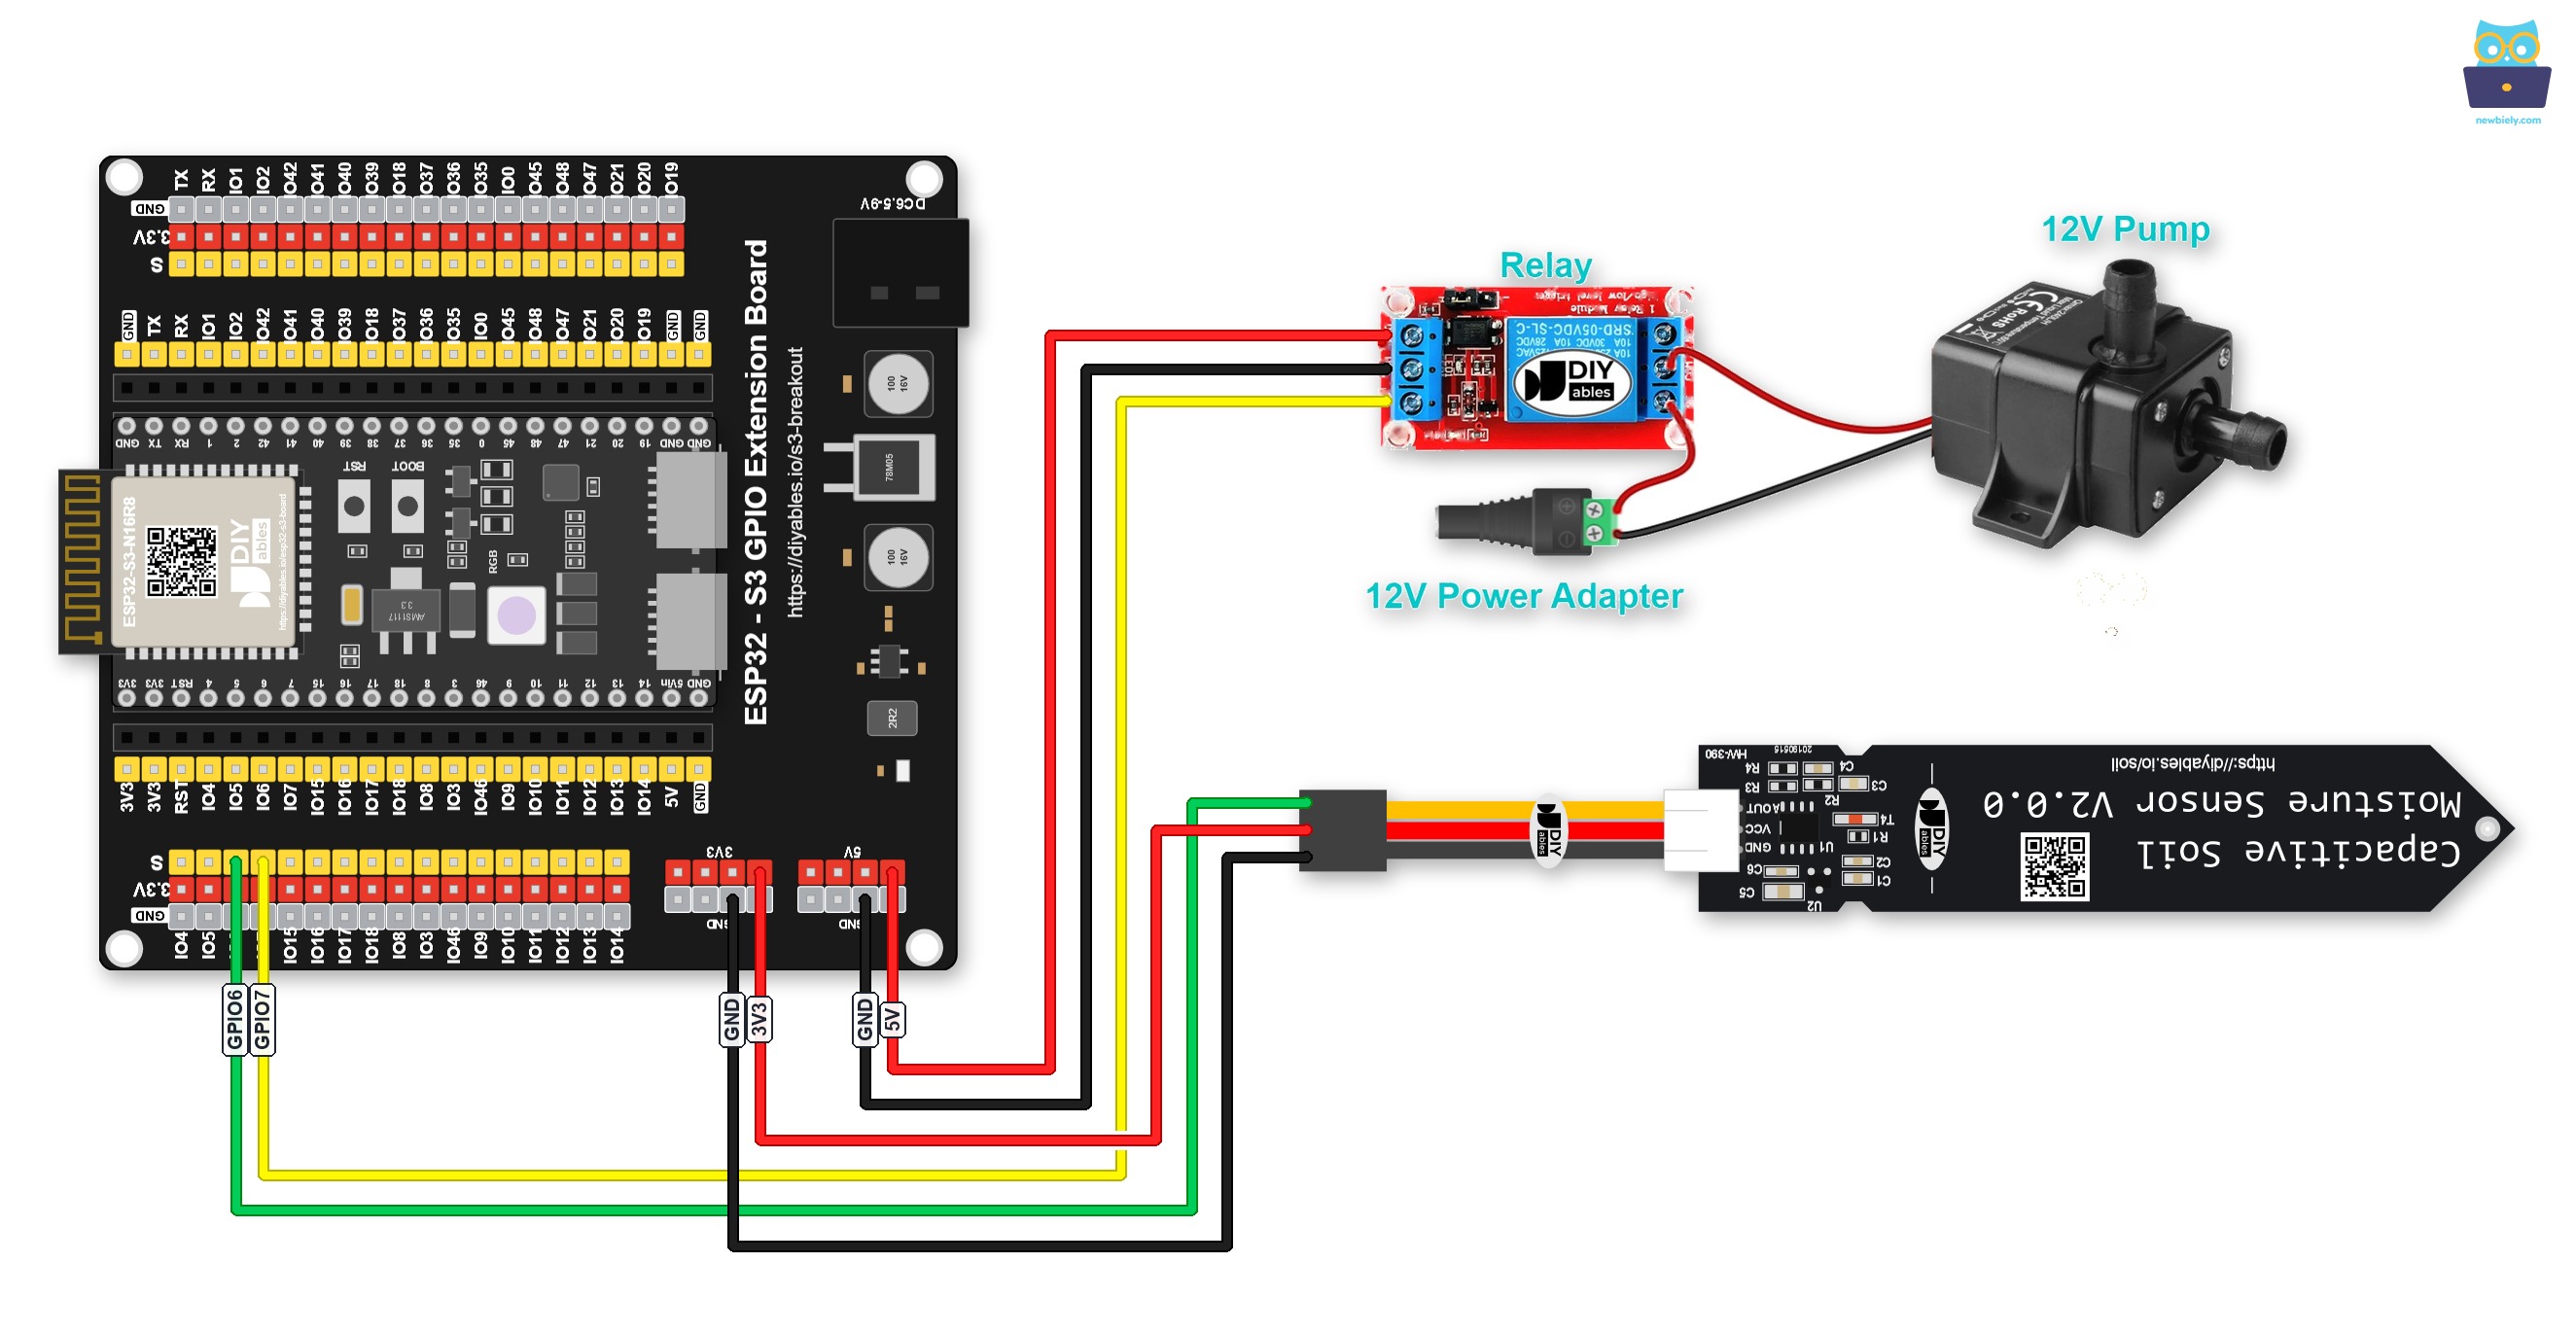
This image is created using Fritzing. Click to enlarge image
| ESP32 S3 Pin | Relay Module Pin |
|---|---|
| GPIO7 | IN |
| GND | GND |
| 5V | VCC |
| Relay Module Terminal | Connection |
|---|---|
| COM | 12V Power Adapter (+) Positive |
| NO | Pump (+) Red Wire |
| Ground Connections | Connection |
|---|---|
| 12V Power Adapter (-) | Pump (-) Black Wire |
ESP32 S3 Code
The following code reads the soil moisture sensor on every loop iteration and compares it against a calibrated THRESHOLD value. When the reading exceeds the threshold (soil is dry), the ESP32 S3 closes the relay to start the pump; when the reading falls below the threshold (soil is wet), it opens the relay to stop the pump. Each decision is printed to the Serial Monitor so you can monitor the system in real time.
Detailed Instructions
- New to ESP32 S3? Complete our Getting Started with ESP32 S3 guide first.
- Calibrate the soil moisture sensor to determine the wet-to-dry THRESHOLD — see the ESP32 S3 - Soil Moisture Sensor tutorial for the calibration procedure.
- Update the THRESHOLD constant in the code with your calibrated value.
- Wire the soil moisture sensor, relay module, pump, and 12V power adapter to the ESP32 S3 as shown in the wiring diagram above.
- Connect the ESP32 S3 to your computer using the USB Type-C cable.
- Open the Arduino IDE and select ESP32S3 Dev Module (or your specific ESP32-S3 board variant) along with the correct COM port.
- Copy the code above, paste it into Arduino IDE, and click the Upload button.
- Open the Serial Monitor at 115200 baud.
- Insert the sensor probe into your soil and observe the pump switching on when the soil is dry and off when the soil becomes wet.
- Pro Tip: Set your THRESHOLD slightly above the true dry-to-wet transition point so the pump activates before the soil reaches critically dry levels, giving your plants a buffer.
Code Explanation
Read the line-by-line explanation in the comment lines of the source code!
Serial Monitor Output
Open the Serial Monitor after uploading to watch the irrigation system respond to changing soil conditions in real time. The output below shows a typical session where the soil starts dry, the pump activates, moisture rises, and the pump shuts off automatically.
※ NOTE THAT:
This tutorial uses the analogRead() function to read values from an ADC (Analog-to-Digital Converter) connected to a soil moisture sensor. The ESP32 S3 ADC is suitable for projects that do not require high accuracy. However, for projects needing precise measurements, keep the following in mind:
- The ESP32 S3 ADC is not perfectly accurate and might require calibration for correct results. Each ESP32 S3 board can vary slightly, so calibration is necessary for each individual board.
- Calibration can be challenging, especially for beginners, and might not always yield the exact results you want.
For projects requiring high precision, consider using an external ADC (e.g ADS1115) with the ESP32 S3 or using another Arduino, such as the Arduino Uno R4 WiFi, which has a more reliable ADC. If you still want to calibrate the ESP32 S3 ADC, refer to the ESP32 ADC Calibration Driver.
Applications and Project Ideas
The ESP32 S3 automatic irrigation system demonstrated here is a versatile foundation that scales from a single potted plant to a multi-zone garden controller.
- Smart Garden Watering: Deploy multiple ESP32 S3 boards across separate garden zones, each with its own sensor and pump, coordinated over Wi-Fi.
- Greenhouse Automation: Combine soil moisture control with temperature and humidity readings to create a fully automated greenhouse environment.
- Indoor Plant Care: Run the system from a USB power bank to keep houseplants watered during vacations without any manual intervention.
- Vertical Farm Controller: Monitor moisture at multiple soil depths using multiple sensors connected to different ADC pins on the ESP32 S3.
- Data-Logging Irrigation: Record pump-on and pump-off events with timestamps to an SD card for long-term plant care analysis and seasonal optimization.
- Remote Irrigation Monitor: Use the ESP32 S3's built-in Wi-Fi to send moisture readings and pump status to a web dashboard or smartphone app in real time.
Relay vs MOSFET Module for the Pump
This project uses a relay to start and stop the pump. A 12V DC pump can also be driven by a MOSFET module.
| Relay | MOSFET Module | |
|---|---|---|
| Pump control | start and stop only | start, stop, and change the flow (PWM) |
| Switching sound | clicks | none |
| Switching time | slow (milliseconds) | very fast |
| Wear | the contacts get old with use | no moving parts to wear |
| Works with | AC and DC pumps | DC pumps only |
| Pump supply voltage | what the relay is rated for | 6V or higher |
| Isolation | yes | yes, with a PC817 optocoupler |
| Choose it for | AC pumps or plain ON/OFF | DC pumps where you want to set the flow |
For watering plants, the relay is enough. The MOSFET module is useful if you want a gentle flow, so the water does not wash the soil away. A pump has a motor coil inside, so add a flyback diode (1N4007 or 1N5819) across the pump when you use the MOSFET module. AC pumps need the relay. The 3.3V level of the ESP32 S3 is plenty, because the LED in the PC817 optocoupler needs only a few milliamps.
To see how to wire and code a pump with both a relay and a MOSFET module, see the ESP32 S3 - Controls Pump tutorial.
Video Tutorial
Watch the step-by-step video walkthrough for this ESP32 S3 project below.
Challenge Yourself
These challenges will help you extend the automatic irrigation system beyond the basic sketch and develop more advanced gardening automation skills.
- Beginner: Add an LED indicator wired to a spare GPIO pin that lights up on the ESP32 S3 whenever the pump is running, giving a clear visual status signal.
- Beginner: Modify the code to add a minimum pump-on duration of 5 seconds so the pump never runs for less than 5 seconds even if the soil sensor fluctuates around the threshold.
- Intermediate: Add a physical push button that lets you manually override the automatic watering cycle and run the pump on demand regardless of the moisture reading.
- Intermediate: Use the ESP32 S3's Wi-Fi to send a notification to your phone via IFTTT or MQTT each time the pump activates, so you always know when your garden is being watered.
- Advanced: Expand the system to control three independent pumps and sensors using a multi-channel relay module, with each channel independently configured for a different plant or zone.
- Advanced: Implement a scheduling overlay so the ESP32 S3 only allows automatic watering during a configurable time window (for example, early morning), preventing watering during the heat of the day or at night.