
ESP32 S3 - Temperature Sensor - LED Matrix
This tutorial shows you how to use the ESP32 S3 to read temperature data from a DS18B20 one-wire sensor and display it live on an FC-16 LED Matrix. By combining two popular peripherals on a single board, you build a self-contained temperature display that scrolls the current reading across the LED matrix without any computer once programmed.
What you'll build:
- A circuit connecting the DS18B20 temperature sensor and FC-16 LED Matrix to the ESP32 S3
- Arduino code that reads temperature from the DS18B20 and writes it to the LED matrix in real time
- A scrolling display that shows both Celsius and Fahrenheit values across the LED matrix
- A foundation you can extend into weather stations, smart signs, or environmental monitors
https://newbiely.com/images/cover/esp32-s3-temperature-sensor-led-matrix.jpg
Hardware Preparation
Or you can buy the following kits:
| 1 | × | DIYables ESP32 S3 Starter Kit (ESP32 S3 included) | |
| 1 | × | DIYables Sensor Kit (18 sensors/displays) |
Additionally, some of these links are for products from our own brand, DIYables .
Buy Note: Many DS18B20 sensors available in the market are unreliable. We strongly recommend buying the sensor from the DIYables brand using the link provided above. We tested it, and it worked reliably.
Overview of Temperature Sensor and LED Matrix
The DS18B20 temperature sensor and FC-16 LED Matrix are two versatile components that work well together on the ESP32 S3. The DS18B20 uses a single-wire 1-Wire protocol to deliver accurate digital temperature readings, while the FC-16 LED Matrix uses a simple SPI interface driven by the MAX7219 chip to display scrolling text and numbers across a 32×8 grid. Combining them lets you build a standalone temperature sign that updates continuously without any additional display hardware.
We have dedicated tutorials covering each component individually with full pinout information, wiring diagrams, and standalone code examples. Review them before starting this project if you are not yet familiar with either peripheral:
Key Specifications
The DS18B20 operates on 3.0V to 5.5V and is fully compatible with the ESP32 S3's 3.3V GPIO pins. It measures temperatures from -55°C to +125°C with ±0.5°C accuracy between -10°C and +85°C, and supports multiple sensors on a single data wire. The FC-16 LED Matrix consists of 8×8 blocks chained together and driven by MAX7219 chips over SPI; a 4-in-1 module provides a 32×8 display controlled through just three signal pins. Because the LED matrix can draw up to 1 A at maximum brightness, it should be powered from an external 5V supply rather than the ESP32 S3's onboard 5V pin.
Wiring Diagram
Connect the DS18B20 temperature sensor and the FC-16 LED Matrix to your ESP32 S3 following the diagrams below. Both components share the same ground rail, and using a DS18B20 adapter module with a built-in pull-up resistor simplifies the build by eliminating the need for a separate 4.7 kΩ resistor.
Safety Notes
Power the DS18B20 from the ESP32 S3's 3.3V pin to keep it within its recommended operating range. Power the LED matrix from an external 5V supply rather than the ESP32 S3's onboard 5V pin, because the matrix can draw enough current to cause instability if taken directly from the board. Connect the ground of the external 5V supply, the LED matrix, and the ESP32 S3 together so they share a common reference. If you are using the bare TO-92 DS18B20 package without an adapter, never omit the 4.7 kΩ pull-up resistor between the DATA and VCC lines, as the 1-Wire protocol requires it for reliable communication.
Wiring diagram:
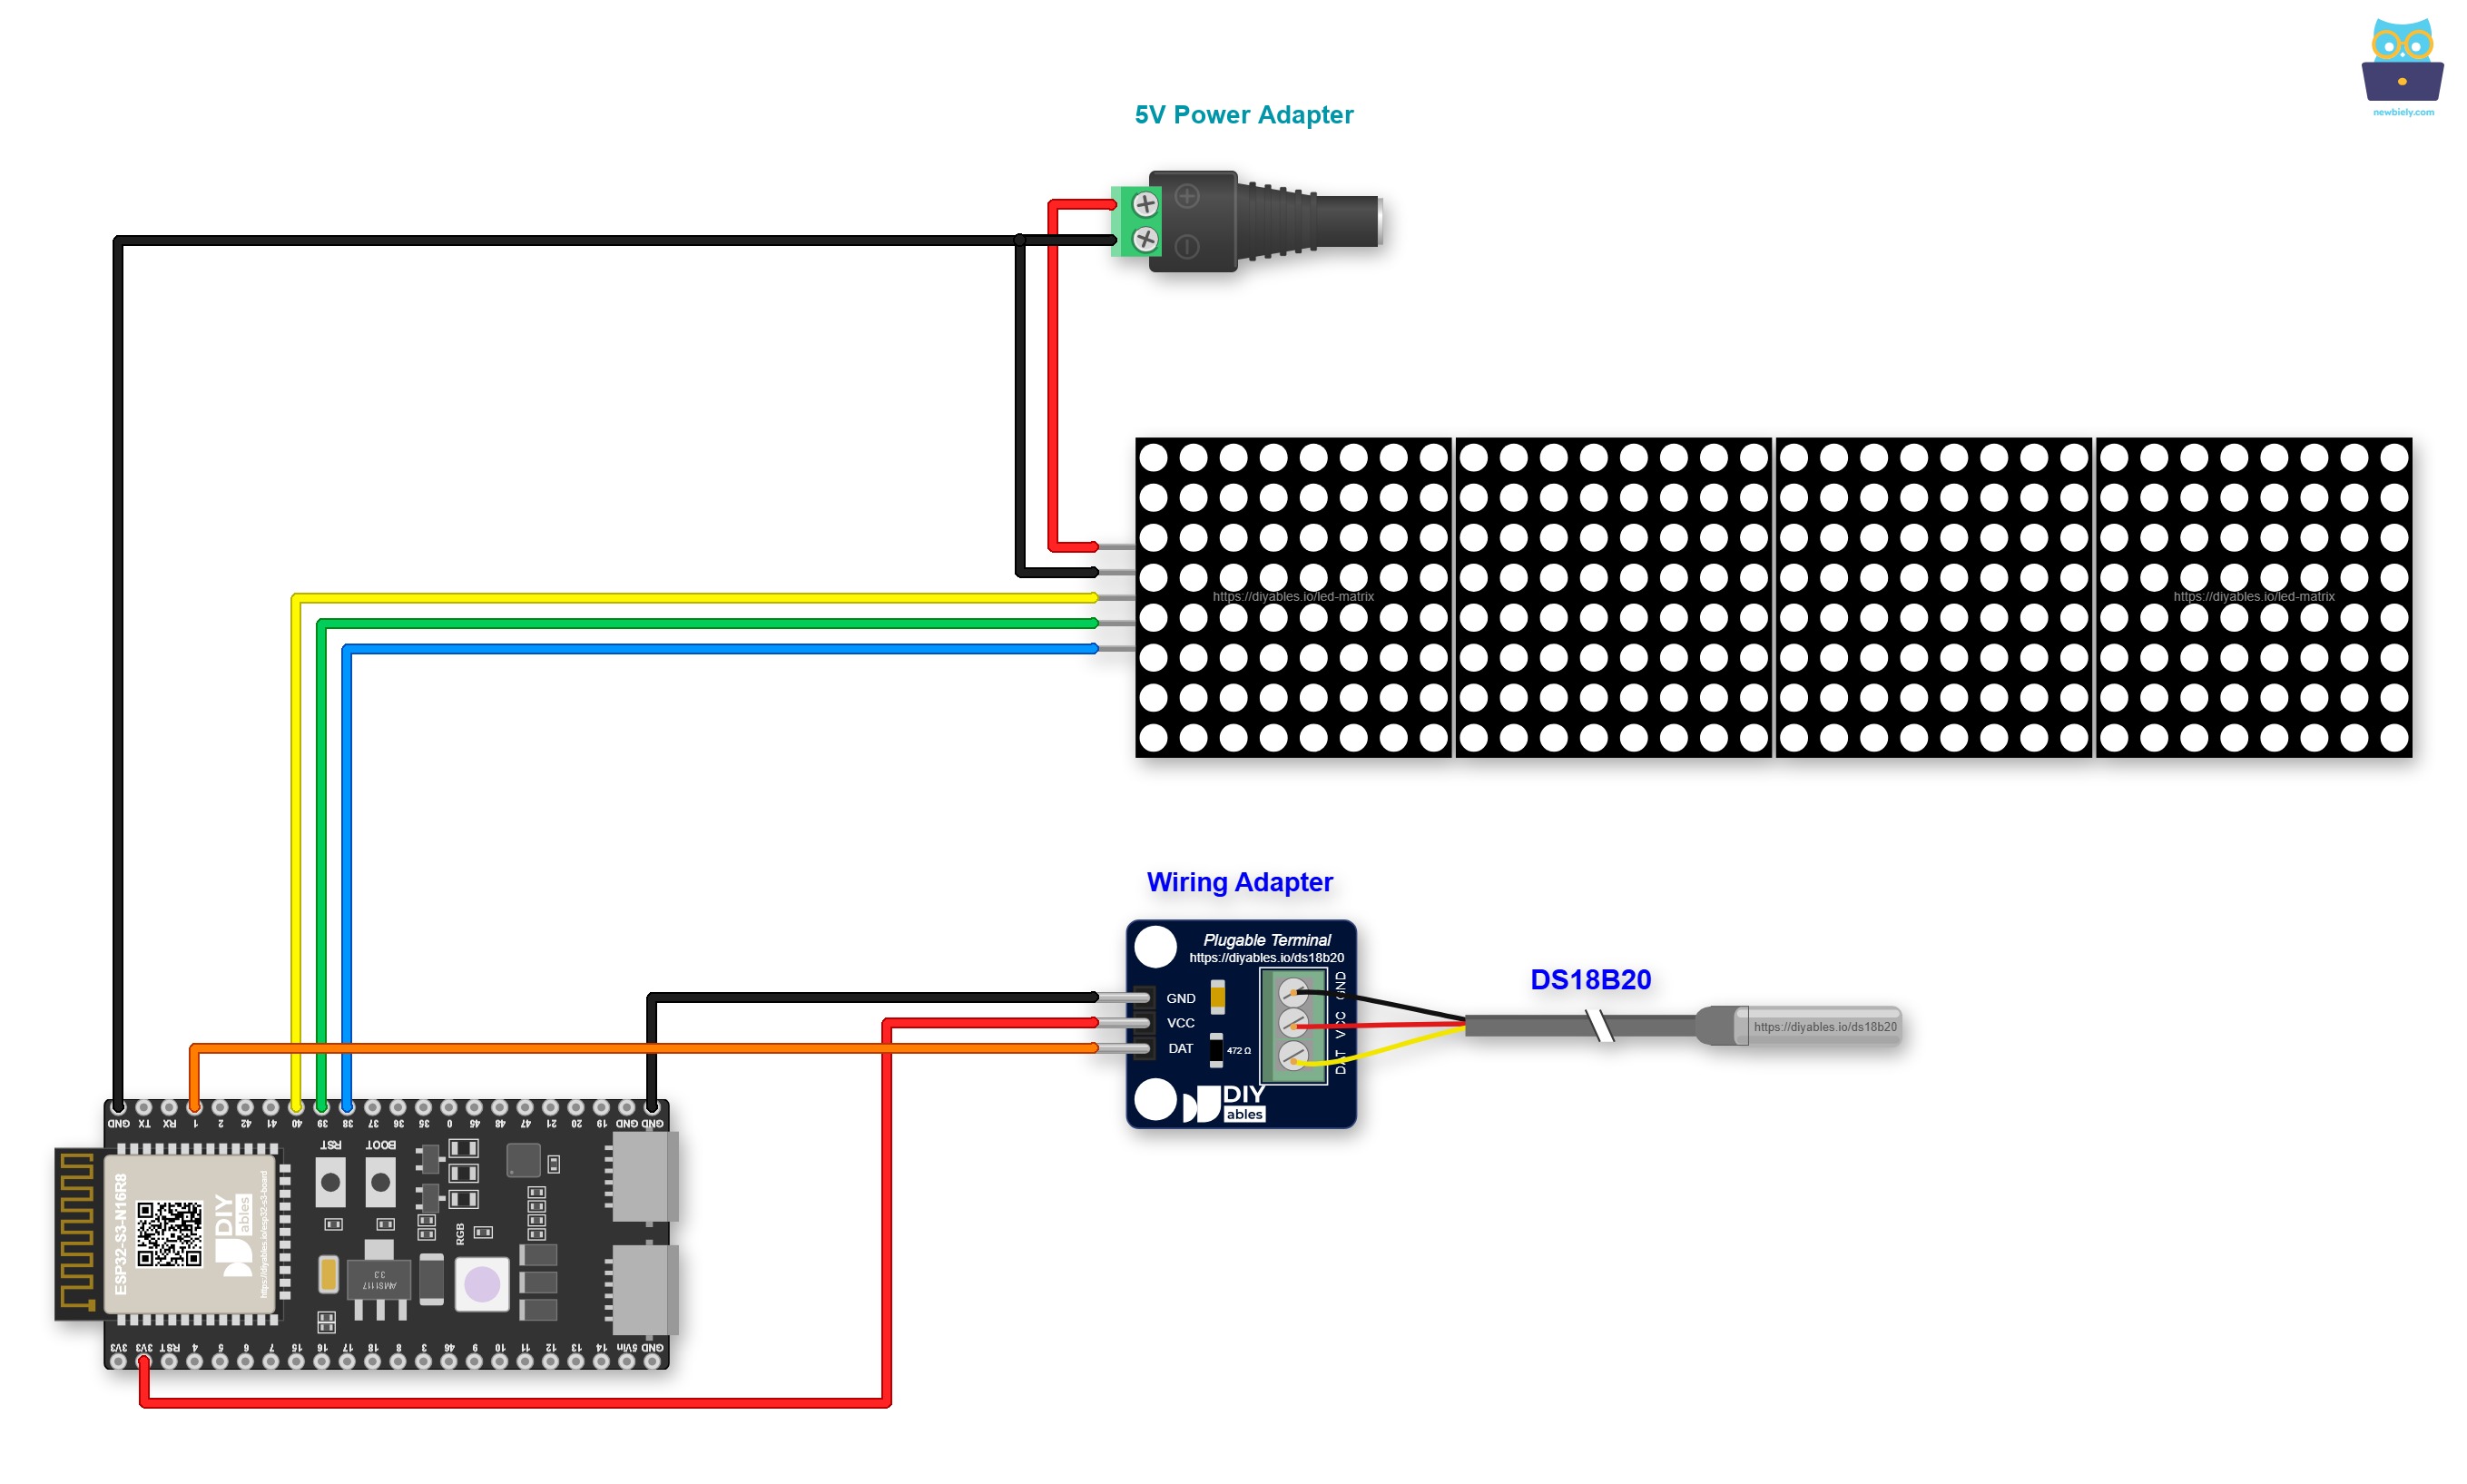
This image is created using Fritzing. Click to enlarge image
Loose wires are a common cause of strange bugs. To do that, mount the ESP32 S3 on a Screw Terminal Block for ESP32 S3. Below is the wiring diagram with the screw terminal board.
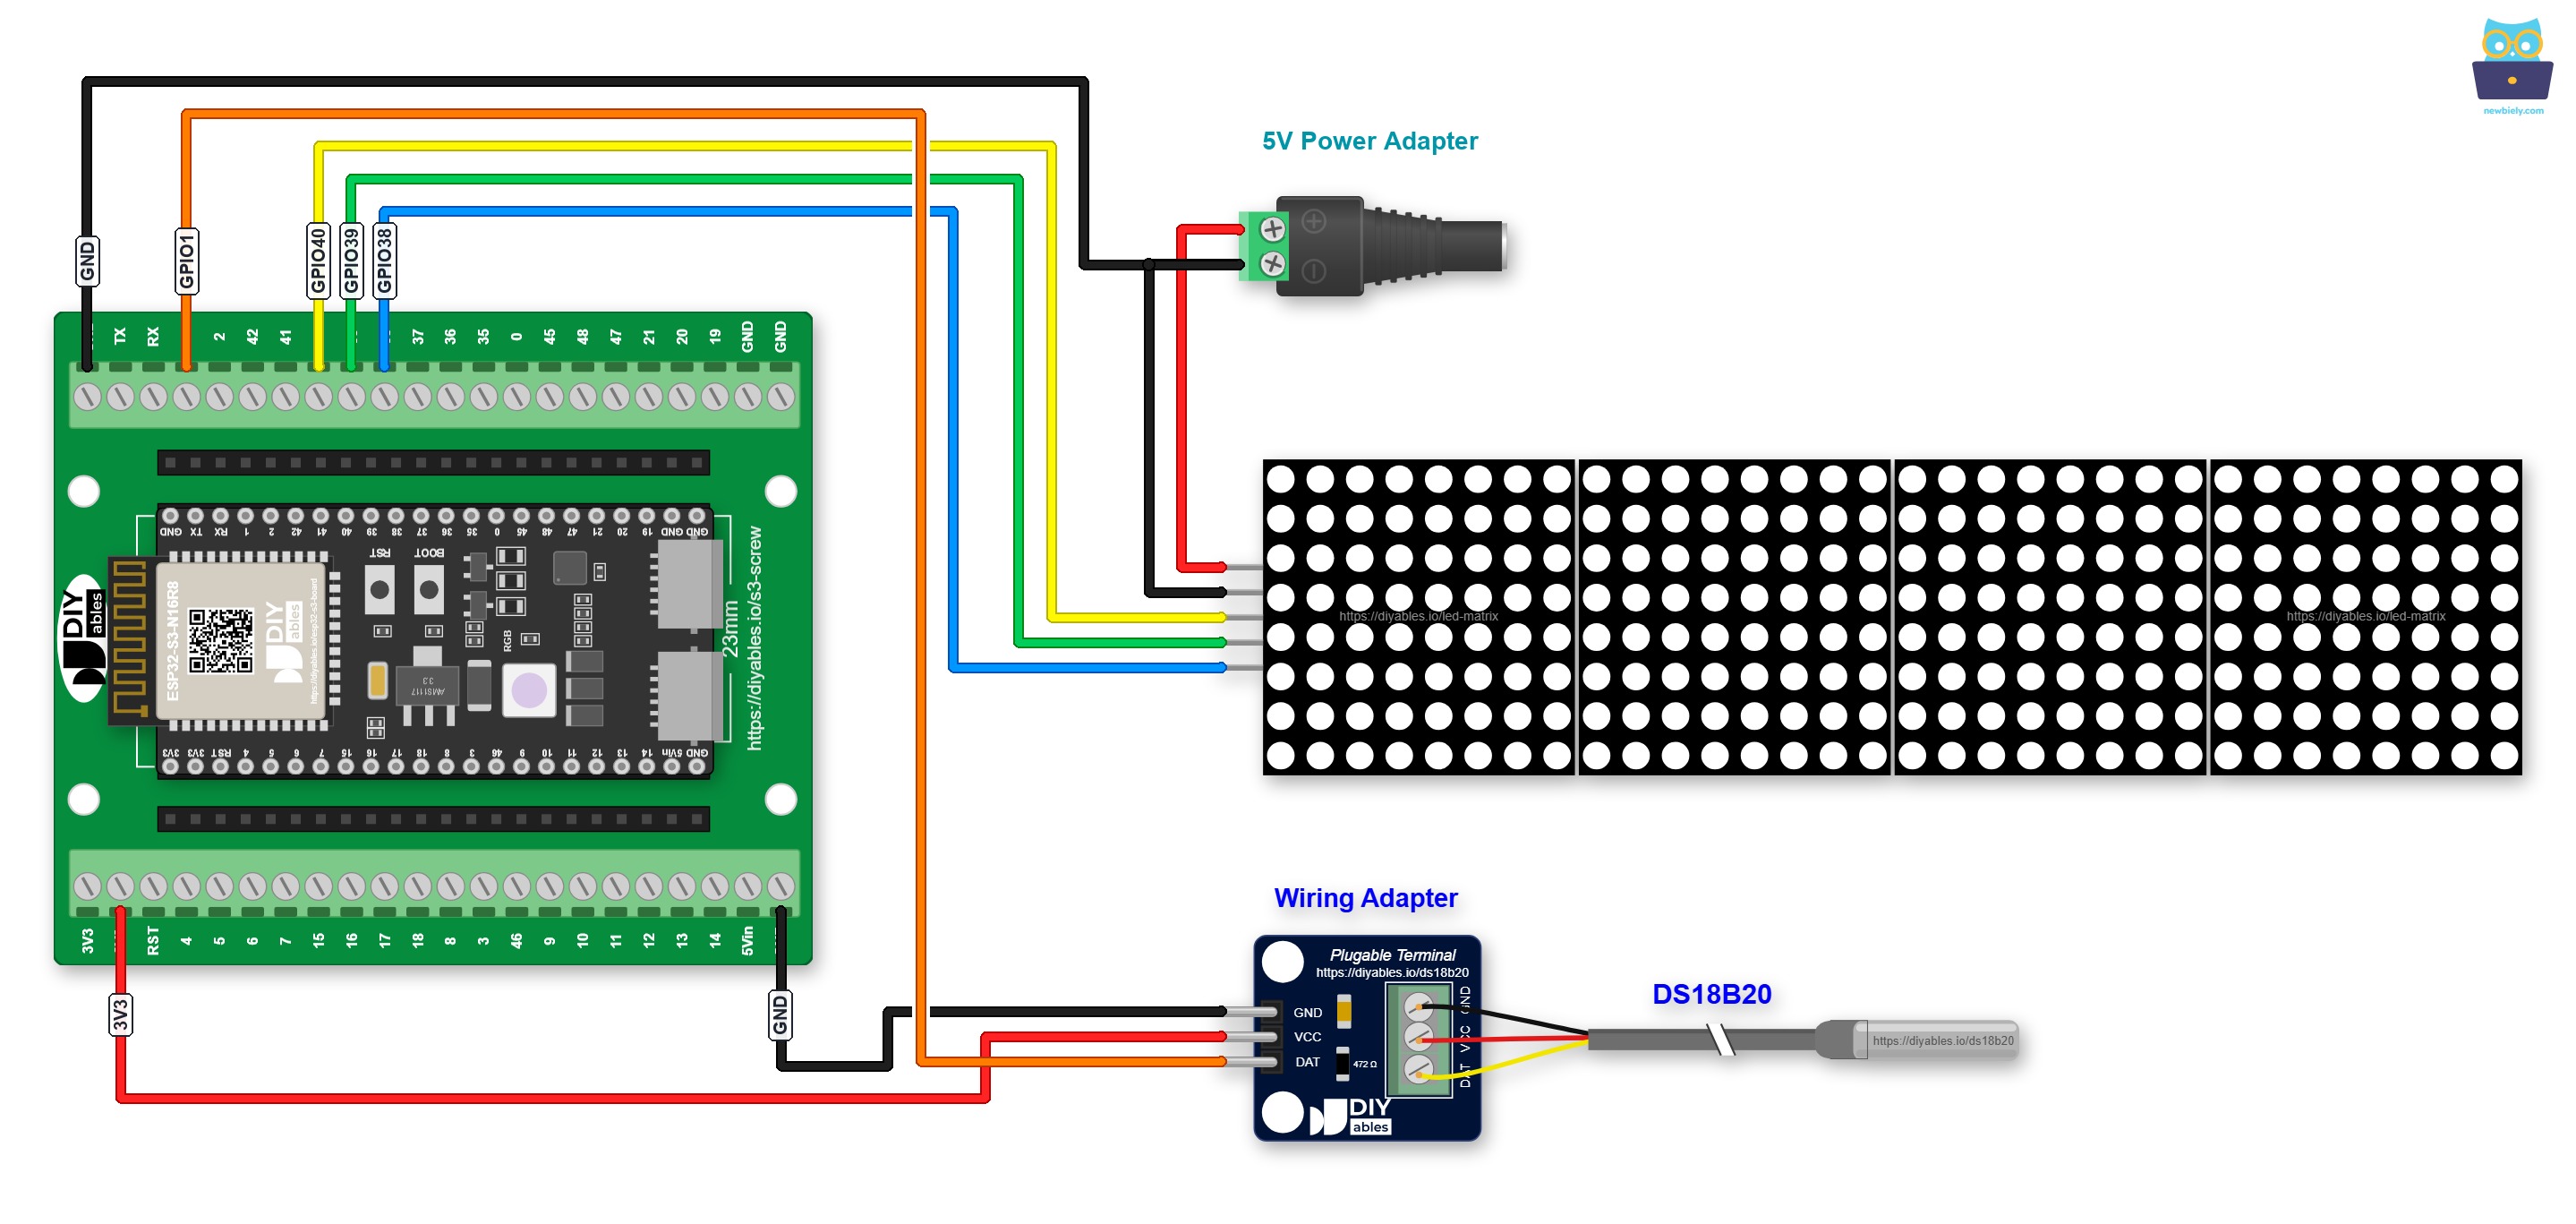
This image is created using Fritzing. Click to enlarge image
You can also use a GPIO Breakout Board for ESP32 S3. It gives each GPIO its own S, 3.3V and GND pins, so module wires plug straight in:
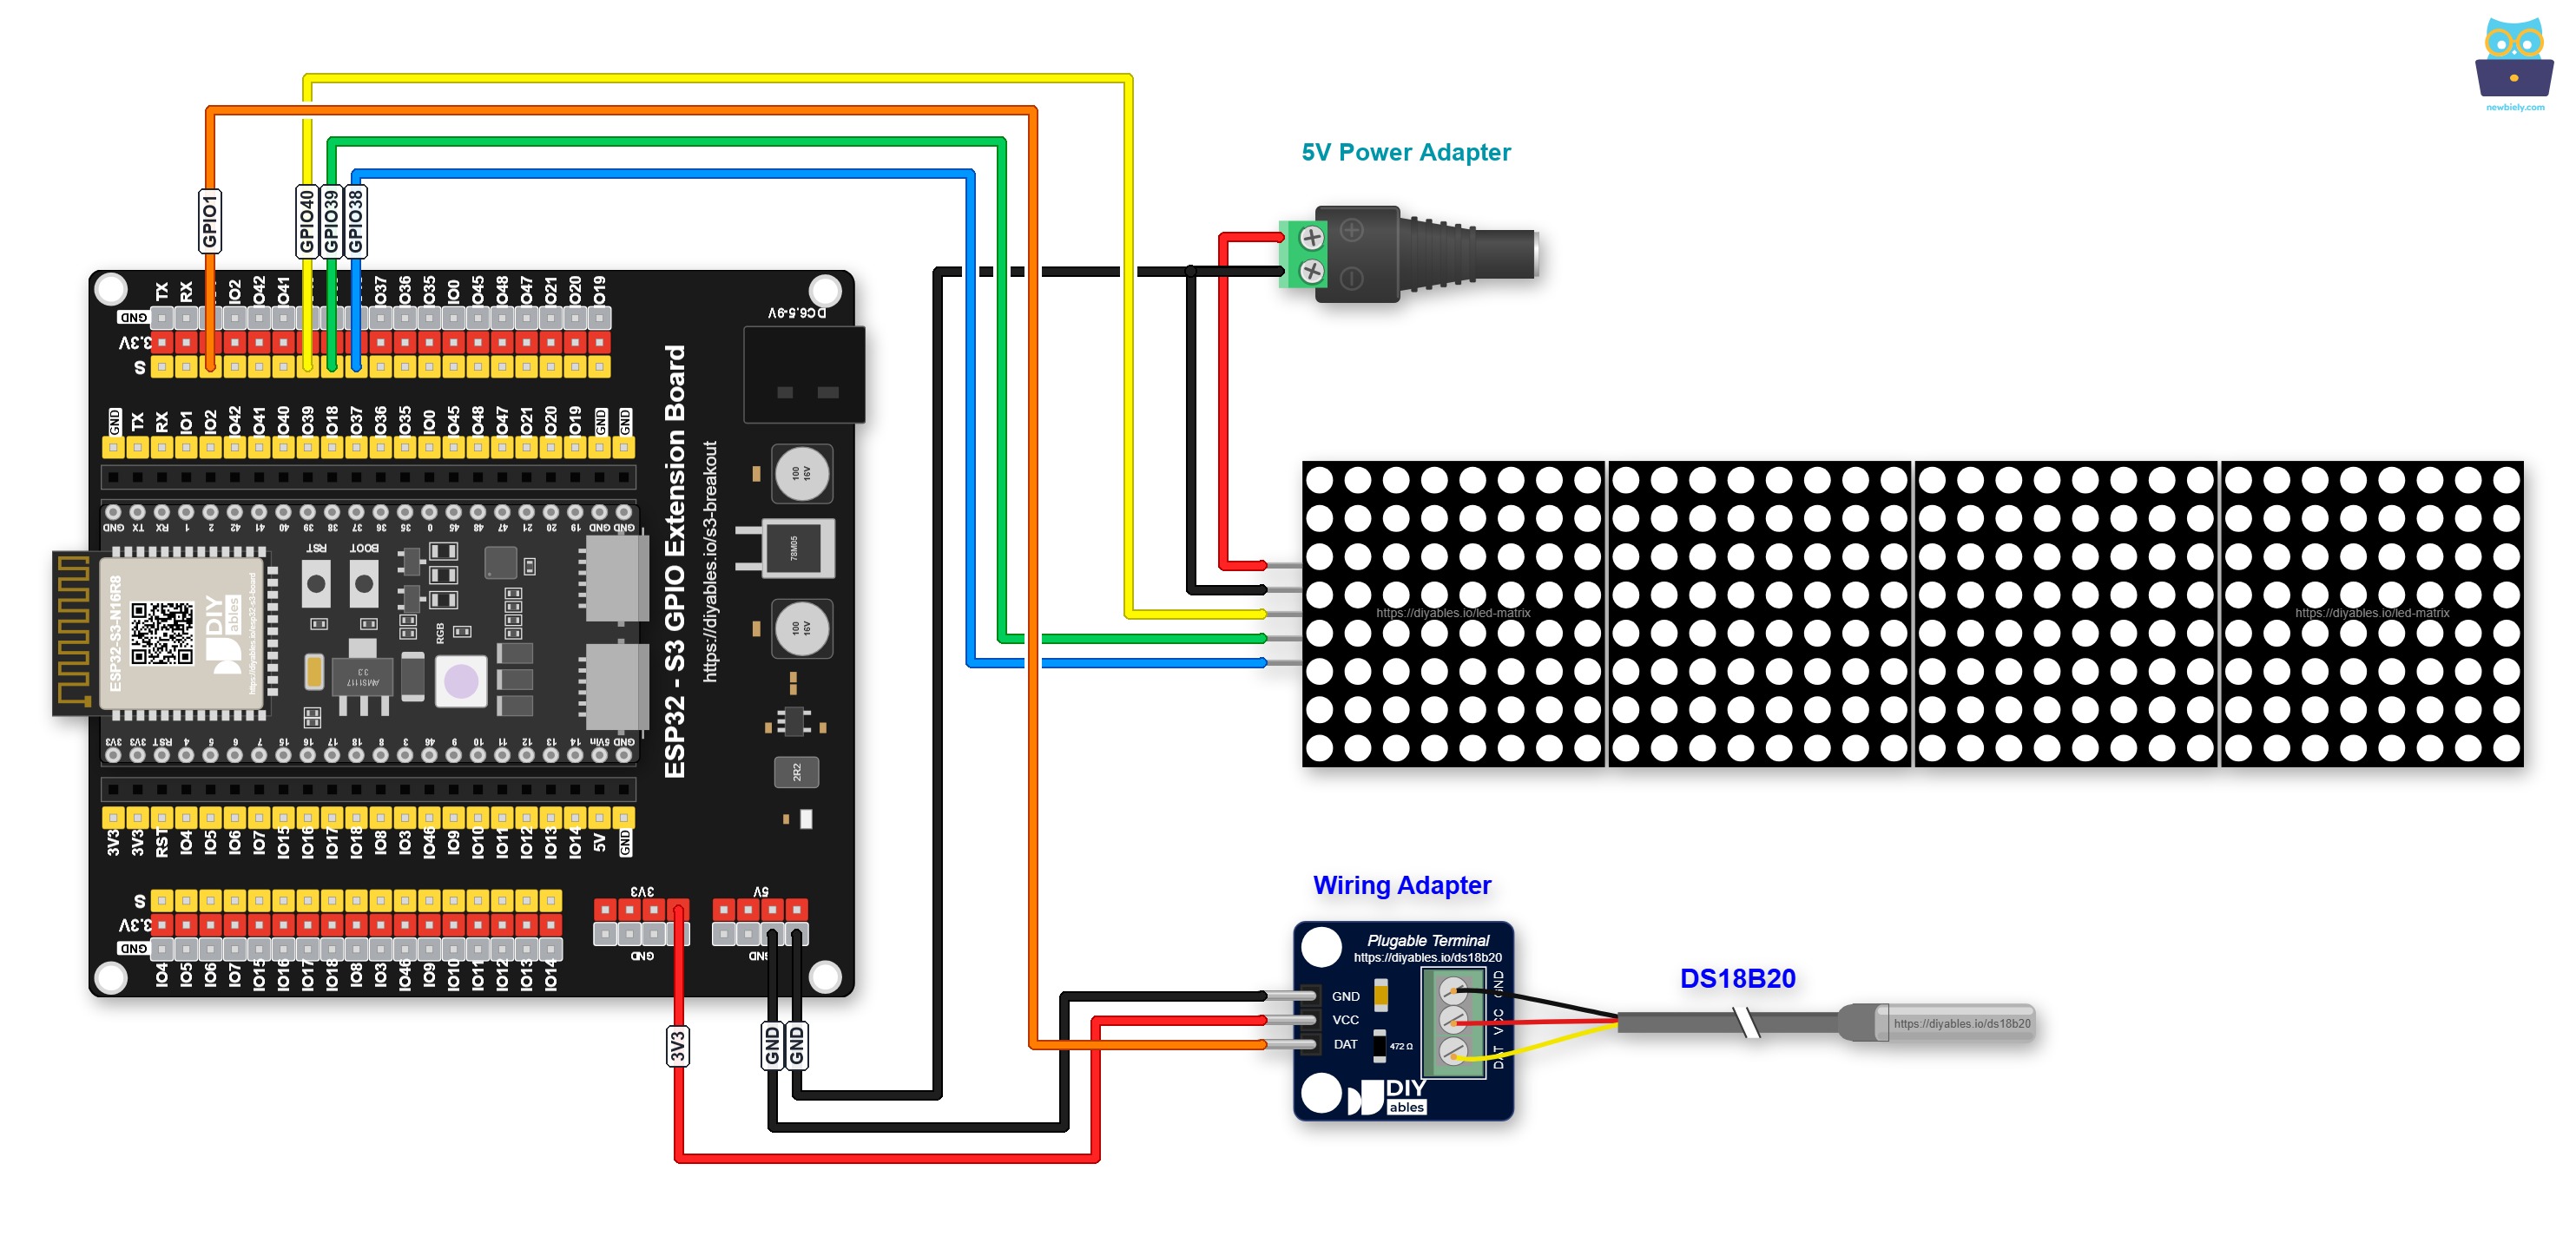
This image is created using Fritzing. Click to enlarge image
DS18B20 Temperature Sensor connections:
| DS18B20 Pin | ESP32 S3 Pin |
|---|---|
| GND | GND |
| VCC | 3.3V |
| DATA | GPIO1 (or any digital pin) |
FC-16 LED Matrix connections:
| LED Matrix Pin | ESP32 S3 Pin |
|---|---|
| VCC | External 5V |
| GND | GND (shared with ESP32 S3) |
| DIN | GPIO40 (MOSI) |
| CS | GPIO39 (or any digital pin) |
| CLK | GPIO38 (SCK) |
ESP32 S3 Code
The following code reads temperature from the DS18B20 sensor using the DallasTemperature library and scrolls the current Celsius reading across the FC-16 LED Matrix display, updating the message every two seconds. It initializes the 1-Wire bus on the configured data pin, requests a temperature conversion, formats the result as a string, and then uses the MD_Parola library to scroll it across the matrix. Both the DallasTemperature and MD_Parola libraries handle the low-level communication, keeping your sketch concise and easy to adapt.
※ NOTE THAT:
The code automatically centers the temperature text horizontally and vertically on the LED Matrix display.
Detailed Instructions
- New to ESP32 S3? Complete our Getting Started with ESP32 S3 guide first.
- Open Library Manager: Click the Libraries icon on the left sidebar of Arduino IDE.
- Install MD_Parola: Type "MD_Parola" in the search box, find the MD_Parola library, and click Install.
- Search for MD_Parola created by majicDesigns and click the Install button.
- Install dependency: When prompted, click Install All to also install the required MD_MAX72XX library.
- Install DallasTemperature: Type "DallasTemperature" in the search box, find the library by Miles Burton, and click Install.
- Search for DallasTemperature created by Miles Burton
- Install OneWire: When prompted, click Install All to also install the required OneWire library.
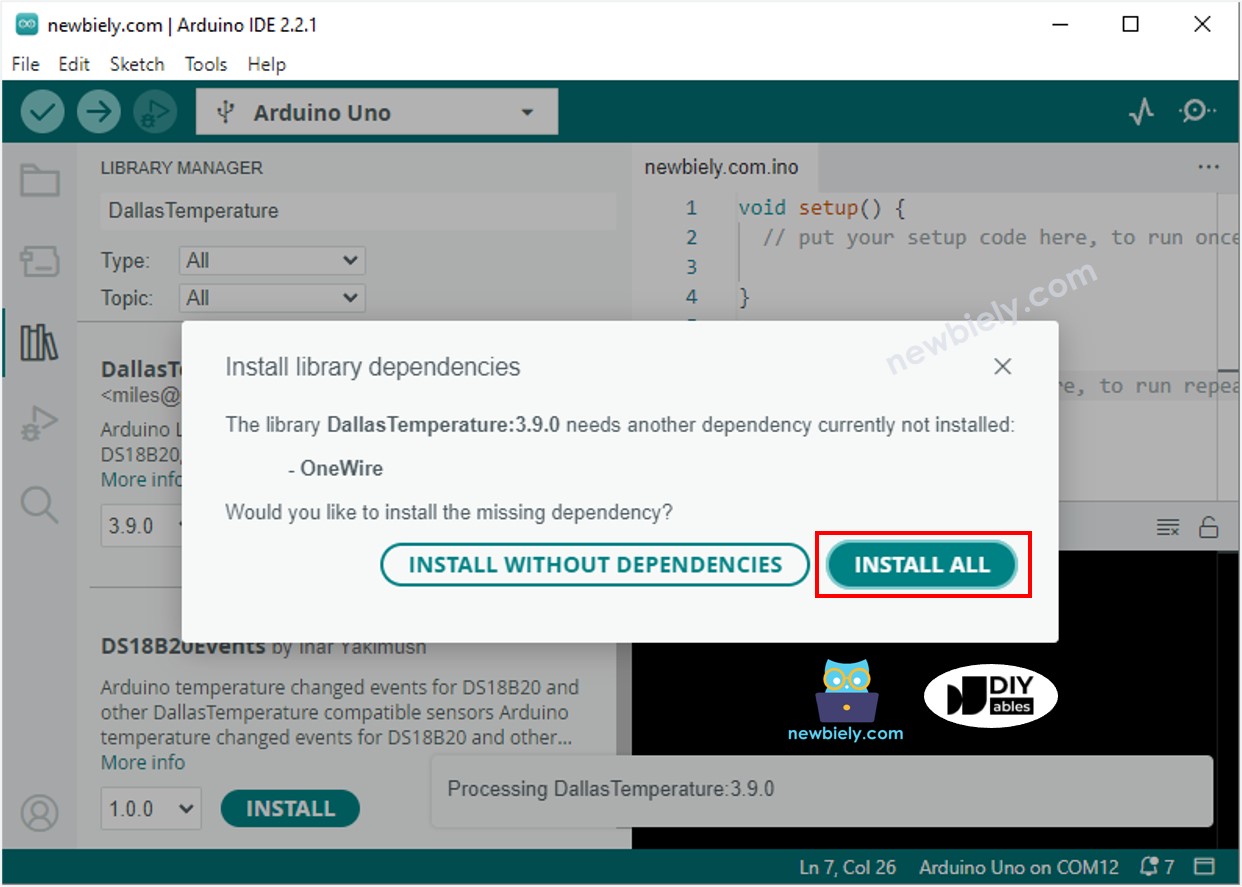
- Wire the components: Follow the wiring diagram above to connect both the DS18B20 sensor and the LED Matrix to your ESP32 S3.
- Connect your board: Plug the ESP32 S3 into your computer using a USB Type-C cable.
- Select your board: In Arduino IDE, choose the ESP32 S3 board and the correct COM port.
- Upload the code: Copy the code above, paste it into Arduino IDE, and click the Upload button.
- Observe the LED Matrix: The display will scroll the current temperature in Celsius every two seconds.
- Test the sensor: Hold the DS18B20 probe in your hand or place it in warm or cold water to see the reading change on the matrix.
- Pro Tip: If readings show -127°C on the matrix, check your DS18B20 wiring — this error value almost always means a missing pull-up resistor or a loose DATA wire.
Serial Monitor Output
Once you upload the code and open the Serial Monitor at 115200 baud, you will see temperature readings printed every two seconds alongside what is scrolling on the LED Matrix. The output below shows a typical session as the sensor warms up from room temperature.
Applications and Project Ideas
Combining a temperature sensor and an LED matrix with the ESP32 S3 is ideal for any situation where temperature needs to be visible at a distance without a monitor or screen. Here are practical ways to use this project:
- Outdoor temperature sign: Mount the LED matrix at a window or entrance to show ambient temperature at a glance from across a room.
- Server room indicator: Display rack temperature on a matrix panel so technicians can spot overheating without logging in to any dashboard.
- Greenhouse thermometer: Scroll temperature data on a visible display inside a greenhouse so workers know conditions without checking a phone.
- Tutorial safety display: Show temperature in environments where heat is a hazard, giving workers a visible warning when conditions change.
- Science classroom demo: Use the scrolling temperature display as a live experiment to show how temperature changes with heat sources or insulation.
- Retail shelf display: Combine with a relay to trigger fans or alerts when a monitored enclosure exceeds a threshold, with the matrix showing the current state.
Video Tutorial
Watch the step-by-step video walkthrough for this ESP32 S3 project below.
Challenges
Try these challenges to deepen your understanding of combining the DS18B20 temperature sensor and LED matrix with the ESP32 S3.
- Beginner: Modify the code to scroll both Celsius and Fahrenheit values in the same message, separated by a slash, so the full reading wraps around continuously.
- Intermediate: Add a second DS18B20 sensor on the same data wire and alternate displaying the temperature from each sensor on successive scroll cycles.
- Advanced: Build a Wi-Fi-connected temperature sign where you can update the display message remotely via a simple web interface hosted on the ESP32 S3, blending live sensor readings with custom text.