
ESP32 S3 - Ultrasonic Sensor - Servo Motor
This tutorial shows you how to use the ESP32 S3 with an HC-SR04 ultrasonic sensor to automatically control a servo motor based on the distance of a detected object. By combining non-contact distance measurement with precise angular actuation, you can build responsive proximity-triggered systems without any physical interaction.
What you'll build:
- An ESP32 S3 circuit with an HC-SR04 ultrasonic sensor and a servo motor wired to the board
- A sketch that reads the distance from the ultrasonic sensor continuously
- A servo motor that rotates to 90° when an object is detected close to the sensor
- A servo motor that returns to 0° automatically when the object moves away
https://newbiely.com/images/cover/esp32-s3-ultrasonic-sensor-servo-motor.jpg
Hardware Preparation
Or you can buy the following kits:
| 1 | × | DIYables ESP32 S3 Starter Kit (ESP32 S3 included) | |
| 1 | × | DIYables Sensor Kit (18 sensors/displays) |
Additionally, some of these links are for products from our own brand, DIYables .
Buy Note: For controlling multiple servo motors, use the PCA9685 16 Channel PWM Servo Driver Module to save MCU pins and simplify wiring.
Overview of Servo Motor and Ultrasonic Sensor
The HC-SR04 ultrasonic sensor and servo motor are a powerful combination for the ESP32 S3: the sensor provides non-contact distance data while the servo delivers precise, repeatable angular output in response to that data. Together they enable a wide class of proximity-aware automation projects — from automatic doors and robotic arm triggers to parking barriers and object-avoidance mechanisms.
Key Specifications
We have specific tutorials about each component covering detailed hardware pinout, working principles, wiring to the ESP32 S3, and full code examples. Learn more at the links below:
Wiring Diagram
Connect the HC-SR04 and the servo motor to your ESP32 S3 as shown in the diagram below. Make sure both the ultrasonic sensor's VCC and the servo motor's power wire are connected to the 5V rail, since neither component operates correctly at 3.3V.
Safety Notes
Servo motors can briefly draw several hundred milliamps under load, which can stress the ESP32 S3's USB supply if used for extended periods. For bench testing, the USB port is generally sufficient; for any deployment scenario, power the servo from a dedicated 5V external supply and share only the GND rail with the ESP32 S3. Similarly, always connect the HC-SR04 VCC pin to 5V — not 3.3V — to ensure accurate ultrasonic measurements.
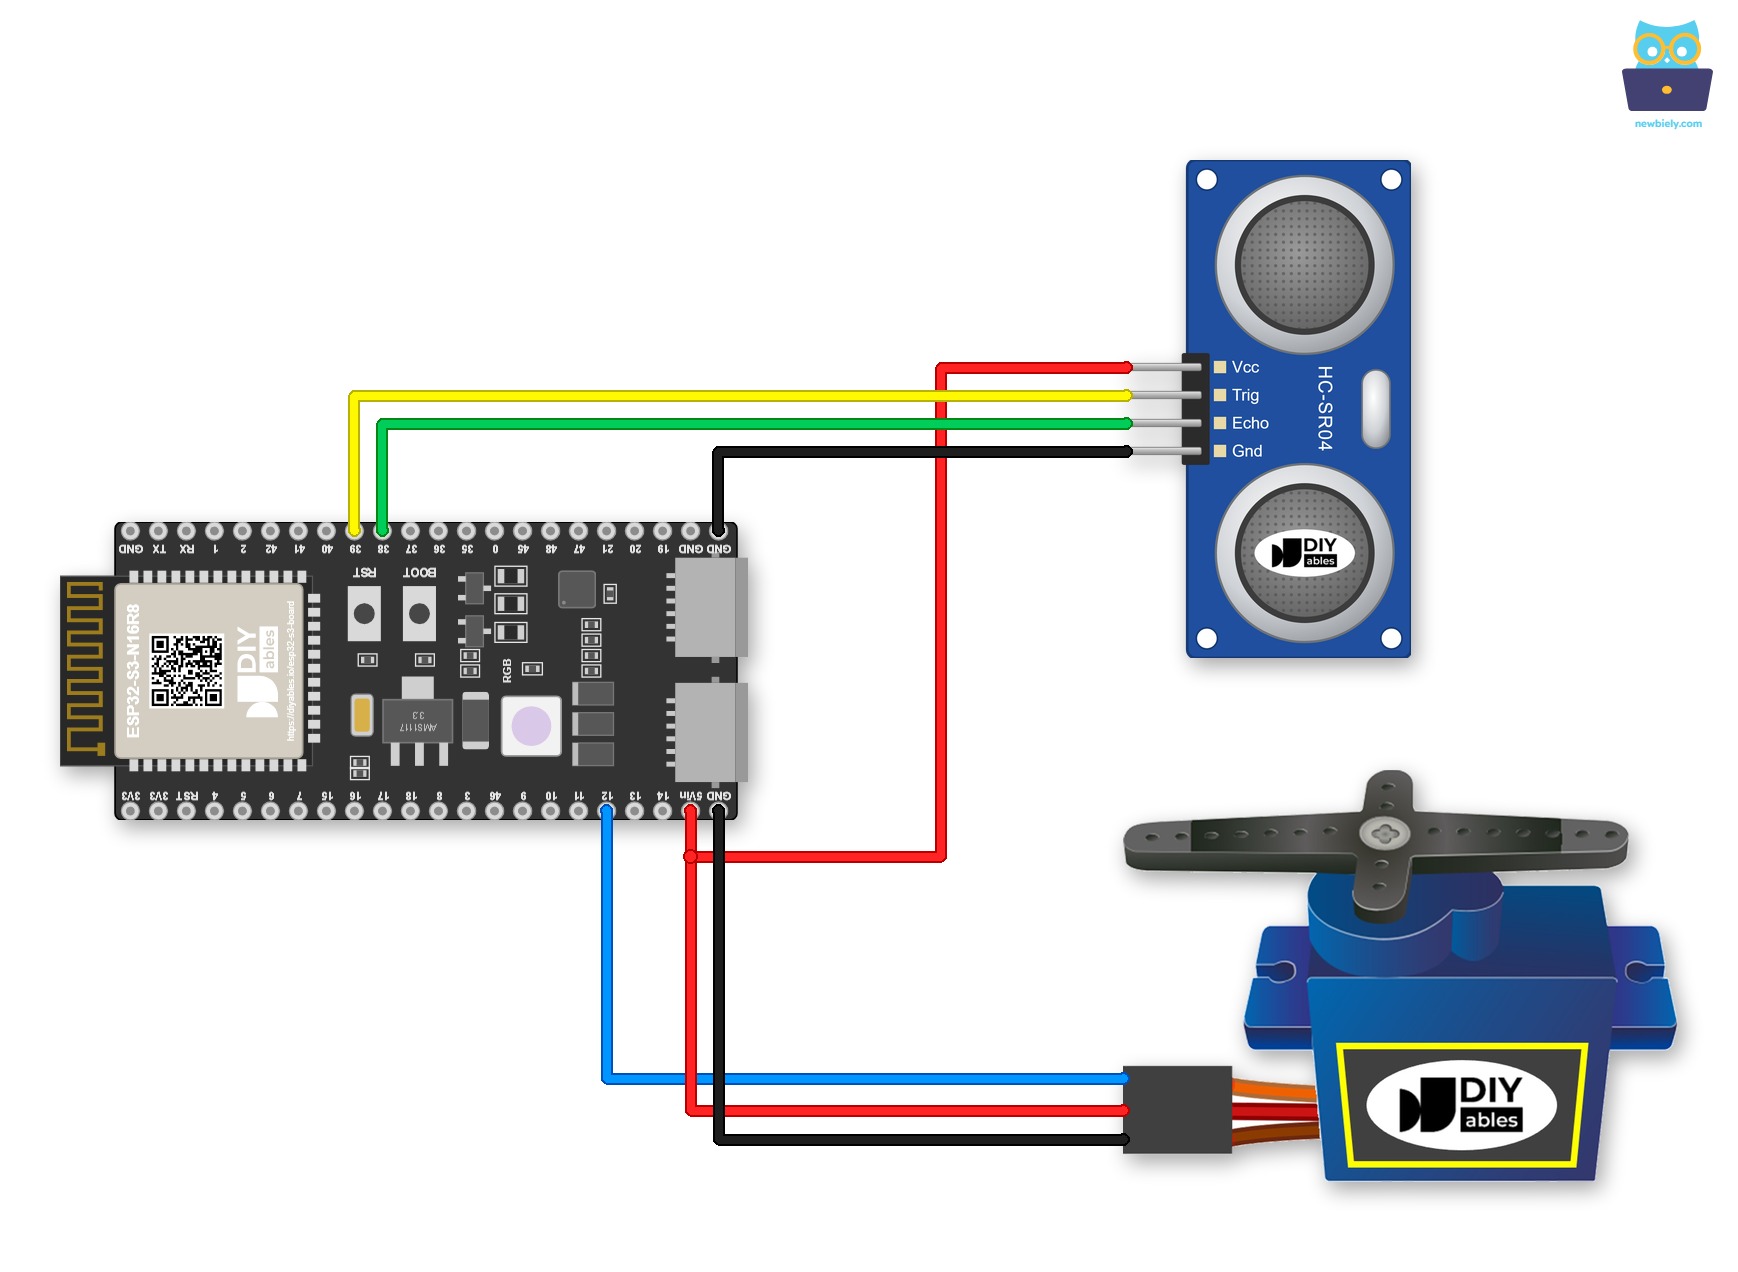
This image is created using Fritzing. Click to enlarge image
| Component | Pin | ESP32 S3 Pin |
|---|---|---|
| Ultrasonic Sensor | VCC | 5V |
| Ultrasonic Sensor | GND | GND |
| Ultrasonic Sensor | TRIG | GPIO39 |
| Ultrasonic Sensor | ECHO | GPIO38 |
| Servo Motor | GND (Brown/Black) | GND |
| Servo Motor | VCC (Red) | 5V |
| Servo Motor | Signal (Yellow/Orange) | GPIO12 |
Jumper wires are good for a quick test, but not for a final build. A Screw Terminal Block for ESP32 S3 solves this. Plug the ESP32 S3 into it and screw the wires in. The pins do not change. Just connect each wire to the matching screw terminal:
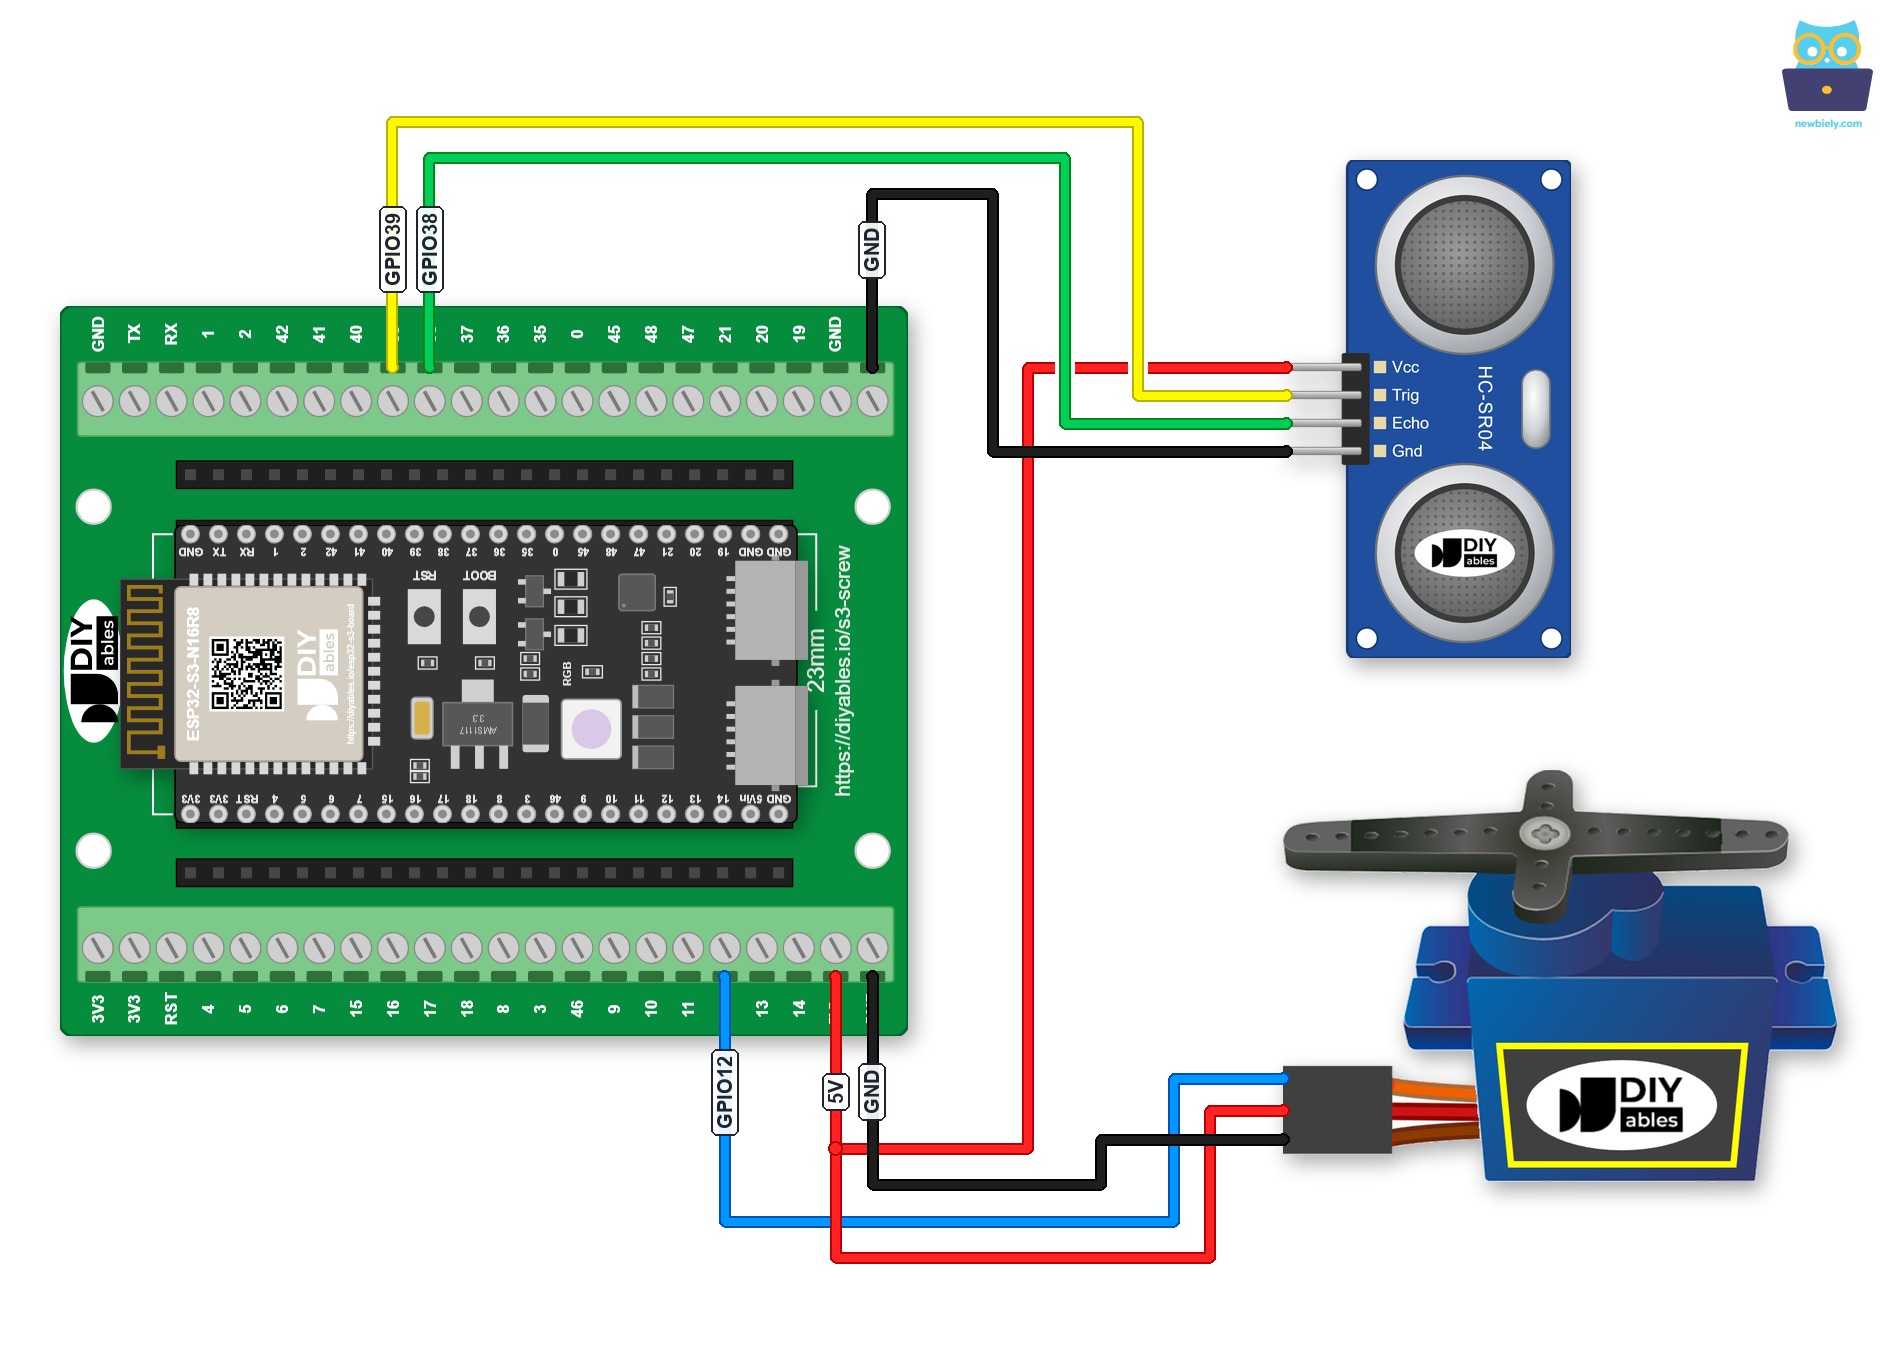
This image is created using Fritzing. Click to enlarge image
A GPIO Breakout Board for ESP32 S3 works too. Besides one S, 3.3V and GND pin for each GPIO, it has extra 3.3V and 5V pins:
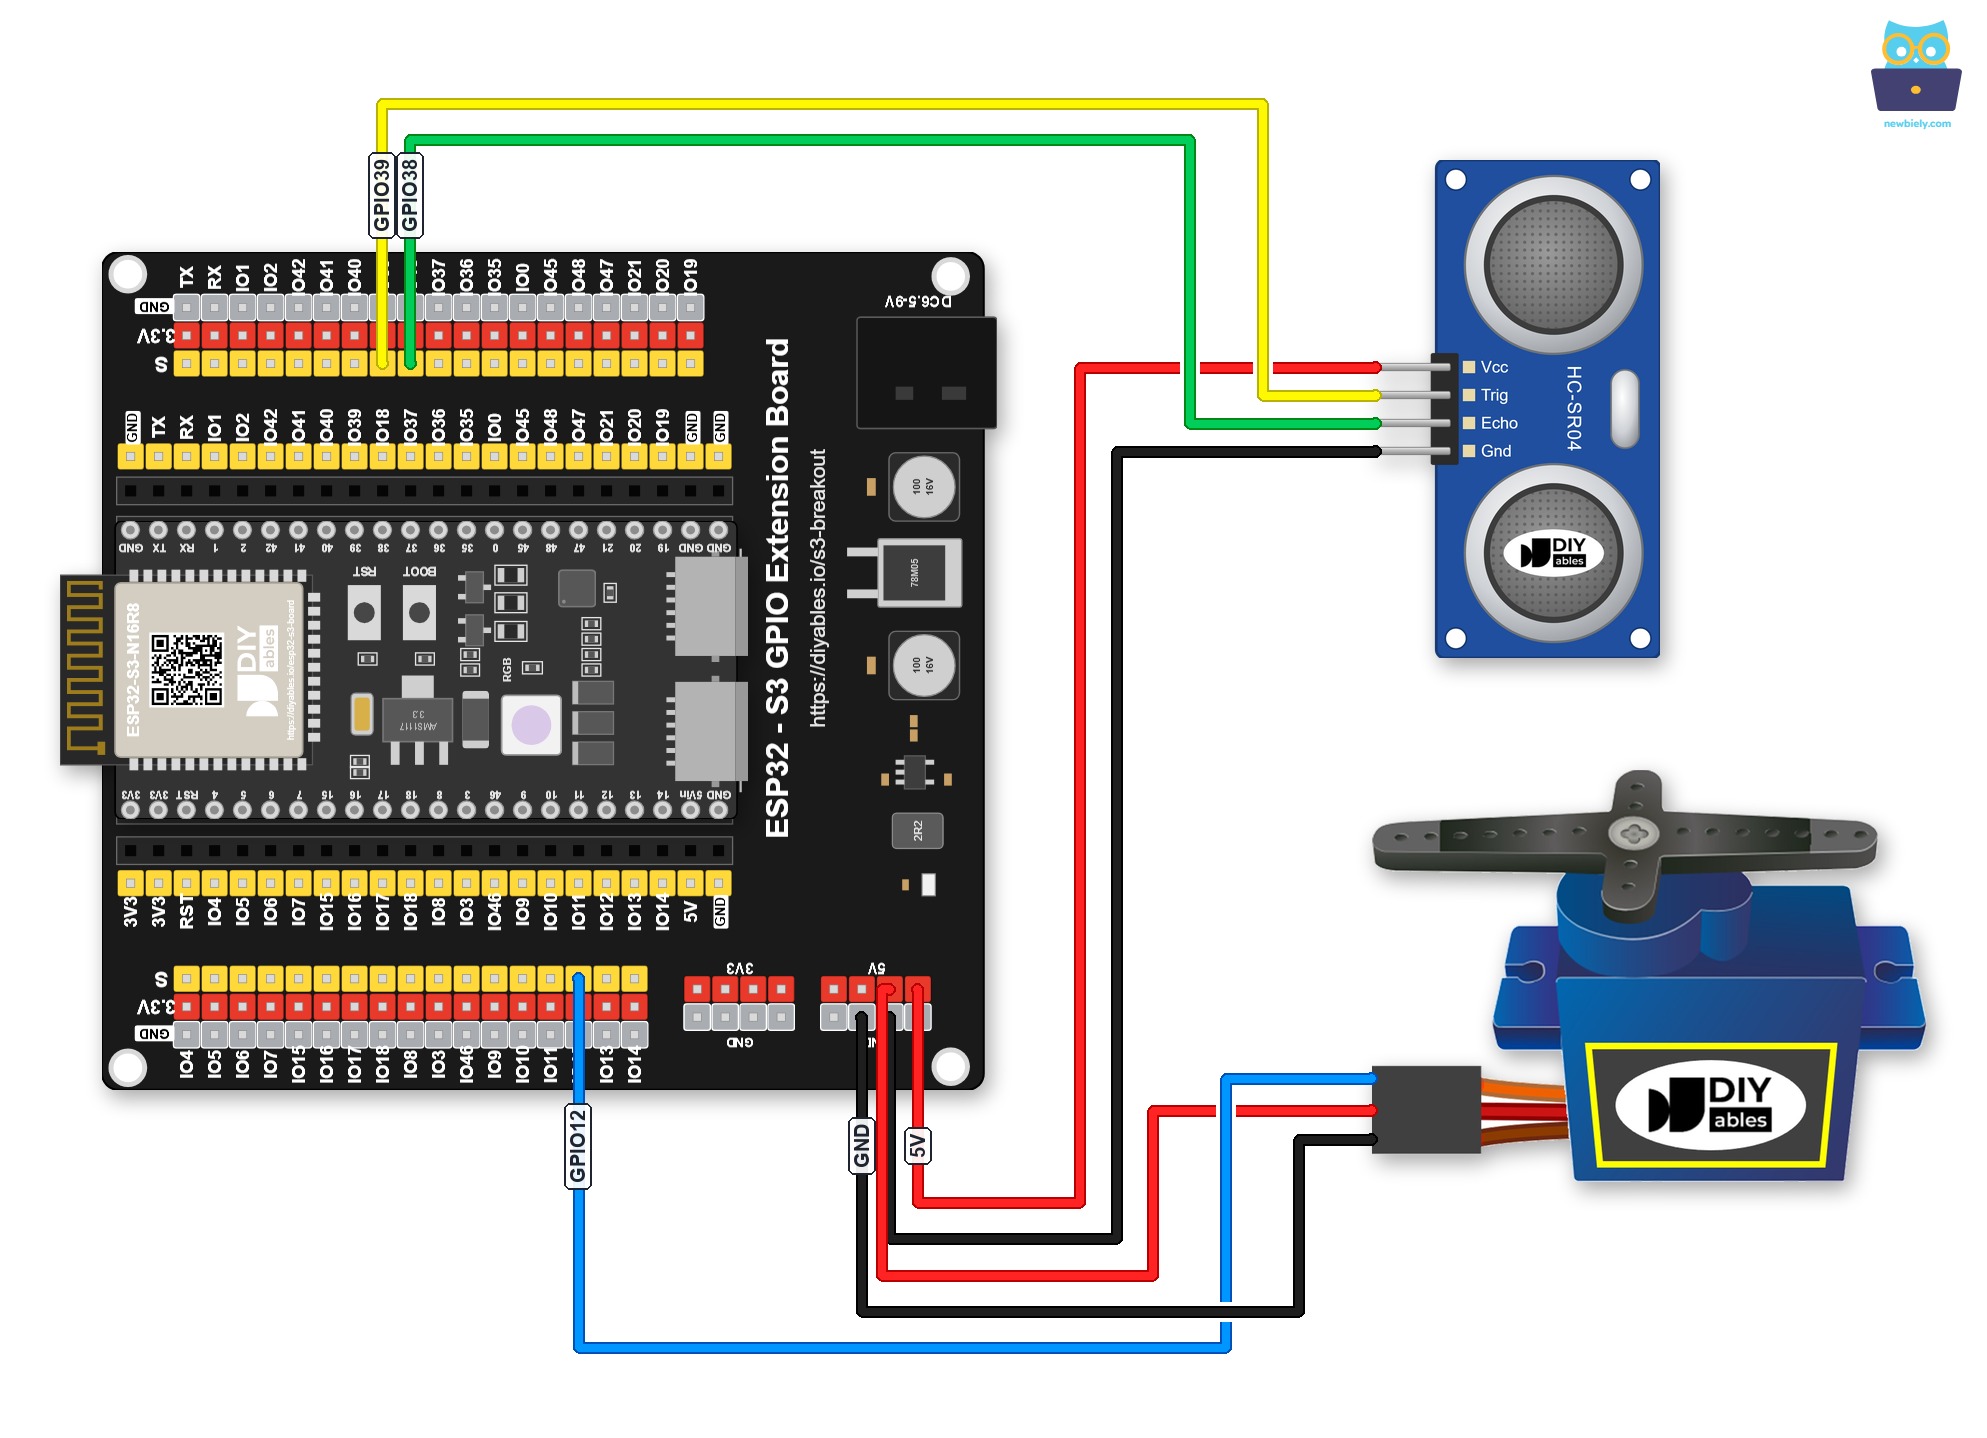
This image is created using Fritzing. Click to enlarge image
ESP32 S3 Code - Ultrasonic Sensor Controls Servo Motor
The following code uses the ESP32 S3 to read the distance measured by the HC-SR04 ultrasonic sensor and translate it into a servo motor angle. When an object comes within the defined threshold distance, the ESP32 S3 commands the servo to rotate to 90°; when the object moves beyond that threshold, the servo returns to 0°. The ESP32Servo library handles PWM signal generation for the servo, while the ultrasonic measurement is driven directly by pulseIn() for simplicity and low latency.
Detailed Instructions
- New to ESP32 S3? Complete our Getting Started with ESP32 S3 guide first.
- Wire the components: Follow the wiring diagram shown above to connect the HC-SR04 ultrasonic sensor and servo motor to your ESP32 S3.
- Connect ESP32 S3: Use a USB Type-C cable to connect the board to your computer.
- Setup Arduino IDE: If this is the first time you use ESP32 S3, see how to setup environment for ESP32 S3 on Arduino IDE.
- Select your board: Choose the ESP32 S3 board and its COM port under Tools in Arduino IDE.
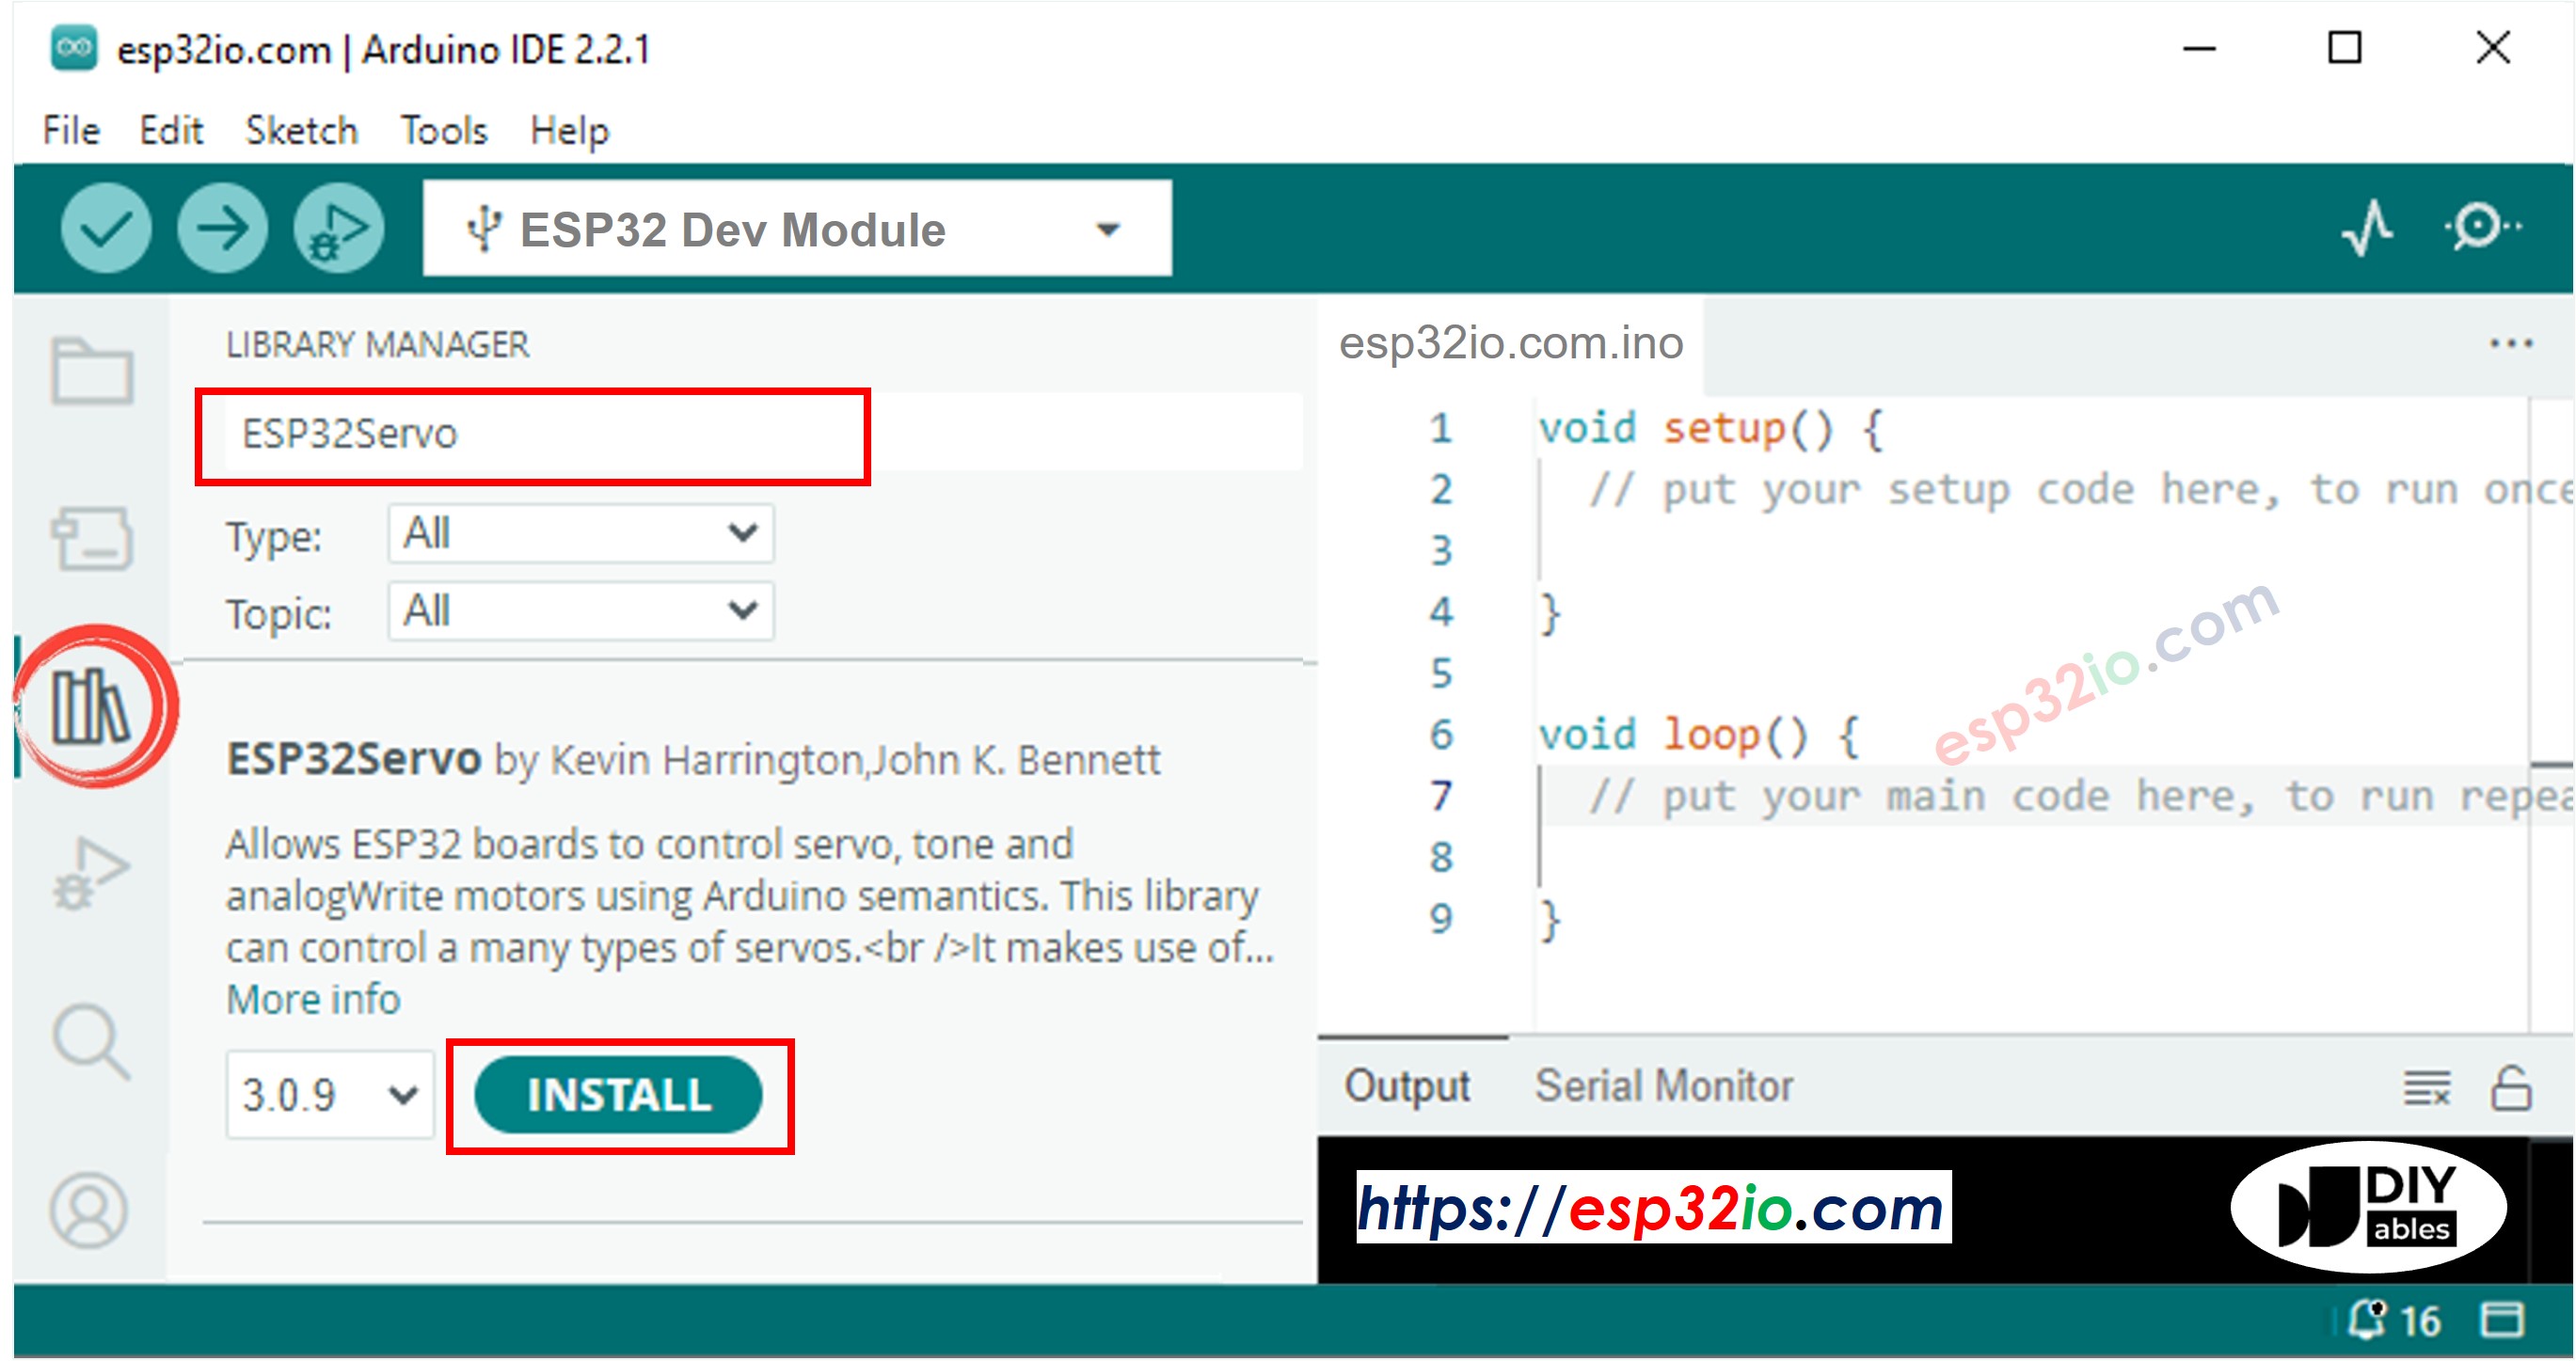
- Install ESP32Servo library: Click the Libraries icon on the left bar of the Arduino IDE. Type ESP32Servo in the search box, then look for the servo library by Kevin Harrington, John K. Bennett. Click Install to install the servo motor library for ESP32.
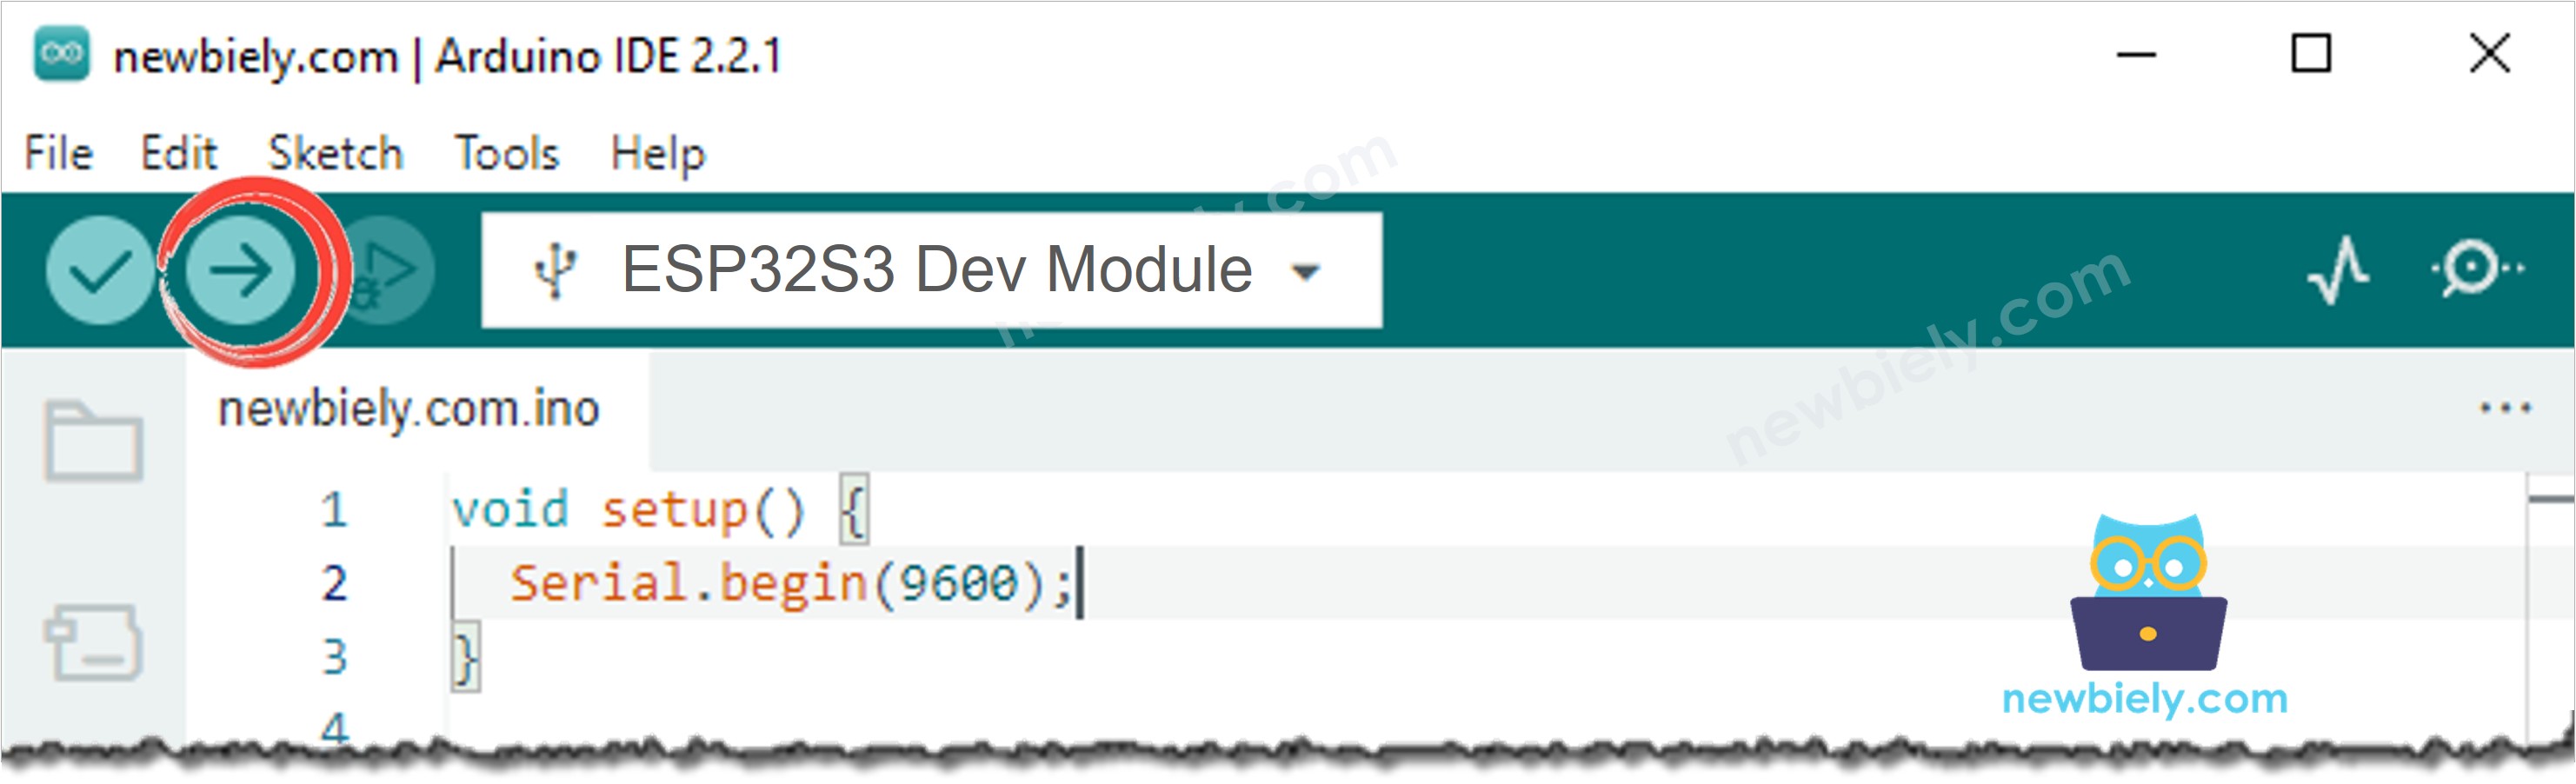
- Upload the code: Copy the code above and paste it into Arduino IDE, then click the Upload button.
- Open Serial Monitor: Open the Serial Monitor at 9600 baud to see live distance readings and servo angle updates.
- Test the sensor: Move your hand in front of the ultrasonic sensor and observe the servo motor responding to changes in distance.
- Pro Tip: If the servo twitches erratically, add a small capacitor (100–470 µF) across the servo's power rails to filter voltage spikes and stabilize the signal.
Serial Monitor Output
Open the Serial Monitor at 9600 baud after uploading. You will see output similar to the following as you move your hand in front of the sensor:
Application Ideas
Combining the ESP32 S3 with an ultrasonic sensor and servo motor unlocks a broad set of proximity-aware actuation projects across automation, robotics, and everyday maker scenarios. Here are some practical ideas to get you started:
- Automatic door or gate: Use the servo to swing a barrier open when a person or vehicle is detected within a set range, and close it automatically when they move away.
- Touchless trash can lid: Trigger the servo to lift a lid when a hand is sensed close to the bin, enabling hands-free waste disposal.
- Proximity-activated robotic arm: Extend or retract a robotic arm joint when an object enters a defined zone, without any button press required.
- Parking barrier: Build a servo-driven parking gate that raises automatically when a car approaches the sensor threshold.
- Object-avoidance mechanism: Use the distance reading to steer a servo-mounted wheel or rudder away from nearby obstacles in a mobile robot.
- Alarm latch: Physically engage or disengage a servo-driven locking pin when someone is detected within a security perimeter.
Video Tutorial
Watch the step-by-step video walkthrough for this ESP32 S3 project below.
Challenge Yourself
Now that your ESP32 S3 ultrasonic-sensor-servo circuit is working, try these progressively harder challenges to deepen your understanding of distance sensing and servo actuation:
- Beginner: Change the distance threshold in the code and observe how the servo's trigger point shifts — experiment with values between 5 cm and 50 cm.
- Beginner: Modify the code so the servo rotates to 180° instead of 90° when an object is detected close to the sensor.
- Intermediate: Add an LED indicator to the ESP32 S3 that turns on when the servo is at 90° and off when it returns to 0°, giving a visual status cue alongside the motor movement.
- Intermediate: Implement distance-proportional servo control, where the servo angle is mapped continuously to the measured distance rather than switching between two fixed positions.
- Advanced: Add an OLED display to the ESP32 S3 that shows both the real-time distance in centimeters and the current servo angle on screen simultaneously.
- Advanced: Build a multi-zone system with two ultrasonic sensors covering different directions, each independently triggering its own servo when an object enters its zone.