
ESP32 S3 - 4-Channel Relay Module
Learn how to control multiple high-voltage devices using an ESP32 S3 and a 4-channel relay module. This beginner-friendly tutorial walks you through wiring, programming, and safely operating four independent relay channels to control pumps, fans, lights, and other appliances.
What you'll build:
- A working circuit connecting an ESP32 S3 to a 4-channel relay module
- A program that turns all four relays ON and OFF in sequence
- Serial Monitor output confirming each relay state change
- A foundation for home automation and IoT control projects
https://newbiely.com/images/cover/esp32-s3-4-channel-relay-module.jpg
Hardware Preparation
Or you can buy the following kits:
| 1 | × | DIYables ESP32 S3 Starter Kit (ESP32 S3 included) | |
| 1 | × | DIYables Sensor Kit (18 sensors/displays) |
Additionally, some of these links are for products from our own brand, DIYables .
Overview of 4-Channel Relay Module
A 4-channel relay module is a control board that contains four independent relays, each capable of switching high-voltage devices such as lights, pumps, and fans under microcontroller command. The module includes onboard optocoupler isolation that protects the ESP32 S3 from high-voltage spikes, and LED indicators that show the state of each relay at a glance.
Key Specifications
- Controls up to four separate high-voltage devices (AC or DC)
- Each relay handles loads up to 10A at 250VAC or 30VDC (typical)
- Operates with 5V logic signals from microcontrollers
- Onboard LED indicators show relay status
- Optocoupler isolation protects your ESP32 S3
- Configurable trigger modes (high/low) via onboard jumpers
- Cost-effective solution for multi-device control in home automation and IoT projects
The 4-Channel Relay Module Pinout
The diagram below identifies every connection point on the 4-channel relay module.
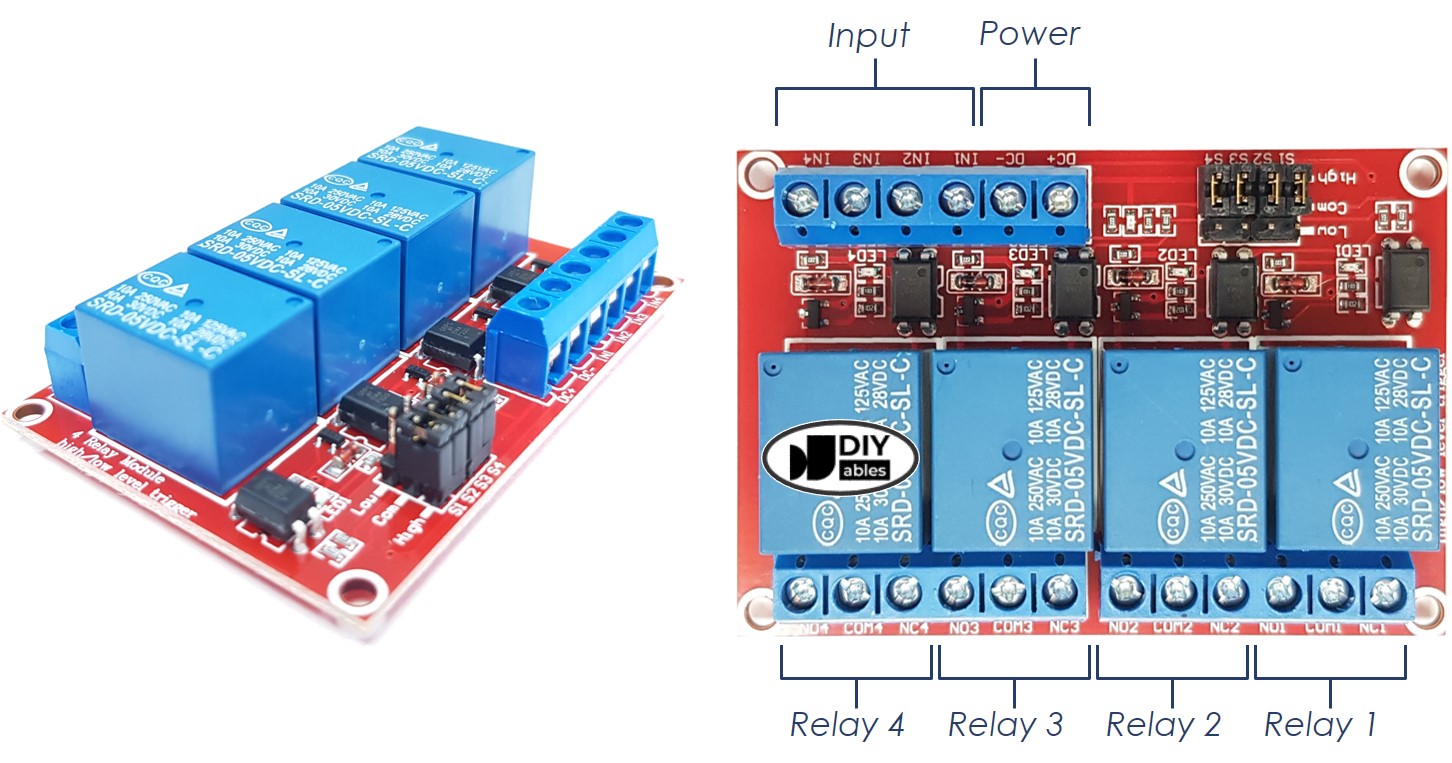
Power Pins:
- DC+: Connect to 5V power supply (external adapter recommended)
- DC-: Connect to GND of power supply and ESP32 S3 GND
Signal Pins (Control):
- IN1: Control signal from ESP32 S3 for relay 1
- IN2: Control signal from ESP32 S3 for relay 2
- IN3: Control signal from ESP32 S3 for relay 3
- IN4: Control signal from ESP32 S3 for relay 4
Output Pins (High-Voltage Connections):
- NC1, NO1, COM1: Relay 1 output (Normally Closed, Normally Open, Common)
- NC2, NO2, COM2: Relay 2 output (Normally Closed, Normally Open, Common)
- NC3, NO3, COM3: Relay 3 output (Normally Closed, Normally Open, Common)
- NC4, NO4, COM4: Relay 4 output (Normally Closed, Normally Open, Common)
To learn about connecting a relay to high-voltage devices and understanding the distinctions between normally closed and normally open, check out the ESP32 S3 - Relay tutorial.
Additionally, the tutorial covers the 4 jumpers available on the relay module, which enable you to individually select between low trigger and high trigger settings for each relay.
Wiring Diagram
Connect your ESP32 S3 to the 4-channel relay module using the wiring guide below, keeping all high-voltage connections away from the low-voltage control side. Always verify every connection before applying power to avoid damaging your components.
Safety Notes
Never power the 4-channel relay module directly from the ESP32 S3 5V pin — the relay module draws more current than the pin can safely supply. Use a dedicated external 5V power adapter for the relay module, a separate 5V source for the ESP32 S3, and an appropriate high-voltage supply for the controlled devices. Keep high-voltage wiring physically separated from low-voltage control wiring at all times.
Power Supply Configuration:
You'll need multiple power sources for this project:
- 5V power adapter for the ESP32 S3 (via USB or power jack)
- 5V power adapter for the 4-channel relay module
- High-voltage power source (12VDC, 24VDC, 120VAC, 220VAC, etc.) for the controlled devices
Wiring Diagram (Three Power Sources):
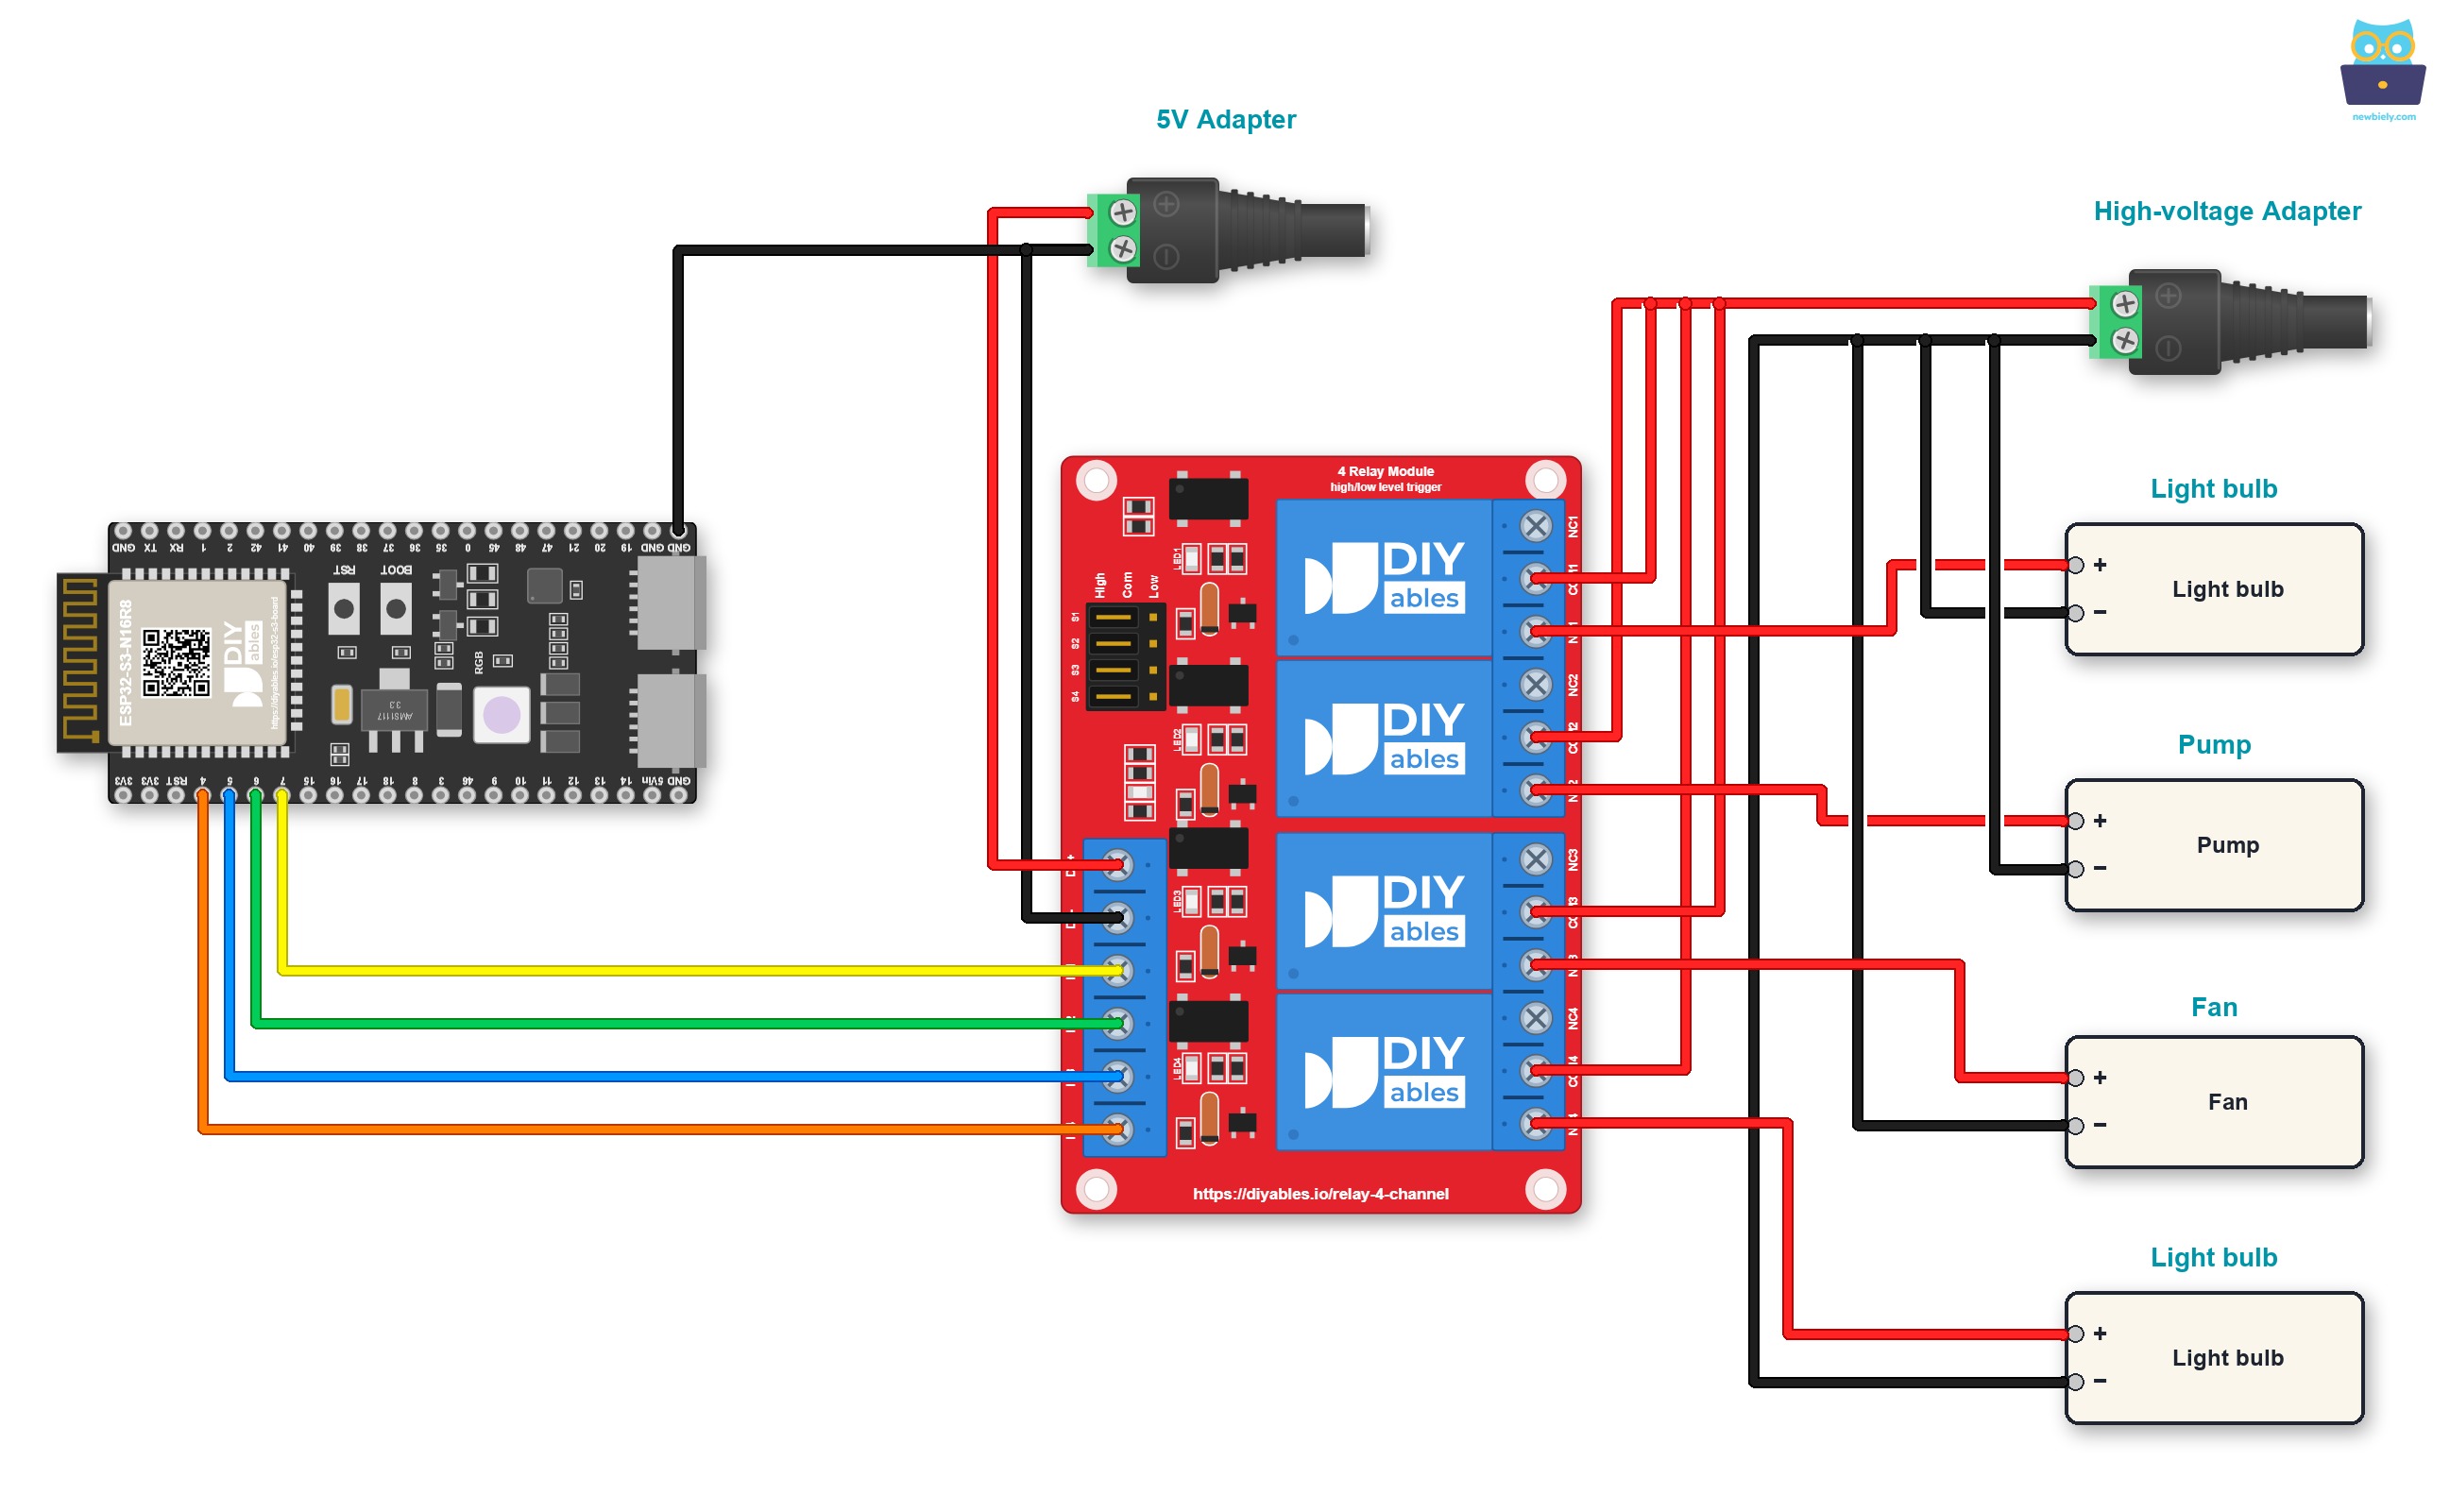
This image is created using Fritzing. Click to enlarge image
| 4-Channel Relay Module | ESP32 S3 |
|---|---|
| DC+ | External 5V Power Supply (+) |
| DC- | External 5V Power Supply (-) AND ESP32 GND |
| IN1 | GPIO7 |
| IN2 | GPIO6 |
| IN3 | GPIO5 |
| IN4 | GPIO4 |
Jumper wires are good for a quick test, but not for a final build. The ESP32 S3 fits a Screw Terminal Block for ESP32 S3, which turns every pin into a screw terminal. Each wire goes to the screw terminal of the same pin, as in the image below.
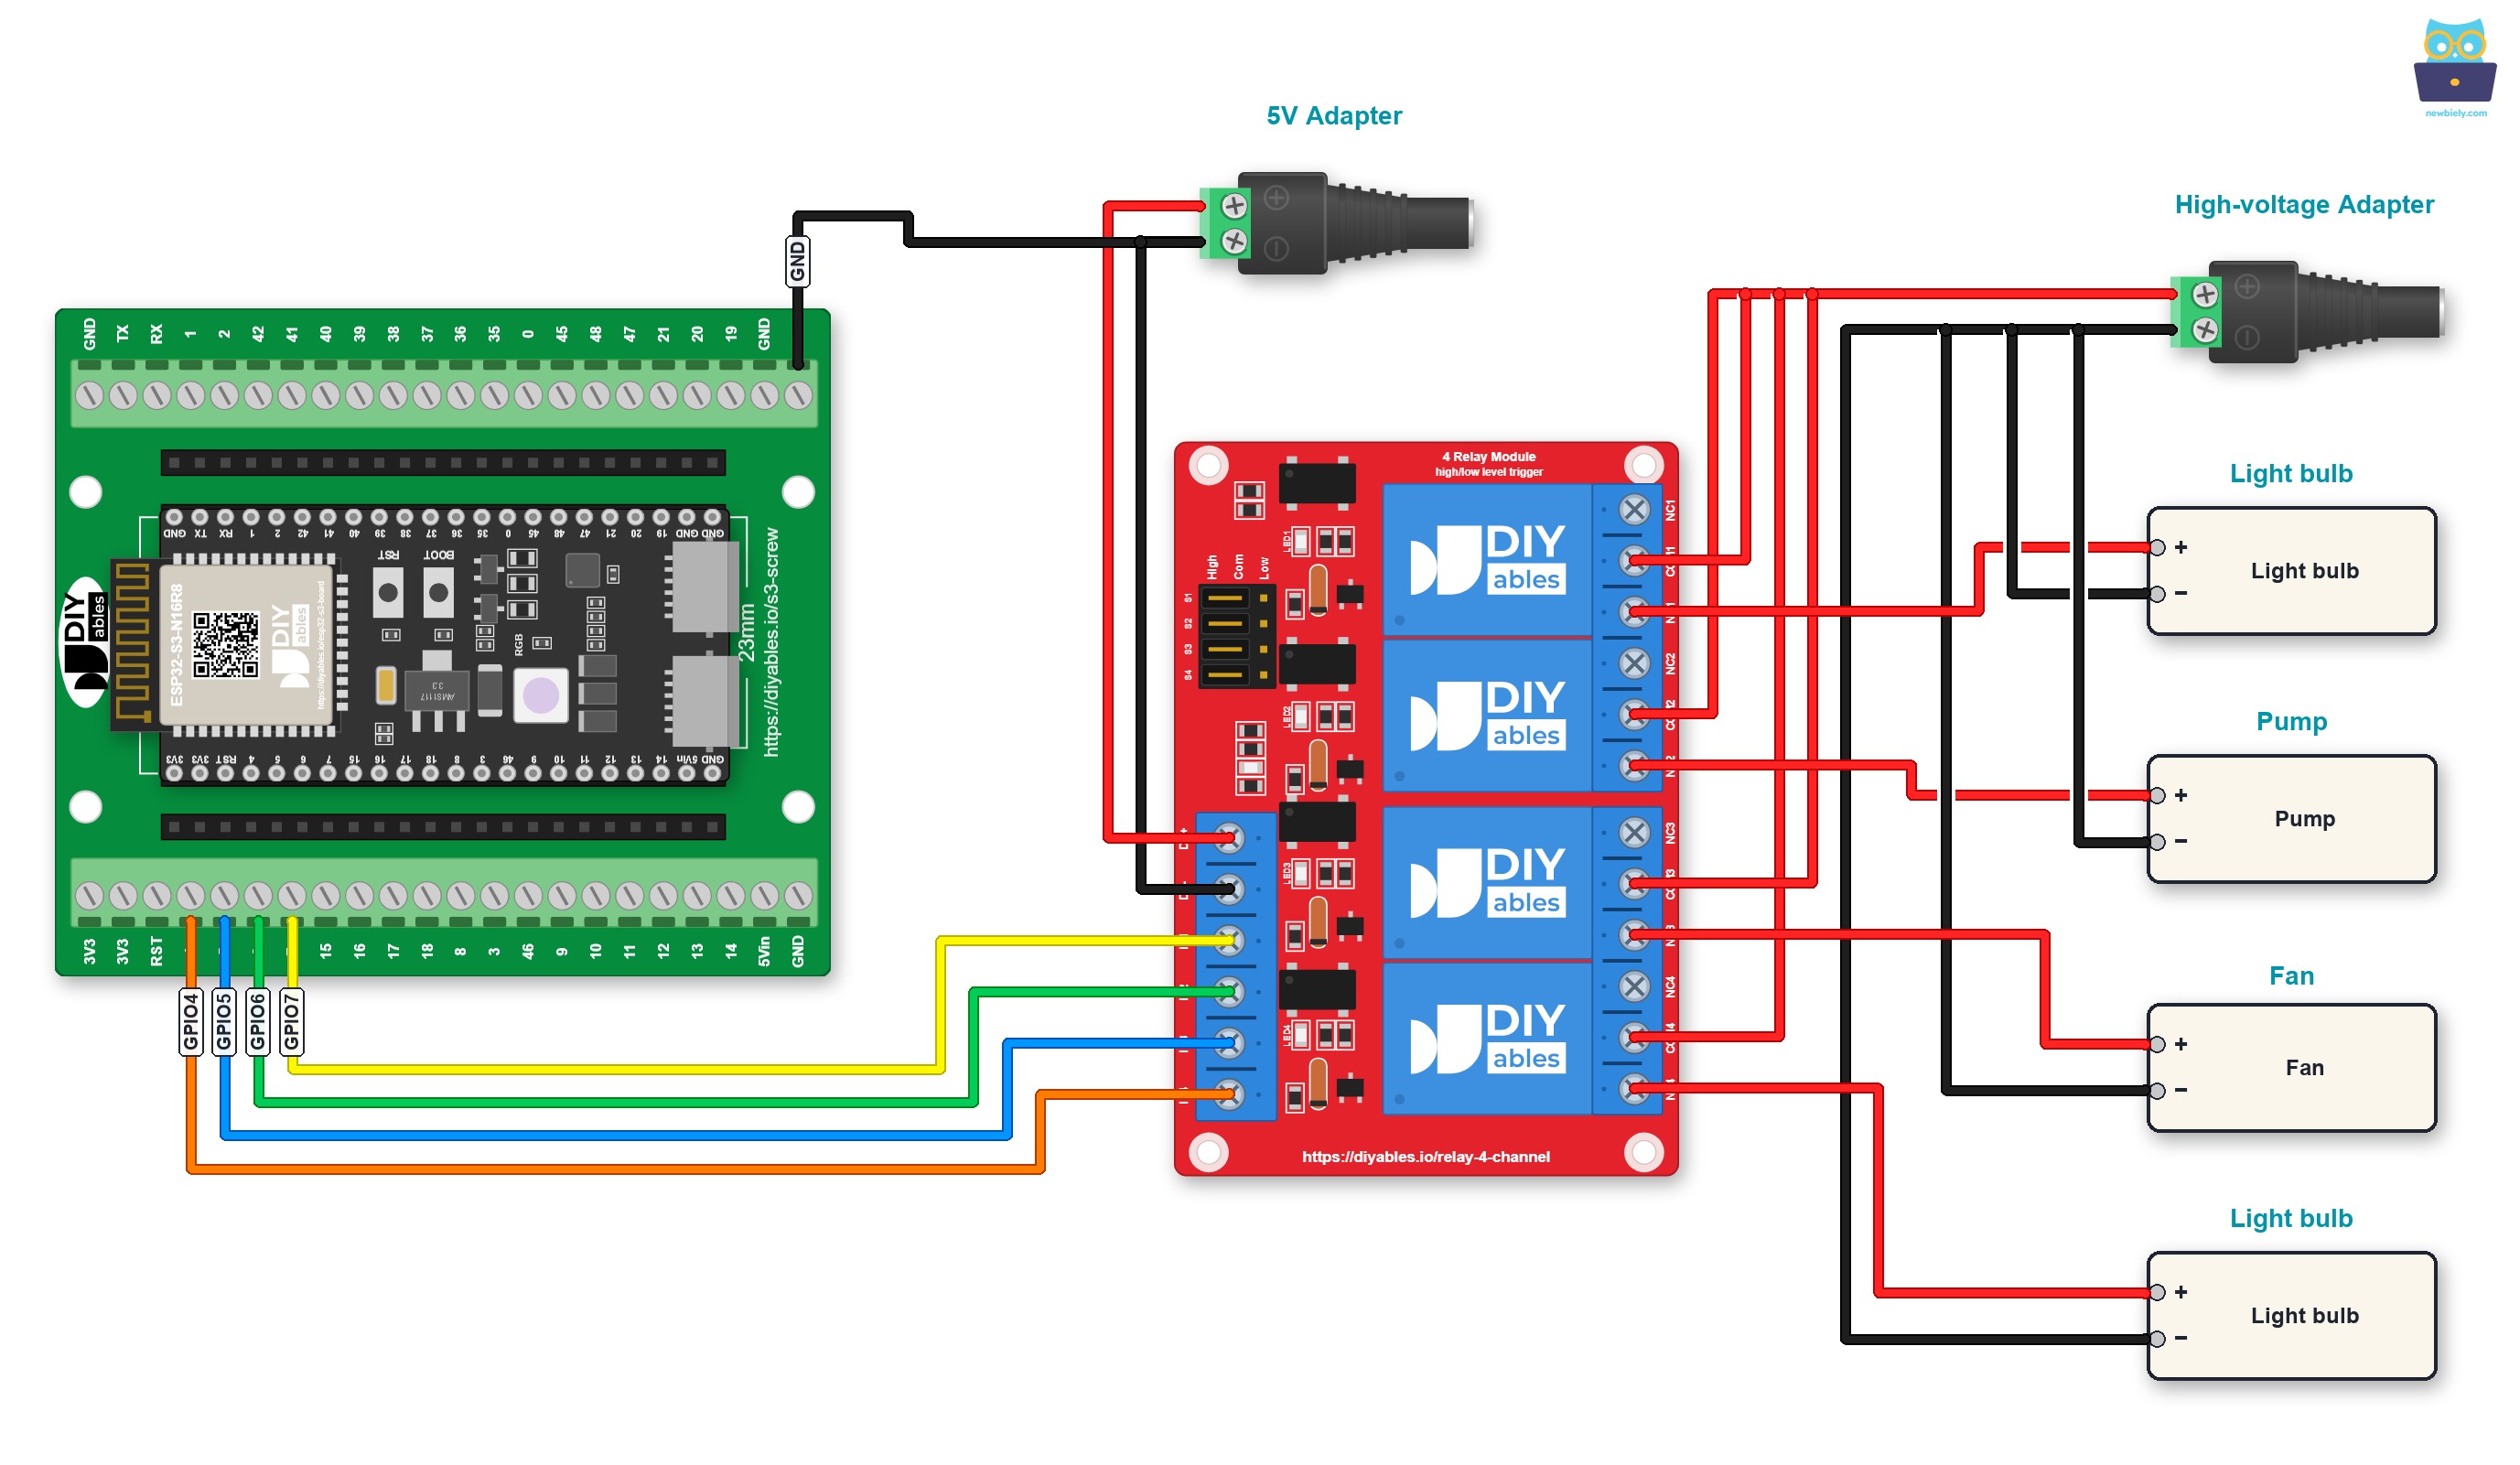
This image is created using Fritzing. Click to enlarge image
A GPIO Breakout Board for ESP32 S3 works too. Besides one S, 3.3V and GND pin for each GPIO, it has extra 3.3V and 5V pins:
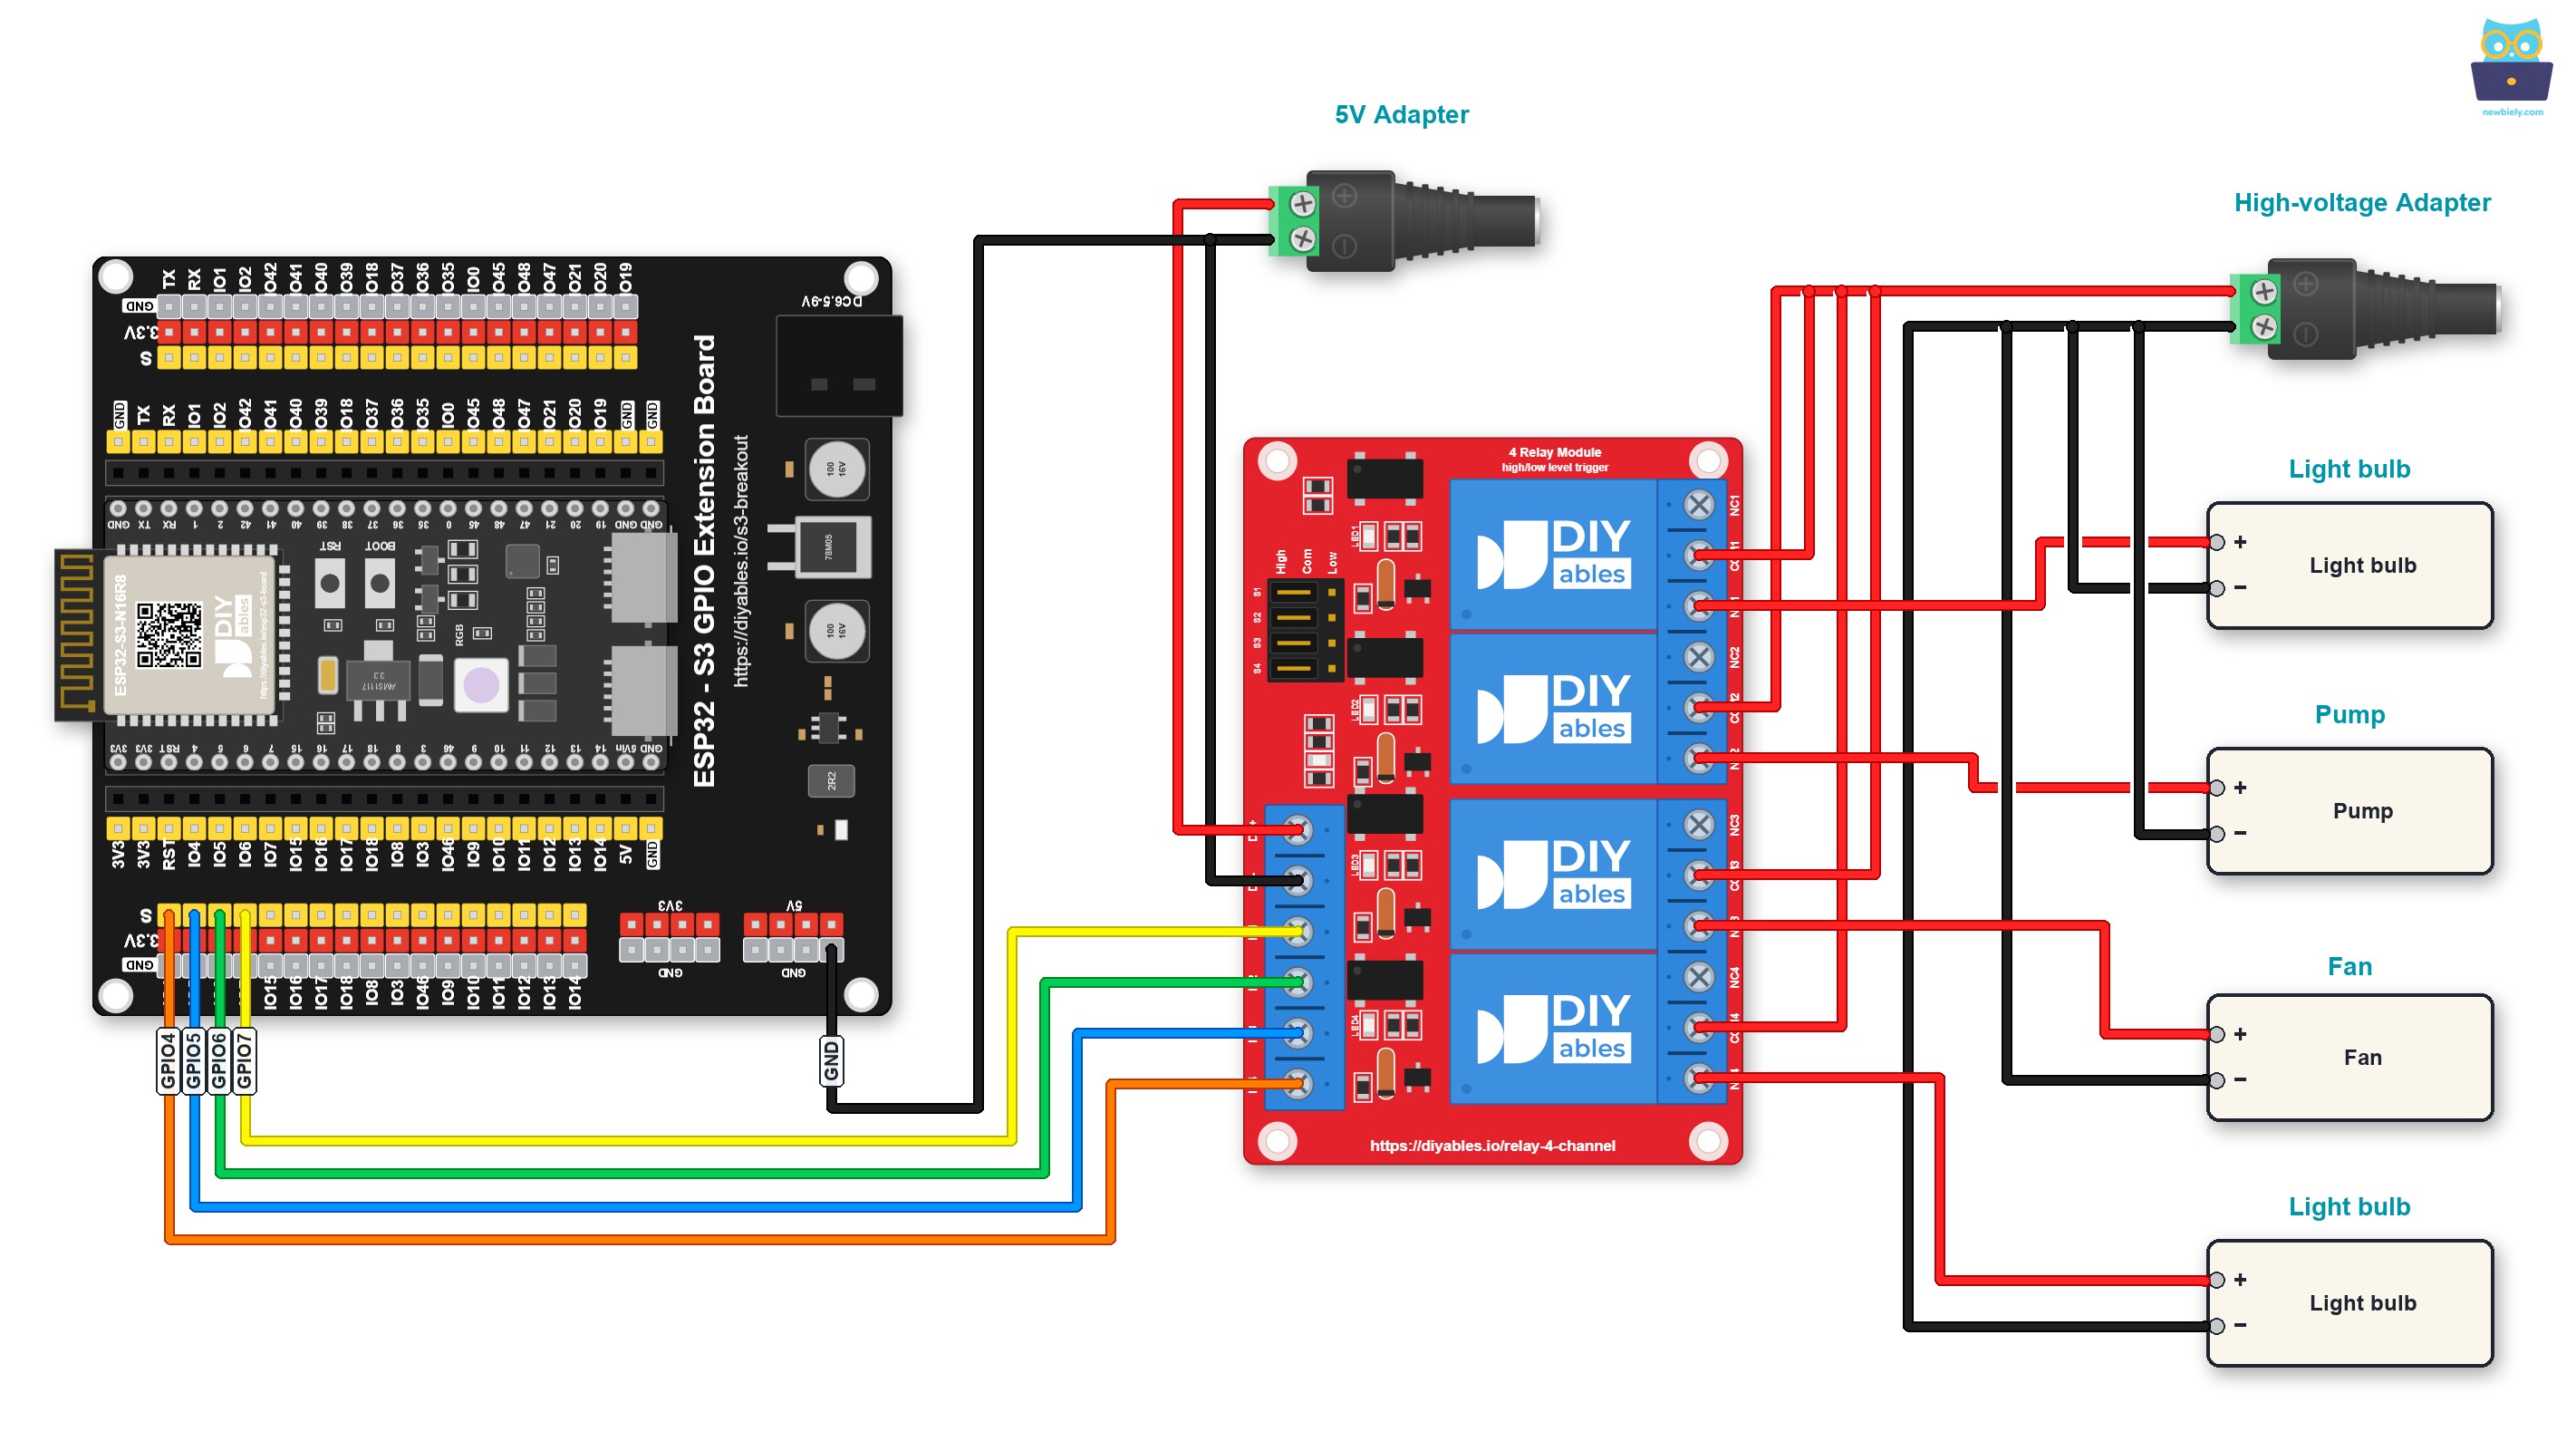
This image is created using Fritzing. Click to enlarge image
Simplified Wiring (Two Power Sources):
You can reduce the number of adapters by using one 5V power source for both the ESP32 S3 and the 4-channel relay module:
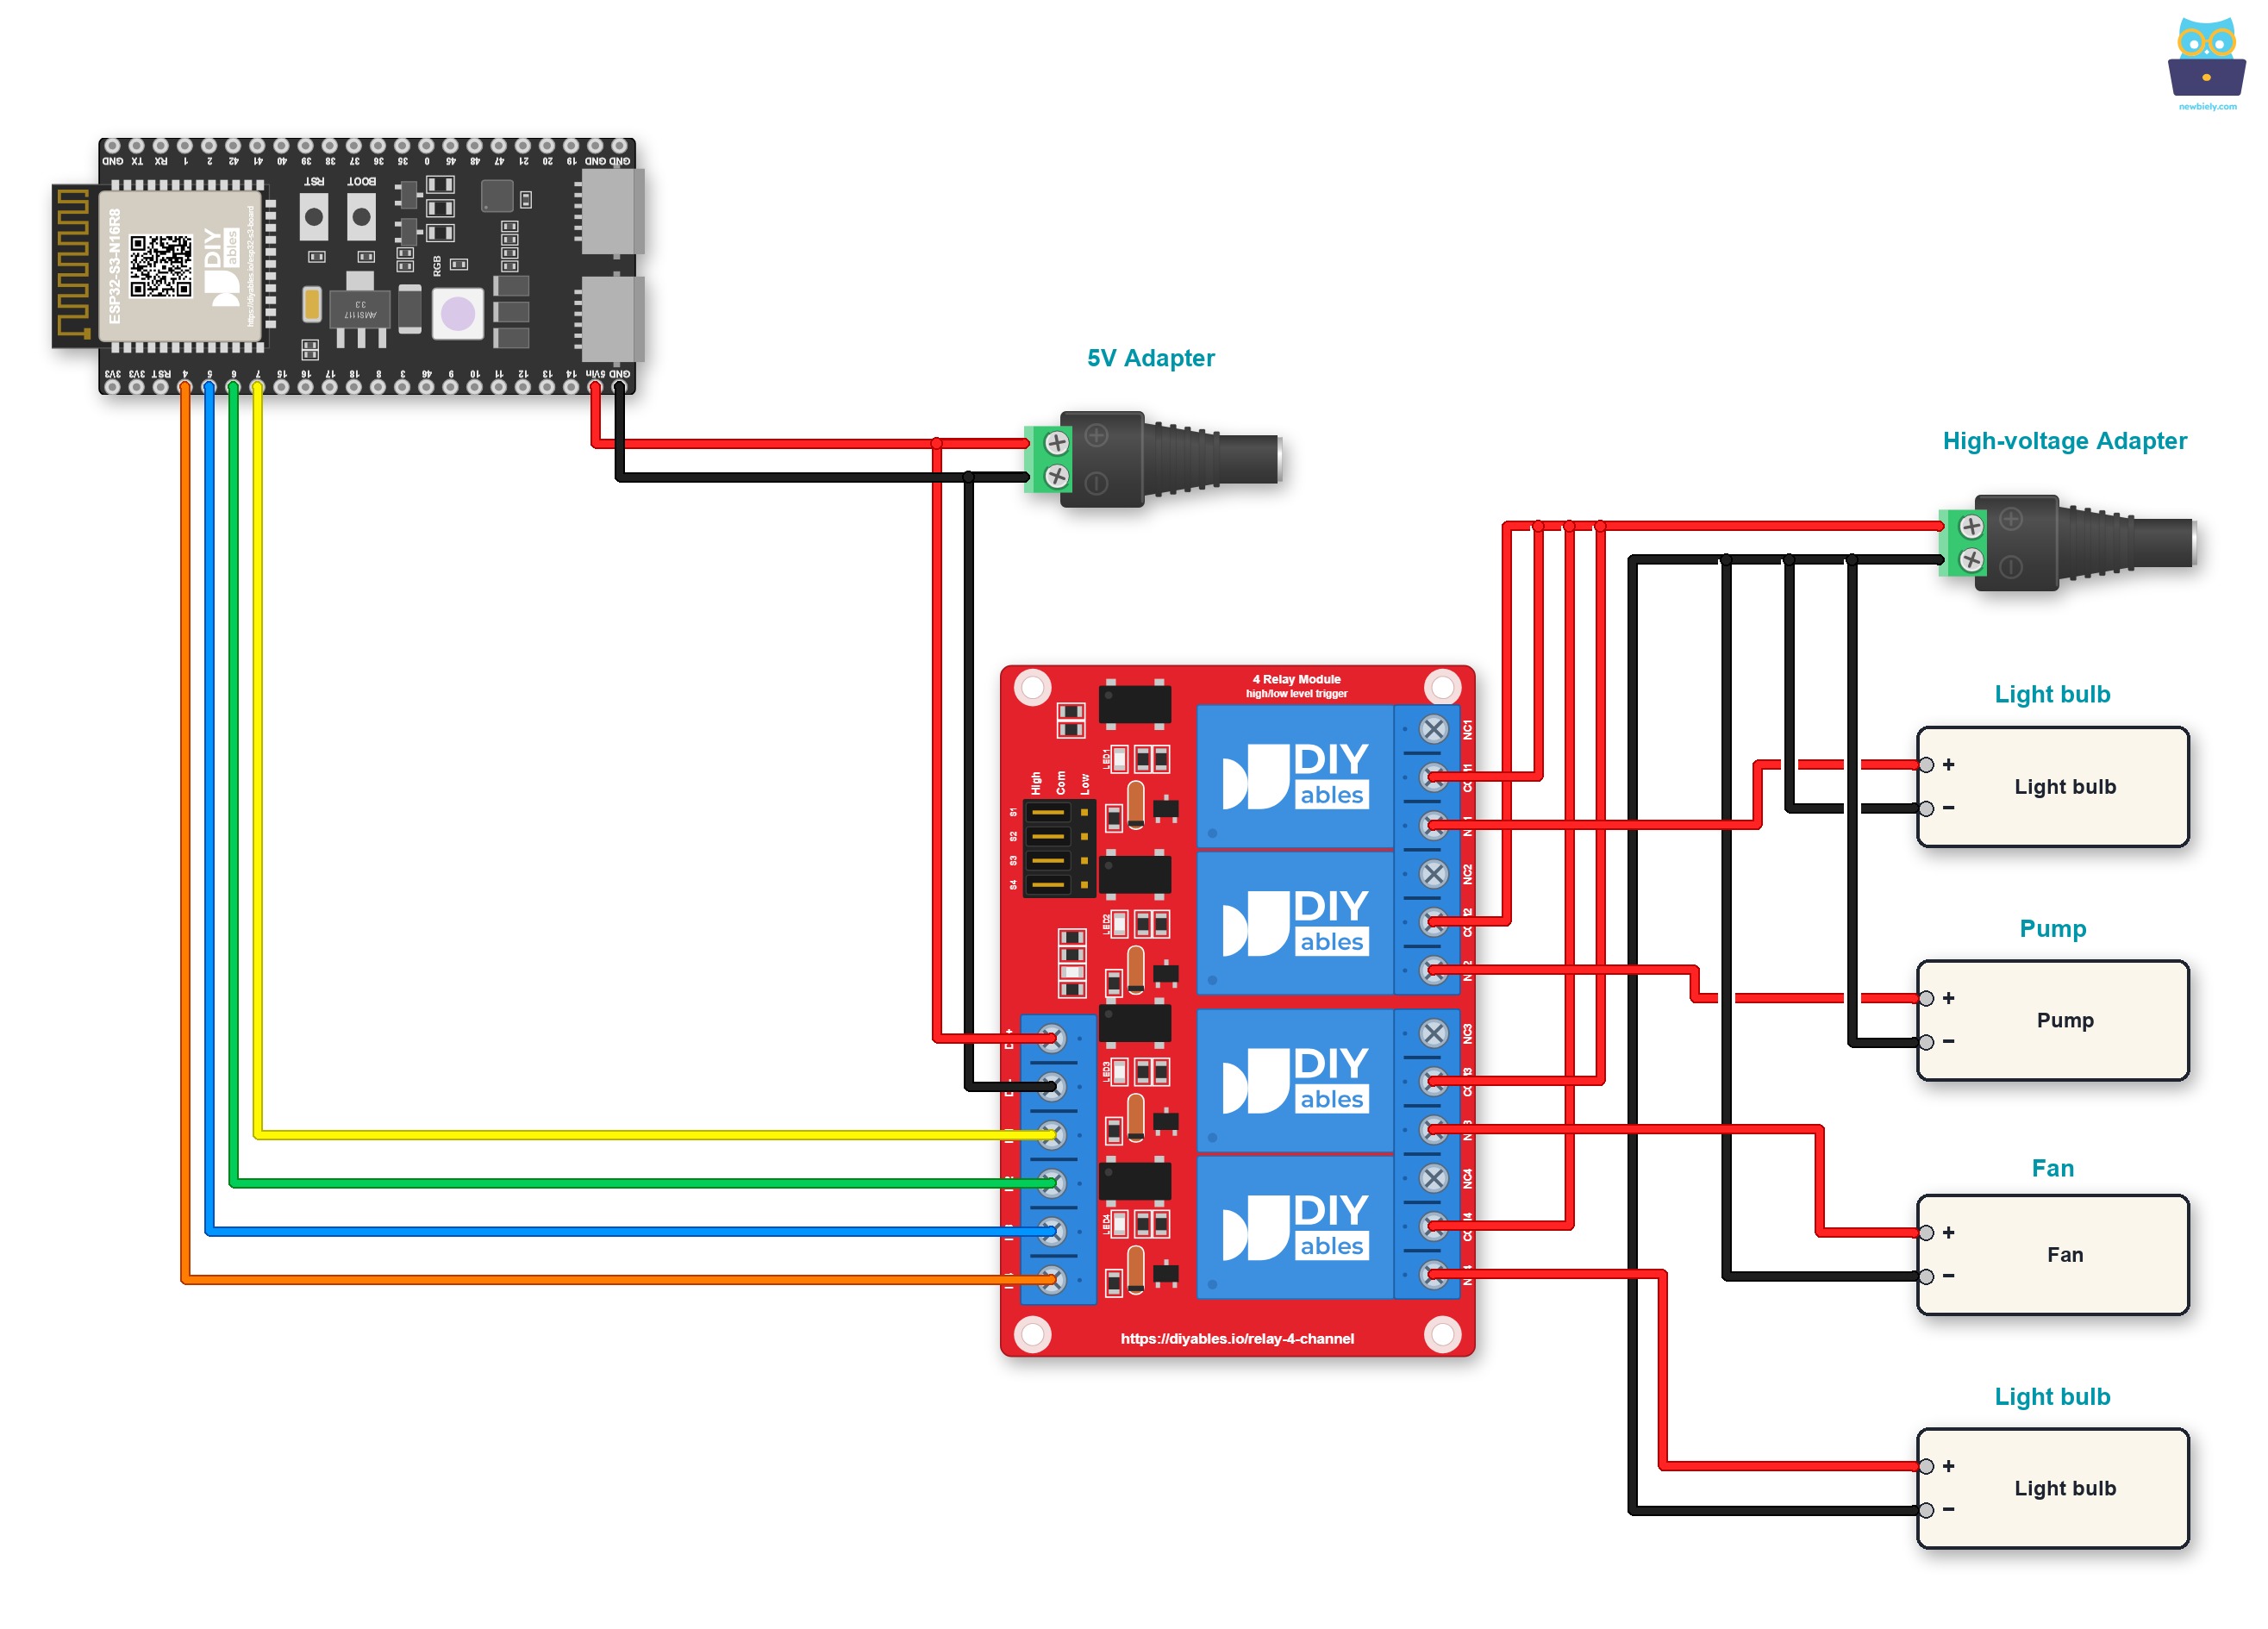
This image is created using Fritzing. Click to enlarge image
※ NOTE THAT:
If the four devices that are managed by a 4-channel relay module have the same voltage, then one high-voltage power adapter can be used for all of them. However, if the voltage is different for each device, then separate high-voltage power adapters must be used.
How To Program For 4-Channel Relay Module
Programming the ESP32 S3 to control a 4-channel relay module uses straightforward digital output commands available in the Arduino IDE. The following code configures four GPIO pins as outputs, then cycles all four relays ON and OFF in sequence while printing status messages to the Serial Monitor for easy debugging.
The code performs these tasks:
- Configures ESP32 S3 pins as digital outputs for relay control
- Turns all four relays ON and OFF in sequence
- Provides serial feedback for monitoring relay states
- Creates a 2-second delay between state changes
Set pins to output mode:
Control relay states:
ESP32 S3 Code
Detailed Instructions
- New to ESP32 S3? Complete our Getting Started with ESP32 S3 guide first.
- Wire the Components: Connect the ESP32 S3 and 4-channel relay module according to the wiring diagram above.
- Connect ESP32 S3: Plug the ESP32 S3 into your computer using a USB Type-C cable.
- Open Arduino IDE: Launch the Arduino IDE software on your computer.
- Select Board and Port: Choose ESP32 S3 as the board and select the correct COM port.
- Copy the Code: Copy the provided code and paste it into Arduino IDE.
- Upload the Code: Click the Upload button to transfer the code to your ESP32 S3.
- Listen for Clicks: You should hear the relays clicking as they switch ON and OFF.
- Check Serial Monitor: Open the Serial Monitor (baud rate 115200) to view the relay status messages.
- Pro Tip: Label each relay channel and its connected device to avoid confusion as your project grows in complexity.
Serial Monitor Output
Applications and Project Ideas
The ESP32 S3 paired with a 4-channel relay module opens the door to a wide range of automation and IoT projects where multiple high-voltage devices need independent control.
- Home Automation System: Control lights, fans, heaters, and appliances remotely via Wi-Fi.
- Greenhouse Controller: Automate irrigation pumps, grow lights, ventilation fans, and heating systems on a schedule.
- Aquarium Manager: Control filter pumps, air pumps, lights, and heaters with programmable timers.
- Smart Garage: Operate a door opener, lighting, ventilation fan, and security system from one board.
- Tutorial Automation: Control power tools, dust collection, lighting, and equipment with a single controller.
- Energy Management: Schedule high-power devices to run during off-peak hours to reduce electricity costs.
Video Tutorial
Watch the step-by-step video walkthrough for this ESP32 S3 project below.
Challenge Yourself
Now that you have four relay channels under ESP32 S3 control, push your skills further with these practical challenges that range from simple timing tweaks to full smart-home integration.
- Beginner: Modify the code to control each relay independently with different timing patterns.
- Beginner: Add button inputs to manually toggle each relay channel on demand.
- Intermediate: Create a web interface to control all four relays from your smartphone browser.
- Intermediate: Implement scheduled automation that turns relays ON and OFF at specific times of day.
- Advanced: Build a voice-controlled system using MQTT and Alexa or Google Home integration.
- Advanced: Add current sensors to each relay output to monitor the power consumption of every controlled device.