
ESP32 S3 - Temperature Sensor - OLED
Learn how to connect a DS18B20 one-wire temperature sensor to an ESP32 S3 and display live temperature readings on an SSD1306 OLED screen. This tutorial walks you through every step, from wiring the hardware to uploading the finished code, so you can see real temperature data on a crisp OLED display in minutes.
What you'll build:
- A circuit connecting the DS18B20 sensor and SSD1306 OLED to the ESP32 S3
- Firmware that reads temperature in Celsius and Fahrenheit from the DS18B20 one-wire sensor
- An OLED display that updates in real time, showing temperature centered on screen
- A foundation you can extend into weather stations, data loggers, and smart home displays
https://newbiely.com/images/cover/esp32-s3-temperature-sensor-oled-display.jpg
Hardware Preparation
Or you can buy the following kits:
| 1 | × | DIYables ESP32 S3 Starter Kit (ESP32 S3 included) | |
| 1 | × | DIYables Sensor Kit (18 sensors/displays) |
Additionally, some of these links are for products from our own brand, DIYables .
Buy Note: Many DS18B20 sensors available in the market are unreliable. We strongly recommend buying the sensor from the DIYables brand using the link provided above. We tested it, and it worked reliably.
Buy Note: If you want a bigger OLED display, use the 2.42 inch OLED Display 128x64 .
Overview of OLED and DS18B20 Temperature Sensor
The SSD1306 OLED and the DS18B20 one-wire temperature sensor are two of the most widely used components in ESP32 S3 projects because both are inexpensive, easy to wire, and well supported by mature Arduino libraries. The OLED communicates over I2C using just two signal wires, while the DS18B20 uses a single data line with a pull-up resistor and supports reading multiple sensors on the same wire. If you want a deeper understanding of either component before continuing, the dedicated tutorials below cover pinouts, operating principles, and standalone code examples in full.
Key References
Wiring Diagram
Connecting the ESP32 S3 to both the DS18B20 sensor and the OLED display requires only a handful of jumper wires because the OLED uses I2C and the sensor uses a single data line. Using a DS18B20 module that includes a built-in adapter board is strongly recommended, since the adapter's onboard resistor eliminates the need to add a separate 4.7 kΩ pull-up resistor to your breadboard.
Safety Notes
Always power the SSD1306 OLED from the 3.3 V rail of the ESP32 S3 — applying 5 V directly to a 3.3 V-only display will damage it permanently. The DS18B20 is tolerant of both 3.3 V and 5 V, but using 3.3 V keeps everything on a single supply rail and avoids any level-shifting concern. If you are using the raw DS18B20 sensor without an adapter, place a 4.7 kΩ resistor between the DATA pin and VCC; without it the one-wire bus will not function reliably.
- How to connect ESP32 S3 with temperature sensor and OLED using breadboard
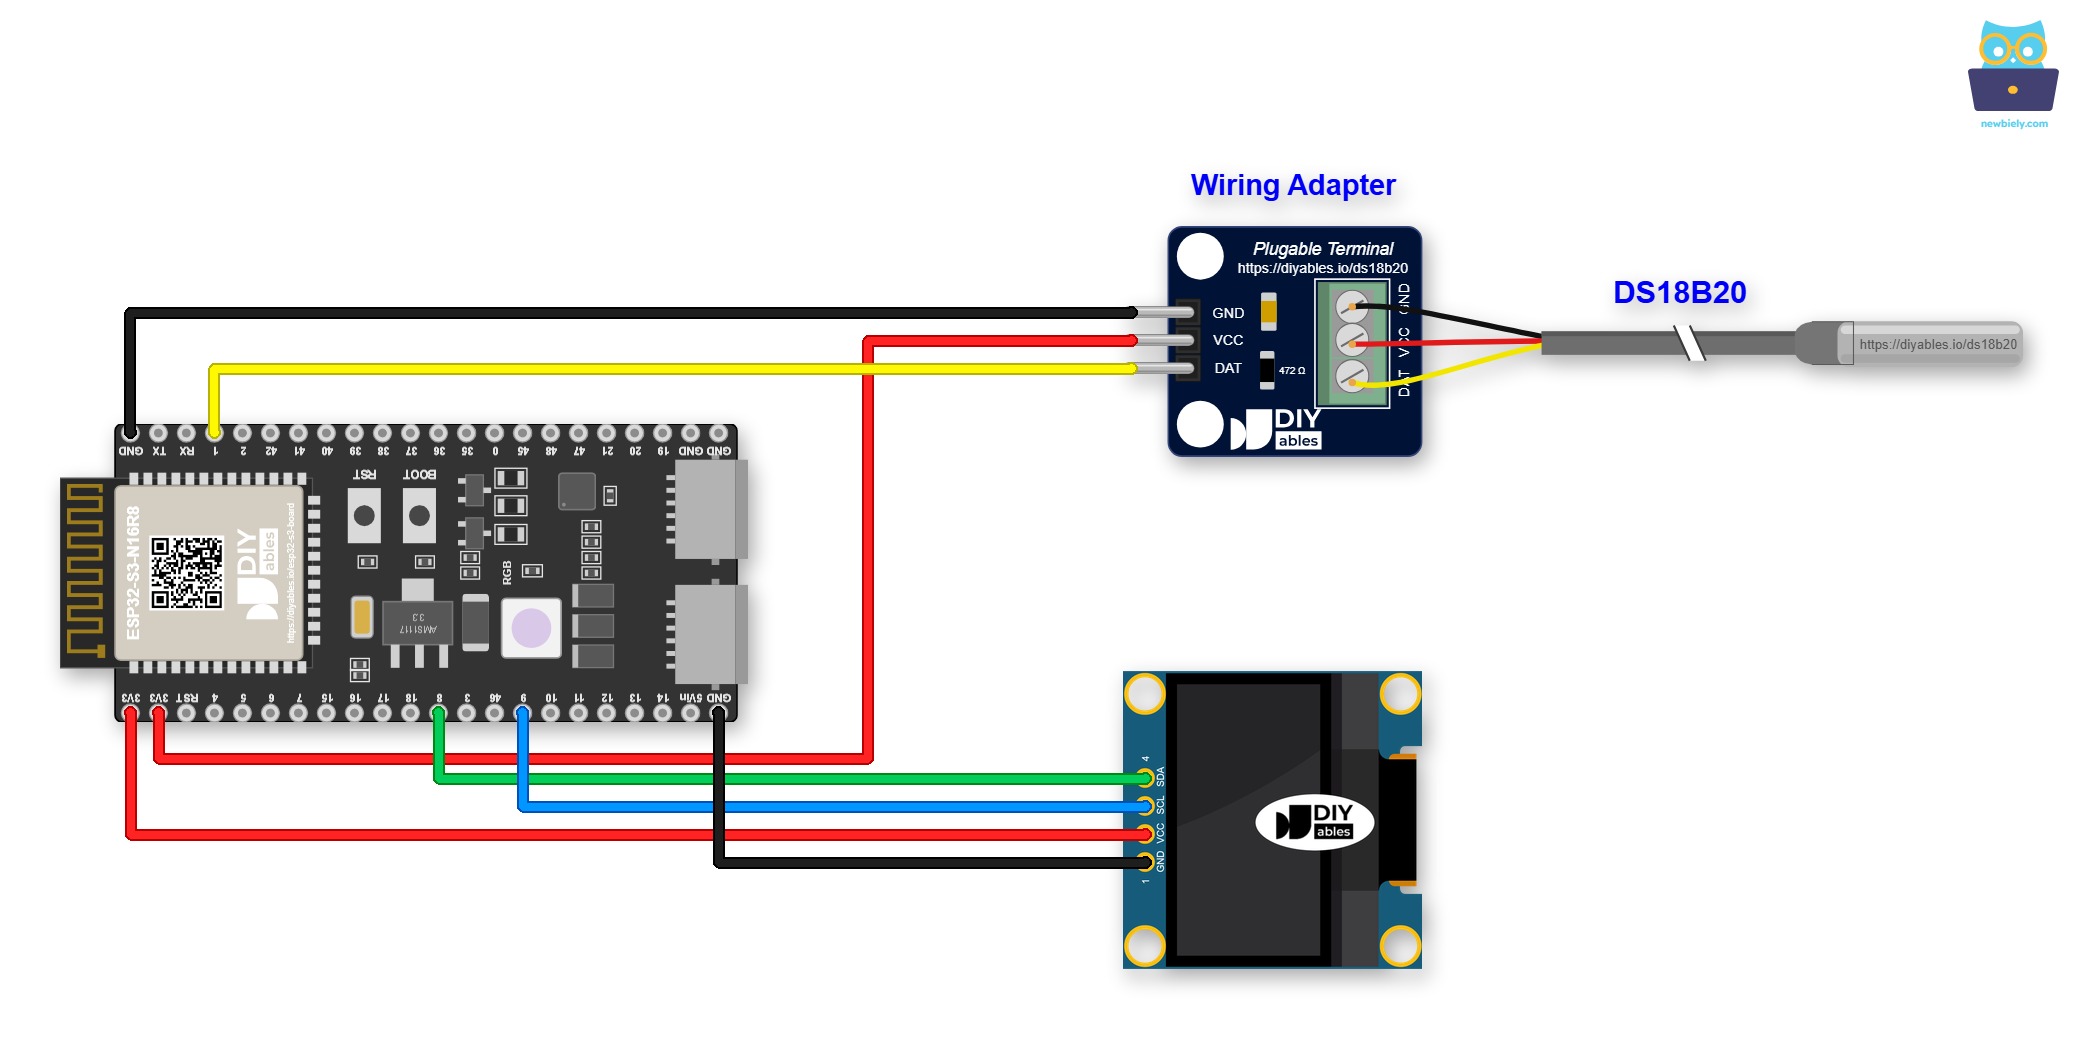
This image is created using Fritzing. Click to enlarge image
If you plan to keep this circuit, think about screw terminals. Put the ESP32 S3 on a Screw Terminal Block for ESP32 S3, then tighten each wire under a screw. Below is the wiring diagram with the screw terminal board.
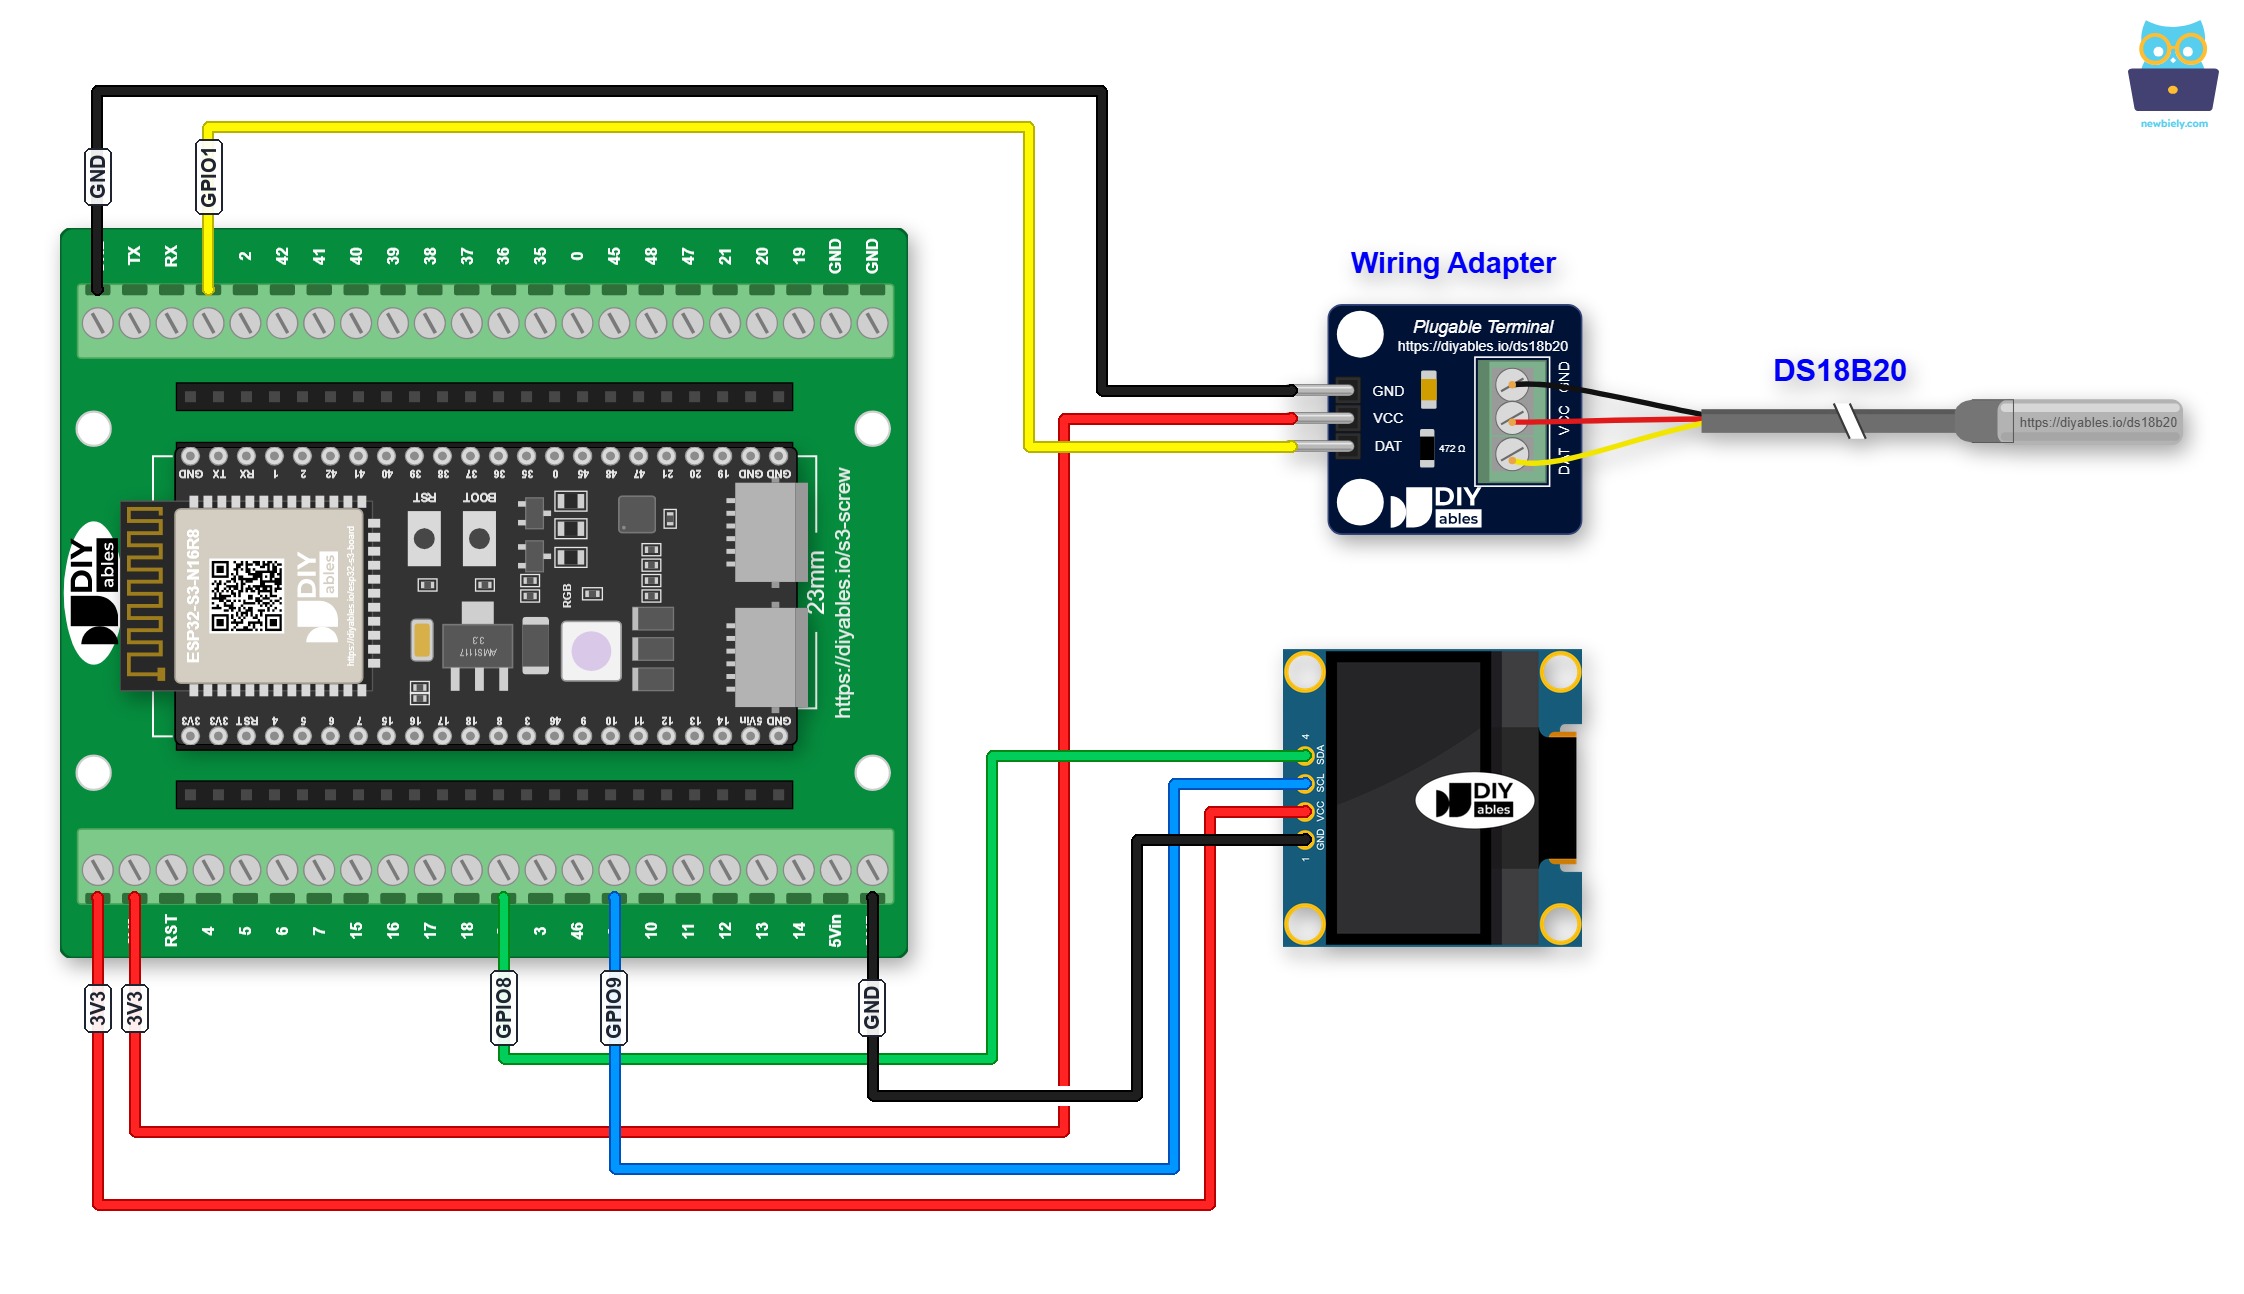
This image is created using Fritzing. Click to enlarge image
Another choice is a GPIO Breakout Board for ESP32 S3. Each GPIO has a signal pin with 3.3V and GND pins next to it, as shown below:
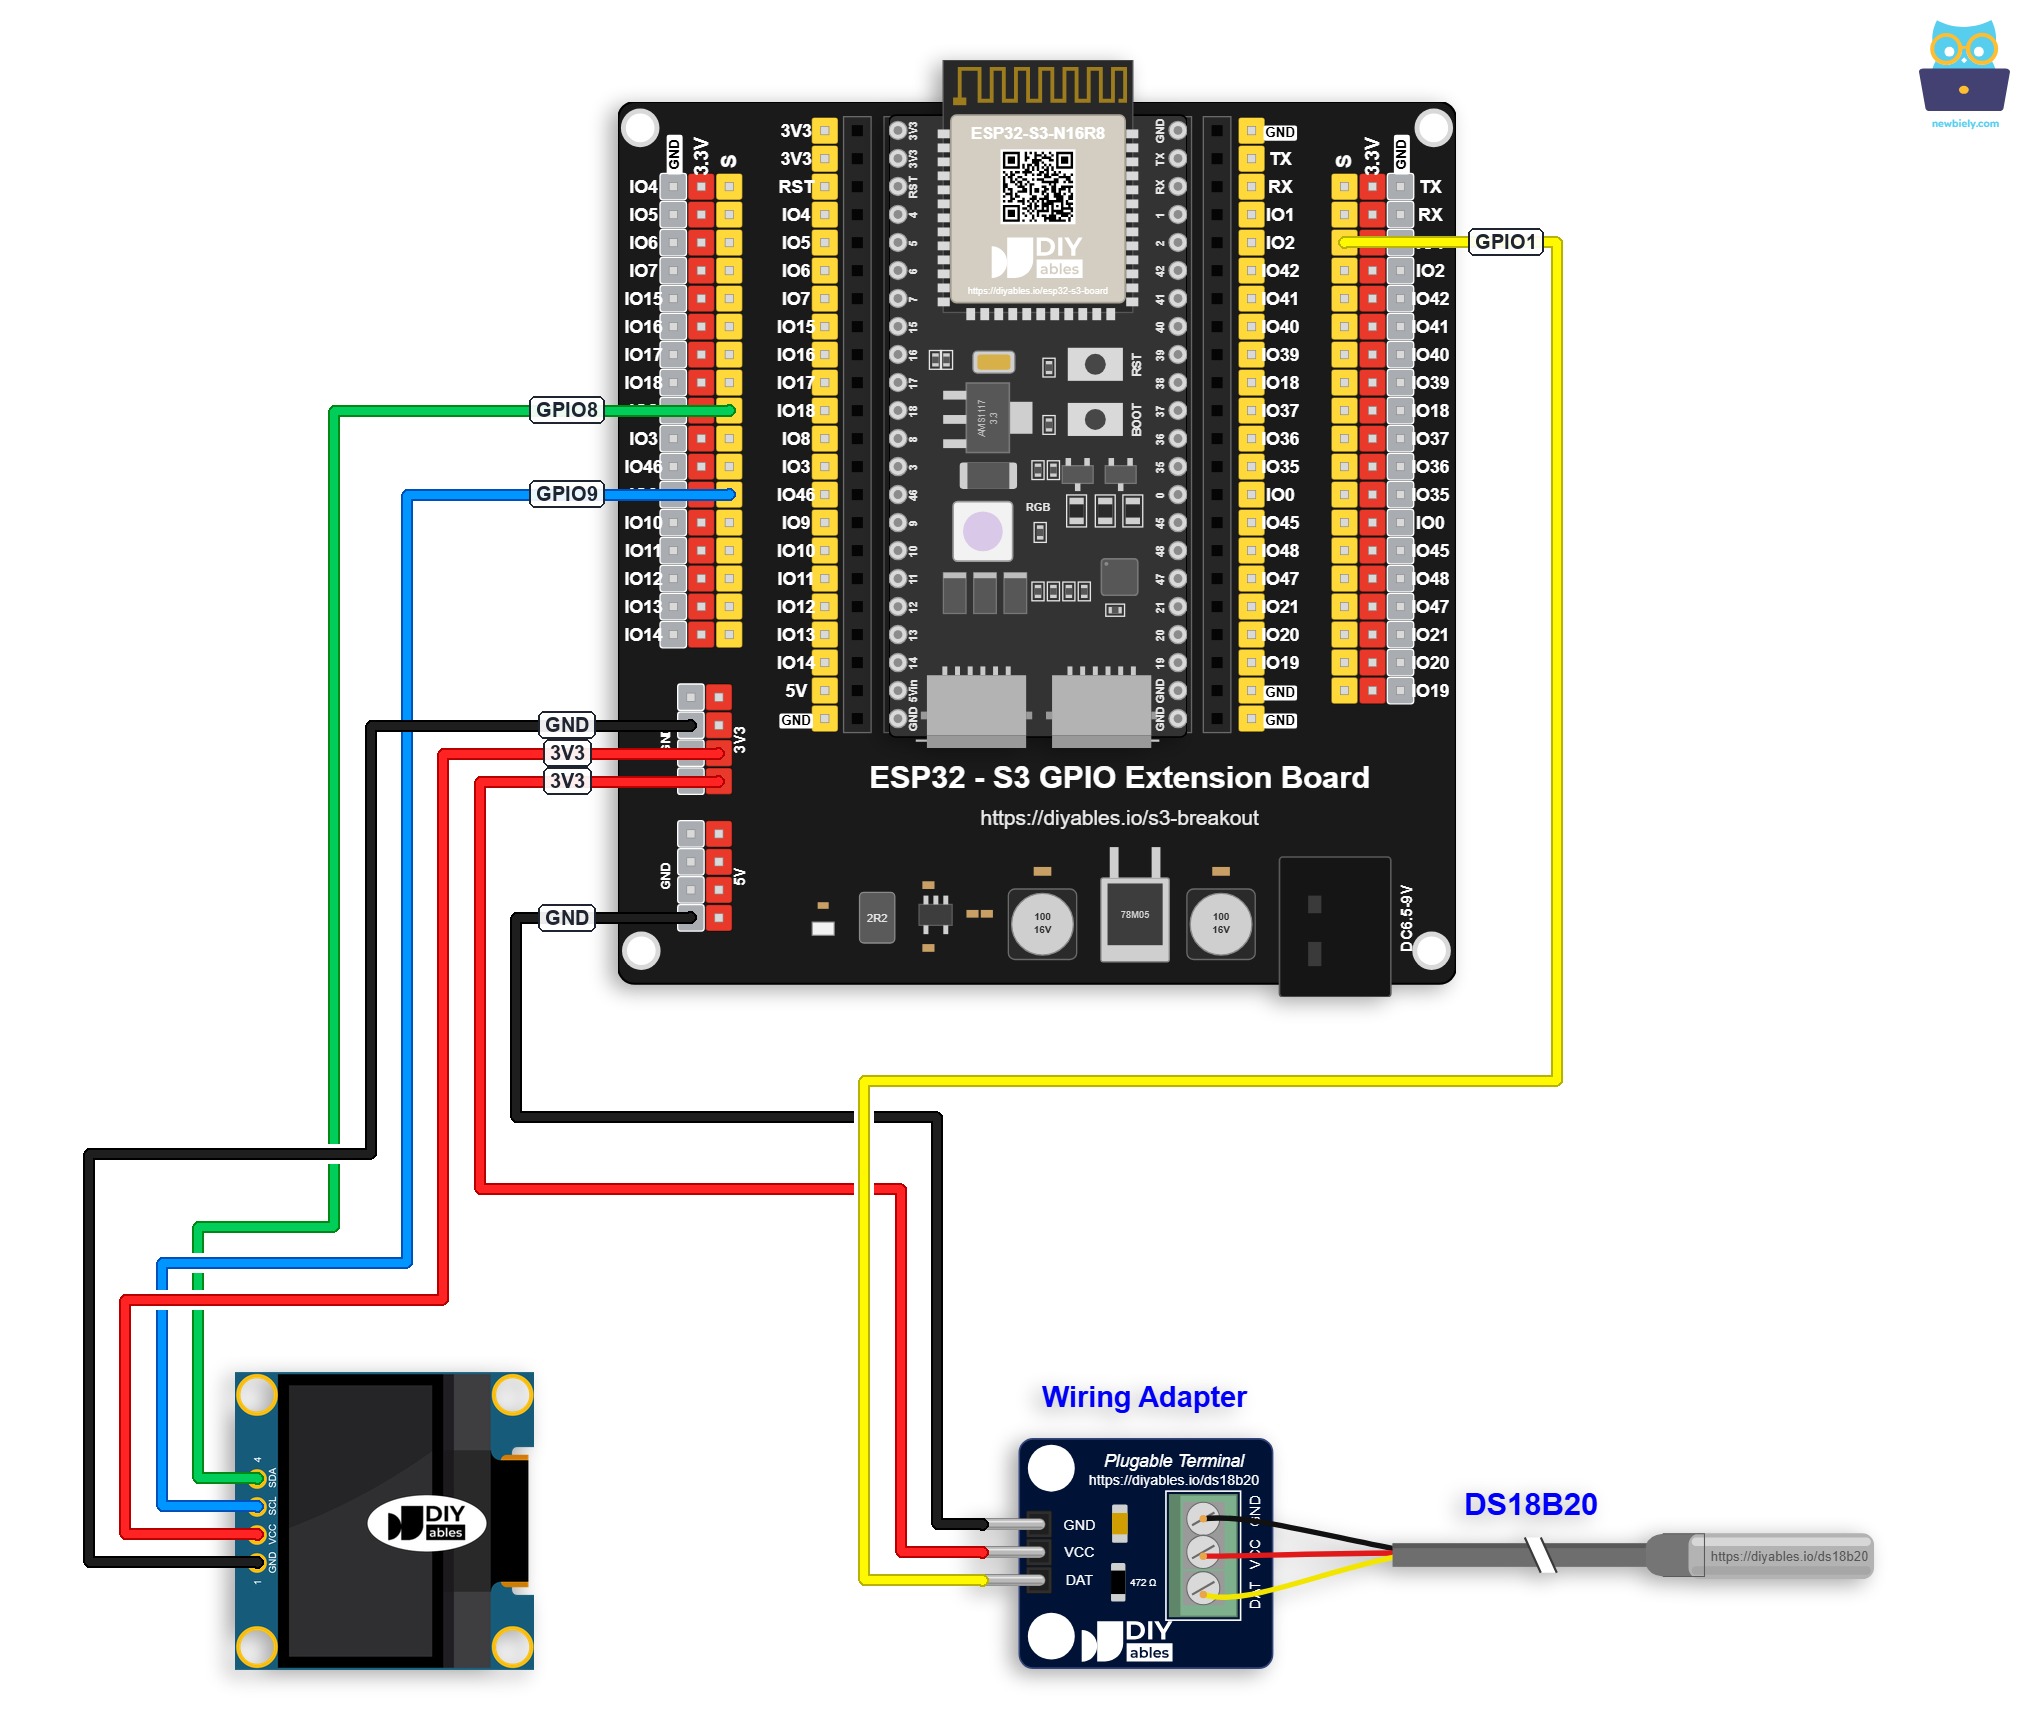
This image is created using Fritzing. Click to enlarge image
- How to connect ESP32 S3 with temperature sensor and OLED using screw terminal block breakout board
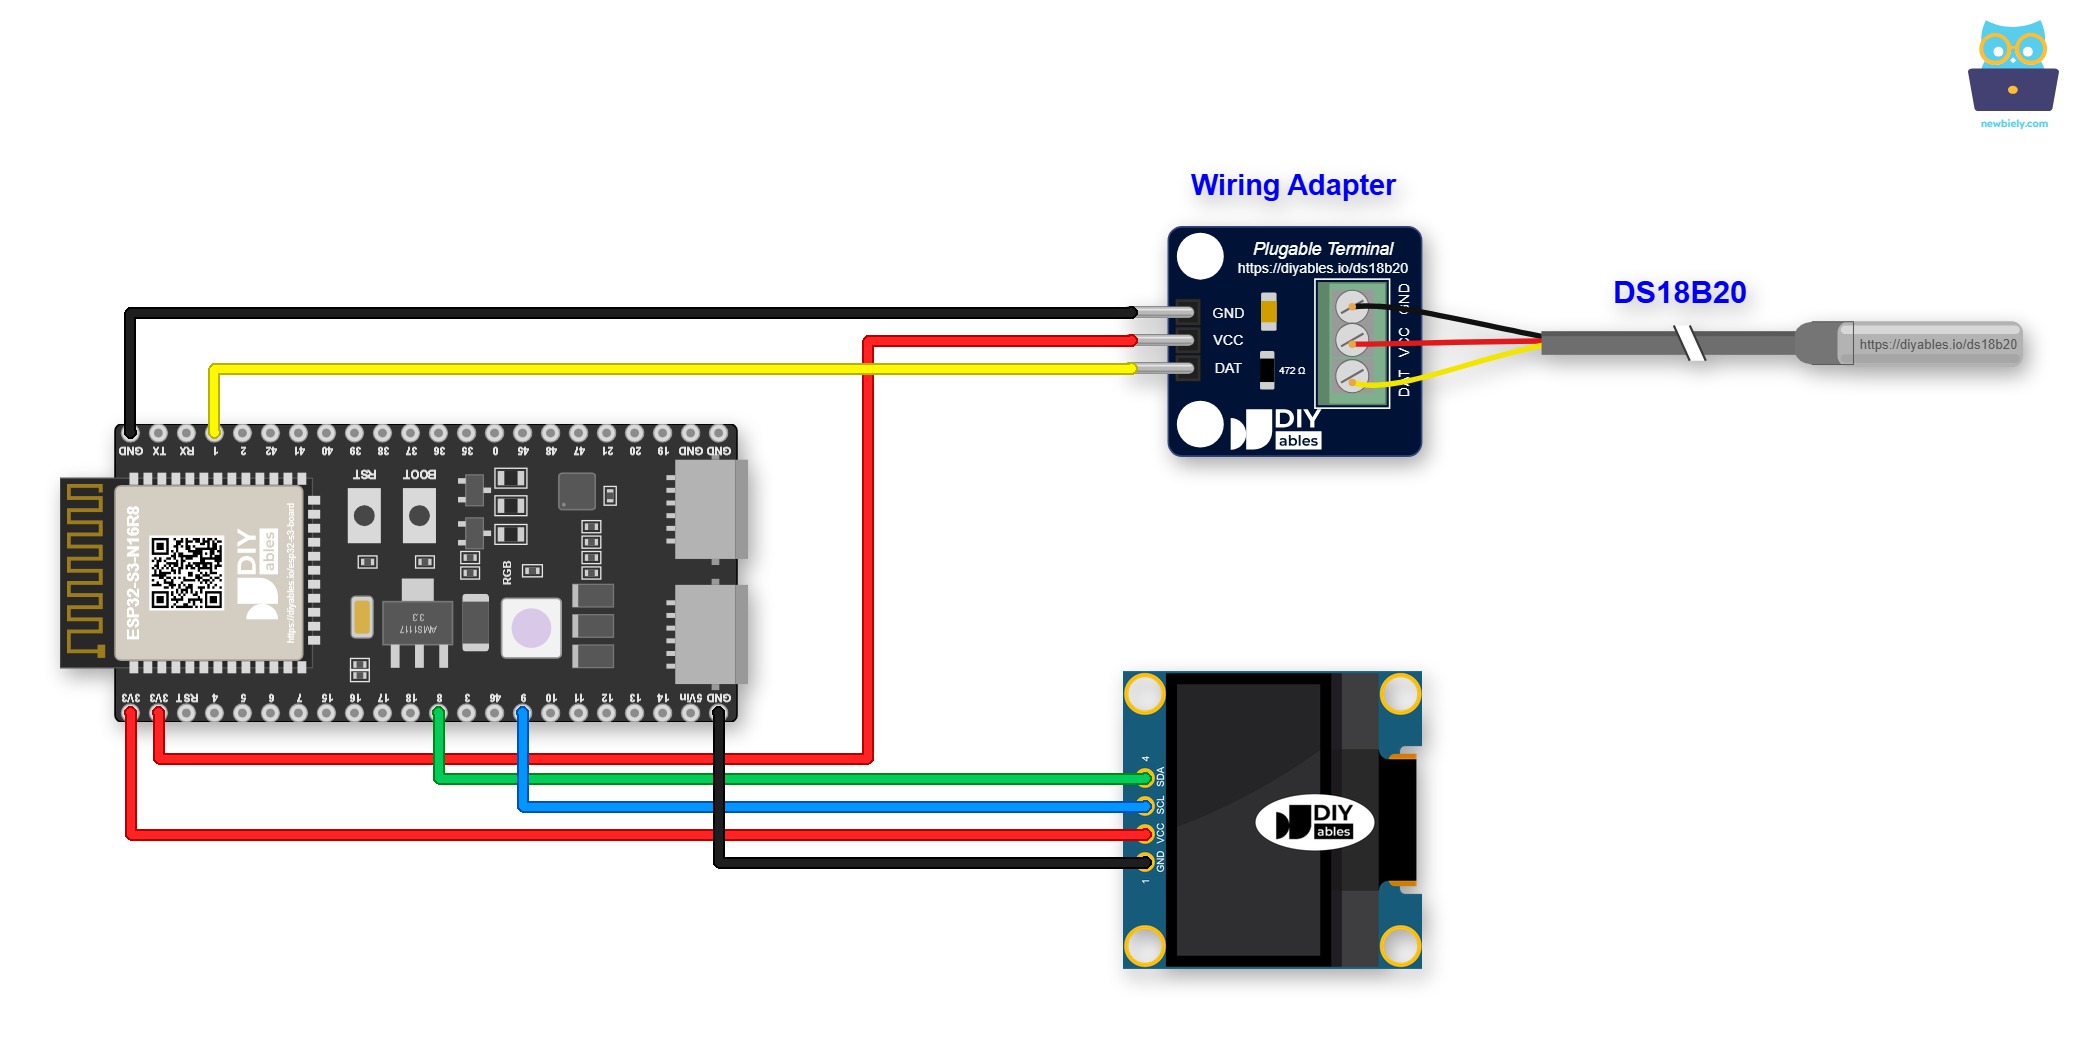
This image is created using Fritzing. Click to enlarge image
| DS18B20 Sensor Pin | ESP32 S3 Pin |
|---|---|
| VCC | 3.3V |
| GND | GND |
| DATA | GPIO1 (or any digital pin) |
We suggest purchasing a DS18B20 sensor that comes with a wiring adapter for easy connection. The adapter has a built-in resistor, eliminating the need for a separate one in the wiring.
ESP32 S3 Code - Temperature from DS18B20 and Display on OLED
The following code initializes both the SSD1306 OLED over I2C and the DS18B20 sensor on its one-wire data pin, then enters a loop that reads the current temperature and prints it centered on the OLED screen every two seconds. Both Celsius and Fahrenheit values are calculated so you can choose which unit to display with a simple change in the source.
Detailed Instructions
- New to ESP32 S3? Complete our Getting Started with ESP32 S3 guide first.
- Prepare the wiring: Connect the DS18B20 sensor and SSD1306 OLED to your ESP32 S3 according to the wiring diagram above.
- Connect to computer: Plug the ESP32 S3 into your computer using a USB Type-C cable.
- Open Arduino IDE: Launch the Arduino IDE on your computer.
- Select your board: Choose ESP32 S3 from the board selector and select the correct COM port.
- Install the OLED library: Click the Libraries icon on the left bar of the Arduino IDE.
- Search for SSD1306: Type "SSD1306" in the search box and find the SSD1306 library by Adafruit.
- Install the library: Click the Install button to install the library.
- Search for Adafruit SSD1306 created by Adafruit and click the Install button.
- Install dependencies: When prompted, click Install All to install all required library dependencies including Adafruit GFX.
- Install DallasTemperature: Search "DallasTemperature" in the search box, then look for the DallasTemperature library by Miles Burton.
- Install: Click the Install button to install the DallasTemperature library.
- Search for DallasTemperature created by Miles Burton
- Install OneWire: When asked to install the dependency, click Install All to install the OneWire library.
- Upload the code: Copy the code above, paste it into Arduino IDE, and click the Upload button.
- Test the sensor: Put the sensor in hot or cold water, or grasp it with your hand to change its temperature.
- View the result: Watch the temperature update live on the OLED display.
https://newbiely.com/images/tutorial/esp32-s3-displays-temperature-on-oled.jpg
※ NOTE THAT:
The code automatically centers the temperature text both horizontally and vertically on the OLED display.
Serial Monitor Output
Open the Serial Monitor at 115200 baud to see the raw temperature values as they are read from the DS18B20 sensor, which is useful for debugging before the OLED display is connected.
Applications and Project Ideas
The ESP32 S3 paired with a DS18B20 sensor and SSD1306 OLED makes a self-contained temperature display module that fits into a wide range of real-world projects. Here are practical ways to put this circuit to work:
- Standalone thermometer: Build a portable, battery-powered thermometer that shows temperature on the OLED without any serial connection.
- Aquarium temperature monitor: Submerge the waterproof DS18B20 probe to track water temperature and alert when it drifts out of range.
- Home weather station: Place sensors in multiple rooms and log readings over Wi-Fi to a dashboard or cloud database.
- Food probe: Use the DS18B20's waterproof version to monitor cooking or fermenting temperatures with a clear OLED readout.
- Server room guard: Continuously monitor rack temperature and trigger an alarm relay if it exceeds a safe threshold.
- Greenhouse controller: Read soil or air temperature and drive ventilation or heating equipment automatically.
- DIY thermostat: Combine with a relay module to build a smart temperature controller for any heating or cooling system.
Video Tutorial
Watch the step-by-step video walkthrough for this ESP32 S3 project below.
Challenge Yourself
Now that your ESP32 S3 is reading temperature from the DS18B20 and displaying it on an OLED, push the project further with these progressively harder challenges:
- Beginner: Add a second line to the OLED that shows the temperature in Fahrenheit below the Celsius reading.
- Beginner: Add an LED indicator that turns on when the temperature rises above 30 °C as a simple over-temperature warning.
- Intermediate: Connect two DS18B20 sensors on the same data wire and display both readings on the OLED simultaneously, using the one-wire multi-sensor addressing feature.
- Intermediate: Log timestamped temperature readings to a microSD card so you can analyze historical data over hours or days.
- Advanced: Build an ESP32 S3 web server that serves a live temperature chart in the browser, pulling data from the DS18B20 every five seconds via an AJAX call.
- Advanced: Add MQTT publishing over Wi-Fi so the temperature appears on a Home Assistant dashboard and triggers automations when thresholds are exceeded.