
ESP32 S3 - ACS712 Current Sensor
How much current does your motor really pull when it starts, runs or gets stuck? The ACS712 answers that with a single analog wire, and the ESP32 S3 turns its voltage into amps you can read on your PC. This guide uses the 30A module and a safe 12V DC device, such as a DC motor, LED strip or lamp, so you can try everything on your desk.
What you'll build in this tutorial:
- What the ACS712 is and how it senses current without touching your circuit
- How to connect it to the ESP32 S3 through a small 10kΩ/20kΩ divider
- A DC current meter sketch that finds its own zero point at startup
- An AC (RMS) version of the sketch for current that changes direction
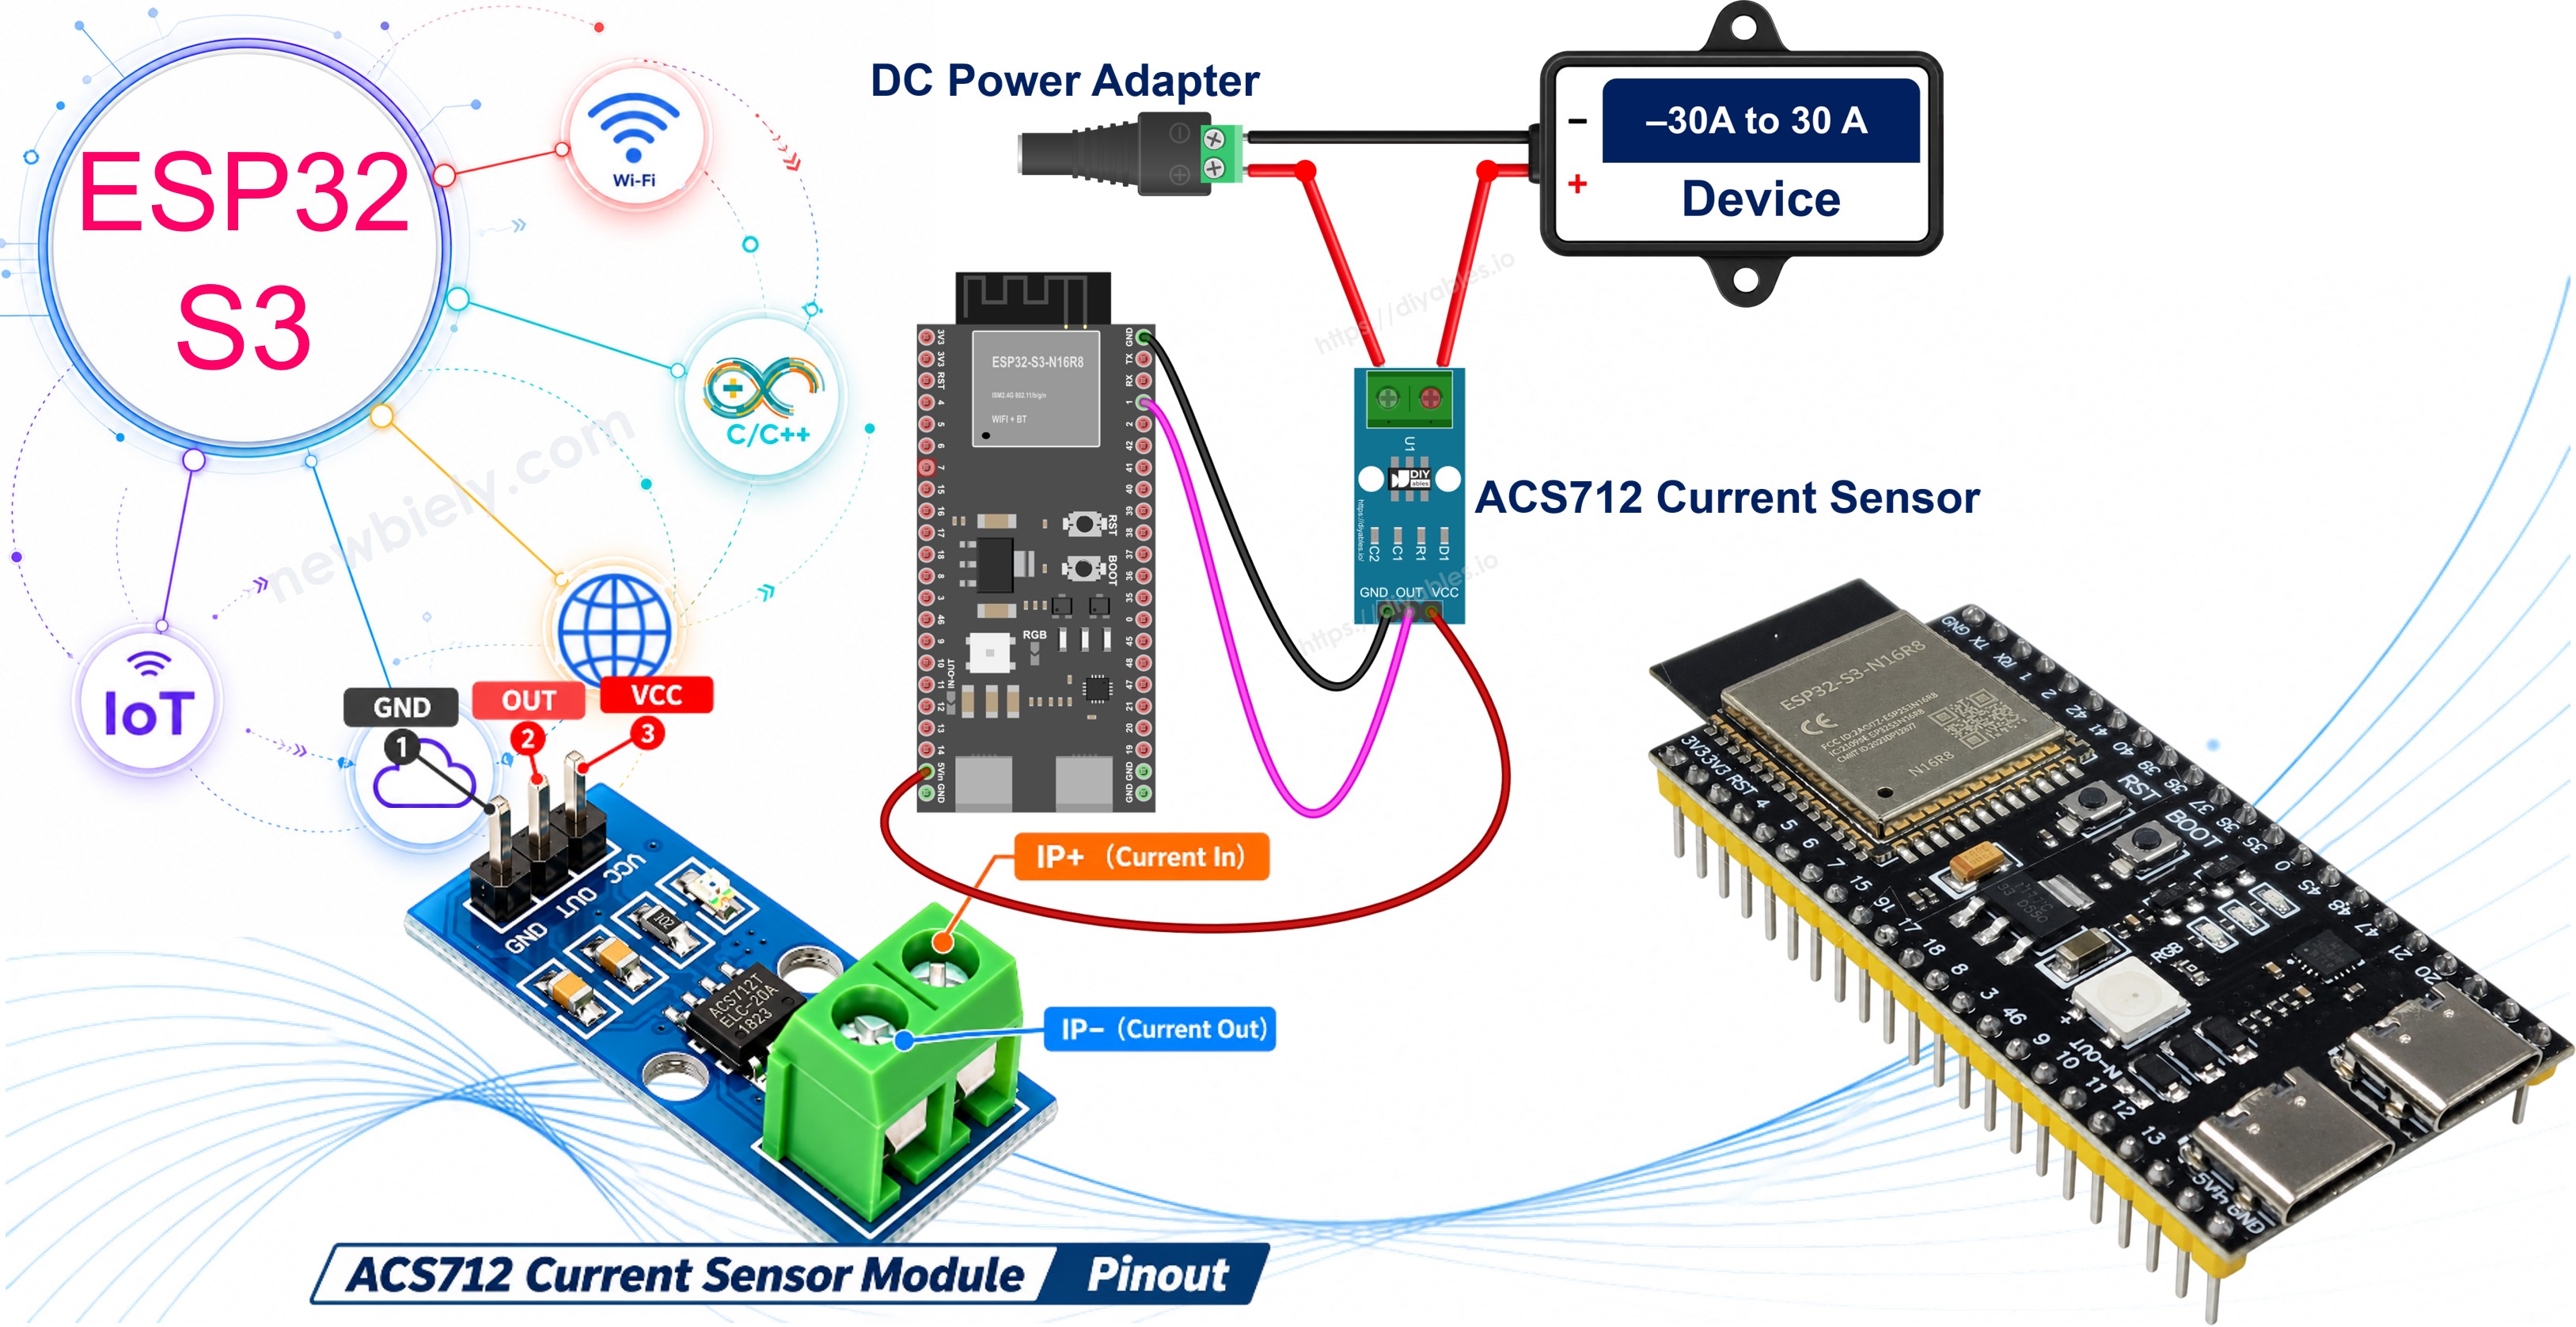
Hardware Preparation
Or you can buy the following kits:
| 1 | × | DIYables ESP32 S3 Starter Kit (ESP32 S3 included) | |
| 1 | × | DIYables Sensor Kit (18 sensors/displays) |
Additionally, some of these links are for products from our own brand, DIYables .
Overview of ACS712 Current Sensor
The ACS712 from Allegro is a current sensor chip that reads both DC and AC current. Inside the chip, the load current runs through a thick copper path. That current creates a magnetic field, and a Hall sensor sitting next to the path turns the field into a voltage. Your load and the ESP32 S3 are never wired together: the two sides are isolated up to 2.1 kV RMS. The copper path is only about 1.2 mΩ, so putting the sensor in your circuit changes almost nothing for the load.
With no current, the OUT pin sits in the middle of the supply, about 2.5V. When current flows from IP+ to IP−, the voltage goes up. When it flows the other way, the voltage goes down. On the 30A version used here, every amp moves the output by 66 mV.
Key Specifications
The module needs a 5V supply (4.5V to 5.5V). It will not work properly at 3.3V, so on the ESP32 S3 it takes power from the 5V pin. Its output is ratiometric, which means the 2.5V center and the 66 mV/A step both scale with the real supply voltage. At full scale the OUT pin swings from about 0.52V (−30 A) to about 4.48V (+30 A).
| Feature | Value |
|---|---|
| Chip | ACS712ELCTR-30A-T (Allegro) |
| Measuring range | −30 A to +30 A (DC or AC) |
| Sensitivity | 66 mV per amp |
| Output at 0 A | VCC / 2 (about 2.5V) |
| Supply voltage | 5V (4.5V to 5.5V) |
| Bandwidth | 80 kHz |
| Total output error | about ±1.5% at 25°C |
| Isolation | 2.1 kV RMS |
| Copper path resistance | about 1.2 mΩ |
The ACS712 comes in three current ranges. They look the same, so check the marking on the chip before you use the code:
| Version | Range | Sensitivity |
|---|---|---|
| ACS712-05B | ±5 A | 185 mV/A |
| ACS712-20A | ±20 A | 100 mV/A |
| ACS712-30A | ±30 A | 66 mV/A |
A bigger range means a coarser reading. With the divider and the 12-bit ADC of the ESP32 S3, one ADC step on the 30A module is close to 17 mA. Add normal electrical noise, and you will often see 50 to 100 mA of "fake" current at 0 A. So this module is best for loads from about 0.5 A upward: motors, lamps, LED strips, heaters and chargers. Averaging many readings helps a lot, and both sketches below do that.
ACS712 Pinout
The module has a 3-pin header for the ESP32 S3 side and a 2-screw terminal block for the load side. A small LED lights up when the module is powered.
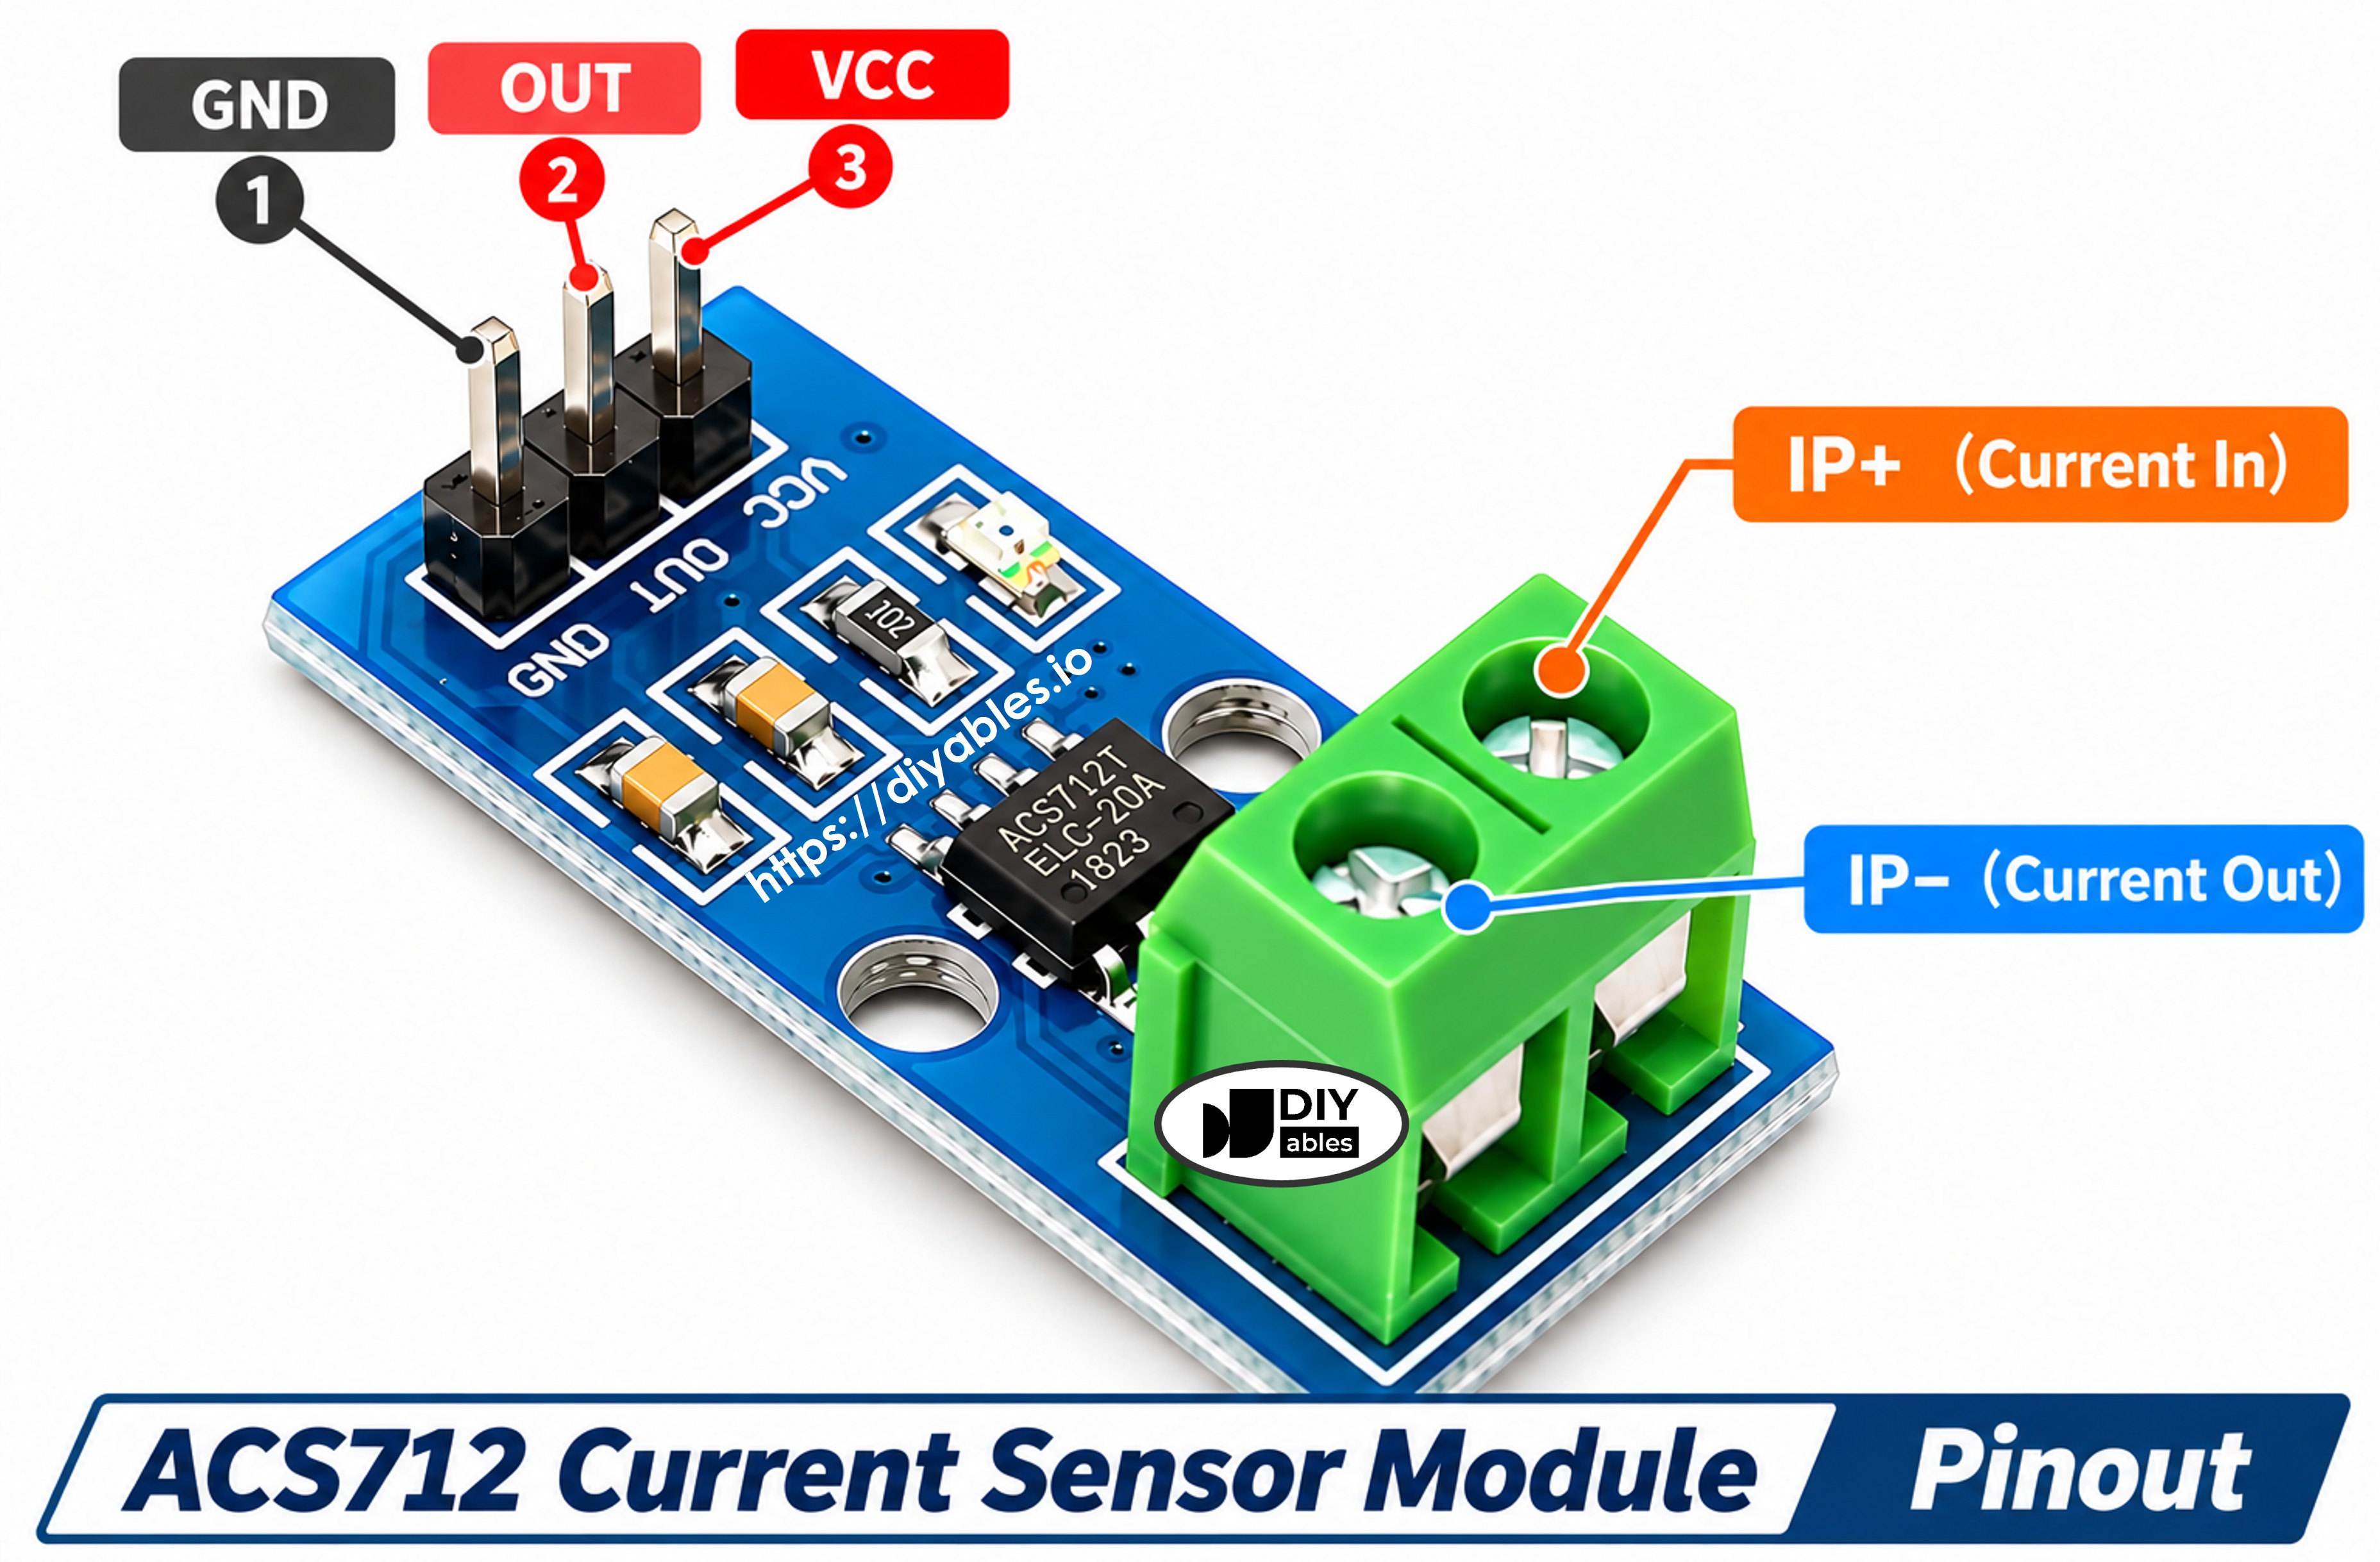
- VCC — 5V power; connect to the 5V pin of the ESP32 S3
- OUT — analog output (about 0.5V to 4.5V); goes to the ESP32 S3 through the divider
- GND — ground; connect to GND of the ESP32 S3
- IP+ — first screw terminal; current entering here reads as positive
- IP− — second screw terminal; current leaves the sensor here
On some modules the two screw terminals have no labels. If your readings come out negative, just swap the two load wires.
How the ACS712 Converts Current to Voltage
The math is short. Take the OUT voltage, subtract the voltage you get at 0 A (Vzero), and divide by the sensitivity:
current (A) = (Vout − Vzero) / 0.066
For example, if Vzero is 2.48V and Vout is 2.55V, the current is (2.55 − 2.48) / 0.066 ≈ 1.06 A. The code does not assume Vzero is exactly 2.5V. Your 5V pin may be 4.9V or 5.1V, and the chip has a small offset, so the sketch measures the real Vzero at startup while the load is off.
Wiring Diagram between ACS712 and ESP32 S3
The analog pins of the ESP32 S3 accept 3.3V at most, but the ACS712 OUT pin can reach about 4.5V. A simple divider fixes this: OUT goes through a 10kΩ resistor to GPIO1, and a 20kΩ resistor goes from GPIO1 to GND. This scales the signal by 2/3, so 4.48V becomes about 2.99V, and the code multiplies by 1.5 to get the real value back.
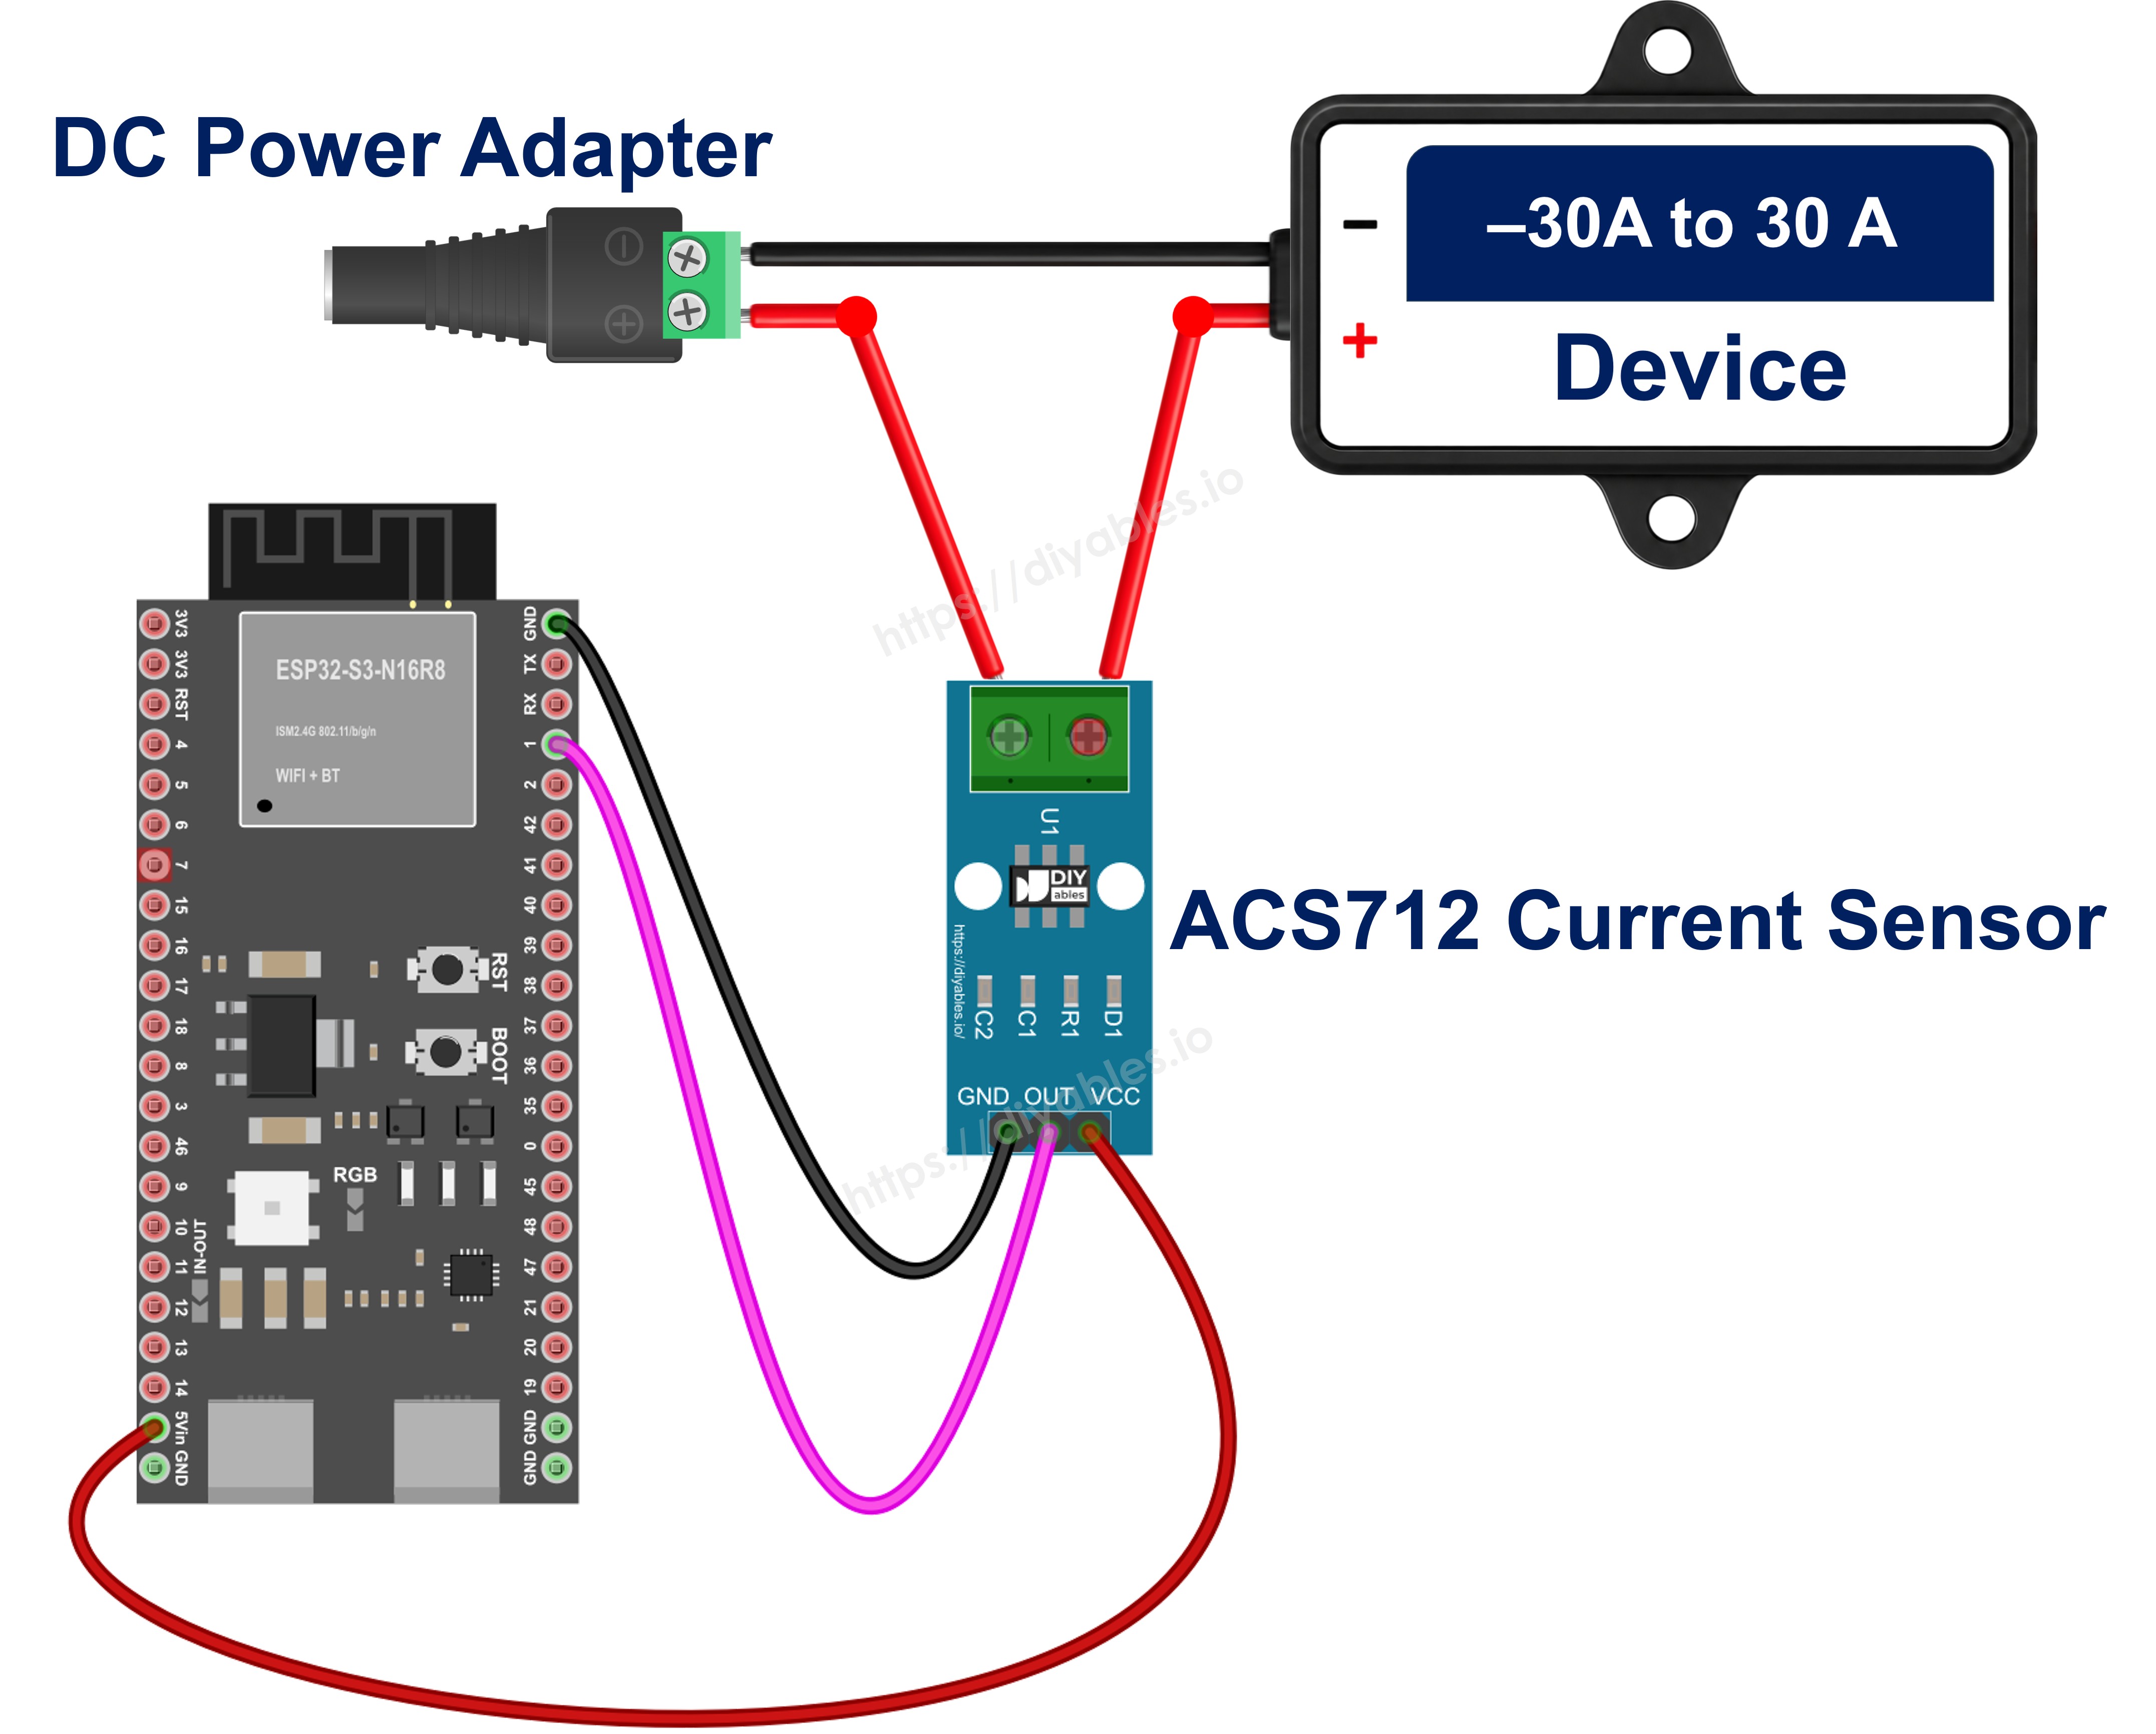
This image is created using Fritzing. Click to enlarge image
| From | To |
|---|---|
| ACS712 VCC | ESP32 S3 5V pin |
| ACS712 GND | ESP32 S3 GND (any GND pin, e.g. the one on the right side) |
| ACS712 OUT | 10kΩ resistor, other end to GPIO1 |
| GPIO1 | 20kΩ resistor, other end to GND |
| 12V adapter + (via DC power jack) | ACS712 IP+ |
| ACS712 IP− | DC device + |
| DC device − | 12V adapter − (via DC power jack) |
GPIO1 is an ADC1 pin on the right-side header, close to the GND pins, so the divider wiring stays short. Only the 5V wire has to go to the left side, because the 5V pin is there. Stay on ADC1 (GPIO1 to GPIO10), because ADC2 pins stop working well once WiFi is on. The screw terminal goes in series with the load: cut the plus wire between the adapter and the DC device and put the sensor in that gap.
Safety Notes
Never connect the ACS712 OUT pin straight to a GPIO; without the divider, a large current can push more than 4V into the pin and damage the ESP32 S3. The screw terminal side carries the full load voltage, so learn with a low-voltage DC load like the 12V DC device in this guide. Mains AC (110V or 220V) can kill. If you later measure a mains device, never touch the screw terminal or its wires while the circuit is live, and keep the whole module in a closed box.
ESP32 S3 Code - ACS712 Current Sensor
At startup the sketch takes 1000 readings with no current flowing and stores their average as the zero voltage. After that, every 500 ms it averages 200 readings, multiplies by 1.5 to undo the divider, and uses the formula above to print the sensor voltage and the current. It uses analogReadMilliVolts(), which applies the ESP32 S3's built-in ADC calibration and gives better results than turning a raw analogRead() value into volts by hand.
Detailed Instructions
- New to ESP32 S3? Complete our Getting Started with ESP32 S3 guide first.
- Build the circuit: Wire everything as in the diagram, but leave the 12V adapter unplugged for now.
- Connect the board: Plug the ESP32 S3 into your computer with the USB Type-C cable.
- Choose board and port: In Arduino IDE, select the ESP32 S3 board and the correct COM port.
- Upload the code: Paste the sketch into Arduino IDE and click Upload.
- Open the Serial Monitor: Set the baud rate to 115200. The load is still off, so the sketch measures a clean zero point.
- Turn the load on: When the Serial Monitor shows "Done", plug in the 12V adapter. The DC device turns on and the current appears.
- Test it: If your DC device is a motor, hold its shaft lightly with your fingers. The motor works harder and the current goes up.
- Pro Tip: Always switch the load off before you power or reset the ESP32 S3. If the load is running during calibration, every reading after that will be wrong by the current that was flowing.
Serial Monitor Output
The first three lines were taken with the DC device off; small values like 0.03 A or −0.05 A are normal noise. Here the DC device was a 12V DC motor. It ran at about 0.9 A, and the 1.30 A line came from slowing the shaft by hand.
Measuring AC Current with the ESP32 S3
AC current flips direction many times per second (50 or 60 times, depending on your country). The OUT voltage swings above and below the zero point, so one average would come out close to 0 A. Instead, the second sketch uses the RMS value, the number a clamp meter shows. For 200 ms, which covers 10 full cycles at 50 Hz or 12 at 60 Hz, it reads the sensor again and again, squares each difference from the zero voltage, and adds them up. Then it divides by the number of samples, takes the square root, and divides by 0.066:
RMS current (A) = sqrt( mean( (Vout − Vzero)² ) ) / 0.066
The wiring and divider stay the same. The zero calibration still needs the load off at startup.
※ NOTE THAT:
An AC load usually means mains voltage, which is dangerous. Ask an experienced person to help, never touch the screw terminal or wires while the circuit is live, and keep the module in an insulated box. If you are a beginner, test this sketch only with low-voltage loads.
Detailed Instructions
- Keep the same wiring, and make sure the AC load is switched off.
- Upload this second sketch and open the Serial Monitor at 115200 baud.
- Wait for the zero voltage line, then switch the load on.
- Pro Tip: Very small AC loads (below about 0.3 A) mostly show noise on the 30A module. For those, use the 5A version and change SENSITIVITY to 0.185.
Here the load was a small 100W bulb on 230V, which pulls about 0.43 A. The 0.06 to 0.07 A with the bulb off is the noise floor of the 30A module, and it adds a little to every RMS result.
Applications and Project Ideas
Once the ESP32 S3 knows how many amps flow, you can watch, log and protect almost any DC load.
- Motor stall alarm: Turn off a motor through a relay or MOSFET when its current jumps far above normal.
- Battery charge monitor: Track the charging current of a 12V battery and see when it drops near zero.
- Solar output logger: Measure the current from a small solar panel every minute and save it to an SD card.
- 3D printer power watch: Watch the heated bed current and spot when the heater switches on and off.
- Power meter: Combine this sensor with the ESP32 S3 - Measure Voltage tutorial and multiply volts by amps to get watts.
- WiFi energy dashboard: Send the current to a web page or MQTT broker so you can check it from your phone.
Video Tutorial
Watch the step-by-step video walkthrough for this ESP32 S3 project below.
Challenge Yourself
When the readings make sense, try these tasks to go further.
- Beginner: Make the built-in LED light up when the current is above 1.0 A.
- Intermediate: Track the highest current since startup and print it next to the live value, so you can catch the motor's start-up peak.
- Advanced: Read the 12V supply with a voltage sensor, multiply by the current, and show watts and watt-hours on an OLED display.