
Arduino Nano - Slide Switch
This tutorial instructs you how to use Arduino Nano to find out which way a slide switch is pushed. The part is the DIYables Mini Slide Switch SS12D10: a tiny switch with a sliding handle that stays where you leave it. That makes it a handy mode selector or ON/OFF setting for a small Nano project. In detail, we will learn:
- How the three pins of the SS12D10 are joined inside, for each handle position
- How to connect Arduino Nano to the slide switch with three wires and no resistor
- How to program Arduino Nano to print ON or OFF each time the handle moves, with a 50 ms debounce check
- How to drop one wire and let the Nano's built-in pull-up resistor (INPUT_PULLUP) do the job
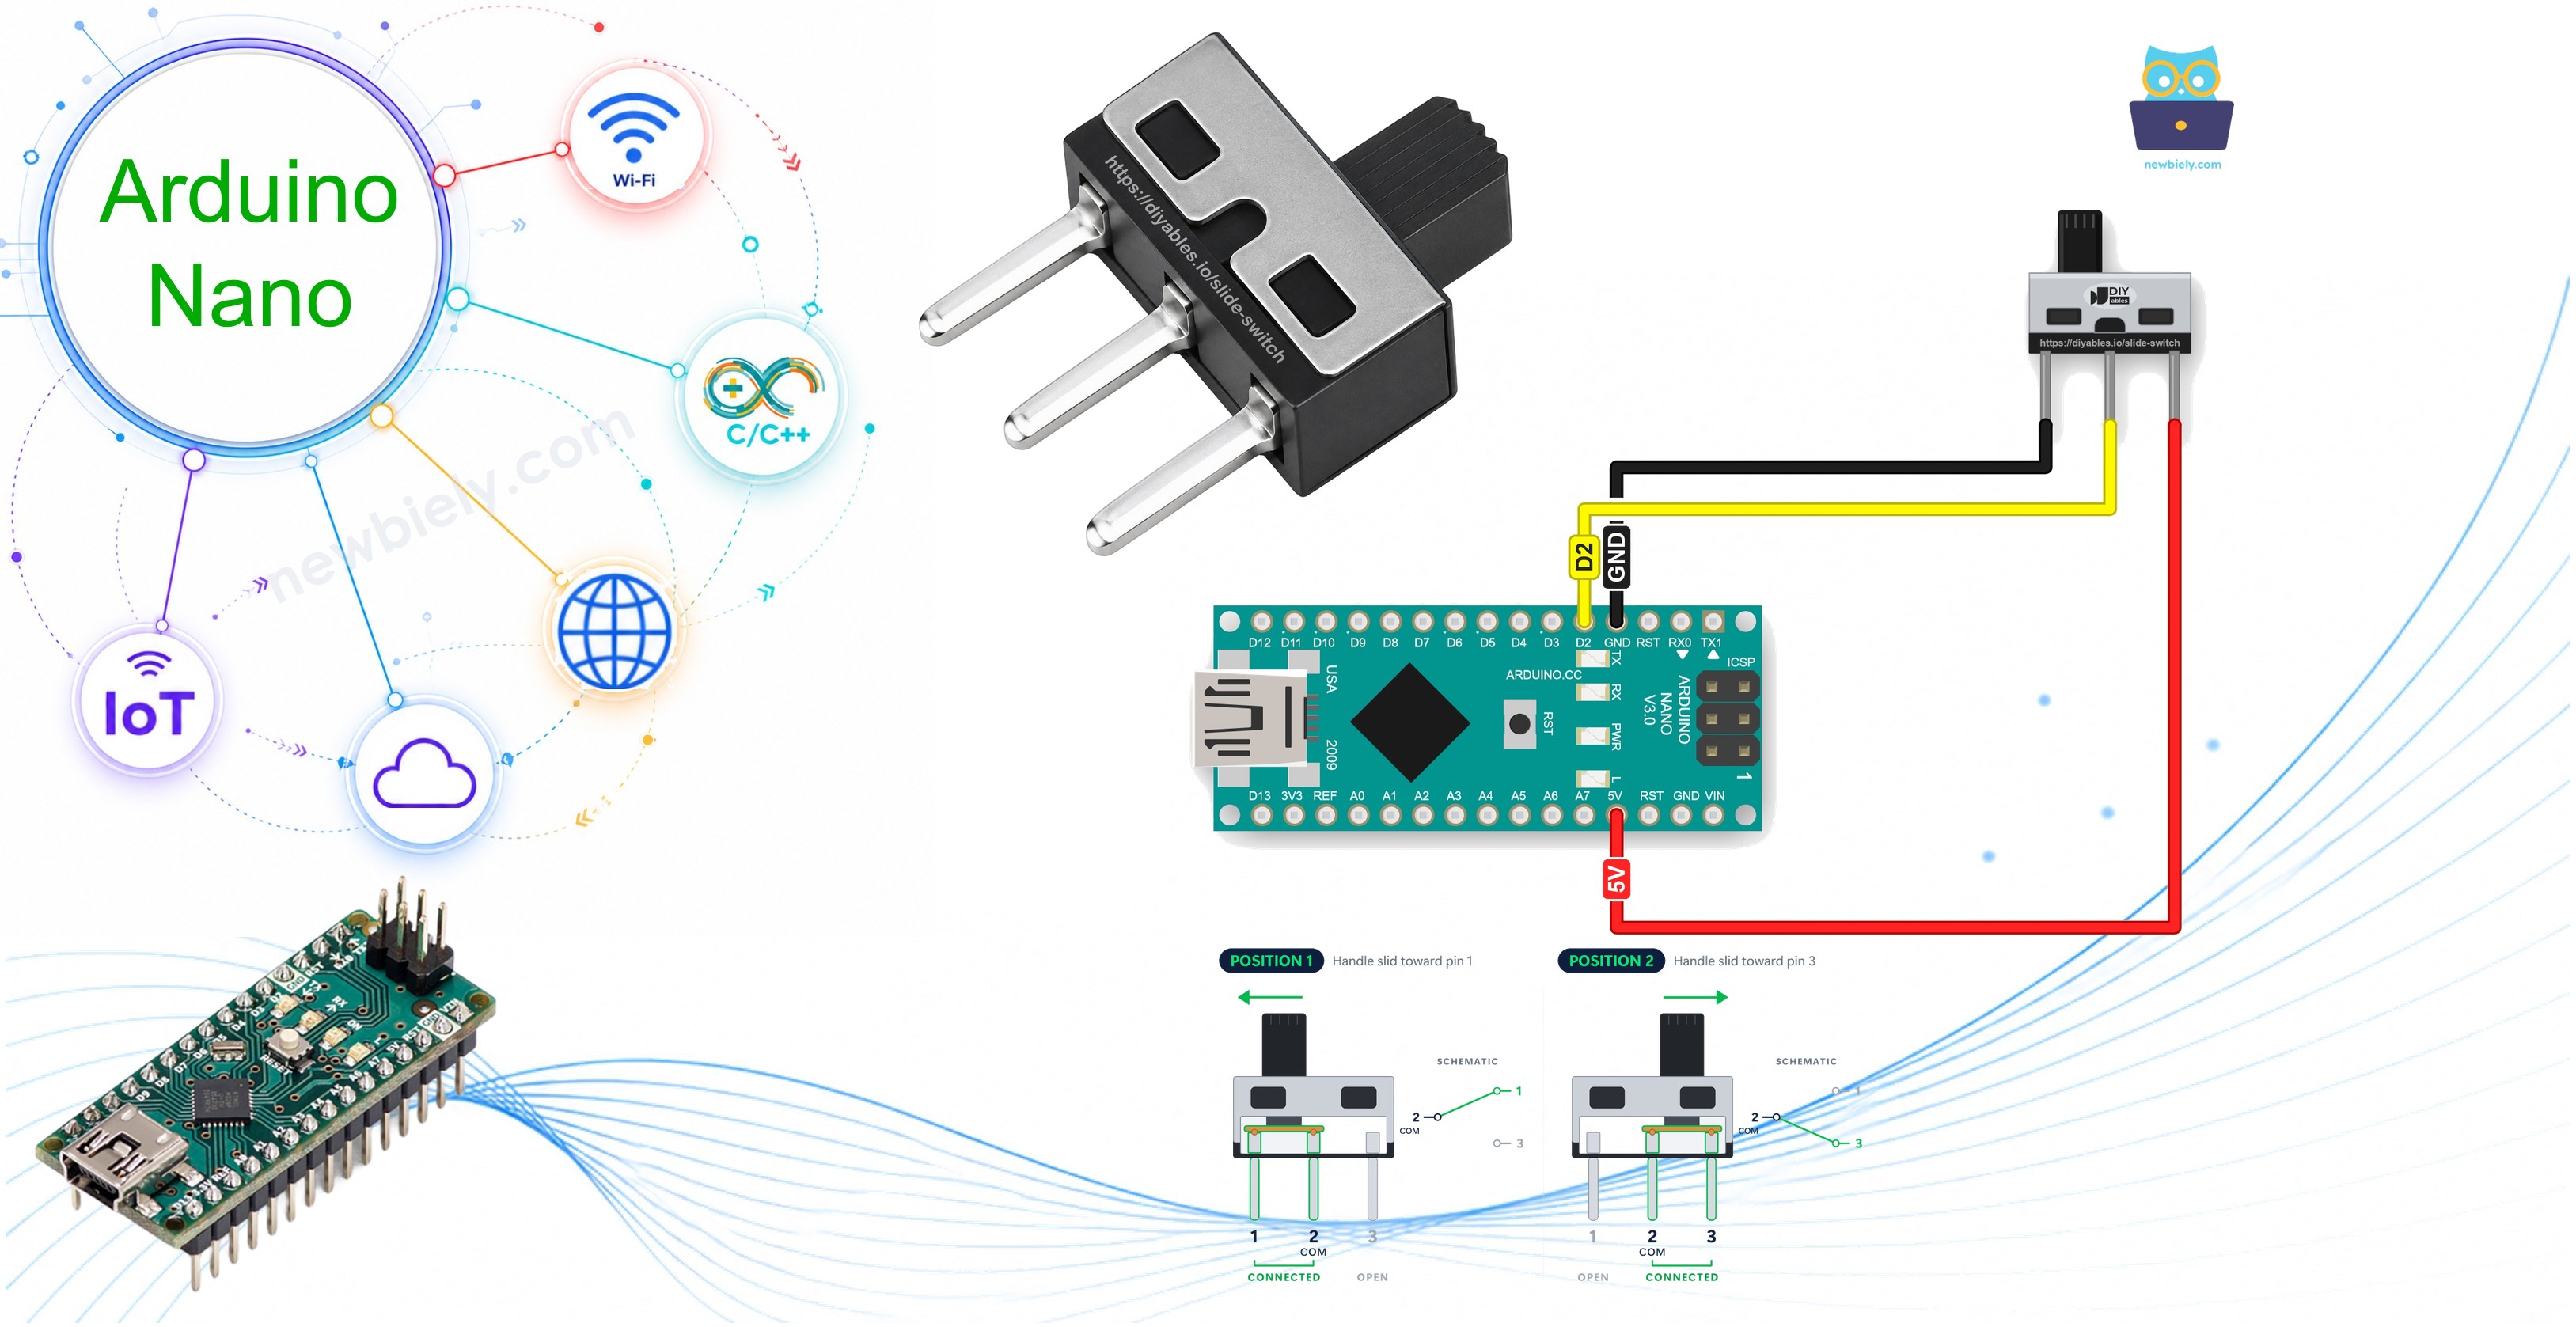
We suggest:
- Utilizing an ON/OFF rocker switch if you need a bigger switch that fits into a hole in the wall of a box.
- Utilizing a DIP switch if you are looking to set several ON/OFF options at once, such as an address or a mode number. For a key that springs back after each press, see Arduino Nano - Button Module.
Hardware Preparation
Or you can buy the following kits:
| 1 | × | DIYables Sensor Kit (18 sensors/displays) |
Additionally, some of these links are for products from our own brand, DIYables .
Overview of Slide Switch
The SS12D10 is a small switch with two positions. A short handle sits on top, and three metal pins come out of the bottom in one row. Push the handle to one side and it stays there until you push it back. A push button behaves differently: it jumps back the moment you let go. The switch type is SPDT (single pole, double throw), also written 1P2T. In plain words, one common pin is joined to one of the two other pins, never to both.
How does it work? Inside, a small metal bridge always touches the middle pin, called COM. The bridge slides together with the handle. On one side it joins COM to pin 1, on the other side it joins COM to pin 3.
| Slide Switch SS12D10 | |
|---|---|
| Contact type | SPDT (1P2T), 2 positions |
| Pins | 3, vertical through-hole |
| Pin pitch | 4.7mm |
| Terminal length | 6.9mm |
| Handle | 5mm |
| Body size | about 12.8 x 6.7 x 18.2mm |
| Contacts | silver-plated brass |
| Contact rating | AC 125V 2A |
| Life | more than 100,000 switching cycles |
| Operating temperature | -25°C to 80°C |
The 125V 2A value is the limit of the metal contacts. In this tutorial, the switch only passes a tiny signal current into one Nano input pin, far below that limit.
The Slide Switch Pinout
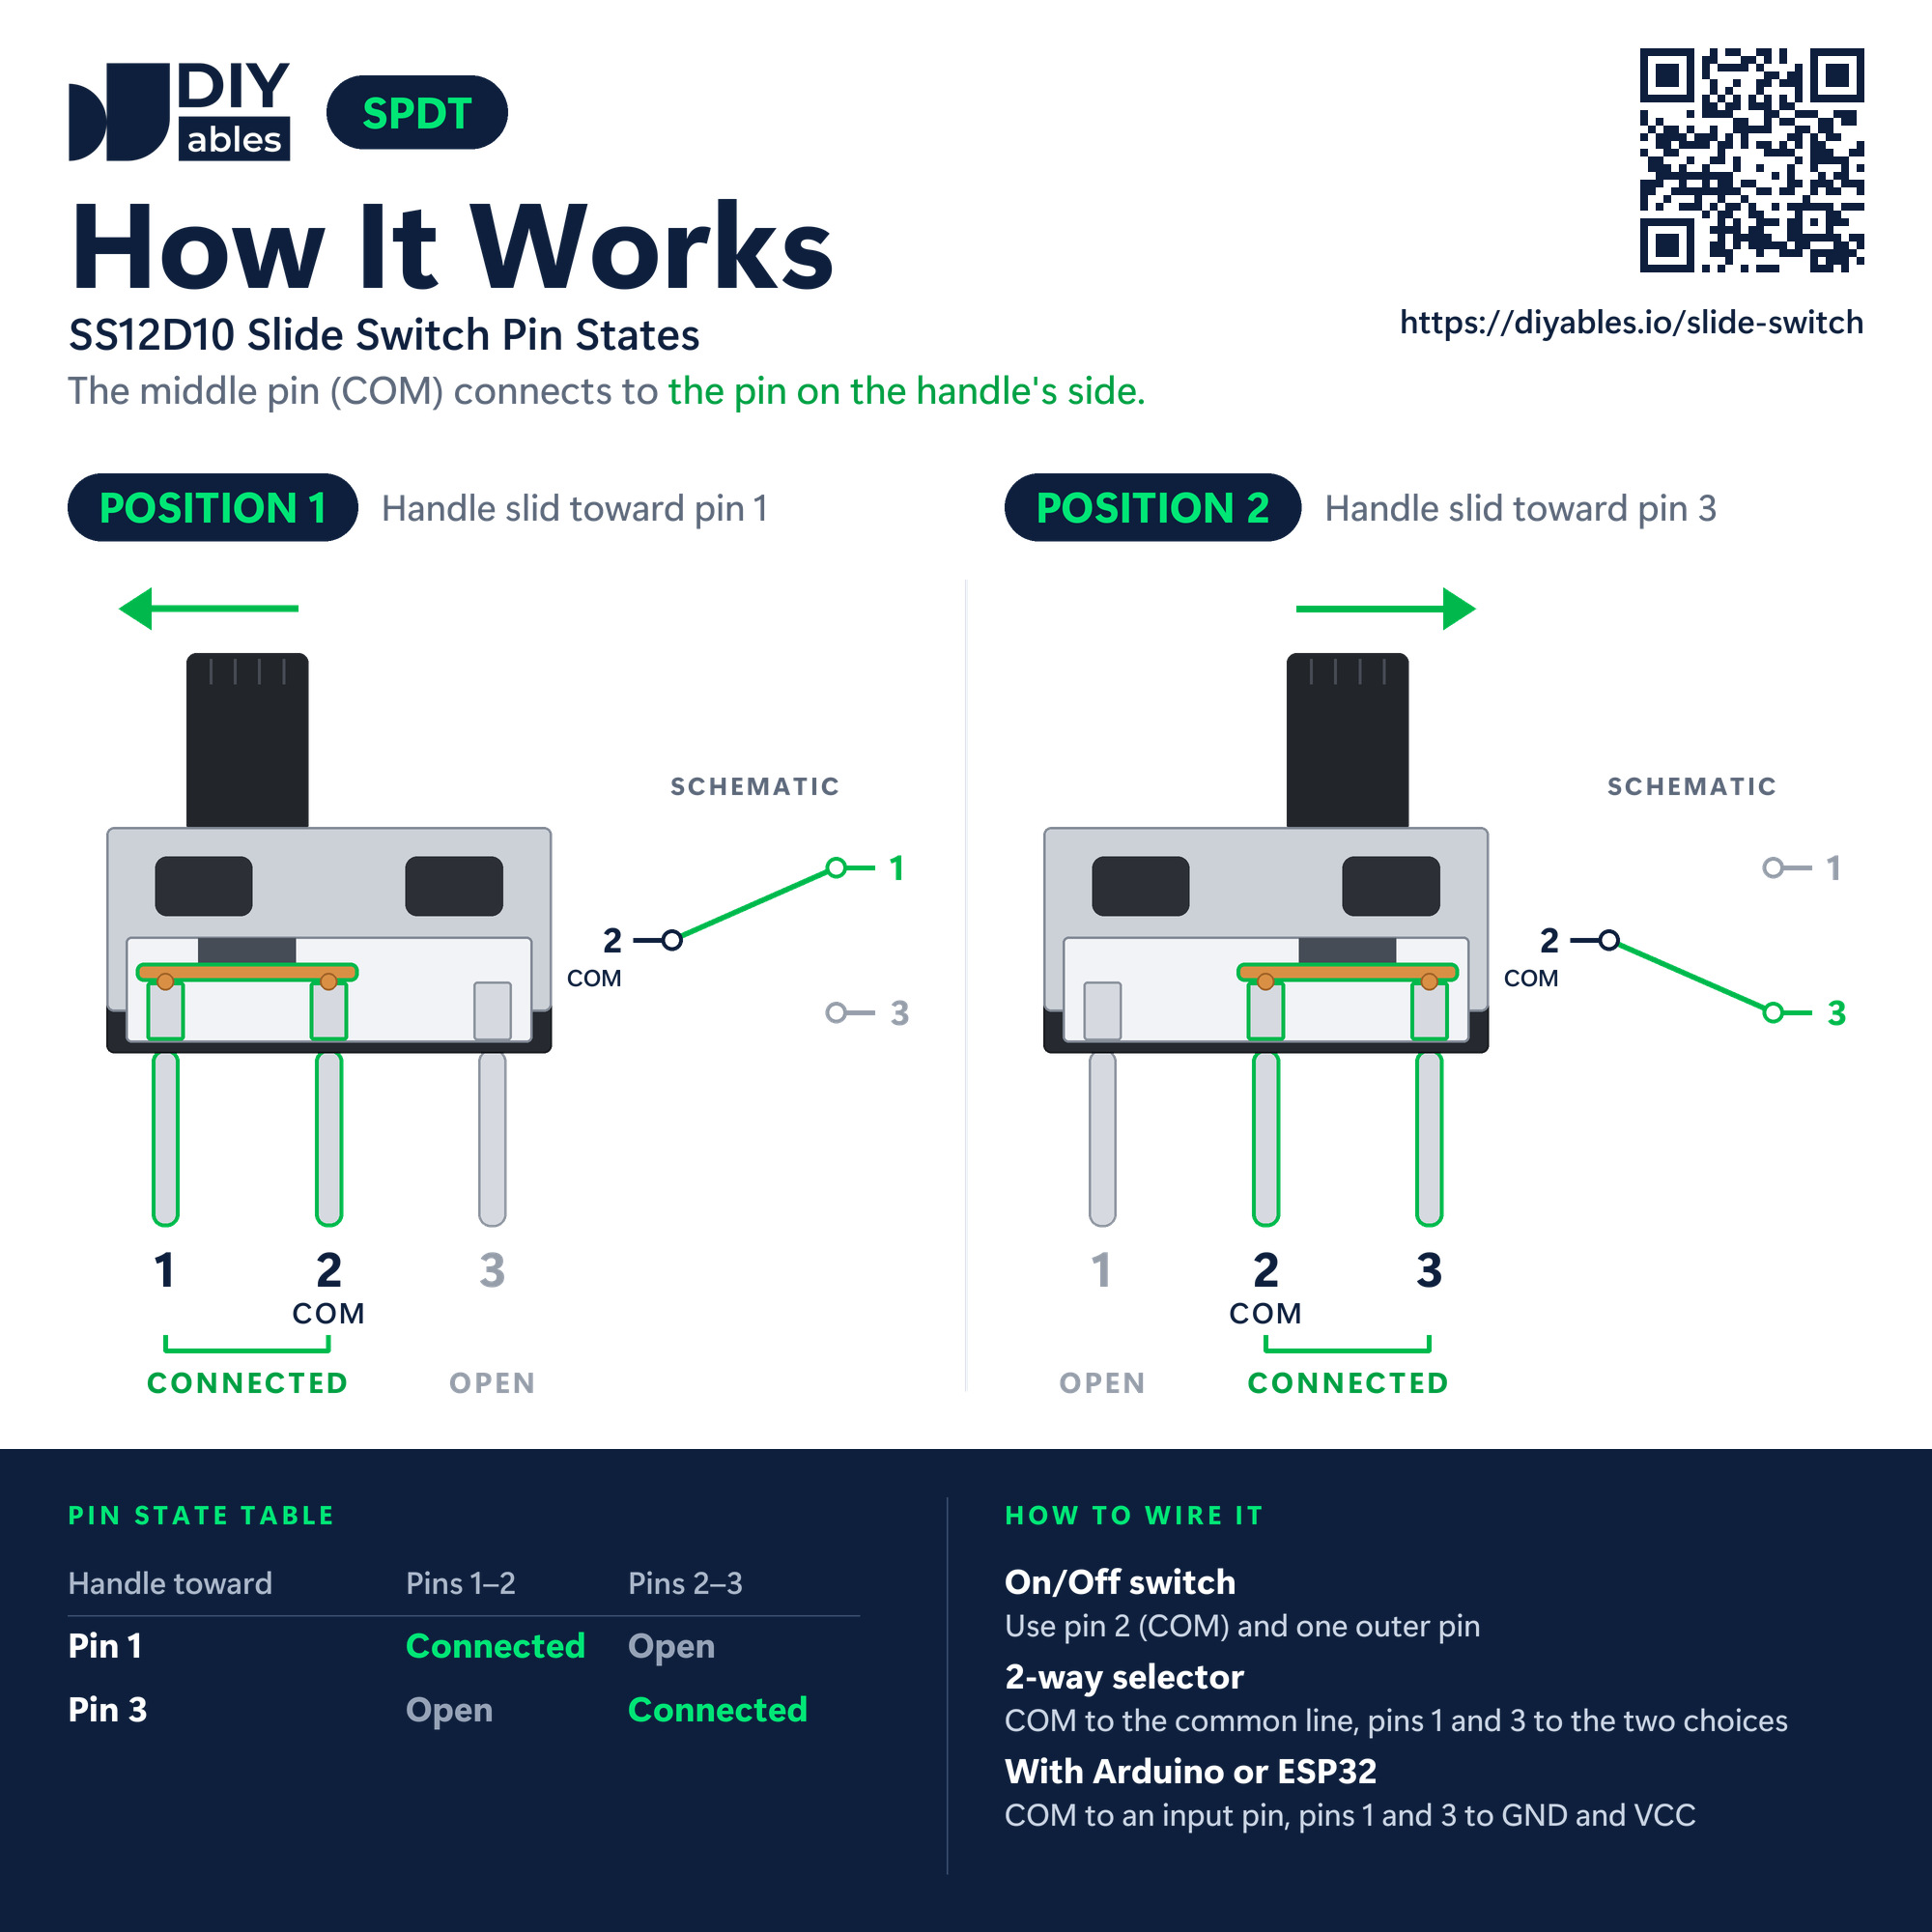
The three pins, from one end of the row to the other:
- Pin 1 (outer pin): must be connected to GND (0V)
- Pin 2, COM (middle pin): must be connected to a digital input pin of Arduino Nano. It always carries the voltage of the outer pin that the handle points to
- Pin 3 (outer pin): must be connected to the 5V pin of Arduino Nano in the 3-wire wiring. In the 2-wire wiring, this pin stays free
The picture also shows what each handle position does:
- Position 1 (handle pushed to the pin 1 end): COM links to pin 1, and pin 3 is left alone
- Position 2 (handle pushed to the pin 3 end): COM links to pin 3, and pin 1 is left alone
※ NOTE THAT:
There are no labels printed on the SS12D10. The middle pin is always COM. The two outer pins are the same, so if you swap the wires on pin 1 and pin 3, the switch still works. Only the ON side and the OFF side of the handle trade places.
Wiring Diagram
COM goes to pin D2, pin 1 goes to GND and pin 3 goes to 5V. In both handle positions, D2 is tied firmly to 5V or to GND, so the pin never floats and no pull-up or pull-down resistor is needed.
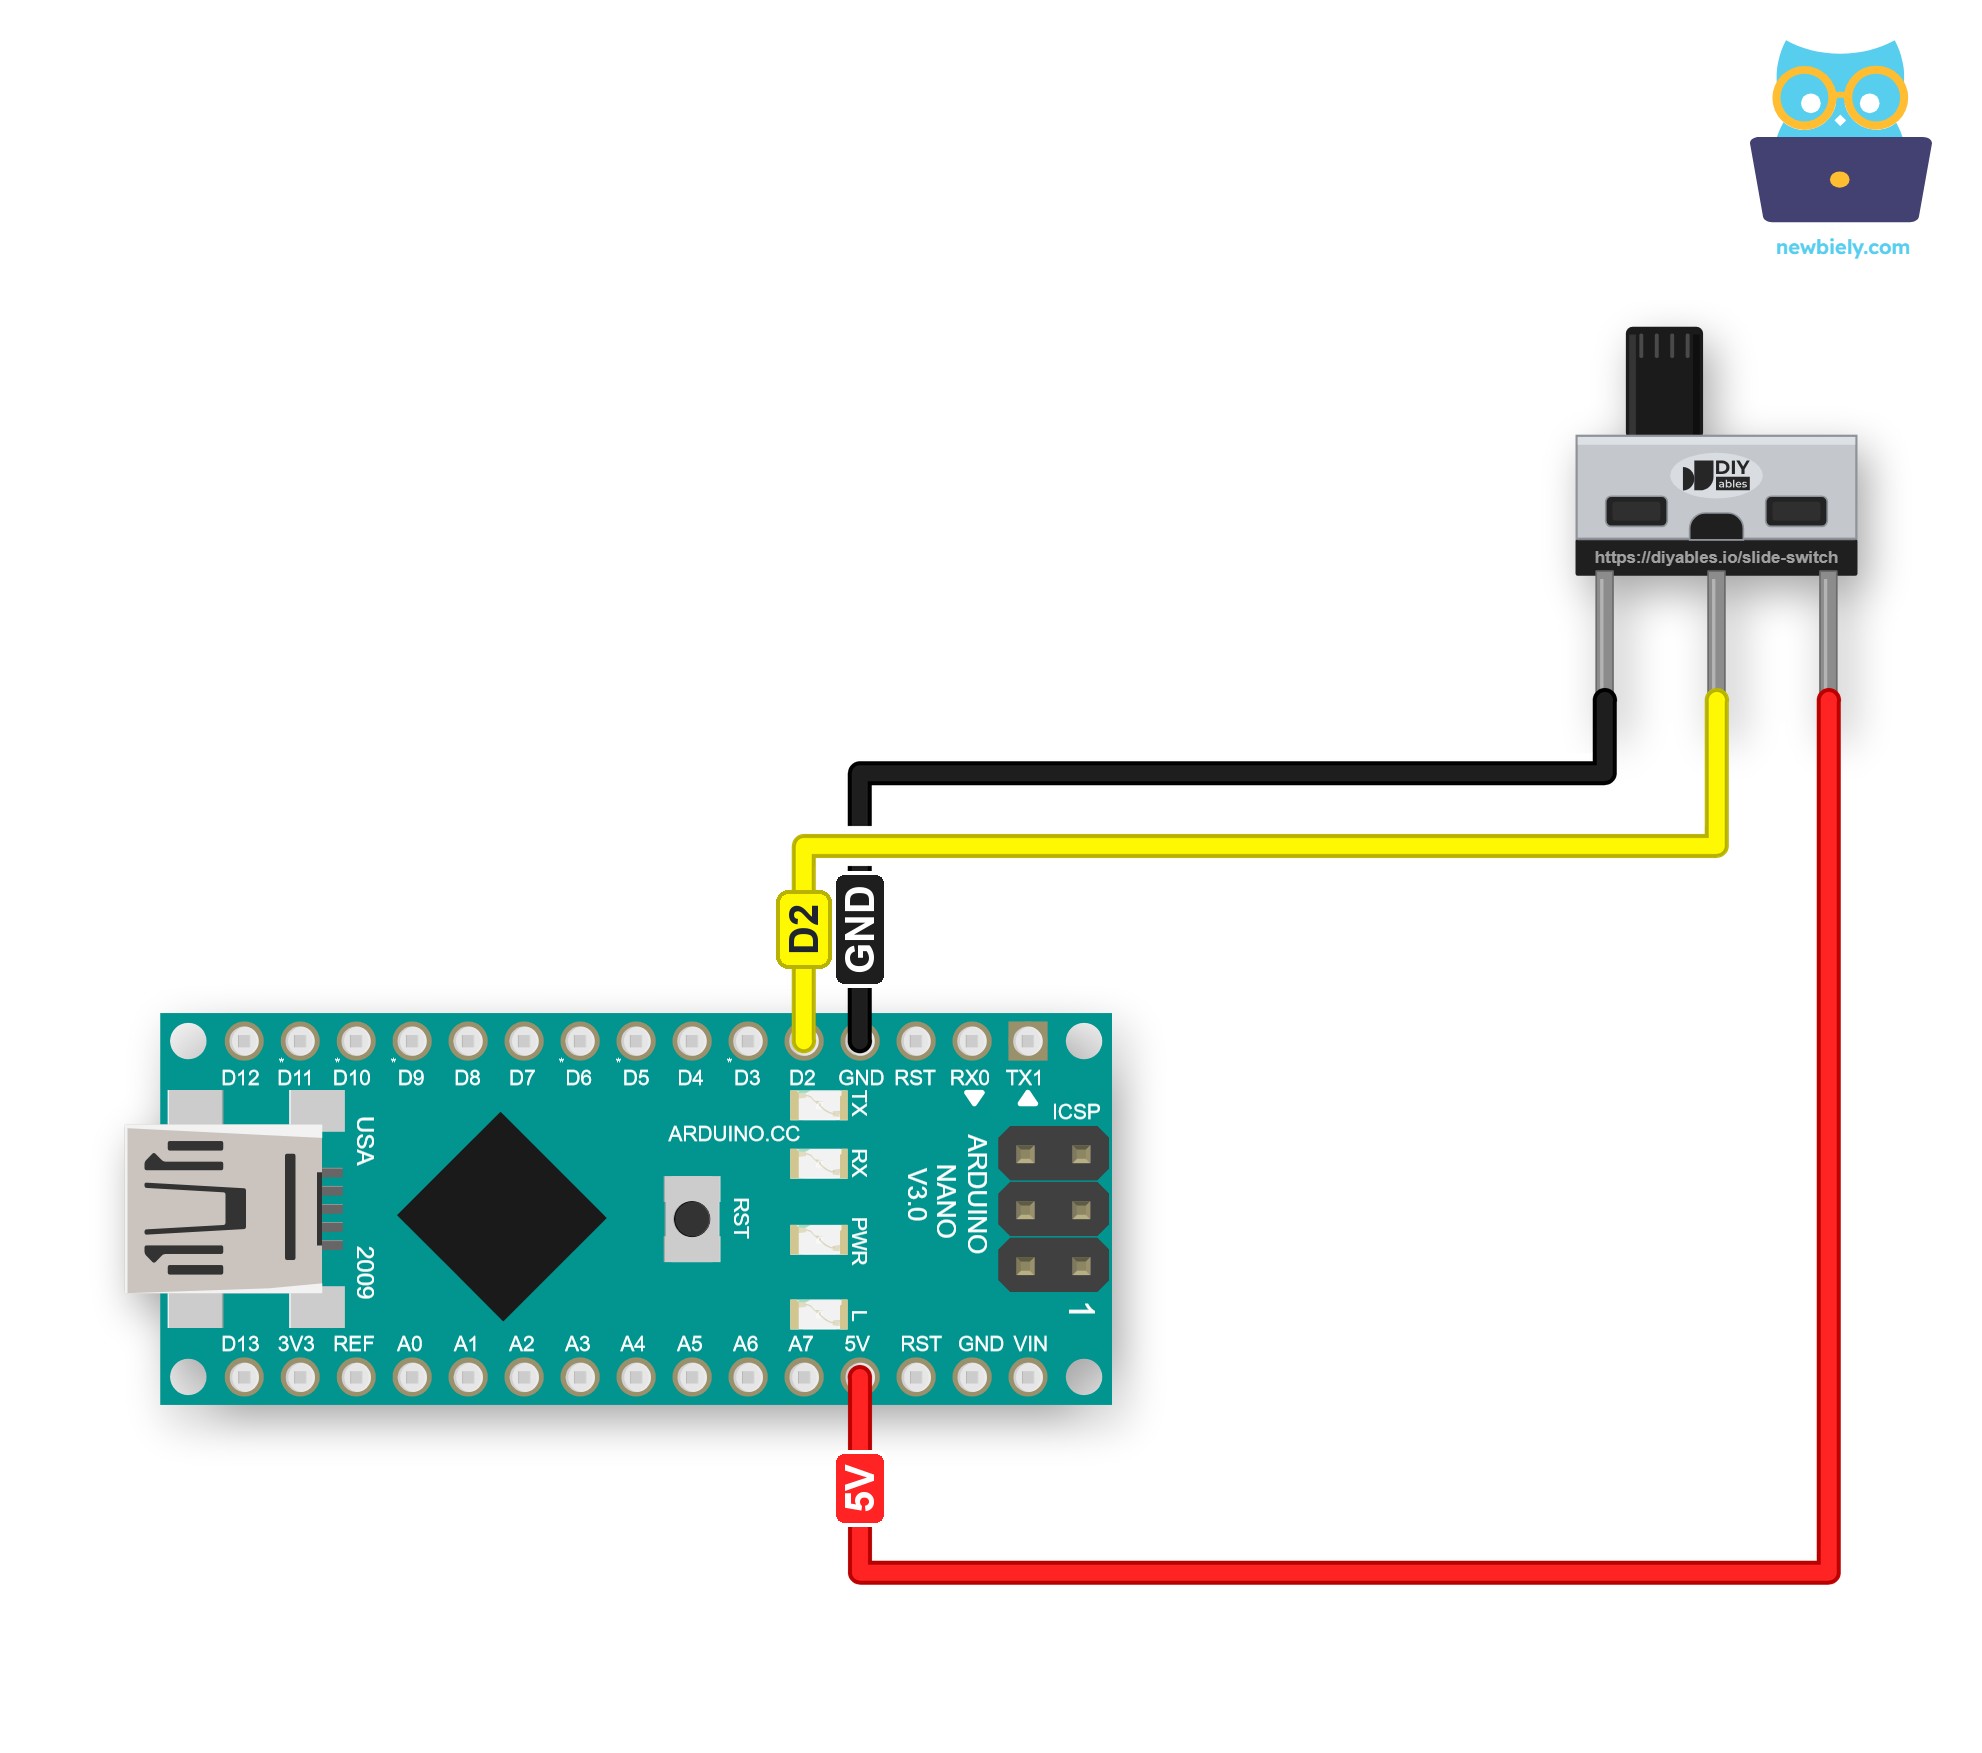
This image is created using Fritzing. Click to enlarge image
| Slide Switch Pin | Arduino Nano Pin |
|---|---|
| Pin 1 | GND |
| Pin 2 (COM) | D2 |
| Pin 3 | 5V |
Want a stronger connection than jumper wires? In this case, use a Screw Terminal Expansion Board for Arduino Nano. The Arduino Nano plugs into it, and each pin gets a screw terminal. The diagram below shows the same wiring with the screw terminal board.
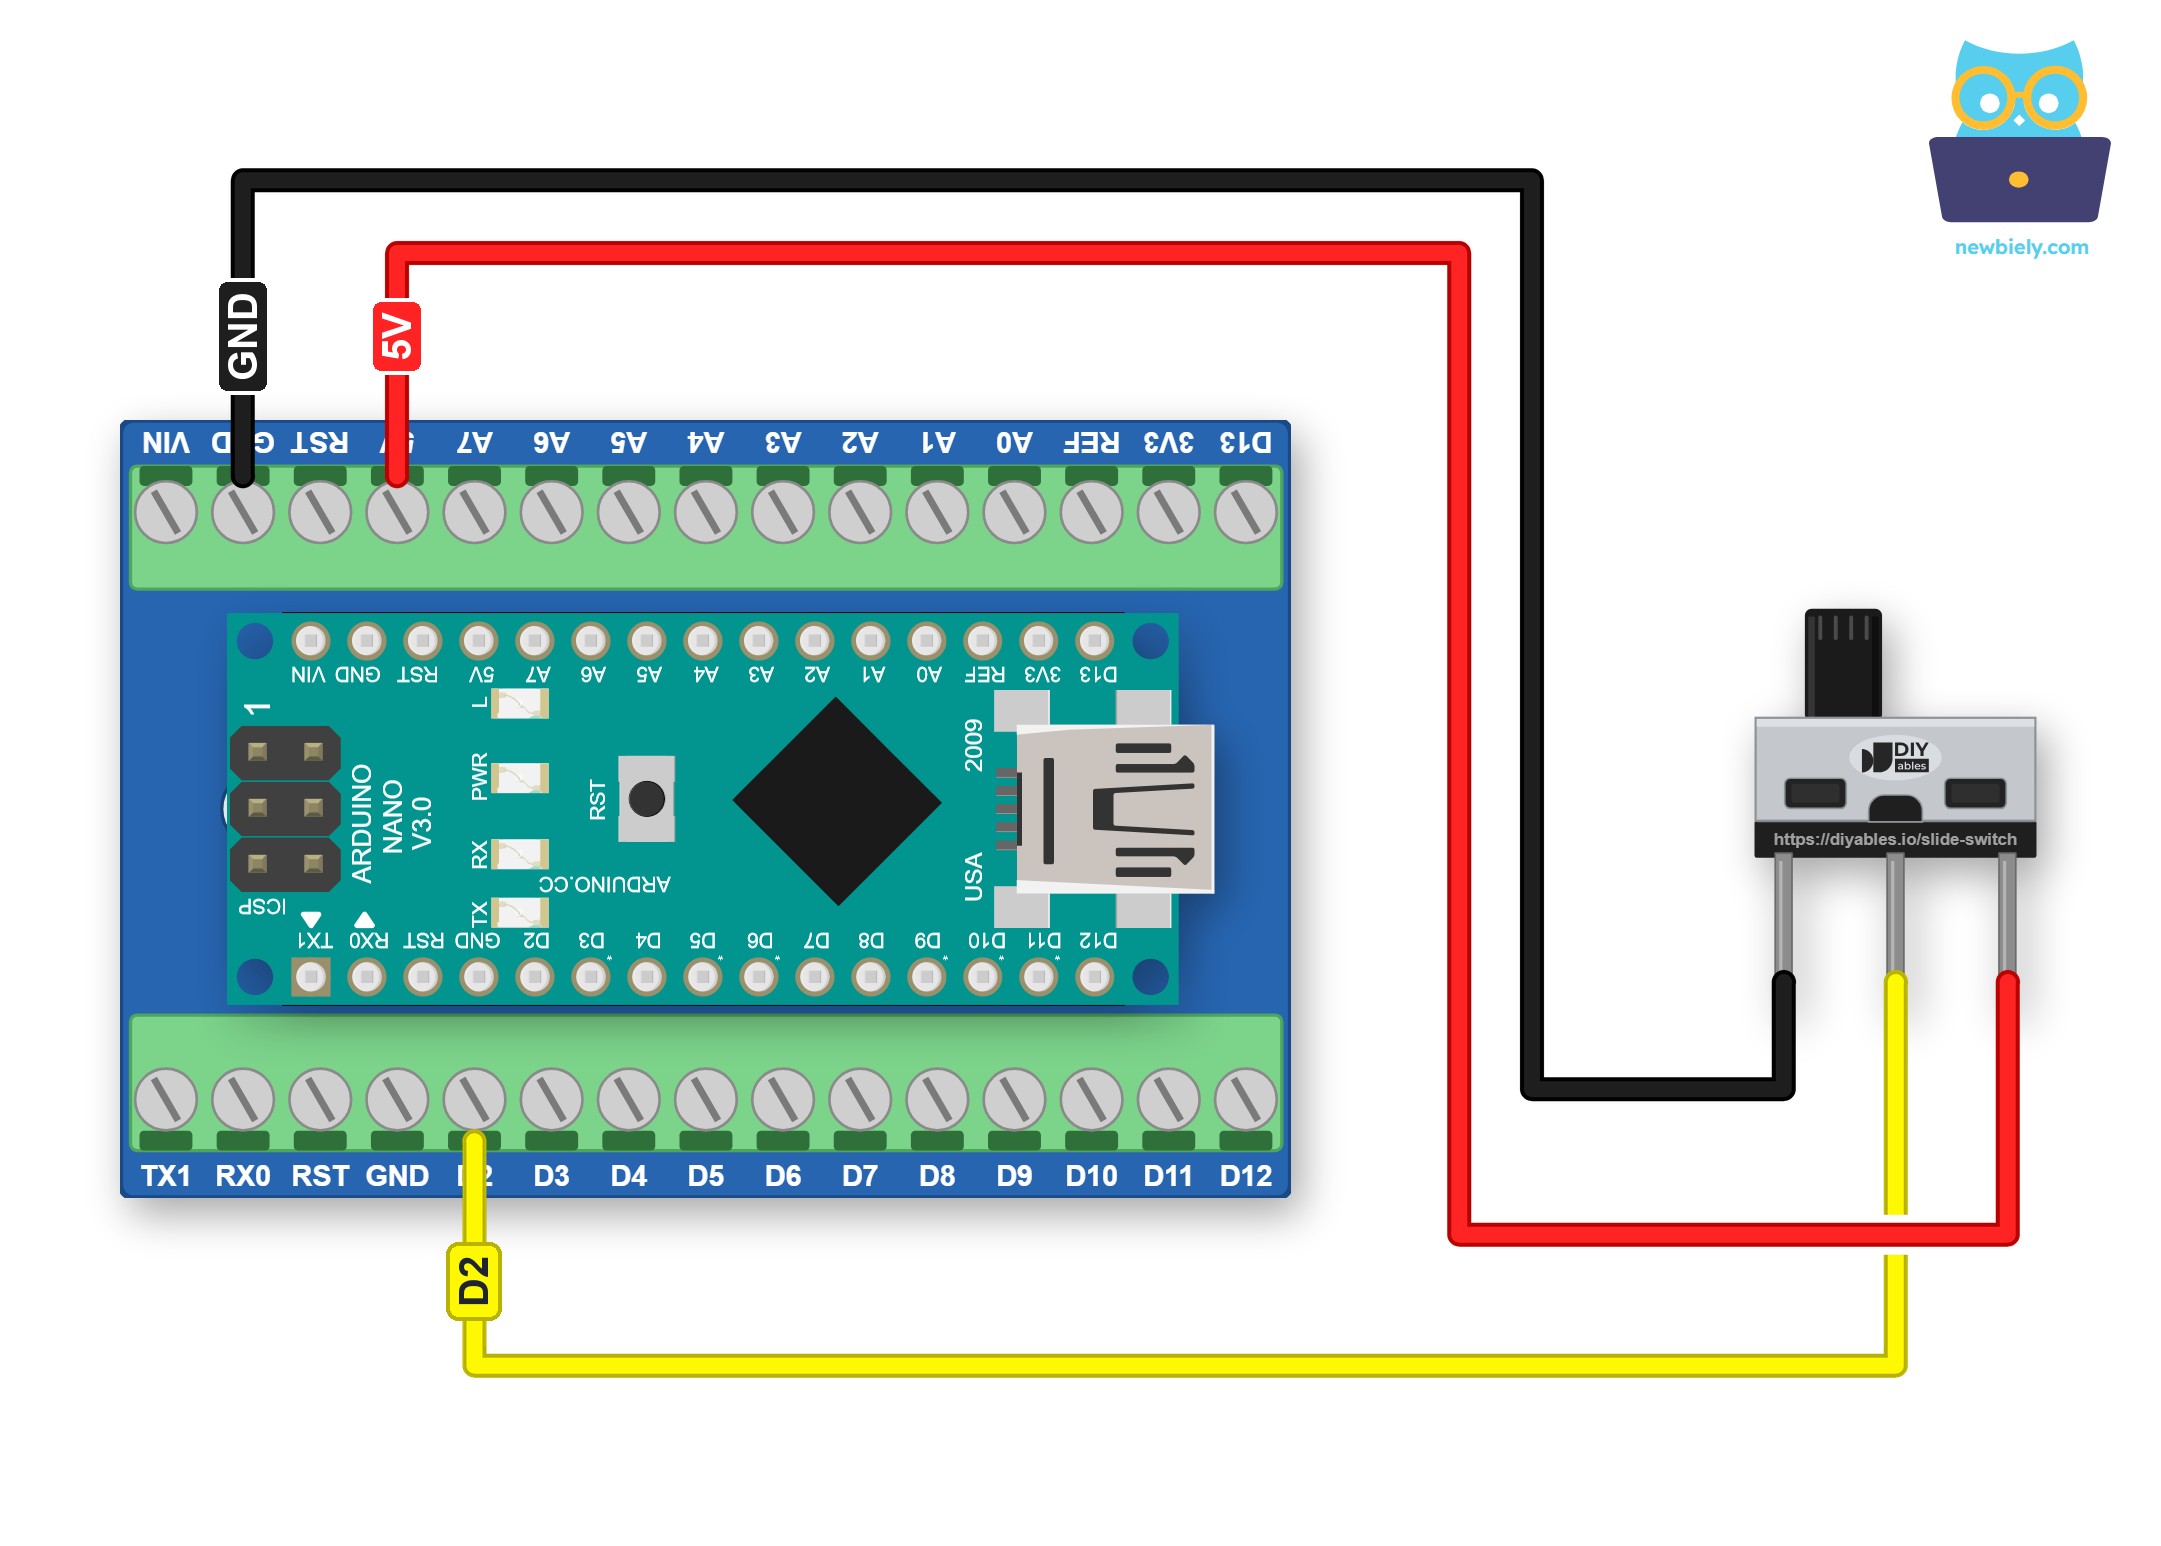
This image is created using Fritzing. Click to enlarge image
※ NOTE THAT:
- Pin 3 goes to the 5V pin, because 5V is the logic level of the ATmega328P chip on the Nano. The 3V3 pin is not used in this tutorial.
- Keep D2 set as an input. Never make it an OUTPUT: the switch connects it straight to 5V or to GND, so an output pin that drives the other level would be shorted.
How To Program For Slide Switch
No library is needed. The Nano reads a slide switch like any other digital input.
- The first step is to specify the Arduino Nano pin that is connected to the COM pin:
- Configure that pin as a plain input in setup() with pinMode(). The switch itself pulls the pin up or down, so INPUT is enough:
- Get the handle position with digitalRead(). HIGH means the handle points to pin 3 (ON), LOW means it points to pin 1 (OFF):
- The metal contacts bounce for a few milliseconds while the handle travels. So when the reading changes, wait 50 milliseconds and read the pin again before you trust the new value.
Arduino Nano Code for Slide Switch
The sketch below prints the handle position once, right after start-up. After that, it stays quiet and adds a line only when you move the handle. Every change is checked a second time after 50 milliseconds, so contact bounce never prints a false line.
Detailed Instructions
- If this is the first time you use Arduino Nano, see how to set up the environment for Arduino Nano in Arduino IDE.
- Wire the components as shown in the diagram.
- Connect the Arduino Nano board to your computer using a USB cable.
- Open Arduino IDE on your computer.
- In the board list, choose Arduino Nano, then choose its COM port.
- Copy the code above into an empty sketch.
- Click the Upload button to compile the sketch and send it to the Nano.
- Open the Serial Monitor and select 9600 baud.
- Set the handle toward pin 1 and press the reset button of the Nano.
- Now slide the handle toward pin 3, back toward pin 1, and toward pin 3 once more.
- Every move adds exactly one line:
If the text never changes, check that the middle pin of the switch, not an outer pin, goes to D2.
Arduino Nano Code for Slide Switch - INPUT_PULLUP (2 Wires)
Short on wires, or need the 5V pin for something else? Each digital pin of the Nano has a pull-up resistor inside the chip. Turn it on with INPUT_PULLUP, and the pin 3 wire is no longer needed. Only two wires are left: COM to D2 and pin 1 to GND.
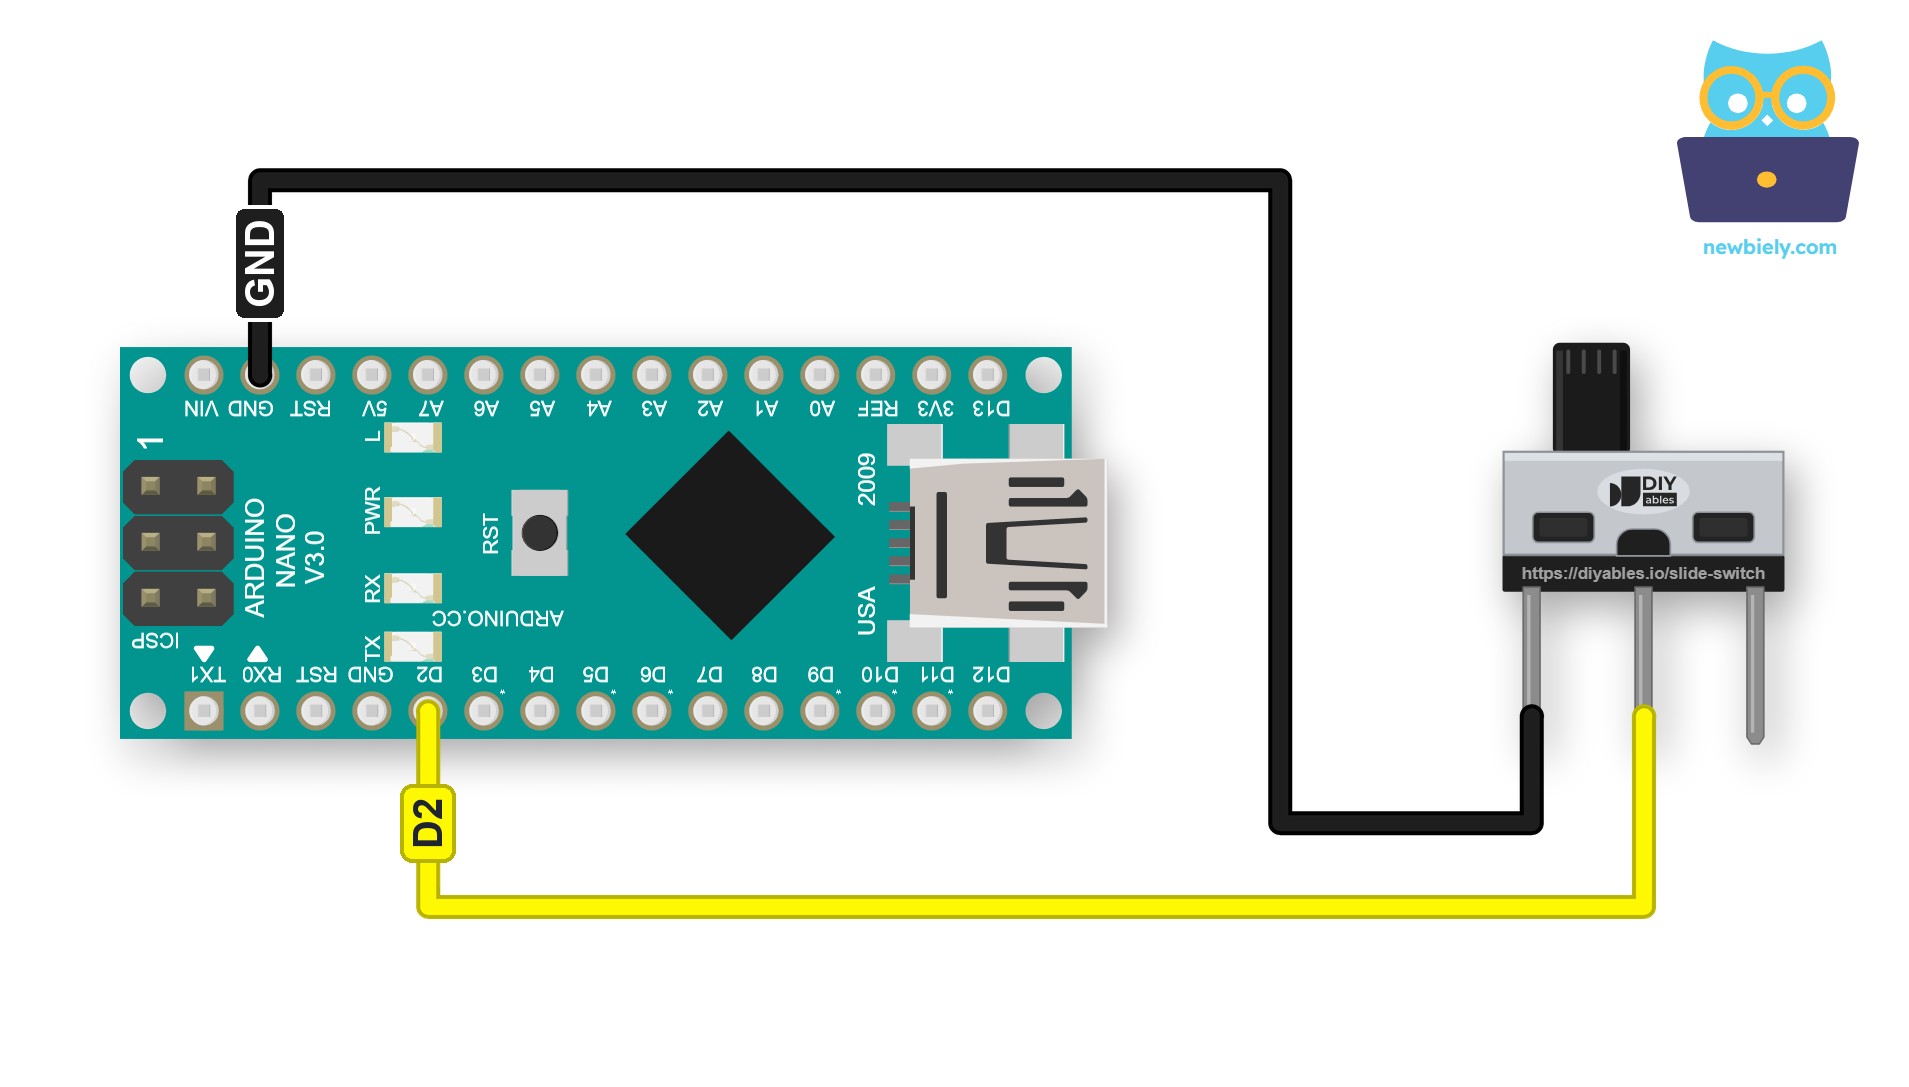
This image is created using Fritzing. Click to enlarge image
See The best way to supply power to the Arduino Nano and other components.
| Slide Switch Pin | Arduino Nano Pin |
|---|---|
| Pin 1 | GND |
| Pin 2 (COM) | D2 |
| Pin 3 | not connected |
Pay attention: with this wiring, the logic is upside down.
- Handle toward pin 1: COM is joined to GND, so D2 reads LOW. The code calls this ON.
- Handle toward pin 3: COM touches nothing, and the internal pull-up lifts D2 to HIGH. The code calls this OFF.
Detailed Instructions
- Pull the wire off pin 3 of the switch. Leave the other two wires in place.
- Paste this sketch into Arduino IDE, in place of the first one.
- Click Upload. The handle is still toward pin 3 from the last test, so the first line says OFF.
- Slide the handle toward pin 1, then toward pin 3, then toward pin 1, then toward pin 3 again.
- The Serial Monitor now shows:
Additional Knowledge
Slide Switch vs Push Button vs ON/OFF Rocker Switch
| Slide Switch (SS12D10) | Push Button | ON/OFF Rocker Switch | |
|---|---|---|---|
| How you use it | slide the handle left or right | press the cap down | tip the rocker to one side |
| Stays where you leave it | yes, until you slide it back | no, it springs back when released | yes, until you tip it back |
| Pins | 3 (SPDT, one common pin) | 4 legs joined in pairs | 2 or 3 |
| Where it goes | on a PCB, through-hole | on a PCB or a breadboard | in a cut-out hole of a panel |
| Size | very small | small | large and easy to reach |
| Typical job | a mode or setting selector inside a device | a short command such as start or next | the main power switch of a box |
It is evident that the slide switch suits a setting that must stay put on a small board. A push button suits a quick command, and an ON/OFF rocker switch suits a power switch on the outside of a case.
Project Ideas
- A day/night selector that changes how bright a lamp project shines
- A mute switch that turns the sound of a buzzer alarm on or off
- A test/run selector that the sketch reads once at start-up to pick its mode
- A direction selector for a small DC motor or a stepper motor