
ESP32 S3 - DHT22 - LCD
The DHT22 sensor paired with an LCD I2C display gives the ESP32 S3 a self-contained environmental monitoring station that shows live temperature and humidity readings without needing a Serial Monitor. This tutorial walks you through wiring both components to the ESP32 S3 and writing the Arduino code that reads the sensor and updates the screen every two seconds.
What you'll build:
- A circuit connecting a DHT22 temperature and humidity sensor and an LCD I2C display to the ESP32 S3
- A sketch that reads temperature and humidity from the DHT22 and displays them on the LCD every two seconds
- A portable, stand-alone environmental monitor that works without a connected laptop
- A foundation you can extend into climate control systems, data loggers, or IoT weather stations
Hardware Preparation
Or you can buy the following kits:
| 1 | × | DIYables ESP32 S3 Starter Kit (ESP32 S3 included) | |
| 1 | × | DIYables Sensor Kit (18 sensors/displays) |
Additionally, some of these links are for products from our own brand, DIYables .
Buy Note: Most LCD I2C displays available on the market are 5V displays. They may work with this board, but it is unsafe and can damage the board. We strongly recommend using the 3.3V LCD I2C display recommended above.
Overview of DHT22 and LCD
The DHT22 sensor uses a single-wire digital protocol to deliver calibrated temperature readings from -40 to 80 °C and relative humidity readings from 0 to 100 % RH, making it a more precise and versatile choice than the DHT11 for both indoor and outdoor environmental monitoring projects. Pairing it with an LCD I2C display gives the ESP32 S3 a clean, human-readable output that updates continuously without requiring any additional hardware beyond a few jumper wires.
Key Specifications
We have dedicated tutorials covering each component in depth. Each tutorial contains detailed information and step-by-step instructions about hardware pinout, working principle, wiring connection to the ESP32 S3, and Arduino code. Learn more about them at the following links:
Wiring Diagram
Connect the DHT22 sensor and the LCD I2C display to your ESP32 S3 following the diagram below, and double-check every connection before powering the board. The DHT22 can operate at either 3.3V or 5V, so you may connect its VCC pin to either rail depending on your setup.
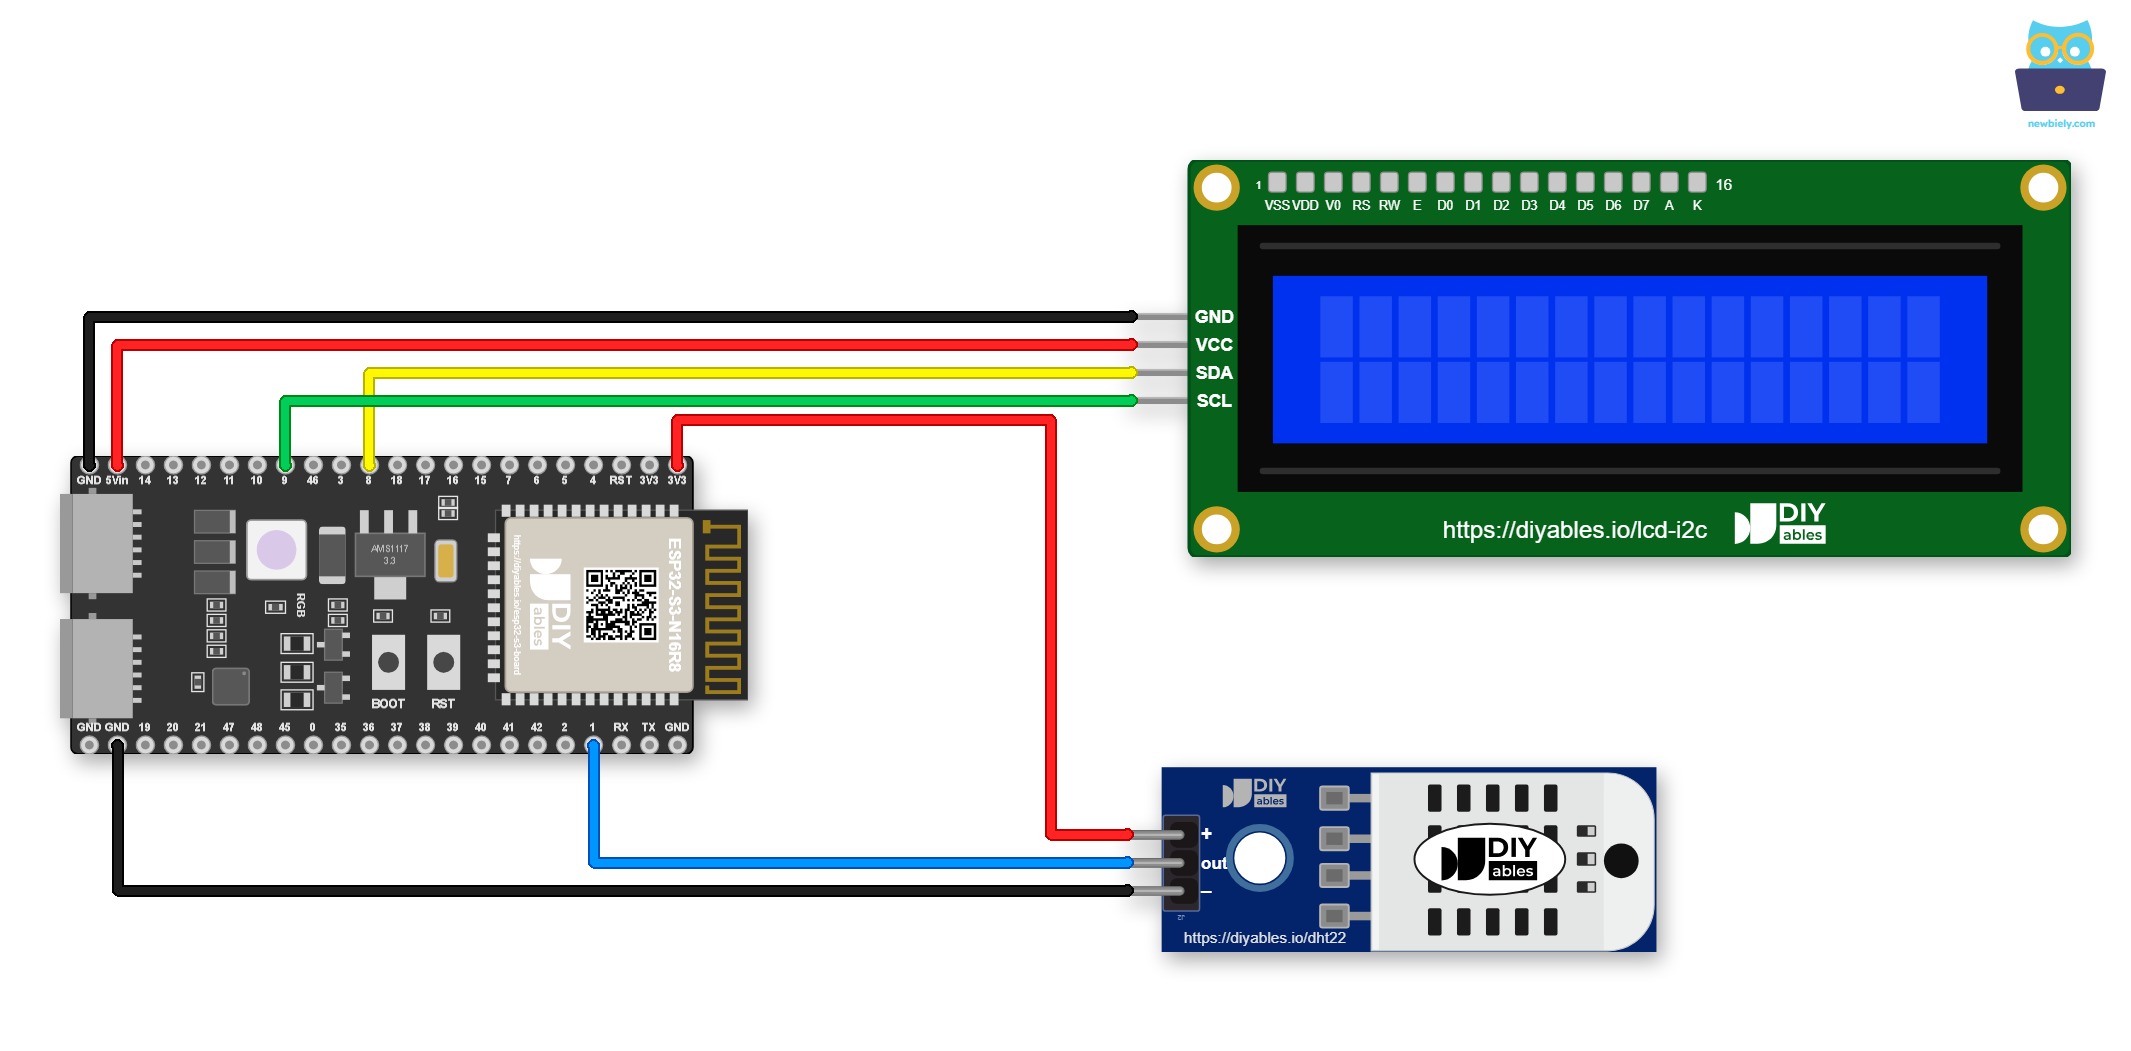
This image is created using Fritzing. Click to enlarge image
In the above diagram, the LCD is powered from the ESP32 S3 board. In some cases this may not supply enough current for the display. If the LCD shows nothing, power it from an external 5V source instead:
- If powering the ESP32 S3 via its Vin pin and the LCD with an external supply
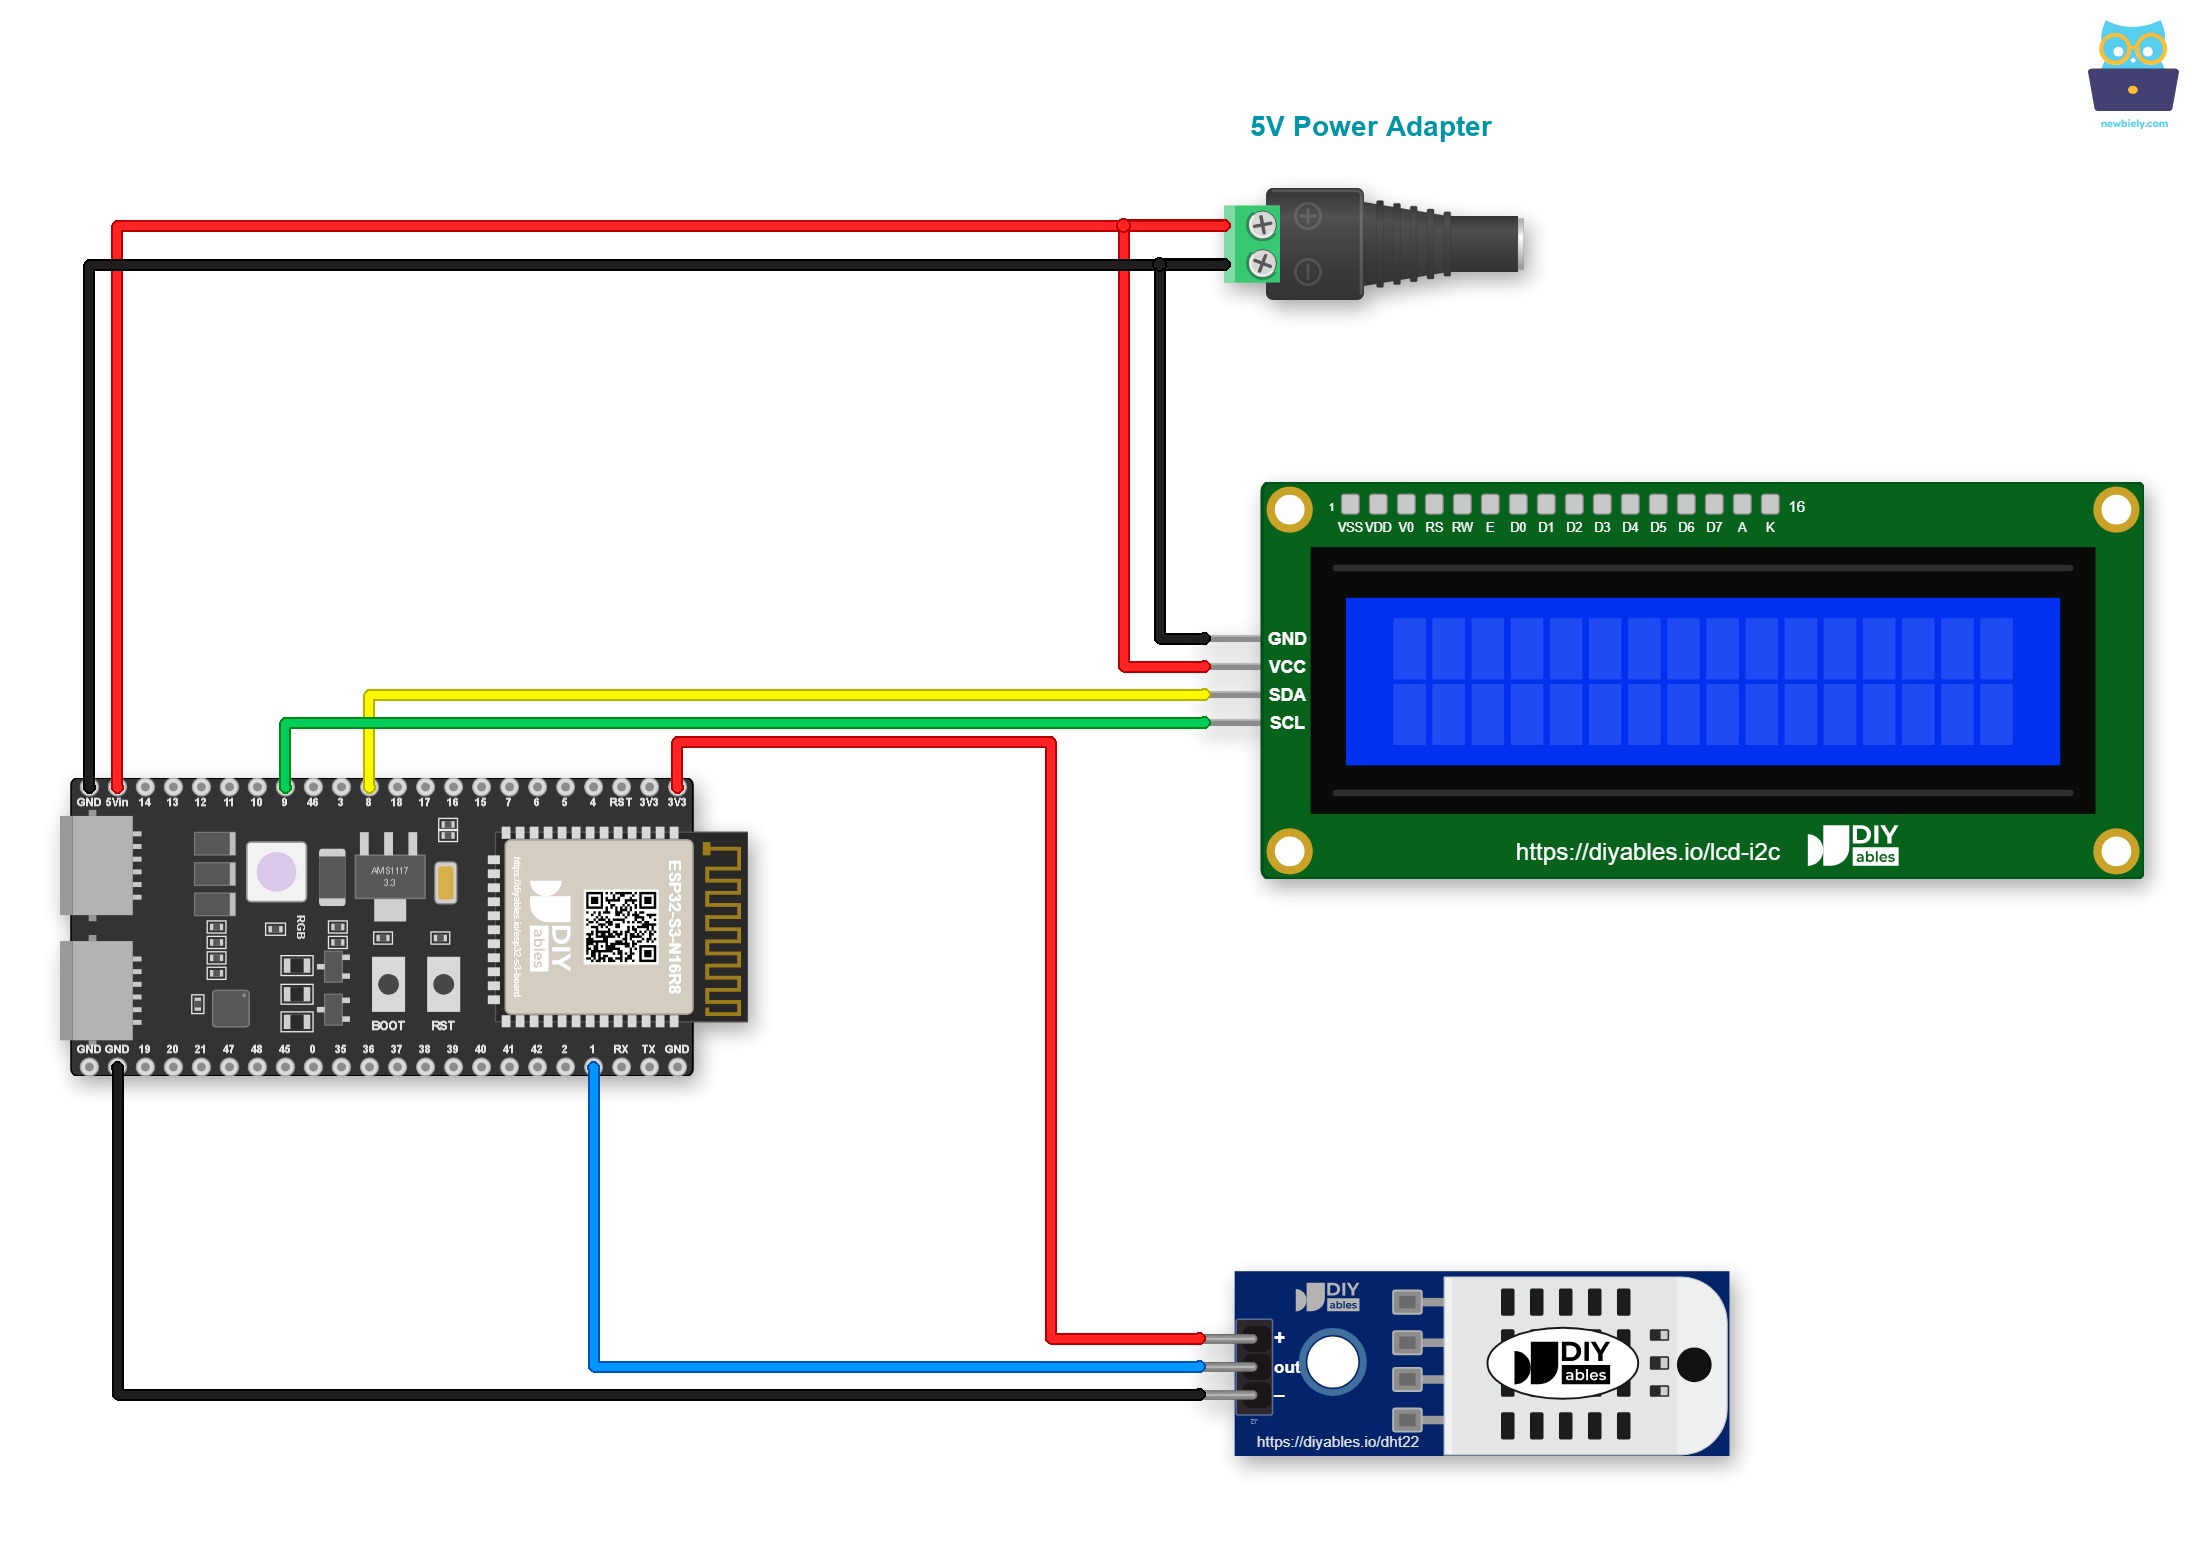
This image is created using Fritzing. Click to enlarge image
A screw terminal keeps each wire tight, even when the board shakes. A Screw Terminal Block for ESP32 S3 solves this. Plug the ESP32 S3 into it and screw the wires in. The wiring stays the same. Only the wires now go to the screw terminals, as shown below.
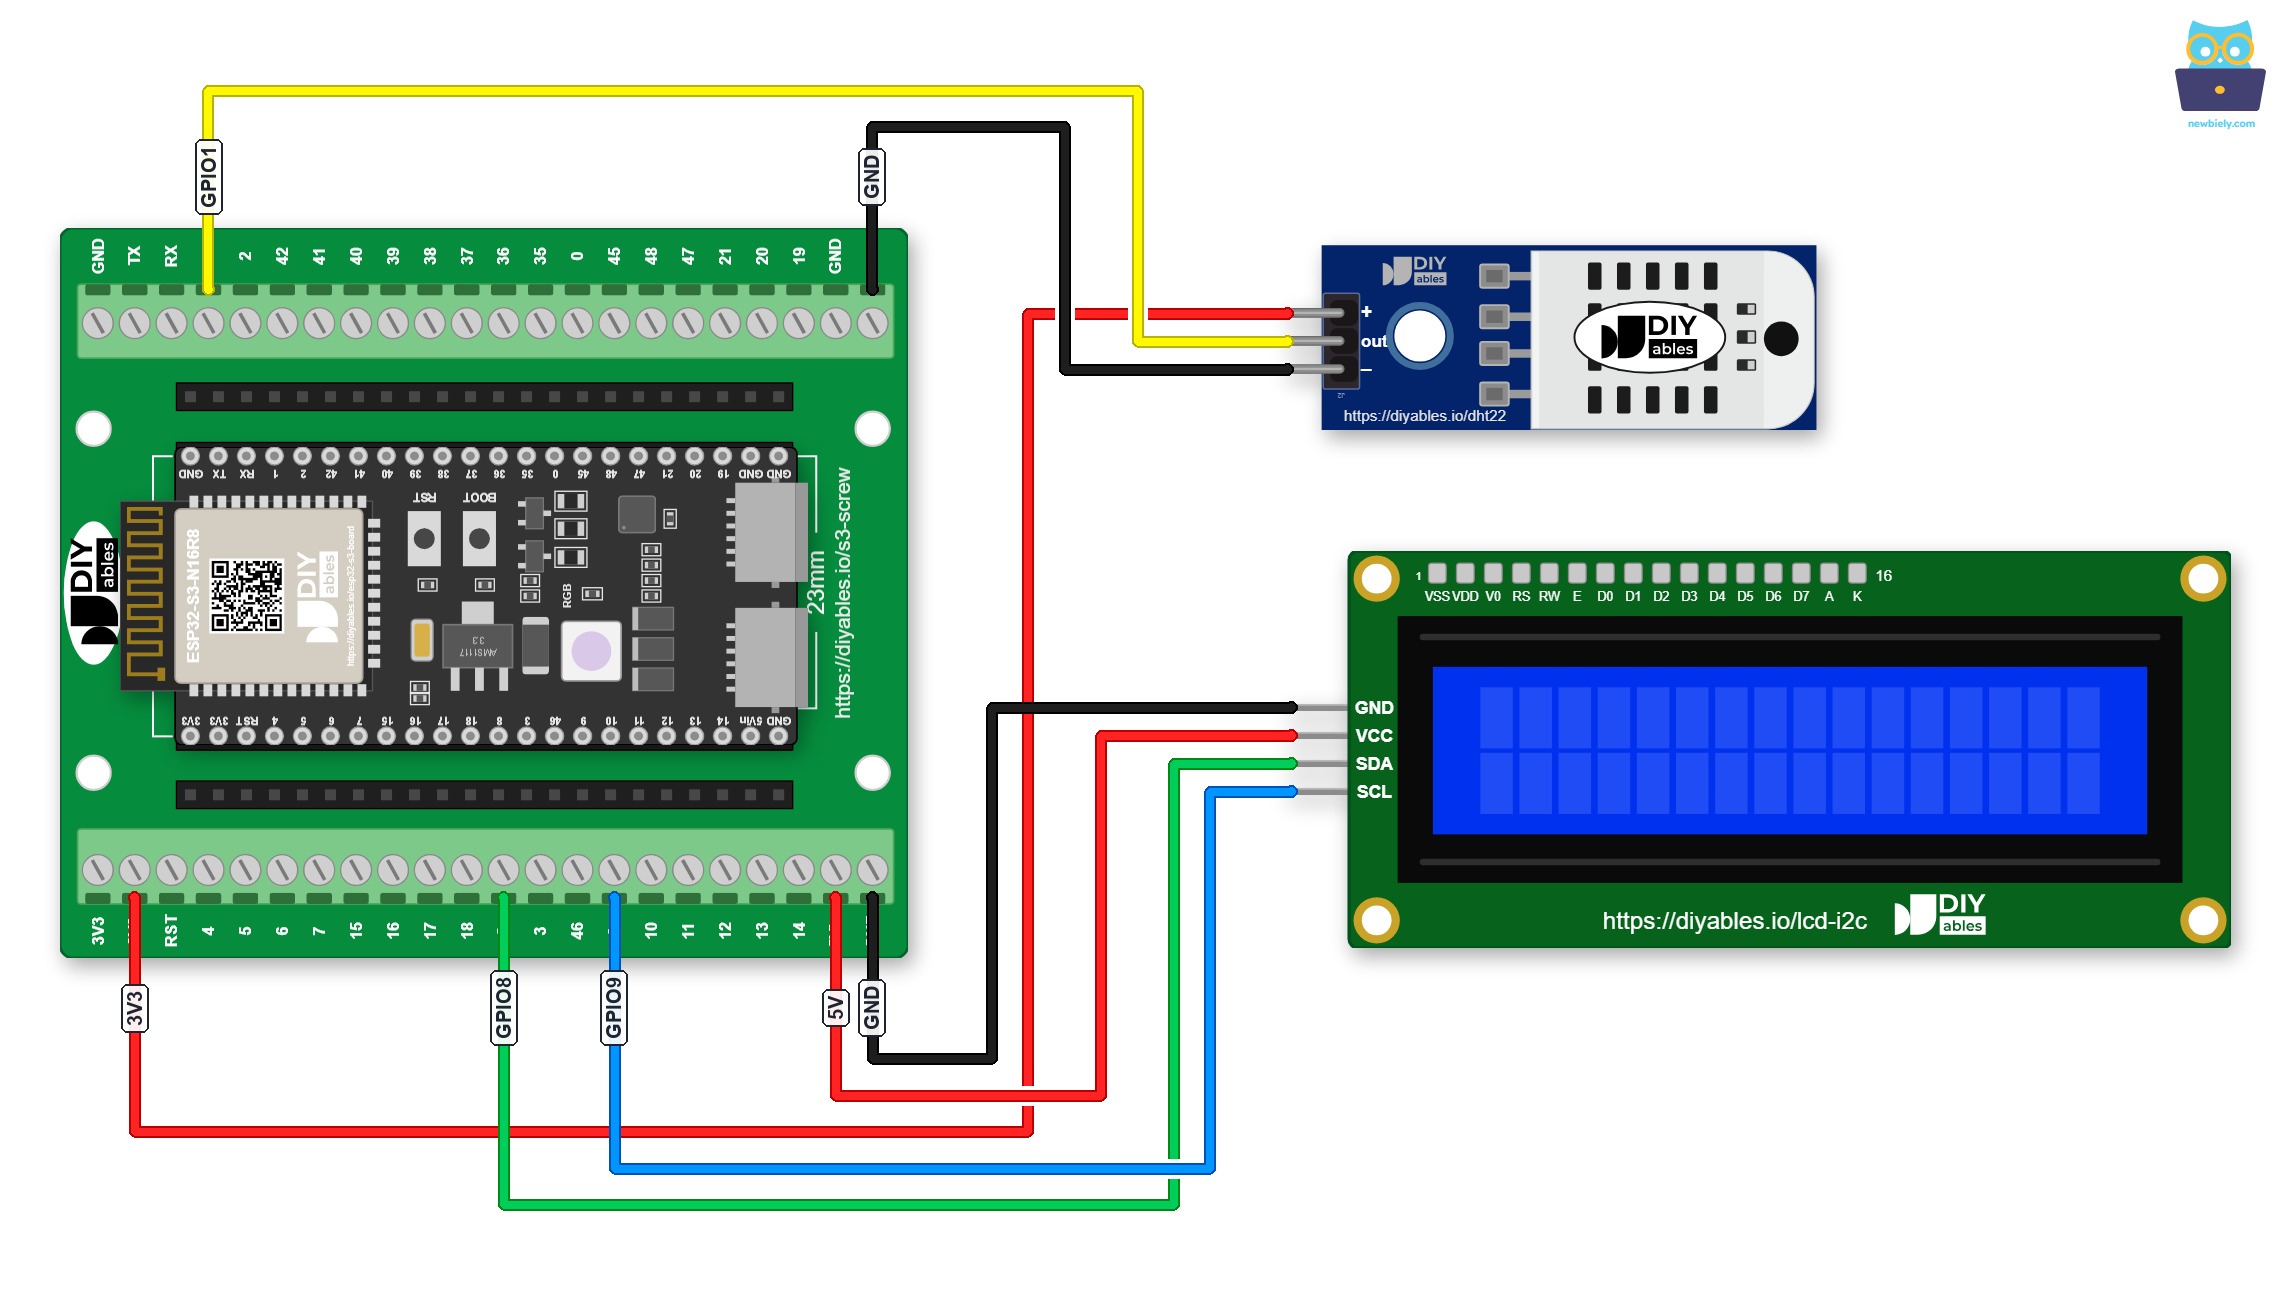
This image is created using Fritzing. Click to enlarge image
Another choice is a GPIO Breakout Board for ESP32 S3. Each GPIO has a signal pin with 3.3V and GND pins next to it, as shown below:
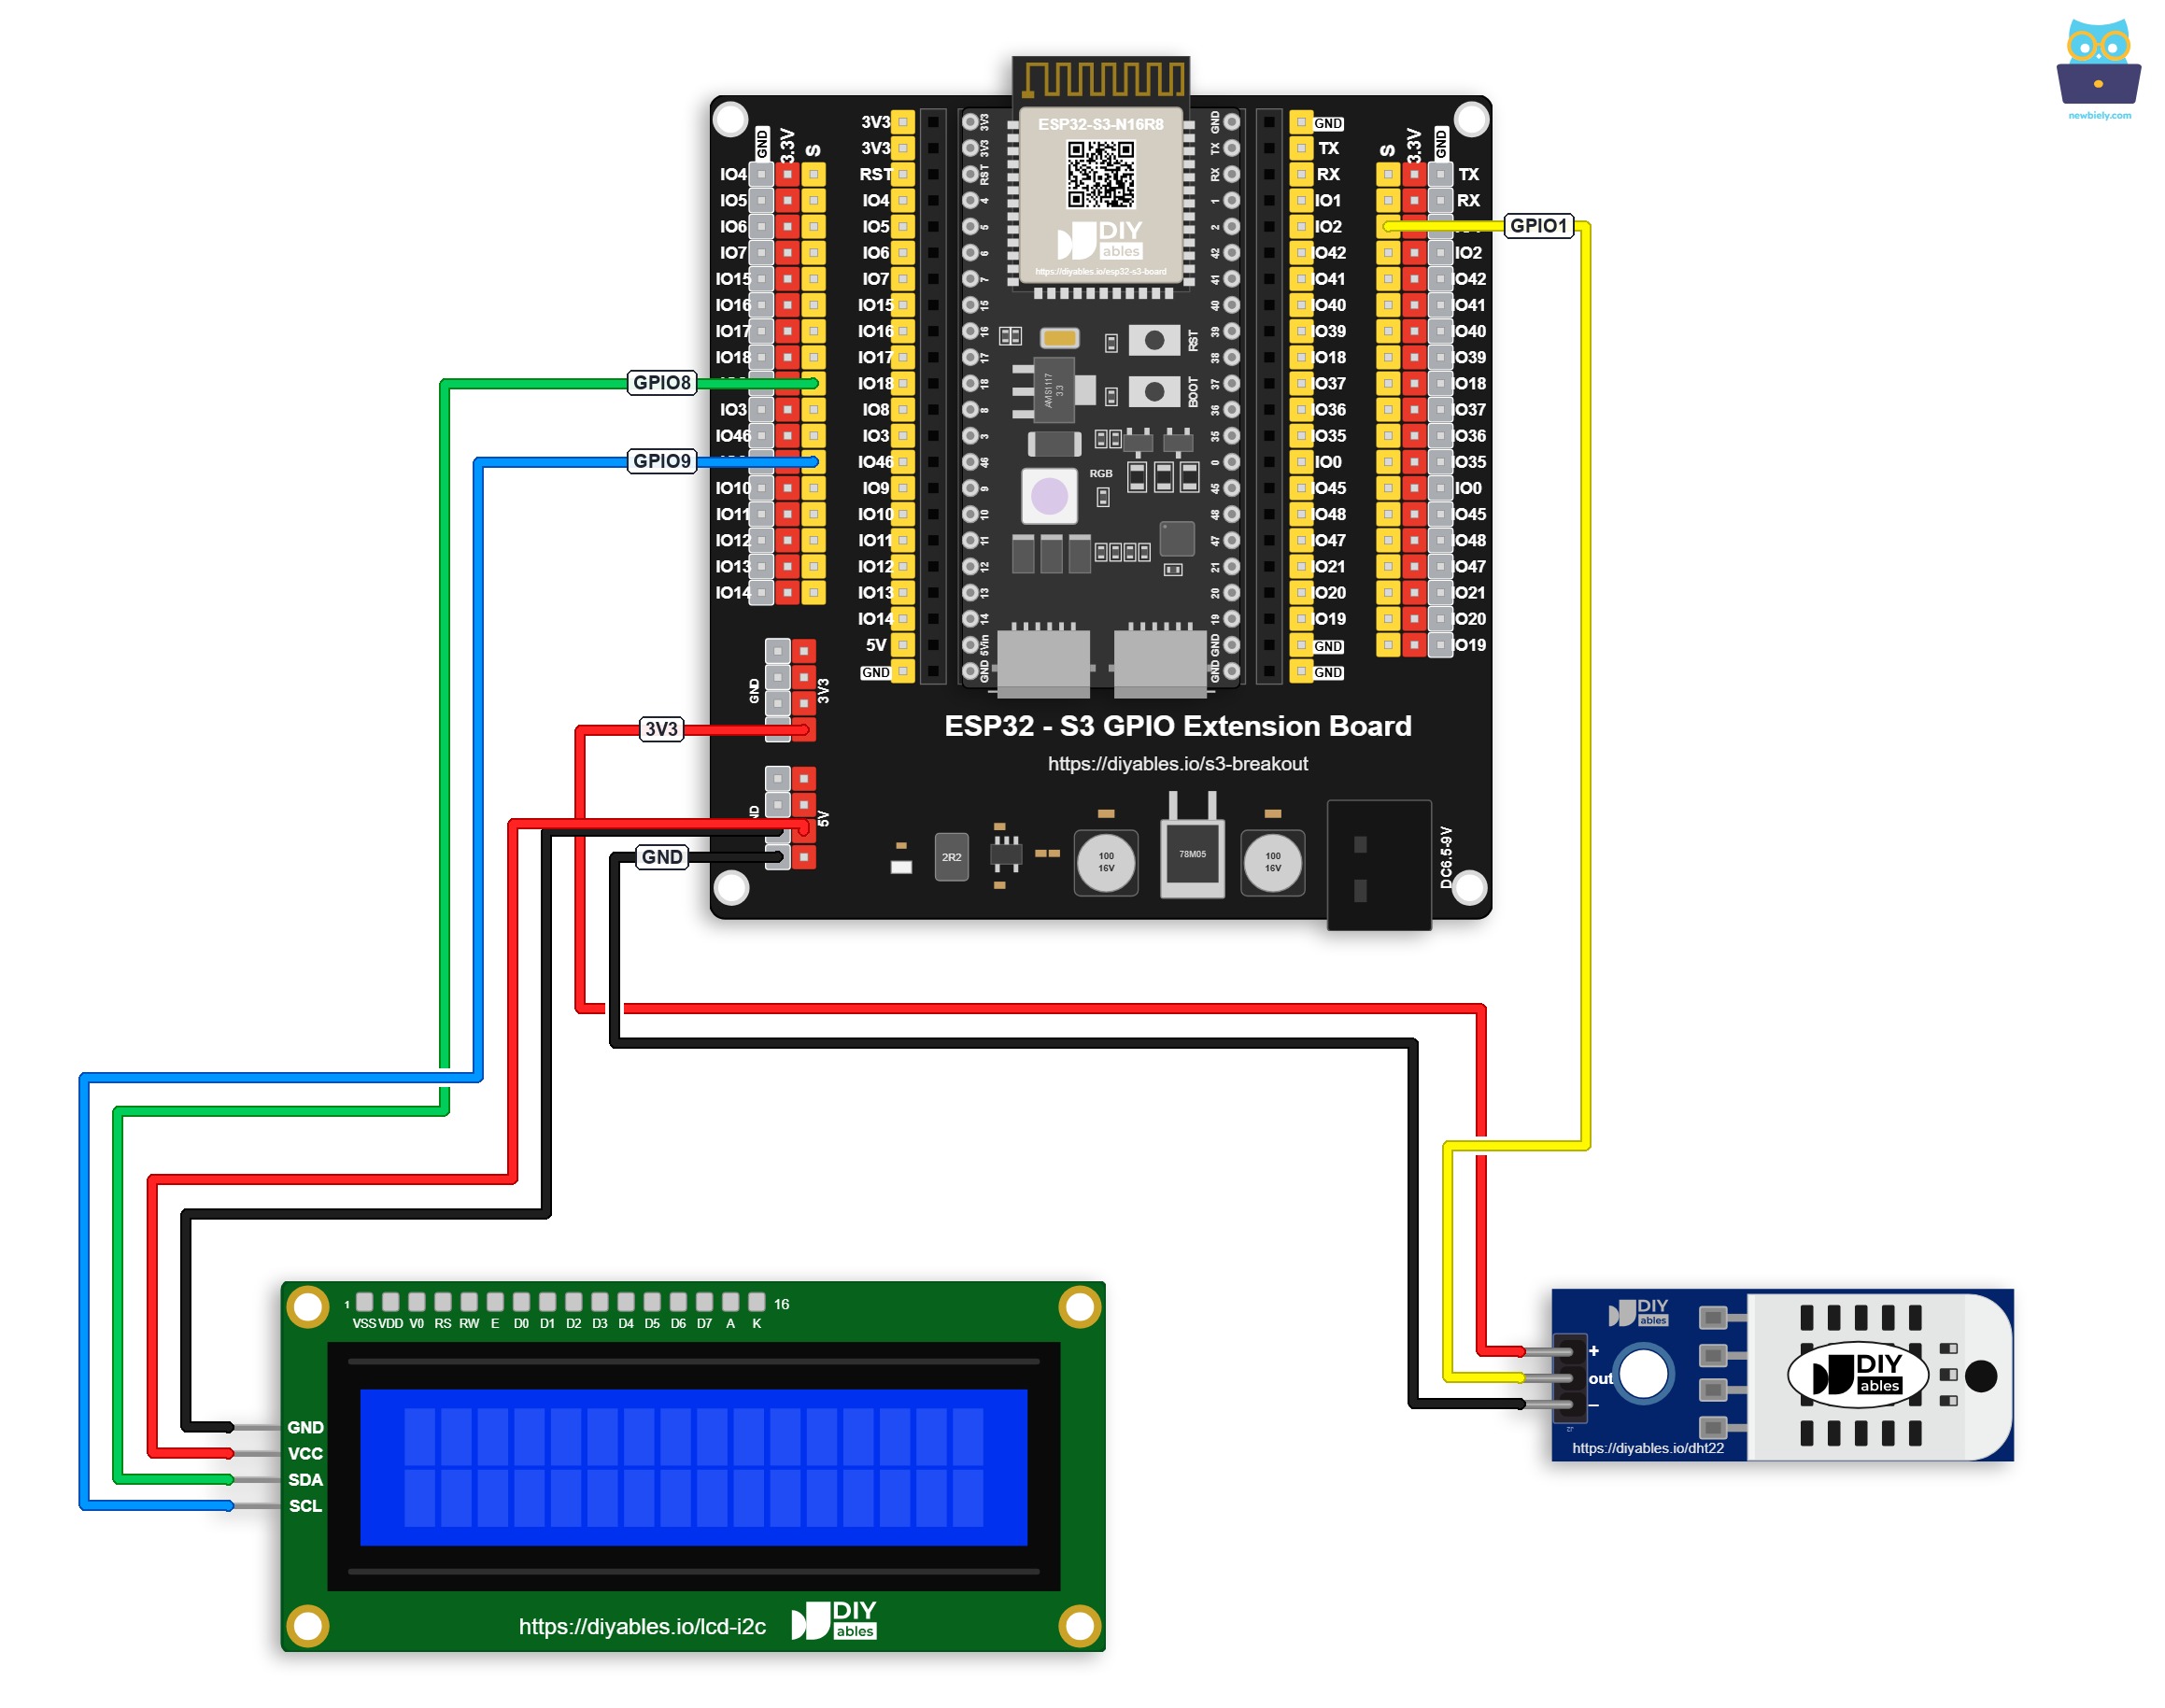
This image is created using Fritzing. Click to enlarge image
- If powering the ESP32 S3 via USB and the LCD with an external supply
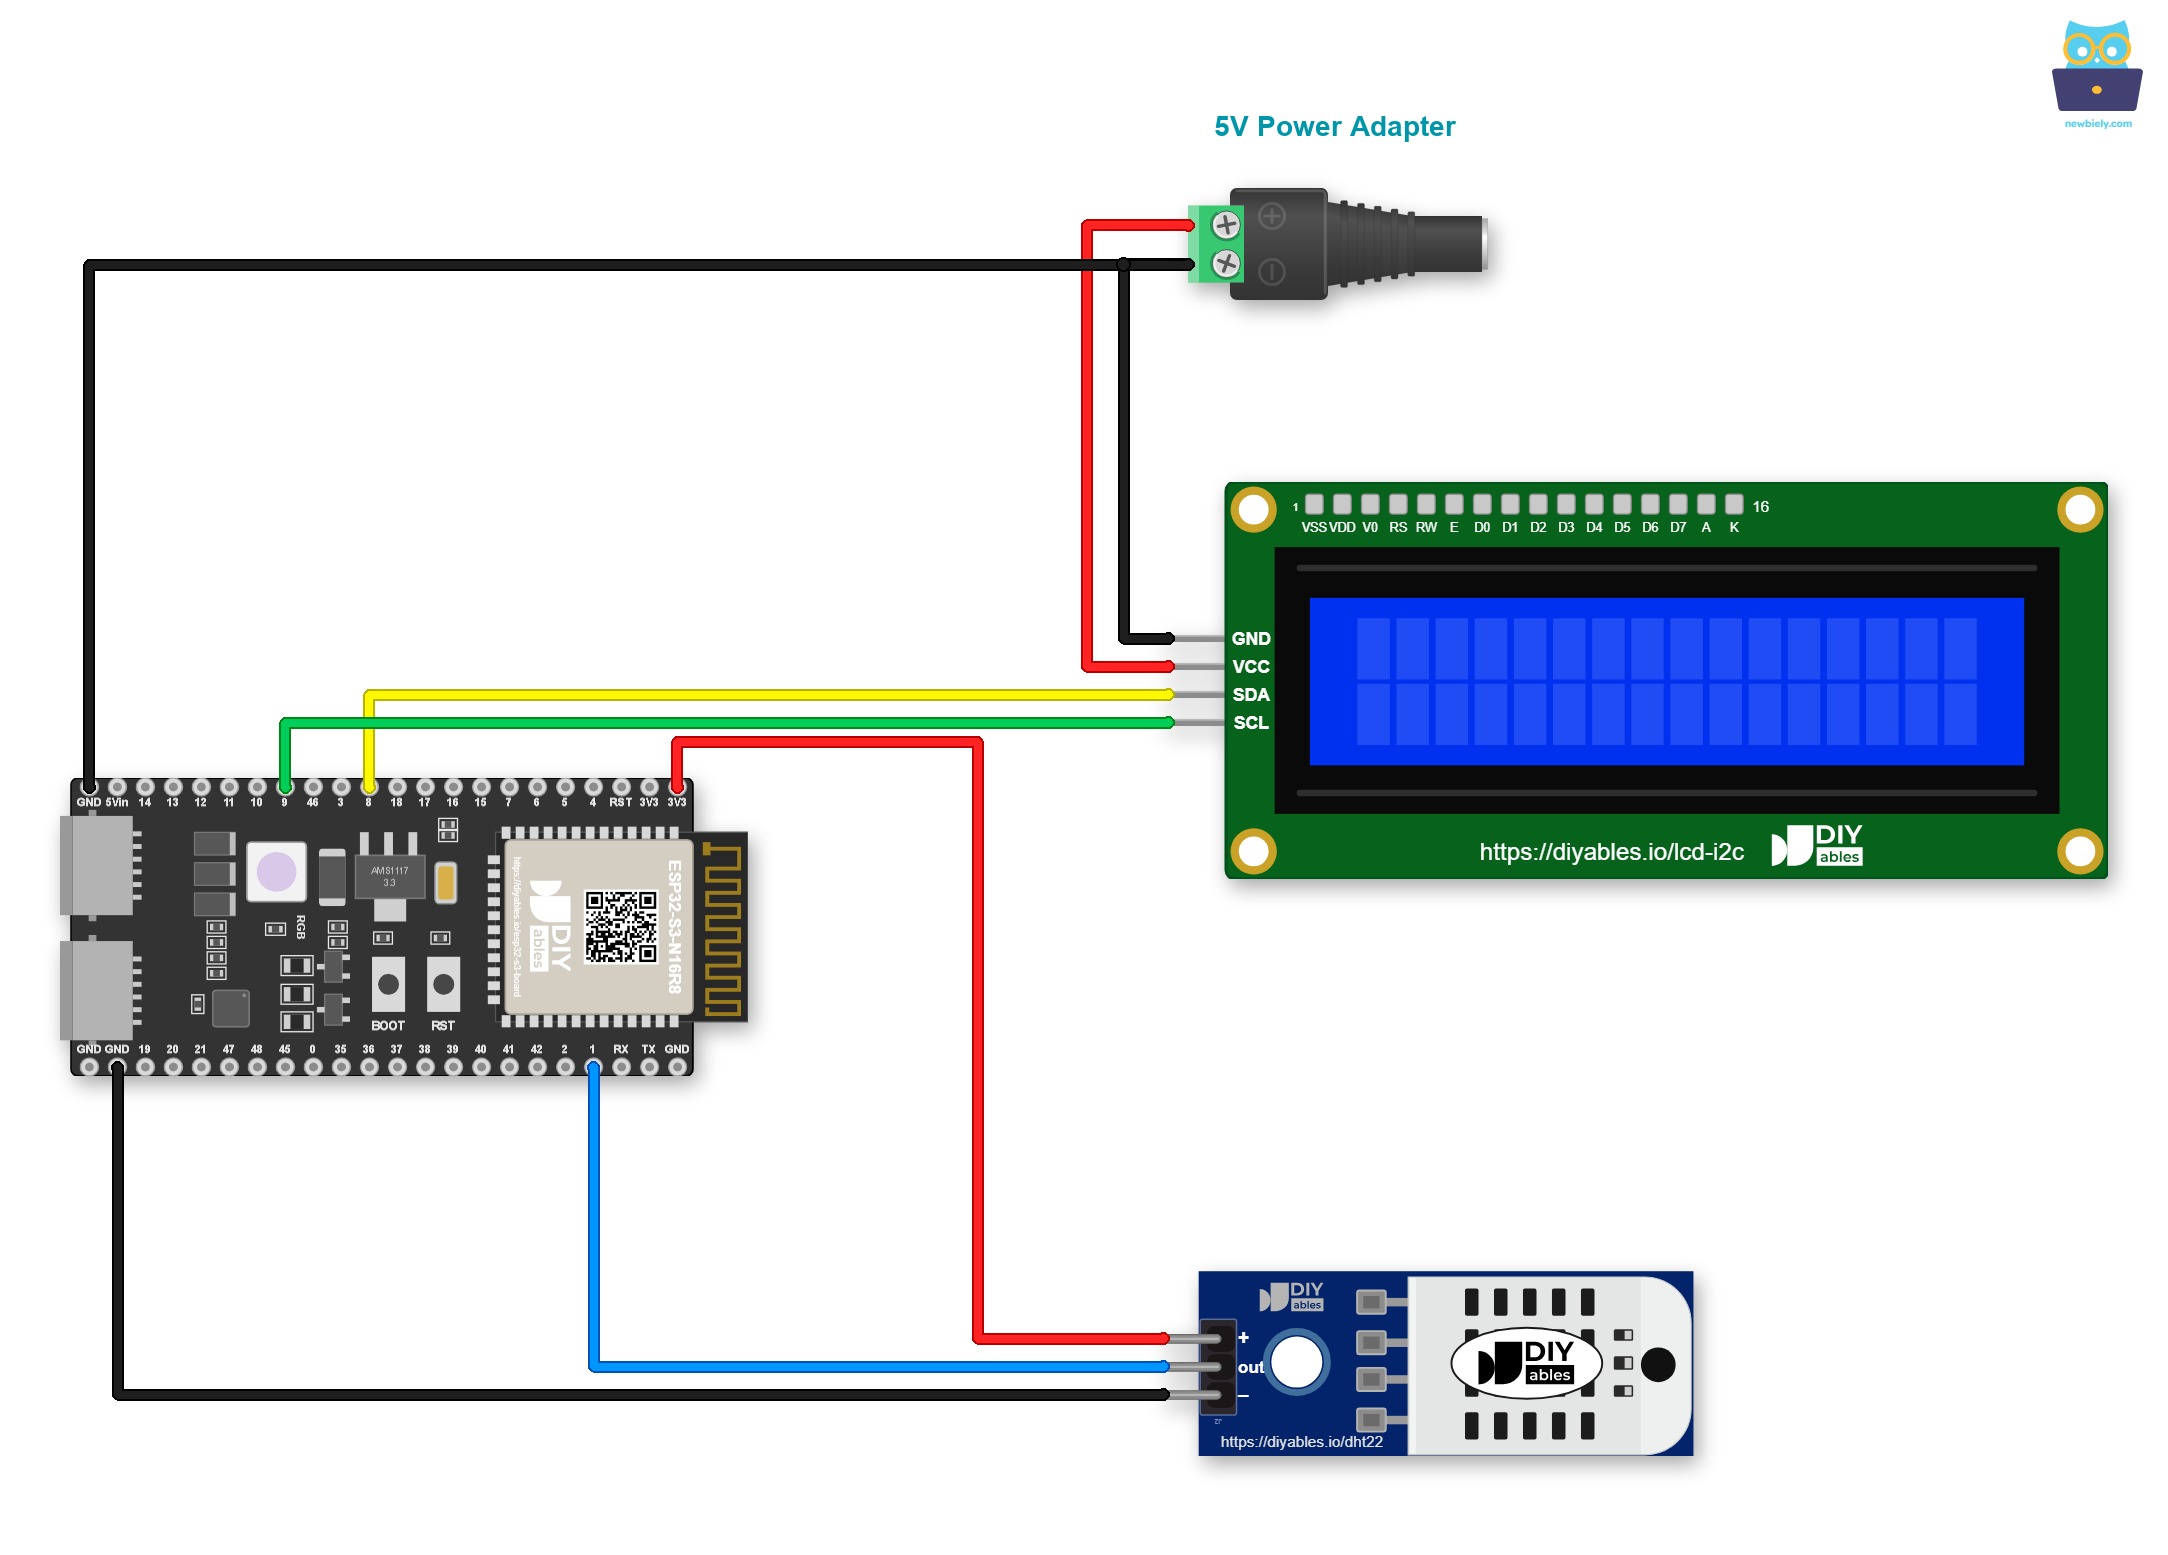
This image is created using Fritzing. Click to enlarge image
Safety Notes
Always verify that the DHT22 data pin is connected to a GPIO that is defined in the sketch, and use a 10 kΩ pull-up resistor between the data pin and VCC if your module does not already include one. Keep the sensor away from heat sources, direct sunlight, and condensation, as these can skew readings and permanently damage the sensing element.
| Component | Pin | ESP32 S3 Pin |
|---|---|---|
| DHT22 Sensor | VCC | 3.3V or 5V |
| DHT22 Sensor | GND | GND |
| DHT22 Sensor | DATA | GPIO1 |
| LCD I2C | VCC | 5V |
| LCD I2C | GND | GND |
| LCD I2C | SCL | GPIO9 (I2C Clock) |
| LCD I2C | SDA | GPIO8 (I2C Data) |
ESP32 S3 Code - DHT22 Sensor - LCD I2C
The following code reads temperature and humidity from the DHT22 sensor every two seconds and displays them on the first and second rows of the LCD I2C screen. It uses the Adafruit DHT library for sensor communication and the DIYables LCD I2C library for display output, keeping both initialization and update logic concise and easy to follow.
※ NOTE THAT:
The LCD I2C address can be different from each manufacturer. In the code, we used address of 0x27 that is specified by DIYables manufacturer. If your LCD displays nothing, try address 0x3F instead.
Detailed Instructions
- New to ESP32 S3? Complete our Getting Started with ESP32 S3 guide first.
- Wire the DHT22 sensor and LCD I2C to the ESP32 S3 following the wiring diagram above.
- Connect the ESP32 S3 board to your PC using a USB Type-C cable.
- Open Arduino IDE on your PC.
- Select the correct ESP32 S3 board and COM port from the Tools menu.
- Click the Libraries icon on the left bar of the Arduino IDE.
- Type "DHT" in the search box, then look for the DHT sensor library by Adafruit.
- Click the Install button to install the library.
- Search for DHT sensor library created by Adafruit and click the Install button.
- A window appears asking you to install dependencies for the library.
- Click Install All to install all required dependencies.
- Type "DIYables LCD I2C" in the search box, then look for the DIYables_LCD_I2C library by DIYables.
- Click the Install button to install the DIYables_LCD_I2C library.
- Search for DIYables LCD I2C created by DIYables.io and click the Install button.
- Copy the above code and paste it into Arduino IDE.
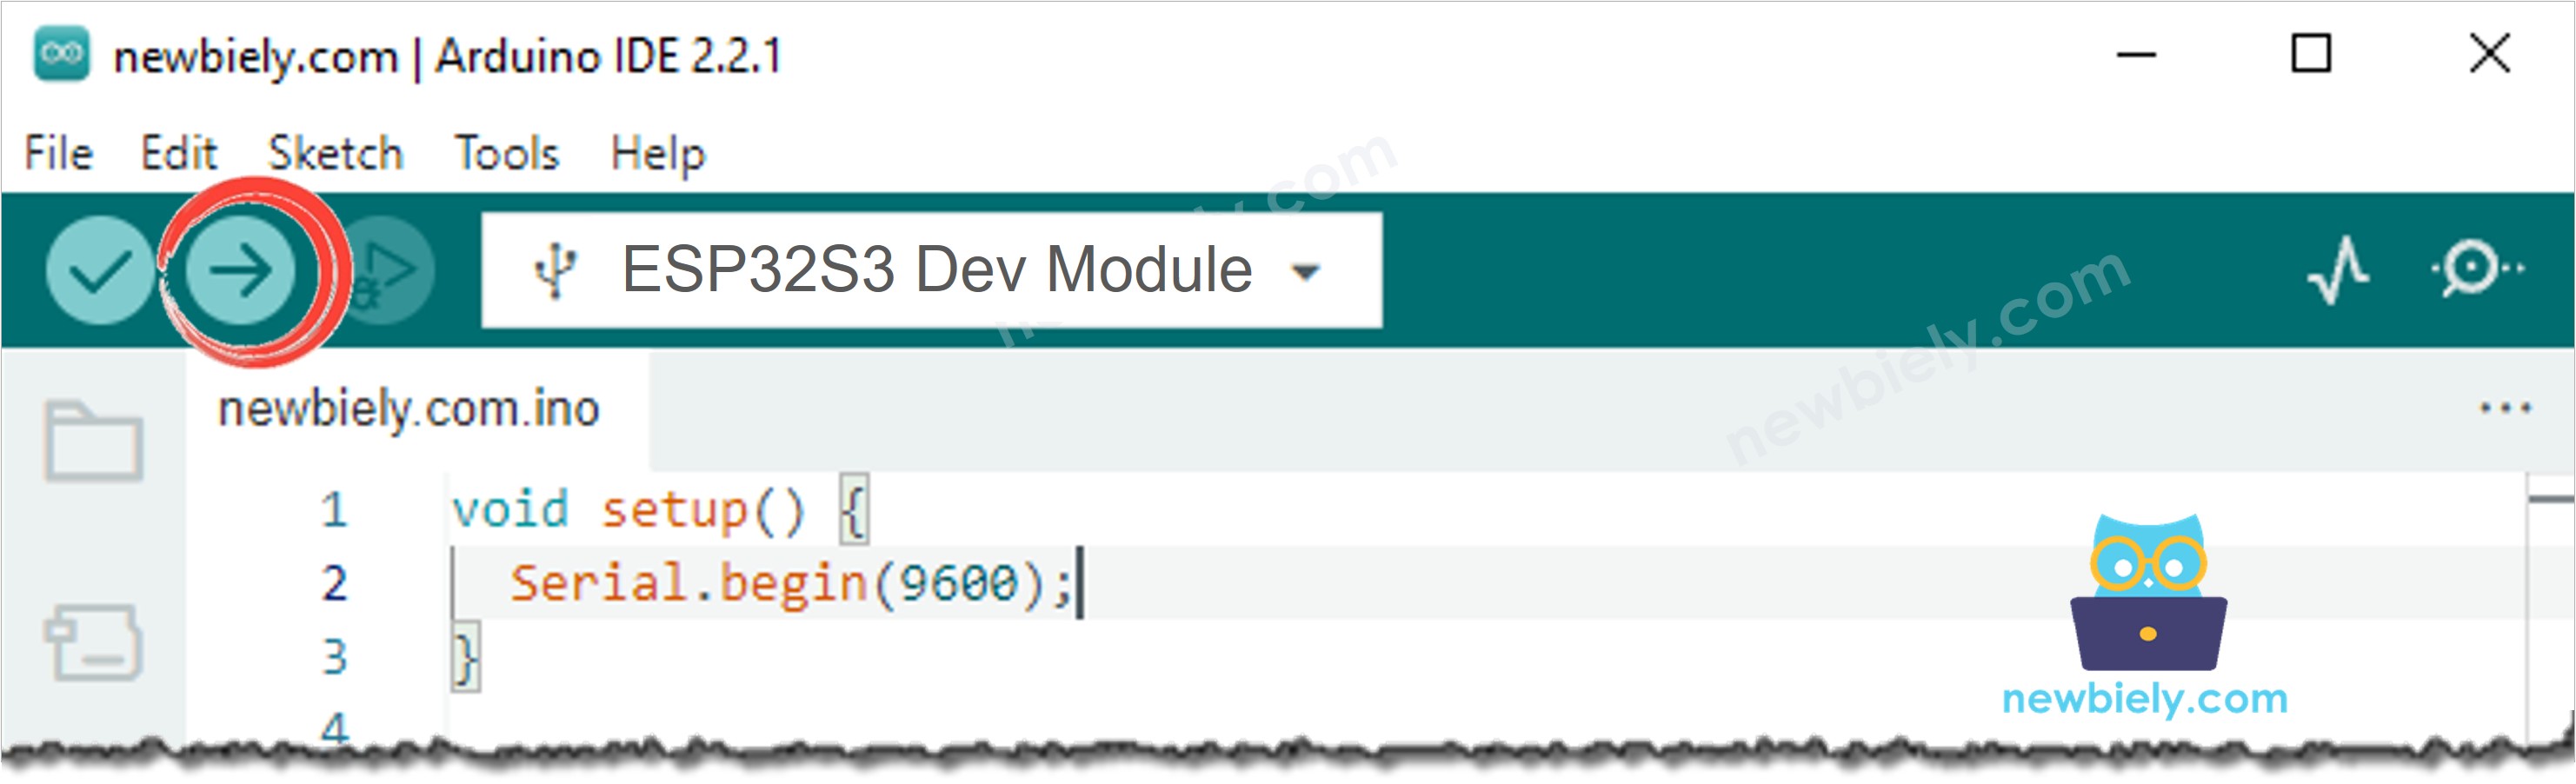
- Click the Upload button to compile and upload the code to your ESP32 S3.
- Place the sensor near a warm cup of coffee or breathe gently on it to change the humidity.
- Watch the temperature and humidity readings update on the LCD display every two seconds.
- Pro Tip: If the LCD displays nothing, adjust the contrast potentiometer on the back of the LCD module and verify that the I2C address in the code matches your module (try 0x3F if 0x27 does not work). See Troubleshooting on LCD I2C for more details.
Serial Monitor Output
The following Serial Monitor output shows the ESP32 S3 reading temperature and humidity from the DHT22 sensor and updating the LCD at regular two-second intervals. Each line is timestamped so you can verify the update rate and observe how readings respond to changes in the environment.
Application and Project Ideas
Once you have live temperature and humidity readings appearing on the LCD with your ESP32 S3, you can adapt this project into a wide range of practical applications across home automation, agriculture, and industrial monitoring.
- Indoor climate monitor: Mount the sensor in a room and display temperature and humidity at a glance to ensure comfortable living conditions.
- Greenhouse controller: Trigger fans or misters automatically when the displayed humidity or temperature exceeds a set threshold.
- Server room monitor: Track temperature and humidity inside a cabinet and activate an alert if either value goes out of range.
- Plant care assistant: Display soil-adjacent humidity readings to remind users when conditions are too dry for sensitive houseplants.
- Data logger: Combine the LCD display with SD card logging so readings are both shown in real time and saved for later analysis.
- IoT weather station: Add Wi-Fi to the project so the ESP32 S3 publishes readings to a cloud dashboard while still showing them locally on the LCD.
Video Tutorial
Watch the step-by-step video walkthrough for this ESP32 S3 project below.
Challenge Yourself
Now that you can display live temperature and humidity readings on the LCD with your ESP32 S3, try these progressively harder challenges to deepen your understanding and extend the project into something more capable.
- Beginner: Modify the sketch to show temperature in both Celsius and Fahrenheit by alternating between the two units every four seconds.
- Beginner: Add a custom degree symbol to the LCD output using the LCD library's custom character feature for a more polished display.
- Intermediate: Implement a simple threshold alert that turns on an LED and prints a warning on the LCD when humidity exceeds 80 %.
- Intermediate: Apply a three-sample rolling average to both temperature and humidity readings to smooth out sensor jitter on the display.
- Advanced: Add a push button that lets the user toggle between Celsius and Fahrenheit mode, storing the preference in flash memory so it survives a power cycle.
- Advanced: Extend the project with Wi-Fi so the ESP32 S3 sends readings to an MQTT broker while simultaneously updating the LCD, enabling remote monitoring from any device on the network.