
ESP32 S3 - Gas Sensor Relay
This tutorial shows you how to program the ESP32 S3 to activate a relay whenever an MQ2 gas sensor detects hazardous gases such as LPG, smoke, alcohol, propane, hydrogen, methane, or carbon monoxide, enabling you to build an automated safety response system. By connecting the relay to a fan, siren, or ventilation actuator, you can trigger an immediate protective action the moment dangerous gas concentrations are detected.
What you'll build:
- A circuit connecting an MQ2 gas sensor and relay module to the ESP32 S3
- A sketch that activates the relay when gas is detected above the threshold and deactivates it when the air clears
- A system capable of switching high-voltage loads such as cooling fans, alarm sirens, or ventilation motors via the relay
- A foundation for expanding into full gas-leak alert and home safety automation projects
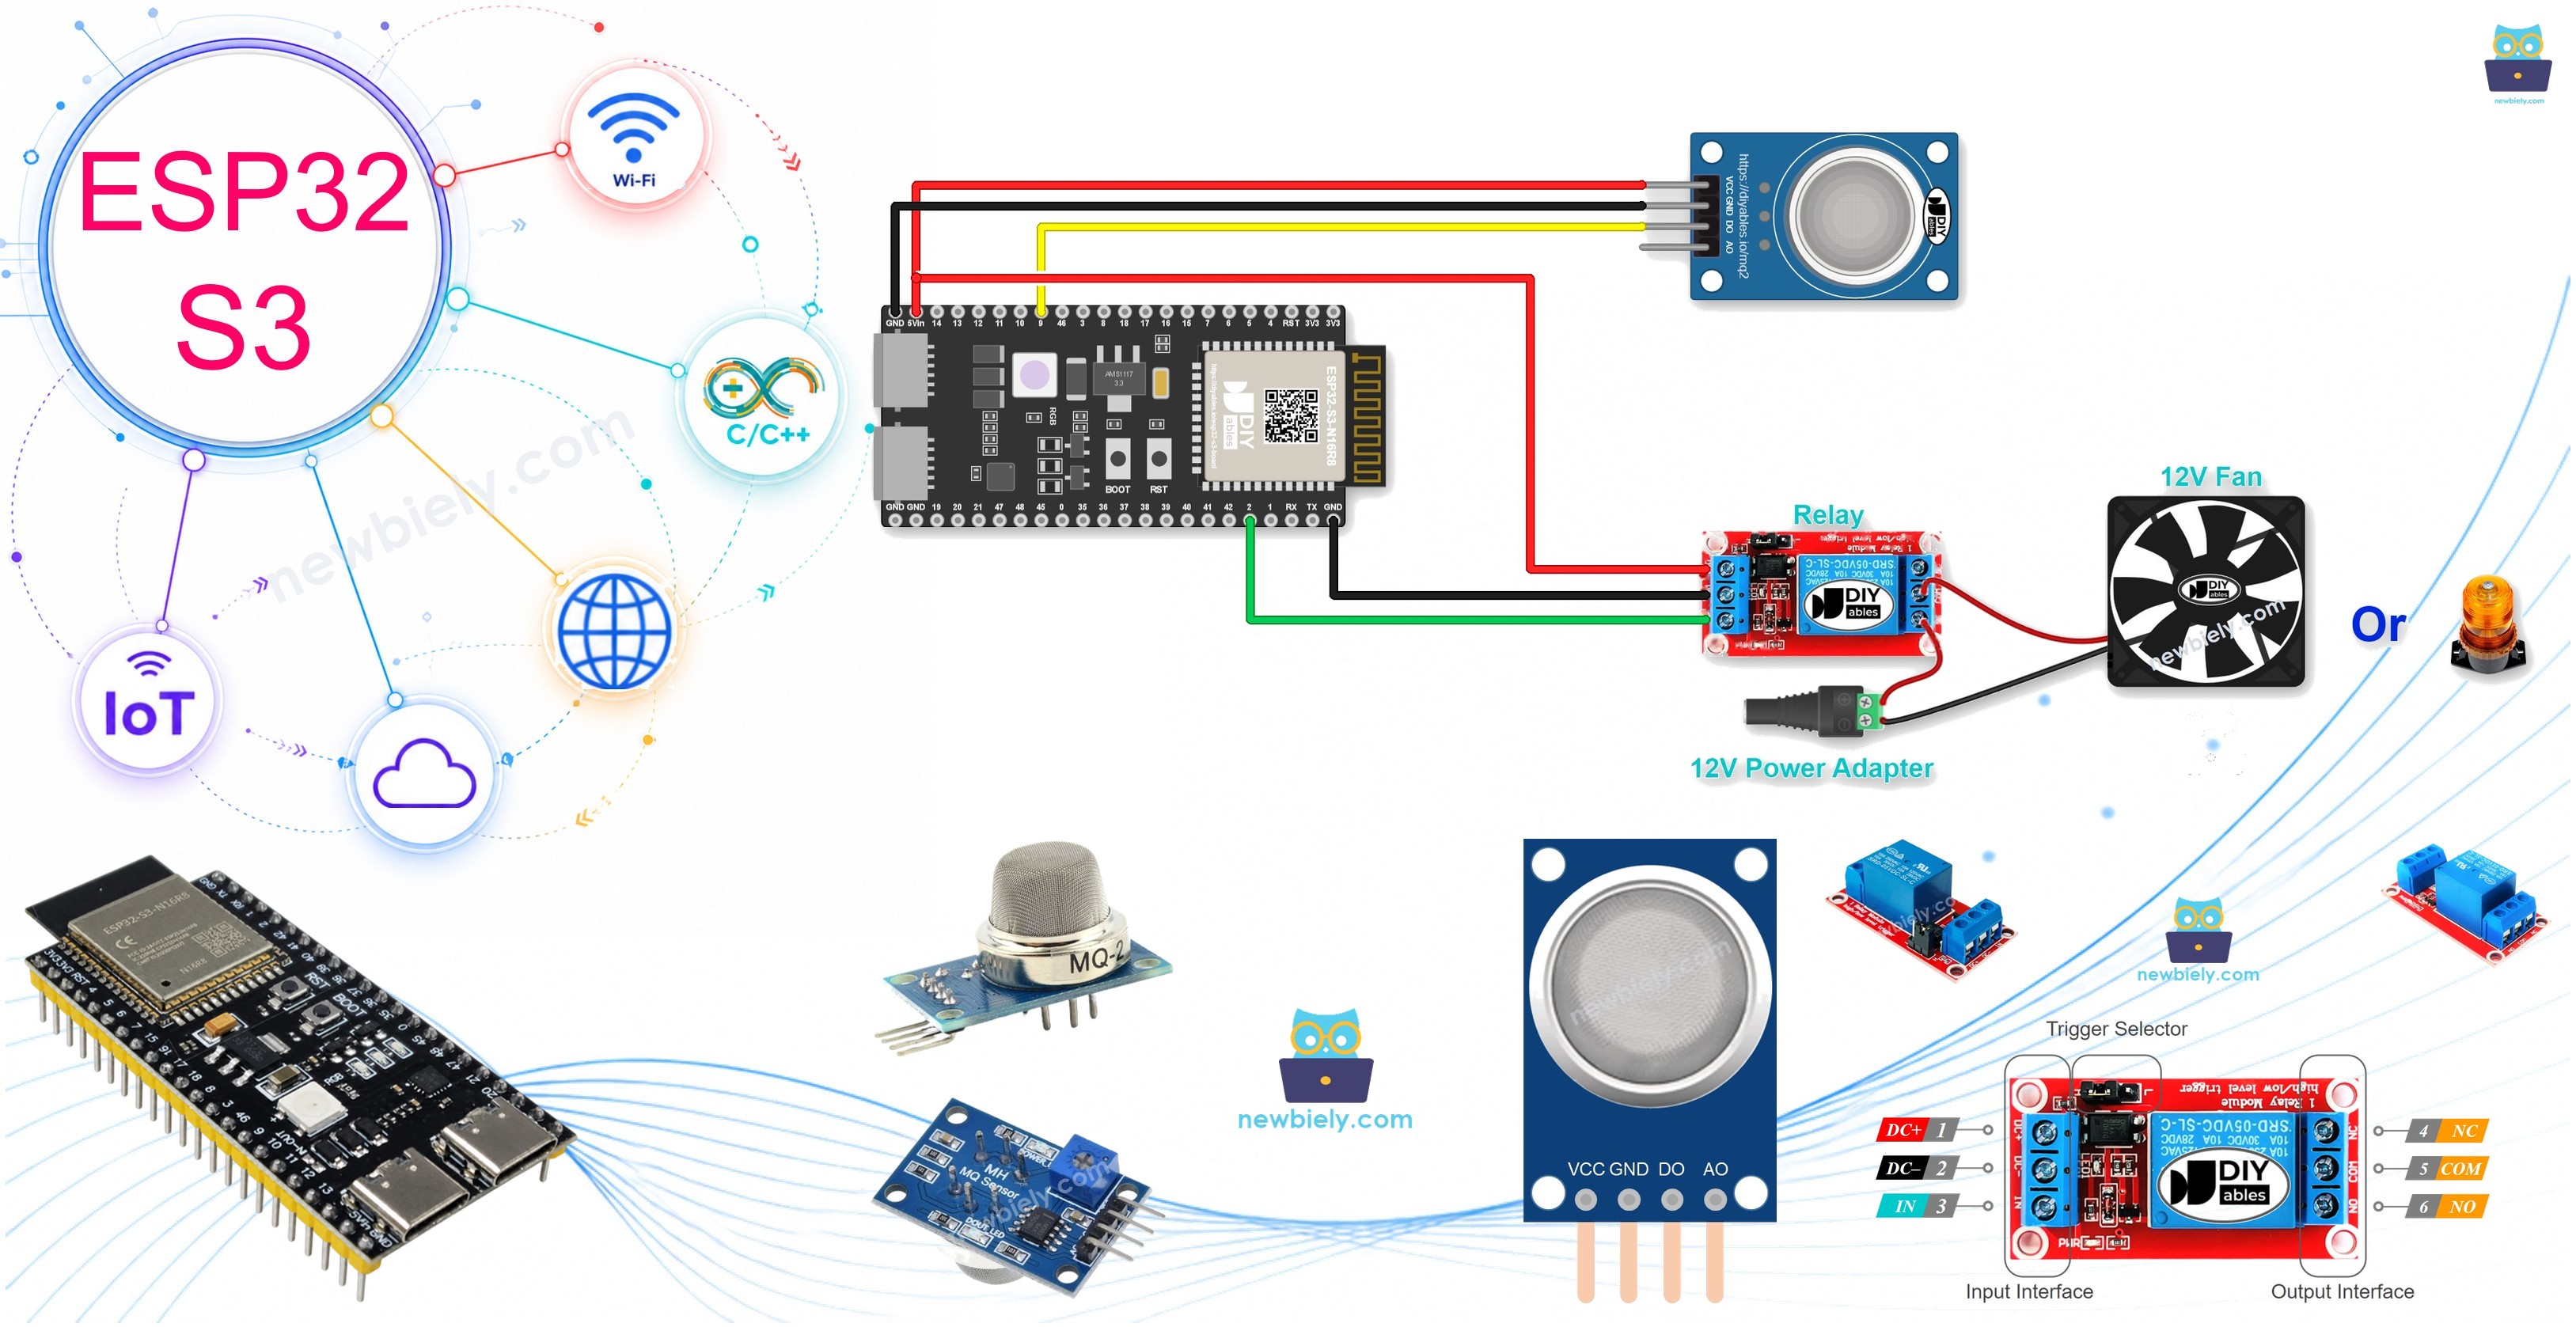
Hardware Preparation
Or you can buy the following kits:
| 1 | × | DIYables ESP32 S3 Starter Kit (ESP32 S3 included) | |
| 1 | × | DIYables Sensor Kit (18 sensors/displays) |
Additionally, some of these links are for products from our own brand, DIYables .
Overview of Relay and MQ2 Gas Sensor
The relay and MQ2 gas sensor are a powerful combination for building indoor safety systems with the ESP32 S3. The MQ2 gas sensor detects a wide range of combustible and toxic gases and outputs a digital signal when gas concentration exceeds a preset threshold, which the ESP32 S3 reads in real time. A relay then safely switches high-voltage or high-current loads — such as fans, sirens, or ventilation systems — that would otherwise damage the board's GPIO pins, enabling automatic protective responses whenever a gas leak is detected.
Key Specifications
We have dedicated tutorials covering each component in depth. Each tutorial contains detailed information and step-by-step instructions about hardware pinout, working principle, wiring connection to the ESP32 S3, and Arduino code. Learn more about them at the following links:
Wiring Diagram
Connect the MQ2 gas sensor and relay to your ESP32 S3 by following the diagram below. Double-check all connections before applying power, especially on the high-voltage side of the relay.
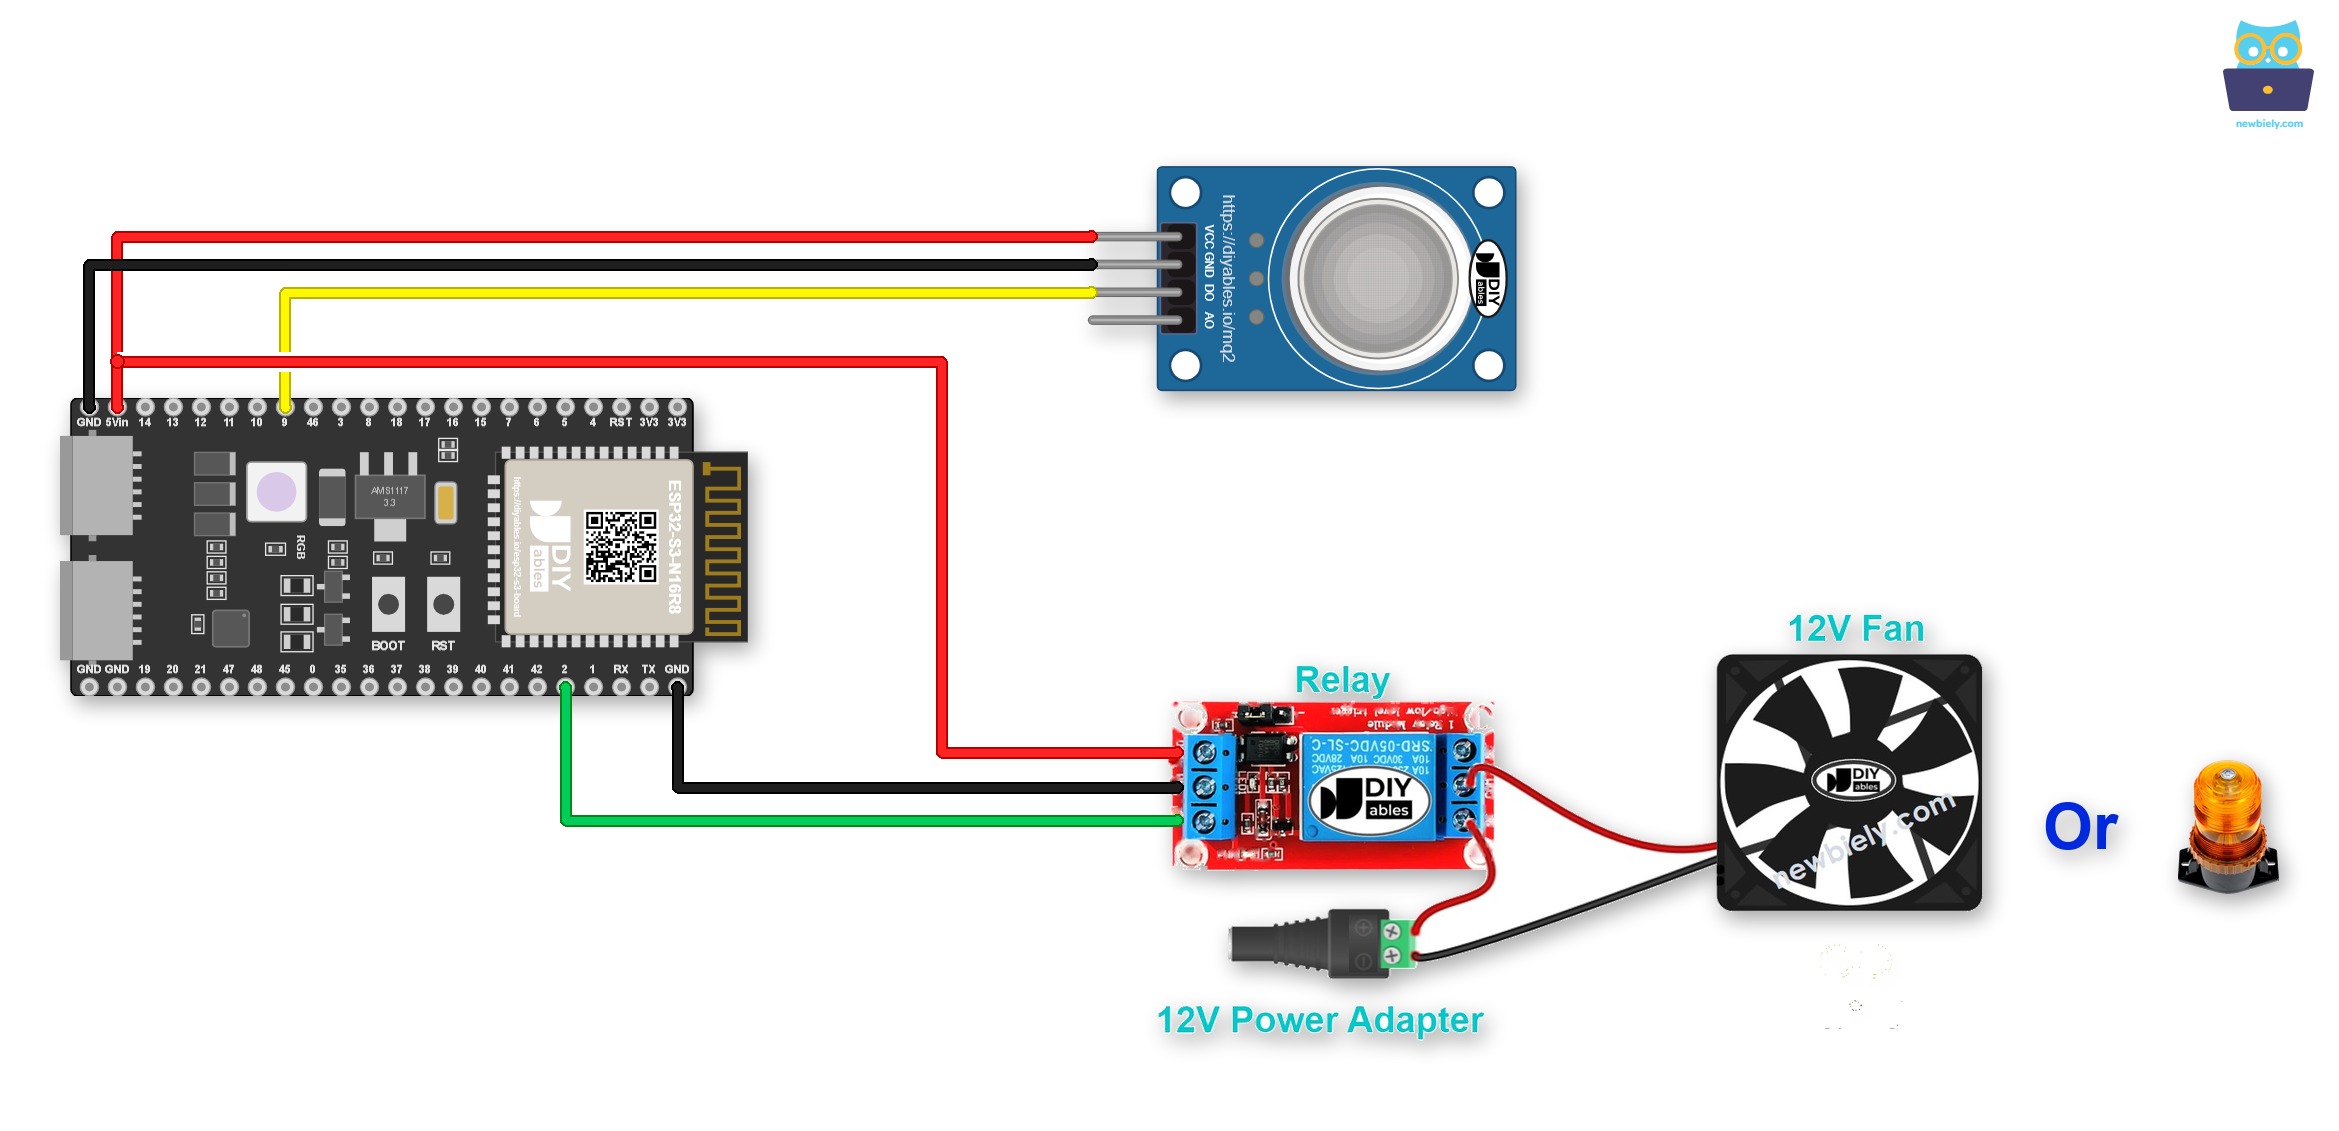
This image is created using Fritzing. Click to enlarge image
Jumper wires are good for a quick test, but not for a final build. The ESP32 S3 fits a Screw Terminal Block for ESP32 S3, which turns every pin into a screw terminal. See the diagram below for the screw terminal version.
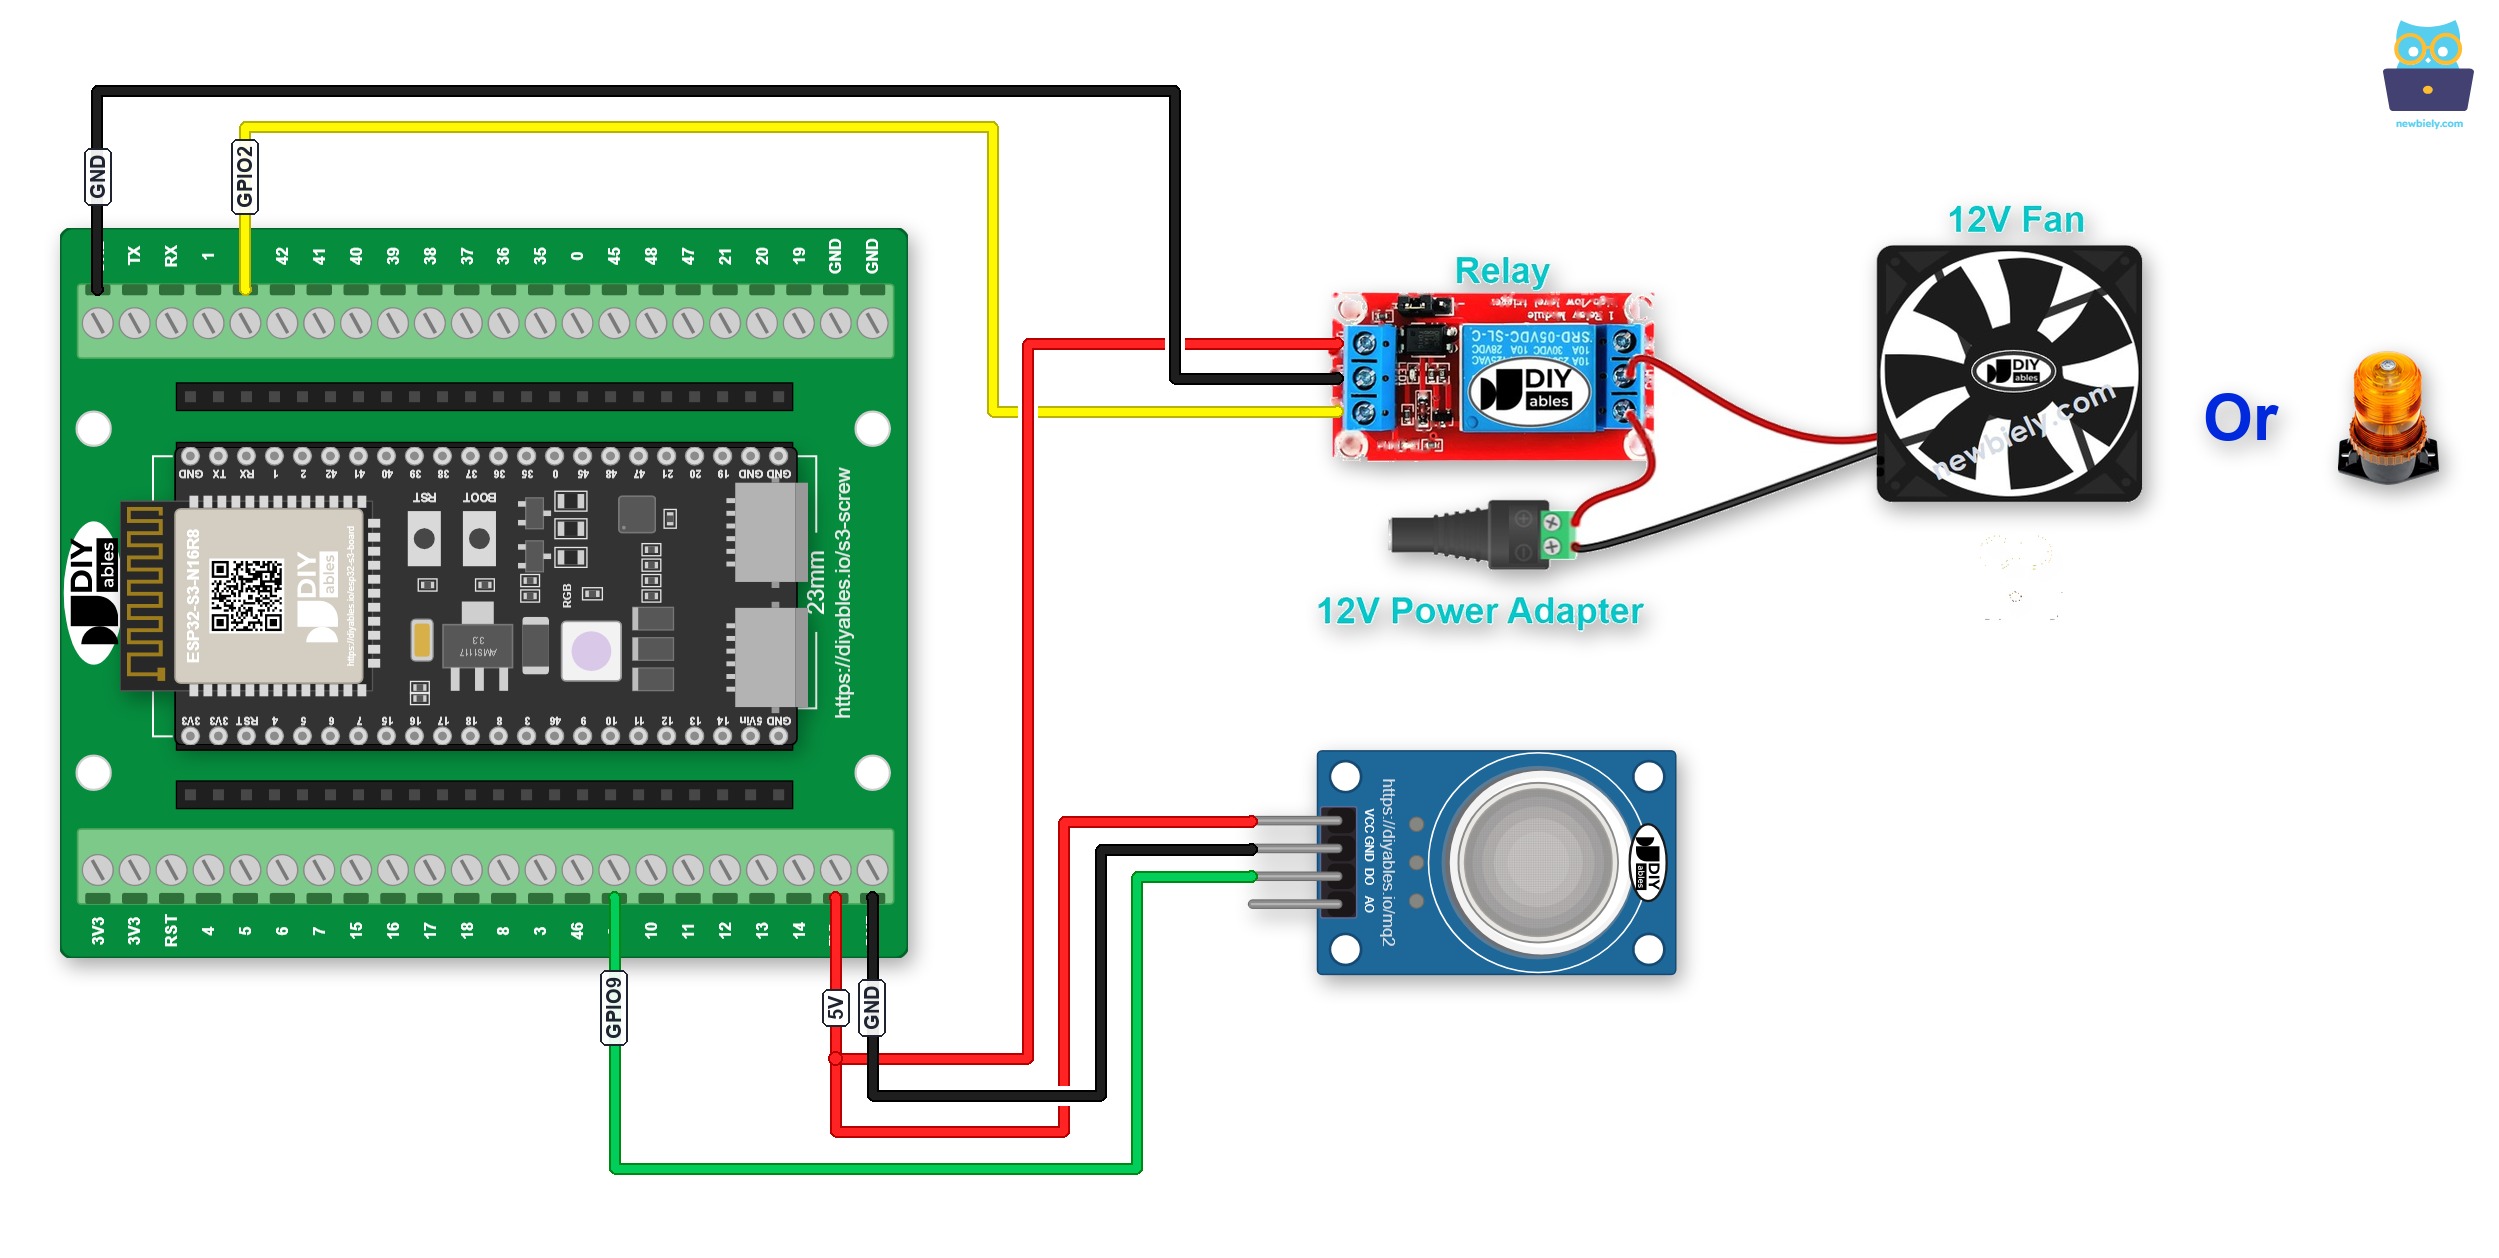
This image is created using Fritzing. Click to enlarge image
Another choice is a GPIO Breakout Board for ESP32 S3. Each GPIO has a signal pin with 3.3V and GND pins next to it, as shown below:
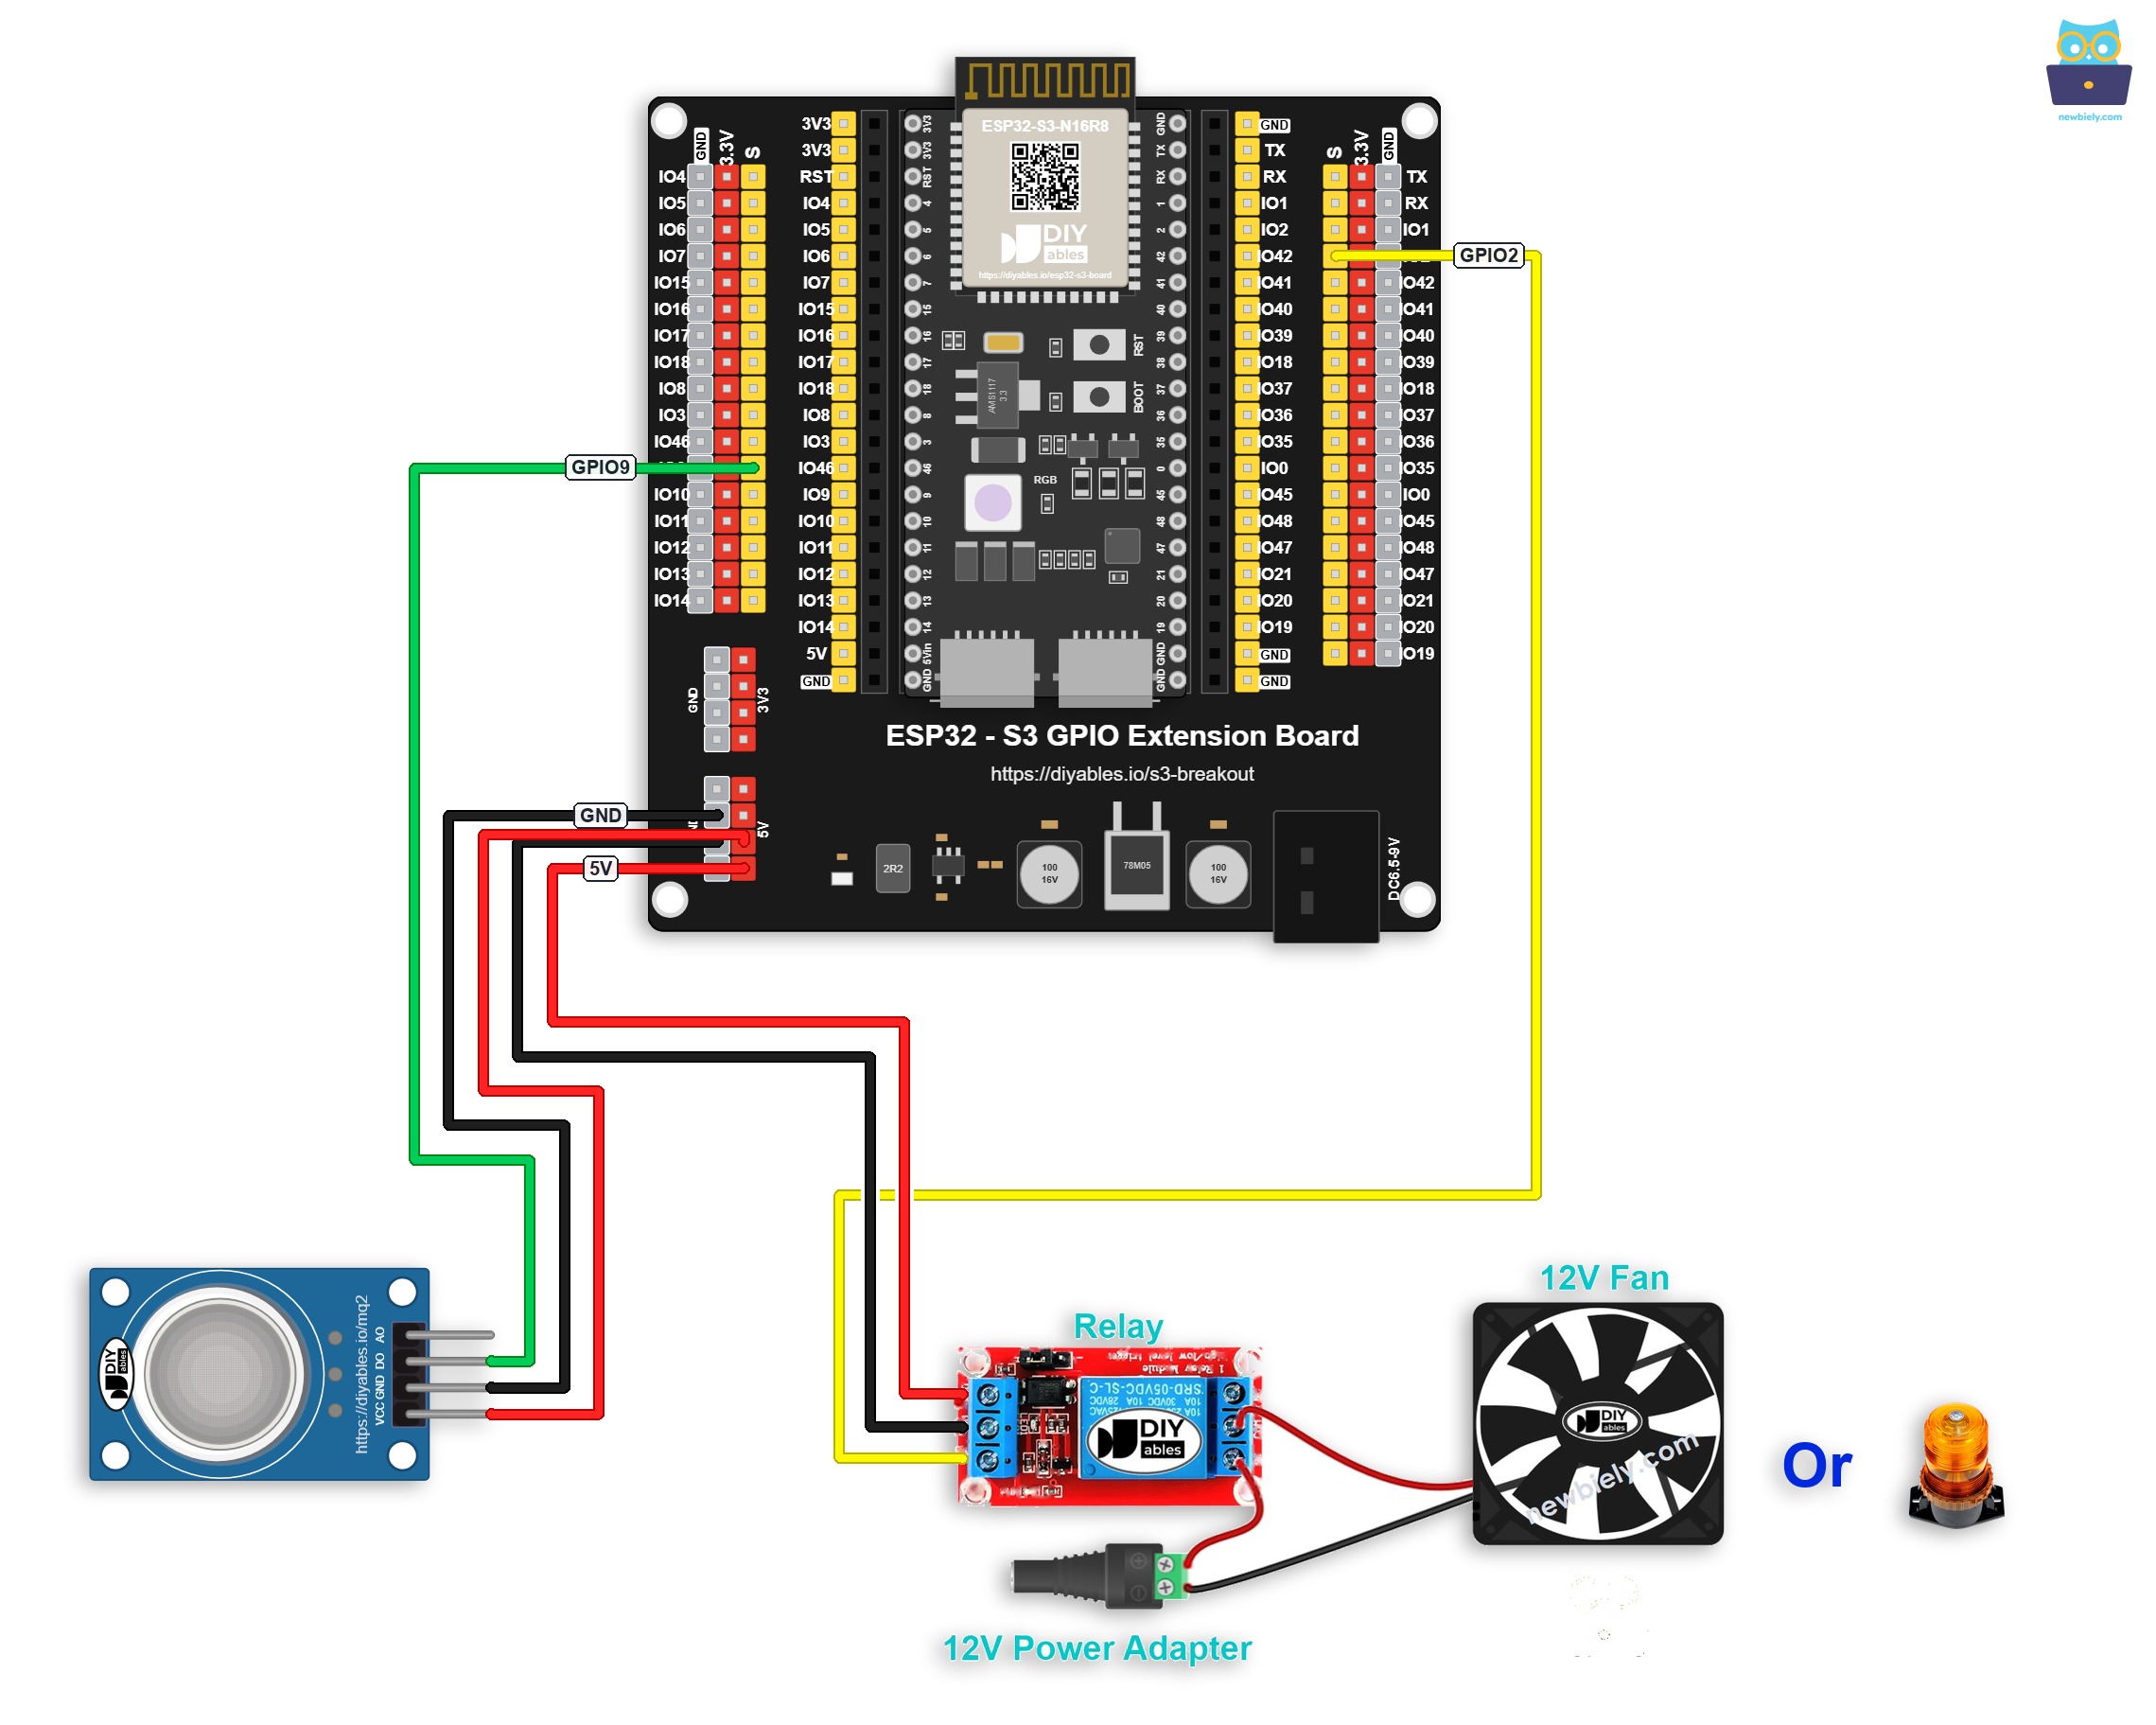
This image is created using Fritzing. Click to enlarge image
Safety Notes
Always verify that the relay's COM and NO (or NC) terminals are securely fastened and that no bare wires are exposed before powering the circuit. Keep the low-voltage control wiring to the ESP32 S3 physically separated from any high-voltage load wiring to reduce the risk of accidental contact. Because this project is intended for detecting hazardous gases, ensure the gas sensor has completed its warm-up period (approximately one to two minutes) before relying on its output for safety-critical decisions.
| Component | Pin | ESP32 S3 Pin |
|---|---|---|
| MQ2 Gas Sensor | GND | GND |
| MQ2 Gas Sensor | VCC | 5V |
| MQ2 Gas Sensor | DO | GPIO9 |
| Relay | DC- | GND |
| Relay | DC+ | 5V |
| Relay | IN | GPIO2 |
ESP32 S3 Code
The following code reads the digital output of an MQ2 gas sensor connected to the ESP32 S3 and controls a relay accordingly — activating the relay when hazardous gas is detected above the sensor's threshold and deactivating it when the air returns to safe levels. All logic is handled with standard Arduino digitalRead() and digitalWrite() calls, so no external libraries are required.
Detailed Instructions
- New to ESP32 S3? Complete our Getting Started with ESP32 S3 guide first.
- Wire the components following the wiring diagram shown above.
- Connect the ESP32 S3 board to your PC using a USB Type-C cable.
- Open Arduino IDE on your PC.
- Select the correct ESP32 S3 board and COM port from the Tools menu.
- Copy the above code and paste it into Arduino IDE.
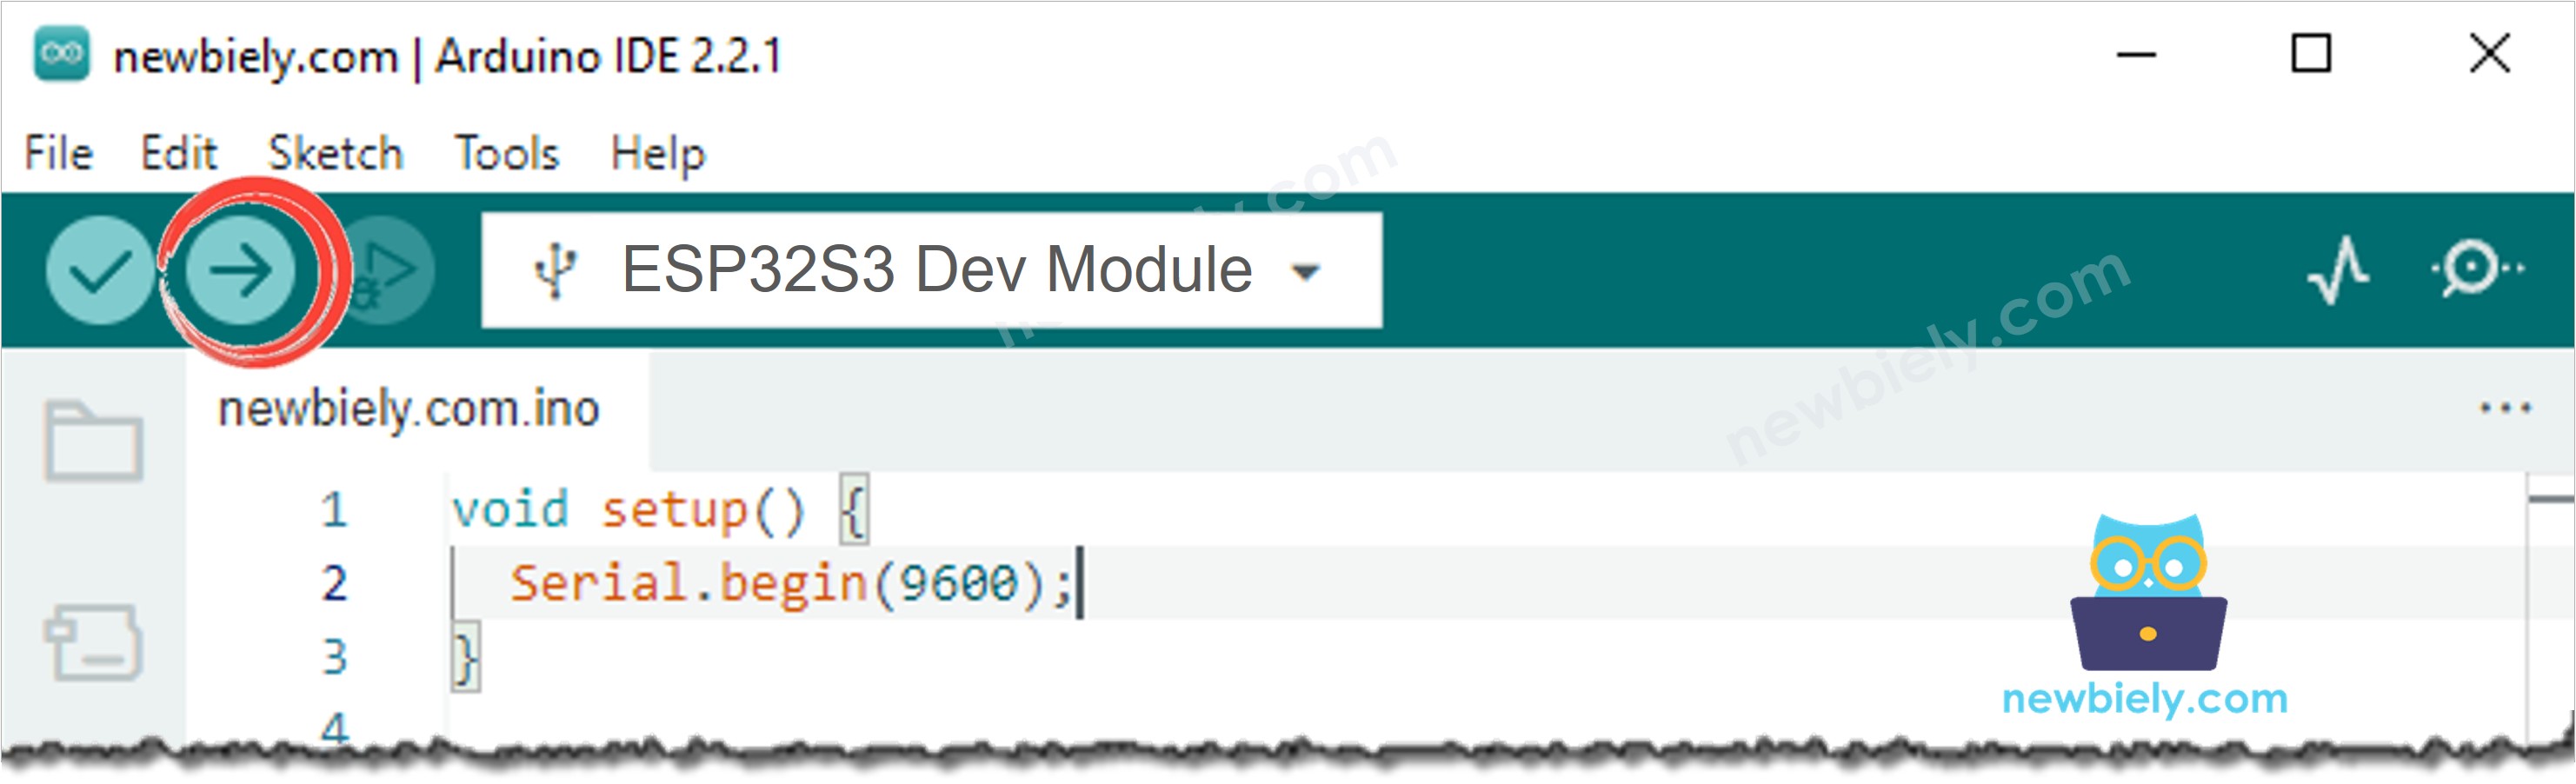
- Click the Upload button to compile and upload the code to the ESP32 S3.
- Allow the MQ2 gas sensor to warm up for one to two minutes after powering on.
- Bring a small amount of gas or smoke near the sensor's detection element.
- Observe the relay activating (you will hear a click) when gas concentration exceeds the threshold.
- Remove the gas source and observe the relay deactivating when the air clears.
- Pro Tip: Open the Serial Monitor at 115200 baud to print relay state messages in real time — this makes it much easier to debug unexpected behavior or calibrate the sensor's sensitivity threshold using the onboard potentiometer.
Serial Monitor Output
The following Serial Monitor output shows the ESP32 S3 responding to gas detection events and clear-air conditions in real time. Each line is timestamped so you can verify the timing between gas-detected and safe transitions.
Application and Project Ideas
Once you master gas-sensor-controlled relay switching with the ESP32 S3, you can extend this pattern into a wide range of practical safety and industrial automation projects.
- Kitchen gas leak alarm: Activate a relay-driven alarm siren and ventilation fan automatically when LPG or propane is detected in a kitchen, giving residents an immediate audible warning.
- Garage carbon monoxide detector: Trigger a relay to open a ventilation gate or activate an exhaust fan whenever CO concentrations rise in an enclosed garage, reducing poisoning risk.
- Industrial smoke detection: Use the relay to shut down machinery or trigger a fire suppression system when smoke is detected in a tutorial or server room.
- Smart home gas shutoff: Connect the relay to a motorized gas valve to automatically shut off the gas supply when a leak is detected, preventing potential explosions.
- Alcohol breath tester gate: Use the relay to control access to a vehicle ignition or secure area by blocking entry when alcohol vapor is detected above a safe threshold.
- Greenhouse fumigation control: Automate the relay to deactivate a fumigation system and activate ventilation fans once gas concentrations reach a safe lower limit after treatment.
Video Tutorial
Watch the step-by-step video walkthrough for this ESP32 S3 project below.
Challenge Yourself
Now that you can control a relay with an MQ2 gas sensor on the ESP32 S3, try these progressively challenging extensions to deepen your understanding and build more capable projects.
- Beginner: Modify the code so the relay stays ON for at least 60 seconds after gas is first detected, even if the sensor briefly reads safe, to prevent rapid relay toggling during fluctuating readings.
- Beginner: Add an LED indicator that lights up whenever the relay is active, giving a visual confirmation alongside the audible relay click.
- Intermediate: Implement a warm-up timer in the sketch that ignores all sensor readings for the first 90 seconds after power-on, preventing false triggers during sensor stabilization.
- Intermediate: Add an LCD or OLED display that shows the current gas level reading and relay state in real time, making the system self-contained without needing a PC.
- Advanced: Build a data-logging system that records gas detection events with timestamps to an SD card so you can review historical gas exposure incidents over days or weeks.
- Advanced: Extend the project with WiFi so the relay state can be monitored and overridden remotely via a web page served by the ESP32 S3, and send an email or push notification alert when gas is detected.