
ESP32 S3 - AWS IoT
This tutorial instructs you how to use the ESP32 S3 with AWS IoT Core. By following along, you will learn how to configure AWS IoT Core for secure device communication and how to program the ESP32 S3 to exchange data with the cloud using the MQTT protocol.
What you'll build:
- A secure connection from the ESP32 S3 to AWS IoT Core using TLS certificates
- A publisher that sends sensor data from the ESP32 S3 to an AWS IoT topic every four seconds
- A subscriber that receives messages from AWS IoT Core on the ESP32 S3
- A foundation for integrating the ESP32 S3 with other AWS services via IoT Rules
Hardware Preparation
Or you can buy the following kits:
| 1 | × | DIYables ESP32 S3 Starter Kit (ESP32 S3 included) | |
| 1 | × | DIYables Sensor Kit (18 sensors/displays) |
Additionally, some of these links are for products from our own brand, DIYables .
Overview of ESP32 S3 and AWS IoT
The ESP32 S3 connects to AWS IoT Core using the MQTT protocol over a secure TLS connection. Unlike a local MQTT broker, AWS IoT Core enforces strict authentication, meaning you must first obtain valid certificates and configure an authorization policy before integrating those credentials into your ESP32 S3 sketch. The overall process breaks down into two main phases: configuring AWS IoT Core to generate credentials, and then writing the ESP32 S3 code that uses those credentials to connect and communicate.
Key Specifications
- Protocol: MQTT over TLS (port 8883)
- Authentication: X.509 certificates issued by AWS IoT Core
- Authorization: IoT Policy attached to the device certificate
- Directions: Bidirectional — ESP32 S3 can publish to and subscribe from AWS IoT topics
Configuring AWS IoT Core for use with ESP32 S3
The objectives of this step include:
- Creating a representation of the ESP32 S3 device on AWS IoT Core, referred to as a "Thing."
- Configuring the necessary authorization to allow the ESP32 S3 device to connect, publish, and subscribe to/from AWS IoT Core, known as a "Policy."
- Generating the AWS credentials required for authentication, known as "Certificates." These credentials will be downloaded and integrated into the Arduino ESP32 S3 code.
Below are instructions on configuring AWS IoT Core for use with ESP32 S3 via the AWS IoT Console. Please note that while the User Interface may change over time, the process should remain similar to the instructions provided below:
- Sign in to the AWS IoT Console
- Create a Thing by going to Manage All devices Things
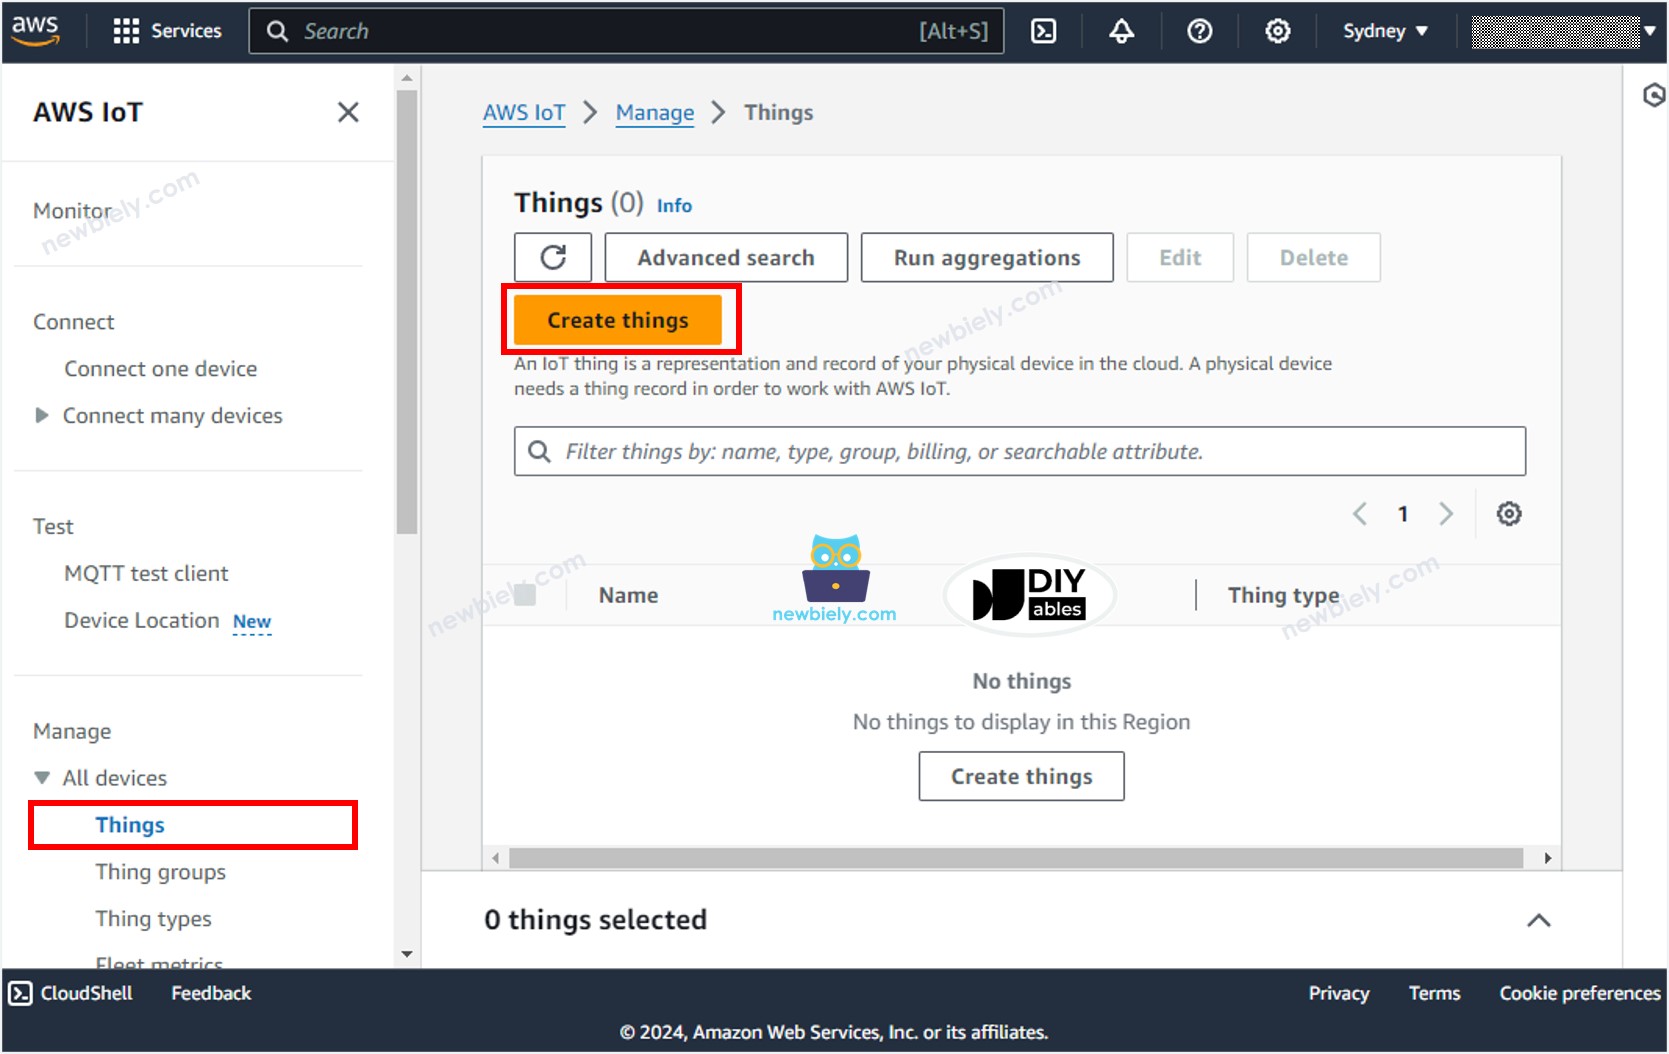
- Click the Create things button.
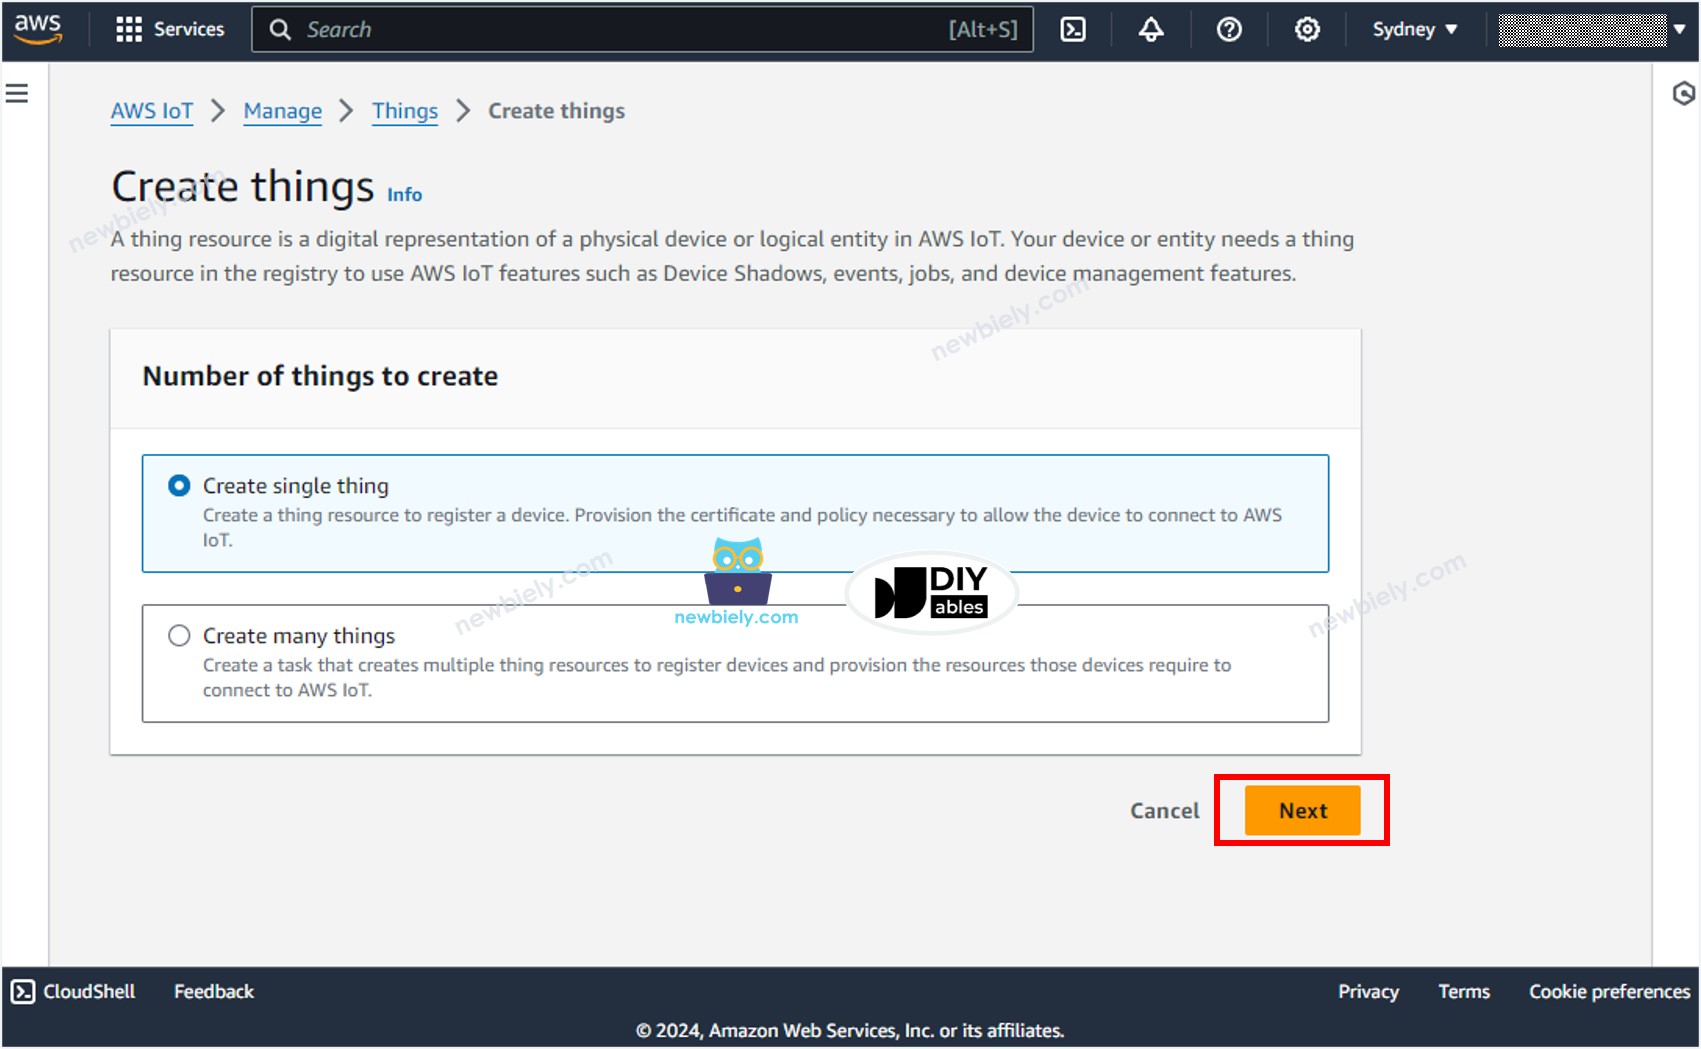
- Select Create single things and click the Next button.
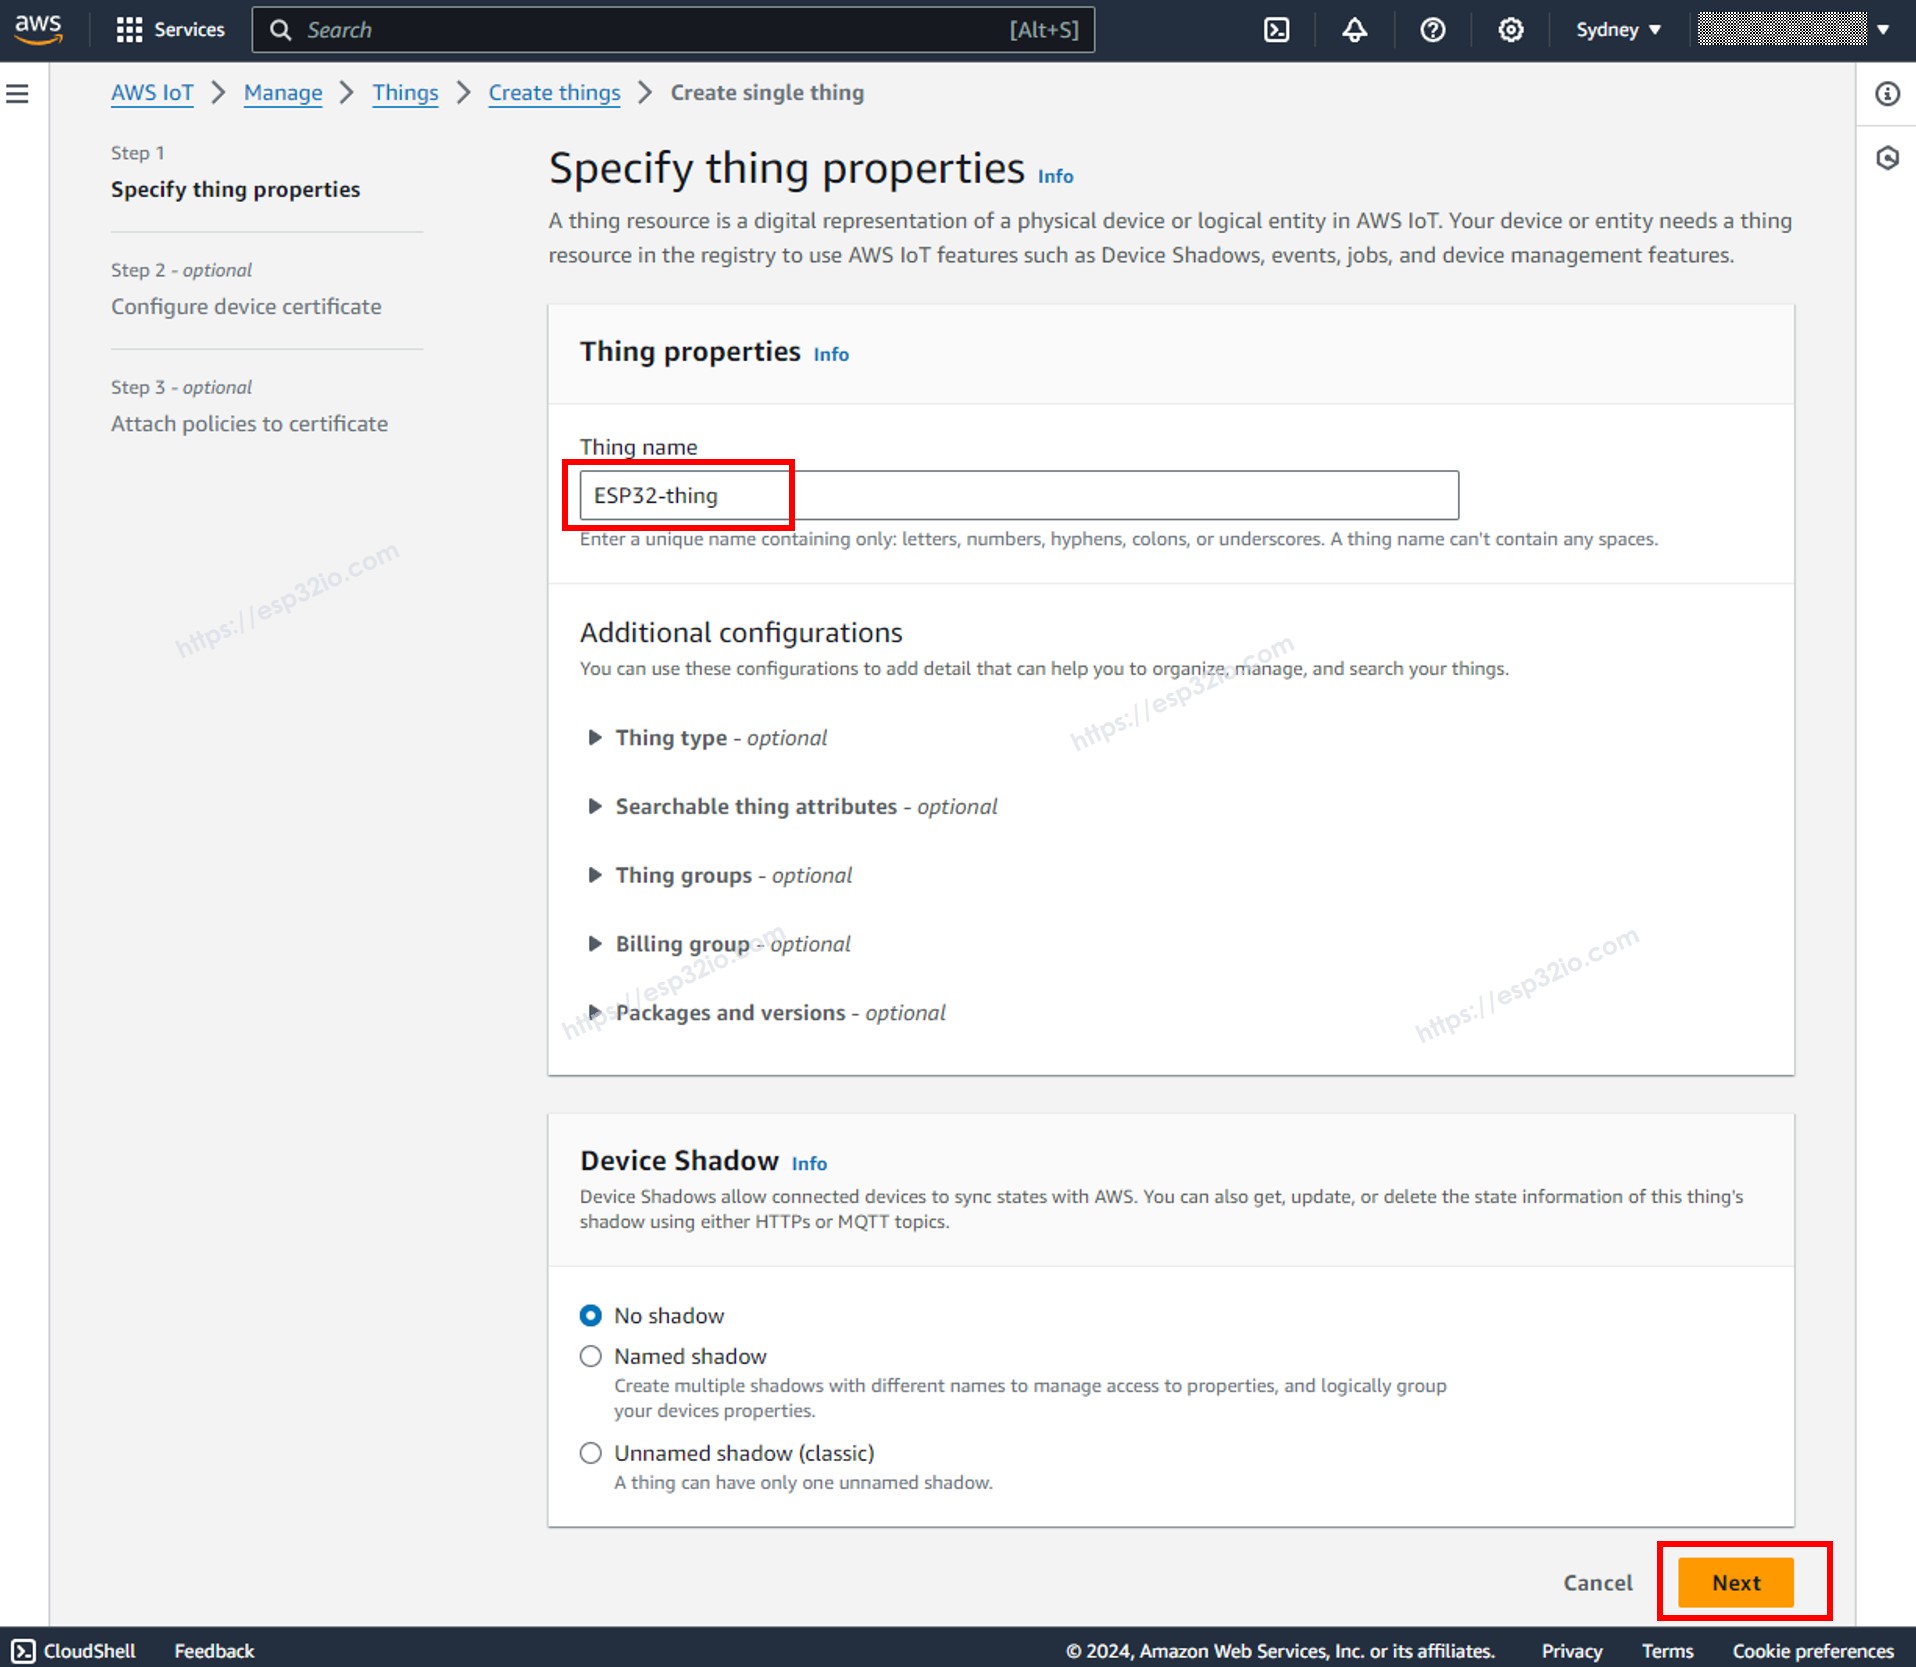
- Specify the Thing name, for example, ESP32-S3-thing and click the Next button at the bottom of the page.
- Generate the credentials by selecting the Auto-generate a new certificate option, and click the Next button.
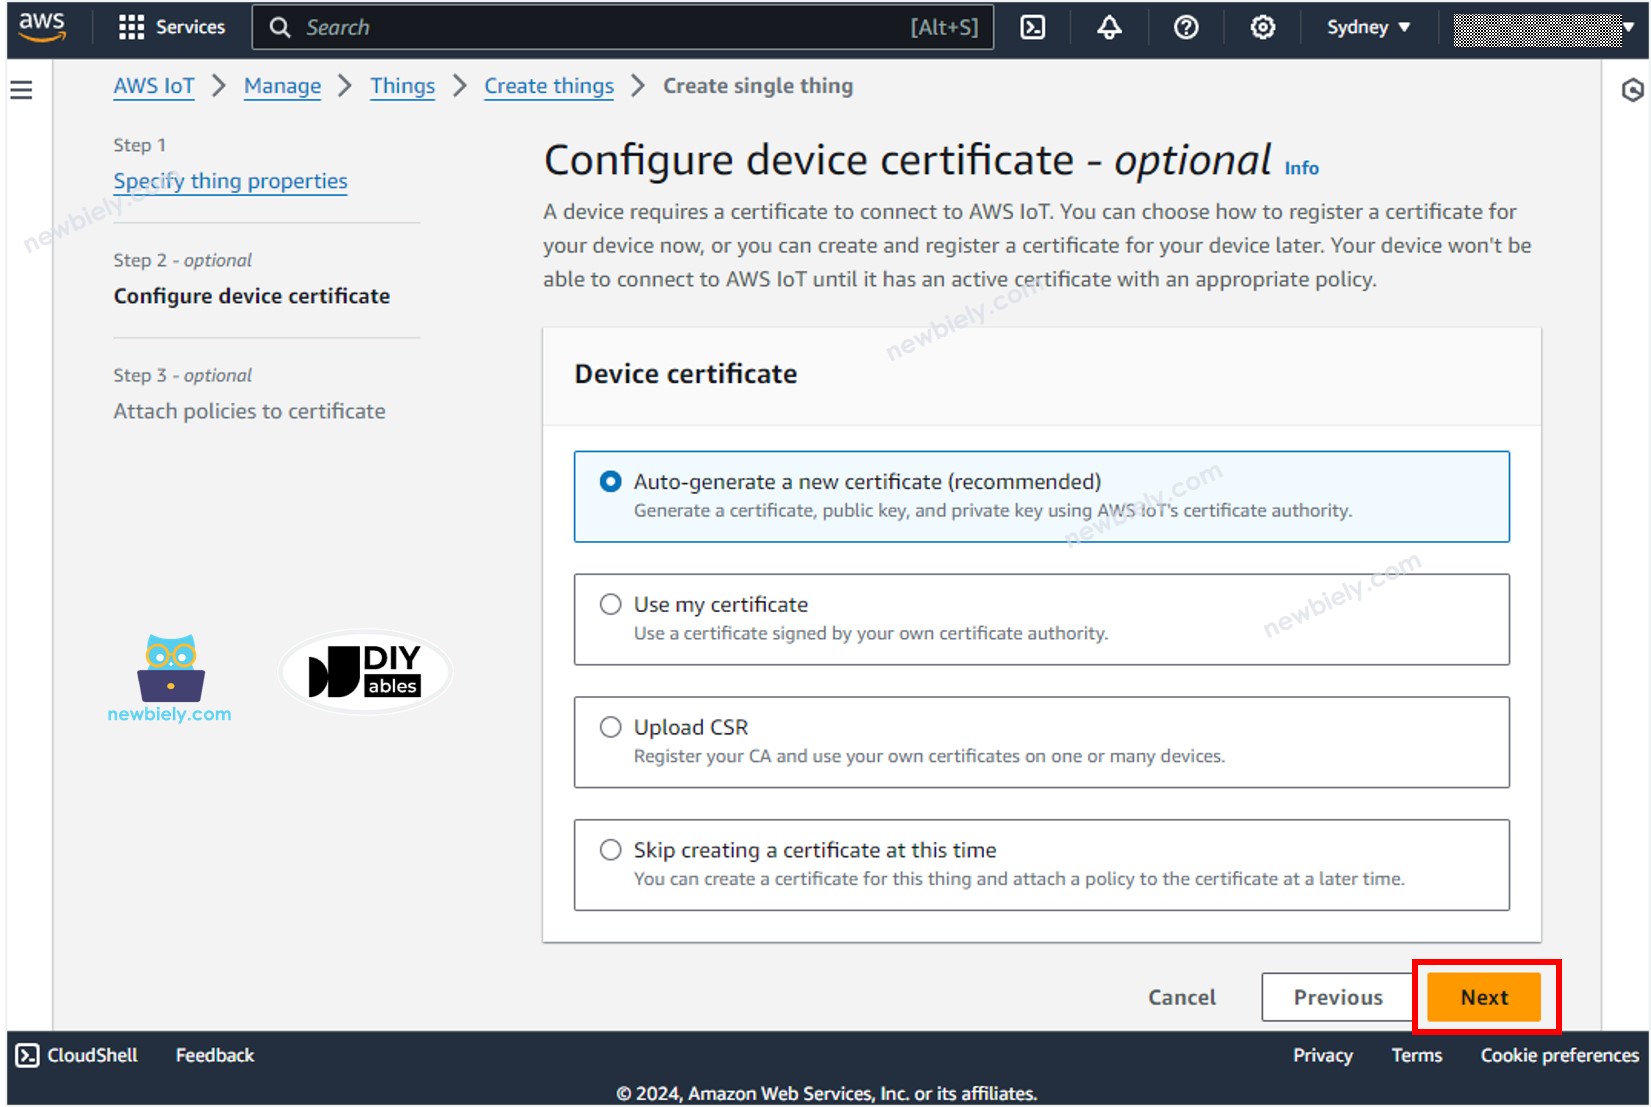
- Now, a Certificate is created and linked to the Thing.
- Create a policy by clicking the Create policy button.
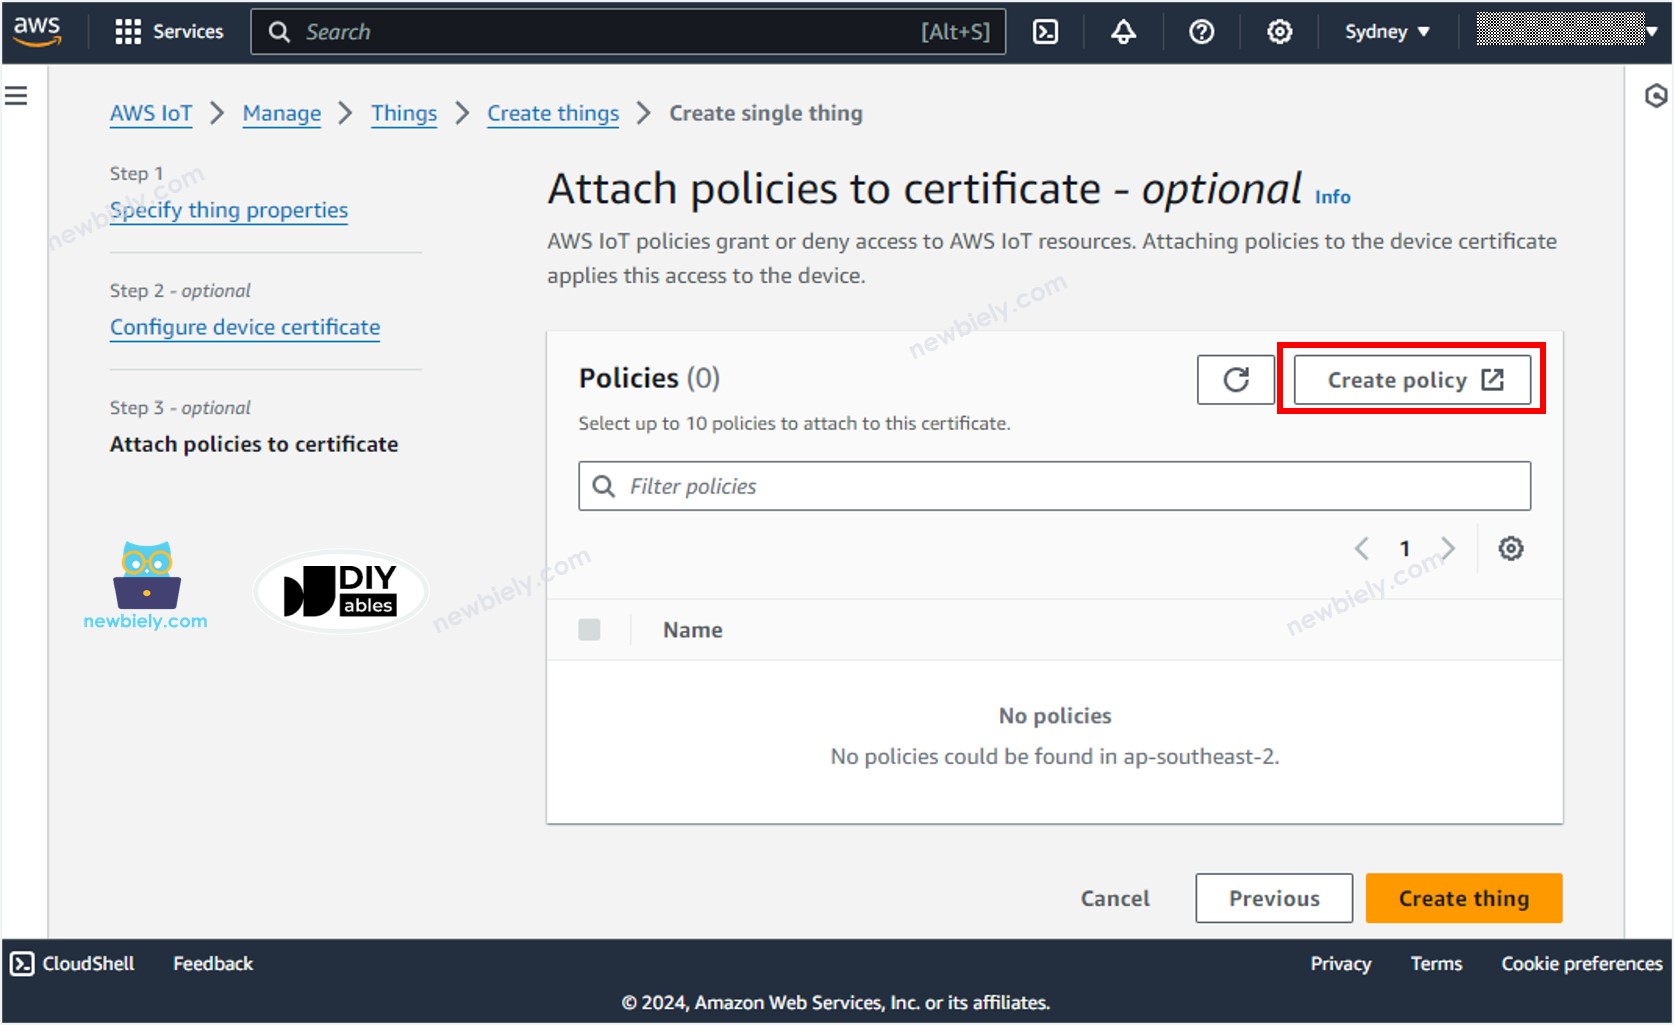
- A new tab will be opened

- Specify the Policy name, for example, ESP32-S3-policy and click the JSON button.
- Copy the below JSON policy content and paste it to the Policy document area:
- Click the Create button at the bottom of the page to create the policy.
- Now, a Policy is created and attached to the Certificate. Close that page and back to the Thing page.
- Check the ESP32-S3-policy and Click the Create thing button to create the Thing.
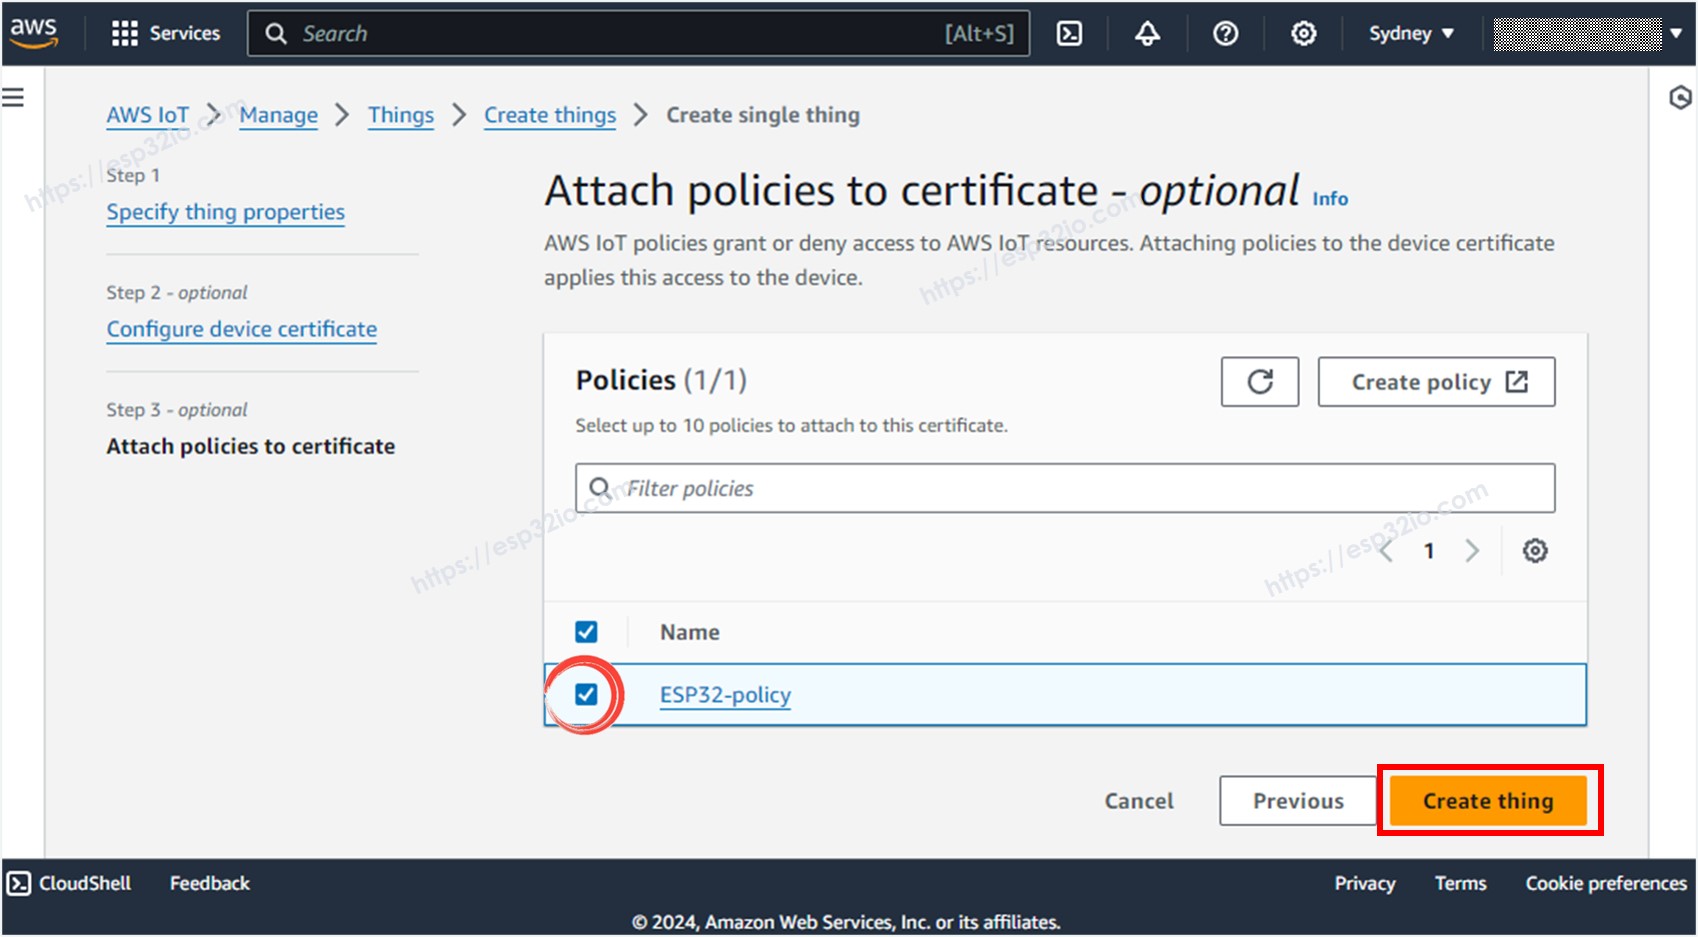
- A popup window appears that allows you to download the credentials files. Download all files and store them in a safe location on your PC and keep them confidentially.

- Then, click the Done button.
Among downloaded files, there are three files will be used in the ESP32 S3 code in the next steps:
- AmazonRootCA1.pem
- Xxxxxxxxxx-certificate.pem.crt
- Xxxxxxxxxx-private.pem.key
These files can be opened by any text editor such as Notepad, or Notepad++
Writing the ESP32 S3 Code to Connect to AWS IoT Core
The following code demonstrates how to connect the ESP32 S3 to AWS IoT Core, publish sensor readings to a cloud topic, and subscribe to incoming messages from AWS. The sketch uses the MQTT and ArduinoJson libraries, and loads the TLS certificates from a companion secrets.h file that you will create in the next step.
Detailed Instructions
- New to ESP32 S3? Complete our Getting Started with ESP32 S3 guide first.
- Open the Library Manager by clicking on the Library Manager icon on the left navigation bar of Arduino IDE
- Type MQTT on the search box, then look for the MQTT library by Joel Gaehwiler.
- Click Install button to install MQTT library.
- Search for MQTT created by Joel Gaehwiler
- Type ArduinoJson on the search box, then look for the ArduinoJson library by Benoit Blanchon.
- Click Install button to install ArduinoJson library.
- Search for ArduinoJson created by Benoit Blanchon
and click the Install button.
- Copy the above code and paste it to Arduino IDE.
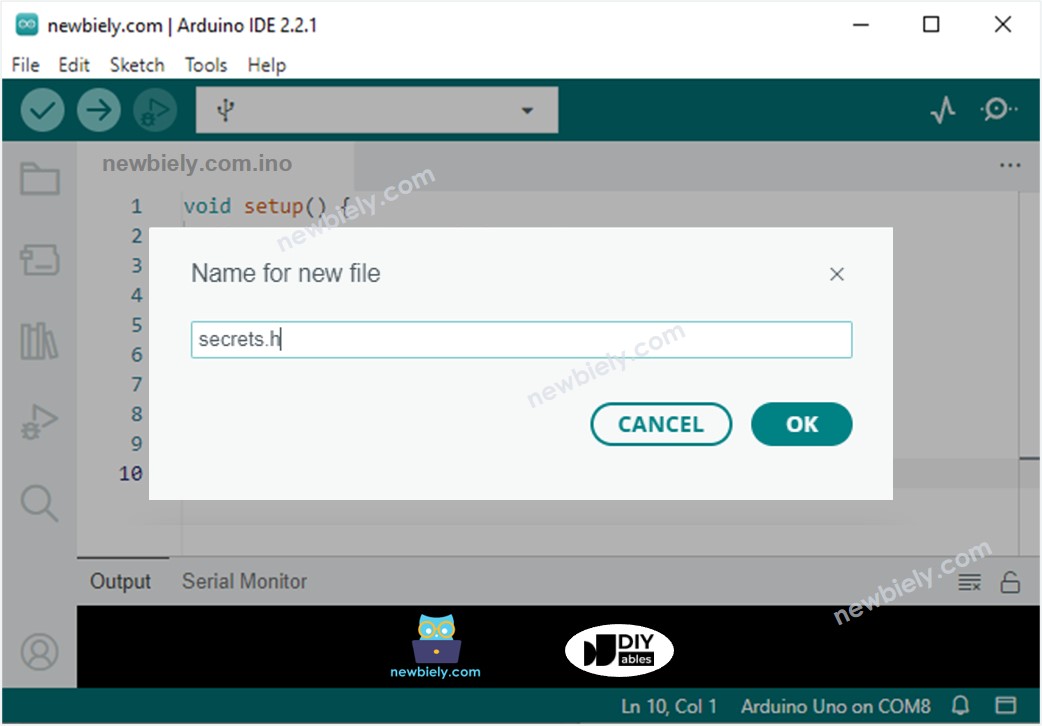
- Create the secrets.h file On Arduino IDE by:
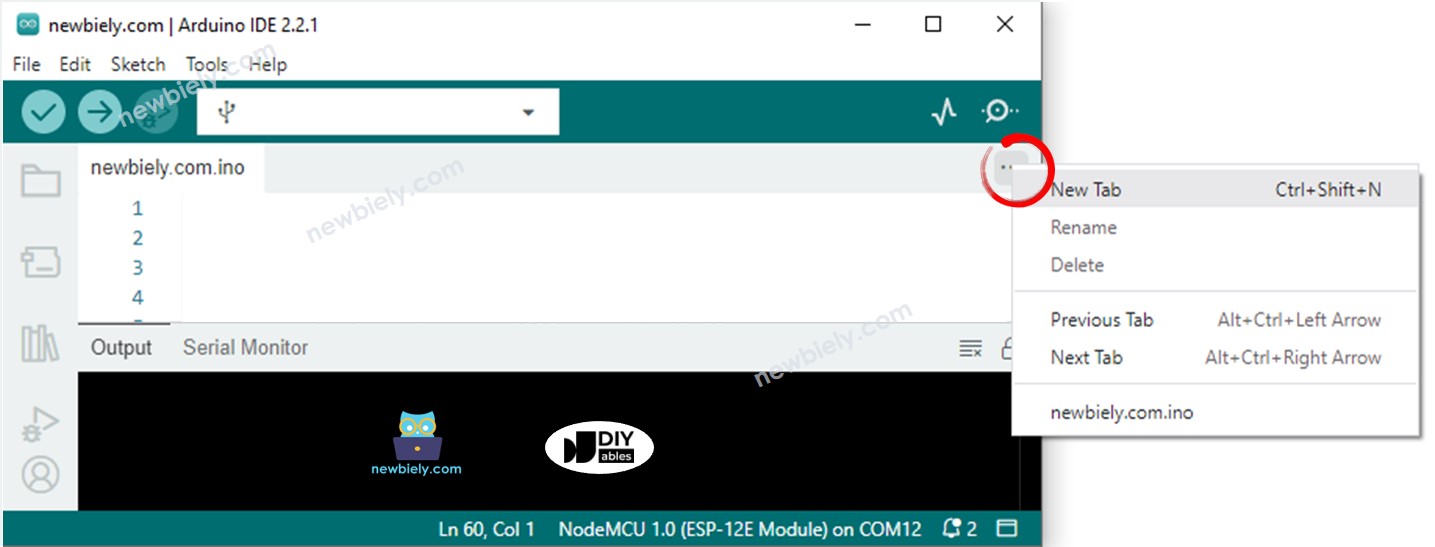
- Either click on the button just below the serial monitor icon and choose New Tab, or use Ctrl+Shift+N keys.
- Give file's name secrets.h and click OK button
- Copy the below code and paste it to the created secrets.h file.
- Update the following information in the secrets.h
- The WIFI_SSID and WIFI_PASSWORD of your WiFi network
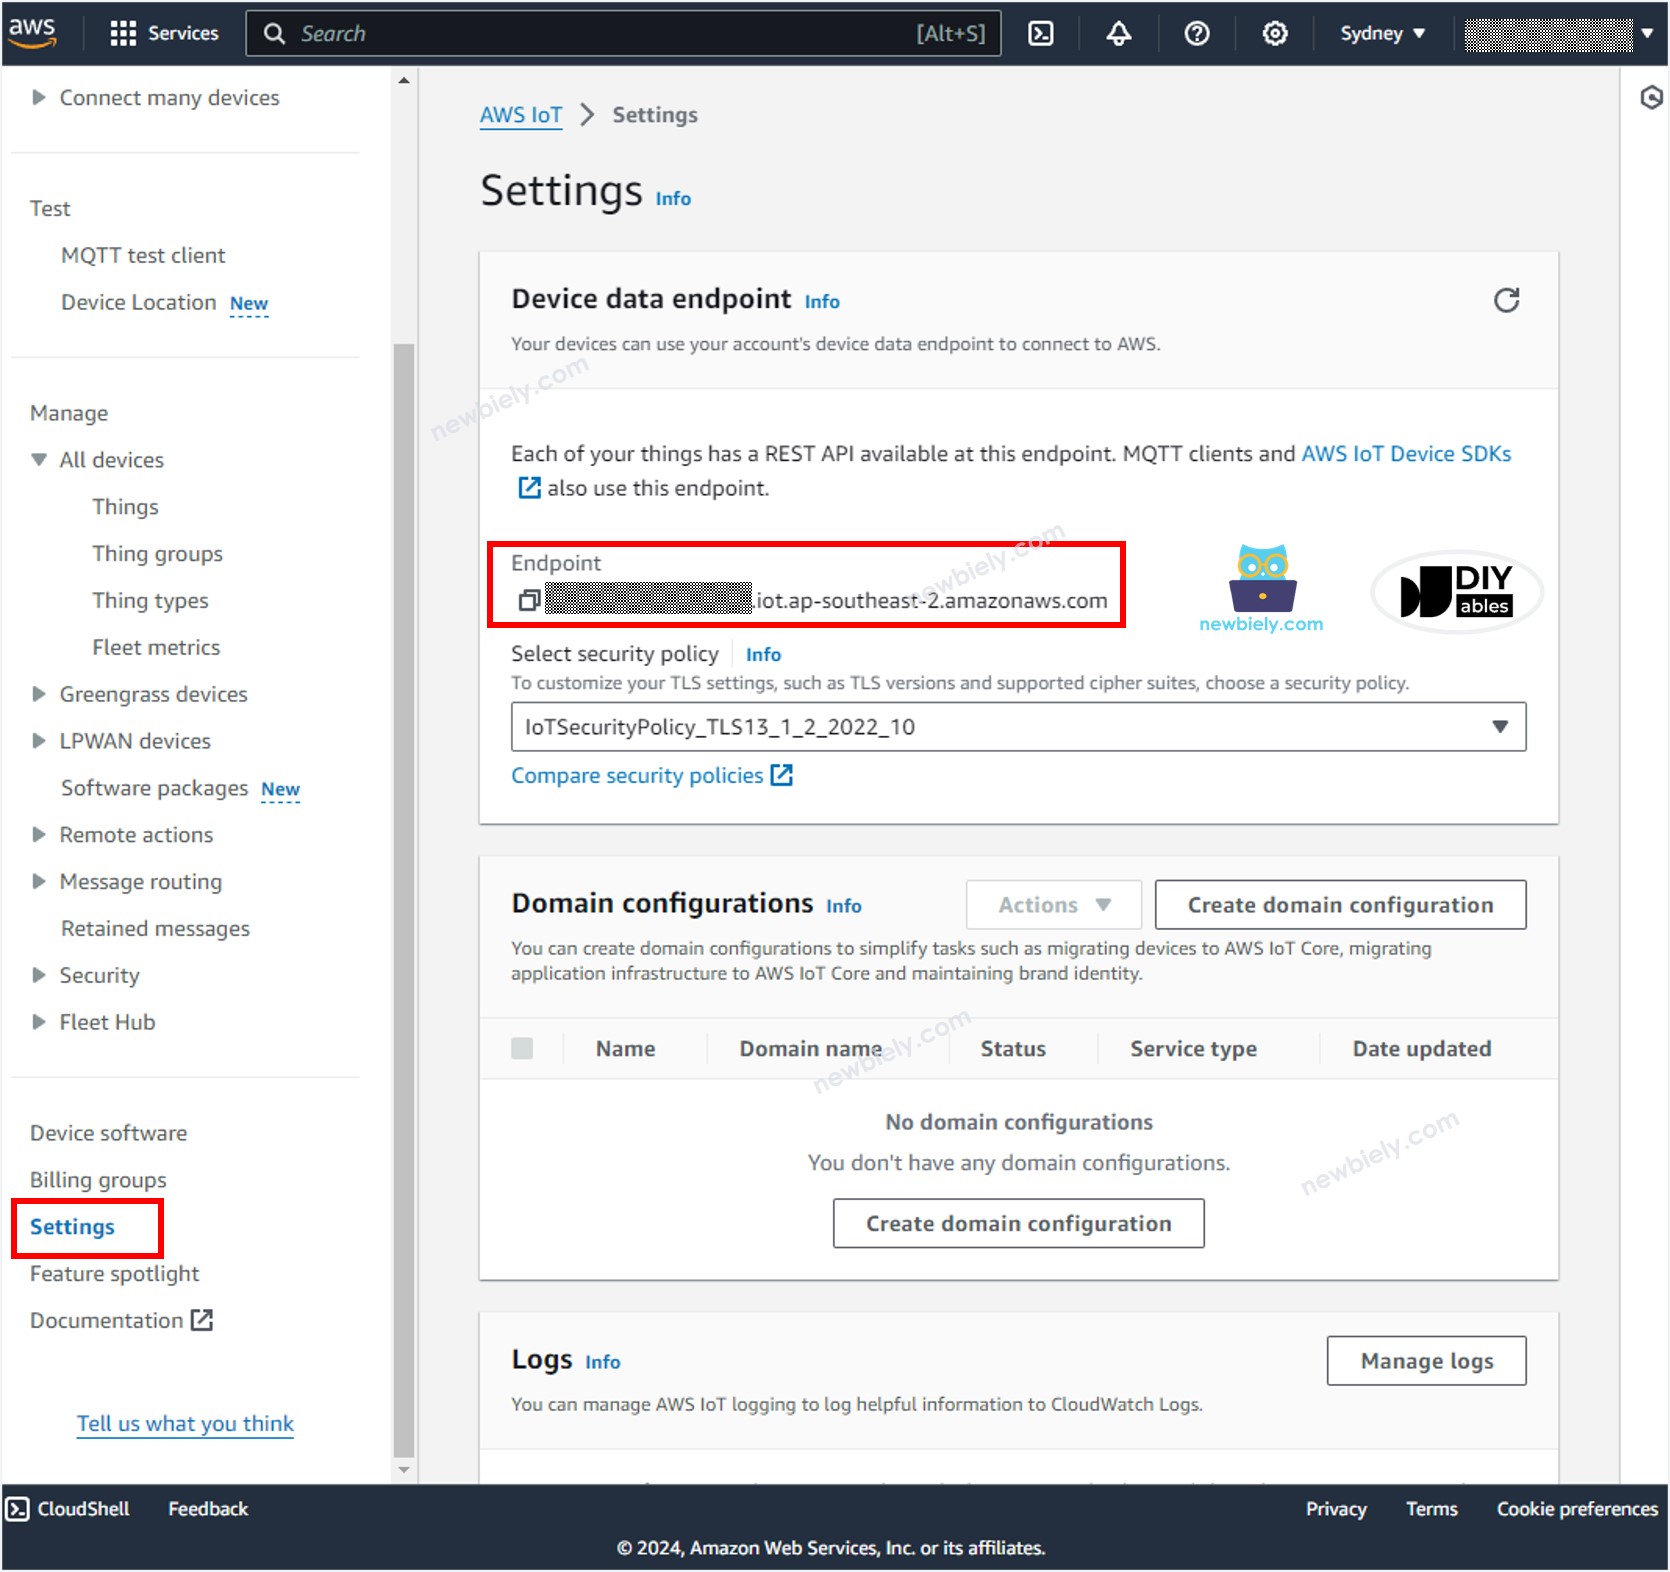
- The AWS_CERT_CA, AWS_CERT_CRT, and AWS_CERT_PRIVATE. These information are in the files you downloaded in the previous step.
- The AWS_IOT_ENDPOINT. This information can be found on AWS IoT Console by going to Setting as below image:
- Compile and upload code to ESP32 S3 board by clicking Upload button on Arduino IDE
- Pro Tip: Keep your secrets.h file out of version control by adding it to .gitignore. This prevents accidentally exposing your AWS certificates in a public repository.
Sending Data from ESP32 S3 to AWS IoT
The ESP32 S3 code periodically reads data from an analog pin and sends it to AWS IoT Core every four seconds over MQTT. Opening the Serial Monitor in Arduino IDE will display a connection log followed by a publishing confirmation for each message sent.
To check if the data are received by AWS IoT or not, do the following steps:
- In AWS IoT Console, navigate to Test MQTT Test Client
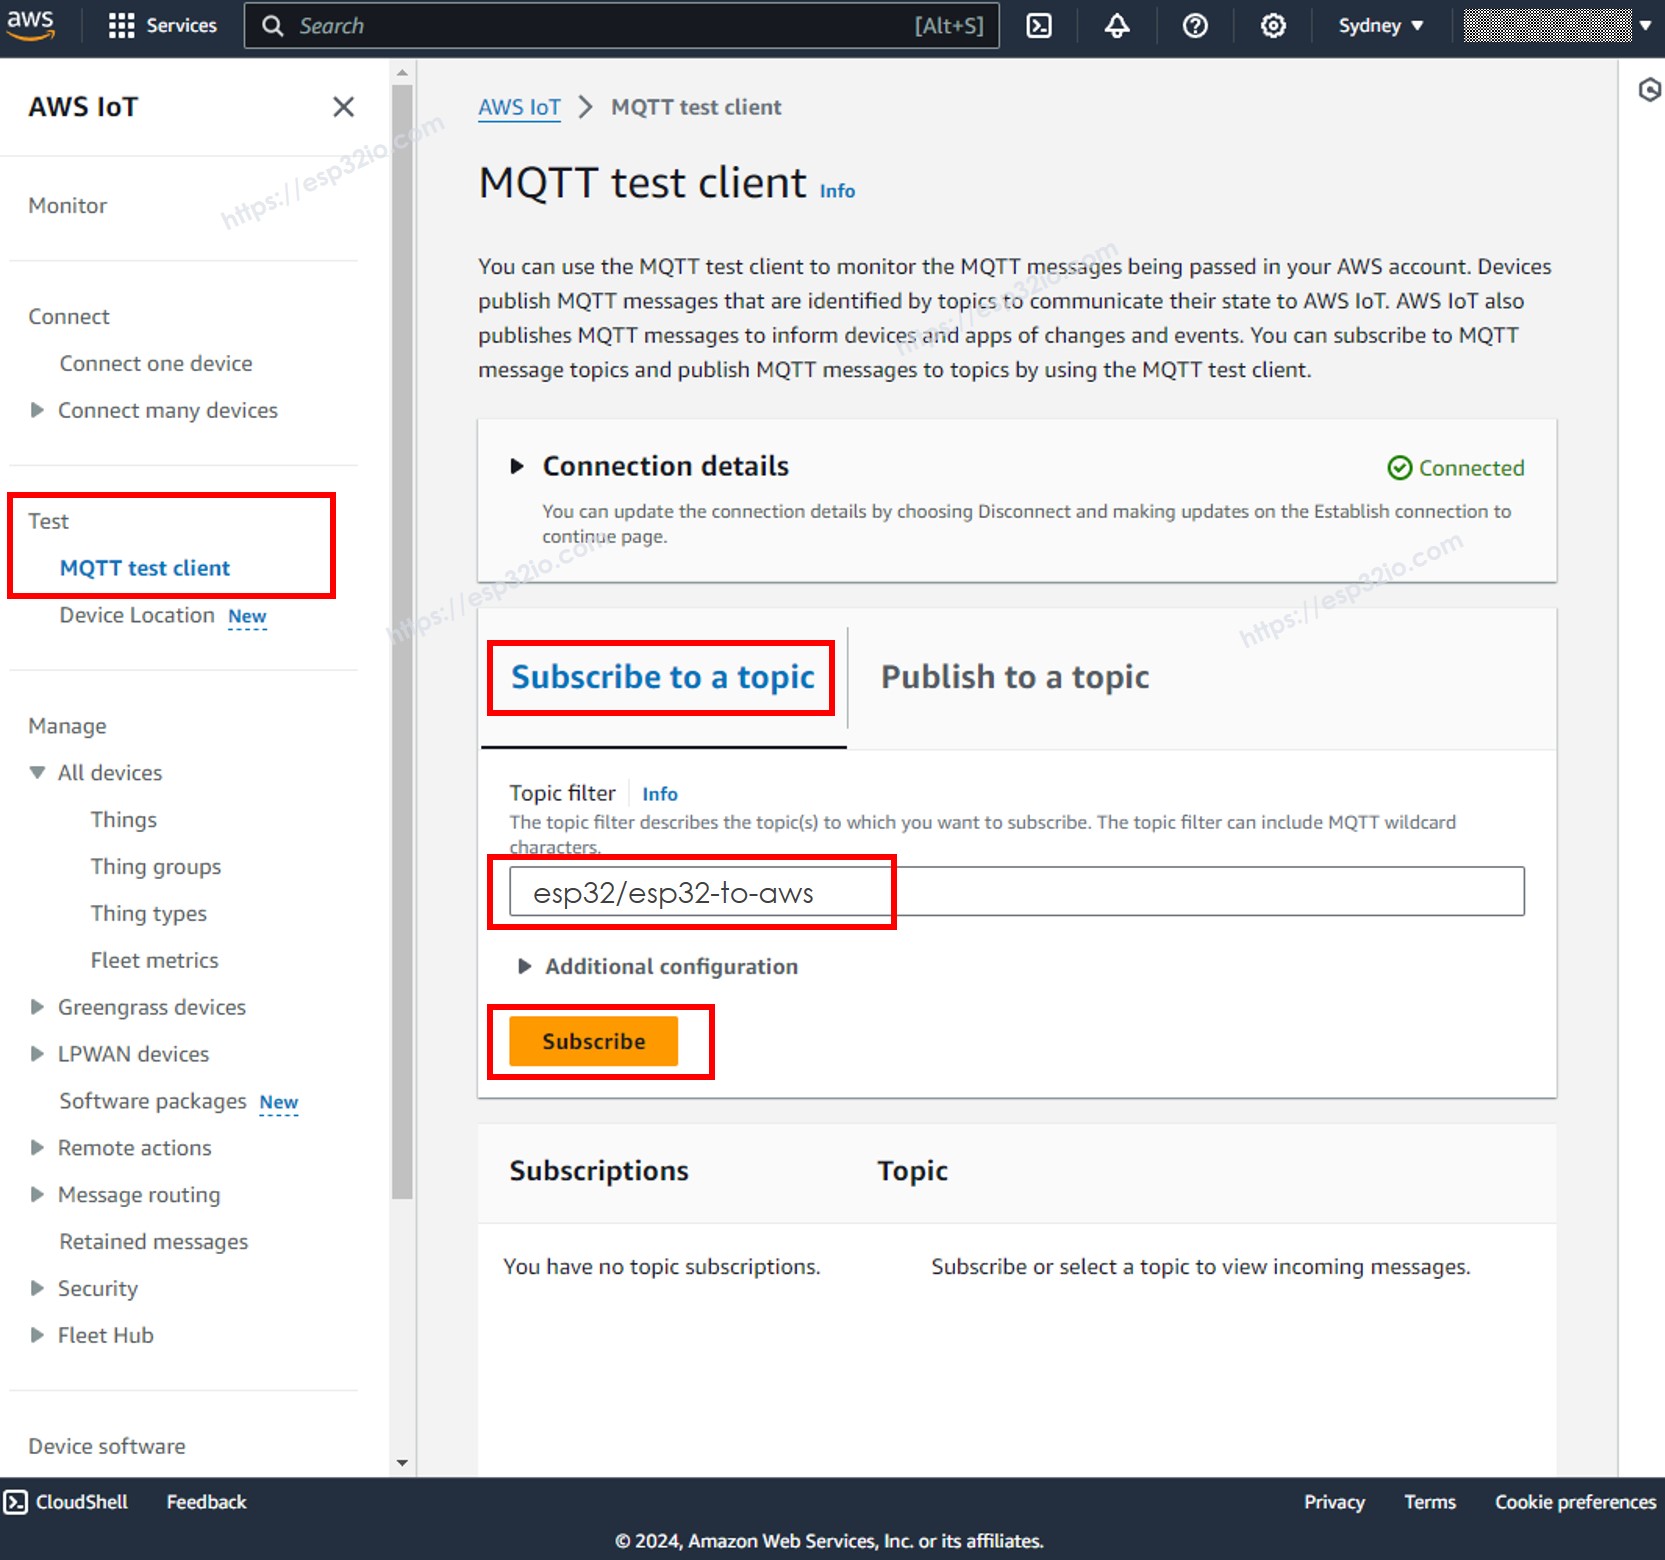
- Click the Subcribe to a topic button.
- Type esp32/esp32-to-aws to the Topic filter. You can change the topic but MUST be matched the topic on the ESP32 S3 code.
- Click the Subcribe button.
- You will be able to see the data sent from ESP32 S3 on the AWS IoT Console.
Sending Data from AWS IoT to ESP32 S3
You are able to send the data from AWS IoT Console to the ESP32 S3 by doing the following steps:
- On Arduino IDE, Open the Serial Monitor
- On AWS IoT Console, navigate to Test MQTT Test Client
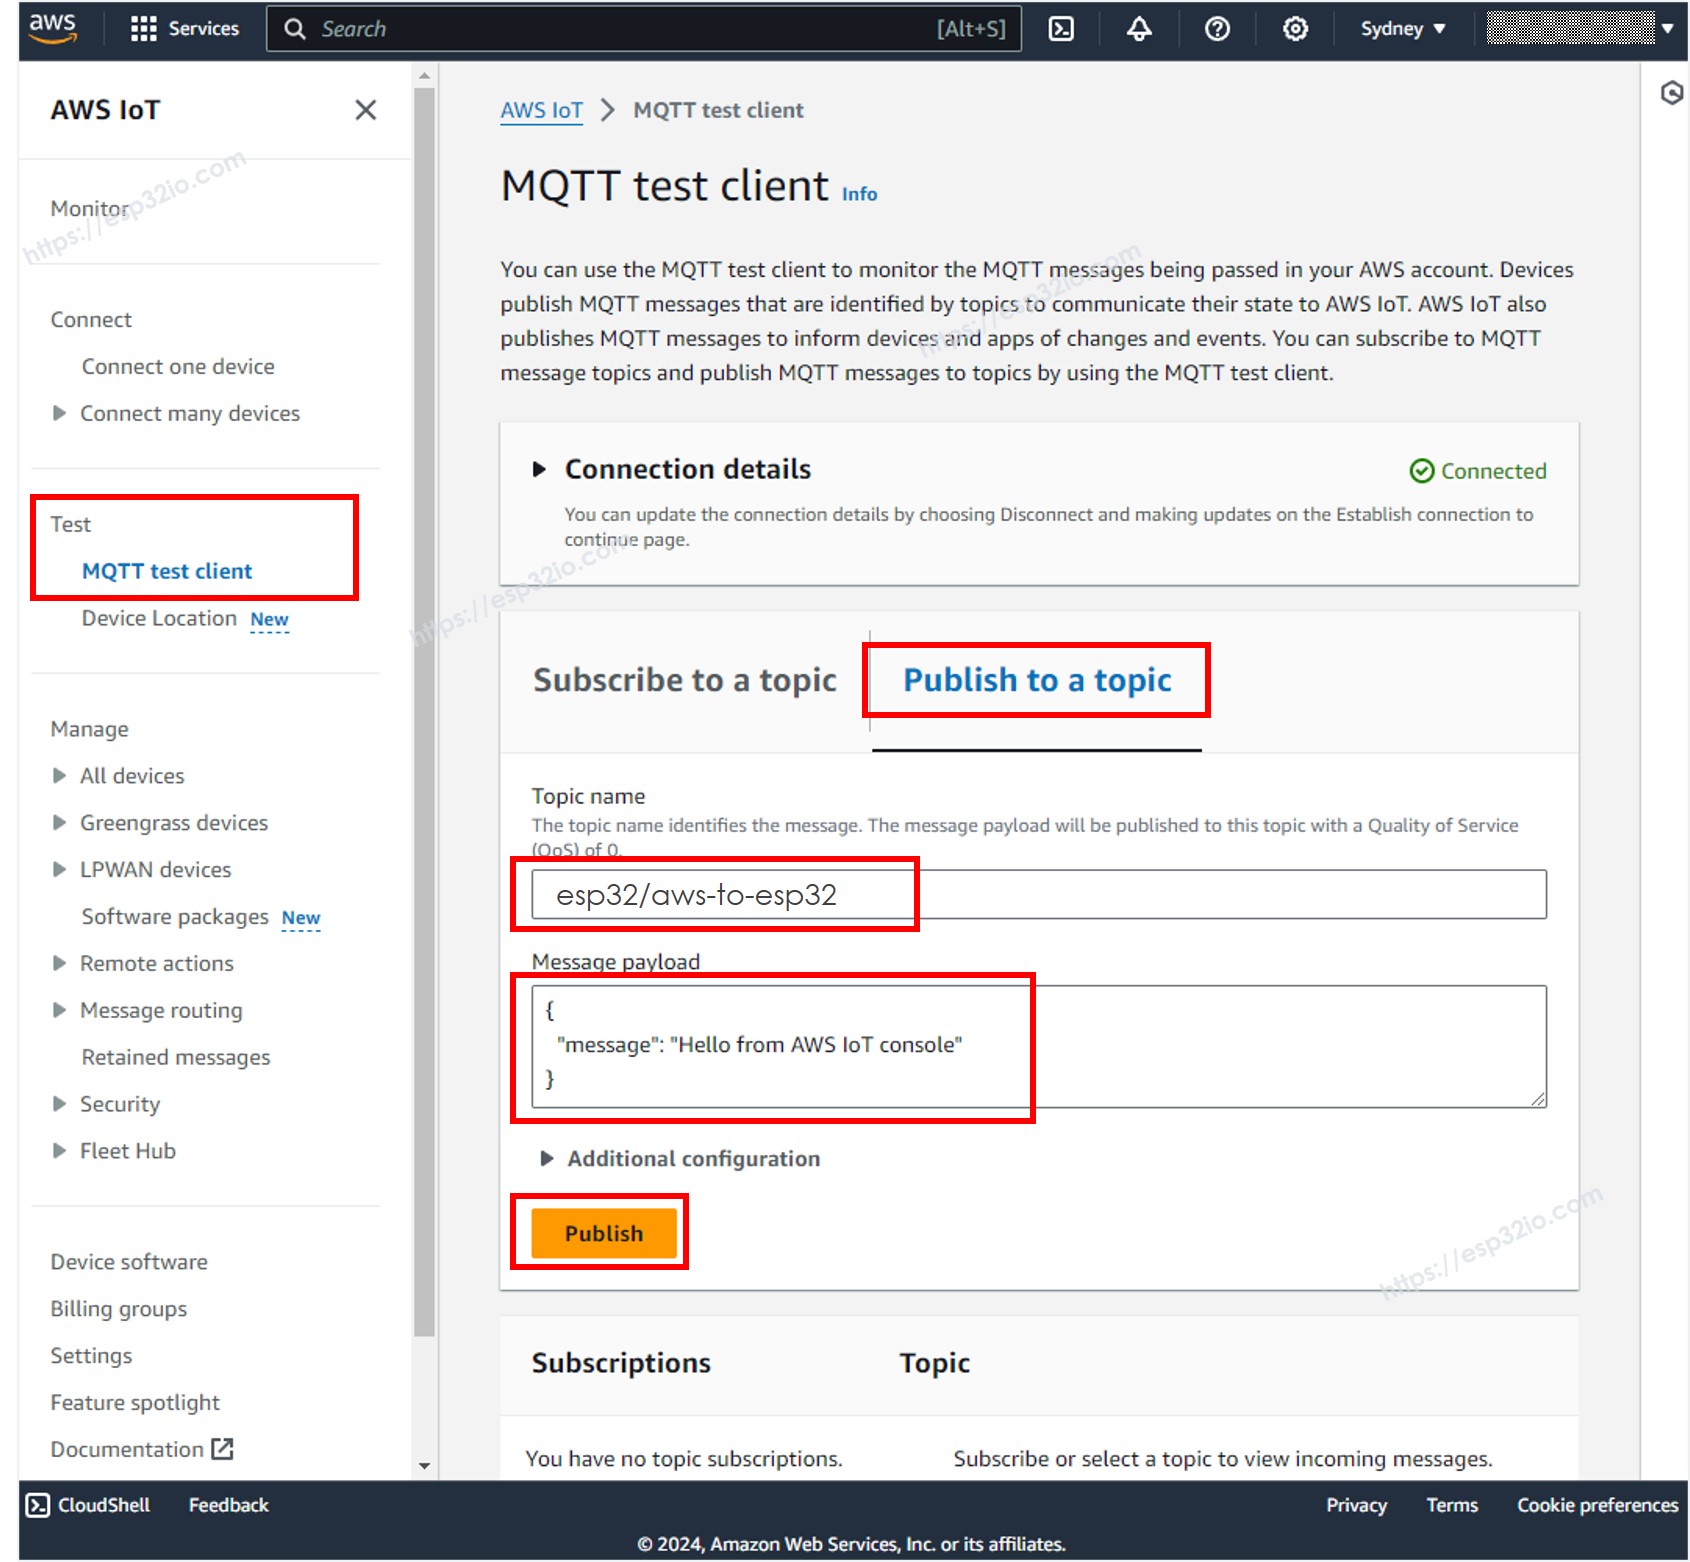
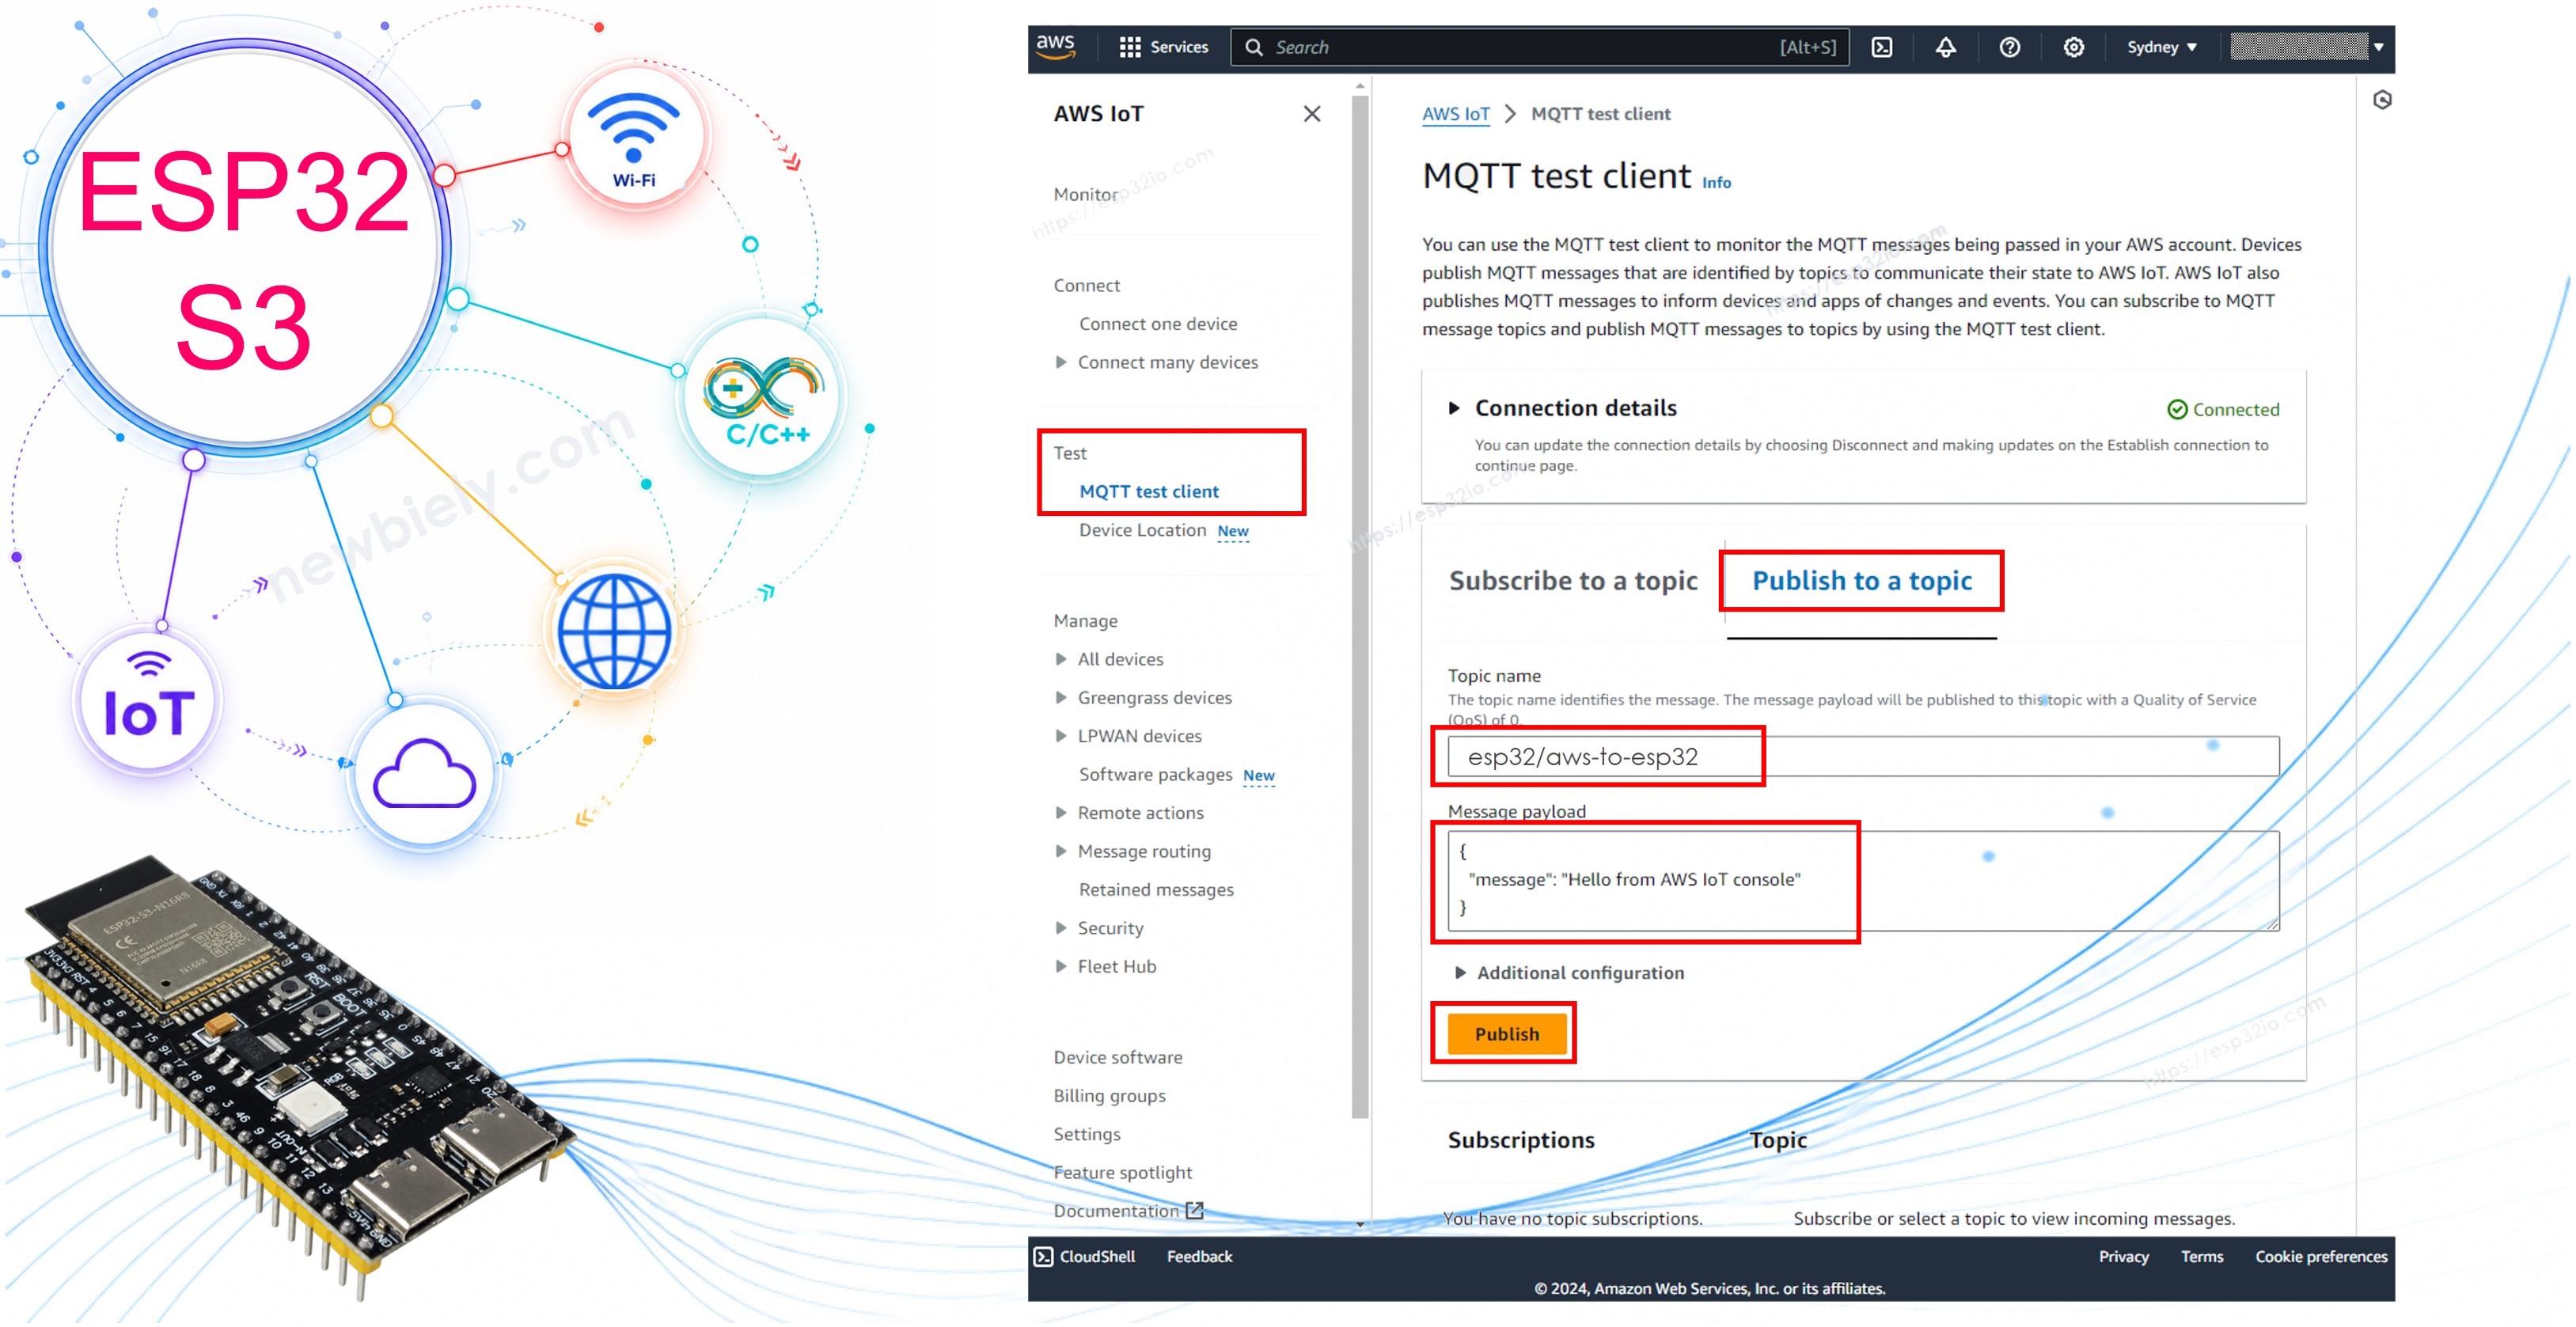
- Click the Publish to a topic button.
- Type esp32/aws-to-esp32 to the Topic name. You can change the topic but MUST be matched the topic on the ESP32 S3 code.
- Optionally, you can change the message payload, or just keep it as default.
- Click the Publish button.
- Check out the Serial Monitor on Arduino IDE, you will see the message sent from AWS IoT Console.
Applications
The ESP32 S3 paired with AWS IoT Core opens the door to a wide range of real-world IoT solutions that benefit from cloud-scale processing, storage, and automation.
- Remote Environmental Monitoring: Deploy the ESP32 S3 in the field to stream temperature, humidity, or air-quality readings to AWS IoT, then visualize trends in Amazon QuickSight.
- Smart Agriculture: Collect soil moisture and weather data from ESP32 S3 nodes and trigger irrigation relays automatically using AWS IoT Rules and Lambda.
- Industrial Asset Tracking: Monitor machine vibration or power consumption on the factory floor, storing time-series data in Amazon Timestream for predictive maintenance.
- Home Automation Hub: Control lights, locks, and HVAC equipment remotely by publishing commands from a web dashboard to the ESP32 S3 via AWS IoT topics.
- Security Alerting: Have the ESP32 S3 publish motion-sensor or door-sensor events to AWS IoT, then route alerts to SNS for instant SMS or email notifications.
Video Tutorial
Watch the step-by-step video walkthrough for this ESP32 S3 project below.
Challenges
Now that your ESP32 S3 is connected to AWS IoT Core, push the project further with the following challenges.
- Beginner: Modify the sketch to publish a fixed JSON payload containing your name and the current uptime, then verify receipt in the MQTT Test Client.
- Intermediate: Add a DHT22 temperature and humidity sensor to the ESP32 S3, publish readings every ten seconds, and create an AWS IoT Rule that stores the data in a DynamoDB table.
- Advanced: Build a two-way control dashboard using AWS Amplify that reads telemetry from DynamoDB and publishes relay-control commands back to the ESP32 S3 through AWS IoT Core.