ESP32 S3 - Control Car via Web

This guide shows you how to use the ESP32 S3 to wirelessly control a robot car from a web browser on your smartphone or PC using WiFi. The control is facilitated through a graphical web user interface using WebSocket, allowing for smooth and real-time control of the car from anywhere on your local network.
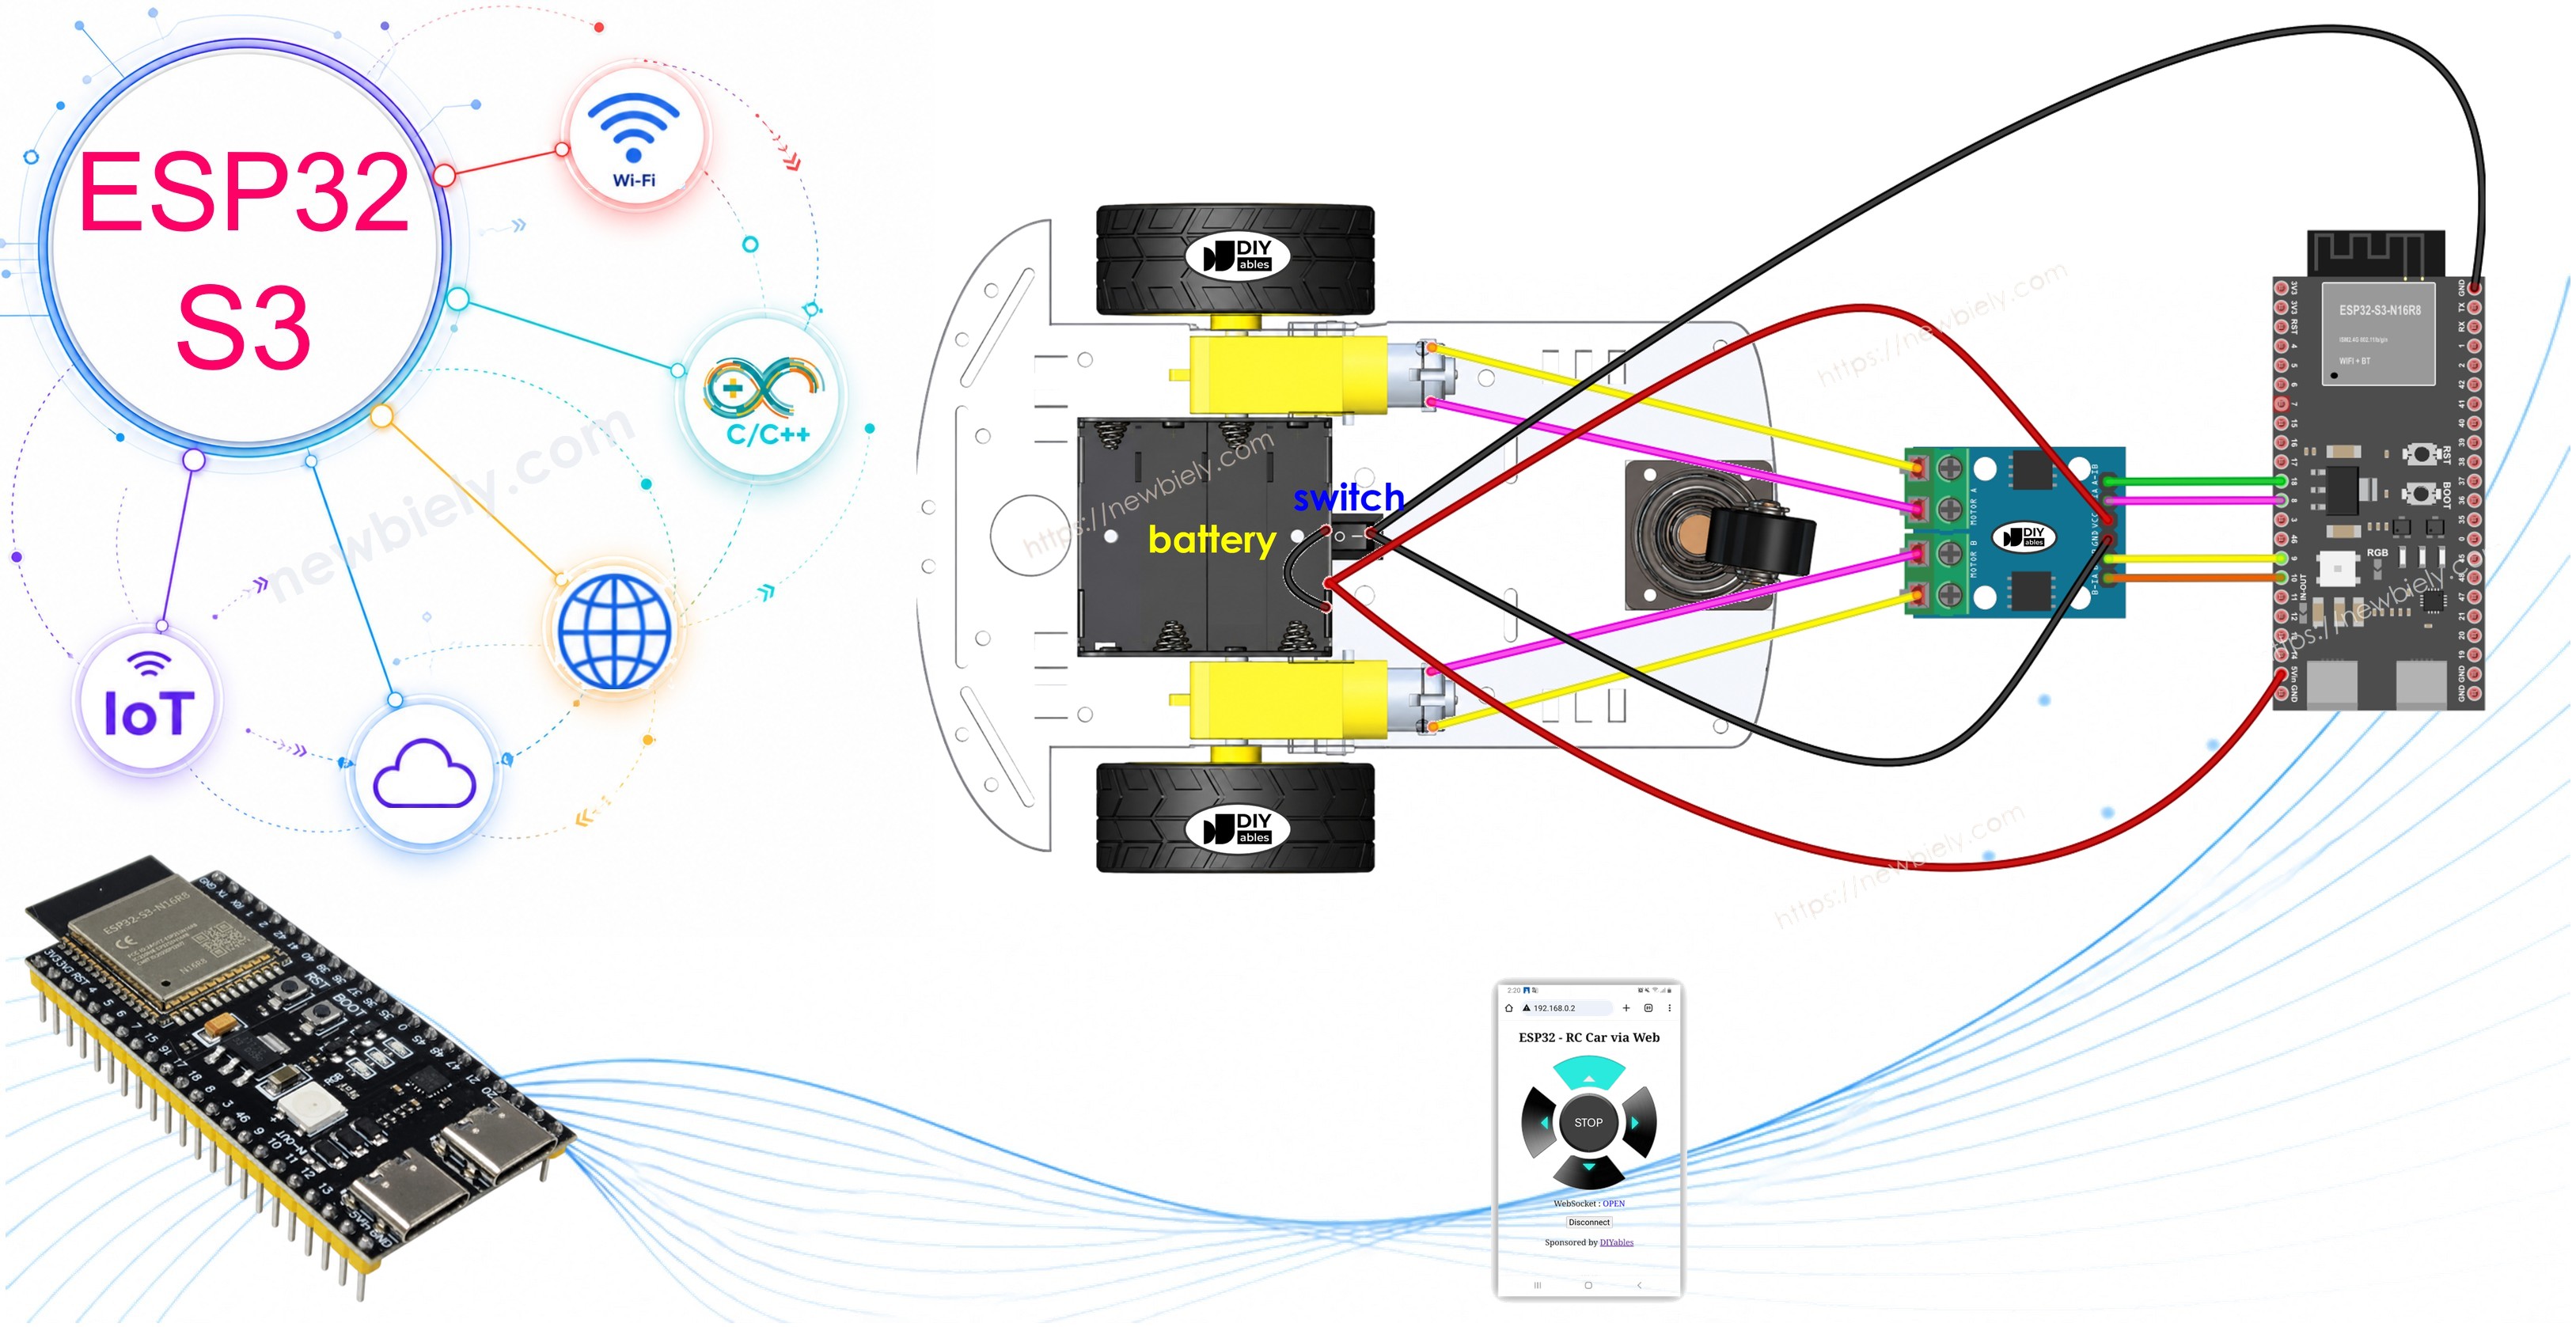
ESP32 S3 2WD robot car controlled from a web browser with the L9110S motor driver

What you'll build:

  1. A web-based control interface hosted on the ESP32 S3 itself
  2. A WebSocket connection for real-time, low-latency command delivery
  3. A motor control system that drives a 2WD RC car forward, backward, left, and right
  4. A browser-accessible UI that works on both smartphones and PCs

Overview of 2WD RC Car and WebSocket

The 2WD RC Car is a popular robotics platform consisting of two independently driven wheels and a castor wheel for balance, making it simple to control direction through differential motor speeds. WebSocket is a communication protocol that establishes a persistent, two-way connection between the web browser and the ESP32 S3, eliminating the need to reload the page every time a command is sent. Together, these technologies allow you to build a responsive, real-time web-controlled car with minimal latency.

Key Specifications

We have specific tutorials about 2WD RC Car and WebSocket. Each tutorial contains detailed information and step-by-step instructions about hardware pinout, working principle, wiring connection to ESP32 S3, ESP32 S3 code... Learn more about them at the following links:

How It Works

The ESP32 S3 code creates both a web server and a WebSocket server, enabling the browser to display the control UI and send real-time commands without page reloads. Here's how it works:

  • When you enter the ESP32 S3's IP address in a web browser, it requests the webpage (User Interface) from the ESP32 S3.
  • The ESP32 S3's web server responds by sending the webpage's content (HTML, CSS, JavaScript).
  • Your web browser then displays the webpage.
  • The JavaScript code within the webpage establishes a WebSocket connection to the WebSocket server on the ESP32 S3.
  • Once this WebSocket connection is established, if you press/release the buttons on the webpage, the JavaScript code quietly sends the commands to the ESP32 S3 through this WebSocket connection in the background.
  • The WebSocket server on the ESP32 S3, upon receiving the commands, controls the robot car accordingly.

The following table shows the command list that the webpage sends to the ESP32 S3 based on the user's actions:

User's Action Button Command Car Action
PRESS UP 1 MOVE FORWARD
PRESS DOWN 2 MOVE BACKWARD
PRESS LEFT 4 TURN LEFT
PRESS RIGHT 8 TURN RIGHT
PRESS STOP 0 STOP
RELEASE UP 0 STOP
RELEASE DOWN 0 STOP
RELEASE LEFT 0 STOP
RELEASE RIGHT 0 STOP
RELEASE STOP 0 STOP

Wiring Diagram between 2WD RC Car and ESP32 S3

Connect the components by following the wiring diagram and notes below. The L9110S motor driver acts as the bridge between the ESP32 S3's logic-level signals and the higher-current motors in the 2WD car.
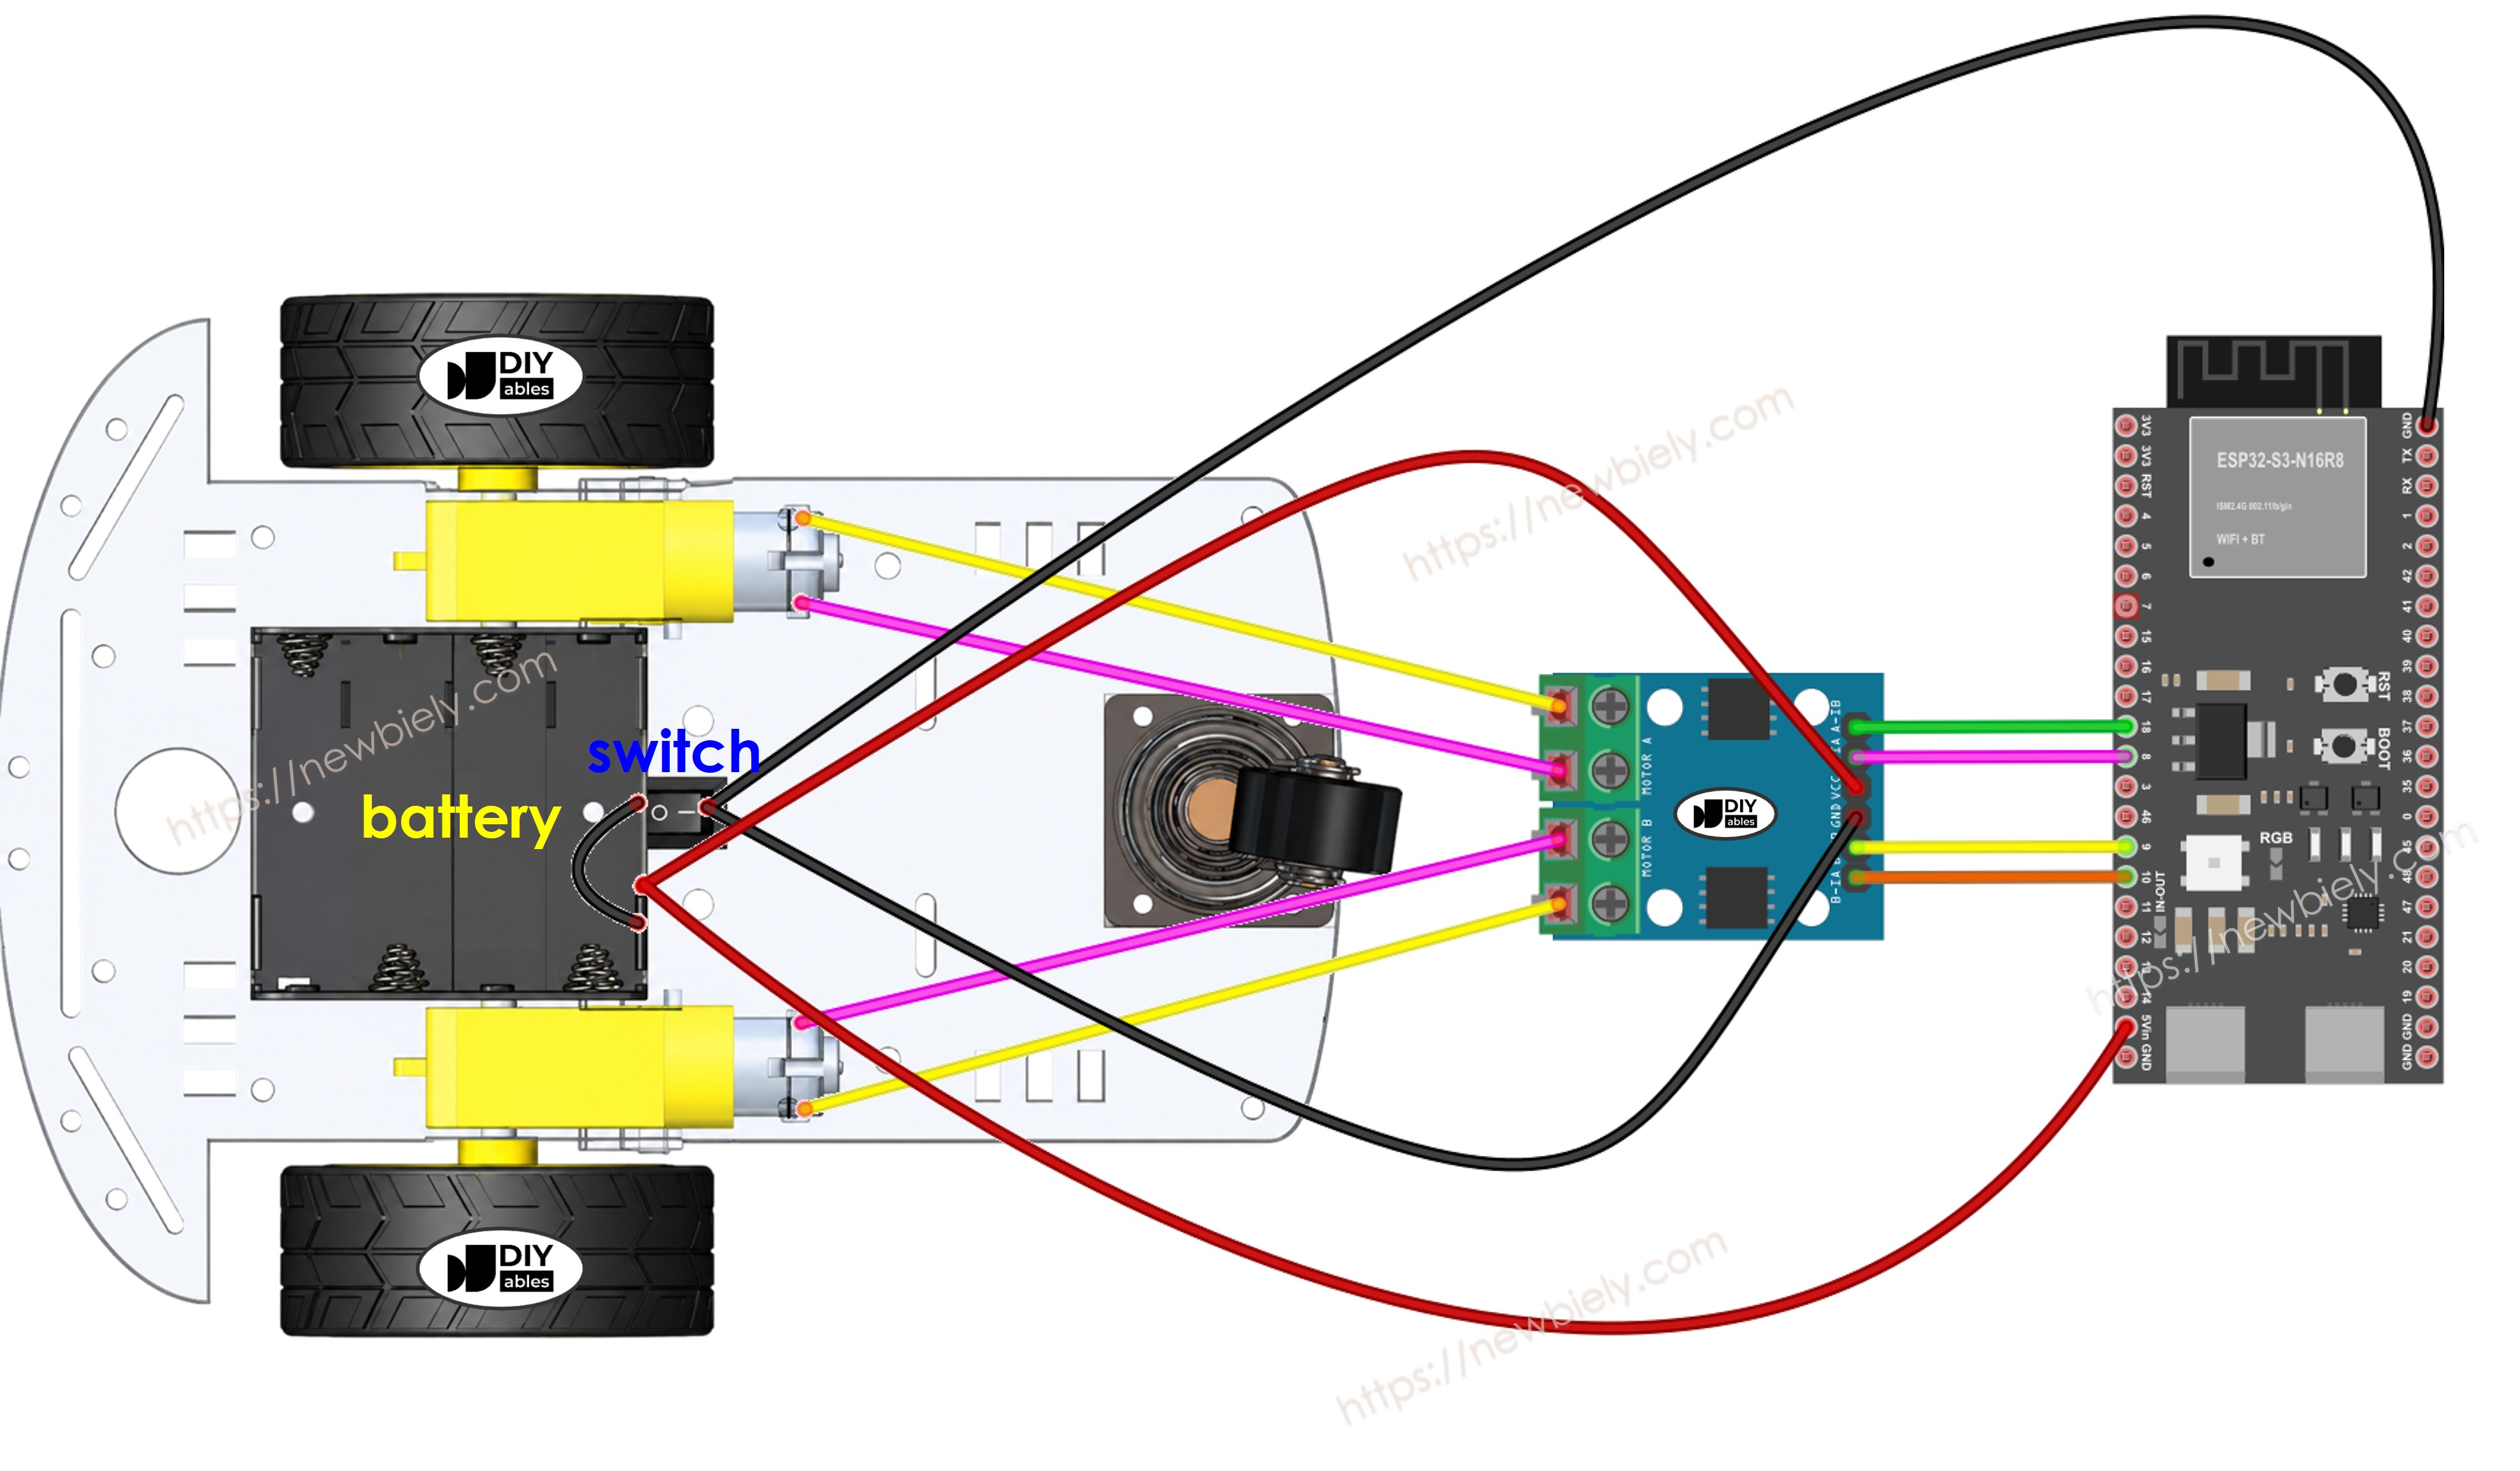
The wiring diagram between ESP32 S3 2WD RC Car

This image is created using Fritzing. Click to enlarge image

A screw terminal keeps each wire tight, even when the board shakes. Simply plug the ESP32 S3 into a Screw Terminal Block for ESP32 S3. This is how it looks with the screw terminal board:
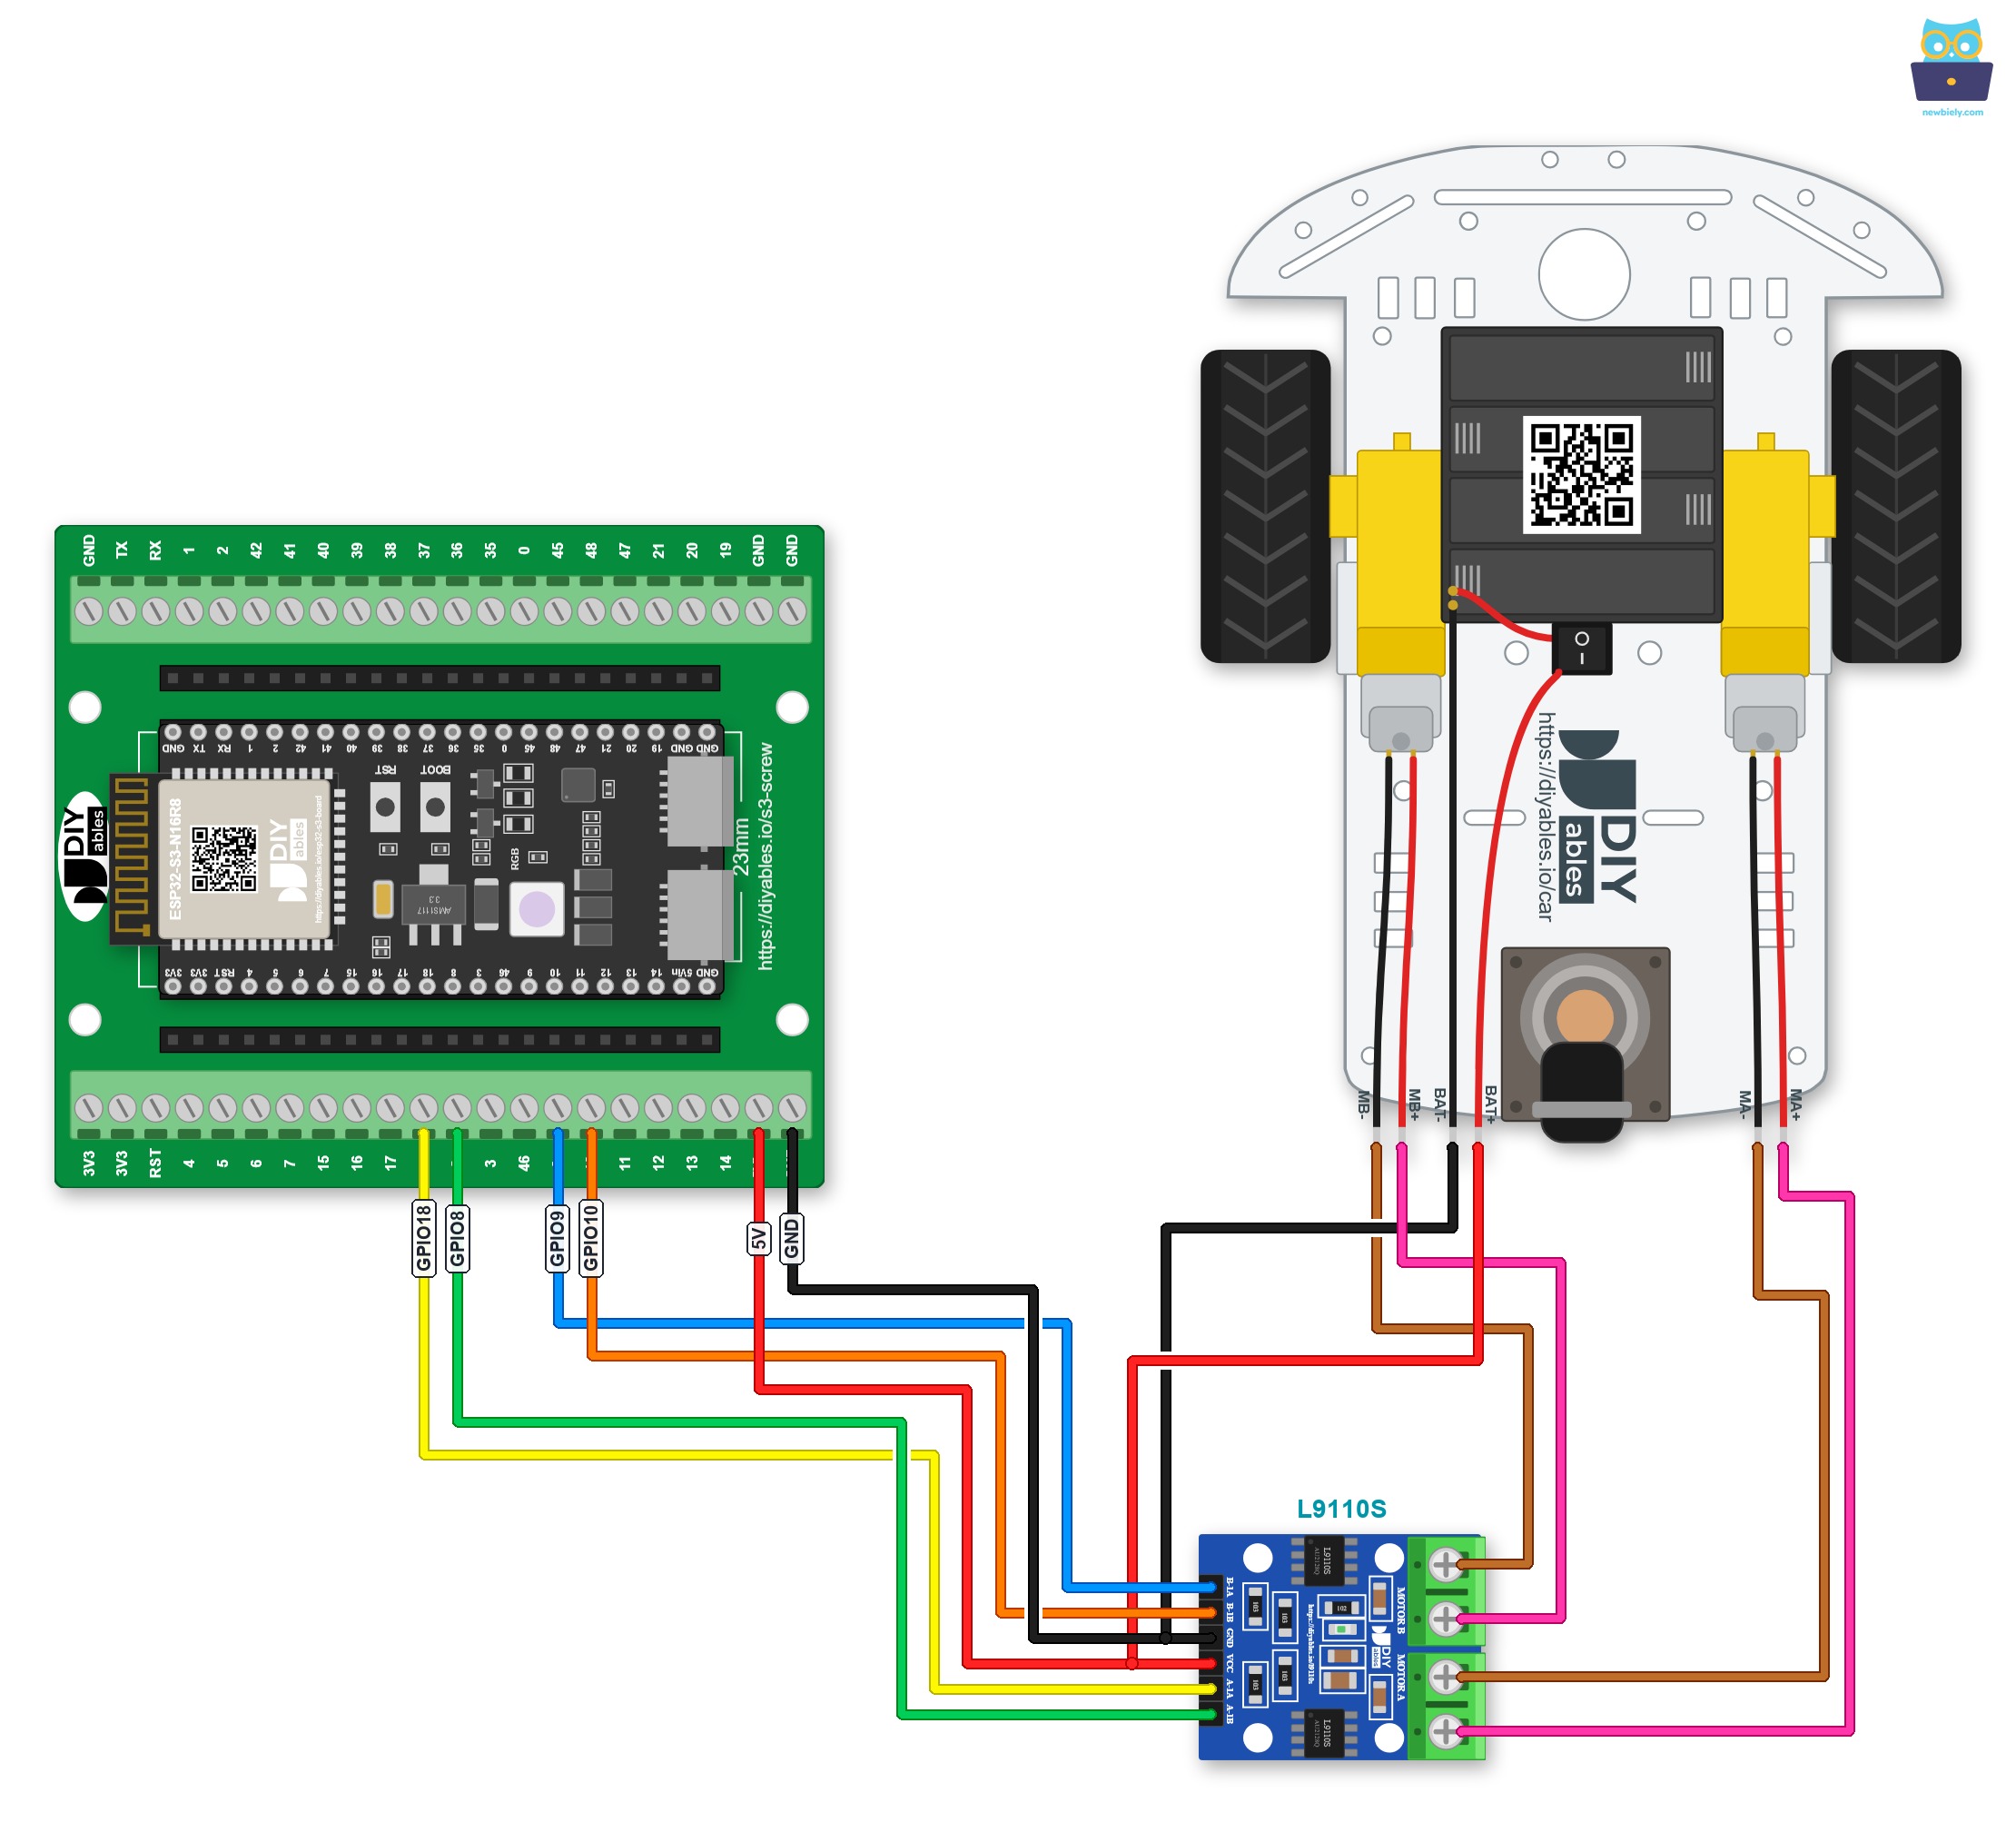
The wiring diagram between ESP32 S3 2WD RC Car Screw Terminal

This image is created using Fritzing. Click to enlarge image

Or plug the ESP32 S3 into a GPIO Breakout Board for ESP32 S3. The same wiring then looks like this:
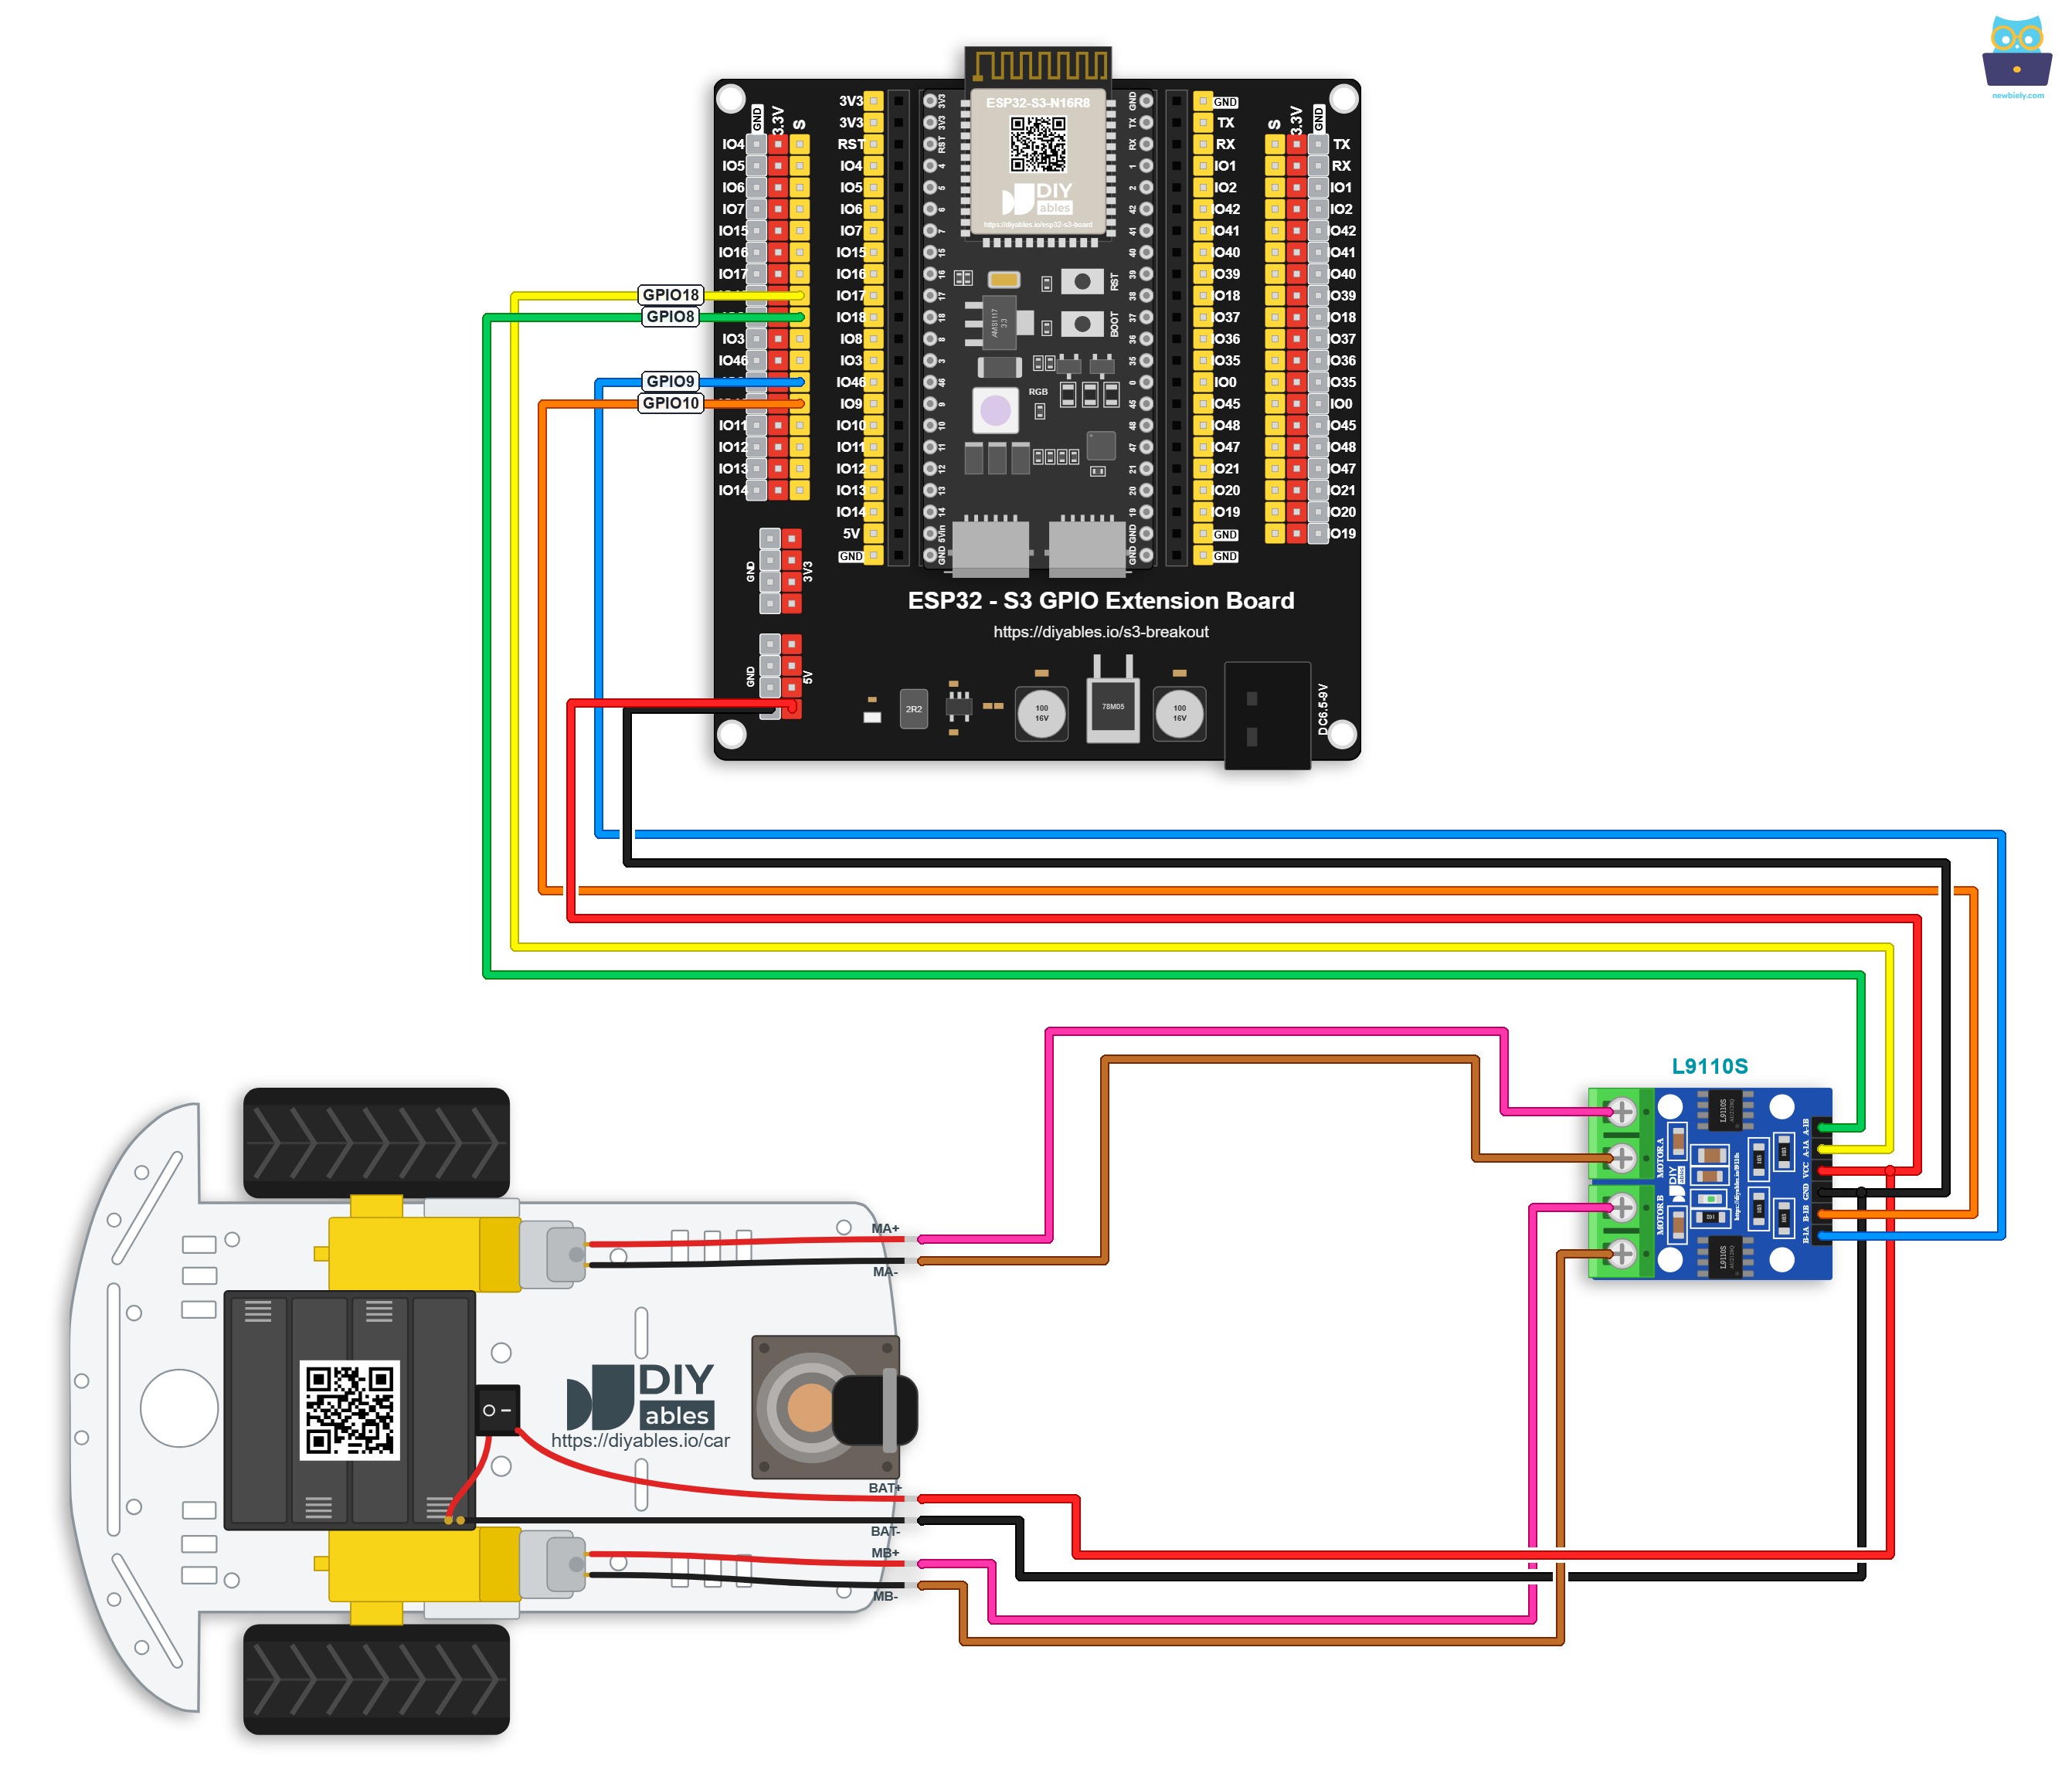
The wiring diagram between ESP32 S3 2WD RC Car GPIO Breakout Board

This image is created using Fritzing. Click to enlarge image
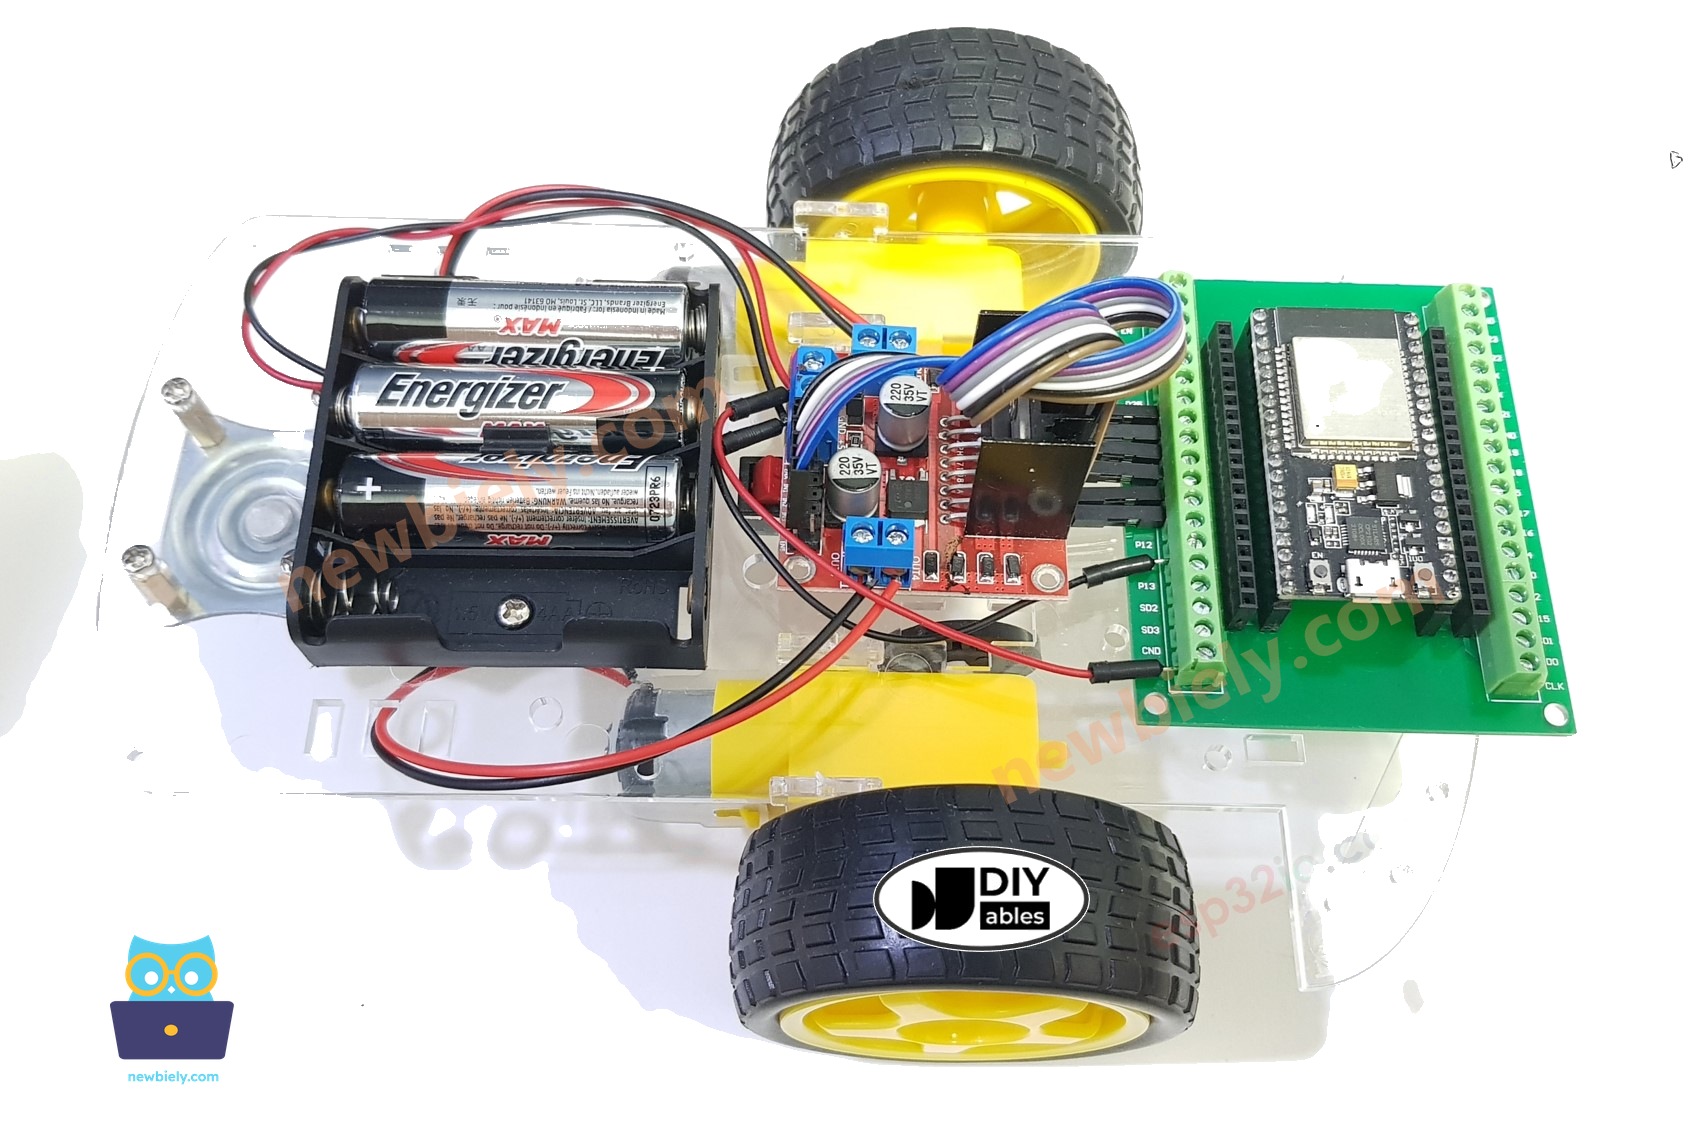
ESP32 S3 2WD RC Car via web

Safety Notes

The L9110S module powers the motors directly from its VCC and GND pins and does not have an onboard 5V regulator. This means you can power everything from a single power source — four 1.5V AA batteries (totaling 6V). Here's how to do it:

  • Connect the 6V battery to the VCC and GND pins of the L9110S module to power the motors.
  • Connect the same 6V battery to the Vin and GND pins of the ESP32 S3 to power the board.
  • Make sure the L9110S module and the ESP32 S3 share a common GND.

Unlike the L298N, the L9110S has no ENA/ENB enable jumpers and no 12V screw terminal, so the wiring is simpler.

Since the 2WD RC car has an on/off switch, you can optionally connect the battery via the switch to enable turning on/off power for the car. If you want to make it simple, just ignore the switch.

ESP32 S3 Code

The following code consists of two files. The webpage's content (HTML, CSS, JavaScript) is stored separately in an index.h file, which keeps the main sketch clean and maintainable. Together, these two files implement a web server, a WebSocket server, and the motor control logic.

  • An .ino file that is ESP32 S3 code, which creates a web server and WebSocket Server, and controls the car
  • An .h file, which contains the webpage's content

Detailed Instructions

  • New to ESP32 S3? Complete our Getting Started with ESP32 S3 guide first.
  • Do the wiring as above image.
  • Connect the ESP32 S3 board to your PC via a USB Type-C cable
  • Open Arduino IDE on your PC.
  • Select the right ESP32 S3 board (e.g. ESP32S3 Dev Module) and COM port.
  • Open the Library Manager by clicking on the Library Manager icon on the left navigation bar of Arduino IDE.
  • Search "DIYables ESP32 WebServer", then find the Web Server library created by DIYables.
  • Click Install button to install the Web Server library.
  • Search for DIYables ESP32 WebServer created by DIYables.io and click the Install button.
∞
Newbiely | Arduino IDE 2.3.8
──
☐
✕
File
Edit
Sketch
Tools
Help
ESP32S3 Dev Module
Library Manager
Type:
All
Topic:
All
DIYables ESP32 WebServer by DIYables.io
DIYables ESP32 WebServer library designed for ESP32 boards. It includes multi-page web server capabilities and WebSocket support for real-time communication, perfect for IoT projects and DIYables ESP32 boards. More info
1.0.1
INSTALL
Newbiely.ino
···
1 void setup() {
Output
Serial Monitor
Ln 1, Col 1
ESP32S3 Dev Module on COM15
1
  • On Arduino IDE, create new sketch, Give it a name, for example, newbiely.com.ino
  • Copy the below code and open with Arduino IDE
/* * This ESP32 S3 code was developed by newbiely.com * * This ESP32 S3 code is made available for public use without any restriction * * For comprehensive instructions and wiring diagrams, please visit: * https://newbiely.com/tutorials/esp32-s3/esp32-s3-controls-car-via-web */ #include <DIYables_ESP32_WebServer.h> #include "index.h" #define CMD_STOP 0 #define CMD_FORWARD 1 #define CMD_BACKWARD 2 #define CMD_LEFT 4 #define CMD_RIGHT 8 #define MOTOR_A_IA_PIN 18 // The ESP32 S3 pin GPIO18 connected to the A-IA pin of the L9110S (Motor A) #define MOTOR_A_IB_PIN 8 // The ESP32 S3 pin GPIO8 connected to the A-IB pin of the L9110S (Motor A) #define MOTOR_B_IA_PIN 9 // The ESP32 S3 pin GPIO9 connected to the B-IA pin of the L9110S (Motor B) #define MOTOR_B_IB_PIN 10 // The ESP32 S3 pin GPIO10 connected to the B-IB pin of the L9110S (Motor B) // WiFi credentials const char WIFI_SSID[] = "YOUR_WIFI_SSID"; const char WIFI_PASSWORD[] = "YOUR_WIFI_PASSWORD"; // Create web server instance DIYables_ESP32_WebServer server; DIYables_ESP32_WebSocket* webSocket; // Web Page handlers void handleHome(WiFiClient& client, const String& method, const String& request, const QueryParams& params, const String& jsonData) { server.sendResponse(client, HTML_CONTENT); // HTML_CONTENT is from index.h } // WebSocket event handlers void onWebSocketOpen(net::WebSocket& ws) { Serial.println("WebSocket client connected"); } void onWebSocketMessage(net::WebSocket& ws, const net::WebSocket::DataType dataType, const char* message, uint16_t length) { String angle = String(message); int command = angle.toInt(); Serial.print("command: "); Serial.println(command); switch (command) { case CMD_STOP: Serial.println("Stop"); CAR_stop(); break; case CMD_FORWARD: Serial.println("Move Forward"); CAR_moveForward(); break; case CMD_BACKWARD: Serial.println("Move Backward"); CAR_moveBackward(); break; case CMD_LEFT: Serial.println("Turn Left"); CAR_turnLeft(); break; case CMD_RIGHT: Serial.println("Turn Right"); CAR_turnRight(); break; default: Serial.println("Unknown command"); } } void onWebSocketClose(net::WebSocket& ws, const net::WebSocket::CloseCode code, const char* reason, uint16_t length) { Serial.println("WebSocket client disconnected"); } void setup() { Serial.begin(115200); delay(1000); pinMode(MOTOR_A_IA_PIN, OUTPUT); pinMode(MOTOR_A_IB_PIN, OUTPUT); pinMode(MOTOR_B_IA_PIN, OUTPUT); pinMode(MOTOR_B_IB_PIN, OUTPUT); Serial.println("ESP32 S3 Web Server and WebSocket Server"); // Configure web server routes server.addRoute("/", handleHome); // Start web server with WiFi connection server.begin(WIFI_SSID, WIFI_PASSWORD); // Enable WebSocket functionality webSocket = server.enableWebSocket(81); if (webSocket != nullptr) { // Set up WebSocket event handlers webSocket->onOpen(onWebSocketOpen); webSocket->onMessage(onWebSocketMessage); webSocket->onClose(onWebSocketClose); } else { Serial.println("Failed to start WebSocket server"); } } void loop() { // Then handle HTTP requests server.handleClient(); // Handle WebSocket server.handleWebSocket(); } void CAR_moveForward() { digitalWrite(MOTOR_A_IA_PIN, HIGH); digitalWrite(MOTOR_A_IB_PIN, LOW); digitalWrite(MOTOR_B_IA_PIN, HIGH); digitalWrite(MOTOR_B_IB_PIN, LOW); } void CAR_moveBackward() { digitalWrite(MOTOR_A_IA_PIN, LOW); digitalWrite(MOTOR_A_IB_PIN, HIGH); digitalWrite(MOTOR_B_IA_PIN, LOW); digitalWrite(MOTOR_B_IB_PIN, HIGH); } void CAR_turnLeft() { digitalWrite(MOTOR_A_IA_PIN, HIGH); digitalWrite(MOTOR_A_IB_PIN, LOW); digitalWrite(MOTOR_B_IA_PIN, LOW); digitalWrite(MOTOR_B_IB_PIN, LOW); } void CAR_turnRight() { digitalWrite(MOTOR_A_IA_PIN, LOW); digitalWrite(MOTOR_A_IB_PIN, LOW); digitalWrite(MOTOR_B_IA_PIN, HIGH); digitalWrite(MOTOR_B_IB_PIN, LOW); } void CAR_stop() { digitalWrite(MOTOR_A_IA_PIN, LOW); digitalWrite(MOTOR_A_IB_PIN, LOW); digitalWrite(MOTOR_B_IA_PIN, LOW); digitalWrite(MOTOR_B_IB_PIN, LOW); }
  • Modify the WiFi information (SSID and password) in the code to match your own network credentials.
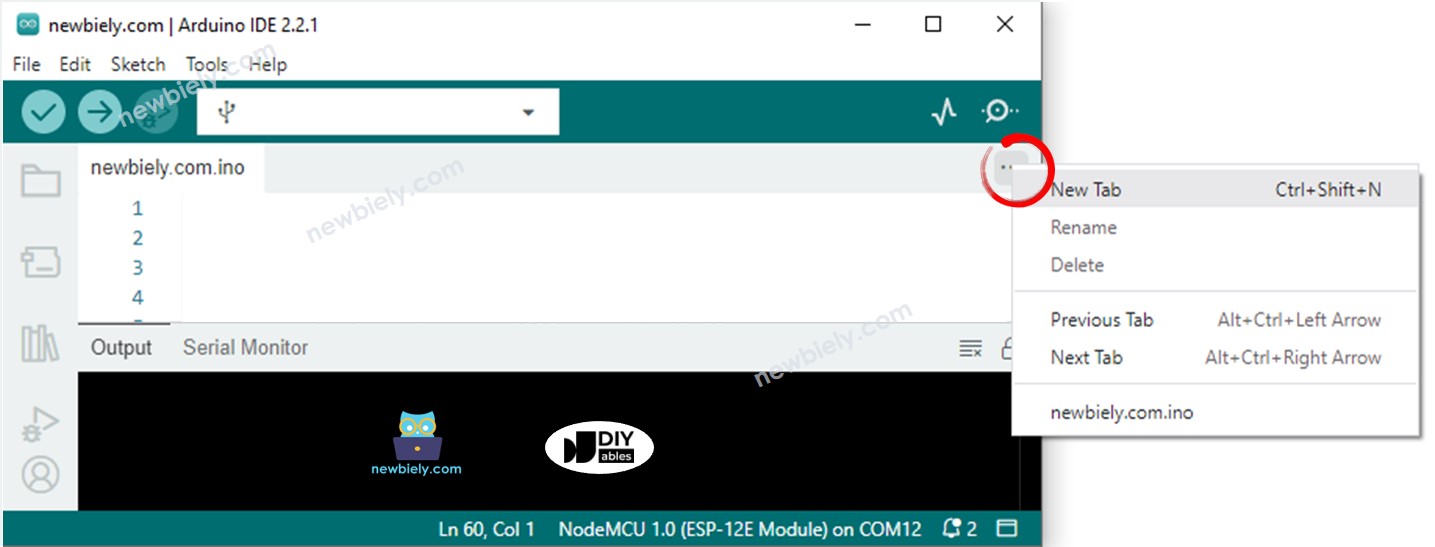
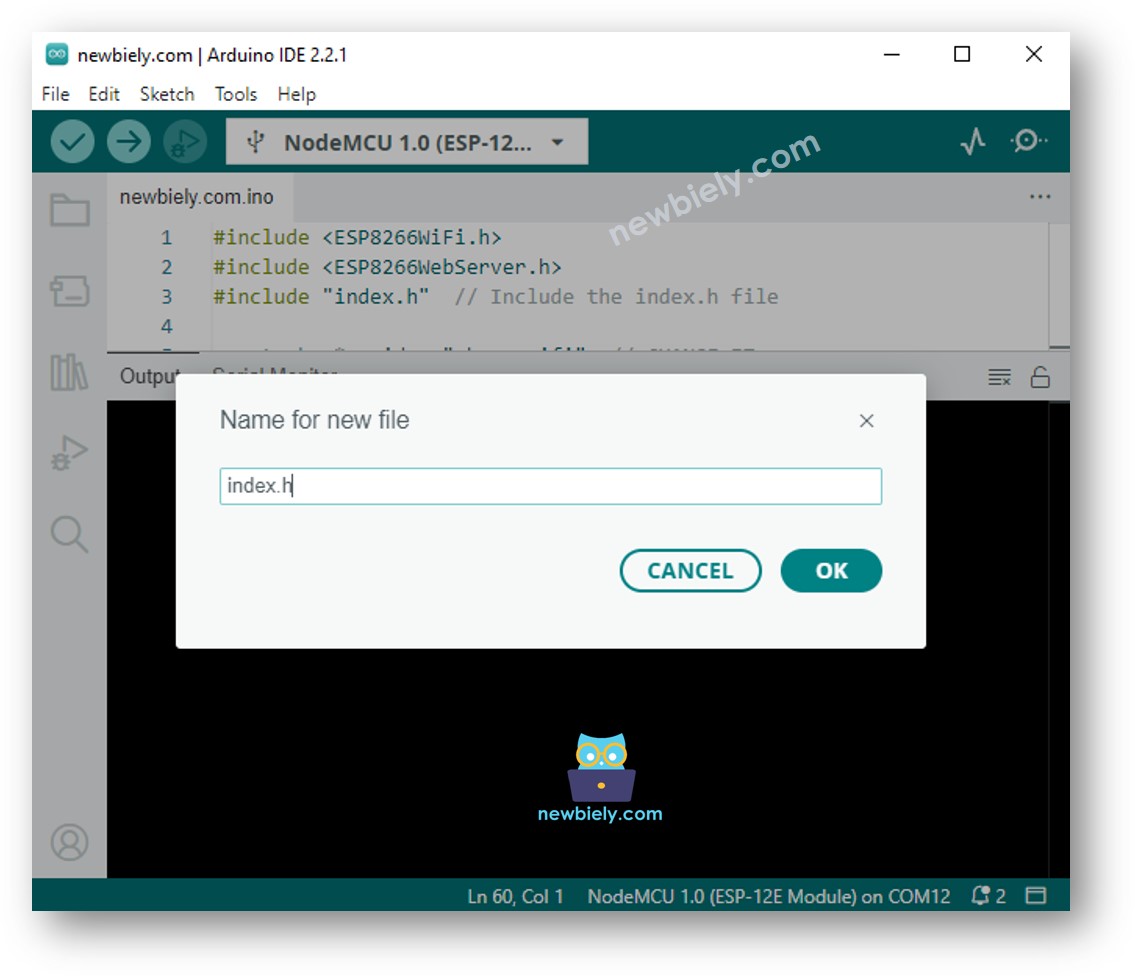
  • Create the index.h file On Arduino IDE by:
    • Either click on the button just below the serial monitor icon and choose New Tab, or use Ctrl+Shift+N keys.
    Arduino IDE 2 adds file
    • Give the file's name index.h and click OK button
    Arduino IDE 2 adds file index.h
    • Copy the below code and paste it to the index.h.
    /* * This ESP32 S3 code was developed by newbiely.com * * This ESP32 S3 code is made available for public use without any restriction * * For comprehensive instructions and wiring diagrams, please visit: * https://newbiely.com/tutorials/esp32-s3/esp32-s3-controls-car-via-web */ const char *HTML_CONTENT = R"=====( <!DOCTYPE html> <html> <head> <title>ESP32 S3 Control Car via Web</title> <meta name="viewport" content="width=device-width, initial-scale=0.7, maximum-scale=1, user-scalable=no"> <style type="text/css"> body { text-align: center; font-size: 24px;} button { text-align: center; font-size: 24px;} #container { margin-right: auto; margin-left: auto; width: 400px; height: 400px; position: relative; margin-bottom: 10px; } div[class^='button'] { position: absolute; } .button_up, .button_down { width:214px; height:104px;} .button_left, .button_right { width:104px; height:214px;} .button_stop { width:178px; height:178px;} .button_up { background: url('https://newbiely.com/images/tutorial/up_inactive.png') no-repeat; background-size: contain; left: 200px; top: 0px; transform: translateX(-50%); } .button_down { background: url('https://newbiely.com/images/tutorial/down_inactive.png') no-repeat; background-size: contain; left:200px; bottom: 0px; transform: translateX(-50%); } .button_right { background: url('https://newbiely.com/images/tutorial/right_inactive.png') no-repeat; background-size: contain; right: 0px; top: 200px; transform: translateY(-50%); } .button_left { background: url('https://newbiely.com/images/tutorial/left_inactive.png') no-repeat; background-size: contain; left:0px; top: 200px; transform: translateY(-50%); } .button_stop { background: url('https://newbiely.com/images/tutorial/stop_inactive.png') no-repeat; background-size: contain; left:200px; top: 200px; transform: translate(-50%, -50%); } </style> <script> var CMD_STOP = 0; var CMD_FORWARD = 1; var CMD_BACKWARD = 2; var CMD_LEFT = 4; var CMD_RIGHT = 8; var img_name_lookup = { [CMD_STOP]: "stop", [CMD_FORWARD]: "up", [CMD_BACKWARD]: "down", [CMD_LEFT]: "left", [CMD_RIGHT]: "right" } var ws = null; function init() { var container = document.querySelector("#container"); container.addEventListener("touchstart", mouse_down); container.addEventListener("touchend", mouse_up); container.addEventListener("touchcancel", mouse_up); container.addEventListener("mousedown", mouse_down); container.addEventListener("mouseup", mouse_up); container.addEventListener("mouseout", mouse_up); } function ws_onmessage(e_msg) { e_msg = e_msg || window.event; // MessageEvent //alert("msg : " + e_msg.data); } function ws_onopen() { document.getElementById("ws_state").innerHTML = "OPEN"; document.getElementById("wc_conn").innerHTML = "Disconnect"; } function ws_onclose() { document.getElementById("ws_state").innerHTML = "CLOSED"; document.getElementById("wc_conn").innerHTML = "Connect"; console.log("socket was closed"); ws.onopen = null; ws.onclose = null; ws.onmessage = null; ws = null; } function wc_onclick() { if(ws == null) { ws = new WebSocket("ws://" + window.location.host + ":81"); document.getElementById("ws_state").innerHTML = "CONNECTING"; ws.onopen = ws_onopen; ws.onclose = ws_onclose; ws.onmessage = ws_onmessage; } else ws.close(); } function mouse_down(event) { if (event.target !== event.currentTarget) { var id = event.target.id; send_command(id); event.target.style.backgroundImage = "url('https://newbiely.com/images/tutorial/" + img_name_lookup[id] + "_active.png')"; } event.stopPropagation(); event.preventDefault(); } function mouse_up(event) { if (event.target !== event.currentTarget) { var id = event.target.id; send_command(CMD_STOP); event.target.style.backgroundImage = "url('https://newbiely.com/images/tutorial/" + img_name_lookup[id] + "_inactive.png')"; } event.stopPropagation(); event.preventDefault(); } function send_command(cmd) { if(ws != null) if(ws.readyState == 1) ws.send(cmd + "\r\n"); } window.onload = init; </script> </head> <body> <h2>ESP32 S3 - RC Car via Web</h2> <div id="container"> <div id="0" class="button_stop"></div> <div id="1" class="button_up"></div> <div id="2" class="button_down"></div> <div id="8" class="button_right"></div> <div id="4" class="button_left"></div> </div> <p> WebSocket : <span id="ws_state" style="color:blue">closed</span><br> </p> <button id="wc_conn" type="button" onclick="wc_onclick();">Connect</button> <br> <br> <div class="sponsor">Sponsored by <a href="https://amazon.com/diyables">DIYables</a></div> </body> </html> )=====";
    • Now you have the code in two files: newbiely.com.ino and index.h
    • Click Upload button on Arduino IDE to upload code to ESP32 S3
    • Open the Serial Monitor
    • Check out the result on Serial Monitor.
    ∞
    Newbiely | Arduino IDE 2.3.8
    ──
    ☐
    ✕
    File
    Edit
    Sketch
    Tools
    Help
    ESP32S3 Dev Module
    Newbiely.ino
    ···
    8 Serial.println("Hello World!");
    Output
    Serial Monitor
    Message (Enter to send message to 'ESP32S3 Dev Module' on 'COM15')
    New Line
    9600 baud
    [2026-01-15 09:12:03] Connecting to WiFi... [2026-01-15 09:12:05] Connected to WiFi [2026-01-15 09:12:05] ESP32 S3 Web Server's IP address: 192.168.0.2 [2026-01-15 09:12:11] WebSocket client connected
    Ln 11, Col 1
    ESP32S3 Dev Module on COM15
    2
    • Take note of the IP address displayed, and enter this address into the address bar of a web browser on your smartphone or PC.
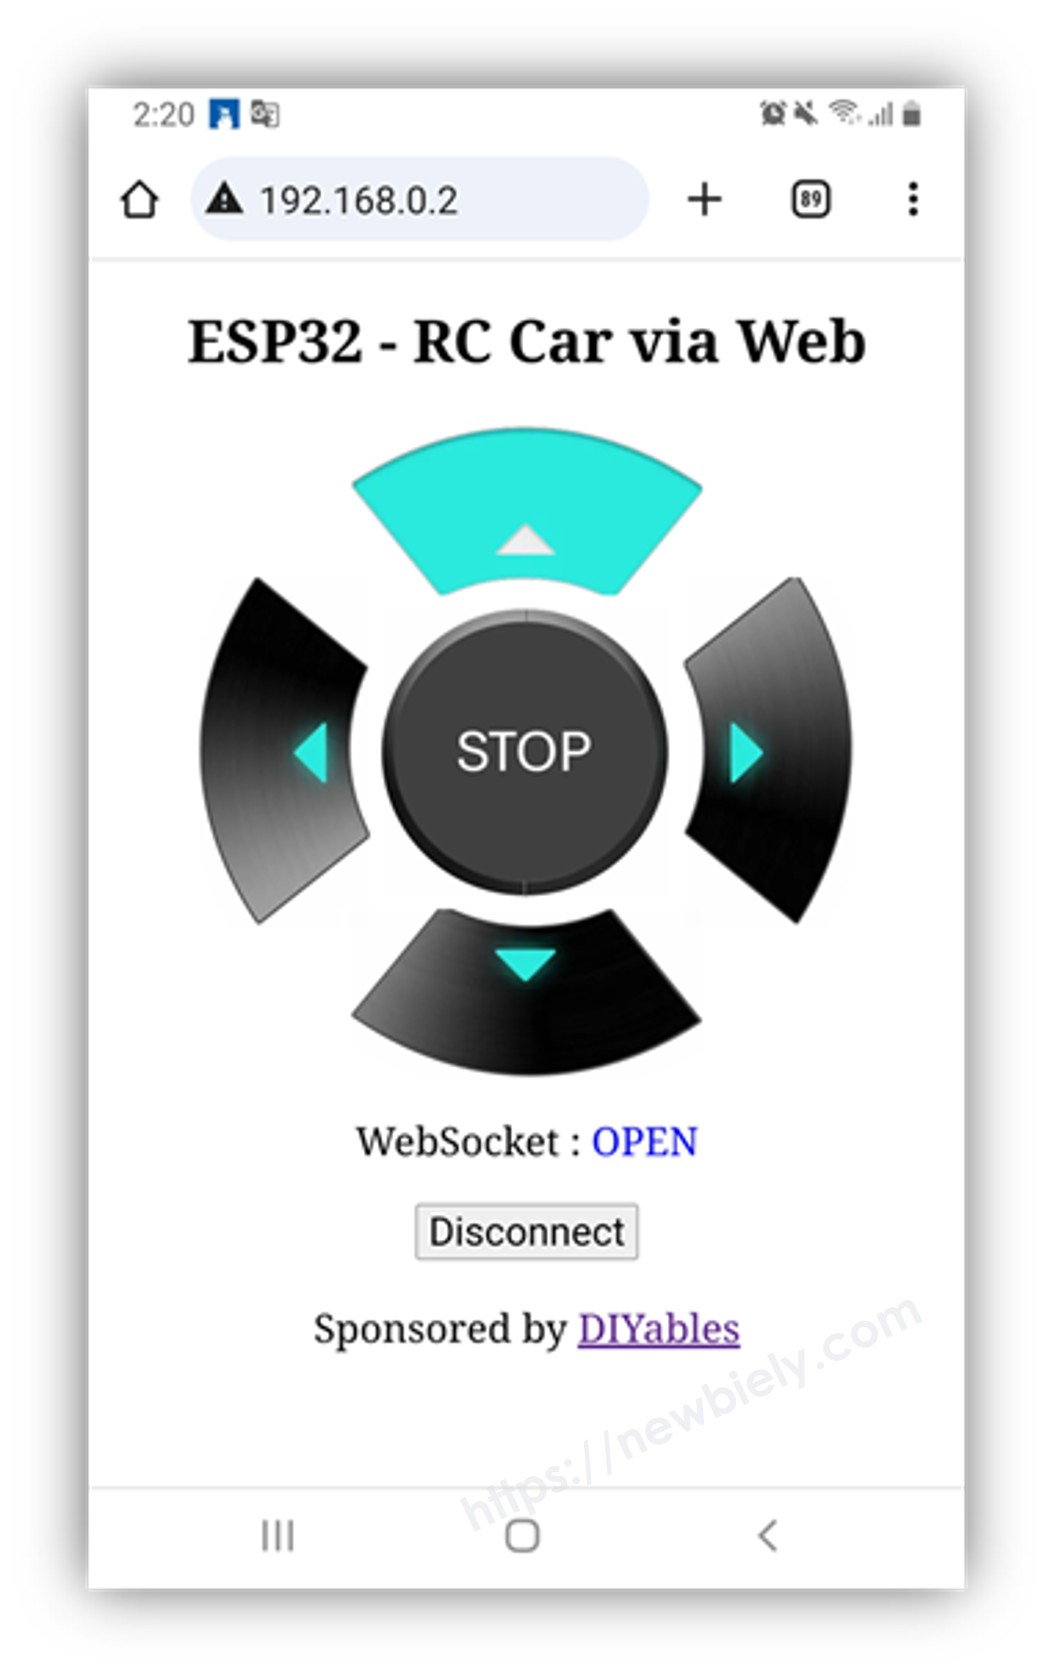
    • You will see the webpage as below:
    ESP32 S3 controls car via web browser
    • The JavaScript code of the webpage automatically creates the WebSocket connection to the ESP32 S3.
    • Now you can control the car to turn left/right, move forward/backward via the web interface.

    To save the memory of ESP32 S3, the images of the control buttons are NOT stored on the ESP32 S3. Instead, they are stored on the internet, so your phone or PC needs to have an internet connection to load images for the web control page.

    ※ NOTE THAT:

    • If you modify the HTML content in the index.h and do not touch anything in newbiely.com.ino file, when you compile and upload code to ESP32 S3, Arduino IDE will not update the HTML content.
    • To make Arduino IDE update the HTML content in this case, make a change in the newbiely.com.ino file (e.g. adding empty line, add a comment....)
    Pro Tip: If the car does not move correctly after wiring, try swapping the motor wire connections on the L9110S module — reversing a motor's polarity changes its spin direction without requiring code changes.

    Line-by-line Code Explanation

    The above ESP32 S3 code contains line-by-line explanation. Please read the comments in the code!

Serial Monitor Output

After uploading the code and opening the Serial Monitor at 115200 baud, you should see output similar to the following readings as the ESP32 S3 connects to WiFi and handles incoming WebSocket commands.

∞
Newbiely | Arduino IDE 2.3.8
──
☐
✕
File
Edit
Sketch
Tools
Help
ESP32S3 Dev Module
Newbiely.ino
···
8 Serial.println("Hello World!");
Output
Serial Monitor
Message (Enter to send message to 'ESP32S3 Dev Module' on 'COM15')
New Line
9600 baud
[2026-01-15 09:12:03] Connecting to WiFi... [2026-01-15 09:12:05] Connected to WiFi [2026-01-15 09:12:05] ESP32 S3 Web Server's IP address: 192.168.0.2 [2026-01-15 09:12:11] WebSocket client connected
Ln 11, Col 1
ESP32S3 Dev Module on COM15
2

Applications

Web-controlled robot cars built with the ESP32 S3 serve as a versatile foundation for countless real-world and educational applications.

  1. Home surveillance robot: Mount a camera on the car and stream video while navigating rooms remotely.
  2. Warehouse inspection bot: Drive through facility aisles to inspect inventory or detect hazards without physical presence.
  3. Educational robotics platform: Teach students web technologies, networking, and motor control in a hands-on, engaging format.
  4. Security patrol robot: Program the car to follow set patrol routes and alert users when motion is detected.
  5. Agricultural monitoring rover: Navigate greenhouse rows to monitor plant health or soil moisture sensor readings.

Video Tutorial

Watch the step-by-step video walkthrough for this ESP32 S3 project below.

Challenges

Once your ESP32 S3 web-controlled car is working, try extending the project with these progressive challenges to deepen your understanding of networking, motor control, and embedded web development.

  1. Beginner: Add a speed control slider to the web interface that adjusts the PWM duty cycle sent to the L9110S motor input pins.
  2. Intermediate: Display the car's current direction and speed status on the webpage in real time using WebSocket messages sent from the ESP32 S3 back to the browser.
  3. Advanced: Add an ultrasonic sensor to the car and implement automatic obstacle avoidance that overrides web commands when an object is detected within 20 cm.

※ OUR MESSAGES

  • As freelancers, We are AVAILABLE for HIRE. See how to outsource your project to us
  • Please feel free to share the link of this tutorial. However, Please do not use our content on any other websites. We invested a lot of effort and time to create the content, please respect our work!