ESP8266 - Button - Long Press Short Press

This tutorial instructs you how to use ESP8266 to delect the button's long press and short press. In detail, we will walk through the following examples:

In the concluding section, we explore how to implement debouncing in practical applications. To learn more about why debouncing is necessary for buttons, please refer to this article. Without debouncing, incorrect detection of a button press may occur.

Hardware Preparation

1×ESP8266 NodeMCU
1×Micro USB Cable
1×Push Button
1×(Optional) Panel-mount Push Button
1×Breadboard
1×Jumper Wires
1×(Optional) 5V Power Adapter for ESP8266
1×(Optional) ESP8266 Screw Terminal Adapter

Or you can buy the following sensor kit:

1×DIYables Sensor Kit 30 types, 69 units
Disclosure: Some of the links provided in this section are Amazon affiliate links. We may receive a commission for any purchases made through these links at no additional cost to you. We appreciate your support.

Overview of Button

If you are unfamiliar with buttons (pinout, operation, programming, etc.), the following tutorials can help you learn:

Wiring Diagram

The wiring diagram between ESP8266 NodeMCU and Button

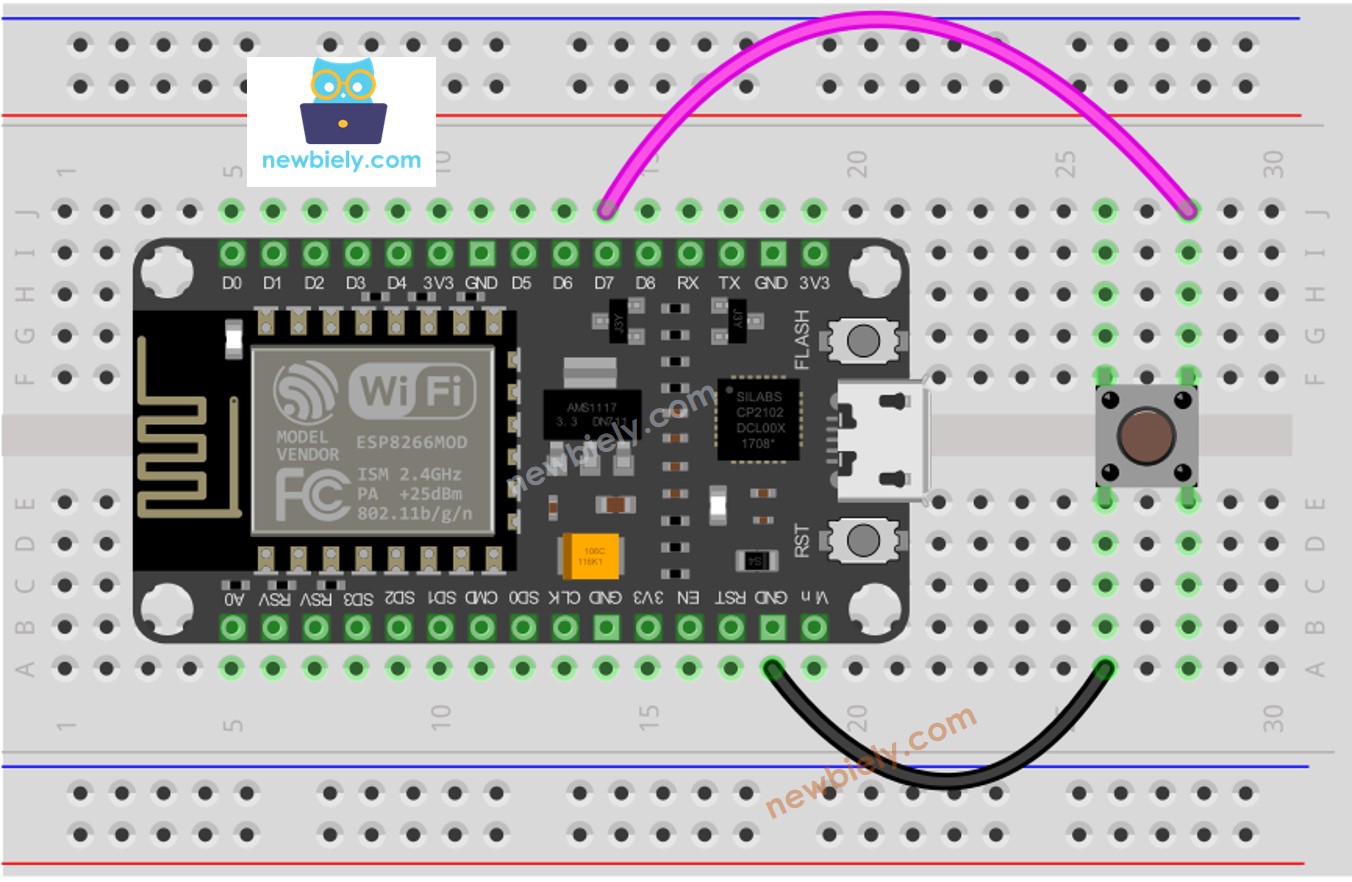
This image is created using Fritzing. Click to enlarge image

See more in ESP8266's pinout and how to supply power to the ESP8266 and other components.

In this tutorial, we will be utilizing the internal pull-up resistor. This means that the button is in a HIGH state when not pressed and a LOW state when pressed.

How To Detect Short Press

We calculate the amount of time between the pressed and released events. If this duration is less than a predetermined time, we detect a short press event.

Determine the duration of a maximum short press.

const int SHORT_PRESS_TIME = 500; // 500 milliseconds
  • Determine when the button has been pressed and record the time of the press.
if(prev_button_state == HIGH && button_state == LOW) time_pressed = millis();
  • Detect when the button is released and record the time of its release.
if(prev_button_state == LOW && button_state == HIGH) time_released = millis();
  • Force
  • Determine the length of time and strength of pressure to be applied.
long press_duration = time_released - time_pressed;
  • Compare the length of the press to the predetermined time for a short press.
  • Identify if it is a short press based on the comparison.
if( press_duration < SHORT_PRESS_TIME ) Serial.println("A short press is detected");

ESP8266 Code for detecting the short press

/* * This ESP8266 NodeMCU code was developed by newbiely.com * * This ESP8266 NodeMCU code is made available for public use without any restriction * * For comprehensive instructions and wiring diagrams, please visit: * https://newbiely.com/tutorials/esp8266/esp8266-button-long-press-short-press */ #define BUTTON_PIN D7 // The ESP8266 pin connected to button #define SHORT_PRESS_TIME 500 // 500 milliseconds int prev_button_state = LOW; // The previous state from the input pin int button_state; // The current reading from the input pin unsigned long time_pressed = 0; unsigned long time_released = 0; void setup() { Serial.begin(9600); pinMode(BUTTON_PIN, INPUT_PULLUP); } void loop() { // read the state of the switch/button: button_state = digitalRead(BUTTON_PIN); if (prev_button_state == HIGH && button_state == LOW) // button is pressed time_pressed = millis(); else if (prev_button_state == LOW && button_state == HIGH) { // button is released time_released = millis(); long press_duration = time_released - time_pressed; if ( press_duration < SHORT_PRESS_TIME ) Serial.println("A short press is detected"); } // save the the last state prev_button_state = button_state; }

Detailed Instructions

To get started with ESP8266 on Arduino IDE, follow these steps:

  • Check out the how to setup environment for ESP8266 on Arduino IDE tutorial if this is your first time using ESP8266.
  • Wire the components as shown in the diagram.
  • Connect the ESP8266 board to your computer using a USB cable.
  • Open Arduino IDE on your computer.
  • Choose the correct ESP8266 board, such as (e.g. NodeMCU 1.0 (ESP-12E Module)), and its respective COM port.
  • Upload the code to the ESP8266 using the Arduino IDE.
  • Press the button for a short time multiple times.
  • Check the output on the Serial Monitor.
COM6
Send
A short press is detected
Autoscroll Show timestamp
Clear output
9600 baud  
Newline  

※ NOTE THAT:

The Serial Monitor may display multiple short press detections for a single press. This is the expected behavior of the button and is referred to as the “chattering phenomenon”. We will address this issue in the last part of this tutorial.

How To Detect Long Press

There are two scenarios in which long press can be detected:

  • When the button is released, the long-press event will be identified
  • While the button is being pressed, the long-press event will be recognized, even before it is let go.
  1. For the initial instance, we calculate the time interval between the pressed and released events. 2. If the duration is more than the predetermined time, then the long-press event is identified.

In the second use case, once the button is pressed, the pressing time is measured continuously and the long-press event is checked until the button is released. As the button is being held down, if the duration is greater than a predetermined amount of time, then the long-press event is detected.

ESP8266 Code for detecting long press when released

/* * This ESP8266 NodeMCU code was developed by newbiely.com * * This ESP8266 NodeMCU code is made available for public use without any restriction * * For comprehensive instructions and wiring diagrams, please visit: * https://newbiely.com/tutorials/esp8266/esp8266-button-long-press-short-press */ #define BUTTON_PIN D7 // The ESP8266 pin connected to button #define LONG_PRESS_TIME 1000 // 1000 milliseconds int prev_button_state = LOW; // The previous state from the input pin int button_state; // The current reading from the input pin unsigned long time_pressed = 0; unsigned long time_released = 0; void setup() { Serial.begin(9600); pinMode(BUTTON_PIN, INPUT_PULLUP); } void loop() { // read the state of the switch/button: button_state = digitalRead(BUTTON_PIN); if(prev_button_state == HIGH && button_state == LOW) // button is pressed time_pressed = millis(); else if(prev_button_state == LOW && button_state == HIGH) { // button is released time_released = millis(); long press_duration = time_released - time_pressed; if( press_duration > LONG_PRESS_TIME ) Serial.println("A long press is detected"); } // save the the last state prev_button_state = button_state; }

Detailed Instructions

To get started with ESP8266 on Arduino IDE, follow these steps:

  • Check out the how to setup environment for ESP8266 on Arduino IDE tutorial if this is your first time using ESP8266.
  • Wire the components as shown in the diagram.
  • Connect the ESP8266 board to your computer using a USB cable.
  • Open Arduino IDE on your computer.
  • Choose the correct ESP8266 board, such as (e.g. NodeMCU 1.0 (ESP-12E Module)), and its respective COM port.
  • Upload the code to ESP8266 using the Arduino IDE.
  • Wait for one second and then press and release the button.
  • Check out the result on the Serial Monitor.
COM6
Send
A long press is detected
Autoscroll Show timestamp
Clear output
9600 baud  
Newline  

The event of long-pressing is only detected when the button is let go.

ESP8266 Code for detecting long press during pressing

/* * This ESP8266 NodeMCU code was developed by newbiely.com * * This ESP8266 NodeMCU code is made available for public use without any restriction * * For comprehensive instructions and wiring diagrams, please visit: * https://newbiely.com/tutorials/esp8266/esp8266-button-long-press-short-press */ #define BUTTON_PIN D7 // The ESP8266 pin connected to button #define LONG_PRESS_TIME 1000 // 1000 milliseconds int prev_button_state = LOW; // The previous state from the input pin int button_state; // The current reading from the input pin unsigned long time_pressed = 0; bool is_pressing = false; bool is_long_detected = false; void setup() { Serial.begin(9600); pinMode(BUTTON_PIN, INPUT_PULLUP); } void loop() { // read the state of the switch/button: button_state = digitalRead(BUTTON_PIN); if(prev_button_state == HIGH && button_state == LOW) { // button is pressed time_pressed = millis(); is_pressing = true; is_long_detected = false; } else if(prev_button_state == LOW && button_state == HIGH) { // button is released is_pressing = false; } if(is_pressing == true && is_long_detected == false) { long press_duration = millis() - time_pressed; if( press_duration > LONG_PRESS_TIME ) { Serial.println("A long press is detected"); is_long_detected = true; } } // save the the last state prev_button_state = button_state; }

Detailed Instructions

To get started with ESP8266 on Arduino IDE, follow these steps:

  • Check out the how to setup environment for ESP8266 on Arduino IDE tutorial if this is your first time using ESP8266.
  • Wire the components as shown in the diagram.
  • Connect the ESP8266 board to your computer using a USB cable.
  • Open Arduino IDE on your computer.
  • Choose the correct ESP8266 board, such as (e.g. NodeMCU 1.0 (ESP-12E Module)), and its respective COM port.
  • Upload the code to the ESP8266 using the Arduino IDE.
  • Wait a few seconds and then press and release the button.
  • Check the Serial Monitor to view the results.
COM6
Send
A long press is detected
Autoscroll Show timestamp
Clear output
9600 baud  
Newline  

The event of pressing and holding down the button will only be detected when the button has not been released.

How To Detect Both Long Press and Short Press

Short Press and Long Press after released

/* * This ESP8266 NodeMCU code was developed by newbiely.com * * This ESP8266 NodeMCU code is made available for public use without any restriction * * For comprehensive instructions and wiring diagrams, please visit: * https://newbiely.com/tutorials/esp8266/esp8266-button-long-press-short-press */ #define BUTTON_PIN D7 // The ESP8266 pin connected to button #define SHORT_PRESS_TIME 1000 // 1000 milliseconds #define LONG_PRESS_TIME 1000 // 1000 milliseconds int prev_button_state = LOW; // The previous state from the input pin int button_state; // The current reading from the input pin unsigned long time_pressed = 0; unsigned long time_released = 0; void setup() { Serial.begin(9600); pinMode(BUTTON_PIN, INPUT_PULLUP); } void loop() { // read the state of the switch/button: button_state = digitalRead(BUTTON_PIN); if (prev_button_state == HIGH && button_state == LOW) // button is pressed time_pressed = millis(); else if (prev_button_state == LOW && button_state == HIGH) { // button is released time_released = millis(); long press_duration = time_released - time_pressed; if ( press_duration < SHORT_PRESS_TIME ) Serial.println("A short press is detected"); if ( press_duration > LONG_PRESS_TIME ) Serial.println("A long press is detected"); } // save the the last state prev_button_state = button_state; }

Detailed Instructions

To get started with ESP8266 on Arduino IDE, follow these steps:

  • Check out the how to setup environment for ESP8266 on Arduino IDE tutorial if this is your first time using ESP8266.
  • Wire the components as shown in the diagram.
  • Connect the ESP8266 board to your computer using a USB cable.
  • Open Arduino IDE on your computer.
  • Choose the correct ESP8266 board, such as (e.g. NodeMCU 1.0 (ESP-12E Module)), and its respective COM port.
  • Upload the code to ESP8266 using the Arduino IDE.
  • Press the button for a long and short duration.
  • Check out the result on the Serial Monitor.

※ NOTE THAT:

The Serial Monitor may display multiple short press detections when a long press is made. This is the expected behavior of the button and is referred to as the "chattering phenomenon". The issue will be addressed in the final part of this tutorial.

Short Press and Long Press During pressing

/* * This ESP8266 NodeMCU code was developed by newbiely.com * * This ESP8266 NodeMCU code is made available for public use without any restriction * * For comprehensive instructions and wiring diagrams, please visit: * https://newbiely.com/tutorials/esp8266/esp8266-button-long-press-short-press */ #define BUTTON_PIN D7 // The ESP8266 pin connected to button #define SHORT_PRESS_TIME 1000 // 1000 milliseconds #define LONG_PRESS_TIME 1000 // 1000 milliseconds int prev_button_state = LOW; // The previous state from the input pin int button_state; // The current reading from the input pin unsigned long time_pressed = 0; unsigned long time_released = 0; bool is_pressing = false; bool is_long_detected = false; void setup() { Serial.begin(9600); pinMode(BUTTON_PIN, INPUT_PULLUP); } void loop() { // read the state of the switch/button: button_state = digitalRead(BUTTON_PIN); if (prev_button_state == HIGH && button_state == LOW) { // button is pressed time_pressed = millis(); is_pressing = true; is_long_detected = false; } else if (prev_button_state == LOW && button_state == HIGH) { // button is released is_pressing = false; time_released = millis(); long press_duration = time_released - time_pressed; if ( press_duration < SHORT_PRESS_TIME ) Serial.println("A short press is detected"); } if (is_pressing == true && is_long_detected == false) { long press_duration = millis() - time_pressed; if ( press_duration > LONG_PRESS_TIME ) { Serial.println("A long press is detected"); is_long_detected = true; } } // save the the last state prev_button_state = button_state; }

Detailed Instructions

To get started with ESP8266 on Arduino IDE, follow these steps:

  • Check out the how to setup environment for ESP8266 on Arduino IDE tutorial if this is your first time using ESP8266.
  • Wire the components as shown in the diagram.
  • Connect the ESP8266 board to your computer using a USB cable.
  • Open Arduino IDE on your computer.
  • Choose the correct ESP8266 board, such as (e.g. NodeMCU 1.0 (ESP-12E Module)), and its respective COM port.
  • Upload the code to your ESP8266 using the Arduino IDE.
  • Press the button for a short and long duration.
  • Check out the result on the Serial Monitor.

※ NOTE THAT:

The Serial Monitor might display multiple short presses being detected when a long press is made. This is the expected behavior of the button and is referred to as the "chattering phenomenon". A solution to this issue will be provided in the final section of this tutorial.

Long Press and Short Press with Debouncing

It is essential to implement debouncing on the button in various applications.

Debouncing can be tricky, particularly when multiple buttons are involved. To make it simpler for novices, we have created a library called ezButton.

We will use this library in the codes below

Short Press and Long Press with debouncing after released

/* * This ESP8266 NodeMCU code was developed by newbiely.com * * This ESP8266 NodeMCU code is made available for public use without any restriction * * For comprehensive instructions and wiring diagrams, please visit: * https://newbiely.com/tutorials/esp8266/esp8266-button-long-press-short-press */ #include <ezButton.h> #define SHORT_PRESS_TIME 1000 // 1000 milliseconds #define LONG_PRESS_TIME 1000 // 1000 milliseconds ezButton button(D7); // create ezButton object for pin D7 unsigned long time_pressed = 0; unsigned long time_released = 0; void setup() { Serial.begin(9600); button.setDebounceTime(50); // set debounce time to 50 milliseconds } void loop() { button.loop(); // MUST call the loop() function first if (button.isPressed()) time_pressed = millis(); if (button.isReleased()) { time_released = millis(); long press_duration = time_released - time_pressed; if ( press_duration < SHORT_PRESS_TIME ) Serial.println("A short press is detected"); if ( press_duration > LONG_PRESS_TIME ) Serial.println("A long press is detected"); } }

Detailed Instructions

To get started with ESP8266 on Arduino IDE, follow these steps:

  • Check out the how to setup environment for ESP8266 on Arduino IDE tutorial if this is your first time using ESP8266.
  • Wire the components as shown in the diagram.
  • Connect the ESP8266 board to your computer using a USB cable.
  • Open Arduino IDE on your computer.
  • Choose the correct ESP8266 board, such as (e.g. NodeMCU 1.0 (ESP-12E Module)), and its respective COM port.
  • To install the ezButton library, refer to How To.
  • Upload the code to ESP8266 using the Arduino IDE.
  • Press and hold the button for a short or long period of time.
  • Check out the result on the Serial Monitor.

Short Press and Long Press with debouncing During Pressing

/* * This ESP8266 NodeMCU code was developed by newbiely.com * * This ESP8266 NodeMCU code is made available for public use without any restriction * * For comprehensive instructions and wiring diagrams, please visit: * https://newbiely.com/tutorials/esp8266/esp8266-button-long-press-short-press */ #include <ezButton.h> #define SHORT_PRESS_TIME 1000 // 1000 milliseconds #define LONG_PRESS_TIME 1000 // 1000 milliseconds ezButton button(D7); // create ezButton object for pin D7 unsigned long time_pressed = 0; unsigned long time_released = 0; bool is_pressing = false; bool is_long_detected = false; void setup() { Serial.begin(9600); button.setDebounceTime(50); // set debounce time to 50 milliseconds } void loop() { button.loop(); // MUST call the loop() function first if (button.isPressed()) { time_pressed = millis(); is_pressing = true; is_long_detected = false; } if (button.isReleased()) { is_pressing = false; time_released = millis(); long press_duration = time_released - time_pressed; if ( press_duration < SHORT_PRESS_TIME ) Serial.println("A short press is detected"); } if (is_pressing == true && is_long_detected == false) { long press_duration = millis() - time_pressed; if ( press_duration > LONG_PRESS_TIME ) { Serial.println("A long press is detected"); is_long_detected = true; } } }

Detailed Instructions

  • Wire the components as shown in the diagram.
  • Connect the ESP8266 board to your computer using a USB cable.
  • Open Arduino IDE on your computer.
  • Choose the correct ESP8266 board, such as (e.g. NodeMCU 1.0 (ESP-12E Module)), and its respective COM port.
  • Get the ezButton library installed. Refer to How To for instructions.
  • Utilize the Arduino IDE to upload the code to the ESP8266.
  • Press and hold the button, then release it.
  • Check the Serial Monitor to observe the outcome.

Video Tutorial

Why Needs Long Press and Short Press

  • To minimize the quantity of buttons, one button can be used for multiple purposes. For example, a short press can be used to switch operation modes, and a long press can be used to turn off the device.
  • Long presses are used to prevent accidental presses. For instance, some devices use a button for factory reset. If it is pressed accidentally, it can be hazardous. To avoid this, the device is designed so that factory reset is only activated when the button is long-pressed (e.g. for more than 5 seconds).

※ OUR MESSAGES

  • As freelancers, We are AVAILABLE for HIRE. See how to outsource your project to us
  • Please feel free to share the link of this tutorial. However, Please do not use our content on any other websites. We invested a lot of effort and time to create the content, please respect our work!