ESP8266 - Write Variable to SD Card

This tutorial provides comprehensive guidance on writing various types of variables to a Micro SD Card using ESP8266. The covered topics include:

To extract key-value pairs from the Micro SD Card and convert them to int, float, or string, please refer to the following tutorial: ESP8266 - Read Config from SD Card.

ESP8266 NodeMCU Micro SD Card

Hardware Preparation

1×ESP8266 NodeMCU
1×Micro USB Cable
1×Micro SD Card
1×Micro SD Card Module
1×Jumper Wires
1×USB 3.0 SD Card Reader
1×(Optional) 5V Power Adapter for ESP8266
1×(Optional) ESP8266 Screw Terminal Adapter

Or you can buy the following sensor kit:

1×DIYables Sensor Kit 30 types, 69 units
Disclosure: Some of the links provided in this section are Amazon affiliate links. We may receive a commission for any purchases made through these links at no additional cost to you. We appreciate your support.

Overview of Micro SD Card Module

If you are unfamiliar with the Micro SD Card Module, including its pinout, how it works, and how to program it, the ESP8266 - Micro SD Card tutorial can provide you with the necessary information.

Wiring Diagram

The wiring diagram between ESP8266 NodeMCU and Micro SD Card Module

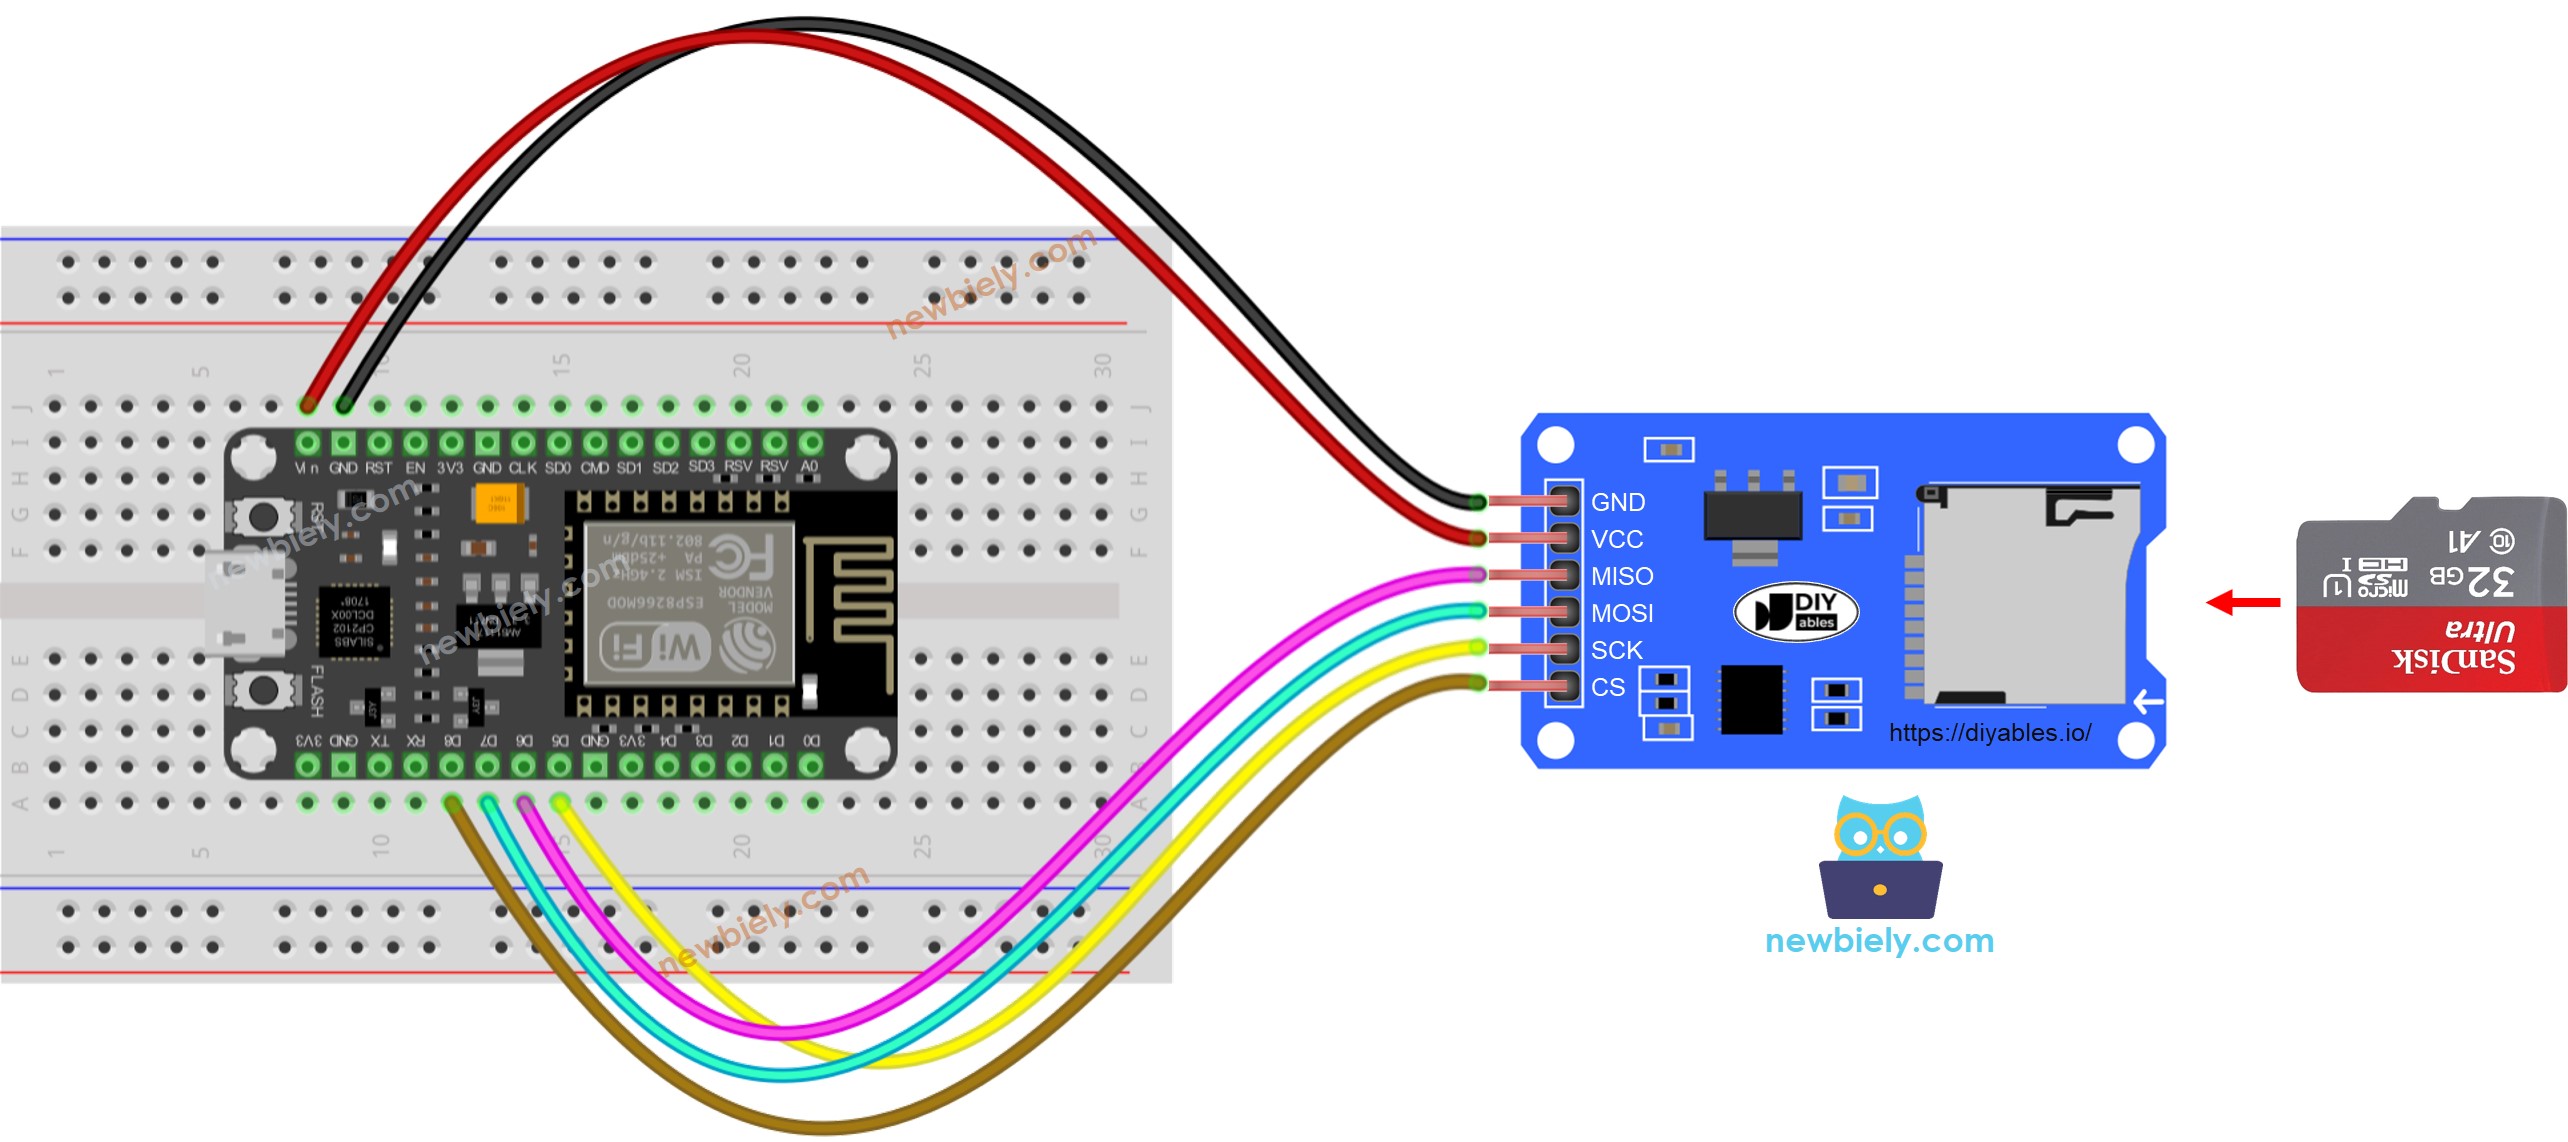
This image is created using Fritzing. Click to enlarge image

See more in ESP8266's pinout and how to supply power to the ESP8266 and other components.

※ NOTE THAT:

If you have an Ethernet shield or any other shield that has a Micro SD Card Holder, you do not need to use the Micro SD Card Module. Simply insert the Micro SD Card into the Micro SD Card Holder on the shield.

ESP8266 - How to write a variable to a file on Micro SD Card

The following code:

  • Stores an integer value to the Micro SD Card
  • Stores a floating point value to the Micro SD Card
  • Stores a string to the Micro SD Card
  • Stores a character array to the Micro SD Card
  • Stores a byte array to the Micro SD Card
/* * This ESP8266 NodeMCU code was developed by newbiely.com * * This ESP8266 NodeMCU code is made available for public use without any restriction * * For comprehensive instructions and wiring diagrams, please visit: * https://newbiely.com/tutorials/esp8266/esp8266-write-variable-to-sd-card */ #include <SD.h> #define PIN_SPI_CS D8 File myFile; int myInt = -52; float myFloat = -12.7; String myString = "HELLO"; char myCharArray[] = "newbiely.com"; byte myByteArray[] = {'1', '2', '3', '4', '5'}; void setup() { Serial.begin(9600); if (!SD.begin(PIN_SPI_CS)) { Serial.println(F("SD CARD FAILED, OR NOT PRESENT!")); while (1); // don't do anything more: } Serial.println(F("SD CARD INITIALIZED.")); Serial.println(F("--------------------")); SD.remove("esp8266.txt"); // delete the file if existed // create new file by opening file for writing myFile = SD.open("esp8266.txt", FILE_WRITE); if (myFile) { myFile.println(myInt); // write int variable to SD card in line myFile.println(myFloat); // write float variable to SD card in line myFile.println(myString); // write String variable to SD card in line myFile.println(myCharArray); // write char array to SD card in line myFile.write(myByteArray, 5); myFile.write("\n"); // new line for (int i = 0; i < 5; i++) { myFile.write(myByteArray[i]); // new line if (i < 4) myFile.write(","); // comma } myFile.write("\n"); // new line myFile.close(); } else { Serial.print(F("SD Card: error on opening file esp8266.txt")); } // open file for reading myFile = SD.open("esp8266.txt", FILE_READ); if (myFile) { while (myFile.available()) { char ch = myFile.read(); // read characters one by one from Micro SD Card Serial.print(ch); // print the character to Serial Monitor } myFile.close(); } else { Serial.print(F("SD Card: error on opening file esp8266.txt")); } } void loop() { }

Detailed Instructions

To get started with ESP8266 on Arduino IDE, follow these steps:

  • Check out the how to setup environment for ESP8266 on Arduino IDE tutorial if this is your first time using ESP8266.
  • Wire the components as shown in the diagram.
  • Connect the ESP8266 board to your computer using a USB cable.
  • Open Arduino IDE on your computer.
  • Choose the correct ESP8266 board, such as (e.g. NodeMCU 1.0 (ESP-12E Module)), and its respective COM port.
  • Ensure that the Micro SD Card is formatted with either FAT16 or FAT32 (you can search for instructions on how to do this online).
  • Then, open the code in the Arduino IDE.
  • Once the code is open, press the Upload button in the Arduino IDE to compile and upload the code to the ESP8266.
  • Finally, view the results in the Serial Monitor.
COM6
Send
SD CARD INITIALIZED. -------------------- -52 -12.70 HELLO newbiely.com 12345 1,2,3,4,5
Autoscroll Show timestamp
Clear output
9600 baud  
Newline  
  • Remove the Micro SD Card from the Micro SD Card module.
  • Insert the Micro SD Card into an USB SD Card reader.
  • Attach the USB SD Card reader to the PC.
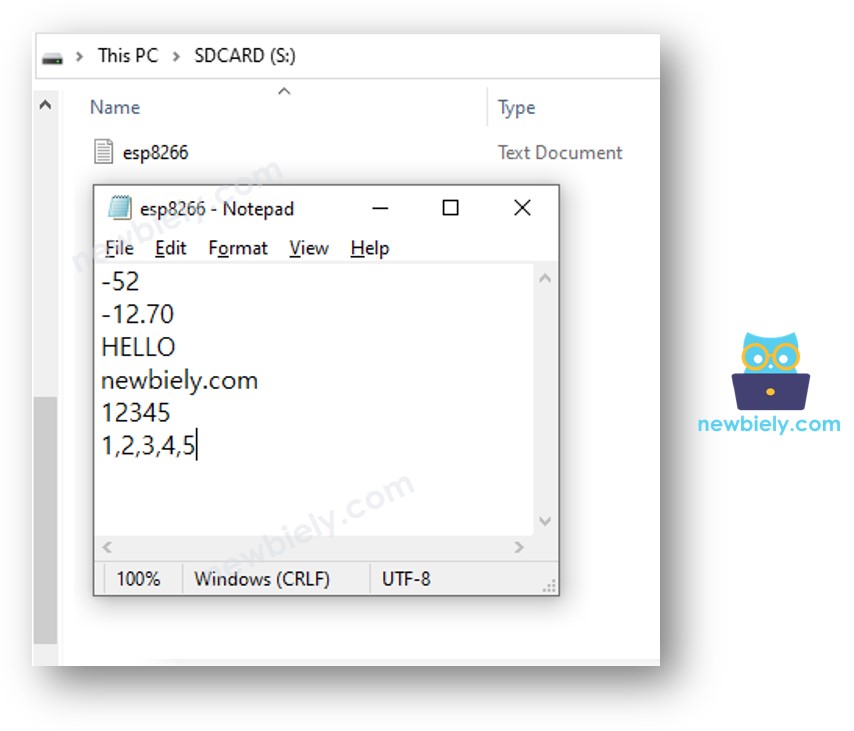
  • Open the esp8266.txt file on your computer, it appears as follows.
ESP8266 NodeMCU writes variable to Micro SD Card

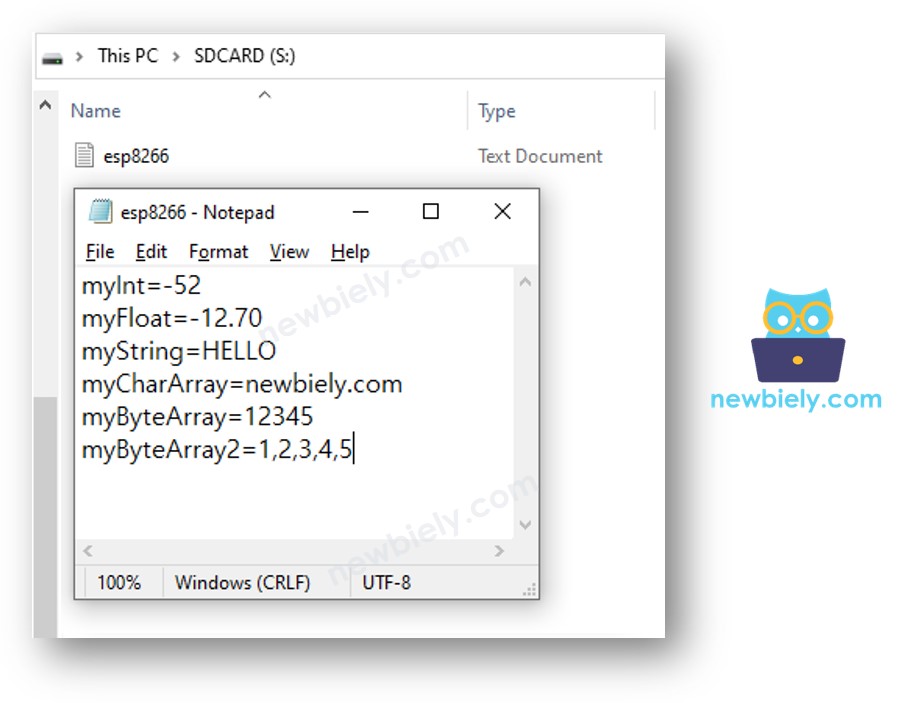
ESP8266 - How to write a key-value to a file on Micro SD Card

/* * This ESP8266 NodeMCU code was developed by newbiely.com * * This ESP8266 NodeMCU code is made available for public use without any restriction * * For comprehensive instructions and wiring diagrams, please visit: * https://newbiely.com/tutorials/esp8266/esp8266-write-variable-to-sd-card */ #include <SD.h> #define PIN_SPI_CS D8 File myFile; int myInt = -52; float myFloat = -12.7; String myString = "HELLO"; char myCharArray[] = "newbiely.com"; byte myByteArray[] = {'1', '2', '3', '4', '5'}; void setup() { Serial.begin(9600); if (!SD.begin(PIN_SPI_CS)) { Serial.println(F("SD CARD FAILED, OR NOT PRESENT!")); while (1); // don't do anything more: } Serial.println(F("SD CARD INITIALIZED.")); Serial.println(F("--------------------")); SD.remove("esp8266.txt"); // delete the file if existed // create new file by opening file for writing myFile = SD.open("esp8266.txt", FILE_WRITE); if (myFile) { myFile.print("myInt="); // write key to SD card myFile.println(myInt); // write int variable to SD card in line myFile.print("myFloat="); // write key to SD card myFile.println(myFloat); // write float variable to SD card in line myFile.print("myString="); // write key to SD card myFile.println(myString); // write String variable to SD card in line myFile.print("myCharArray="); // write key to SD card myFile.println(myCharArray); // write char array to SD card in line myFile.print("myByteArray="); // write key to SD card myFile.write(myByteArray, 5); myFile.write("\n"); // new line myFile.print("myByteArray2="); // write key to SD card for (int i = 0; i < 5; i++) { myFile.write(myByteArray[i]); // new line if (i < 4) myFile.write(","); // comma } myFile.write("\n"); // new line myFile.close(); } else { Serial.print(F("SD Card: error on opening file esp8266.txt")); } // open file for reading myFile = SD.open("esp8266.txt", FILE_READ); if (myFile) { while (myFile.available()) { char ch = myFile.read(); // read characters one by one from Micro SD Card Serial.print(ch); // print the character to Serial Monitor } myFile.close(); } else { Serial.print(F("SD Card: error on opening file esp8266.txt")); } } void loop() { }

Detailed Instructions

  • Wire the components as shown in the diagram.
  • Connect the ESP8266 board to your computer using a USB cable.
  • Open Arduino IDE on your computer.
  • Choose the correct ESP8266 board, such as (e.g. NodeMCU 1.0 (ESP-12E Module)), and its respective COM port.
  • Copy the code and open it in Arduino IDE.
  • Click the Upload button to send it to the ESP8266.
  • View the outcome on the Serial Monitor.
COM6
Send
SD CARD INITIALIZED. -------------------- myInt=-52 myFloat=-12.70 myString=HELLO myCharArray=newbiely.com myByteArray=12345 myByteArray2=1,2,3,4,5
Autoscroll Show timestamp
Clear output
9600 baud  
Newline  
  • Remove the Micro SD Card from the Micro SD Card module.
  • Insert the Micro SD Card into an USB SD Card reader.
  • Connect the USB SD Card reader to the computer.
  • Open the esp8266.txt file on your PC; it will appear as follows.
ESP8266 NodeMCU writes variable to Micro SD Card

Video Tutorial

※ OUR MESSAGES

  • As freelancers, We are AVAILABLE for HIRE. See how to outsource your project to us
  • Please feel free to share the link of this tutorial. However, Please do not use our content on any other websites. We invested a lot of effort and time to create the content, please respect our work!