ESP8266-to-ESP8266 MQTT Communication
In this tutorial, we'll cover:
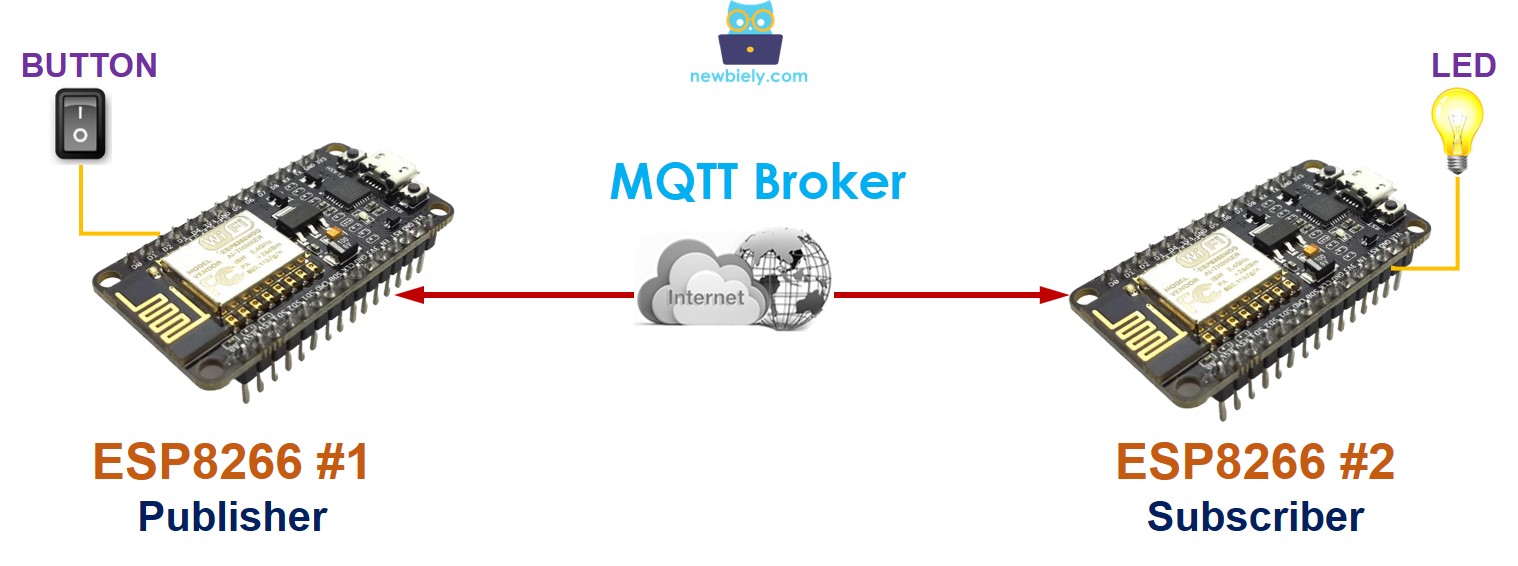
- How to enable bidirectional communication between two ESP8266 using MQTT.
- Example scenario: Using a button or switch connected to ESP8266 #1 to control an LED connected to ESP8266 #2 via MQTT.
Hardware Preparation
| 2 | × | ESP8266 NodeMCU | |
| 2 | × | Micro USB Cable | |
| 1 | × | Recommended: Screw Terminal Expansion Board for ESP8266 |
Or you can buy the following kits:
| 1 | × | DIYables Sensor Kit (18 sensors/displays) |
Additionally, some of these links are for products from our own brand, DIYables .
Overview of ESP8266 and MQTT
We have a detailed tutorial on how to use ESP8266 with MQTT here:
Communication between two ESP8266 via MQTT
Two ESP8266 boards can communicate with each other using an MQTT server. If you prefer direct communication between two ESP8266 without relying on an MQTT server, please check out the tutorial on ESP8266 to ESP8266 TCP Client/Server communication.
When ESP8266 #1 and ESP8266 #2 exchange data through an MQTT broker:
- Both ESP8266 connect to the MQTT broker.
- To enable ESP8266 #2 to send data to ESP8266 #1:
- ESP8266 #1 subscribes to a topic, such as: esp8266-1/data.
- ESP8266 #2 can transmit data to ESP8266 #1 by publishing it to the topic that ESP8266 #1 is subscribed to.
- Similarly, to allow ESP8266 #1 to send data to ESP8266 #2:
- ESP8266 #2 subscribes to a topic, like: esp8266-2/data.
- ESP8266 #1 can send data to ESP8266 #2 by publishing it to the topic that ESP8266 #2 is subscribed to.
By following this approach, two ESP8266 can exchange data bidirectionally.
Example Use Case
Let's realize the following application: A button/switch connected to ESP8266 #1 controls an LED connected to ESP8266 #2 via MQTT.
As mentioned above, there are some application protocols we can use. In this example, to make it simple, we will define a protocol by ourself (a self-defined protocol)
How It Works
Let's define a simple protocol:
- Both ESP8266 #1 and ESP8266 #2 connect to an MQTT Broker (MQTT server).
- For ESP8266 #1:
- ESP8266 #1 publishes an MQTT message to a specific topic whenever the state of a switch changes.
- When the button/switch is turned on, the MQTT message payload is set to 1.
- When the button/switch is turned off, the MQTT message payload is set to 0.
- For ESP8266 #2:
- ESP8266 #2 subscribes to the same topic.
- If ESP8266 #2 receives an MQTT message with a payload of 1, it activates the LED.
- If ESP8266 #2 receives an MQTT message with a payload of 0, it deactivates the LED.
- ESP8266 #1 - Wiring diagram between ESP8266 and button
- ESP8266 #2 - Wiring diagram between ESP8266 and LED
Wiring Diagram
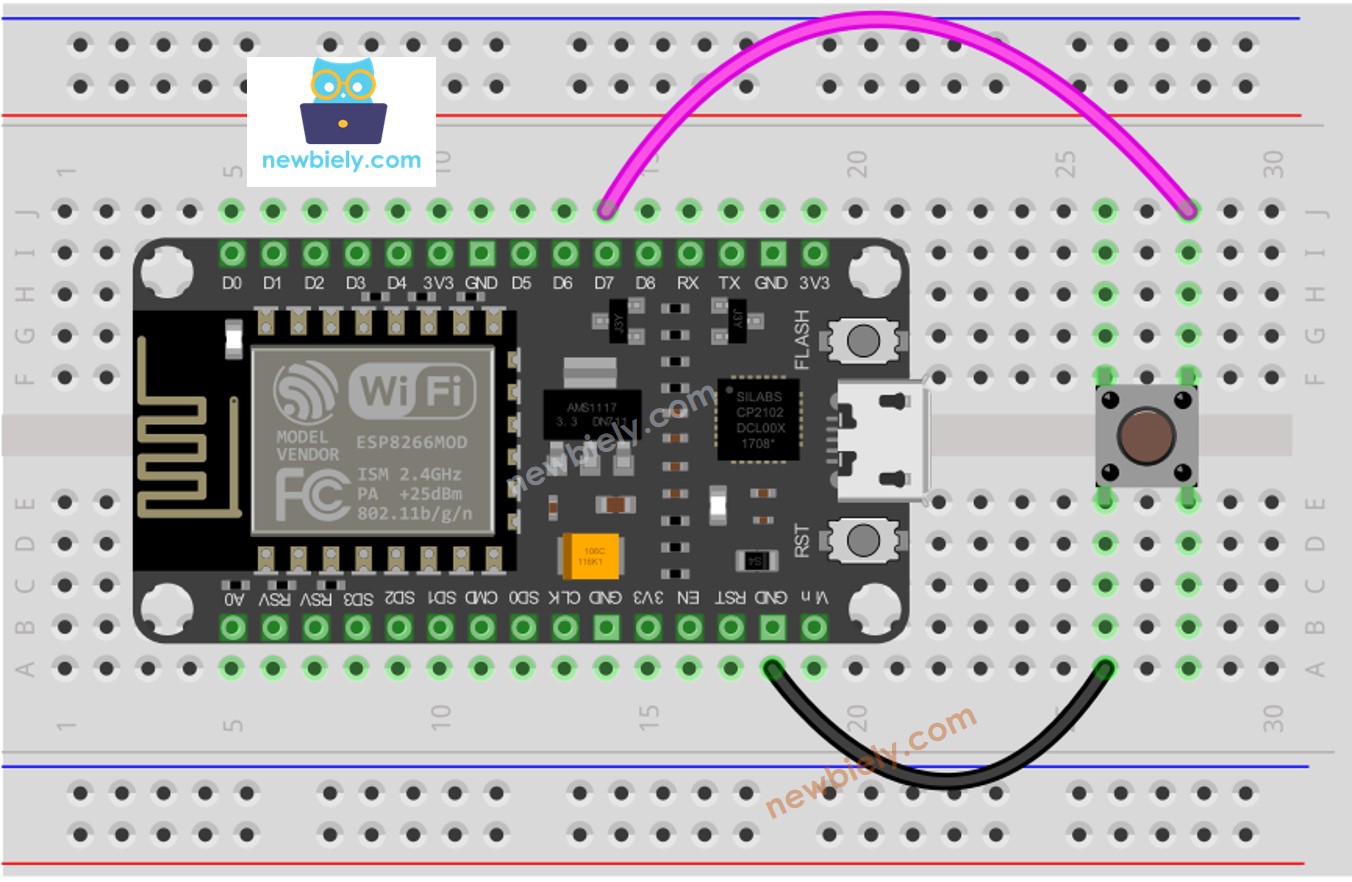
This image is created using Fritzing. Click to enlarge image
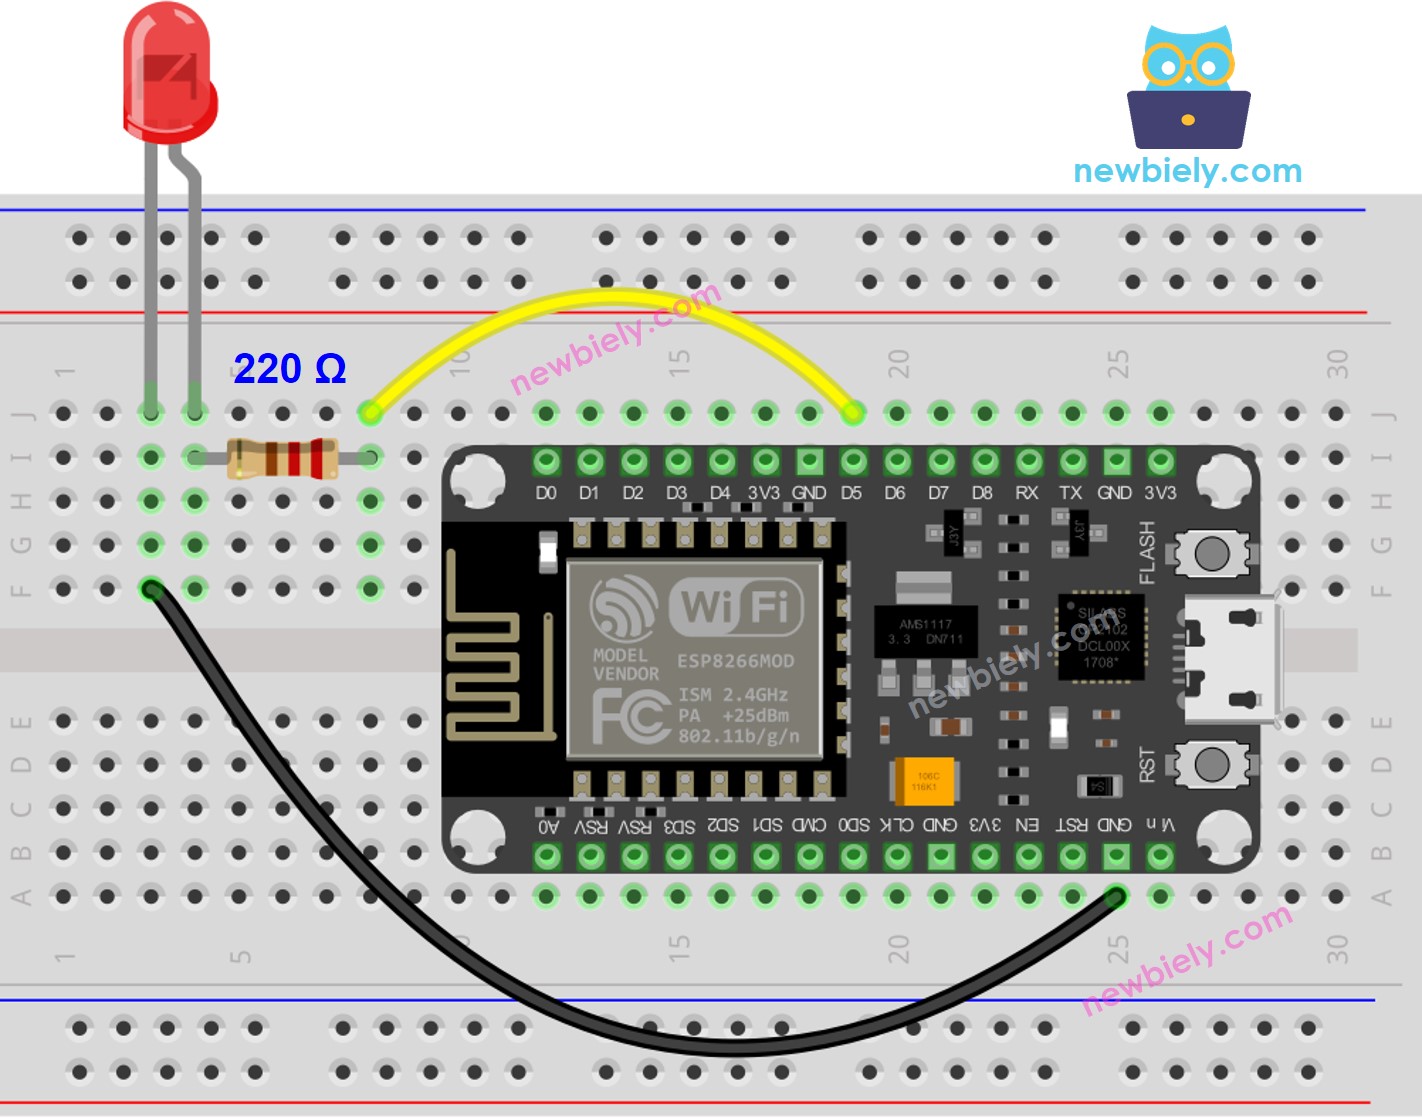
This image is created using Fritzing. Click to enlarge image
See more in ESP8266's pinout and how to supply power to the ESP8266 and other components.
Communication between two ESP8266 via MQTT
ESP8266 Code #1
ESP8266 Code #2
Detailed Instructions
To get started with ESP8266 on Arduino IDE, follow these steps:
- Check out the how to setup environment for ESP8266 on Arduino IDE tutorial if this is your first time using ESP8266.
- Wire the components as shown in the diagram.
- Connect the ESP8266 board to your computer using a USB cable.
- Open Arduino IDE on your computer.
- Choose the correct ESP8266 board, such as (e.g. NodeMCU 1.0 (ESP-12E Module)), and its respective COM port.
- Wire a button/switch to ESP8266 #1
- Wire an LED to ESP8266 #2
- Open Arduino IDE (called Arduino IDE #1)
- Open another Arduino IDE window (called Arduino IDE #2) by clicking on Arduino IDE icon on your PC (important!())
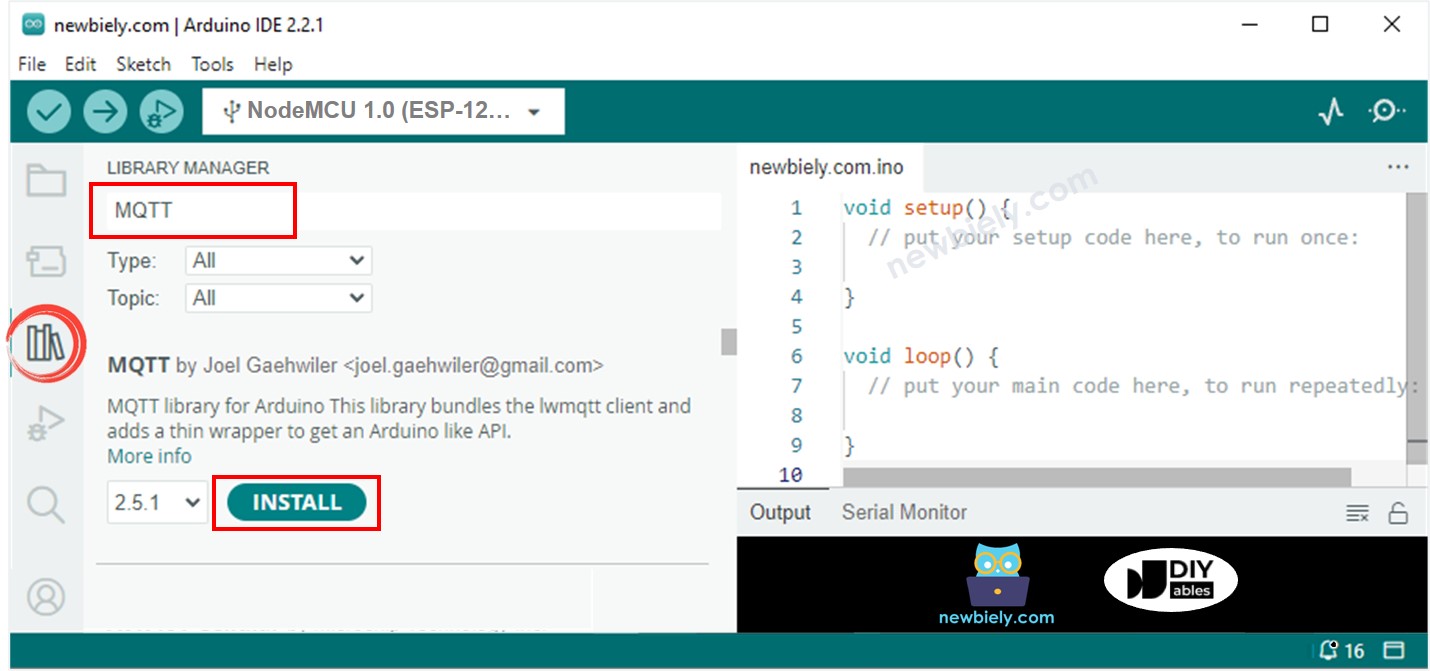
- Open the Library Manager by clicking on the Library Manager icon on the left navigation bar of Arduino IDE
- Type MQTT on the search box, then look for the MQTT library by Joel Gaehwiler.
- Click Install button to install MQTT library.
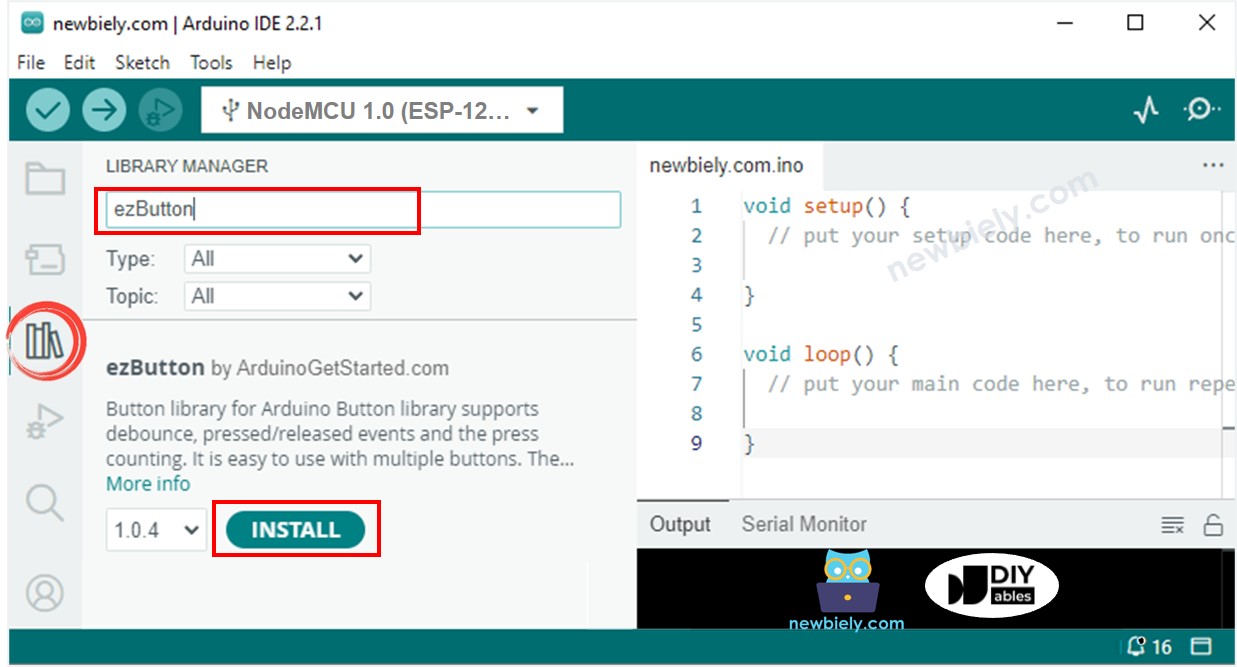
- Type ezButton on the search box, then find the button library by ArduinoGetStarted
- Click Install button to install ezButton library.
- Connect ESP8266 #1 to PC via USB cable and select COM port of ESP8266 #1 on Arduino IDE #1
- Connect ESP8266 #2 to PC via USB cable and select COM port of ESP8266 #2 on Arduino IDE #2
- Copy ESP8266 #1 code, paste to Arduino IDE #1 and save it (named ESP8266-1)
- Copy ESP8266 #2 code, paste to Arduino IDE #2 and save it (named ESP8266-2)
- Replace the WiFi information (SSID and password) in both codes with your own.
- Replace the MQTT broker address in both codes (domain name or IP address).
- Upload ESP8266 #1 code to ESP8266 #1
- Upload ESP8266 #2 code to ESP8266 #2
- Open Serial Monitor on Arduino IDE #1
- Open Serial Monitor on Arduino IDE #2
- Press and hold the button on ESP8266 #1 → see LED's state on ESP8266 #2 (ON)
- Release button on ESP8266 #1 → see LED's state on ESP8266 #2 (OFF)
- Press, hold, and release the button several times.
- See output on both Serial Monitors
- Serial Monitor of ESP8266 #1
- Serial Monitor of ESP8266 #2