ESP8266 - Motion Sensor MP3 Player
This tutorial instructs you on how to use ESP8266, an HC-SR501 motion sensor, and an MP3 player to trigger the playback of a recorded audio file upon detecting motion. This project is versatile and can be tailored for applications like automatically delivering recorded audio instructions or warnings whenever a human presence is detected.
Hardware Preparation
Or you can buy the following kits:
| 1 | × | DIYables Sensor Kit (18 sensors/displays) |
Disclosure: Some of the links provided in this section are Amazon affiliate links. We may receive a commission for any purchases made through these links at no additional cost to you.
Additionally, some of these links are for products from our own brand, DIYables .
Additionally, some of these links are for products from our own brand, DIYables .
Overview of MP3 Player and Motion Sensor
If you do not know about MP3 player and motion sensor (pinout, how it works, how to program ...), learn about them in the following tutorials:
Wiring Diagram

This image is created using Fritzing. Click to enlarge image
See more in ESP8266's pinout and how to supply power to the ESP8266 and other components.
Preparation
- Pre-store the recorded mp3 file that we want to play to the micro SD Card.
- Insert the micro SD Card to the MP3 player module
- Connect the MP3 player module to ESP8266
- Connect the speaker to the MP3 player module to a
- Connect the speaker to a power source.
- Connect the motion sensor to the ESP8266.
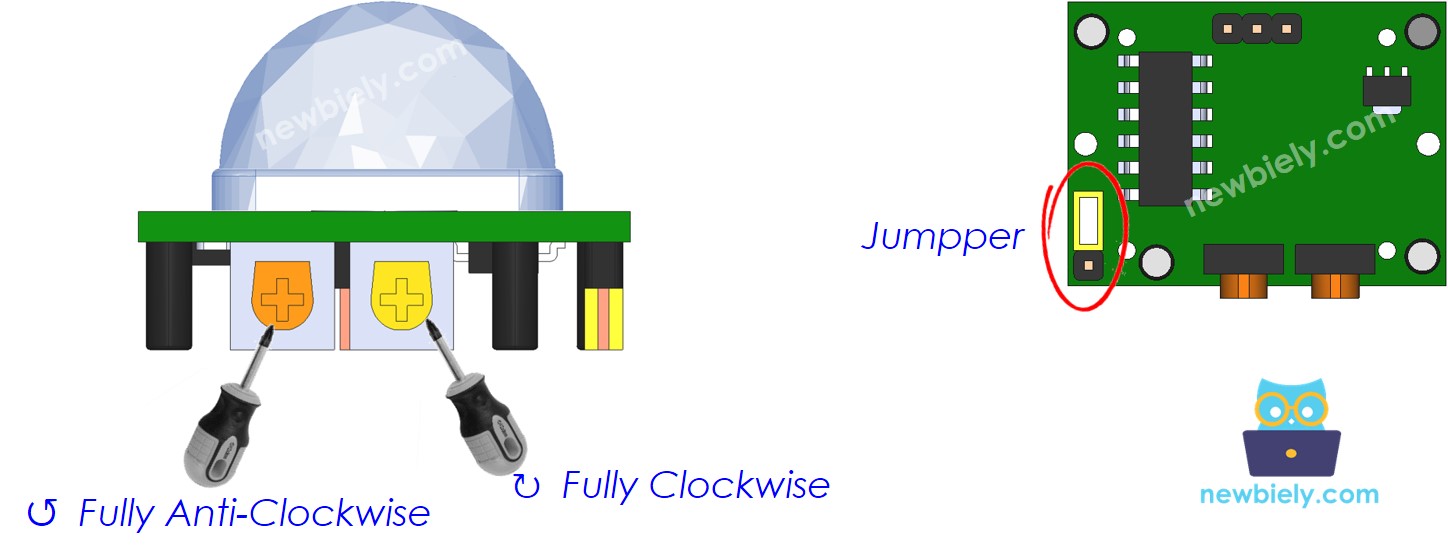
- Do setting for motion sensor as below table
| Time Delay Adjuster | Screw it in anti-clockwise direction fully. |
| Detection Range Adjuster | Screw it in clockwise direction fully. |
| Repeat Trigger Selector | Put jumper as shown on the image. |
ESP8266 Code - Motion Sensor Controls MP3 Player
/*
* This ESP8266 NodeMCU code was developed by newbiely.com
*
* This ESP8266 NodeMCU code is made available for public use without any restriction
*
* For comprehensive instructions and wiring diagrams, please visit:
* https://newbiely.com/tutorials/esp8266/esp8266-motion-sensor-mp3-player
*/
#include <SoftwareSerial.h>
#define CMD_PLAY_NEXT 0x01
#define CMD_PLAY_PREV 0x02
#define CMD_PLAY_W_INDEX 0x03
#define CMD_SET_VOLUME 0x06
#define CMD_SEL_DEV 0x09
#define CMD_PLAY_W_VOL 0x22
#define CMD_PLAY 0x0D
#define CMD_PAUSE 0x0E
#define CMD_SINGLE_CYCLE 0x19
#define DEV_TF 0x02
#define SINGLE_CYCLE_ON 0x00
#define SINGLE_CYCLE_OFF 0x01
#define ESP8266_RX D5 // The ESP8266 pin connected to the TX of the Serial MP3 Player module
#define ESP8266_TX D6 // The ESP8266 pin connected to the RX of the Serial MP3 Player module
#define MOTION_SENSOR_PIN D2 // The ESP8266 pin connected to motion sensor's pin
SoftwareSerial mp3(ESP8266_RX, ESP8266_TX);
int prev_motion_state; // The previous state of motion sensor
int motion_state; // The current state of motion sensor
void setup() {
Serial.begin(9600);
mp3.begin(9600);
delay(500); // wait chip initialization is complete
mp3_command(CMD_SEL_DEV, DEV_TF); // select the TF card
delay(200); // wait for 200ms
pinMode(MOTION_SENSOR_PIN, INPUT); // set arduino pin to input mode
motion_state = digitalRead(MOTION_SENSOR_PIN);
}
void loop() {
prev_motion_state = motion_state; // save the last state
motion_state = digitalRead(MOTION_SENSOR_PIN); // read new state
if (motion_state == LOW && prev_motion_state == HIGH) { // pin state change: LOW -> HIGH
Serial.println("Motion detected!");
mp3_command(CMD_PLAY, 0x0000); // Play the first mp3 file
}
else
if (motion_state == HIGH && prev_motion_state == LOW) { // pin state change: HIGH -> LOW
Serial.println("Motion stopped!");
}
}
void mp3_command(int8_t command, int16_t dat) {
int8_t frame[8] = { 0 };
frame[0] = 0x7e; // starting byte
frame[1] = 0xff; // version
frame[2] = 0x06; // The number of bytes of the command without starting byte and ending byte
frame[3] = command; //
frame[4] = 0x00; // 0x00 = no feedback, 0x01 = feedback
frame[5] = (int8_t)(dat >> 8); // data high byte
frame[6] = (int8_t)(dat); // data low byte
frame[7] = 0xef; // ending byte
for (uint8_t i = 0; i < 8; i++) {
mp3.write(frame[i]);
}
}
Detailed Instructions
To get started with ESP8266 on Arduino IDE, follow these steps:
- Check out the how to setup environment for ESP8266 on Arduino IDE tutorial if this is your first time using ESP8266.
- Wire the components as shown in the diagram.
- Connect the ESP8266 board to your computer using a USB cable.
- Open Arduino IDE on your computer.
- Choose the correct ESP8266 board, such as (e.g. NodeMCU 1.0 (ESP-12E Module)), and its respective COM port.
- Connect ESP8266 to PC via USB cable
- Open Arduino IDE, select the right board and port
- Copy the above code and open with Arduino IDE
- Click Upload button on Arduino IDE to upload code to ESP8266
- Move your hand in front of sensor
- Check out the audio from MP3 player