ESP8266 - Read Config from SD Card
This tutorial guides you through the utilization of a config file on a Micro SD Card with ESP8266, encompassing the following aspects:
Placing a config.txt file on the Micro SD Card, comprising key-value pairs.
Programming ESP8266 to read the configuration data from the Micro SD Card and storing it in an int
Programming ESP8266 to read the configuration data from the Micro SD Card and storing it in a float
Programming ESP8266 to read the configuration data from the Micro SD Card and storing it in a String
Or you can buy the following kits:
Disclosure: Some of the links provided in this section are Amazon affiliate links. We may receive a commission for any purchases made through these links at no additional cost to you.
Additionally, some of these links are for products from our own brand,
DIYables .
If you are unfamiliar with the Micro SD Card Module, including its pinout, how it works, and how to program it, then check out the ESP8266 - Micro SD Card tutorial.
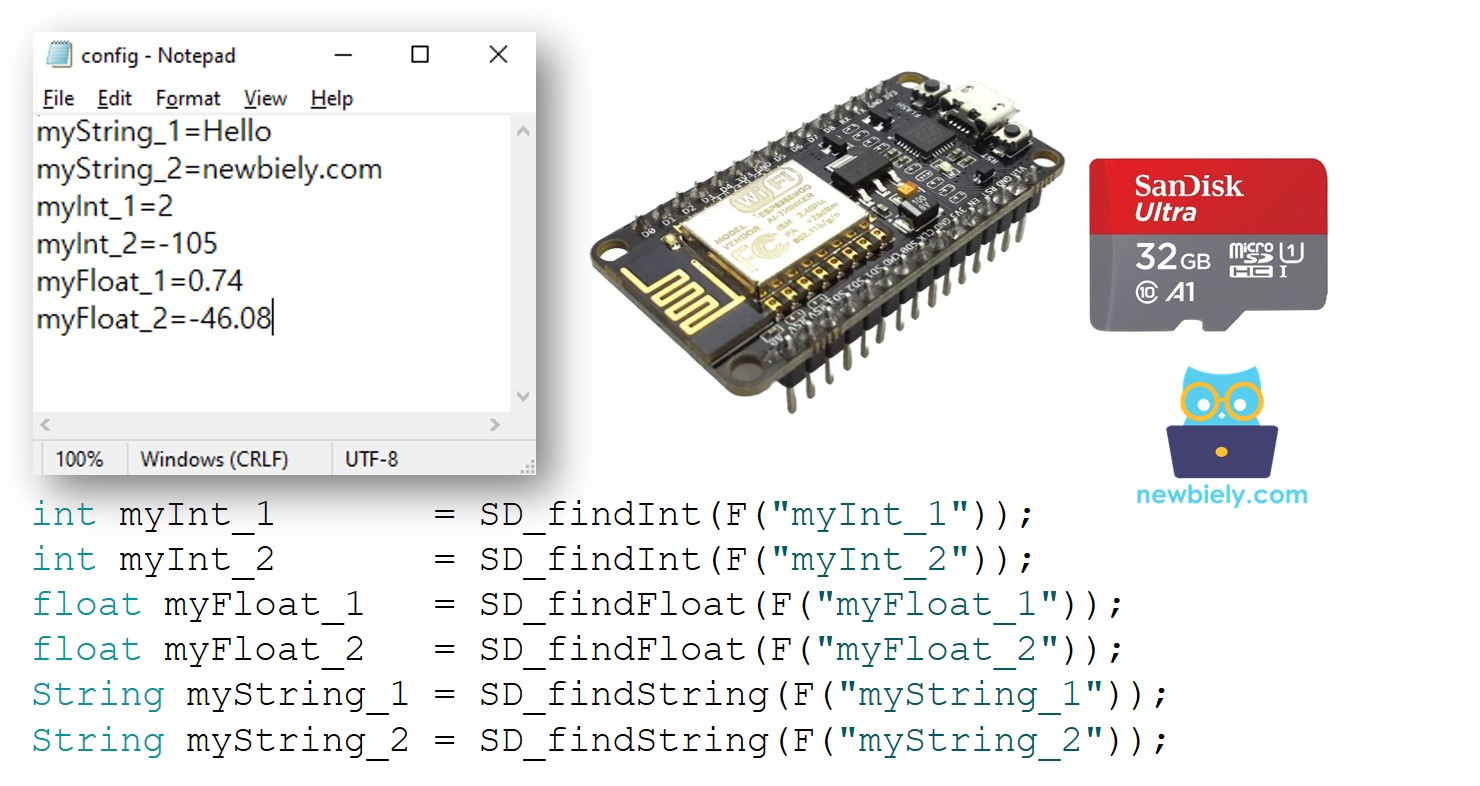
Each key-value pair is held on a single line of the Micro SD Card, with the key and value divided by an = character. Additionally, each pair is separated from the others by a newline character.
The ESP8266 code will look for the key and locate the associated value, storing it in a variable. This variable can be an int float String
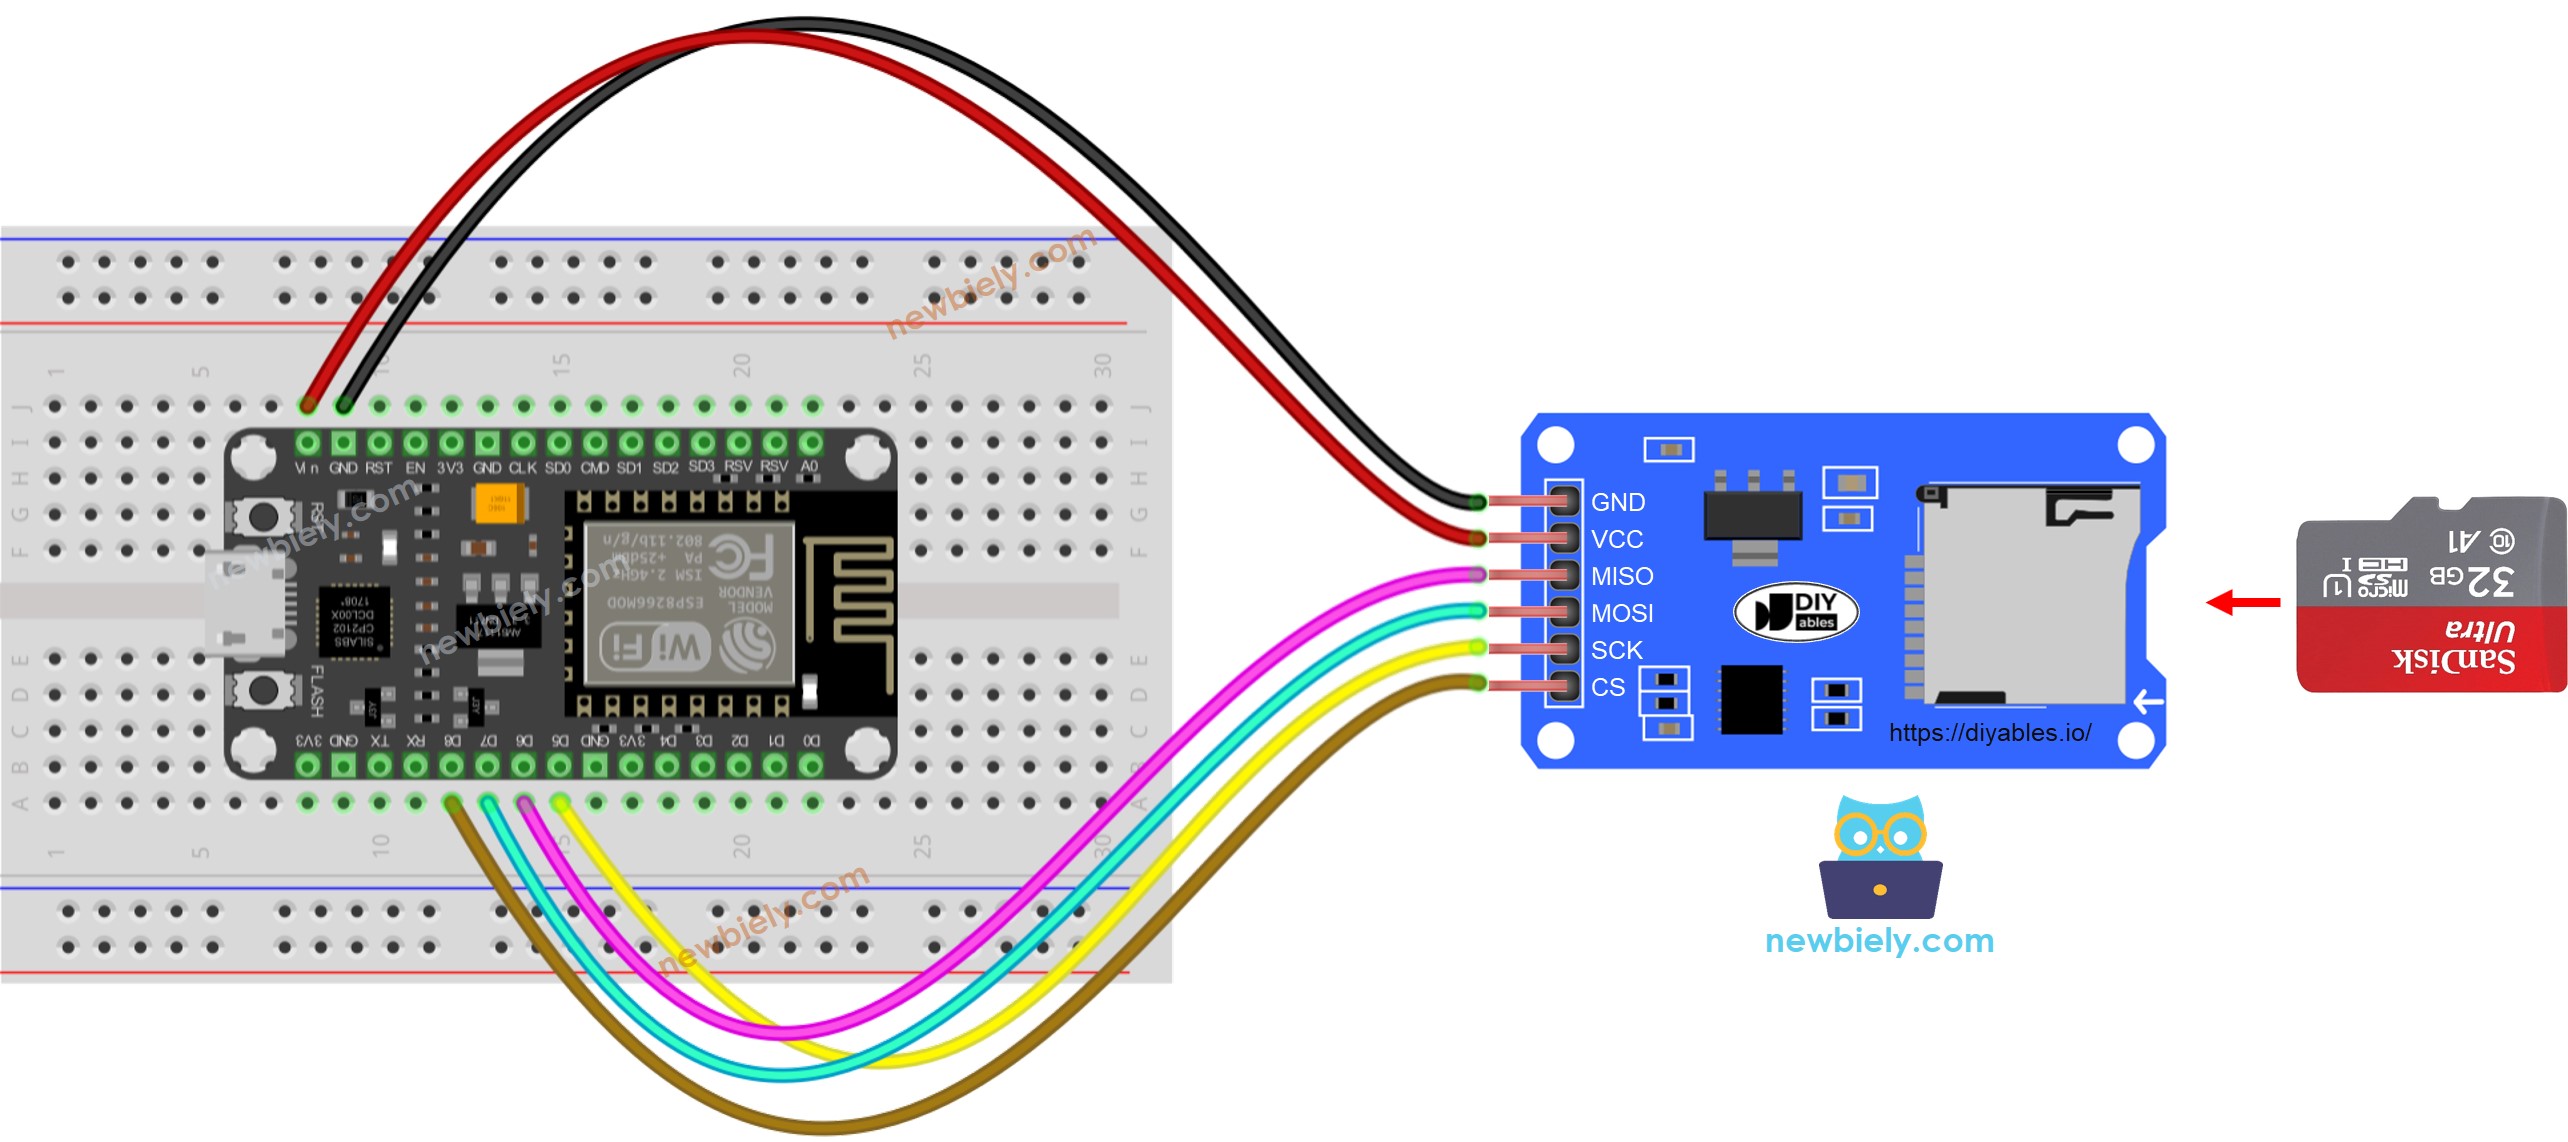
This image is created using Fritzing . Click to enlarge image
See more in ESP8266's pinout and how to supply power to the ESP8266 and other components .
※ NOTE THAT:
If you have an Ethernet shield or any other shield that includes a Micro SD Card Holder, you don't need to use the Micro SD Card Module. Simply insert the Micro SD Card into the Holder on the shield.
myString_1=Hello
myString_2=newbiely.com
myInt_1=2
myInt_2=-105
myFloat_1=0.74
myFloat_2=-46.08
Attach the Micro SD Card to the PC through a USB 3.0 SD Card Reader.
Ensure that the Micro SD Card is formatted FAT16 or FAT32 (look up instructions online).
Place the config.txt file in the main directory of the Micro SD Card.
Once finished, unplug the Micro SD Card from the PC.
Connect the Micro SD Card to the ESP8266 using the Micro SD Card Module as per the wiring diagram.
Copy the code given below and open it with the Arduino IDE.
#include <SD .h>
#define PIN_SPI_CS D8
#define FILE_NAME "config.txt"
#define KEY_MAX_LENGTH 30
#define VALUE_MAX_LENGTH 30
int myInt_1;int myInt_2;float myFloat_1;float myFloat_2;String myString_1;String myString_2;void setup () { Serial .begin (9600);
if (!SD .begin (PIN_SPI_CS)) {
Serial .println (F ("SD Card failed, or not present" ));
while (1);
}
Serial .println (F ("SD Card initialized." ));
myInt_1 = SD_findInt(F ("myInt_1" ));
myInt_2 = SD_findInt(F ("myInt_2" ));
myFloat_1 = SD_findFloat(F ("myFloat_1" ));
myFloat_2 = SD_findFloat(F ("myFloat_2" ));
myString_1 = SD_findString(F ("myString_1" ));
myString_2 = SD_findString(F ("myString_2" ));
Serial .print (F ("myInt_1 = " ));
Serial .println (myInt_1);
Serial .print (F ("myInt_2 = " ));
Serial .println (myInt_2);
Serial .print (F ("myFloat_1 = " ));
Serial .println (myFloat_1);
Serial .print (F ("myFloat_2 = " ));
Serial .println (myFloat_2);
Serial .print (F ("myString_1 = " ));
Serial .println (myString_1);
Serial .print (F ("myString_2 = " ));
Serial .println (myString_2);
}
void loop () {}
bool SD_available(const __FlashStringHelper * key) { char value_string[VALUE_MAX_LENGTH];
int value_length = SD_findKey(key, value_string);
return value_length > 0;
}
int SD_findInt(const __FlashStringHelper * key) { char value_string[VALUE_MAX_LENGTH];
int value_length = SD_findKey(key, value_string);
return HELPER_ascii2Int(value_string, value_length);
}
float SD_findFloat(const __FlashStringHelper * key) { char value_string[VALUE_MAX_LENGTH];
int value_length = SD_findKey(key, value_string);
return HELPER_ascii2Float(value_string, value_length);
}
String SD_findString(const __FlashStringHelper * key) { char value_string[VALUE_MAX_LENGTH];
int value_length = SD_findKey(key, value_string);
return HELPER_ascii2String(value_string, value_length);
}
int SD_findKey(const __FlashStringHelper * key, char * value) { File configFile = SD .open (FILE_NAME);
if (!configFile) {
Serial .print (F ("SD Card: error on opening file " ));
Serial .println (FILE_NAME);
return ;
}
char key_string[KEY_MAX_LENGTH];
char SD_buffer[KEY_MAX_LENGTH + VALUE_MAX_LENGTH + 1];
int key_length = 0;
int value_length = 0;
PGM_P keyPoiter;
keyPoiter = reinterpret_cast<PGM_P>(key);
byte ch;
do {
ch = pgm_read_byte(keyPoiter++);
if (ch != 0)
key_string[key_length++] = ch;
} while (ch != 0);
while (configFile.available ()) {
int buffer_length = configFile.readBytesUntil ('\n' , SD_buffer, 100);
if (SD_buffer[buffer_length - 1] == '\r' )
buffer_length--;
if (buffer_length > (key_length + 1)) {
if (memcmp(SD_buffer, key_string, key_length) == 0) {
if (SD_buffer[key_length] == '=' ) {
value_length = buffer_length - key_length - 1;
memcpy(value, SD_buffer + key_length + 1, value_length);
break ;
}
}
}
}
configFile.close ();
return value_length;
}
int HELPER_ascii2Int(char *ascii, int length ) { int sign = 1;
int number = 0;
for (int i = 0; i < length ; i++) {
char c = *(ascii + i);
if (i == 0 && c == '-' )
sign = -1;
else {
if (c >= '0' && c <= '9' )
number = number * 10 + (c - '0' );
}
}
return number * sign;
}
float HELPER_ascii2Float(char *ascii, int length ) { int sign = 1;
int decimalPlace = 0;
float number = 0;
float decimal = 0;
for (int i = 0; i < length ; i++) {
char c = *(ascii + i);
if (i == 0 && c == '-' )
sign = -1;
else {
if (c == '.' )
decimalPlace = 1;
else if (c >= '0' && c <= '9' ) {
if (!decimalPlace)
number = number * 10 + (c - '0' );
else {
decimal += ((float )(c - '0' ) / pow (10.0, decimalPlace));
decimalPlace++;
}
}
}
}
return (number + decimal) * sign;
}
String HELPER_ascii2String(char *ascii, int length ) { String str;
str.reserve(length );
str = "" ;
for (int i = 0; i < length ; i++) {
char c = *(ascii + i);
str += String (c);
}
return str;
}
∞
Newbiely | Arduino IDE 2.3.8
8
Serial .println ("Hello World!" );
Message (Enter to send message to 'Nodemcu 1.0 (ESP-12E Module)' on 'COM15')
SD Card initialized.
myInt_1 = 2
myInt_2 = -105
myFloat_1 = 0.74
myFloat_2 = -46.08
myString_1 = Hello
myString_2 = newbiely.com
Ln 11, Col 1
Nodemcu 1.0 (ESP-12E Module) on COM15
2
You can now alter the code in order to include additional variables.
※ NOTE THAT:
The code does not take into account the arrangement of key-value pairs. It will search from the start to the end of the file until the key is found.