ESP8266 - Stepper Motor Limit Switch

This tutorial instructs you how to use ESP8266 to control a stepper motor via a limit switch and an L298N driver. Specifically, we will cover:

Hardware Preparation

1×ESP8266 NodeMCU
1×USB Cable Type-C
1×Limit Switch (KW12-3)
1×Limit Switch (V-156-1C25)
1×Stepper Motor Nema 17
1×L298N Motor Driver Module
1×12V Power Adapter
1×DC Power Jack
1×Jumper Wires
1×Breadboard
1×(Recommended) Screw Terminal Expansion Board for ESP8266
1×(Recommended) Power Splitter For ESP8266 Type-C

Or you can buy the following sensor kits:

1×DIYables Sensor Kit (30 sensors/displays)
1×DIYables Sensor Kit (18 sensors/displays)
Disclosure: Some of the links provided in this section are Amazon affiliate links. We may receive a commission for any purchases made through these links at no additional cost to you.
Additionally, some of these links are for products from our own brand, DIYables .

Overview of Stepper Motor and Limit Switch

If you are unfamiliar with stepper motor and limit switch (including pinout, functioning, programming, etc.), the following tutorials can provide you with more information:

Wiring Diagram

This tutorial provides the wiring diagram for two cases: One stepper motor + one limit switch, One stepper motor + two limit switches.

  • Wiring Diagram between ESP8266, stepper motor and, and a limit switch.
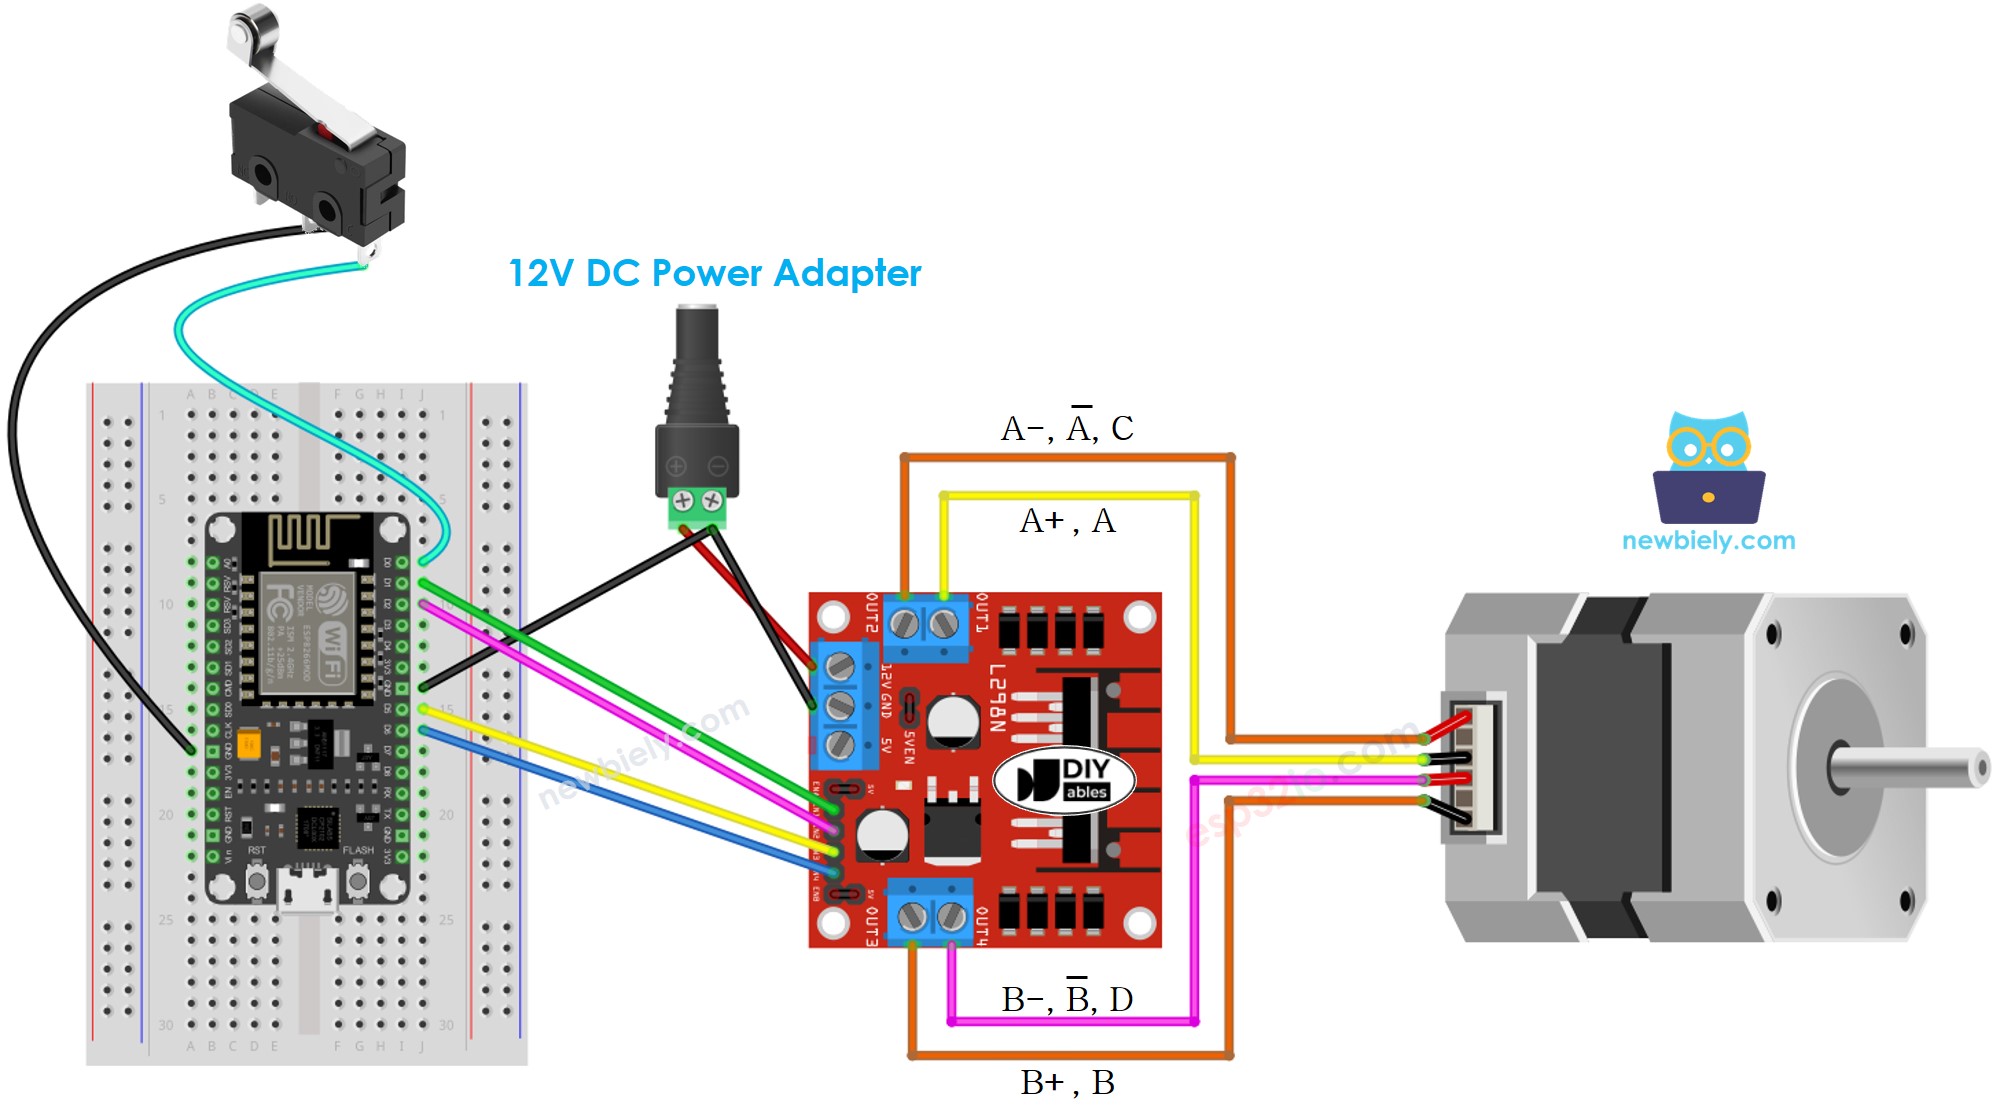
The wiring diagram between ESP8266 NodeMCU and stepper motor and limit switch

This image is created using Fritzing. Click to enlarge image

  • Wiring Diagram between ESP8266, stepper motor and, and two limit switches.
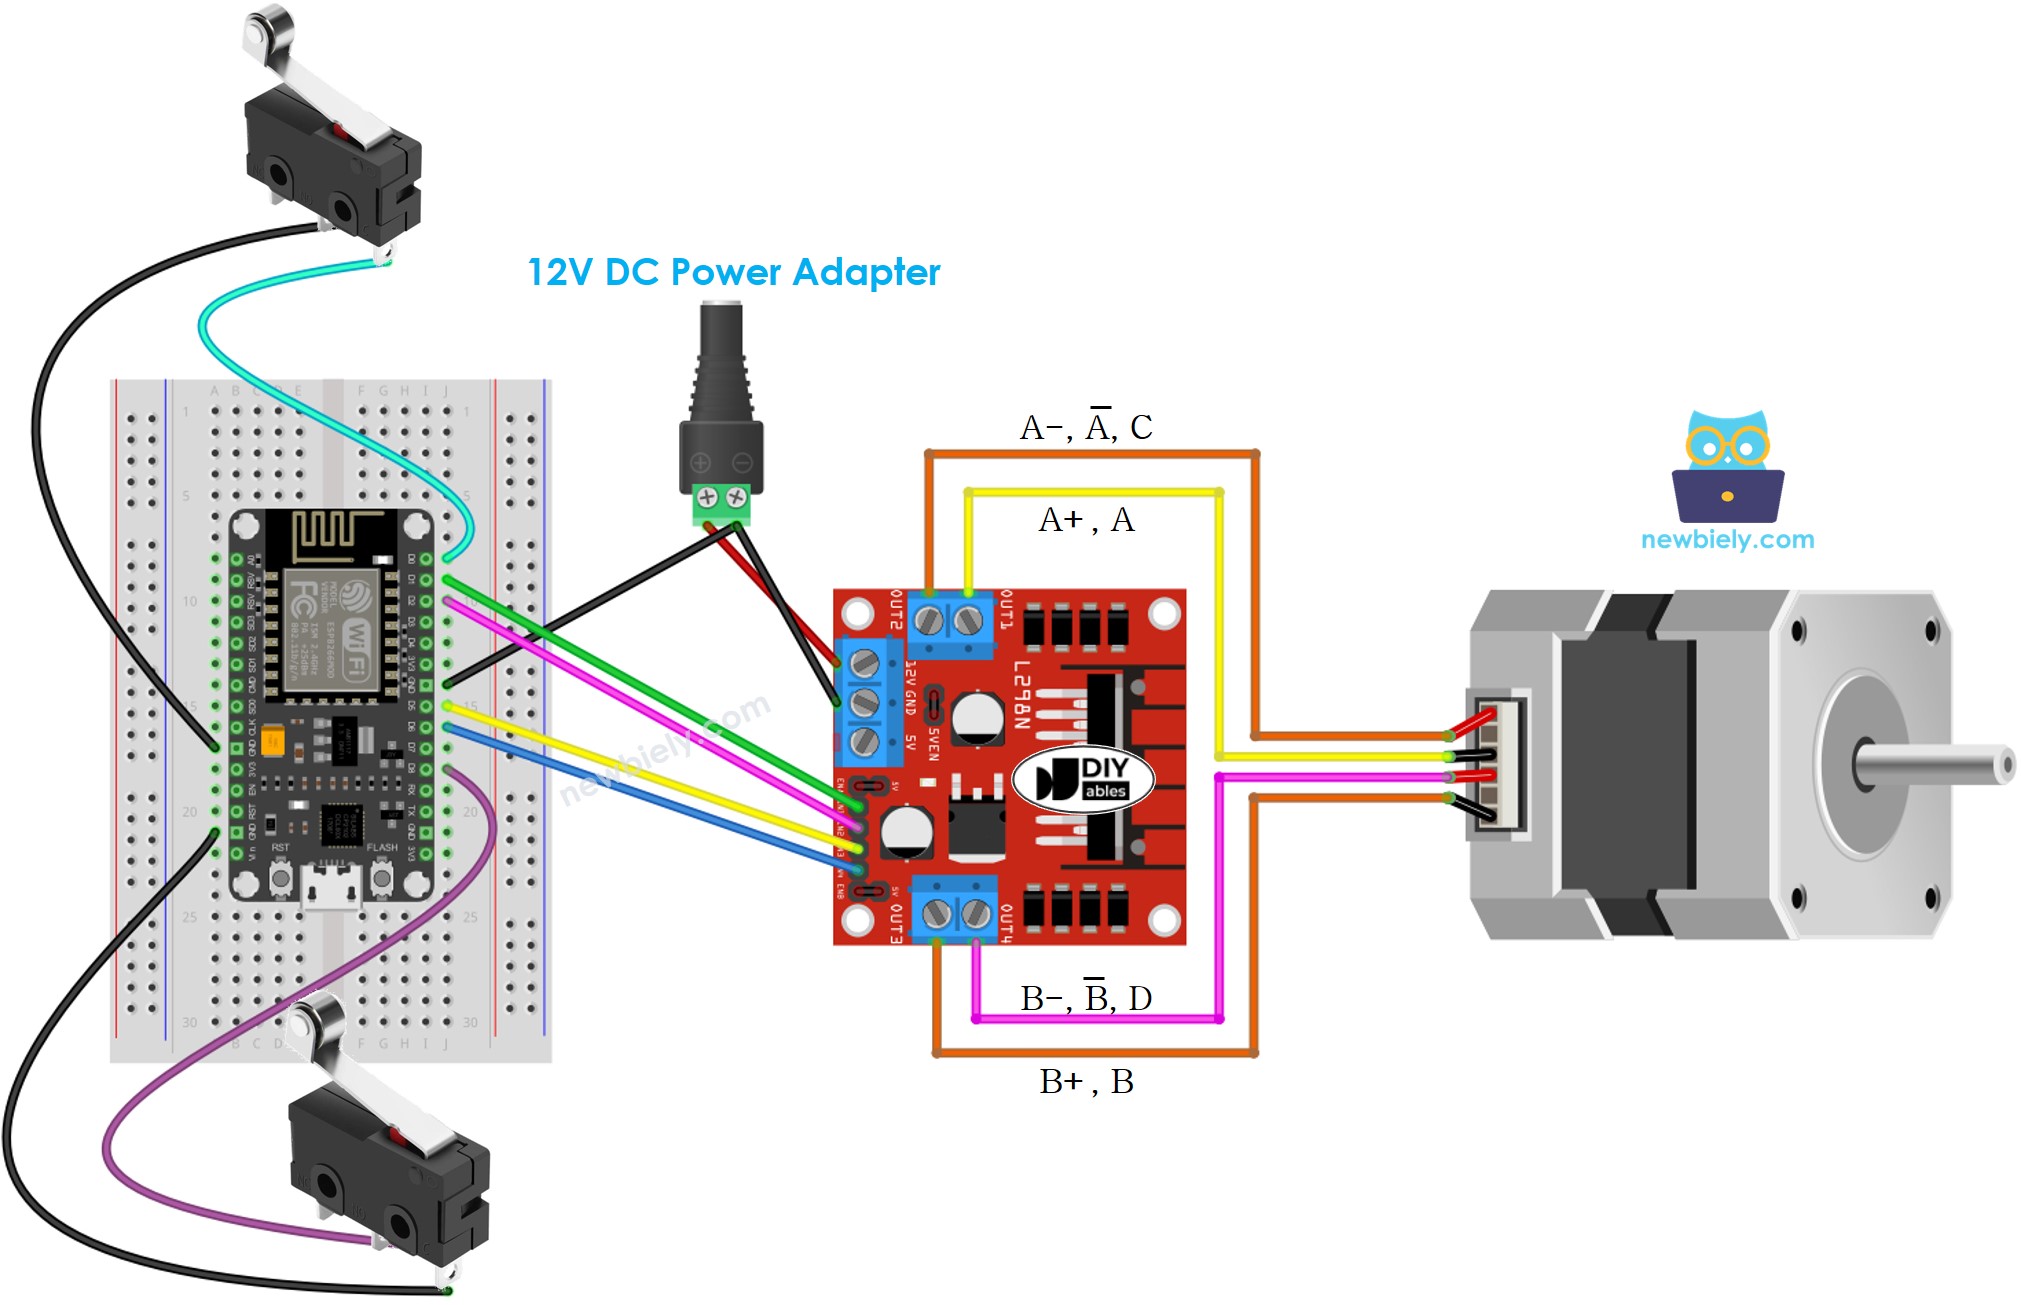
The wiring diagram between ESP8266 NodeMCU and stepper motor and two limit switches

This image is created using Fritzing. Click to enlarge image

See more in ESP8266's pinout and how to supply power to the ESP8266 and other components.

※ NOTE THAT:

The wiring connection between the stepper motor and L298N may vary depending on the type of stepper motor. Therefore, it is important to take a look at this ESP8266 - Stepper Motor tutorial to understand how to make the connection.

ESP8266 Code - Stop Stepper Motor by a Limit Switch

There are various methods to stop a stepper motor:

  • Invoke stepper.stop() function: This will not cause an instantaneous stop, but rather a gradual one
  • Omit calling stepper.run() function: This will result in an immediate stop of the stepper motor

The code below will cause a stepper motor to rotate continuously until a limit switch is engaged, at which point it will stop immediately.

/* * This ESP8266 NodeMCU code was developed by newbiely.com * * This ESP8266 NodeMCU code is made available for public use without any restriction * * For comprehensive instructions and wiring diagrams, please visit: * https://newbiely.com/tutorials/esp8266/esp8266-stepper-motor-limit-switch */ #include <ezButton.h> #include <AccelStepper.h> #define MAX_POSITION 0x7FFFFFFF // maximum of position we can set (long type) ezButton limit_switch(D0); // create ezButton object that attach to the ESP8266 pin D0 AccelStepper stepper(AccelStepper::FULL4WIRE, D1, D2, D5, D6); bool is_stopped = false; void setup() { Serial.begin(9600); limit_switch.setDebounceTime(50); // set debounce time to 50 milliseconds stepper.setMaxSpeed(500.0); // set the maximum speed stepper.setAcceleration(50.0); // set acceleration stepper.setSpeed(100); // set initial speed stepper.setCurrentPosition(0); // set position stepper.moveTo(MAX_POSITION); } void loop() { limit_switch.loop(); // MUST call the loop() function first if (limit_switch.isPressed()) { Serial.println(F("The limit switch: TOUCHED")); is_stopped = true; } if (is_stopped == false) { // without this part, the move will stop after reaching maximum position if (stepper.distanceToGo() == 0) { // if motor moved to the maximum position stepper.setCurrentPosition(0); // reset position to 0 stepper.moveTo(MAX_POSITION); // move the motor to maximum position again } stepper.run(); // MUST be called in loop() function } else { // If the stepper.run() function is not invoked, the motor stops immediately // NOTE: invoking the stepper.stop() does NOT stop the motor immediately. Serial.println(F("The stepper motor is STOPPED")); } }

Detailed Instructions

To get started with ESP8266 on Arduino IDE, follow these steps:

  • Check out the how to setup environment for ESP8266 on Arduino IDE tutorial if this is your first time using ESP8266.
  • Wire the components as shown in the diagram.
  • Connect the ESP8266 board to your computer using a USB cable.
  • Open Arduino IDE on your computer.
  • Choose the correct ESP8266 board, such as (e.g. NodeMCU 1.0 (ESP-12E Module)), and its respective COM port.
  • Connect a USB cable to the ESP8266 and PC.
  • Open the Arduino IDE, select the appropriate board and port.
  • Click to the Libraries icon on the left bar of the Arduino IDE.
  • Search for “ezButton”, then locate the button library provided by ArduinoGetStarted.com.
  • Press the Install button to install ezButton library.
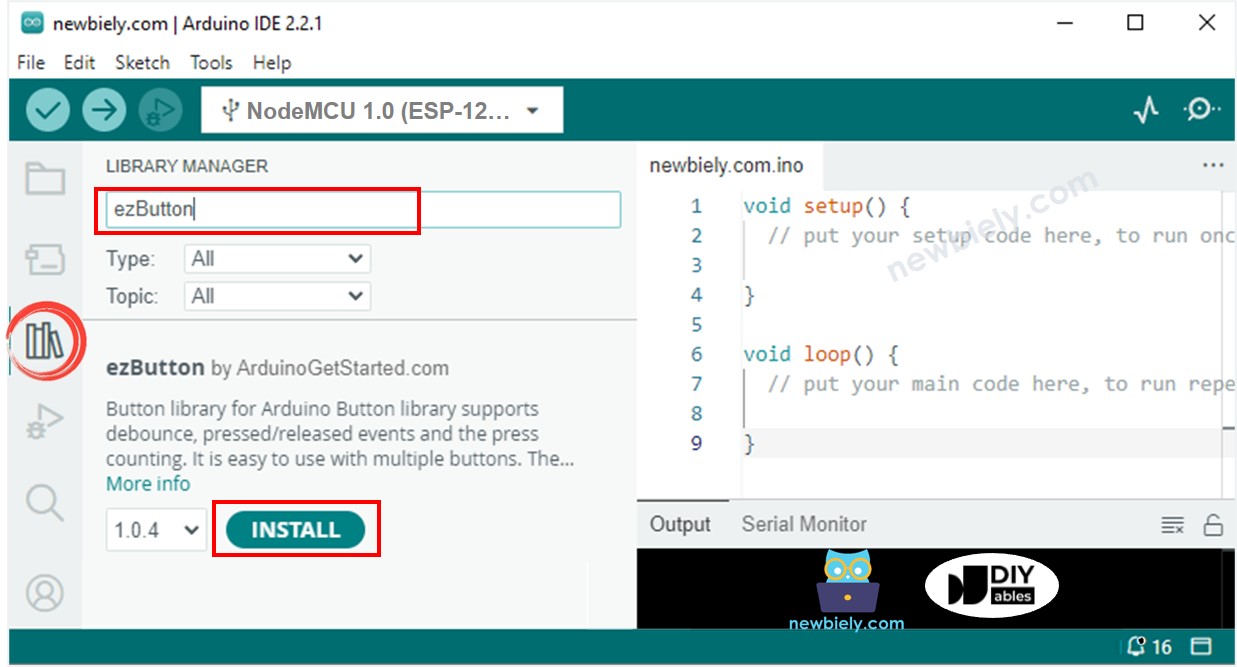
ESP8266 NodeMCU button library
  • Look up “AccelStepper” and locate the AccelStepper library created by Mike McCauley.
  • Press the Install button to add the AccelStepper library.
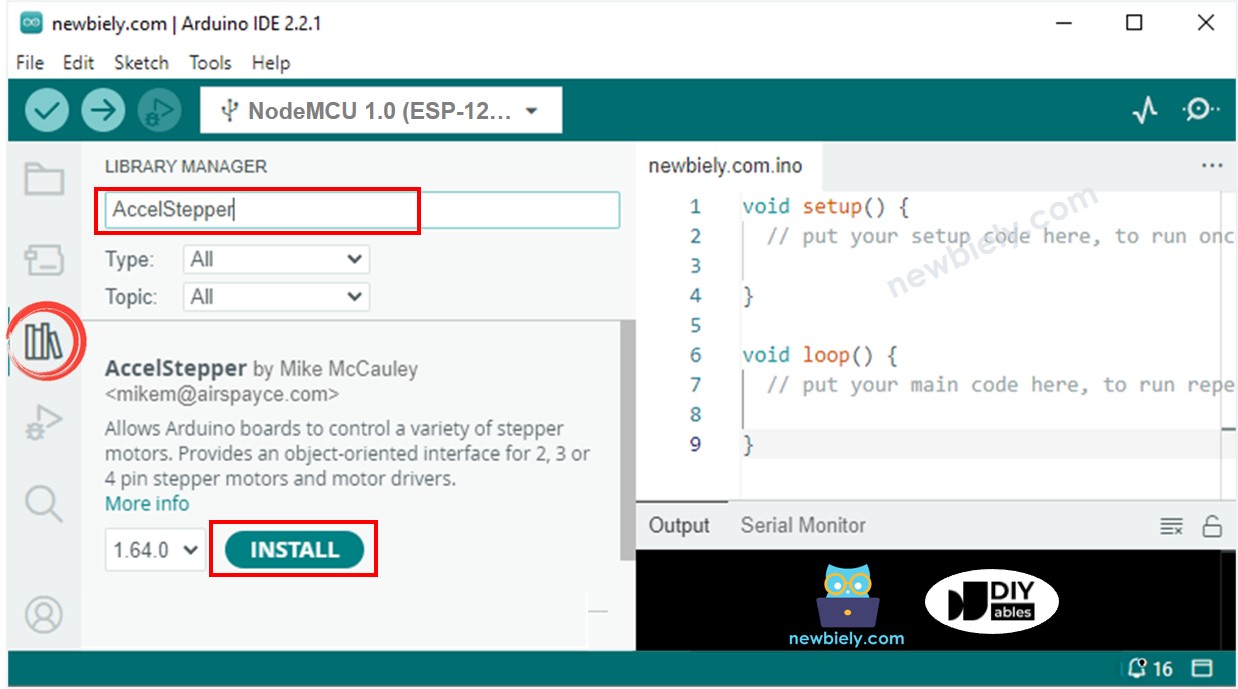
ESP8266 NodeMCU AccelStepper library
  • Copy the code and open it with the Arduino IDE.
  • Click the Upload button in order to transfer the code to the ESP8266.
  • If the wiring is done correctly, the motor will rotate in a clockwise direction.
  • Tap the limit switch and the motor will be stopped right away.
  • The result that appears on the Serial Monitor should look like this.
COM6
Send
The limit switch: TOUCHED The stepper motor is STOPPED The stepper motor is STOPPED The stepper motor is STOPPED The stepper motor is STOPPED
Autoscroll Show timestamp
Clear output
9600 baud  
Newline  

Code Explanation

Check out the line-by-line explanation contained in the comments of the source code!

ESP8266 Code - Change Direction of Stepper Motor by a Limit Switch

The code below causes a stepper motor to rotate continuously, and it will reverse its direction when a limit switch is touched.

/* * This ESP8266 NodeMCU code was developed by newbiely.com * * This ESP8266 NodeMCU code is made available for public use without any restriction * * For comprehensive instructions and wiring diagrams, please visit: * https://newbiely.com/tutorials/esp8266/esp8266-stepper-motor-limit-switch */ #include <ezButton.h> #include <AccelStepper.h> #define DIRECTION_CCW -1 #define DIRECTION_CW 1 #define MAX_POSITION 0x7FFFFFFF // maximum of position we can set (long type) ezButton limit_switch(D0); // create ezButton object that attach to the ESP8266 pin D0 AccelStepper stepper(AccelStepper::FULL4WIRE, D1, D2, D5, D6); int direction = DIRECTION_CW; long target_pos = 0; void setup() { Serial.begin(9600); limit_switch.setDebounceTime(50); // set debounce time to 50 milliseconds stepper.setMaxSpeed(500.0); // set the maximum speed stepper.setAcceleration(50.0); // set acceleration stepper.setSpeed(100); // set initial speed stepper.setCurrentPosition(0); // set position target_pos = direction * MAX_POSITION; stepper.moveTo(target_pos); } void loop() { limit_switch.loop(); // MUST call the loop() function first if (limit_switch.isPressed()) { Serial.println(F("The limit switch: TOUCHED")); direction *= -1; // change direction Serial.print(F("The direction -> ")); if (direction == DIRECTION_CW) Serial.println(F("CLOCKWISE")); else Serial.println(F("ANTI-CLOCKWISE")); target_pos = direction * MAX_POSITION; stepper.setCurrentPosition(0); // set position stepper.moveTo(target_pos); } // without this part, the move will stop after reaching maximum position if (stepper.distanceToGo() == 0) { // if motor moved to the maximum position stepper.setCurrentPosition(0); // reset position to 0 stepper.moveTo(target_pos); // move the motor to maximum position again } stepper.run(); // MUST be called in loop() function }

Detailed Instructions

To get started with ESP8266 on Arduino IDE, follow these steps:

  • Check out the how to setup environment for ESP8266 on Arduino IDE tutorial if this is your first time using ESP8266.
  • Wire the components as shown in the diagram.
  • Connect the ESP8266 board to your computer using a USB cable.
  • Open Arduino IDE on your computer.
  • Choose the correct ESP8266 board, such as (e.g. NodeMCU 1.0 (ESP-12E Module)), and its respective COM port.
  • Copy the code and open it with the Arduino IDE.
  • Click the Upload button to send the code to the ESP8266.
  • If the wiring is correct, the motor will rotate in a clockwise direction.
  • When you touch the limit switch, the stepper motor's rotation will be reversed to an anti-clockwise direction.
  • Touching the limit switch again will cause the stepper motor to rotate clockwise again.
  • The output on the Serial Monitor should look like this.
COM6
Send
The limit switch: TOUCHED The direction -> ANTI-CLOCKWISE The limit switch: TOUCHED The direction -> CLOCKWISE
Autoscroll Show timestamp
Clear output
9600 baud  
Newline  

ESP8266 Code - Change Direction of Stepper Motor by two Limit Switches

The code below causes a stepper motor to spin continuously, and it will reverse its direction when either of two limit switches is touched.

/* * This ESP8266 NodeMCU code was developed by newbiely.com * * This ESP8266 NodeMCU code is made available for public use without any restriction * * For comprehensive instructions and wiring diagrams, please visit: * https://newbiely.com/tutorials/esp8266/esp8266-stepper-motor-limit-switch */ #include <ezButton.h> #include <AccelStepper.h> #define DIRECTION_CCW -1 #define DIRECTION_CW 1 #define STATE_CHANGE_DIR 1 #define STATE_MOVE 2 #define STATE_MOVING 3 #define MAX_POSITION 0x7FFFFFFF // maximum of position we can set (long type) ezButton limit_switch_1(D0); // create ezButton object that attach to the ESP8266 pin D0 ezButton limit_switch_2(D8); // create ezButton object that attach to the ESP8266 pin D8 AccelStepper stepper(AccelStepper::FULL4WIRE, D1, D2, D5, D6); int stepper_state = STATE_MOVE; int direction = DIRECTION_CW; long target_pos = 0; void setup() { Serial.begin(9600); limit_switch_1.setDebounceTime(50); // set debounce time to 50 milliseconds limit_switch_2.setDebounceTime(50); // set debounce time to 50 milliseconds stepper.setMaxSpeed(500.0); // set the maximum speed stepper.setAcceleration(50.0); // set acceleration stepper.setSpeed(100); // set initial speed stepper.setCurrentPosition(0); // set position } void loop() { limit_switch_1.loop(); // MUST call the loop() function first limit_switch_2.loop(); // MUST call the loop() function first if (limit_switch_1.isPressed()) { stepper_state = STATE_CHANGE_DIR; Serial.println(F("The limit switch 1: TOUCHED")); } if (limit_switch_2.isPressed()) { stepper_state = STATE_CHANGE_DIR; Serial.println(F("The limit switch 2: TOUCHED")); } switch (stepper_state) { case STATE_CHANGE_DIR: direction *= -1; // change direction Serial.print(F("The direction -> ")); if (direction == DIRECTION_CW) Serial.println(F("CLOCKWISE")); else Serial.println(F("ANTI-CLOCKWISE")); stepper_state = STATE_MOVE; // after changing direction, go to the next state to move the motor break; case STATE_MOVE: target_pos = direction * MAX_POSITION; stepper.setCurrentPosition(0); // set position stepper.moveTo(target_pos); stepper_state = STATE_MOVING; // after moving, go to the next state to keep the motor moving infinity break; case STATE_MOVING: // without this state, the move will stop after reaching maximum position if (stepper.distanceToGo() == 0) { // if motor moved to the maximum position stepper.setCurrentPosition(0); // reset position to 0 stepper.moveTo(target_pos); // move the motor to maximum position again } break; } stepper.run(); // MUST be called in loop() function }

Detailed Instructions

  • Wire the components as shown in the diagram.
  • Connect the ESP8266 board to your computer using a USB cable.
  • Open Arduino IDE on your computer.
  • Choose the correct ESP8266 board, such as (e.g. NodeMCU 1.0 (ESP-12E Module)), and its respective COM port.
  • Copy the code and open it with the Arduino IDE.
  • Click the Upload button in the IDE to upload the code to the ESP8266.
  • If the wiring is correct, the motor should spin in a clockwise direction.
  • When you touch limit switch 1, the stepper motor's direction should switch to anti-clockwise.
  • Touching limit switch 2 should cause the motor to reverse direction again, this time to clockwise.
  • The result displayed on the Serial Monitor should look like the following.
COM6
Send
The limit switch 1: TOUCHED The direction -> ANTI-CLOCKWISE The limit switch 2: TOUCHED The direction -> CLOCKWISE
Autoscroll Show timestamp
Clear output
9600 baud  
Newline  

Video Tutorial

※ OUR MESSAGES

  • As freelancers, We are AVAILABLE for HIRE. See how to outsource your project to us
  • Please feel free to share the link of this tutorial. However, Please do not use our content on any other websites. We invested a lot of effort and time to create the content, please respect our work!