This tutorial instructs you how to program the ESP8266 to become a web server, allowing you to access temperature data via a web interface. Using an attached DS18B20 temperature sensor, you can easily check the current temperature by using your smartphone or PC to visit the web page served by the ESP8266. Here's a brief overview of how it works:
ESP8266 is programmed as a web server.
You type the IP address of ESP8266 in a web browser on your smartphone or PC.
ESP8266 responds to the request from the web browser with a web page that contains the temperature read from the DS18B20 sensor.
We will go through two example codes:
ESP8266 code that provides a very simple web page that shows the temperature from the DS18B20 sensor. This makes it easy for you to understand how it works. HTML content is embedded in ESP8266 code
ESP8266 code that provides a graphic web page that shows the temperature from the DS18B20 sensor, HTML content is separated from ESP8266 code.
Disclosure: Some of the links provided in this section are Amazon affiliate links. We may receive a commission for any purchases made through these links at no additional cost to you. Additionally, some of these links are for products from our own brand, DIYables .
Buy Note: Many DS18B20 sensors available in the market are unreliable. We strongly recommend buying the sensor from the DIYables brand using the link provided above. We tested it, and it worked reliably.
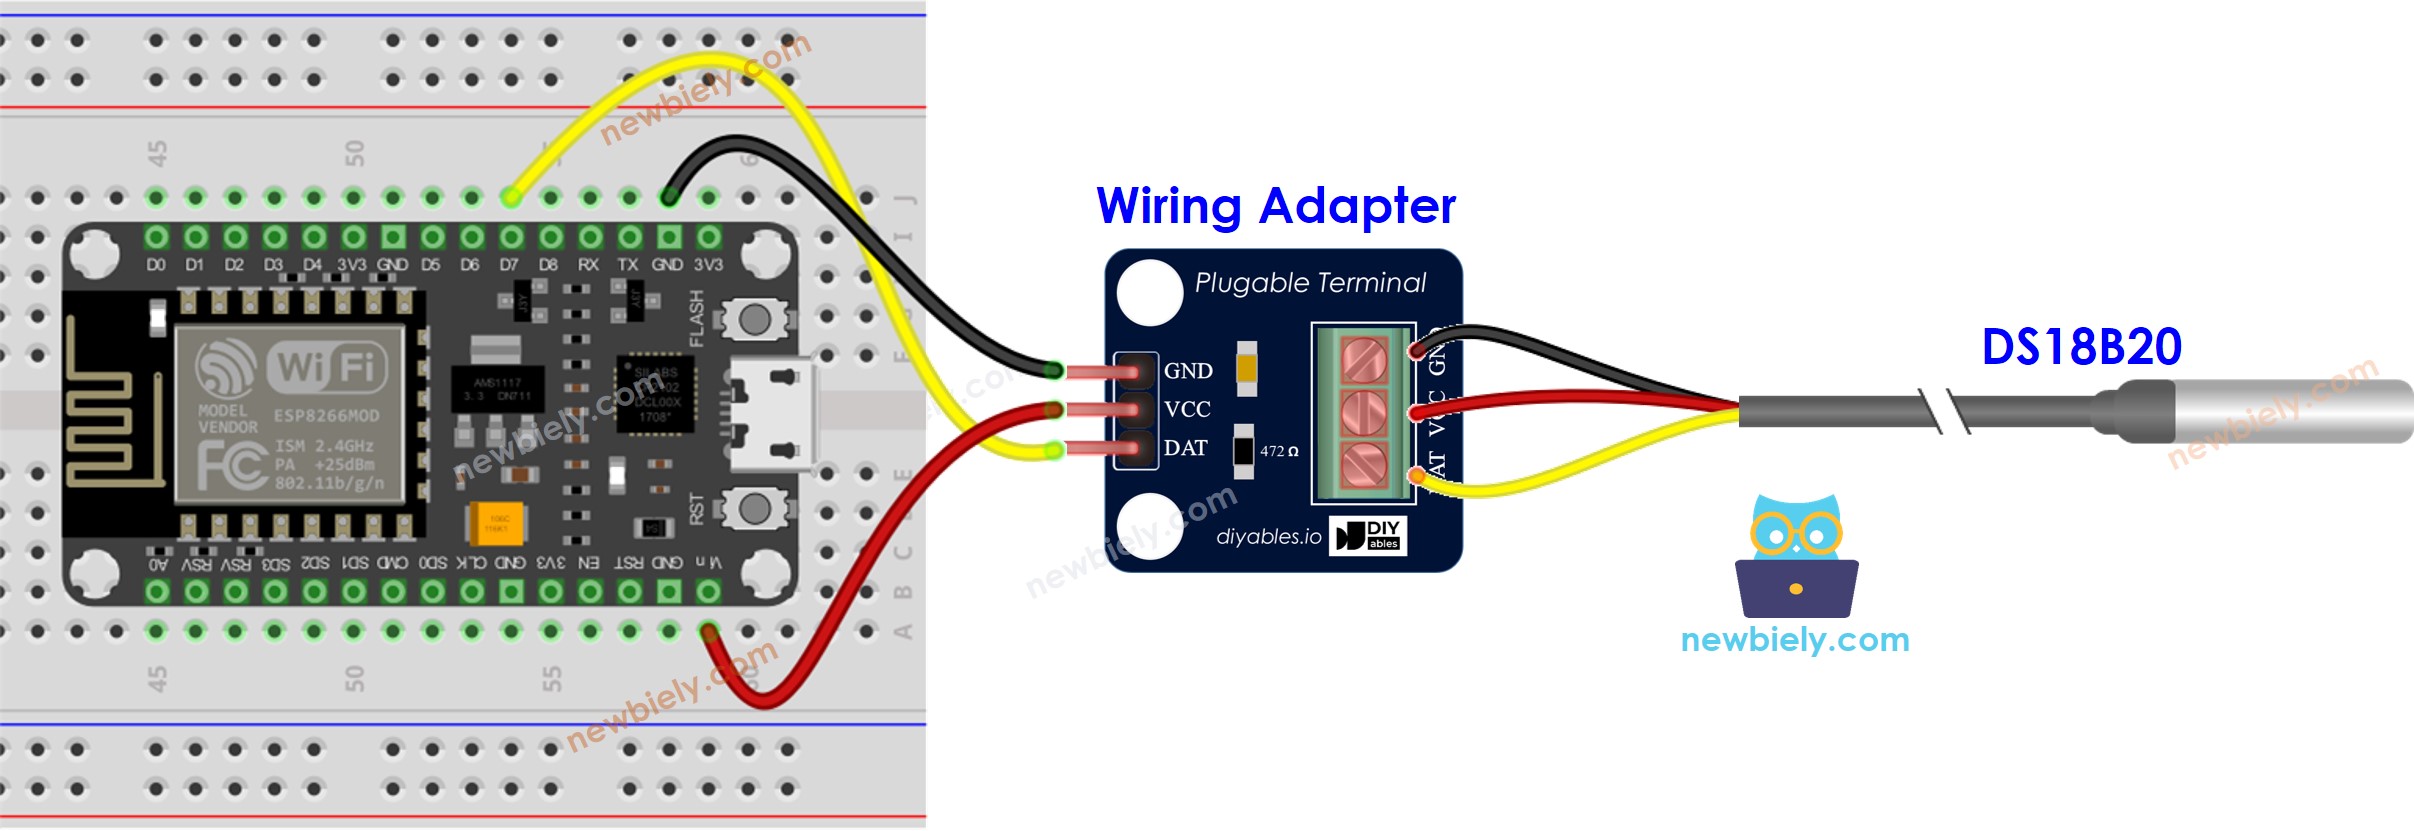
Overview of ESP8266 Web Server and DS18B20 Temperature Sensor
If you do not know about ESP8266 Web Server and DS18B20 temperature sensor (pinout, how it works, how to program ...), learn about them in the following tutorials:
/* * This ESP8266 NodeMCU code was developed by newbiely.com * * This ESP8266 NodeMCU code is made available for public use without any restriction * * For comprehensive instructions and wiring diagrams, please visit: * https://newbiely.com/tutorials/esp8266/esp8266-temperature-via-web */#include <ESP8266WiFi.h>#include <ESP8266WebServer.h>#include <OneWire.h>#include <DallasTemperature.h>#define SENSOR_PIN D7 // The ESP8266 pin connected to DS18B20 sensor's DATA pinconst char* ssid = "YOUR_WIFI_SSID"; // CHANGE ITconst char* password = "YOUR_WIFI_PASSWORD"; // CHANGE ITOneWire oneWire(SENSOR_PIN); // setup a oneWire instanceDallasTemperature DS18B20(&oneWire); // pass oneWire to DallasTemperature libraryESP8266WebServer server(80); // Web server on port 80floatgetTemperature() { DS18B20.requestTemperatures(); // send the command to get temperaturesfloat temperature_C = DS18B20.getTempCByIndex(0); // read temperature in °Creturn temperature_C;}voidsetup() {Serial.begin(9600); DS18B20.begin(); // initialize the DS18B20 sensor// Connect to Wi-FiWiFi.begin(ssid, password);while (WiFi.status() != WL_CONNECTED) {delay(1000);Serial.println("Connecting to WiFi..."); }Serial.println("Connected to WiFi");// Print the ESP8266's IP address Serial.print("ESP8266 Web Server's IP address: "); Serial.println(WiFi.localIP());// Define a route to serve the HTML page server.on("/", HTTP_GET, []() {Serial.println("ESP8266 Web Server: New request received:"); // for debuggingSerial.println("GET /"); // for debugging// get temperature from sensorfloat temperature = getTemperature();// Format the temperature with two decimal placesString temperatureStr = String(temperature, 2);String html = "<!DOCTYPE HTML>"; html += "<html>"; html += "<head>"; html += "<link rel=\"icon\" href=\"data:,\">"; html += "</head>"; html += "<p>"; html += "Temperature: <span style=\"color: red;\">"; html += temperature; html += "°C</span>"; html += "</p>"; html += "</html>"; server.send(200, "text/html", html); });// Start the server server.begin();}voidloop() {// Handle client requests server.handleClient();// Your code here}
Detailed Instructions
To get started with ESP8266 on Arduino IDE, follow these steps:
Connect the ESP8266 board to your computer using a USB cable.
Open Arduino IDE on your computer.
Choose the correct ESP8266 board, such as (e.g. NodeMCU 1.0 (ESP-12E Module)), and its respective COM port.
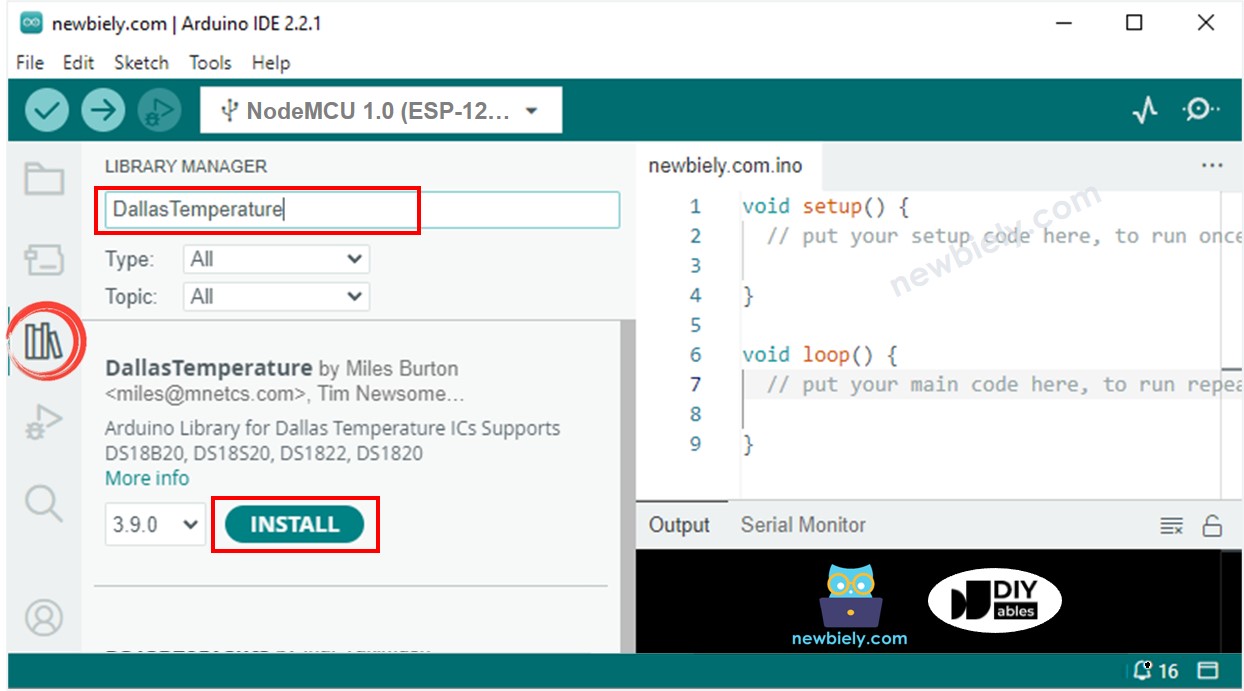
Click to the Libraries icon on the left bar of the Arduino IDE.
Type “Dallas” on the search box, then look for the DallasTemperature library by Miles Burton.
Click Install button to install DallasTemperature library.
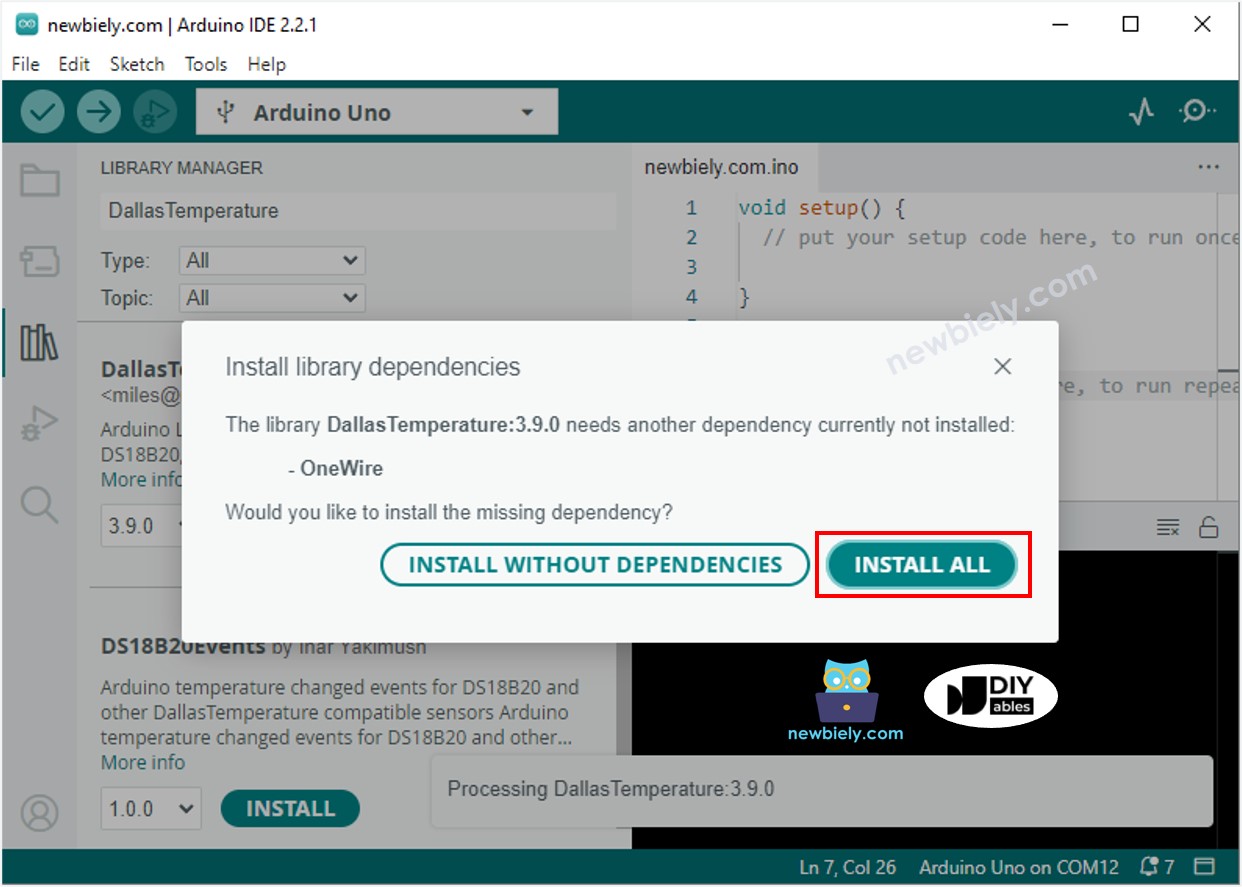
You will be asked to install the dependency. Click Install All button to install OneWire library.
Copy the above code and open with Arduino IDE
Change the wifi information (SSID and password) in the code to yours
Click Upload button on Arduino IDE to upload code to ESP8266
Open the Serial Monitor
Check out the result on Serial Monitor.
Newbiely | Arduino IDE 2.3.8
──
☐
✕
File
Edit
Sketch
Tools
Help
Nodemcu 1.0 (ESP-12E Module)
Newbiely.ino
···
8Serial.println("Hello World!");
Output
Serial Monitor
Message (Enter to send message to 'Nodemcu 1.0 (ESP-12E Module)' on 'COM15')
New Line
9600 baud
Connecting to WiFi...
Connected to WiFi
ESP8266 Web Server's IP address: 192.168.0.5
Ln 11, Col 1
Nodemcu 1.0 (ESP-12E Module) on COM15
2
You will find an IP address. Type this IP address into the address bar of a web browser on your smartphone or PC.
You will see the following output on the Serial Monitor.
Newbiely | Arduino IDE 2.3.8
──
☐
✕
File
Edit
Sketch
Tools
Help
Nodemcu 1.0 (ESP-12E Module)
Newbiely.ino
···
8Serial.println("Hello World!");
Output
Serial Monitor
Message (Enter to send message to 'Nodemcu 1.0 (ESP-12E Module)' on 'COM15')
New Line
9600 baud
Connecting to WiFi...
Connected to WiFi
ESP8266 Web Server's IP address: 192.168.0.5
ESP8266 Web Server: New request received:
GET /
Ln 11, Col 1
Nodemcu 1.0 (ESP-12E Module) on COM15
2
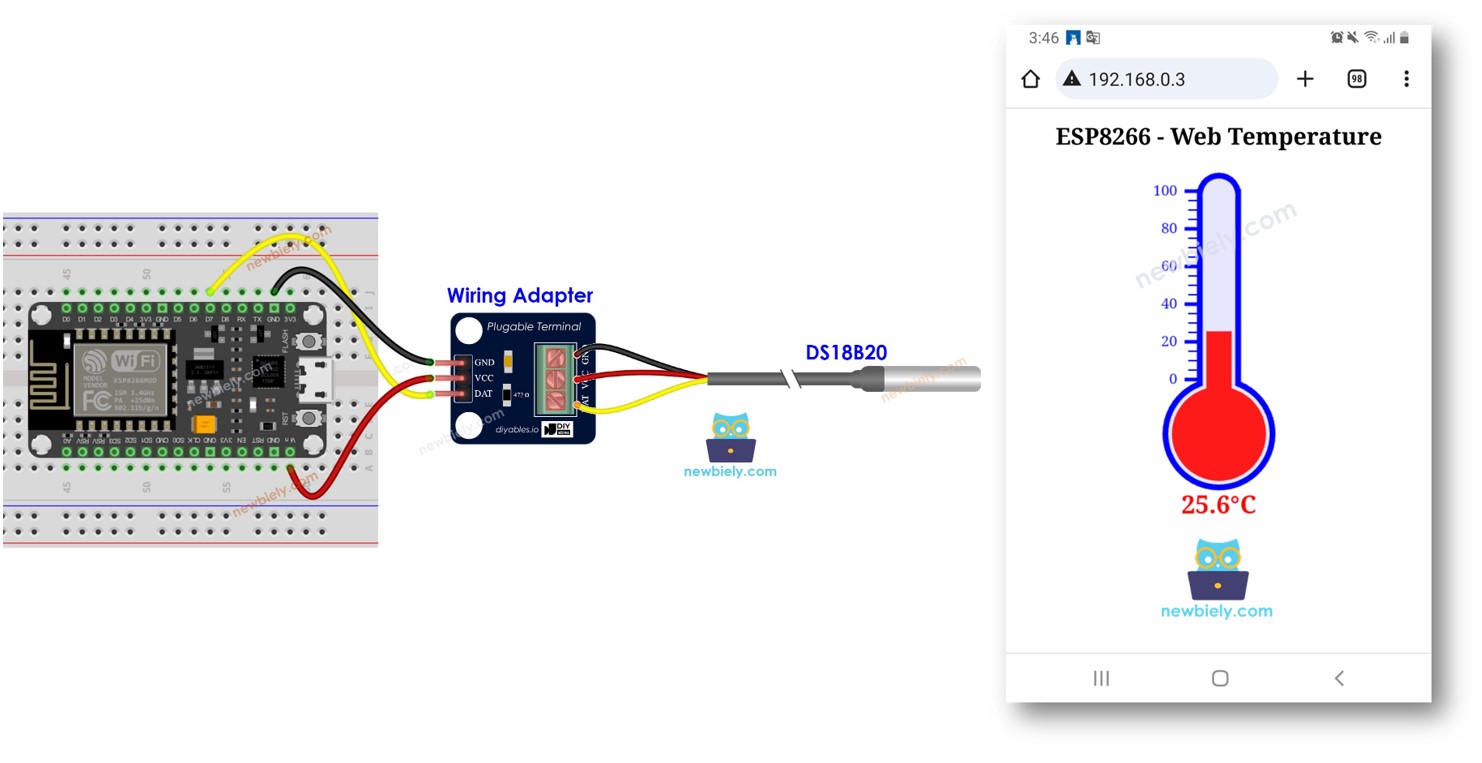
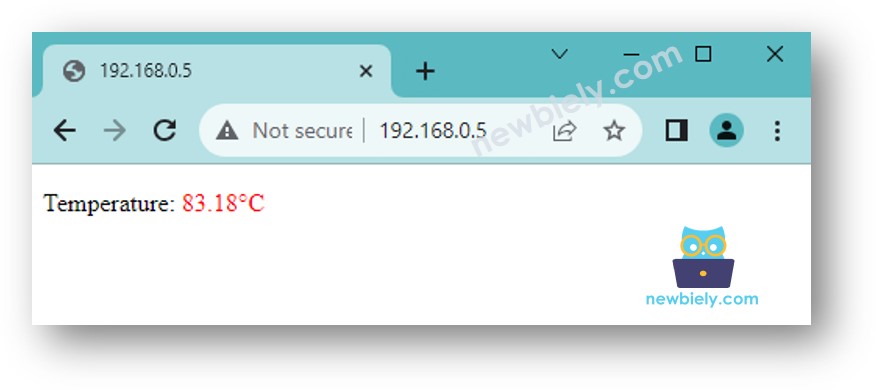
You will see a very simple web page of ESP8266 board on the web browser as below:
※ NOTE THAT:
With the code provided above, to get the termperature update, you have to reload the page on the web browser. In a next part, we will learn how to make web page update the temperature value on backround without reloading the webpage.
ESP8266 Code - Graphic Web Page
As a graphic web page contains a large amount of HTML content, embedding it into the ESP8266 code as before becomes inconvenient. To address this, we need to separate the ESP8266 code and the HTML code into different files:
The ESP8266 code will be placed in a .ino file.
The HTML code (including HTML, CSS, and Javascript) will be placed in a .h file.
For detail of how to separate the HTML code from ESP8266 code, please refer to ESP8266 - Web Server tutorial.
Detailed Instructions
Open Arduino IDE and create new sketch, Give it a name, for example, newbiely.com.ino
Copy the below code and open with Arduino IDE
/* * This ESP8266 NodeMCU code was developed by newbiely.com * * This ESP8266 NodeMCU code is made available for public use without any restriction * * For comprehensive instructions and wiring diagrams, please visit: * https://newbiely.com/tutorials/esp8266/esp8266-temperature-via-web */#include <ESP8266WiFi.h>#include <ESP8266WebServer.h>#include"index.h"// Include the index.h file#include <OneWire.h>#include <DallasTemperature.h>#define SENSOR_PIN D7 // The ESP8266 pin connected to DS18B20 sensor's DATA pinconst char* ssid = "YOUR_WIFI_SSID"; // CHANGE ITconst char* password = "YOUR_WIFI_PASSWORD"; // CHANGE ITOneWire oneWire(SENSOR_PIN); // setup a oneWire instanceDallasTemperature DS18B20(&oneWire); // pass oneWire to DallasTemperature libraryESP8266WebServer server(80); // Web server on port 80floatgetTemperature() { DS18B20.requestTemperatures(); // send the command to get temperaturesfloat temperature_C = DS18B20.getTempCByIndex(0); // read temperature in °Creturn temperature_C;}voidsetup() {Serial.begin(9600); DS18B20.begin(); // initialize the DS18B20 sensor// Connect to Wi-FiWiFi.begin(ssid, password);while (WiFi.status() != WL_CONNECTED) {delay(1000);Serial.println("Connecting to WiFi..."); }Serial.println("Connected to WiFi");// Print the ESP8266's IP address Serial.print("ESP8266 Web Server's IP address: "); Serial.println(WiFi.localIP());// Serve the HTML page from the file server.on("/", HTTP_GET, []() {Serial.println("ESP8266 Web Server: New request received:"); // for debuggingSerial.println("GET /"); // for debugging server.send(200, "text/html", webpage); // webpage is from index.h file });// Define a route to get the temperature data server.on("/temperature", HTTP_GET, []() {Serial.println("ESP8266 Web Server: New request received:"); // for debuggingSerial.println("GET /temperature"); // for debuggingfloat temperature = getTemperature();// Format the temperature with two decimal placesString temperatureStr = String(temperature, 2); server.send(200, "text/plain", temperatureStr); });// Start the server server.begin();}voidloop() {// Handle client requests server.handleClient();// Your code here}
Change the WiFi information (SSID and password) in the code to yours
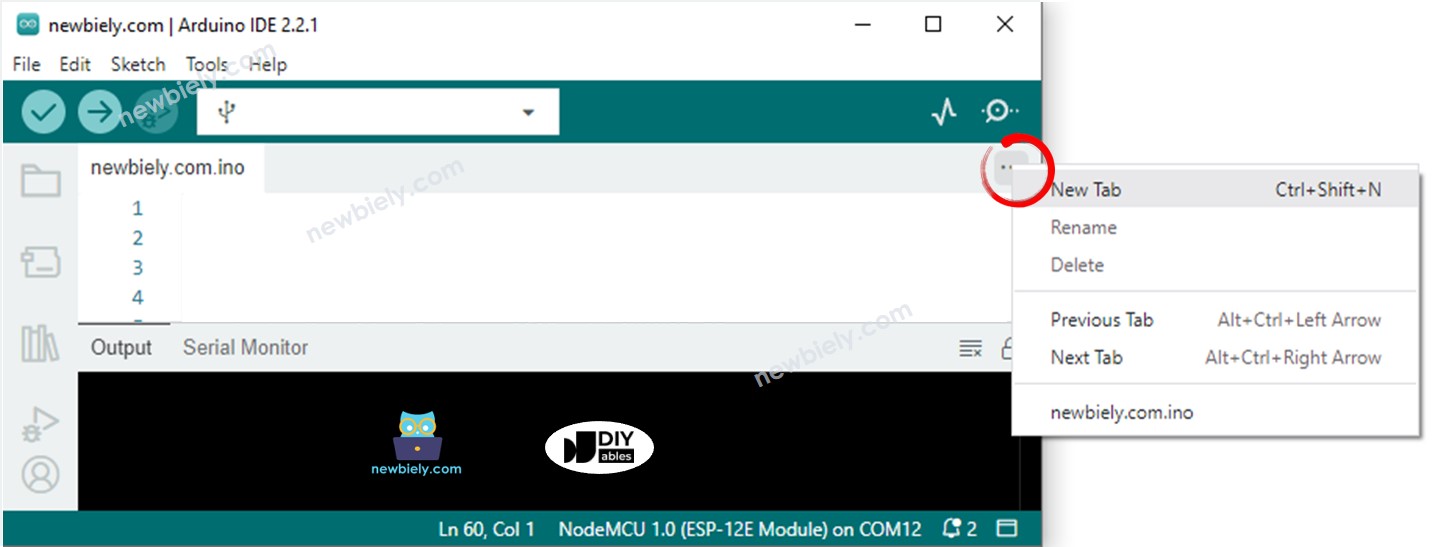
Create the index.h file On Arduino IDE by:
Either click on the button just below the serial monitor icon and choose New Tab, or use Ctrl+Shift+N keys.
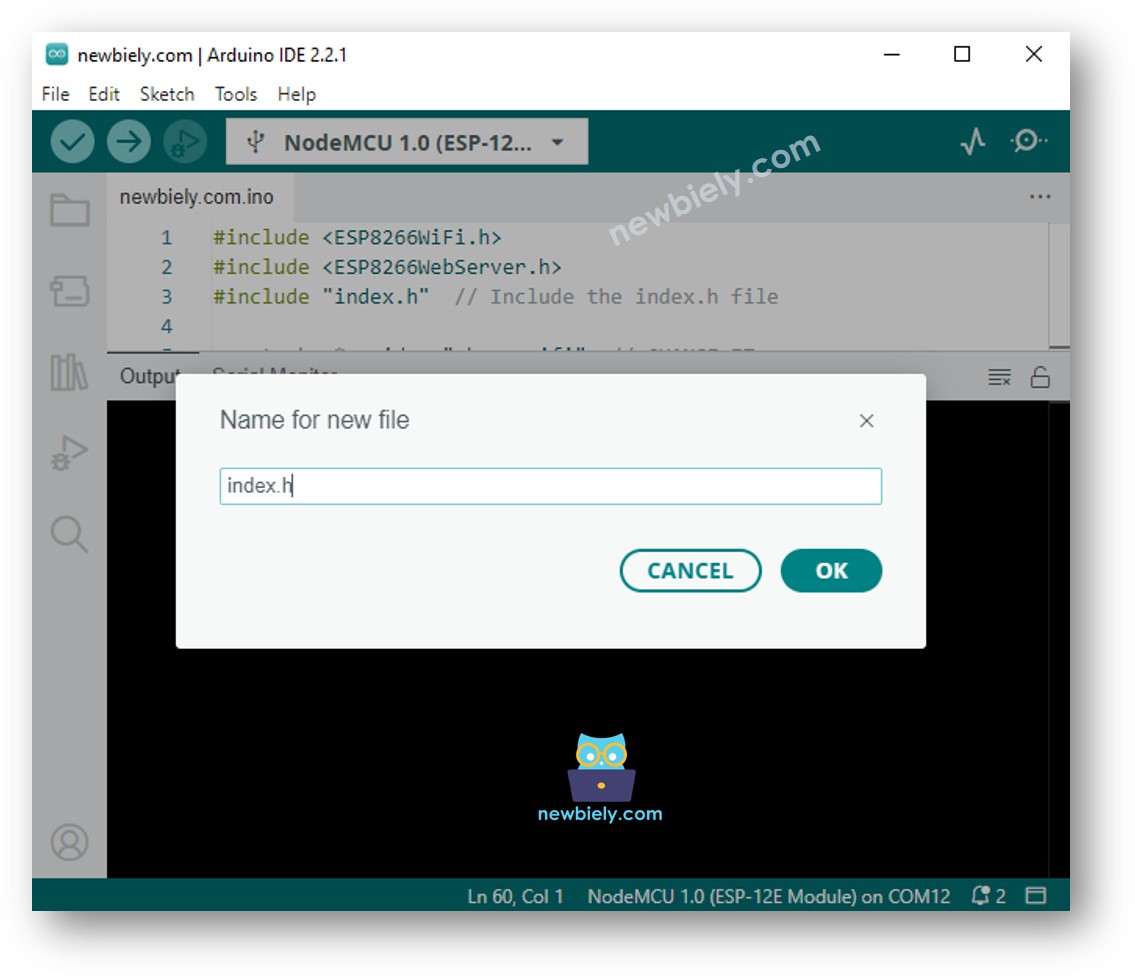
Give the file's name index.h and click OK button
Copy the below code and paste it to the index.h.
/* * This ESP8266 NodeMCU code was developed by newbiely.com * * This ESP8266 NodeMCU code is made available for public use without any restriction * * For comprehensive instructions and wiring diagrams, please visit: * https://newbiely.com/tutorials/esp8266/esp8266-temperature-via-web */#ifndef WEBPAGE_H#define WEBPAGE_Hconst char* webpage = R"=====(<!DOCTYPE html><html><head><title>ESP8266 - Web Temperature</title><meta name="viewport" content="width=device-width, initial-scale=0.7, maximum-scale=0.7"><meta charset="utf-8"><link rel="icon" href="https://diyables.io/images/page/diyables.svg"><style>body { font-family: "Georgia"; text-align: center; font-size: width/2pt;}h1 { font-weight: bold; font-size: width/2pt;}h2 { font-weight: bold; font-size: width/2pt;}button { font-weight: bold; font-size: width/2pt;}</style><script>var cvs_width = 200, cvs_height = 450;function init() { var canvas = document.getElementById("cvs"); canvas.width = cvs_width; canvas.height = cvs_height + 50; var ctx = canvas.getContext("2d"); ctx.translate(cvs_width/2, cvs_height - 80); fetchTemperature(); setInterval(fetchTemperature, 4000); // Update temperature every 4 seconds}function fetchTemperature() { fetch("/temperature") .then(response => response.text()) .then(data => {update_view(data);});}function update_view(temp) { var canvas = document.getElementById("cvs"); var ctx = canvas.getContext("2d"); var radius = 70; var offset = 5; var width = 45; var height = 330; ctx.clearRect(-cvs_width/2, -cvs_height + 80, cvs_width, cvs_height + 50); ctx.strokeStyle="blue"; ctx.fillStyle="blue";//5-step Degree var x = -width/2; ctx.lineWidth=2;for (var i = 0; i <= 100; i+=5) { var y = -(height - radius)*i/100 - radius - 5; ctx.beginPath(); ctx.lineTo(x, y); ctx.lineTo(x - 20, y); ctx.stroke(); }//20-step Degree ctx.lineWidth=5;for (var i = 0; i <= 100; i+=20) { var y = -(height - radius)*i/100 - radius - 5; ctx.beginPath(); ctx.lineTo(x, y); ctx.lineTo(x - 25, y); ctx.stroke(); ctx.font="20px Georgia"; ctx.textBaseline="middle"; ctx.textAlign="right"; ctx.fillText(i.toString(), x - 35, y); }// shape ctx.lineWidth=16; ctx.beginPath(); ctx.arc(0, 0, radius, 0, 2 * Math.PI); ctx.stroke(); ctx.beginPath(); ctx.rect(-width/2, -height, width, height); ctx.stroke(); ctx.beginPath(); ctx.arc(0, -height, width/2, 0, 2 * Math.PI); ctx.stroke(); ctx.fillStyle="#e6e6ff"; ctx.beginPath(); ctx.arc(0, 0, radius, 0, 2 * Math.PI); ctx.fill(); ctx.beginPath(); ctx.rect(-width/2, -height, width, height); ctx.fill(); ctx.beginPath(); ctx.arc(0, -height, width/2, 0, 2 * Math.PI); ctx.fill(); ctx.fillStyle="#ff1a1a"; ctx.beginPath(); ctx.arc(0, 0, radius - offset, 0, 2 * Math.PI); ctx.fill(); temp = Math.round(temp * 100) / 100; var y = (height - radius)*temp/100.0 + radius + 5; ctx.beginPath(); ctx.rect(-width/2 + offset, -y, width - 2*offset, y); ctx.fill(); ctx.fillStyle="red"; ctx.font="bold 34px Georgia"; ctx.textBaseline="middle"; ctx.textAlign="center"; ctx.fillText(temp.toString() + "°C", 0, 100);}window.onload = init;</script></head><body><h1>ESP8266 - Web Temperature</h1><canvas id="cvs"></canvas></body></html>)=====";#endif
Now you have the code in two files: newbiely.com.ino and index.h
Click Upload button on Arduino IDE to upload code to ESP8266
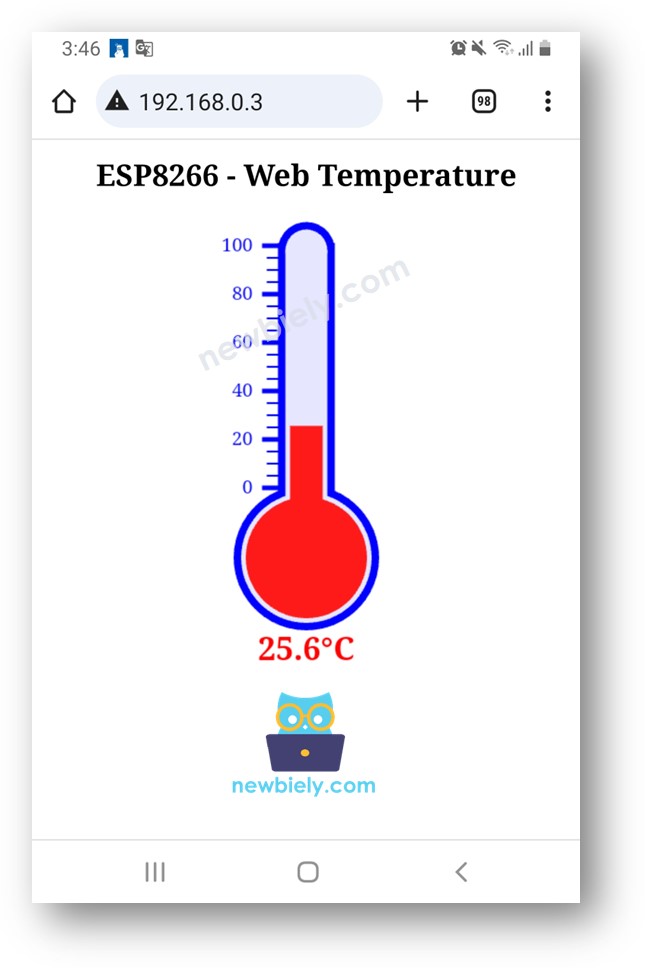
Access the web page of ESP8266 board via web browser on your PC or smartphone as before. You will see it as below:
※ NOTE THAT:
If you modify the HTML content in the index.h and does not touch anything in newbiely.com.ino file, when you compile and upload code to ESP8266, Arduino IDE will not update the HTML content.
To make Arduino IDE update the HTML content in this case, make a change in the newbiely.com.ino file (e.g. adding empty line, add a comment....)
Please feel free to share the link of this tutorial. However, Please do not use our content on any other websites. We invested a lot of effort and time to create the content, please respect our work!