ESP8266 - RTC
This tutorial instructs you how to use ESP8266 to read date and time from RTC module. In detail, we will learn:
How to connect DS3231 Real-Time Clock module to ESP8266.
How to program ESP8266 to read date and time (second, minute, hour, day of week, day off month, month, and year) from the DS3231 RTC module.
How to program ESP8266 to create daily schedules.
How to program ESP8266 to create weekly schedules.
How to program ESP8266 to create schedules on a specific date.
Or you can buy the following kits:
Disclosure: Some of the links provided in this section are Amazon affiliate links. We may receive a commission for any purchases made through these links at no additional cost to you.
Additionally, some of these links are for products from our own brand,
DIYables .
ESP8266 has certain functions related to time, such as millis() and micros(). However, they do not provide the date and time (seconds, minutes, hours, day, date, month, and year). To get this information, we need to use a Real-Time Clock (RTC) module, such as DS3231 or DS1370. The DS3231 Module has greater precision than the DS1370. For more information, please see DS3231 vs DS1307.
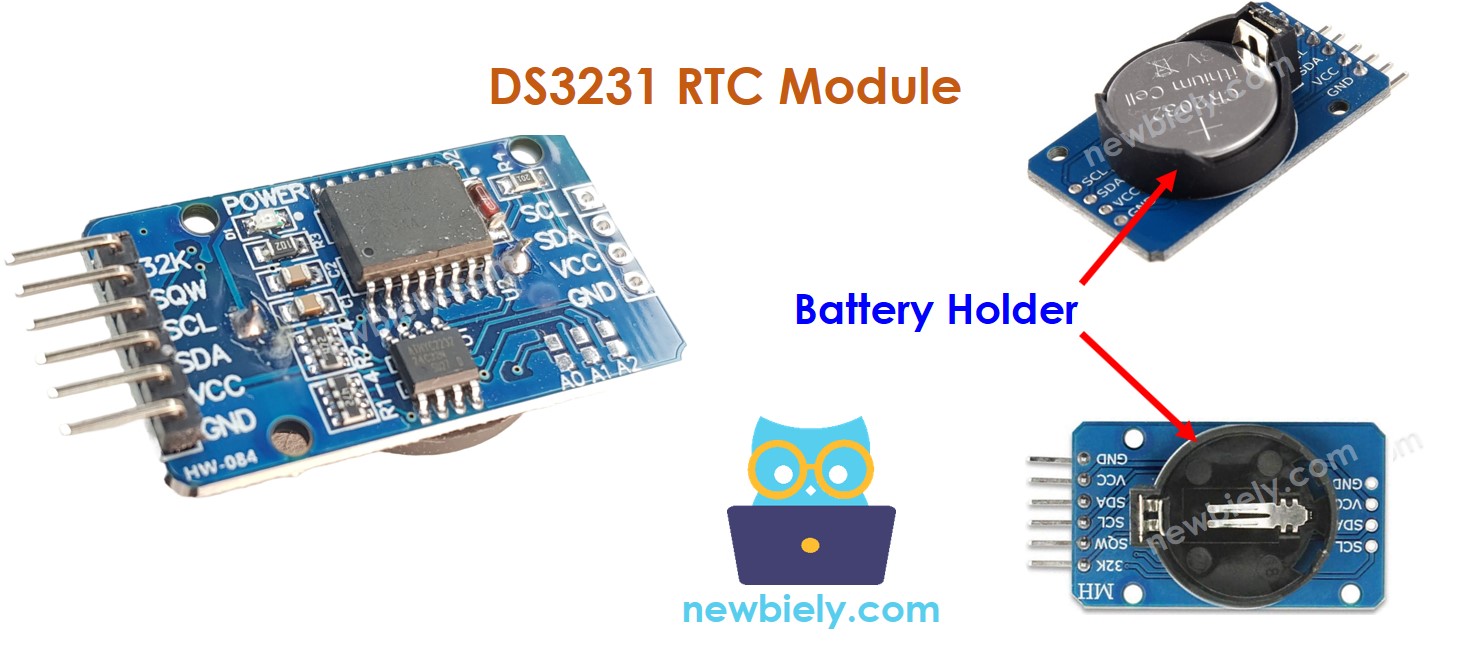
The Real-Time Clock DS3231 Module has 10 pins:
32K: This pin provides a stable and precise reference clock.
SQW: This pin produces a square wave at 1Hz, 4kHz, 8kHz or 32kHz and can be managed through programming. It can also be used as an alarm interrupt in various time-dependent applications.
SCL: This is the serial clock pin for the I2C interface.
SDA: This is the serial data pin for the I2C interface.
VCC: This pin supplies power to the module. It can be between 3.3V and 5.5V.
GND: This is the ground pin.
For regular operation, four pins are required: VCC, GND, SDA, and SCL.
The DS3231 Module has a battery holder that, when a CR2032 battery is inserted, will keep the time on the module running even when the main power is off. Without the battery, the time information will be lost if the main power is disconnected and it will need to be reset.

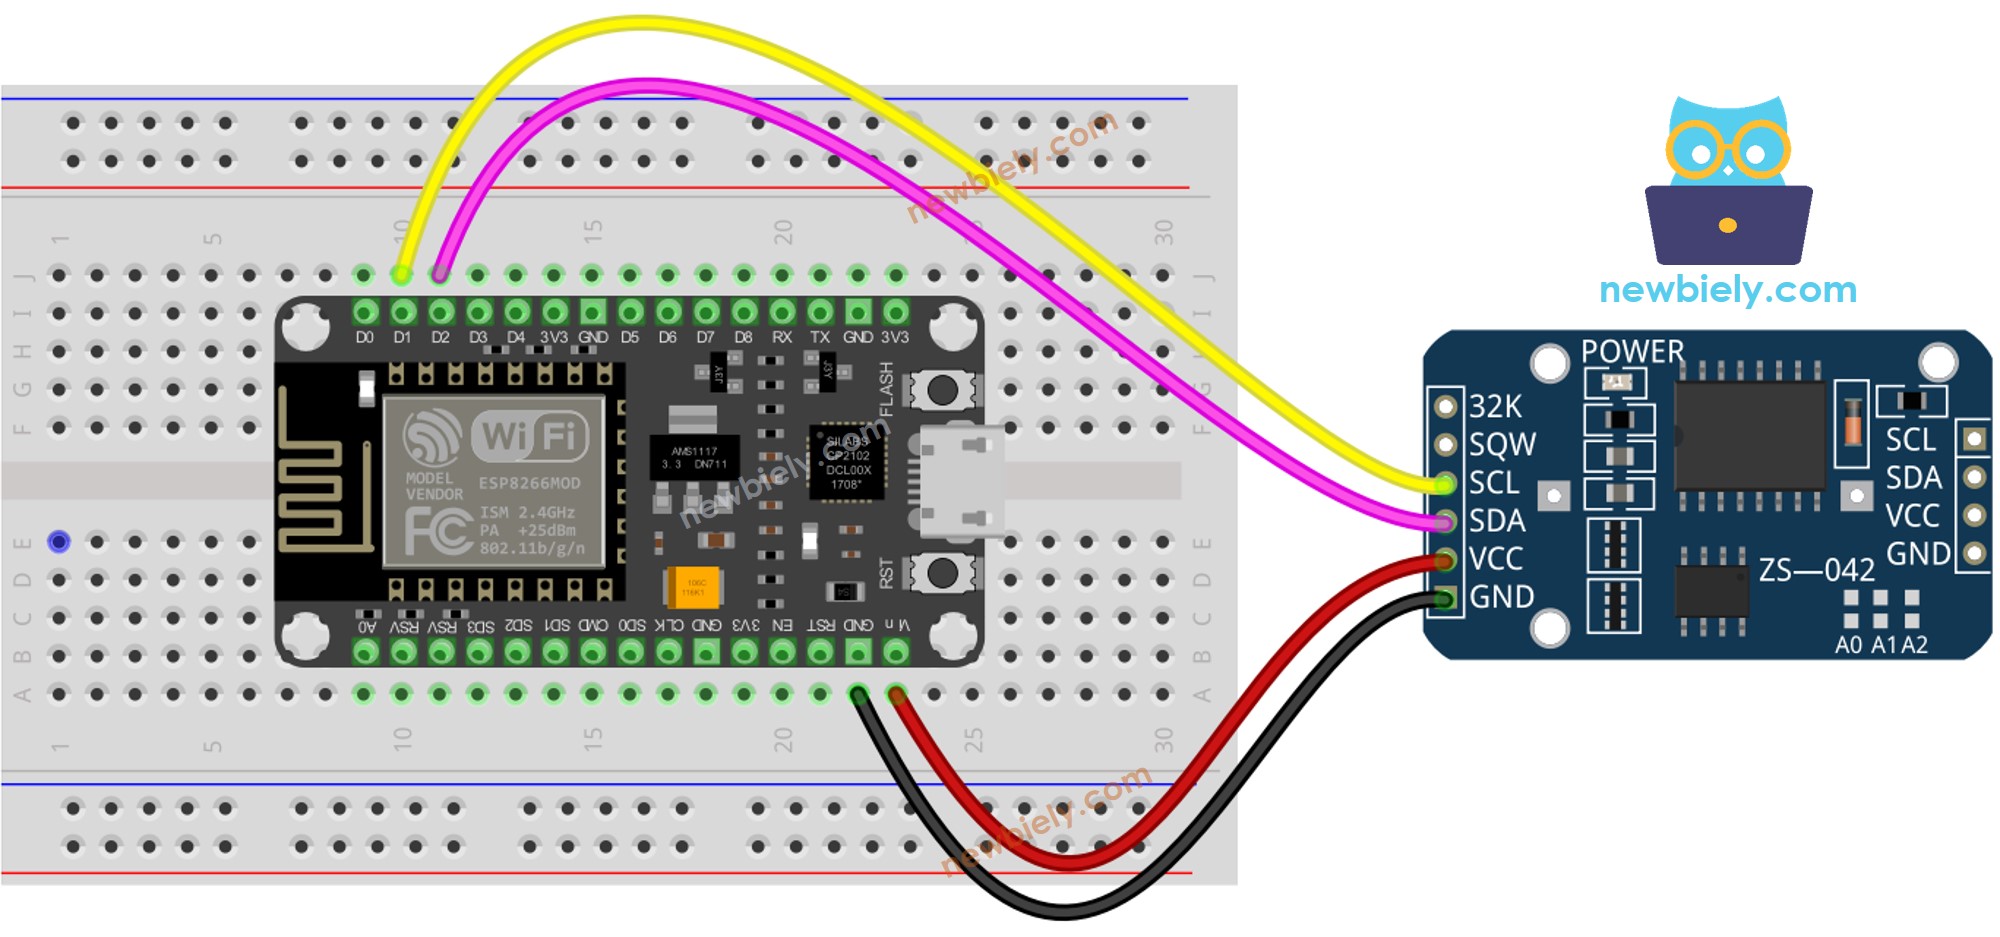
This image is created using Fritzing. Click to enlarge image
See more in ESP8266's pinout and how to supply power to the ESP8266 and other components.
| DS3231 RTC Module | ESP8266 |
|---|
| Vin | 3.3V |
| GND | GND |
| SDA | GPIO4 |
| SCL | GPIO5 |
if (! rtc.begin()) {
Serial.println("Couldn't find RTC");
while (1);
}
rtc.adjust(DateTime(F(__DATE__), F(__TIME__)));
DateTime now = rtc.now();
Serial.print("Date & Time: ");
Serial.print(now.year(), DEC);
Serial.print('/');
Serial.print(now.month(), DEC);
Serial.print('/');
Serial.print(now.day(), DEC);
Serial.print(" (");
Serial.print(now.dayOfTheWeek());
Serial.print(") ");
Serial.print(now.hour(), DEC);
Serial.print(':');
Serial.print(now.minute(), DEC);
Serial.print(':');
Serial.println(now.second(), DEC);
#include <RTClib.h>
RTC_DS3231 rtc;
char daysOfTheWeek[7][12] = {
"Sunday",
"Monday",
"Tuesday",
"Wednesday",
"Thursday",
"Friday",
"Saturday"
};
void setup () {
Serial.begin(9600);
if (! rtc.begin()) {
Serial.println("Couldn't find RTC");
Serial.flush();
while (1);
}
rtc.adjust(DateTime(F(__DATE__), F(__TIME__)));
}
void loop () {
DateTime now = rtc.now();
Serial.print("Date & Time: ");
Serial.print(now.year(), DEC);
Serial.print('/');
Serial.print(now.month(), DEC);
Serial.print('/');
Serial.print(now.day(), DEC);
Serial.print(" (");
Serial.print(daysOfTheWeek[now.dayOfTheWeek()]);
Serial.print(") ");
Serial.print(now.hour(), DEC);
Serial.print(':');
Serial.print(now.minute(), DEC);
Serial.print(':');
Serial.println(now.second(), DEC);
delay(1000);
}
To get started with ESP8266 on Arduino IDE, follow these steps:
Wire the components as shown in the diagram.
Connect the ESP8266 board to your computer using a USB cable.
Open Arduino IDE on your computer.
Choose the correct ESP8266 board, such as (e.g. NodeMCU 1.0 (ESP-12E Module)), and its respective COM port.
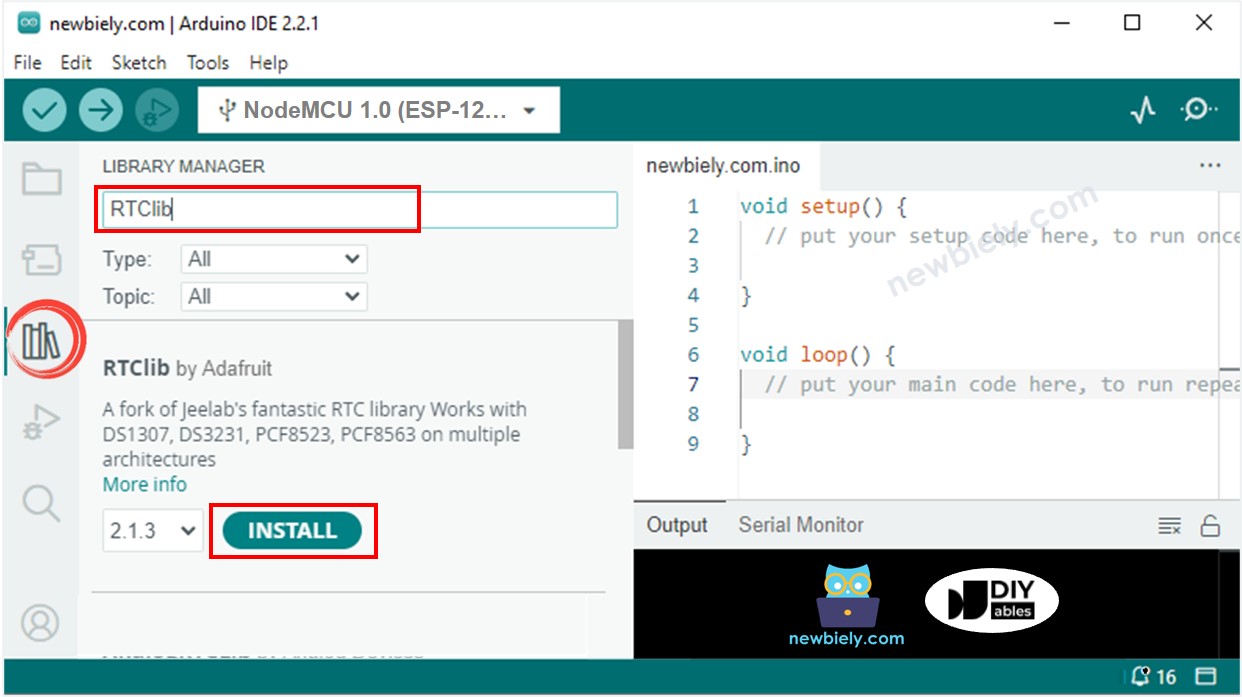
Click to the Libraries icon on the left bar of the Arduino IDE.
Search for “RTClib” and locate the RTC library by Adafruit.
Press the Install button to install the RTC library.
Copy the code and open it with the Arduino IDE.
Click the Upload button in the IDE to send it to the ESP8266.
Open the Serial Monitor.
Check the output on the Serial Monitor.
Date & Time: 2021/10/6 (Wednesday) 11:27:35
Date & Time: 2021/10/6 (Wednesday) 11:27:36
Date & Time: 2021/10/6 (Wednesday) 11:27:37
Date & Time: 2021/10/6 (Wednesday) 11:27:38
Date & Time: 2021/10/6 (Wednesday) 11:27:39
Date & Time: 2021/10/6 (Wednesday) 11:27:40
Date & Time: 2021/10/6 (Wednesday) 11:27:41
Date & Time: 2021/10/6 (Wednesday) 11:27:42
Date & Time: 2021/10/6 (Wednesday) 11:27:43
Date & Time: 2021/10/6 (Wednesday) 11:27:44
#include <RTClib.h>
uint8_t DAILY_EVENT_START_HH = 13;
uint8_t DAILY_EVENT_START_MM = 50;
uint8_t DAILY_EVENT_END_HH = 14;
uint8_t DAILY_EVENT_END_MM = 10;
RTC_DS3231 rtc;
char daysOfTheWeek[7][12] = {
"Sunday",
"Monday",
"Tuesday",
"Wednesday",
"Thursday",
"Friday",
"Saturday"
};
void setup () {
Serial.begin(9600);
if (! rtc.begin()) {
Serial.println("Couldn't find RTC");
while (1);
}
rtc.adjust(DateTime(F(__DATE__), F(__TIME__)));
}
void loop () {
DateTime now = rtc.now();
if (now.hour() >= DAILY_EVENT_START_HH &&
now.minute() >= DAILY_EVENT_START_MM &&
now.hour() < DAILY_EVENT_END_HH &&
now.minute() < DAILY_EVENT_END_MM) {
Serial.println("It is on scheduled time");
} else {
Serial.println("It is NOT on scheduled time");
}
printTime(now);
}
void printTime(DateTime time) {
Serial.print("TIME: ");
Serial.print(time.year(), DEC);
Serial.print('/');
Serial.print(time.month(), DEC);
Serial.print('/');
Serial.print(time.day(), DEC);
Serial.print(" (");
Serial.print(daysOfTheWeek[time.dayOfTheWeek()]);
Serial.print(") ");
Serial.print(time.hour(), DEC);
Serial.print(':');
Serial.print(time.minute(), DEC);
Serial.print(':');
Serial.println(time.second(), DEC);
}
#include <RTClib.h>
#define SUNDAY 0
#define MONDAY 1
#define TUESDAY 2
#define WEDNESDAY 3
#define THURSDAY 4
#define FRIDAY 5
#define SATURDAY 6
uint8_t WEEKLY_EVENT_DAY = MONDAY;
uint8_t WEEKLY_EVENT_START_HH = 13;
uint8_t WEEKLY_EVENT_START_MM = 50;
uint8_t WEEKLY_EVENT_END_HH = 14;
uint8_t WEEKLY_EVENT_END_MM = 10;
RTC_DS3231 rtc;
char daysOfTheWeek[7][12] = {
"Sunday",
"Monday",
"Tuesday",
"Wednesday",
"Thursday",
"Friday",
"Saturday"
};
void setup () {
Serial.begin(9600);
if (! rtc.begin()) {
Serial.println("Couldn't find RTC");
while (1);
}
rtc.adjust(DateTime(F(__DATE__), F(__TIME__)));
}
void loop () {
DateTime now = rtc.now();
if (now.dayOfTheWeek() == WEEKLY_EVENT_DAY &&
now.hour() >= WEEKLY_EVENT_START_HH &&
now.minute() >= WEEKLY_EVENT_START_MM &&
now.hour() < WEEKLY_EVENT_END_HH &&
now.minute() < WEEKLY_EVENT_END_MM) {
Serial.println("It is on scheduled time");
} else {
Serial.println("It is NOT on scheduled time");
}
printTime(now);
}
void printTime(DateTime time) {
Serial.print("TIME: ");
Serial.print(time.year(), DEC);
Serial.print('/');
Serial.print(time.month(), DEC);
Serial.print('/');
Serial.print(time.day(), DEC);
Serial.print(" (");
Serial.print(daysOfTheWeek[time.dayOfTheWeek()]);
Serial.print(") ");
Serial.print(time.hour(), DEC);
Serial.print(':');
Serial.print(time.minute(), DEC);
Serial.print(':');
Serial.println(time.second(), DEC);
}
#include <RTClib.h>
#define SUNDAY 0
#define MONDAY 1
#define TUESDAY 2
#define WEDNESDAY 3
#define THURSDAY 4
#define FRIDAY 5
#define SATURDAY 6
#define JANUARY 1
#define FEBRUARY 2
#define MARCH 3
#define APRIL 4
#define MAY 5
#define JUNE 6
#define JULY 7
#define AUGUST 8
#define SEPTEMBER 9
#define OCTOBER 10
#define NOVEMBER 11
#define DECEMBER 12
DateTime EVENT_START(2021, AUGUST, 15, 13, 50);
DateTime EVENT_END(2021, SEPTEMBER, 29, 14, 10);
RTC_DS3231 rtc;
char daysOfTheWeek[7][12] = {
"Sunday",
"Monday",
"Tuesday",
"Wednesday",
"Thursday",
"Friday",
"Saturday"
};
void setup () {
Serial.begin(9600);
if (! rtc.begin()) {
Serial.println("Couldn't find RTC");
Serial.flush();
while (1);
}
rtc.adjust(DateTime(F(__DATE__), F(__TIME__)));
}
void loop () {
DateTime now = rtc.now();
if (now.secondstime() >= EVENT_START.secondstime() &&
now.secondstime() < EVENT_END.secondstime()) {
Serial.println("It is on scheduled time");
} else {
Serial.println("It is NOT on scheduled time");
}
printTime(now);
}
void printTime(DateTime time) {
Serial.print("TIME: ");
Serial.print(time.year(), DEC);
Serial.print('/');
Serial.print(time.month(), DEC);
Serial.print('/');
Serial.print(time.day(), DEC);
Serial.print(" (");
Serial.print(daysOfTheWeek[time.dayOfTheWeek()]);
Serial.print(") ");
Serial.print(time.hour(), DEC);
Serial.print(':');
Serial.print(time.minute(), DEC);
Serial.print(':');
Serial.println(time.second(), DEC);
}


